
Google Product Listing Ads Optimization: The Definitive Guide (2024)
-
Saiful Islam
Nowadays, people just don’t visit online; they literally live online!
So, if you are planning to spend money on product advertising, it better be somewhere online.
Somewhere where… you ask?
Google!
Why?
Because, Google has 4.3 billion worldwide users with a 92.24% market share! And, for every $1 spent on Google product listing Ads, advertisers receive $8 ROI from Google Ads and searches!
Sounds intriguing, right?
But, are you getting such a massive 800% ROI from your ads?
You don’t, right?
Don’t worry! Via this Google product listing ads tutorial, we’re going to walk you through everything from the basics, like Google Ads introduction to the advanced product listing ads optimization techniques to achieve the highest ROI possible.
So, let’s earn some bucks together!
What is Google Ad?
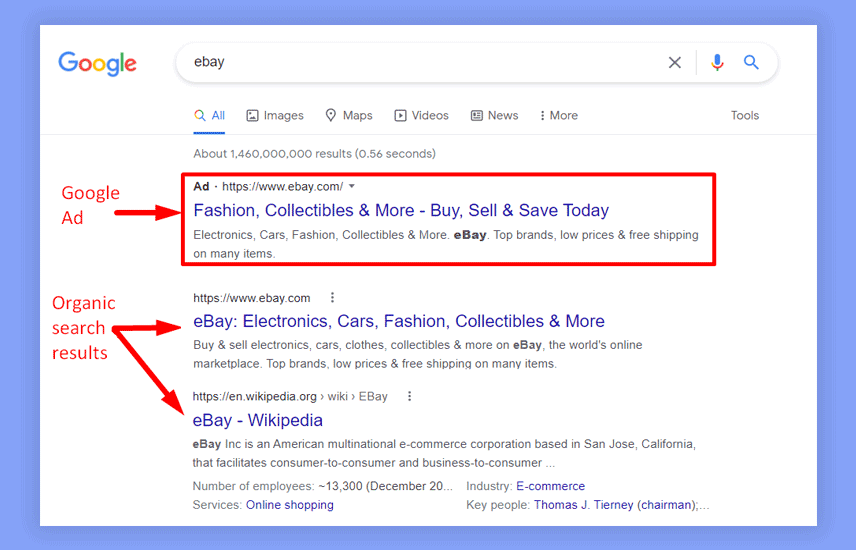
Google Ads (formerly known as Google AdWords) is nothing but a paid advertising platform created by Google. This platform works by following the pay-per-click (PPC) marketing method. That means, the advertisers usually pay either for every impression or click on their ad.
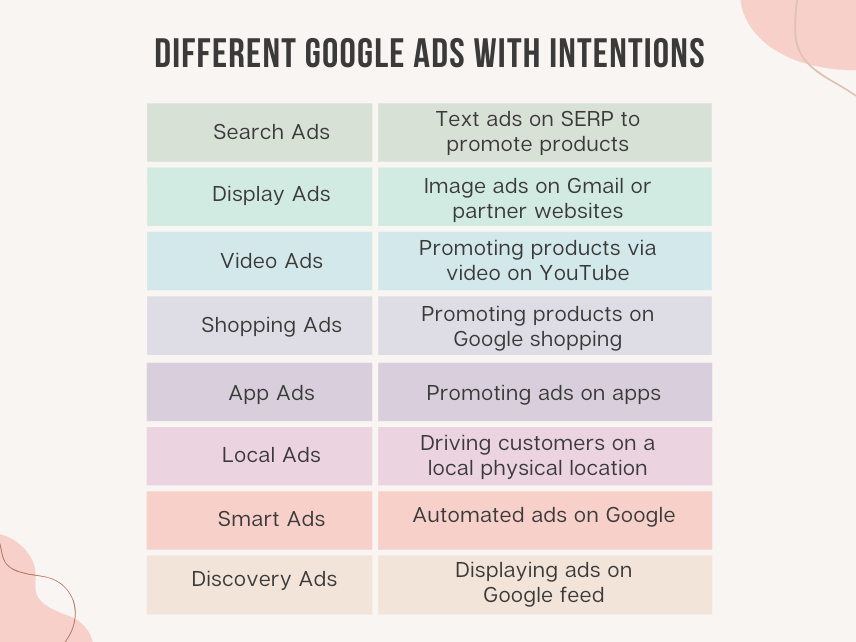
There are different types of Google Ads for different platforms. These are –
- Search Ads
- Video Ads
- Display Ads
- Product Listing Ads
- App Ads
- Local Ads
- Smart Ads
- Discovery Ads
All of these ads are placed on different platforms and used to achieve different goals. Here we have listed the main intentions of these ads. Check the image below to understand the intentions –
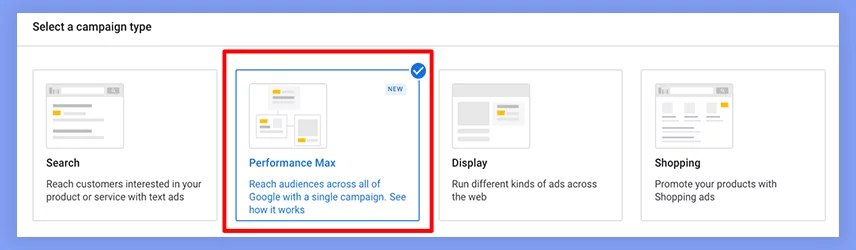
By the way, Google introduced a completely brand-new campaign type called “Performance Max.” Its primary concern is providing more personalized ad results to the audiences.
By default, Google supports 7 pre-formatted goals to achieve by running these ads on Google shopping campaigns. These are –
- Sales
- Leads
- Website Traffic
- Brand awareness and reach
- Product and brand consideration
- App promotion, and
- Local store visits and promotions
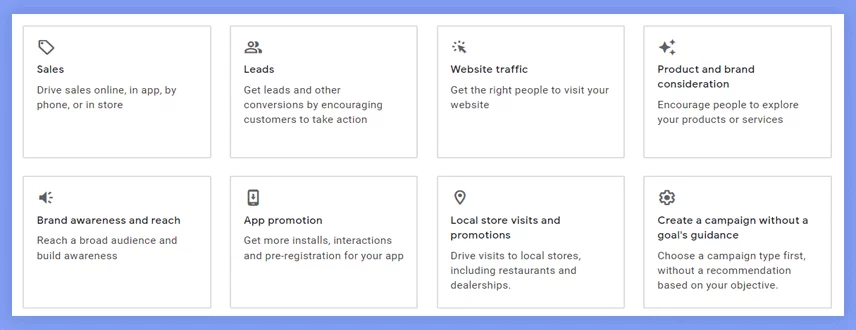
But you can also set a campaign without any target goals. In that case, you have to choose the last option, which is “Create a campaign without a goal’s guidance.”
Remember, even though you don’t choose a campaign template, your ads will still be visible on comparative Google platforms. These platforms are Google organic search results page, YouTube, Gmail, Map, etc.
Here are the supported ad platforms of Google –
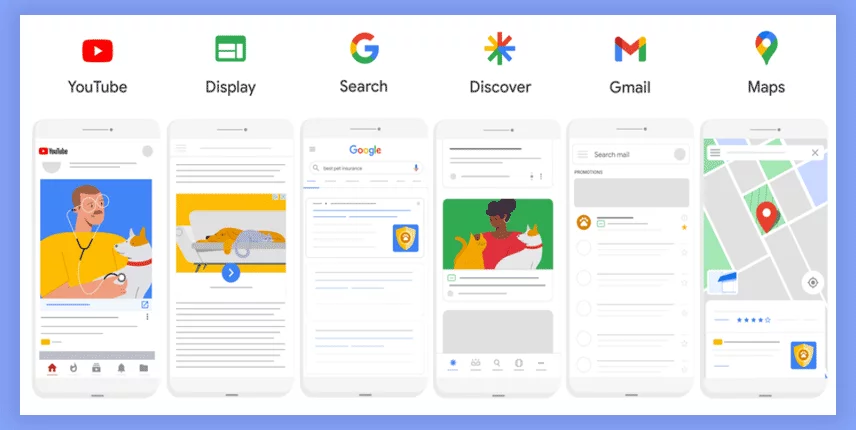
These Google ads are known as the Google display network. And product listing ads or Google shopping ad campaigns can generate better ROI only when those ads are being displayed on the right network.
Here’s the list of campaign types based on the goals or objectives –
| Goal / Objectives | Campaign Types |
|---|---|
| Sales | Search, Shopping, Performance Max, Display, Video, Discovery |
| Website traffic | Search, Video, Shopping, Display, Performance Max, Discovery |
| Leads | Search, Shopping, Video, Display, Performance Max, Discovery |
| Product and brand consideration | Video |
| Brand awareness and reach | Video, Display |
| Website Traffic | Supported apps |
| Local store visits and promotion | Performance Max, Local |
Note: While setting up the app promotion, you will get three additional campaign subtypes. These are –
- New app installation
- Increasing app engagement and
- Pre-registration for an app (exclusively for Android apps)
Choose the best one that suits your campaign type.
What are Google Product Listing Ads or Google Shopping Ads?
You might have already heard of Google shopping ads, right?
The Google shopping ads were previously known as the Google Product Listing Ads (PLA). So, what are these ads?
In short, PLA is a data-feed-driven Google ad that shows on the Google search result page when someone searches for any product-related information on Google.
Unlike the general Google Ads, the PLA shows only product advertisements. The following image shows the product listing ads against the search for a porch swing on Google.
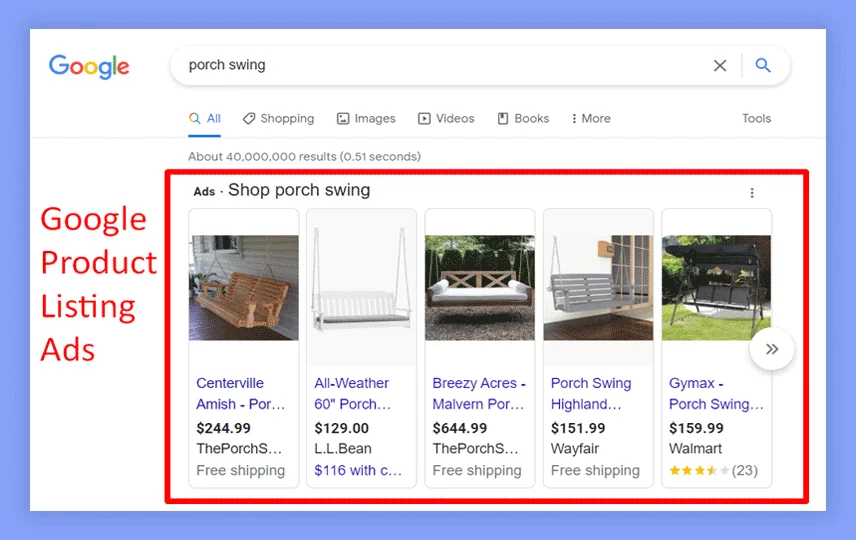
The product listing ads include a few very basic product information like –
- Product image
- Name
- Price
- Seller information
- Price or rating etc.
Google collects this information from the product feeds submitted to the Google Merchant Center. Then it displays these products for relevant search queries.

How to Set Up Google Product Listing Ads?
The process of setting up product listing ads is a little bit different from the general Google search ads. But the process is pretty easy to implement and doesn’t require much technical knowledge.
To setup PLA’s, you will need –
- An online store
- An active Gmail account
- A GMC account, and
- A Google Ads account
By the way, you can create a Google Merchant Center (GMC) account as well as Google Ads by using your existing Gmail account. There’s no need to create a new Gmail for GMC and Google Ads.
Now, it’s time to start the PLA setup process. There are five steps to creating PLAs. These are –
- Setting up a GMC account
- Verifying your online store
- Creating a product feed
- Upload the feed on GMC and
- Setting up PLA
Sounds easy, right? Yes!
Let’s check the infographic below to have a quick overview of this whole Google shopping campaign or ads creation process.
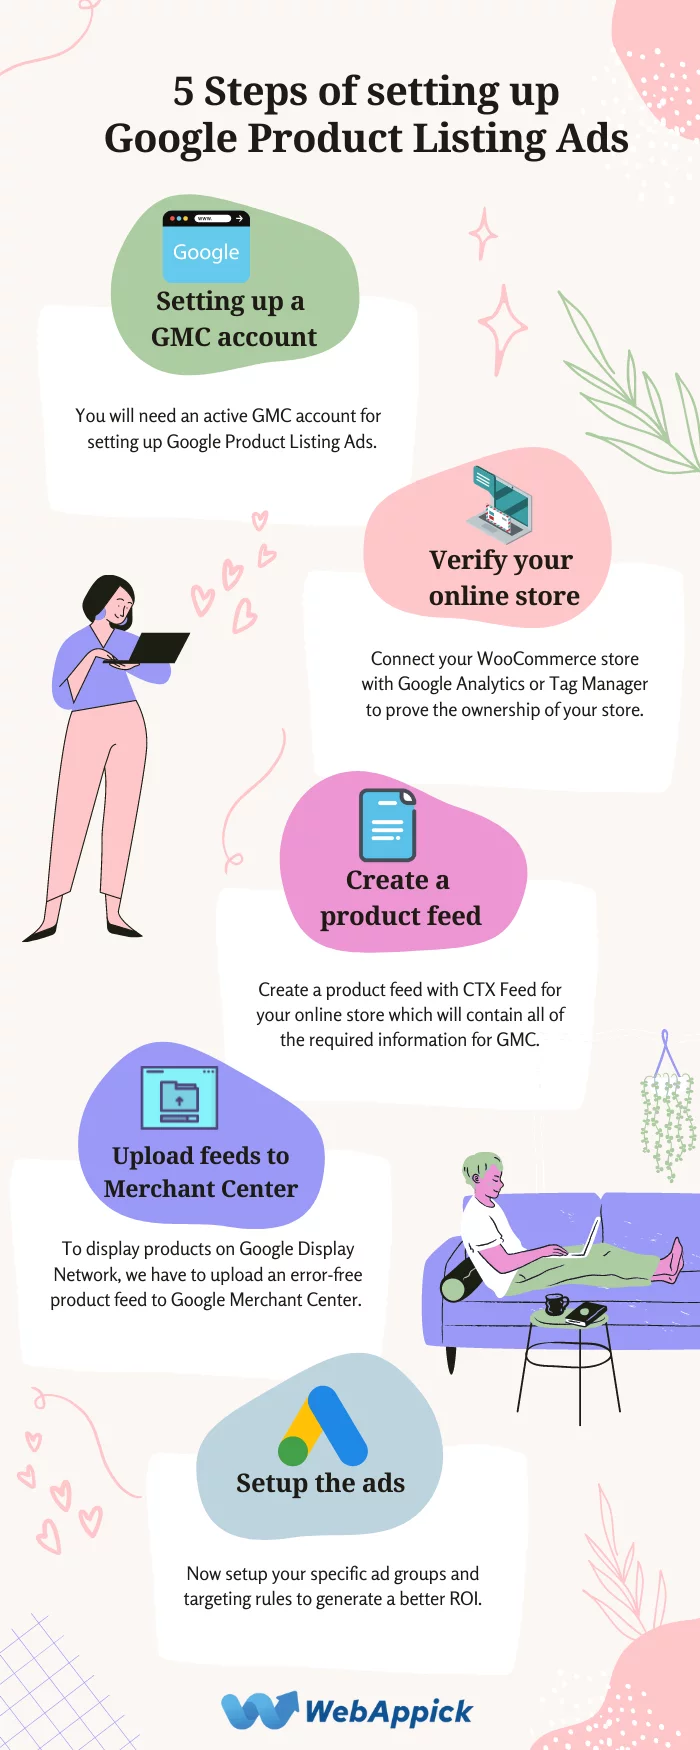
That’s a simple illustration of the complete process of how to set up Google product listing ads. Now, let’s explain these steps briefly.
Step #1: Setting up a GMC account
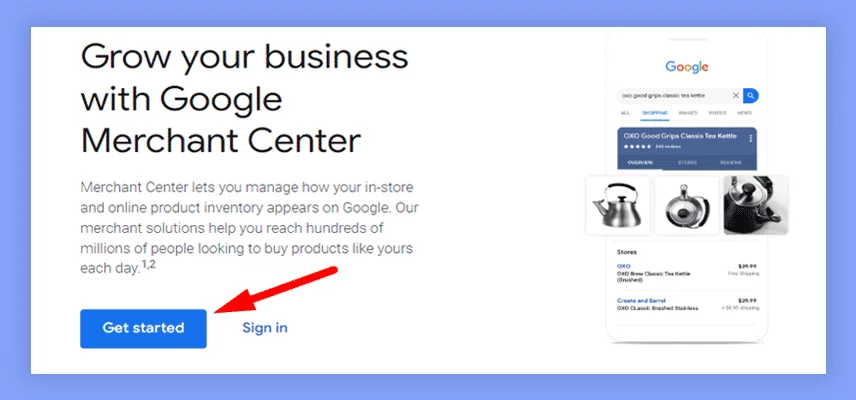
To advertise your products on the Google Shopping tab, you will need a Google Merchant Center (GMC) account. It lets the WooCommerce shop owners manage the product appearance on Google display networks for both online and in-store products.
Note: You will need an active Gmail account to create a Google Merchant Center account. You can either create a new Gmail account or use your existing one to create this account. First, go to the Google Merchant Center homepage and click the Get Started blue button. If you are an existing user, you can use the Sign-in option.
On the following page, you will be required to enter some business information. Right now, you have to provide only three pieces of information –
- Legal business name
- Business country (origin), and
- Local time zone
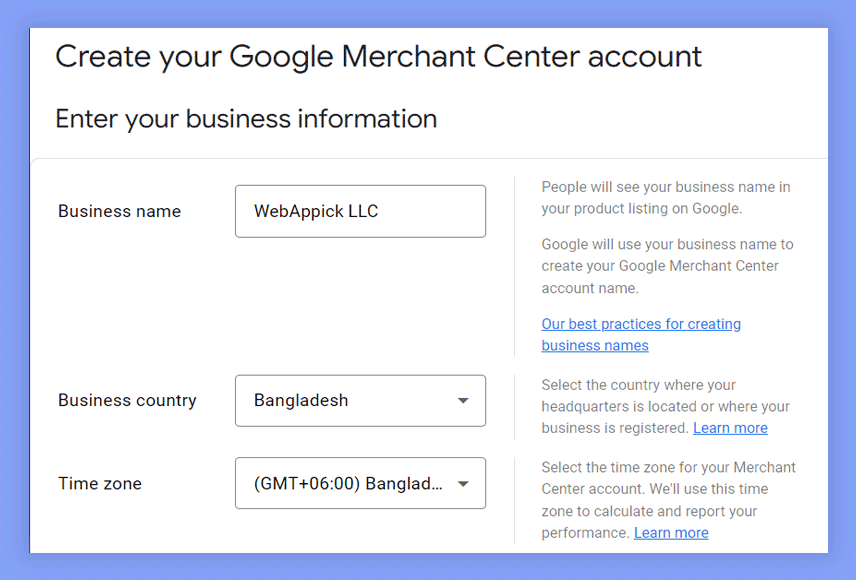
Fill up these boxes appropriately with the required information. By the way, if you have multiple branches in different locations, you have to choose the headquarters location. Otherwise, choose the location where your business is registered.
Even if you need to change the business information, that’s not an issue. You can update your information anytime!
Then, you have to select the third-party tools you use to manage your online store. As of now, Google Merchant Center supports six different third-party tools to integrate. These are –
- Shopify
- WooCommerce
- BigCommerce
- PrestaShop
- PayPal, and
- GoDaddy
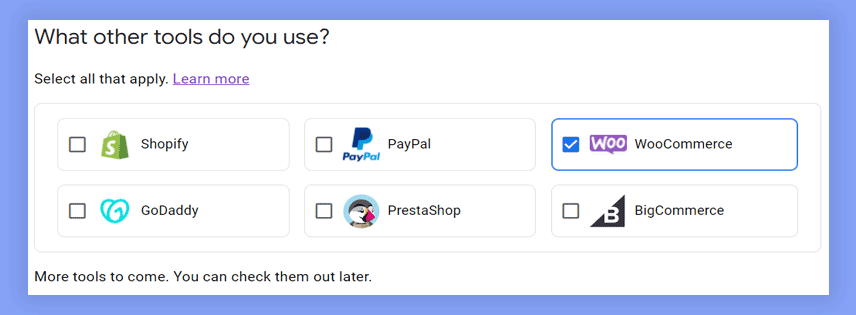
As we are using WooCommerce for our shop, we have selected only WooCommerce. You can select multiple platforms from here if needed.
Then, agree to the Merchant Center Terms of Service, and the Create account button will be activated afterward. Click on that, and your account will be ready in no time.
Your business website must follow the Merchant Center guidelines. Violations of any guideline might lead to an account suspension.
Step #2: Verifying your online store to GMC
After successfully creating a Google Merchant Center account, it’s time to verify the ownership. You cannot run Google shopping campaigns or PLA advertising without verifying the ownership of your website.
By the way, the ownership verification isn’t a tough nut to crack. This entire verification process has two steps. These are –
- Verifying your website address and
- Claiming your website
Let’s explain these steps in brief.
1. Verifying your website address
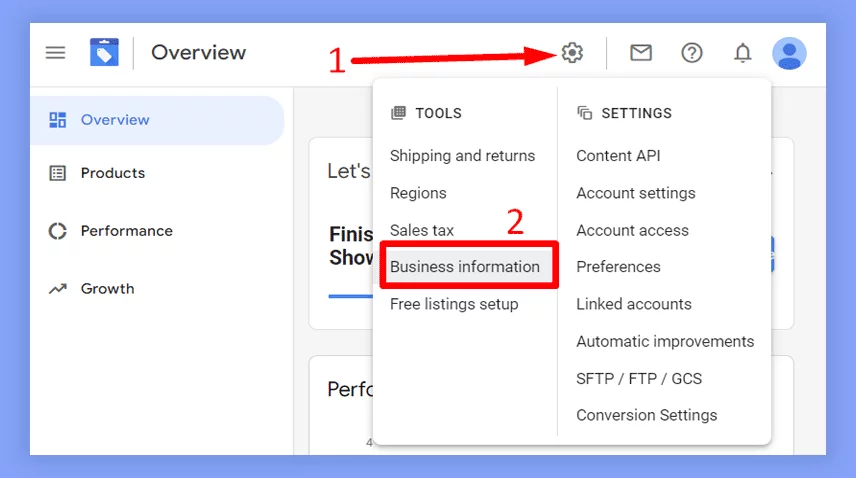
First, sign in to the Google Merchant Center Account and click on that gear (⚙) icon. Choose the Business Information option under the TOOLS tab.
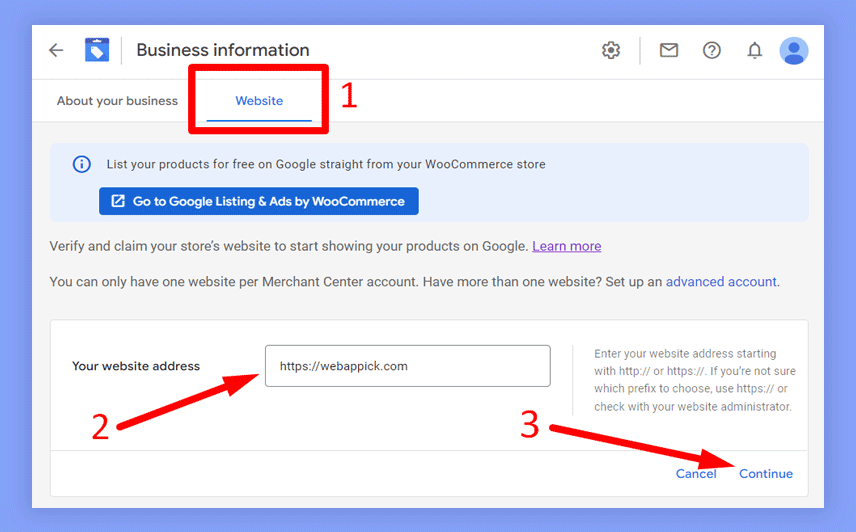
On the Business Information page, choose the Website tab to submit your website address to GMC. Enter your complete website URL with https:// or http:// and click the Continue button.
If you submit a valid website URL, you will get three different verification methods. These are –
- Add an HTML tag or upload an HTML file to your website
- Verify with Google Tag Manager and
- Verify with Google Analytics
All of these methods have the same impact on the verification process. Choose your preferred method and verify your website.
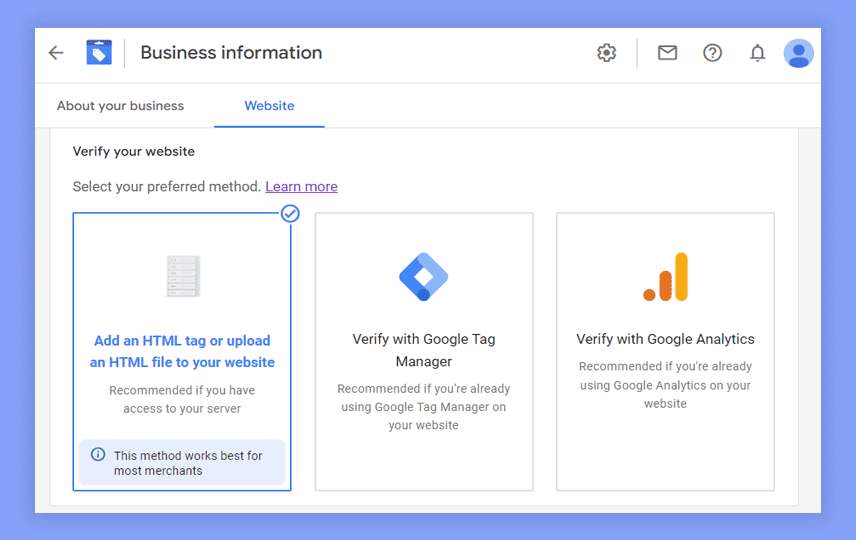
However, Google recommends using the HTML option as it’s compatible with most merchants. If you choose the HTML option, you will get two different options. These are –
- Adding an HTML tag and
- Upload an HTML file
Different users can use different methods for this verification process. Here’s the verification process for different methods.
| Methods | Verification Process |
|---|---|
| Adding an HTML tag | Paste the HTML tag on the <head> section of your website’s homepage |
| Upload an HTML file | Upload the HTML file to the file server |
| Use Google Tag Manager | Use the Tag Manager code on your website’s homepage’s <head> section. |
| Use Google Analytics | Add the Google Analytics tracking code on the <head> section of the homepage. |
Check the video below to get the Google’s official verification tutorial guide –
That’s how you can verify your WooCommerce website on Google Merchant Center. If you verify the website successfully, you will get a notice saying, “Your website has been verified. You can now claim your website.”
2. Claiming your website
As you are done with the verification process, it’s time to claim the website. Now, browse the Business information tab again, and you will get the claiming section on the bottom section.
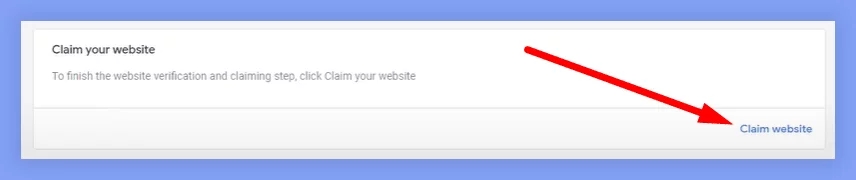
Once the claim is made, you will get a verified badge under your website address. By the way, there will be two verification badges on there. The first one indicates successful website verification, and the last one indicates that you have successfully claimed your website.
Step #3: Creating a product feed
So, you are done with your website verification. Now, it’s time to upload your products to the merchant center. However, Google recommends submitting a product feed with all of your products instead of uploading your products one by one.
In this section, we will create a product data feed in the most effective way possible. By the way, you can generate unlimited product feeds for free by using CTX Feed, a full-fledged product feed generator.

The free version of CTX Feed is available on the WordPress plugin store. Simply search for CTX Feed on the plugin store and install it.
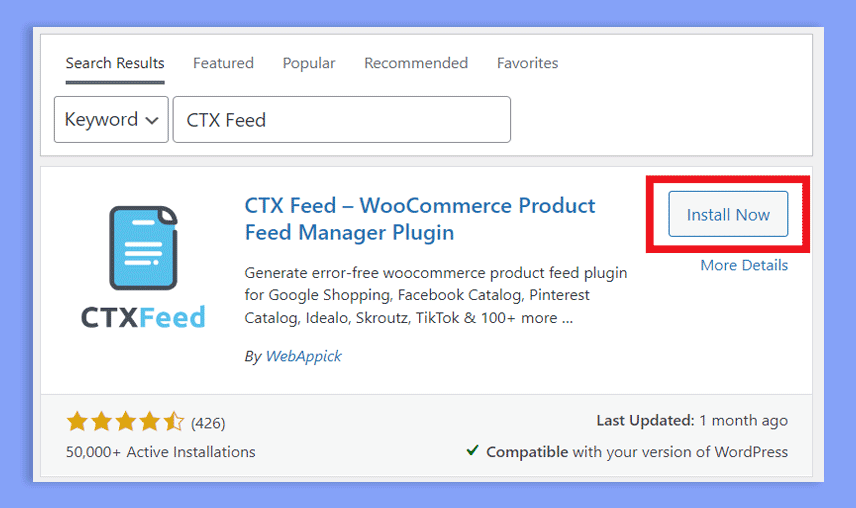
If you install the plugin successfully, you will get the CTX Feed menu on the left sidebar of the WordPress dashboard panel.
Proceed to CTX Feed > Make Feed to create a new Google shopping feed for your WooCommerce products.
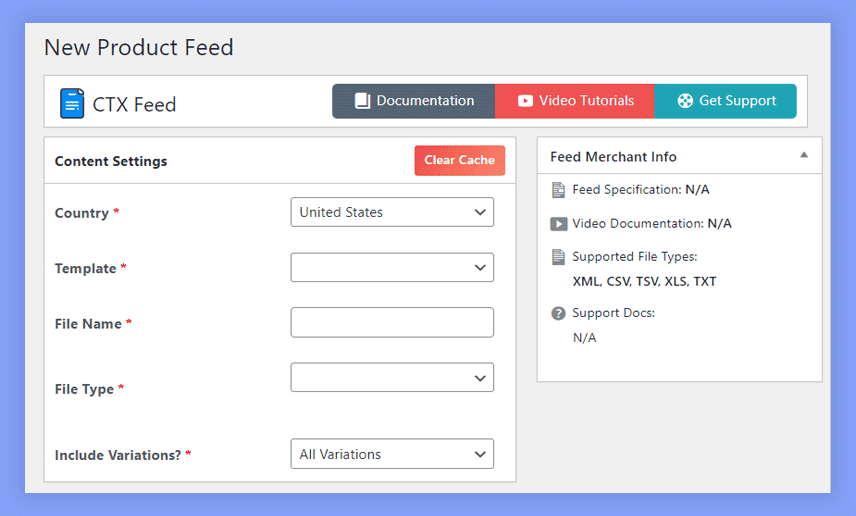
On the New Product Feed window, you have to provide some relevant information such as –
- Country name
- Feed template (Example – Google Shopping)
- A unique filename
- File type, and
- Variation
Just after choosing the template, CTX Feed will automatically load the Feed Config for your selected merchant. However, you don’t need to change anything from the feed configuration section unless you want to generate an advanced feed.
By the way, you can check all of the previously generated feeds by navigating to CTX Feed > Manage Feeds. You can view, regenerate, export, and download the feed log along with the feed from the Manage Feeds page.
However, you must optimize the products with relevant keywords and product categories while creating a feed. Thus, Google Shopping can show your products to the appropriate audience whenever someone searches for these products.
Step #4: Upload the feed on Google Merchant Center
As you intend to run product listing ads on Google, there’s no alternative to uploading products on GMC.
If you followed this guideline correctly, we have already generated the product feed using the CTX Feed product feed generator. Now it’s time to upload that feed on GMC.
Here, we are going to explain the product uploading process on GMC.
1. Choosing the uploading method
To upload the product feed, log in to your merchant center account first. Then, proceed to the Products section from the left sidebar. From there, you have to choose the product uploading method.
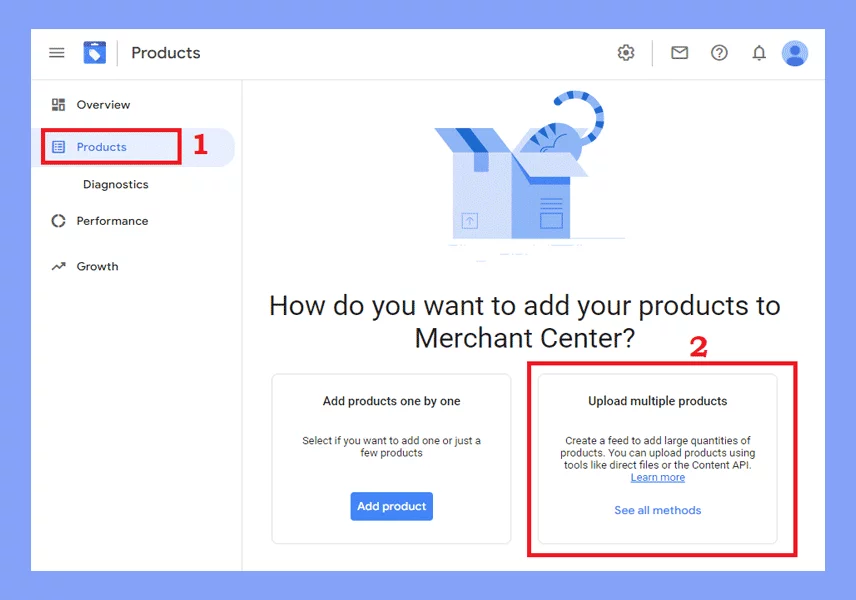
GMC supports two different methods of product uploading. These are –
- Adding products one by one or
- Uploading multiple products via a product feed
As the product feed option is comparatively easier, faster, and more reliable, we will use this method.
2. Filling out the basic information
The very first step of uploading the product feed is filling out the basic information there. At first, you have to provide three different pieces of information –
- Country of sale
- Language, and
- Destination
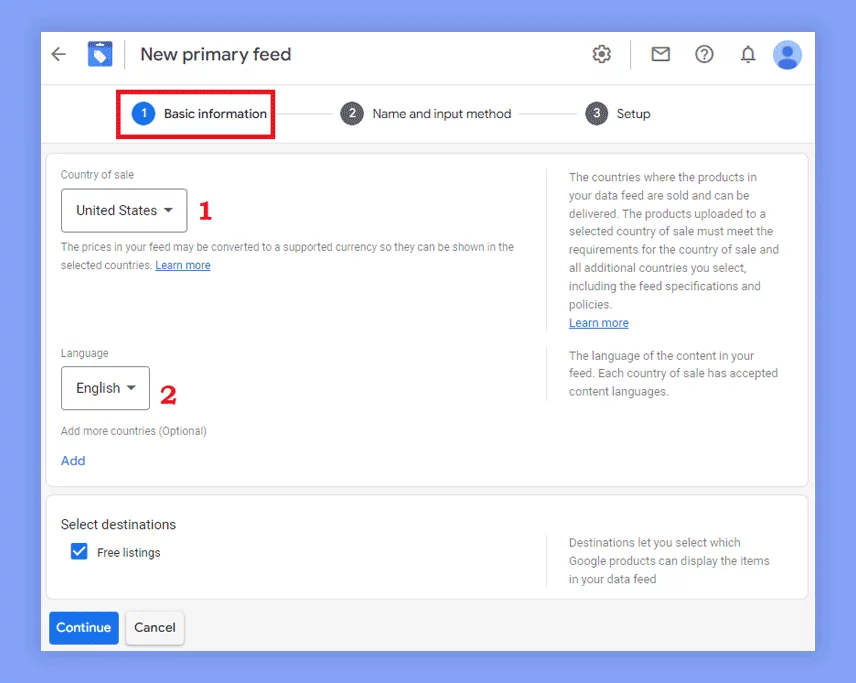
However, the destination option will be visible only after choosing the Country of sale from the drop-down menu.
3. Feed name and submission method
In this section, you have to provide a valid name for your product feed and choose a submission method. Google supports four submission methods for uploading product feeds.
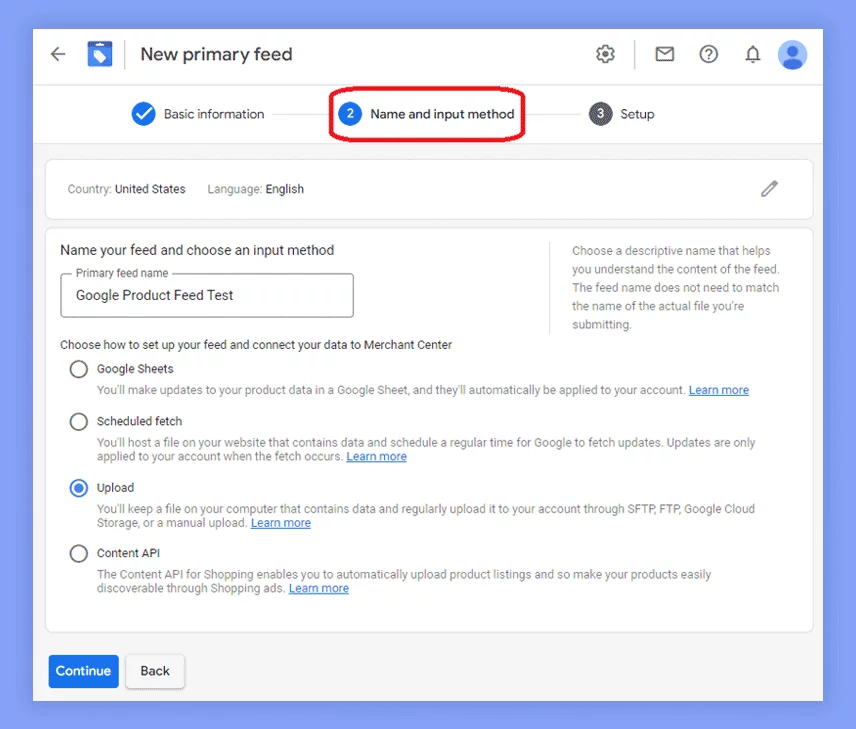
All of these product feed submission methods will result in exactly the same result. So, you can choose whichever you prefer most. Take a look at the table below to understand which method will work best for you –
| Submission Method | Feed Uploading Process |
|---|---|
| Google Sheets | Create a new Google product spreadsheet template and upload that product sheet. |
| Scheduled fetch | Host a feed file on your website and schedule a fetching time for Google. |
| Uploading via FTP | Keep a file on your local computer and upload it via FTP, SFTP, Google cloud storage, or manually. |
| Using Content API | Uploading product feeds automatically by creating custom feed rules for your API data. |
It doesn’t matter which method you are using for that. But you must update the feed on a regular basis. But, that’s not a problem if you choose CTX Feed for generating your product feed.
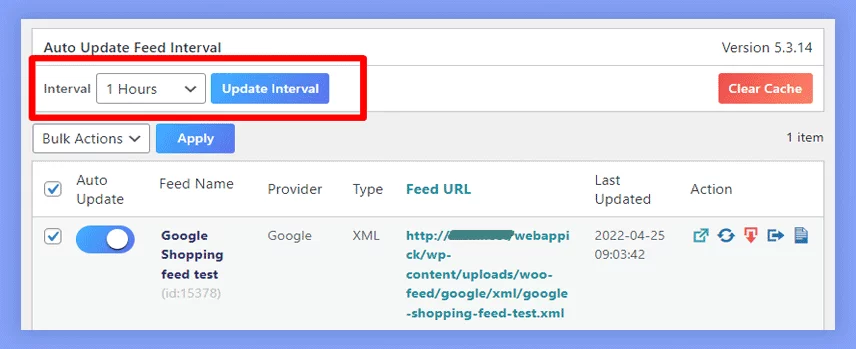
CTX Feed Pro offers eight different feed interval timings. These are –
- 5 minutes
- 15 minutes
- 30 minutes
- 1 hour
- 6 hours
- 12 hours
- 24 hours and
- 1 week
Choose the appropriate interval time based on how frequently you update your WooCommerce products.
4. Finalize the feed creation process
This is the final step of creating a product feed for Google. In this step, you have to input the feed file name file link (depending on the submission method) and set up a fetching schedule time.
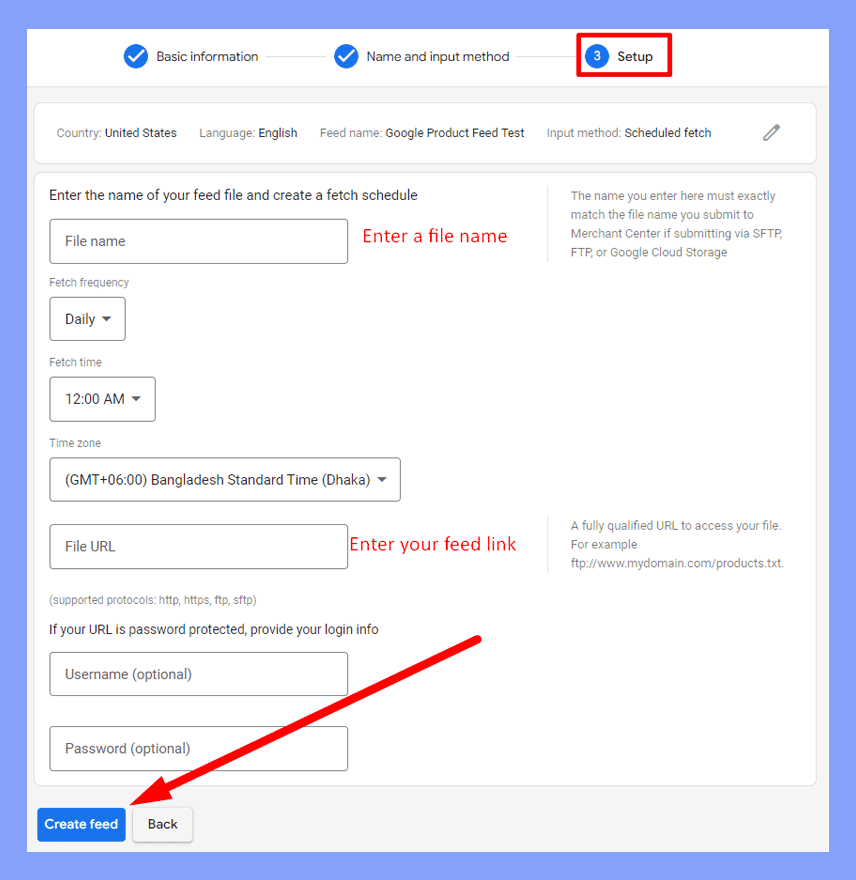
By default, Google supports three different fetch frequency timing: daily, weekly, and monthly. You have to choose it based on how frequently you update your website’s product.
In short, you have to upload the following information here –
- A unique file name
- Feed fetching frequency
- Fetching time
- Fetching timezone
- A working feed URL, and
- Feed credentials for password-protected feed
After providing all of this information correctly, click on the Create feed blue button. It will start processing your feed and uploading your products to the Google Merchant Center.
Here’s the step-by-step video tutorial for creating a product feed and uploading it on Google Merchant Center.
Step #5: Setting up Product Listing Ads aka Google Shopping Campaigns
By now, all of your products will be uploaded to the Google Merchant Center. It’s time to set up the Ads for your products. You have to perform seven different tasks for setting up the product listing ads. These are –
- Linking the Google Ads and Merchant Center account
- Creating a new campaign
- Setting the bidding strategy and budget
- Adding location and languages
- Adding asset group
- Providing additional information via extensions and
- Publishing the campaign
Let’s perform these tasks together.
1. Linking the Google Ads and Merchant Center account
Before setting up PLAs, we have to link our GMC account with the ads account. This linking process has two steps. These are –
- Sending a linking request to Google Ads from GMC and
- Approving that link request from the Google Ads account
Let’s do it.
- Requesting linking request to Google Ads from Merchant Center
You have to send a linking request from the merchant center first to complete the linking request. To send the request, click on the gear (⚙) icon first. Then choose Linked Accounts from the menu.
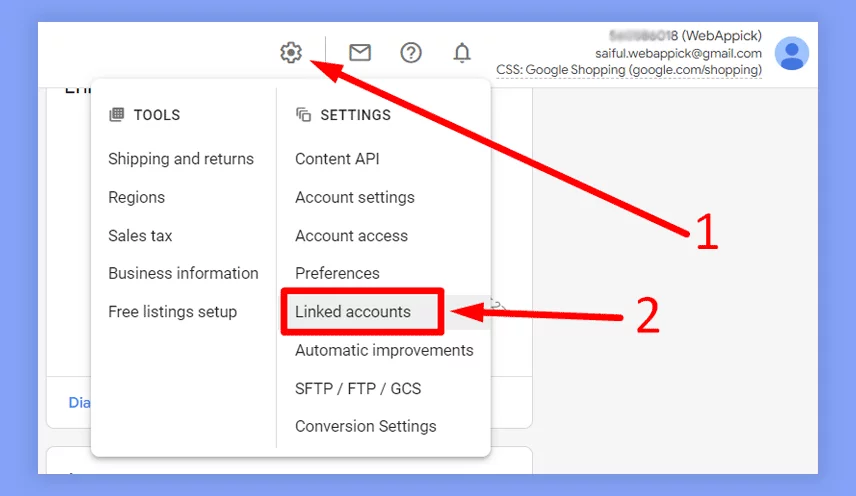
As we have already created our Google Ads account, the customer ID of our Google Ads accounts will be listed under the Google Ads tab.
Click on the Link option under the Actions option. By clicking here, GMC will send a request to Google Ads to link your Ads account with GMC.
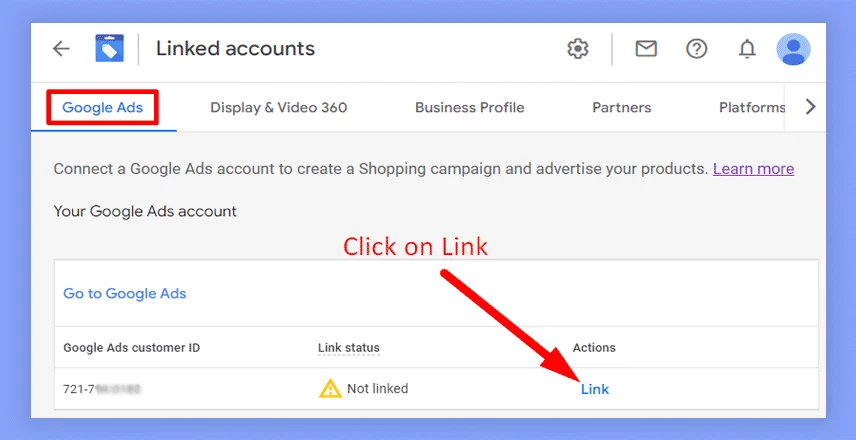
If you have multiple Ads accounts, all of those will be visible on this page. In that case, you have to choose the correct customer ID and click on that Link option.
- Approving link request from Google Ads account
First, log in to your Google Ads account and click on the Tools and Settings option from the navbar.

Choose Google Merchant Center from the linked account page. You can check the linking request from there. You can either Approve or Reject the request from there.
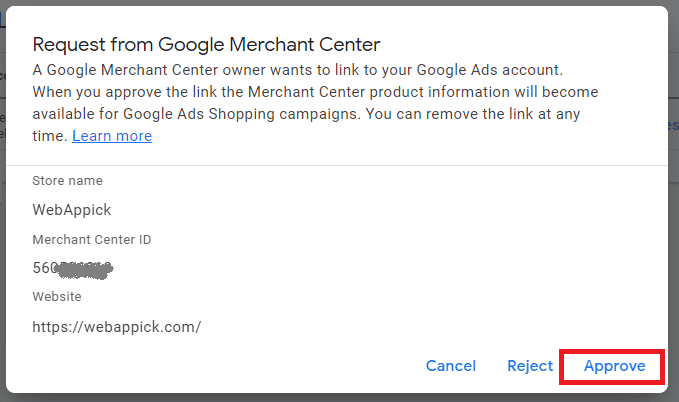
Click on that Approve button, and you are done with the linking process.
Now it’s time to check the linking status. Browse the Google Merchant Center > Linked accounts > Google Ads and you’ll get a link status section like below.
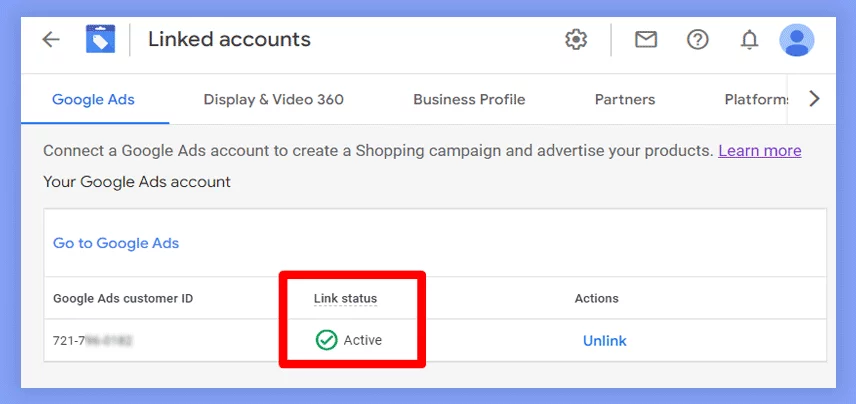
If you have done everything correctly, your link will be activated by now. However, you can also unlink the ads account by clicking the Unlink button.
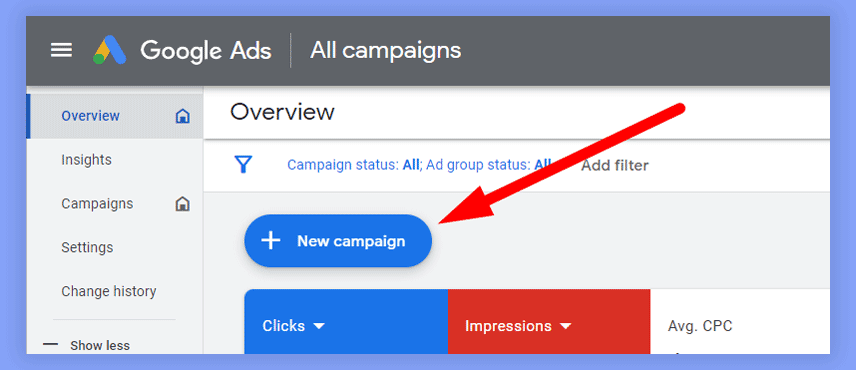
2. Creating a new campaign
Now it’s time to set up PLAs by creating a campaign on Google Adwords, aka Google Ads. To do that, log in to your Google Ads account and click on the + New campaign button from the dashboard.
Then, you’ll just need to follow the on-screen instructions. However, you have to do the following tasks to get your job done:
- Choose an objective
- Select a campaign type
- Choose your Merchant Center account
- Select your country name and
- Give a campaign name
After performing all of these tasks, you will get a popup containing the overview of your ads. Click on the Start new button if everything seems okay to you.
3. Setting the bidding strategy and budget
Now, it’s time to set up your budget and bidding strategy. Try to follow a smart bid strategy here. It will result in a great ROI even with a limited budget.
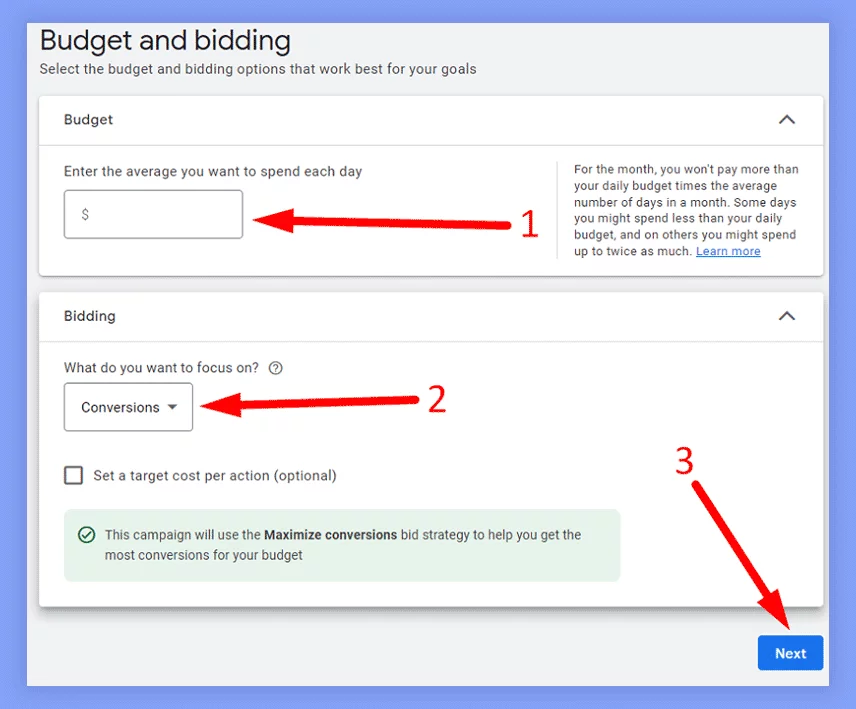
In the bidding section, there will be two outputs to choose –
- Conversions &
- Conversion rate
Choose the one you want to accomplish from this ad.
Later on, you have to enter the amount you want to spend per day on your ads. However, Google won’t charge you just for showing your ads on the Google platform. You will be charged only when someone clicks on your ads.
We love Google’s policy of charging you money only when searchers click on your ads.
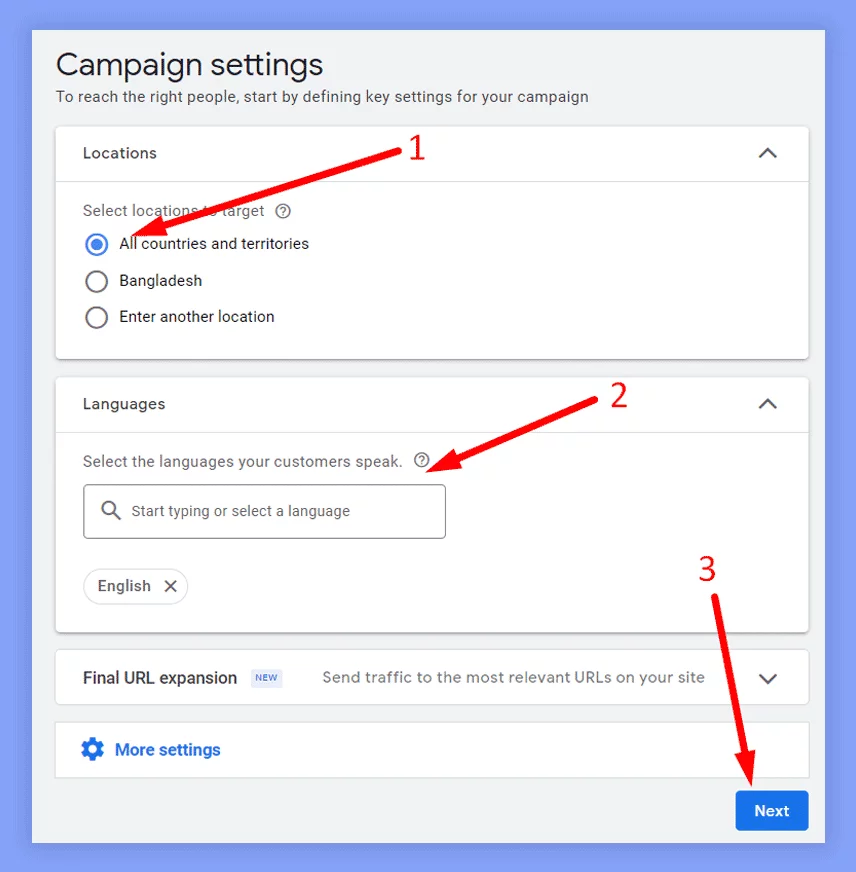
4. Adding target country, language, & URL expansion
Next, you have to set the target country, language, and URL expansion from the Campaign settings option.
When choosing the location, you can change either all countries or a specific location of your target audience. Then, select the language of your destination country.
In the last part of this section, you have to enter the URL expansion of your website. You know, Google automatically updates the headline based on search intent. So, you can limit the URLs where you want most of your traffic.
The Final URL expansion feature offers two options for you –
- Sending traffic to the most relevant URLs on your website or
- Sending traffic only to the URLs you’ve provided
By the way, you can also exclude some particular URLs when choosing the first option.
5. Adding asset group
Now it’s time to provide your website information, aka assets. These assets include information about your website, such as –
- Images (up to 15 images)
- Logos (up to 5 logos)
- Videos (up to 5 videos)
- Headlines (up to 5 headlines)
- Long headlines (up to 5 long headlines)
- Descriptions (up to 4 descriptions)
- Business name (up to 25 characters)
- CTA button texts and
- One HTML5 file.
Google will use all of this information to display your ads on multiple platforms. These are the basic information about setting up the Google Adwords product listing ads.
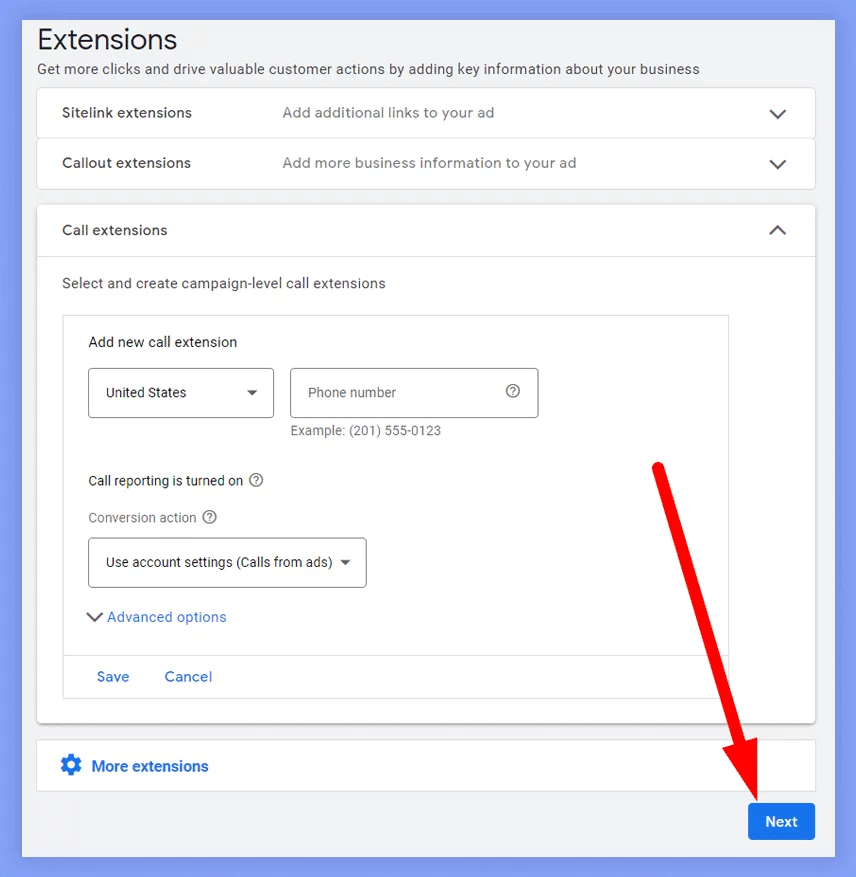
6. Providing additional information via extensions
In this section, we will add some additional information in the form of extensions. All of this additional information will increase your Google product listing ads performance even more.
Google allows you to add three different extensions to your ad. These are –
- Sitelink extensions
- Callout extensions and
- Call extensions
Let’s explain all of these extensions.
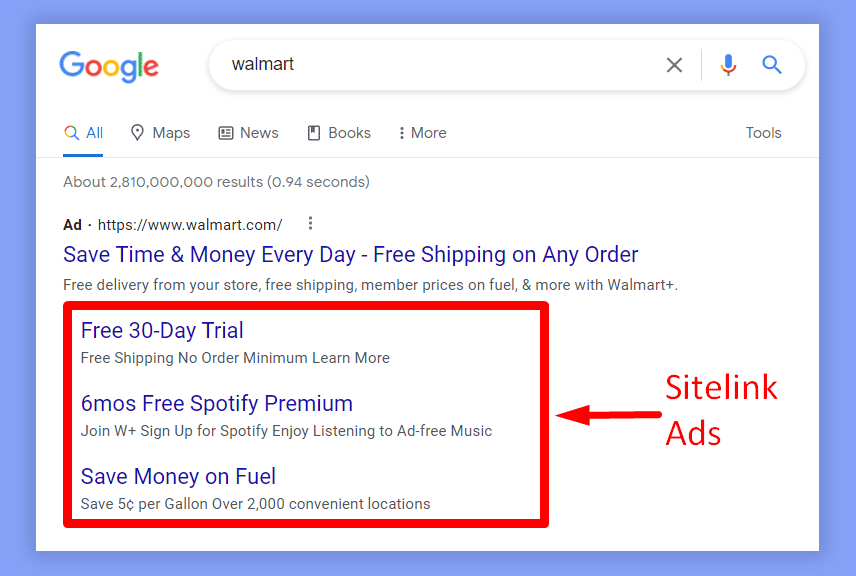
Sitelink extensions
Google Ads requires a minimum of 2 sitelink extensions to create this ad campaign. Every sitelink extension needs the following information –
- Sitelink ads text
- Two Descriptions, and
- Final URL
After providing this information, Google can display your product ads as site link extensions. Check the image below to understand the presentation of site link ads of Walmart on the Google search result page.
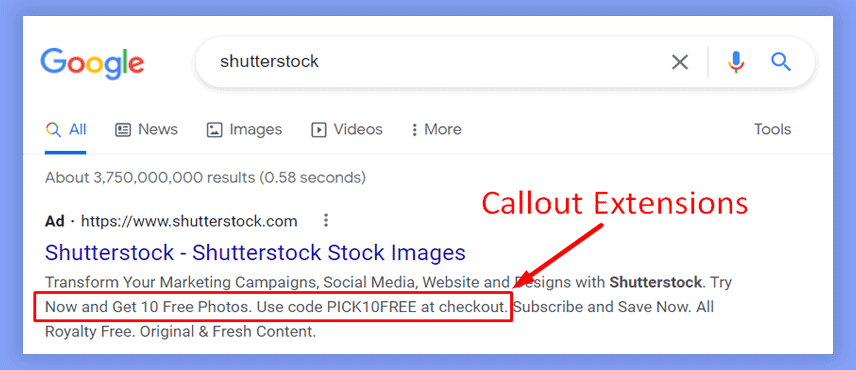
Callout extensions
After that, you have to set up the callout extensions of your ads. These are the promotional texts of your product ads. You can add a maximum of four callout extensions to your ad.
Call extensions
The last one on this list is the call extensions. This extension lets the user include phone numbers on their ad. People can call you only by tapping on that phone number while browsing from a phone. It increases the click-through rates (CTR) significantly.
After you set up all of these extensions, click on the Next button located on the bottom right corner.
However, you can also add some additional extensions to your website, such as –
- Structured snippet extensions
- Promotion extensions
- Lead form extensions
- Price extensions, and
- Location extensions
Use any of these while creating your ad (if needed).
7. Publishing the campaign
That’s the end of creating an ad for your products. Now, you will get a summarized overview of your ad. If everything seems okay to you, hit the Publish campaign button. Your ad will be live within a very short time.
Always double-check your ads details before publishing the campaign.
That’s the overall process of creating product listing ads for your WooCommerce products.
14 Best Practices for How to Optimize Google Product Listing Ads
By now, we have successfully created a Google shopping product listing ad. Now, it’s time to optimize that ad to get the highest revenue possible. Here, we have listed the top 14 tips for Google Product Listing Ads optimization smartly.
1. Optimize Product Feed
As you are creating ads for your products, there’s no alternative to optimizing the product feed. So, let’s start with optimizing the Google product listing ads feed for the products of your WooCommerce store.
There are some key strategies to optimize the feed. For example –
- Don’t make any spelling mistakes
- Limit product title to 70 characters.
- Add appropriate product category taxonomy
- Review the disapproved and limited products
- Optimize keywords on title and descriptions
- Add a clear product image to the feed
- Fix the errors in your feed
- Add structured product data
- Export the feed in the appropriate format
- Use the same product name on the product feed and product landing page, etc.
These are the common tactics for optimizing product feeds. However, you don’t need to think about these issues while generating product feeds with CTX feed.
CTX feed is a full-fledged WordPress plugin for creating product feeds for WooCommerce stores. You can use it to create error-free product feeds for unlimited products within a minute.

2. Optimize Feed Attributes
Ignoring the technical part is a common tendency among WooCommerce website owners. However, the proper usage of only a few attributes can drastically increase the performance of your ads.
Here, we have listed a few common Google product listing ads requirements that you must add to your product feed.
- Use unique value for the title [title] and product ID [id]
- Write clear product description [description]
- Select the appropriate product category [google_product_category]
- Provide a valid GTIN [gtin], MPN [mpn], and Brand [brand] attributes
- Add availability information [availability]
- Provide the availability date for the stock-out products [availability_date]
You should include these common and required attributes in the product feed.
3. Add Some Additional Attributes
Google learns about your WooCommerce products from the product feeds. So, it’s better to add some additional information besides the required ones.
Here are some additional attributes that will help your products stand out in a crowd.
| Attributes | Usage of these Attributes |
|---|---|
| [mobile_link] | Add a mobile-optimized version of your product landing pages |
| [additional_image_link] | Add a few extra product images |
| [expiration_date] | Use to stop displaying the products on a specific date |
| [unit_pricing_measure] | Show the pricing and product size |
| [sale_price] | Use to show the discounted price |
| [unit_pricing_base_measure] | Use to include the denominator of the product price |
| [loyalty_points] | Specify the types and amount of loyalty points for each purchase |
| [google_product_category] | Use for Google’s product categorization |
| [subscription_cost] | Include an annual or monthly payment plan |
| [installment] | Use to show the monthly payment plan in several installments |
These additional attributes will not only increase the ad’s visibility but also increase the revenue. Here are some additional benefits of using the extra attributes on your product feed:
- Outrank the competitor’s products
- Display ads for personalized search terms
- Increase store ad performance.
You can check the Merchant Center product data specification to learn about more attributes.
4. Use Automation to Update the Feeds Frequently
As your business expands, you will definitely add more products to your store. However, you don’t need to submit product feeds again and again just after adding new products.
Besides that, you can use the automatic product fetches offered by Google Merchant Center. This option is called Scheduled Fetch. While submitting the product feed to GMC, choose the scheduled fetch option and set a fetch time.
Thus, Google Merchant Center will automatically look for new updates on your time. However, there are three conditions to make this work. These are –
- The feed file shouldn’t contain any errors.
- The file size shouldn’t exceed 4GB &
- No blocking of “AdsBot-Google” & “Googlebot” user agents from your feed directory.
Follow these rules and update your product feeds automatically using the scheduled fetch feed uploading process.
5. Keep Reviewing Negative Keywords
We all know that covering a broader topic in an ad group helps get more traffic and increases product sales. But you can increase that sales amount even more by eliminating the irrelevant keywords – also known as negative keywords!
So, what are the negative Google product listing ads keywords?
In short, all of the irrelevant keywords in your campaigns are called negative keywords. These are the keywords for which you don’t want to show your ads.
Let me just share an example. Suppose you run several Google shopping campaigns by focusing on keywords like ‘cricket bat for kids.’ So, the relevant keywords for this term will be –
| Keywords | Relevancy |
|---|---|
| Best cricket bats | ✅ |
| Cricket bat weight | ✅ |
| Baseball bat | ❌ |
| Bats for adults | ❌ |
| Crickets and bats | ❌ |
Just take a closer look at the table. The last three keywords don’t match the buying intent for the terms like ‘cricket bat for kids’. So, running Google ads campaigns for these keywords won’t bring any benefit to you.
Fortunately, adding negative keywords for your ads isn’t a hard nut to crack. You can blacklist your preferred negative keywords straight from your Google Ads account.
To add negative keywords, log in to your Ads account first. Then navigate to TOOLS AND SETTINGS > Shared Library > Negative keywords lists.
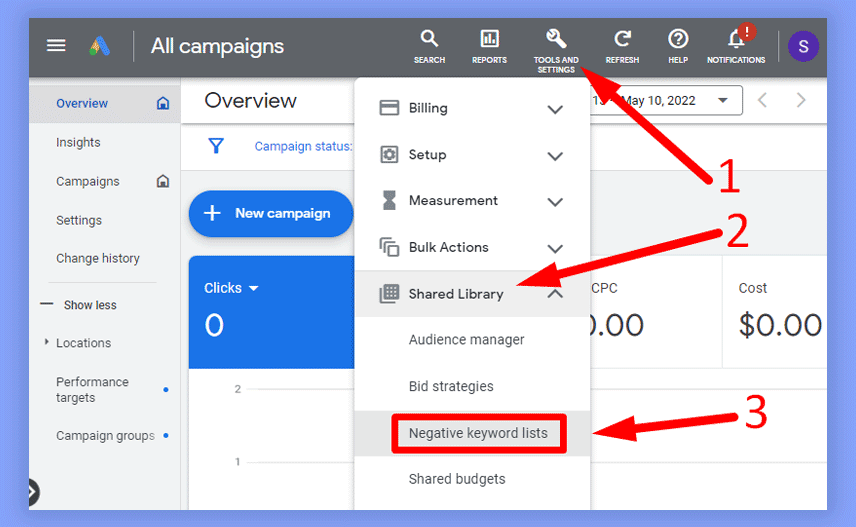
On the negative keywords page, click on the plus sign and add your keywords. After listing all of those, click on the Save button, and the list of your negative keywords will be added.
Here’s the visual presentation of adding negative keywords from the Google Ads account.
That’s how you can remove irrelevant keywords from the ad groups and reach comparatively more customers.
6. Use Product Ad Groups Wisely
The ad groups are a collection of groups with similar intentions. If you want to optimize Google Shopping campaigns, you must organize the product ads properly within a single campaign.
Always put similar keywords of your products within a single ad group. However, the pricing of your products won’t be affected after listing products within a group. You can set different prices for different products within an ad group.
By the way, there’s a product limit on ad groups. You can add a maximum of 20,000 product groups to a given ad group of a particular shopping campaign. If you have more products, create multiple ad groups.
Each ad group can have up to 20,000 product groups.
Let me share an example of product groups within a shopping campaign. Thus you will understand which products you have to add under which product group.
Suppose you sell clothes for baby boys, girls, kids, and adults. So, your product groups will be as follows –
| Baby boys | Baby girls | Kids | Adults |
|---|---|---|---|
| Onesies | Tops | T-shirts | Cloaks |
| Mittens | Cardigans | Sweaters | Shirts |
| Bodysuits | Cotton hats | Socks | Coats |
| Pajamas | Rugs | Sweatshirts | Hats |
That’s how you can categorize your products into different groups. So, create product groups and reach more potential customers.
There are several attributes available for the product groups. For example –
| Attributes | Description |
|---|---|
| Item ID [id] | Show unique identifier for each product |
| Brand [brand] | Specify the brand name of the product |
| Category [google_product_category] | Categorize based on Google product taxonomy |
| Product type [product_type] | Assign the product type for individual products |
| Custom labels [custom_label_*] | Set custom labels on product groups (up to 5 labels per product group) |
| Condition [condition] | Specify the product condition (new or used product) |
| Channel | Determine the sales channel (online or local store) |
Use the required attributes on your product group. These additional attributes provide more information about a product.
7. Apply Smart Bidding Strategies
Do you know that you can generate more conversions only by choosing the right bidding strategy?
But, the question is, which is the right one?
To be honest, there’s a huge controversy among marketers regarding this issue. While few support smart bidding strategies, others strongly suggest choosing manual bidding processes.
However, we don’t want to engage in the controversy. Tim Davidson published an article on Medium comparing Google’s smart bidding and manual bidding strategies. After six months of comparison, he achieved 142.86% more conversion by spending 60.35% less money by following the smart bidding!
Amazing, right?
Besides that, there are some additional benefits of choosing smart bidding strategies. These are –
- Makes accurate predictions using advanced machine learning technology
- There are lots of attributes to analyze ads and measure performance.
- In-depth performance reporting with bid simulator
- Flexible performance target settings, etc.
However, there are different types of smart bidding strategies. These are –
| Name of Strategy | What it’s best for |
|---|---|
| Target CPA (Cost Per Action) | Suitable for generating leads or sales |
| Target ROAS (Return On Ad Spend) | Used to achieve a specific target |
| Maximize Conversions | Convert the maximum number of target customers into buyers |
| Maximize Conversion Value | Google will automatically set a budget to achieve the highest conversion |
| Target Impression Share | To set bids automatically to achieve target impressions |
| Enhanced Cost Per Click (e-CPC) | Automatically adjust bids to achieve |
| Target Search Page Location | Used to display the ads on the top position of search result page |
| Maximize Clicks | Focused on getting the highest amount of clicks |
You can choose any of those strategies to run your ad. But calculate your math wisely if you choose Target CPA or ROAS.
The formula for calculating ROAS is –
(Sales / Ad Spend) x 100 = ROAS
The formula for calculating CPA is –
(Total cost / Number of Conversion) = CPA
How to Update Google Shopping Campaign Bid Strategy?
If you ever feel like updating your campaign bid strategy, there’s nothing wrong with it. In fact, you should edit your strategy if you don’t get enough responses as expected.
Here is the step-by-step procedure for updating the Google shopping campaign –
- Log in to your Google Ads account
- Click on Campaigns from the left menu
- Choose the campaign you want to update
- Click the campaign’s Settings option
- Click Change Bid Strategy under Bidding option
- Choose your desired bidding strategy from the drop-down menu
- Save your settings.
That’s it! Your updating process is done. Let’s hope to achieve a better conversion rate after updating your bidding strategy.
8. Choose the Perfect Campaign Structure
Choosing the perfect campaign structure is the heart of a successful campaign. A good campaign structure helps to generate better ROI.
There are four different types of campaign structures to choose from. These are –
- Single campaign with single ad and product group
- Single campaign with multiple product groups
- Multiple campaigns with a single product group
- Multiple campaigns with multiple product groups
So, which one should you choose? To be honest, there’s no specific answer for that. All of these structures have their own advantages and downsides.
Different structures suit different situations. Let’s explain these structures one by one. Thus you can understand which one you should choose for your WooCommerce website.
– Single Campaign with Single Ad and Product Group
In this campaign structure, you will have only one product group and one ad group within only one campaign. Each product of this campaign will get equal importance in this structure.
This structure is better for the new eCommerce stores. All you can do in this structure is just raise the max CPC for your products. Use this structure only if you don’t have any idea about which product needs more financing.
– Single Campaign with Multiple Product Groups
This campaign structure allows only one campaign with multiple ad groups. There are several benefits of this structure. For example – it’s easy to set up or can be managed from a single campaign pretty easily.
By the way, there’s a downside too! You can’t filter the negative keywords from the product level, and you must solely depend on a single campaign for everything.
Besides these difficulties, this structure is the most used one. As it provides the highest level of control over the products, so you can easily control your investments.
– Multiple Campaigns with Single Product Group
If you have only one product group and want to split your campaigns into multiple customer bases, this is the solution you need. You can set multiple campaigns for specific attributes like SKUs, brands, items, or other search queries in this structure.
As the target customers are quite specific here, so you can allocate your budget effectively to the potential customers. Besides, you can manage your biddings on both product level and search queries at the same time.
And just like the previous one, it also has some limitations. For example, it’s complicated to manage multiple campaigns and reports from multiple sources simultaneously. It needs more time to manage those ads on a daily basis.
However, it won’t be a problem for the Google shopping experts. But, if you are a new user, handle this structure along with the priority settings with care.
Choosing the appropriate Campaign priority setting is important for multiple campaigns with a single product group structure.
– Multiple Campaigns with Multiple Product Groups
Using multiple campaigns with multiple product groups is an advanced way of Google product listing ads optimization. Usually, people apply this method to promote their best-selling products even more.
However, it’s better to remove the low-performing products from the campaigns. Your budget allocation should follow the 80/20 rule. Allocate 80% of your budget for high-performing products and 20% for the average to low-performing products.
By the way, it’s better to exclude the repeatedly lowest-performing products from the campaigns. If you still want to keep those products listed, optimize those first, then include those on the campaign list.
So, that’s it about the campaigns and product groups. Choose the appropriate campaign structure and spend your money wisely!
9. Optimize for Smartphone Users
The popularity of shopping via smartphone is increasing rapidly. The PayPal newsroom reported that 73% of Australian buyers used their smartphones for online payment only in 2019. Besides, 49% of Australians shop via their mobile phone at least once a week!
So, it’s really important to optimize your Google shopping ads and landing pages for smartphone users. You might already know that Google has an attribute called [mobile_link]. You can submit a mobile-optimized link to your product pages by using this attribute.
77% of smartphone shoppers prefer to buy goods from a mobile-optimized website.
~ Think with Google
10. Modify Geo-Targeting
Most people think that analyzing the customer’s location is important only for the brick-and-mortars. But, analyzing the customer’s physical location is pretty important for online businesses too!
Nowadays, 8 out of 10 consumers prefer to use search engines to find information based on their city or zip code. The search queries like ‘near me’ that result in local results are increasing quite rapidly. Here’s the Google trends data for ‘near me’ search queries –
As a website owner, you can also benefit from the increasing demands of local search queries. A case study of WordStream shows that offering discounts on the checkout page has increased revenue by 9916%!
So, there’s no alternative to optimizing your product listing ads aka Google shopping ads for local search queries.
How to optimize your Google shopping ads for geo-targeting?
Here are some hacks to optimize Google shopping ads to generate better ROI –
- Add location-based negative keywords
- Setup the location radius
- Exclude certain locations
- Include local terms in the title and description
- Adjust product group bids to lower CPA
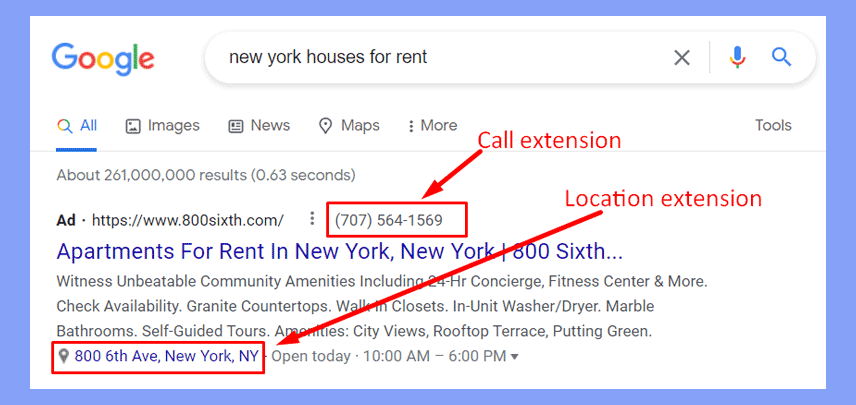
- Use location and call extensions to show contact info etc.
If you can successfully apply these local ad hacks, it will definitely help you to generate more sales. So, optimize your product listing ads based on geo-targeting and generate more ROI pretty easily.
11. Include Merchant Promotions with Your Shopping Ads
Who doesn’t love online coupons?
The 2021 Consumer Intel Report by Vericast shows that 90% of shoppers expect to apply coupons during their online purchases. So, you can get a sales hike only by offering some discount coupons.
While initiating a product listing ads on Google, you can add a unique coupon code. Thus, your ad will show an additional Special offer on the product card.
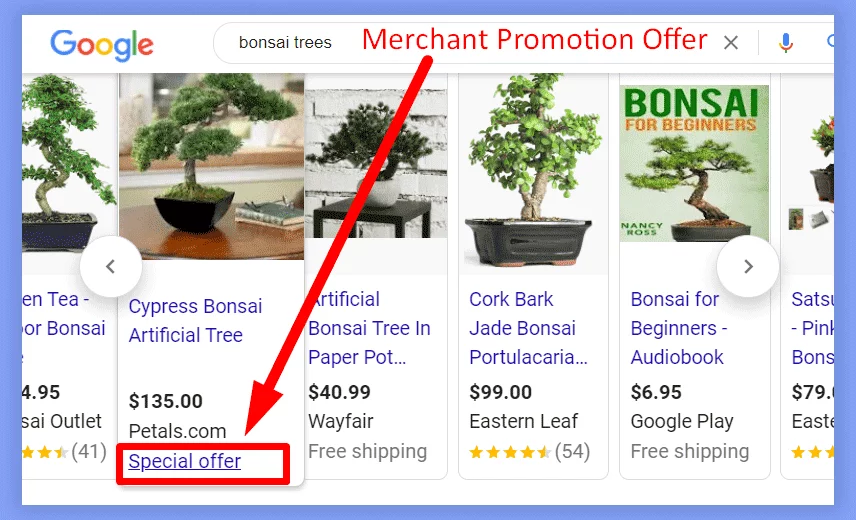
By the way, you can create this offer even after uploading products via free product listings. The products with free listings will be available on the Google Shopping tab.
12. Optimize Product Images
A picture is worth a thousand words!
It becomes even more important while we are talking about eCommerce sales. A better product image creates a better impression on the shoppers. Thus, it significantly boosts the overall sales volume!
Besides that, Google also suggests that sellers upload better WooCommerce product feed. If you intend to upload products to Google Merchant Center, you must follow the required guidelines.
Here’s the list of Google’s recommendations for product images –
| Format | Description |
|---|---|
| Supported attributes | [image_link] and [additional_image_link] |
| Image links | RFC 3986 compliant, http or https URL, and only ASCII characters |
| Character limit | 1 – 2,000 |
| Supported file formats | JPG, JPEG, PNG, BMP, TIFF, WebP, and GIF |
Minimum Requirements of Uploading Product Images to Google Merchant Center –
You have to meet the minimum requirements t0 display your products via GMC.
- Image resolution should be less than 64 megapixels.
- The image file should be less than 16MB.
- The minimum size for apparel product images is 250 x 250 pixels.
- Minimum size for non-apparel product images 100 x 100 pixels.
- The recommended image size is 800 x 800 pixels.
- Upload unique images without any background distractions.
- Use a transparent or solid white background.
- Frame the product within 75% to 90% of the whole image.
These are the common requirements for uploading product photos to the Google merchant center. However, Google also forbids some practices. These are –
- Don’t use a logo, illustration, or generic image of a product.
- The image shouldn’t contain a promotional tag.
- Don’t add multiple products within a single image.
- Don’t use borders on images.
- Always displays the product’s front view.
- Avoid blurry images, etc.
Implement Google’s official image recommendation in the following section to get your product images featured on Google Shopping. You may follow the video instructions below to get a better understanding of Google’s image requirements.
13. Use Appropriate Product Title
The title of a product represents not only the product name but also carries the product branding and a few specifications! So, it’s mandatory to name your pricing right. There’s a universal strategy for naming a product.
As you might already know, different product categories have different naming strategies. Here are the recommended title structures by Google –
| Product category | Product Category Structure | Naming Example |
|---|---|---|
| Clothes | Brand name + Gender + Product category + other attributes (color, size, material, etc) | Calvin Klein Men’s T-shirt Cotton Crew – Red |
| Hardware | Brand name + Product category + other attributes (color, size, material, etc) | Wayfair Double Bed – White walnut wood |
| Books | Book Title + Format + Author + other attributes (subtitles, ISBN number, etc) | The Seventh Scroll Hardcover by Wilbur Smith ISBN – 9780312119997 |
| Electronics | Brand name + Product + other attributes (color, release year, notable specs, etc) | OnePlus 9R blue 8/256gb variant |
| Consumable foods or groceries | Brand name + Product +other attributes (condition, category, weight, etc) | Nestle KitKat 3 Finger Chocolate Wafer 27.5 gm |
| Seasonal goods | Condition + Brand + product type + other attributes (weight, item list, etc) | Fresh Bangladeshi Fruit basket (15 lbs) |
That’s the general procedure of declaring product titles for eCommerce websites. Follow this method while writing the product names of your website.
14. Write a Clear and Concise Product Description
We know that product listing ads or Google shopping ads don’t display product descriptions on their ads. But that doesn’t lessen the importance of product description. The product description is visible on the free listings of products.
Here are some essential tips for writing a perfect product description –
- Be unique and natural
- Research your target audience first
- Present the product benefits
- Optimize the description for search engine
- Use powerful words to convince consumers
- Mention technical specifications (if needed)
- Highlight important sections etc.
If you describe a product by keeping these points in mind, hopefully, you will generate a better ROI than before.
Benefits of Using Google Product Listing Ads for WooCommerce Stores
Did you know that 49% of buyers search on Google to find new products?
So, this is probably the best platform to get potential customers to place ads. Let’s have a look at other benefits of using Google Product Listing Ads for your WooCommerce store.
1. Get More Customers
As you might already know, Google places the PLAs in the center position of the search result page. Thus it gets better exposure and generates a better output for the people.
Besides that, Google’s real-time understanding of consumer interests analyzes the consumer’s behavior and displays the right product in front of the consumers. That’s why you can generate comparatively more sales with Google!
2. Promoting Products via Automation
Google Ads uses automation and machine learning to analyze the users and promote the right product to the potential customers. It works like promoting the products directly to the end-users of a sales funnel.
If you want to complete all of these tasks manually, it will not only cost more money but also require lots of research. Google PLAs just ease the whole promotion process on your behalf.
3. Increase Brand Exposure
It’s pretty common that someone didn’t click on your ads even after noticing them.
So, does it mean your ads are just lost in vain?
No!
Even though the visitor didn’t click on the ads, they still end up noticing your brand on the ad. Thus, your brand reaches a more expansive and highly relevant audience.
By the way, we have already mentioned that you don’t need to pay anything if someone doesn’t click on your ads. So, you can say that you are getting the brand exposure for free!
4. Increase Conversion Rates
The PLAs are comparatively more eye-catching and placed in the search results. So it becomes more visible to the audiences than other ads.
Most importantly, the shoppers review several information like the product title, description, images, variations, etc., even before purchasing the product. If you can present that information smartly, there’s a big chance of convincing a customer to buy a product. As a result, it increases your conversion rate.
5. Acquire Rich Insights
Tracking the performance is a major part of the whole Google shopping ads optimization process. After running an ad campaign, you must track those to find out the highest and lowest-performing products.
In the product listing ads, you will get lots of shopping campaign insights to measure your ad performance. You can easily find your next steps in optimizing a campaign by analyzing those campaigns.
If you want to know more benefits of product listing ads, you may check our full article about the benefits of Google Shopping ads aka product listing ads.
Things to Consider Before Optimizing Your Google Product Listing Ads aka Shopping Ads
If you want to get a better result, you must follow some core PLA campaign optimization tips. In this section, we will discuss those tips of ads optimization.
1. Avoid extremely low priced products
The core goal of a business is to make profit by selling products. So, if your products are extremely low priced, it will be a huge challenge to make profit.
There’s a common tendency among newbie business persons to sell their products just by calculating the buying price. But, every single product has its own expenses and costs.
For example, you are selling a small product for 60 cents. If you run an ad for this product, then you have to consider several facts. The selling price of this product should be the combination of the following costs.
- Manufacturing cost
- Labor cost
- Packaging price
- Transportation cost
- Online or offline ad cost, etc.
If you sell a product for only 60 cents, even after managing the costs explained above, how much will you earn from there? So, it’s better to avoid running ads for the extremely low-priced products of your WooCommerce store.
2. Get an updated product feed
The product feed is the heart and soul of a product ad. All of the products of your ads are listed on the product feed. So, it must be error-free and compatible with the merchant center.
If Google can scan and understand your product feed better, then it will display your product properly on the display network. So, you shouldn’t compromise for even a tiny mistake on the product feed.
While optimizing the feed, you have to optimize certain parts of your product feed. These are –
- Product URL
- Title
- Image
- Price
- Weight
- Variations
- Description, etc.
However, you might need to upload several versions of the product’s price and description. To promote your products in multiple countries, you have to upload multilingual descriptions and prices in multiple currencies.
As multilingual and multi-currencies are sensitive data, you must rely on a good (really good!) plugin to generate the product feed. We recommend using the CTX Feed WooCommerce product feed generator to generate your feeds.

CTX Feed allows you to generate unlimited product feeds for WooCommerce websites. It can generate feeds for 100+ popular merchants all around the world.
If you are wondering about Google ads compatibility, we can assure you that CTX Feed can generate 100% compatible product feed by maintaining Google product listing ads requirements.
3. Remove non-profitable products
As you are investing your time and money in managing a campaign, you are definitely expecting a better result, right?
That’s why you have to get rid of the non-profitable ads even before optimizing the PLAs. Compare the sales performance among different products and include only the best-performing products in your campaign.
By removing the non-profitable products, you are not only saving your time and advertising costs but also increasing the revenue!
4. Remove stock-out products
You must check the stock-out products before initializing a shopping campaign. By the way, it’s completely normal if it’s a temporarily stock-out product. Just run your ads and try to make those products available as soon as possible.
But, you must declutter your product feed if there’s no chance of it being available in the near future. Even if you can’t make some products available before starting a campaign, you shouldn’t include those on the product feed.
5. Don’t make any massive changes at once
It’s true that you have to update your products on a regular basis. But, don’t go for a massive change within a short time.
We all know how tempting it is to make some dramatic changes to your product feed or PLAs. But, you should know that Google ads and shopping campaigns are very sensitive in terms of information.
Even a tiny bit of change in product strategy might result in a dramatic change in performance. So, it’s better to go slow and steady while updating information on your ad campaign.
It’s better to make less than 20% change on your bids.
Frequently Asked Questions
Depending on the size of your changes, it might take around 1-2 weeks to notice the changes. Then you will notice the changes in your product listings ads performance.
Yes, you can!
At the end of April 2020, Google announces free listings for all U.S. merchants on Google shopping. But, you can’t run a campaign or ads based on those products for free!
Yes!
WooCommerce developed a Google Listings & Ads plugin to connect your online store seamlessly with Google. By using this plugin, you can connect your store for the free listing, track performance from the store dashboard, and run paid ads on Google.
Final Words
There’s an old adage, “You need to spend money to make money.” And the best place to spend money on ads is the Google Shopping platform. So, spend a little on product listing ads wisely and generate better revenue.
By the way, creating a product listing ad or shopping campaign isn’t as intimidating as it seems. Follow the Google product listing ads optimization tips stated above and increase your conversion!
If you have any further questions about Google product listing ads, feel free to put that in the comment box below.
Till then, keep optimizing your ads!
