How to Add Tax in WooCommerce Invoice
-
Fadiyah Sameh
For governments to help the economy grow and develop, they need reliable ways to pay for social programs and public investments. To reach the goal of a prosperous, functional, and orderly society, it is important to have programs that help with health, education, infrastructure, and other services.
And in order to achieve these, the government requires to collect money, and that’s where taxation comes into play. Taxes not only pay for public goods and services, but they are also an important part of the agreement between citizens and the economy.
Therefore, you need to pay sales taxes even for your WooCommerce store business. Also, you need to inform your customers about the tax amount as well.
How?
You need to show tax on WooCommerce invoice. This will serve both you and your customer’s record keeping and tax filing.
In this article, we will find out what online sales tax is and how to add tax in WooCommerce invoice.
Let’s begin with online sales tax.
What is WooCommerce sales tax?
WooCommerce or eCommerce sales tax is the tax that businesses must charge online customers and collect from them. The way online sales tax works is the same as when a customer buys something in a brick-and-mortar store and has to pay a tax on top of the price.
It goes by a variety of names, including “internet sales tax,” “eCommerce sales tax,” and “online sales tax,” but all of these are somewhat deceptive. Despite popular belief, online purchases are not subject to a separate tax.
Rather, recent changes to tax law reflect the fact that our lives are increasingly lived in the digital realm and that conducting business in a state does not necessitate the presence of a brick-and-mortar store, warehouse, or office.
Since US retailers own 50% of WooCommerce stores, this article will focus on how US states handle sales tax.
There is a sales tax in 45 of the 50 US states and Washington, D.C. On top of that, these states also let “special taxing districts,” like cities and counties, charge a sales tax.
So, when it comes to sales tax in different states in the United States, WooCommerce sellers may have to deal with a wide range of different laws and rules.
Do you need to collect sales taxes on WooCommerce purchases?
As an online retailer, it is your duty to determine the appropriate rate of sales tax to charge your customers and to collect and remit that tax to the appropriate state on behalf of the state in which you conduct business.
Defining the sales tax for online purchases
Due to the obvious location of brick-and-mortar businesses, collecting sales tax can be relatively easy to manage. However, sales tax can be a hassle when running an online Woo store if you ship to customers in different countries.
Compliance with US federal sales tax regulations is complicated by the fact that every state and municipality has its own sales tax law. What’s more, if your business spans state lines, you’ll need to register with each state individually to collect and file taxes.
Sales tax nexus
When you have a sales tax nexus in a state, you have to collect sales taxes there. What is a sales tax nexus, though?
Nexus is the term for having a physical presence in a place. You have a physical presence when you open a store in another city or state or when your sales reach a certain threshold. Let me give you some examples of the sales tax nexus and how it makes you follow the rules and laws of the state.
Home
This is one of the most common types of nexus, which means you have to collect and pay sales tax in states where you have a physical store.
Employee
If your company has employee nexus, you have the legal right to collect sales tax from customers who live in the same state in which your employees are employed. This refers to businesses that operate on a global scale and therefore hire workers from a variety of countries.
Not to mention that they have to register and collect sales tax in the state where the employee resides in order to legally operate there.
Inventory
This is for companies that do not keep stock on hand in their home states but instead buy and sell through intermediaries. The location of your inventory determines which states you must register for sales tax.
Economics
If your annual sales in a state are over a certain amount, you will have established sales tax nexus in that state. This could be calculated from data such as sales volume or total product revenue.
How to comply with WooCommerce sales tax?
Economic nexus states can be a serious threat to expanding businesses. The media will likely write about your company’s success, and auditors will certainly take note. Attorneys can turn a profit in states like New York by filing whistleblower lawsuits against companies that aren’t in compliance.
The question now becomes, “What can you do to prevent this?”
Be sure to follow all of the relevant regulations for collecting and remitting sales tax on online purchases in the states where you have a physical presence or a physical presence and a nexus.
Let’s break into details.
Find out where your sales tax nexus is and what kinds of products are subject to sales tax
Your company is at risk of audit, fines, and repayment if you do not have a firm grasp of state-by-state sales tax laws. That’s why it’s important for your WooCommerce company to study the local tax regulations in every state where it operates.
The first step is to learn about “sourcing,” which refers to the place of taxation for a given sale. The location of the seller determines the tax rate for “origin-sourced” sales, while the location of the buyer determines the tax rate for “destination-sourced” sales.
If you’re a retailer, finding out whether your state is an “origin source” or “destination source” is crucial. Remember that if you are a remote seller with economic nexus, the rules of origin and destination sourcing apply differently.
The final destination will likely determine those purchases. Therefore, you must determine the appropriate sales tax rate in each jurisdiction in which your company has nexus. In addition, as your company expands, so too will the number of states from which you must collect e-commerce sales tax.
Fortunately, you are exempt from collecting sales taxes from customers located in states where you do not have nexus. Sadly, only a small number of states have yet to implement economic nexus legislation.
If that wasn’t difficult enough, you’ll also have to figure out if the state taxes the products you’re selling there. The economic nexus threshold may not apply to all transactions or all products in all states.
For instance, in four states, sales tax is not collected at all on clothing purchases, and another fifteen states offer partial exemptions on clothing purchases during sales tax holidays or other tax-free periods.
Register for a sales tax permit
Get in line with the law by applying for a sales tax license in your nexus state.
To do this, you must get in touch with the relevant taxing authority in your state, typically referred to as the “[State] Department of Revenue.” Information about who you are and what you do as a business is required by the state.
Without a license, collecting sales tax is illegal in most states. They believe that if you collect sales tax from customers without a license, you are misleading them into thinking that you are actually doing so while actually keeping the money for yourself.
It is imperative to obtain a sales tax license before beginning collection. When a state issues a business a sales tax license, it will also specify how often a company must file sales tax returns. This is usually done once a month, three times a year, or once a year.
Generally speaking, a state will require you to file a sales tax return and remit sales tax collected from you more frequently as your sales volume increases within that state.
Collect, report, and file your sales tax returns
Upon receiving your sales tax permit and gaining an understanding of the sales tax nexus, you will be required to begin collecting and submitting sales tax returns.
When you factor in the fact that each state has its own sales tax regulations and that you may have nexus in more than one state, things get complicated fast. Therefore, you should either use tax preparation software or hire a professional.
Two types of tax rates exist; those applicable to the store itself and those applicable to the customer. Taxes based on a customer’s location are applied less frequently than those based on a business’s location because of the extra work involved.
You must now return the taxes you have collected, as they do not legally belong to you. This is a task that one person cannot complete because each state has its own rules for determining sales tax rates.
In some states, you have to mail in your tax payments, while others would rather have you pay taxes online.
Automate the sales tax process in WooCommerce
You should now be aware that sales tax is subject to a plethora of rules and regulations, some of which vary from one state to the next. That’s a lot of trouble to go to, and it could lead to lots of mistakes, which the company can’t afford to make because of the potential for legal repercussions.
Therefore, you should consider automating the tax collection process in WooCommerce. There is a multitude of third-party WooCommerce sales tax plugins to automate the process and get rid of any and all manual labor.
TaxJar is one of the most well-known of those currently available WooCommerce sales tax plugins. It is a software-as-a-service (SaaS) application that automates the calculation of sales tax.
Additionally, it is compatible with virtually all eCommerce platforms, including WooCommerce. Learn how you can use Taxjar in WooCommerce to collect your taxes from this article here.
How to enable sales tax settings in WooCommerce?
Tax collection and reporting sounds complicated, right? However, enabling tax options in WooCommerce is as easy as it can get.
First, you need to enable tax settings. Jump to your WordPress admin panel.
From there –
- Go to WooCommerce>>Settings>>General.
- Checkmark the “Enable taxes” box.
- Save your changes.
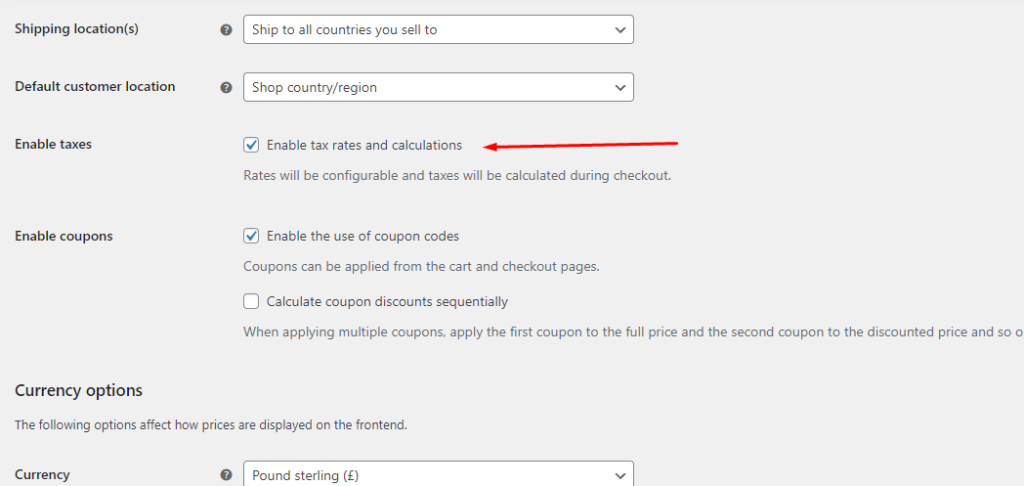
After you turn that option on, you’ll see a new menu tab called “Tax,” which has the following options.
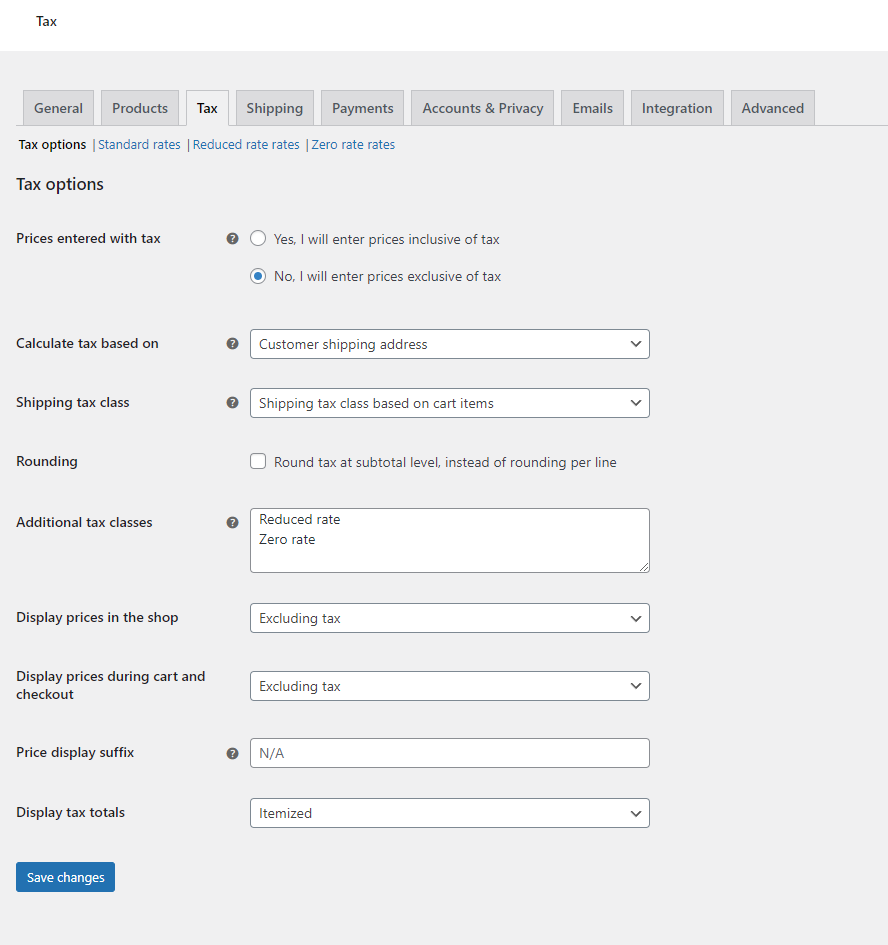
WooCommerce gives you a wide variety of options to customize your websites, such as the capability to include taxes in your prices, different shipping tax class, additional tax classes, and a lot more.
WooCommerce is compatible with three distinct approaches to calculating taxes:
- Store base address
- Customer billing address
- Customer shipping address
You also have the option of assigning classes to your products, which will result in the application of either a standard or an additional tax class whenever one of your customers makes a purchase.
Tax prices can also be shown on your store’s product page, checkout page, and cart page. On Woo Commerce’s official website, you can also find instructions on how to configure different tax settings in WooCommerce.
However, we will mention some of the important ones below.
WooCommerce tax classes
By default, WooCommerce offers three tax classes.
- Standard
- Reduced rate
- Zero rate
Additionally, you can add more classes as per your needs. But what are these classes for?
In layman’s terms, tax classes are additional “categories” for products that are used to group products in accordance with the tax rate that applies to each group.
For instance, if you sell products that are subject to taxes at different VAT and tax rates, such as 19% and 7%, you will need to configure your store accordingly. If this is the case, you should consider establishing two different tax classes, perhaps titled “Services” (or simply 19%) and “Clothing” (or simply 7%). In a later step during product configuration, you will need to select the appropriate tax class before a specific tax can be applied to this product.
Now, let’s assume that you sell products to customers in other countries, each of which has a unique tax rate that is applied by WooCommerce. As an illustration, the value-added tax (VAT) rate for services in Italy is 21%, while in Spain, it is 29%. You can now set different rates for different countries by adding the Country code to the section of the website that deals with tax classes.
How to add tax rate in WooCommerce
You can notice three tax classes at the top screen of the tax settings page.
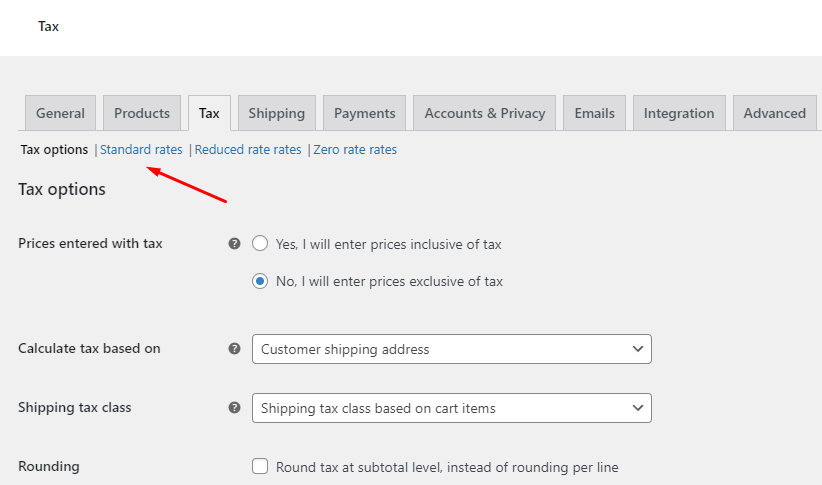
Let’s click on the Standard rates for our example.
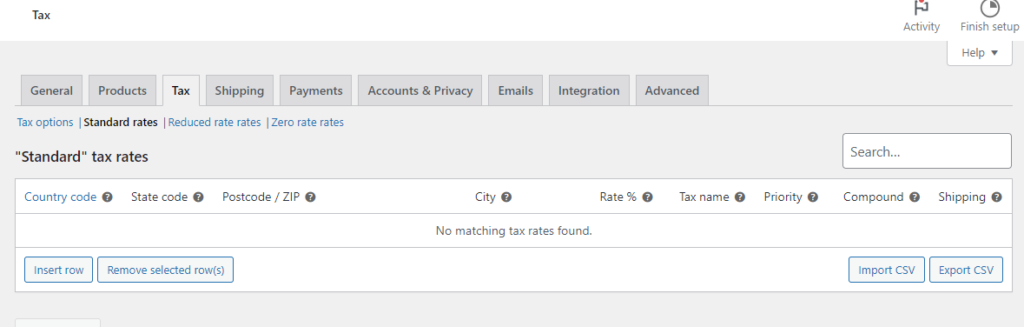
Now click on the Insert row, and then you need to input your details to add a new tax rate.
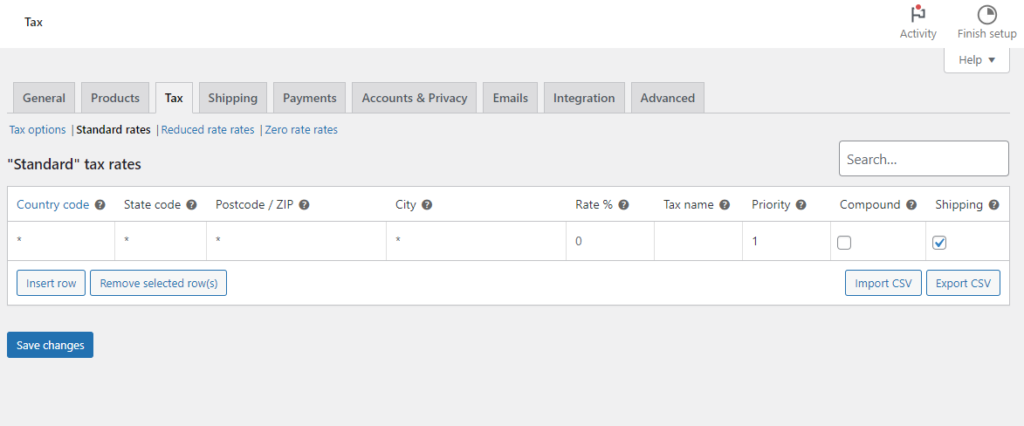
Tax rate attributes
Let’s take a look at the attributes you need to fill in.
Country code – Type in a two-letter ISO 3166-1 alpha-2 code for your country. If you don’t specify a country, the default rate will be used for all countries.
State code – In the same way as the preceding section, if you want this to apply to all states, leave the State code field blank. Otherwise, enter a two-letter code. The rule applies only to a select few nations.
ZIP/Postcode -Enter a postal code or codes, separated by a semicolon, in the “Postal Code” field. Using a dash (-) to demarcate the beginning and endpoints of a range is another valid option. If you’d like your application to be considered for all zip codes, just leave this blank.
City – Choose which city or cities this tax rate will be applied to. Use a semicolon to separate multiple cities if necessary. The standard practice for selecting all cities is to leave this field blank.
The standard sales tax rates
Rate – Set the value of the rate in percent. Use a format with four places after the decimal point, and don’t enter the mark%. Example: 19. Decimal numbers are only needed when the rate isn’t a whole number, like 7.3.
Tax name – enter tax name. Customers will be able to see the names of taxes displayed in the shop, as well as on WooCommerce invoices, among other places. Example: VAT 19%.
Priority – Priority entails selecting which of the rates should be used first. Keep in mind that if you only set one priority for all of your tax rates, only that one will show up on your WooCommerce invoices. WooCommerce will calculate tax for each individual tax rate if you’ve set multiple taxes rates for a single tax class with different weights.
Compound – Check this box if the rate is a mix of other rates. The compound tax will be added after the other rates have been calculated. This means that the rate for which you checked the box will be added to a product that has already been taxed.
Shipping – If you’re using WooCommerce to sell products online, you can choose whether or not to include sales tax in the shipping price. If you do not choose a shipping rate, no sales tax will be applied to your order. If you choose multiple shipping methods and rates, taxes will be calculated based on the order in which they were chosen.
Now that we have a better idea of how to add sales tax in WooCommerce, we need to learn how to add tax/vat on WooCommerce invoice.
But let’s begin with what an invoice is and why you need to create an invoice with tax columns.
What is an invoice, and why do you need a tax column in WooCommerce invoice?
Invoicing is a way for a company and its clients to keep track of their financial transactions. It checks and records the goods the customer bought and the price they agreed to pay.
Invoices are important for keeping track of your company’s money, inventory, and accounting. In addition to being useful, they make selling easier by putting all the important information on one page.
It can also be used as proof if your customers want a refund because you made a mistake or the goods were broken. If the client makes a claim that doesn’t make sense, the invoice can be used as proof.
Invoices for tax filing
It is important to keep sales invoice copies for tax and accounting purposes. Having an invoice copy on hand is essential when filing GST or income tax returns. If the company suspects any tax irregularities, it can use the invoices as evidence.
It is critical for the owner of a WooCommerce company to keep an up-to-date record of all sales invoices in order to accurately report income and guarantee that taxes are paid.
How to add vat tax in WooCommerce invoice?
WooCommerce has all the tools that let you quickly and easily configure sales tax for your online store. However, the core Woo plugin doesn’t have the option to create invoices.
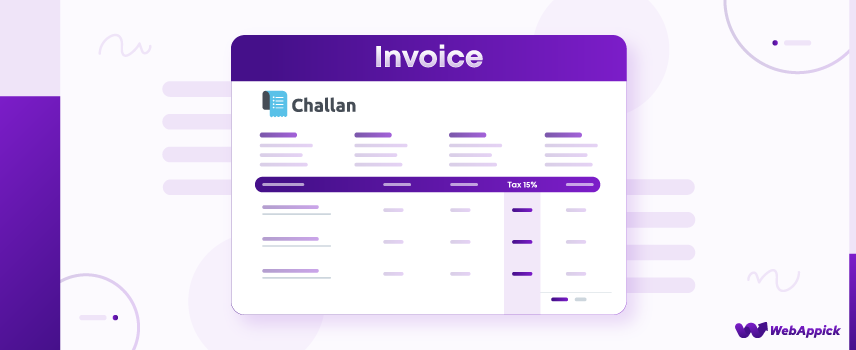
You need to install a third-party plugin such as the Challan to accomplish this task.
Challan pdf invoicing plugin
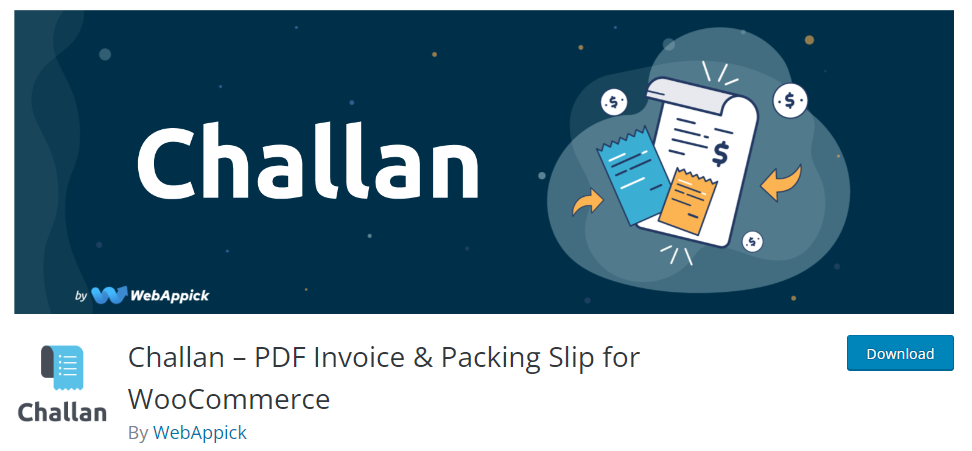
Challan is a freemium WooCommerce PDF invoice plugin that gives you the ability to generate and send invoices immediately following the completion of each order. Along with the WooCommerce invoices, you also have the ability to generate shipping labels, packing lists, and credit notes.
Most importantly, you can show tax on invoice with the help of this plugin.
In addition, you don’t have to manually create the WooCommerce invoices after each order. Using the Challan WooCommerce invoice plugin, you can create a unique invoice template for your business. After that point, the plugin will produce invoices for the orders on its own automatically.
In addition to that, it adds PDF copies of the invoices to the order confirmation emails that are sent out.
You have a great deal of leeway in terms of personalizing and tailoring your invoice template. You have the ability to add elements of your brand, such as your logo, information about your company, paid stamps, signatures, custom footer notes, and so on.
In addition to that, you have the option of selecting the background from among a variety of pre-made templates. You also have the option of setting a personalized background image for the documents.
Challan also allows you to personalize your invoice template by using CSS codes and custom fields. You also have the option of manually downloading the documents from the order pages.
The premium version of Challan is equipped with a plethora of one-of-a-kind features. The pro version of this plugin gives you even more customization options for your invoice templates, allowing you to take your game to the next level.
In addition, your customers can also download the invoices from their accounts page.
Key features
- Generates invoices automatically for every order.
- Generates invoices, packing lists, shipping labels, and credit notes.
- Allows you to create invoices with tax columns.
- Lets you design an invoice/packing list template for all future orders.
- Allows you to customize and personalize your invoice template extensively.
- Enables you to add brand elements such as your logo, custom footer, signature, etc.
- Lets you set a custom background image.
- Allows you to choose from pre-made template designs.
- Supports adding CSS codes for template customization.
Price
You can find the free version of this freemium plugin in the WordPress plugins repository. The premium version has two sets of packages.
Annual cost –
Single Site – $29.00
Five Sites – $59.00
Ten Sites -$129.00
Lifetime cost –
Single Site – $119.00
Five Site – $229.00
Ten Site – $457.00
How to add tax in WooCommerce invoice?
In order to add tax in WooCommerce invoice, you need to install the Challan pro plugin.
Once you have purchased a plan, Challan will let you download their pro plugin. After that, go to your WordPress admin panel and then Plugins>>Add New.
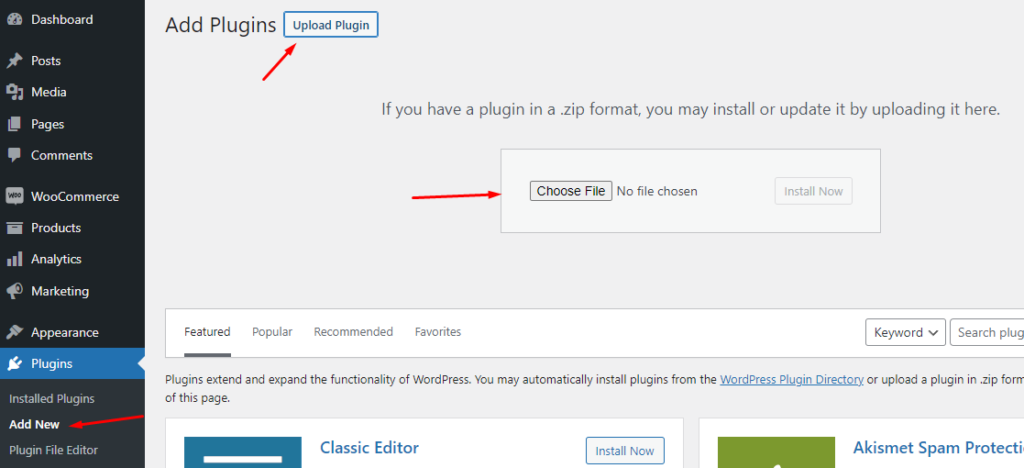
Click on the Upload button to upload the plugin. Install and activate.
Challan will create its own menu in the admin panel. From there, go to Settings.
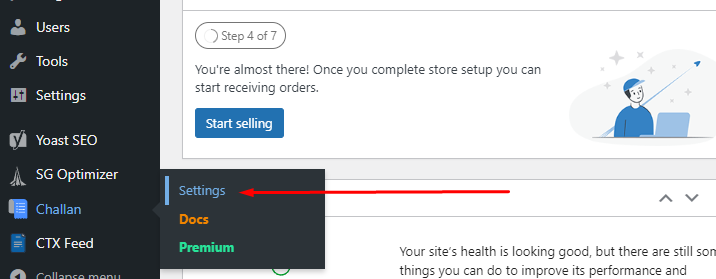
Now jump to the Invoice tab and scroll down to the Tax & Fees section. You will also find vat options there.
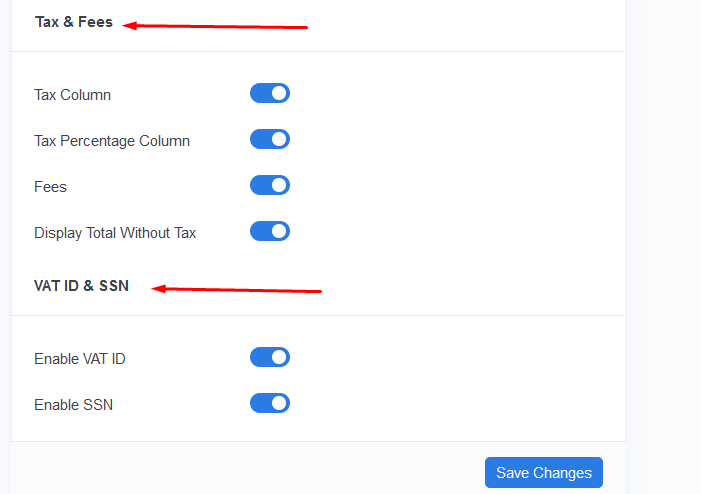
Toggle to enable the options. Let’s check how it adds tax to the WooCommerce invoice.
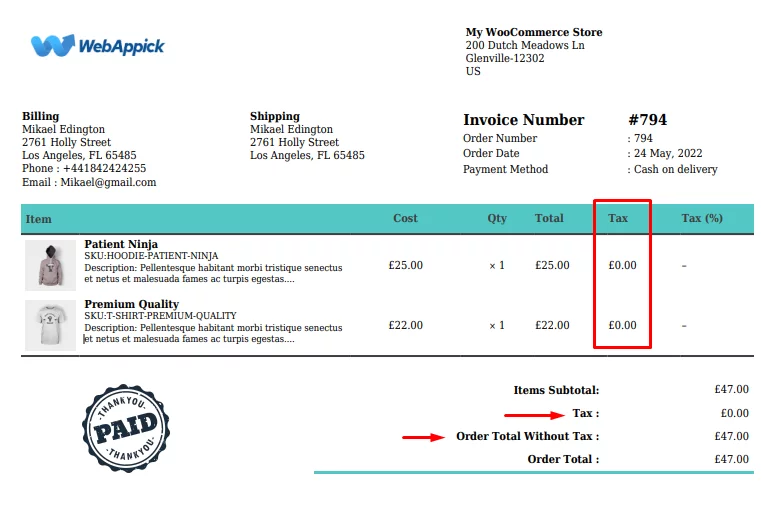
It’s empty because we didn’t configure any tax settings for the demo site. Once you configure the appropriate settings or assign a plugin, your invoices will show the appropriate tax rates in the invoices.
Wrap up
The process of establishing tax rates for your web store can be time-consuming. Thankfully, WooCommerce makes it easy to set up your tax settings and tax calculations.
We’ve gone over everything you’ll need to know to properly configure WooCommerce tax settings. We have also covered how to add tax in WooCommerce invoice.
Remember that your tax situation will vary based on the selling location and other legal requirements. Therefore, you should be careful when determining tax rules in WooCommerce.
We wish you much success with your taxes and hope this article eases the burden. Feel free to post a question or comment if you need clarification.
