How To Setup Cron for Auto Feed update?
WordPress Cron updates the feeds once the visitor comes to your site. Without the visitor’s visit, it will not update the feed even if the interval is set for a specific time. For example, if the interval is set as 6 hours, it will still wait for the visitors to visit the site; otherwise, the CRON will not update it at that interval and be rescheduled for the next interval.
However, the CTX Feed utilizes the CRON update and will lead to an auto-update of your feed every single time your feed is set to update for that time interval. It saves you from manually updating your product into the product feed. It will also spare you the fear of not having your feeds updated on time.
Besides, you can also set your Cron job from CPanel, or Server, or any other third-party Cron Job service like EasyCron.com to generate the Cron Job URL to auto-update your Feeds. You can set the following URL to run the cron job manually.

OPTION 1: WordPress CRON
Firstly, you need to check whether or not your CRON status is enabled. The Auto Feed Update highly depends on the WordPress CRON. If WordPress CRON is disabled, The Auto Feed Update will not function. Therefore, go to CTX Feed > Status and check whether or not it is enabled.

If it turns out disabled, the following code must be added at the bottom of the wp-config.php file to enable WP CRON.
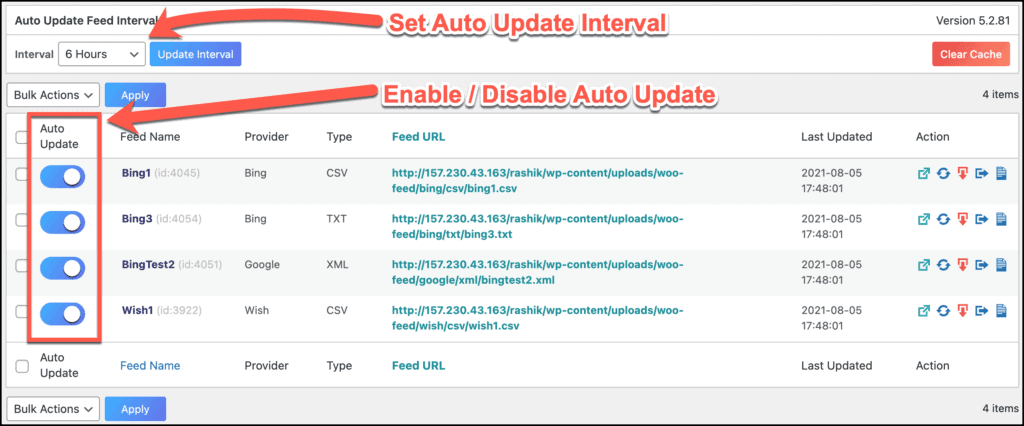
define('DISABLE_WP_CRON', false);Go to CTX Feed > Manage Feeds and set the auto-feed update interval. Available intervals are 1 week, 24 Hours, 12 Hours, 6 Hours, 1 Hour. The premium version of the plugin offers lower intervals like 30 Minutes, 15 Minutes, & 5 Minutes. However, The optimum interval time is anywhere between 6 to 12 hours.

LOwer update interval
We highly discourage you from setting lower update intervals because the continuous feed update process can slow down your server & site. If you are confident enough or you are using any VPS or Dedicated server then you can use a lower update interval.

OPTION 2: For cPanel Configuration
Before using a third-party cron service, you need to disable WordPress cron. The following code must be added at the bottom of the wp-config.php file to enable WP CRON.
define('DISABLE_WP_CRON', true);
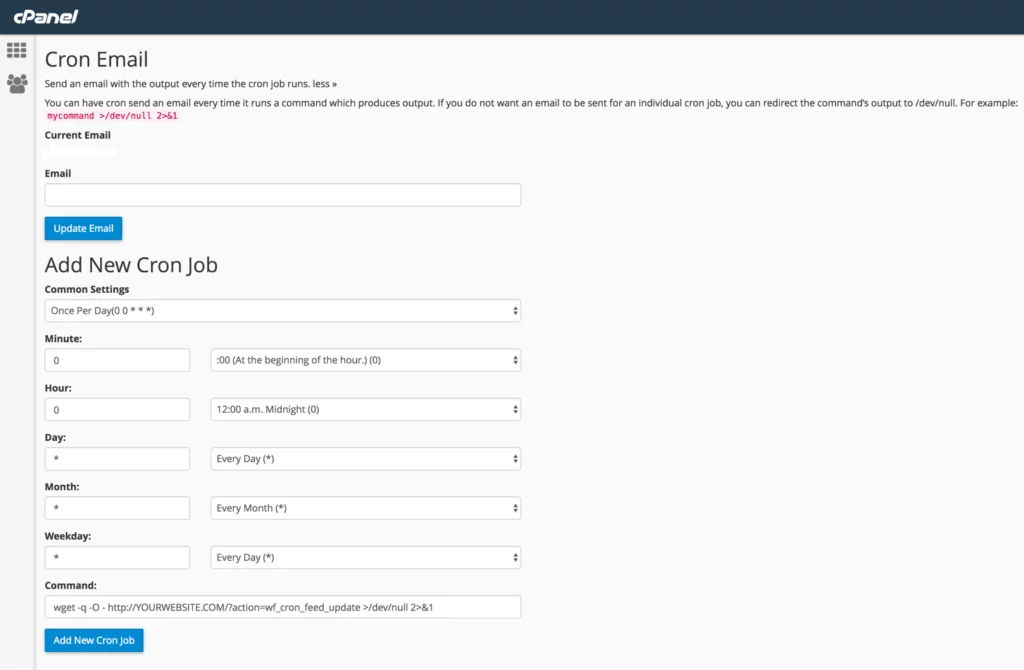
Custom Timing: Here you can customize how often your Cron job will run. If you chose a common Setting option from the first drop-down these will be filled in automatically for you and you can skip them.
Command: Here you need to enter the command you want the Cron job to run. This can be a simple shell command or you can run a script.
wget -q -O - http://yourdomain.com/wp-cron.php?doing_wp_cron >/dev/null 2>&1
OPTION 3: For Mac OS X and Linux
Before using a third-party cron service, you need to disable WordPress cron. The following code must be added at the bottom of the wp-config.php file to enable WP CRON.
define('DISABLE_WP_CRON', true);Mac OS X and Linux both use Cron as their time-based scheduling system. It is typically accessed from the terminal with the
crontab -e
command. It should be noted that tasks will be run as a regular user or as root depending on the system user running the command.
Cron has a specific syntax that needs to be followed and contains the following parts:
- Minute
- Hour
- Day of month
- Month
- Day of week
- Command to execute

If a command should be run regardless of one of the time sections an asterisk (*) should be used. For example, if you wanted to run a command every 15 minutes regardless of the hour, day, or month it would look like:
15 * * * * command
Many servers have wget installed and this is an easy tool to call the Cron script.
wget -q -O - http://yourdomain.com/wp-cron.php?doing_wp_cron >/dev/null 2>&1
A daily call to your site’s Cron Job that triggers at midnight every night could look similar to:
0 0 * * * wget -q -O - http://yourdomain.com/wp-cron.php?doing_wp_cron >/dev/null 2>&1
OPTION 4: For Windows Server
Before using a third-party cron service, you need to disable WordPress cron. The following code must be added at the bottom of the wp-config.php file to enable WP CRON.
define('DISABLE_WP_CRON', true);Windows call their time-based scheduling system the Task Scheduler. It can be accessed via the Administrative Tools in the control panel.
How you set up the task varies with the server setup. One method is to use PowerShell and a Basic Task. After creating a Basic Task the following command can be used to call the WordPress Cron script.
powershell "Invoke-WebRequest http://yourdomain.com/wp-cron.php?doing_wp_cron"
You can also learn How To Configure Auto Feed Update with CTX feed WooCommerce product feed generator plugin in this following video tutorial:
