How to Fix Auto Feed Update, not Working Issue?
There are so many reasons your auto-feed update may not run properly. We will discuss the reasons and their solutions here. Follow these steps to learn how to fix auto feed update not working issue.
Before heading to the solution, you need to have some basic knowledge about how the WordPress cron job works.
WordPress Cron updates the feeds once the visitor comes to your site. Without the visitor’s visit, it will not update the feed even if the interval is set for a specific time. For example, if the interval is set as 6 hours, it will still wait for the visitors to visit the site; otherwise, the CRON will not update it at that interval and be rescheduled for the next interval.
REASON 1: Check WordPress CRON status.
Solution: Firstly, you need to check whether or not your CRON status is enabled. The Auto Feed Update highly depends on the WordPress CRON. If WordPress CRON is disabled, The Auto Feed Update will not function. Therefore, go to CTX Feed > Status and check whether or not it is enabled.

If it turns out disabled, the following code must be added at the bottom of the wp-config.php file.
define('DISABLE_WP_CRON', false);
REASON 2: Lower Update Interval.
Solution: If the update interval is between 1 hour to 5 minutes, the Auto Feed update may fail in this case if any visitor does not visit your site within that interval. It will be better if the update interval is set anywhere between 6 hours to 12 hours.
Available intervals are 1 week, 24 Hours, 12 Hours, 6 Hours, 1 Hour. The premium version of the plugin offers lower intervals like 30 Minutes, 15 Minutes, & 5 Minutes. However, The optimum interval time is anywhere between 6 to 12 hours.
LOW UPDATE interval
We highly discourage you from setting lower update intervals because the continuous feed update process can slow down your server & site. If you are confident enough or you are using any VPS or Dedicated server then you can use a lower update interval.
REASON 3: Auto-update enabled or not???
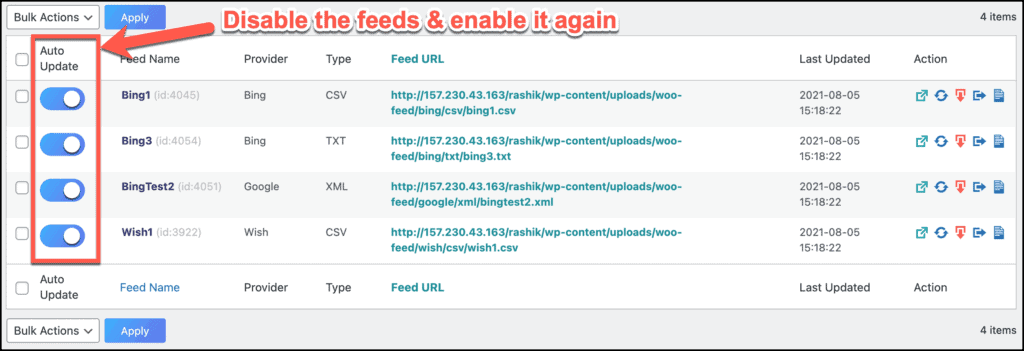
Solution: Firstly, it needs to be ensured from the CTX Feed > Manage Feed whether the Auto Update has been enabled for that specific feed or not.
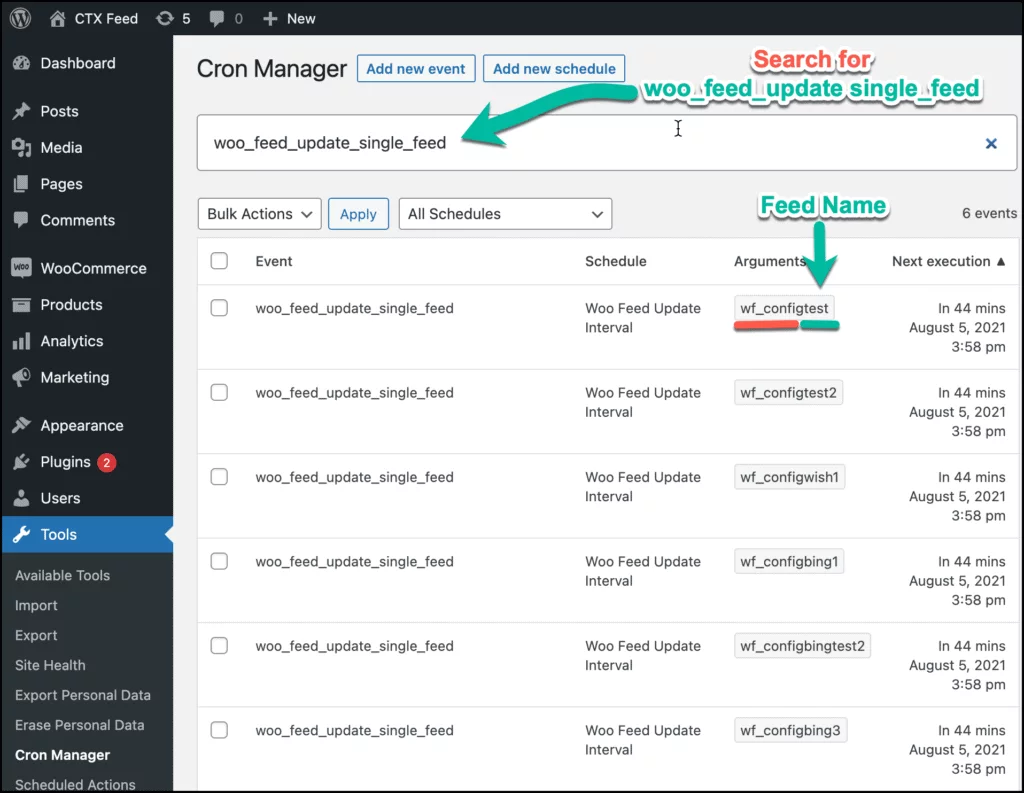
In order to ensure all the feeds are enabled, you need to install the CRON MANAGER plugin. Therefore, to install and activate the plugin, go to Tools > Cron Manager. In the Search events field, search for “woo_feed_update_single_feed”. Make sure that the feed update schedules are listed in the following table.

If Auto Update enabled feeds are listed there, then it’s ok otherwise, you need to disable auto feed update for the feeds then enable it again from the Manage Feed page.

Disable test feed
You need to turn off the Auto Update option for the feeds that you don’t wish to update. You should only turn on the Auto Update for the feeds that are final otherwise, updating a huge number of feeds at a time may increase the server load, thus slowing the server speed, and consequently, failing to update the feed.
REASON 4: Low PHP execution time.
Solution: You need to go to CTX Feed > Status and check out the PHP execution time. Due to low PHP execution time, the Auto Feed Update operation may fail to complete the process within the given execution time frame.


If the auto-feed update operation does not work, increase your server PHP execution_time & memory_limit, and try again. Contact your hosting provider to increase those values. You need to restart the server after upgrading the execution_time & memory_limit.
PHP execution time
If the PHP execution_time is 30, the CTX Feed plug-in can process up to 2000 products at a time, depending on your server/hosting. Based on your product quantity, you can set the execution time, such as 300, 600, 900 and 1200, etc. However, If it doesn’t work even after increasing the execution time, you must increase your server RAM.
REASON 5: Error on site.
You must check by going to the CTX Feed > Status page if your WP DEBUG Status is okay. If not, add the below code at the bottom of the wp-config.php file.
// Enable WP_DEBUG mode
define( 'WP_DEBUG', true );
// Enable Debug logging to the /wp-content/debug.log file
define( 'WP_DEBUG_LOG', true );
// Disable display of errors and warnings
define( 'WP_DEBUG_DISPLAY', false );
@ini_set( 'display_errors', 0 );
// Use dev versions of core JS and CSS files (only needed if you are modifying these core files)
define( 'SCRIPT_DEBUG', true );
Due to Fatal Errors on your site, the Auto Feed operation may fail. After enabling the debug mode, you need to check the Fatal Errors in two different ways:
First, go to CTX Feed > Status. Click on the “Logs” tab and check if there is an error message over there.
Secondly, if you don’t find any error messages yet, go to WooCommerce > Status. Then click on the “Logs” tab and open the drop-down list. This list will show you date-wise errors that are causing the error on site. From the list, you need to open the latest log file like woo-feed-fatal-errors… or fatal-errors…
Once you encounter any error, you need to copy the error and contact our customer support team.
REASON 6: Server RAM
According to our test, shared hosting with 2GB RAM, the CTX Feed plugin can process up to 4000 products at a time. If none of the above solutions work out, You may need to increase the server RAM and try again.
You can also watch a step by step video to learn how to fix auto feed update not working issue in the following video tutorial:
Contact Support
If you fail to comply with any of the aforementioned solutions on your own, contact our support team, and we will be happy to help you.