When a feed is missing products, shows the wrong values, or fails to generate, CTX Feed’s logs are how you find out why. The plugin keeps two kinds of logs, and there are three ways to get them — all covered in this guide, along with the Debug logging switch that adds extra diagnostic detail while you are chasing a problem.
The two kinds of logs
- Feed generation logs — CTX Feed’s own record of each feed build: which products it processed, which it skipped and for what reason, and any warnings or errors along the way. CTX Feed always keeps one log file per feed, refreshed on every run, so a feed’s latest generation is always on record — no setting required. Turning Debug logging on (Step 1) adds a deeper system diagnostics trace on top.
- PHP error logs — actual PHP errors and fatal crashes coming from the plugin’s code. These go through WooCommerce’s own logger, so you find them under WooCommerce → Status → Logs (pick the log whose source is
ctxfeed). See the PHP error logs section below.
And the three ways to get the generation logs:
- Read them inside WordPress — CTX Feed → System → System status → Logs (Step 3).
- Download them — from Settings → Diagnostics, or per feed from the Manage Feeds list (Step 4).
- Straight off the server — the raw
.logfiles live in alogs-…folder inside/wp-content/uploads/woo-feed/(see “Where the log files live”).
Step 1: Turn on debug logging
The per-feed generation log is always recorded, but the Debug logging switch adds the detailed diagnostics — step-by-step info and debug lines plus performance timings — that make tricky problems findable:
- In your WordPress dashboard, open CTX Feed, then go to System → Settings.
- Scroll to the Diagnostics card.
- Switch the Debug logging toggle on.
- Click Save changes in the save bar at the top of the page. (CTX Feed settings do not auto-save — the save bar counts your unsaved edits until you save them.)
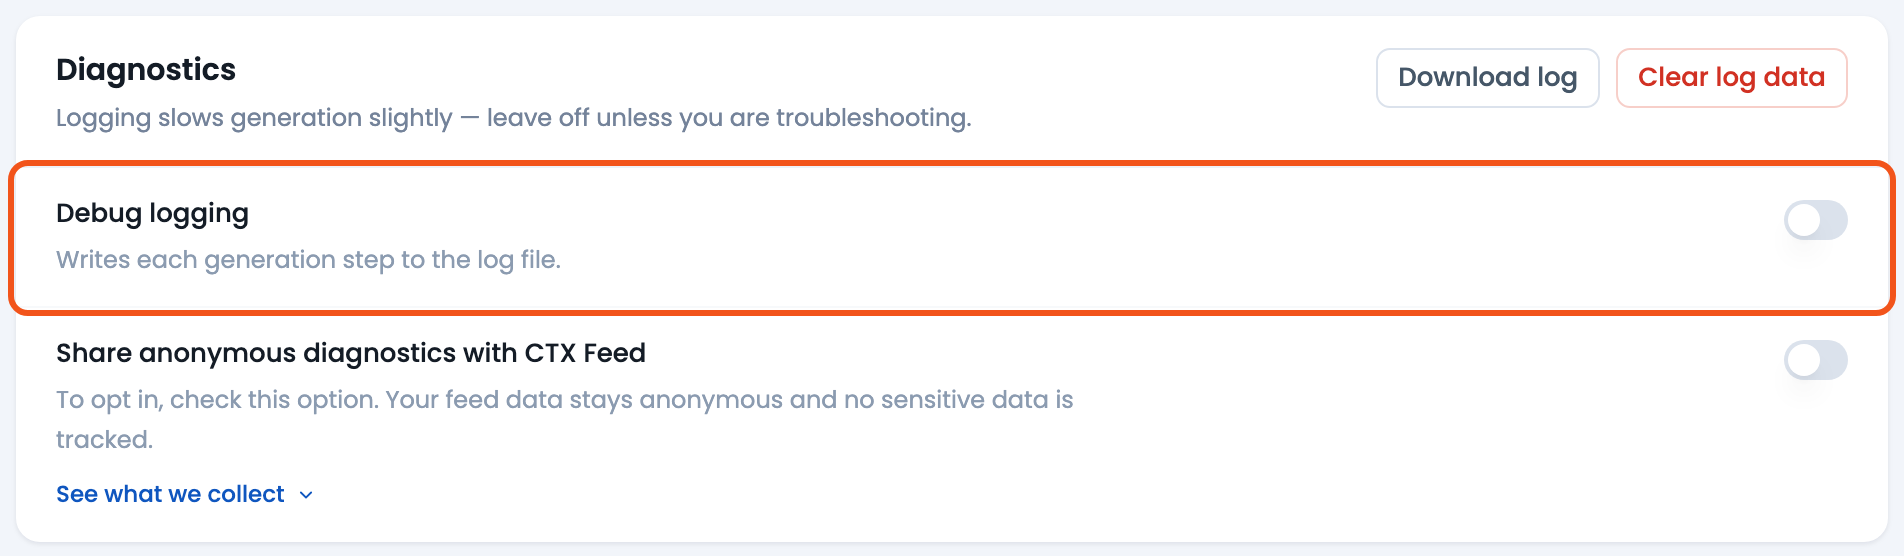
Debug logging is a diagnostic tool, so keep it off during normal operation — the extra detail adds a little overhead and noise. Turn it on while you are chasing a problem, then turn it back off afterward (Step 5).
Step 2: Reproduce the problem
The extra diagnostics only capture what happens after the switch is on — and each feed’s log is started fresh on every run — so trigger a new generation to record the issue:
- Go to CTX Feed → Manage Feeds.
- Find the feed you are troubleshooting and click Regenerate.
- Let the generation finish. CTX Feed writes each step of that run to the log as it goes.
Step 3: Read the logs inside WordPress
You do not have to download a file to see what happened. CTX Feed shows the logs right in the admin:
- Open CTX Feed → System → System status.
- Select the Logs tab. The Generation log panel shows the recorded lines. It shows up to 256 KB of log data, most recently updated feed logs first, so on a store with many feeds the oldest logs may be cut off — use the feed filter or the per-feed Download Log to see a specific feed.
- Use the two filters above the log to narrow it down:
- Feed filter — show only the entries for one feed instead of all of them.
- Level filter — choose All levels, Error, Warn, or Info & Debug. Log lines are color-coded: Error in red, Warn in amber, and Info / Debug in muted gray, so problems stand out.
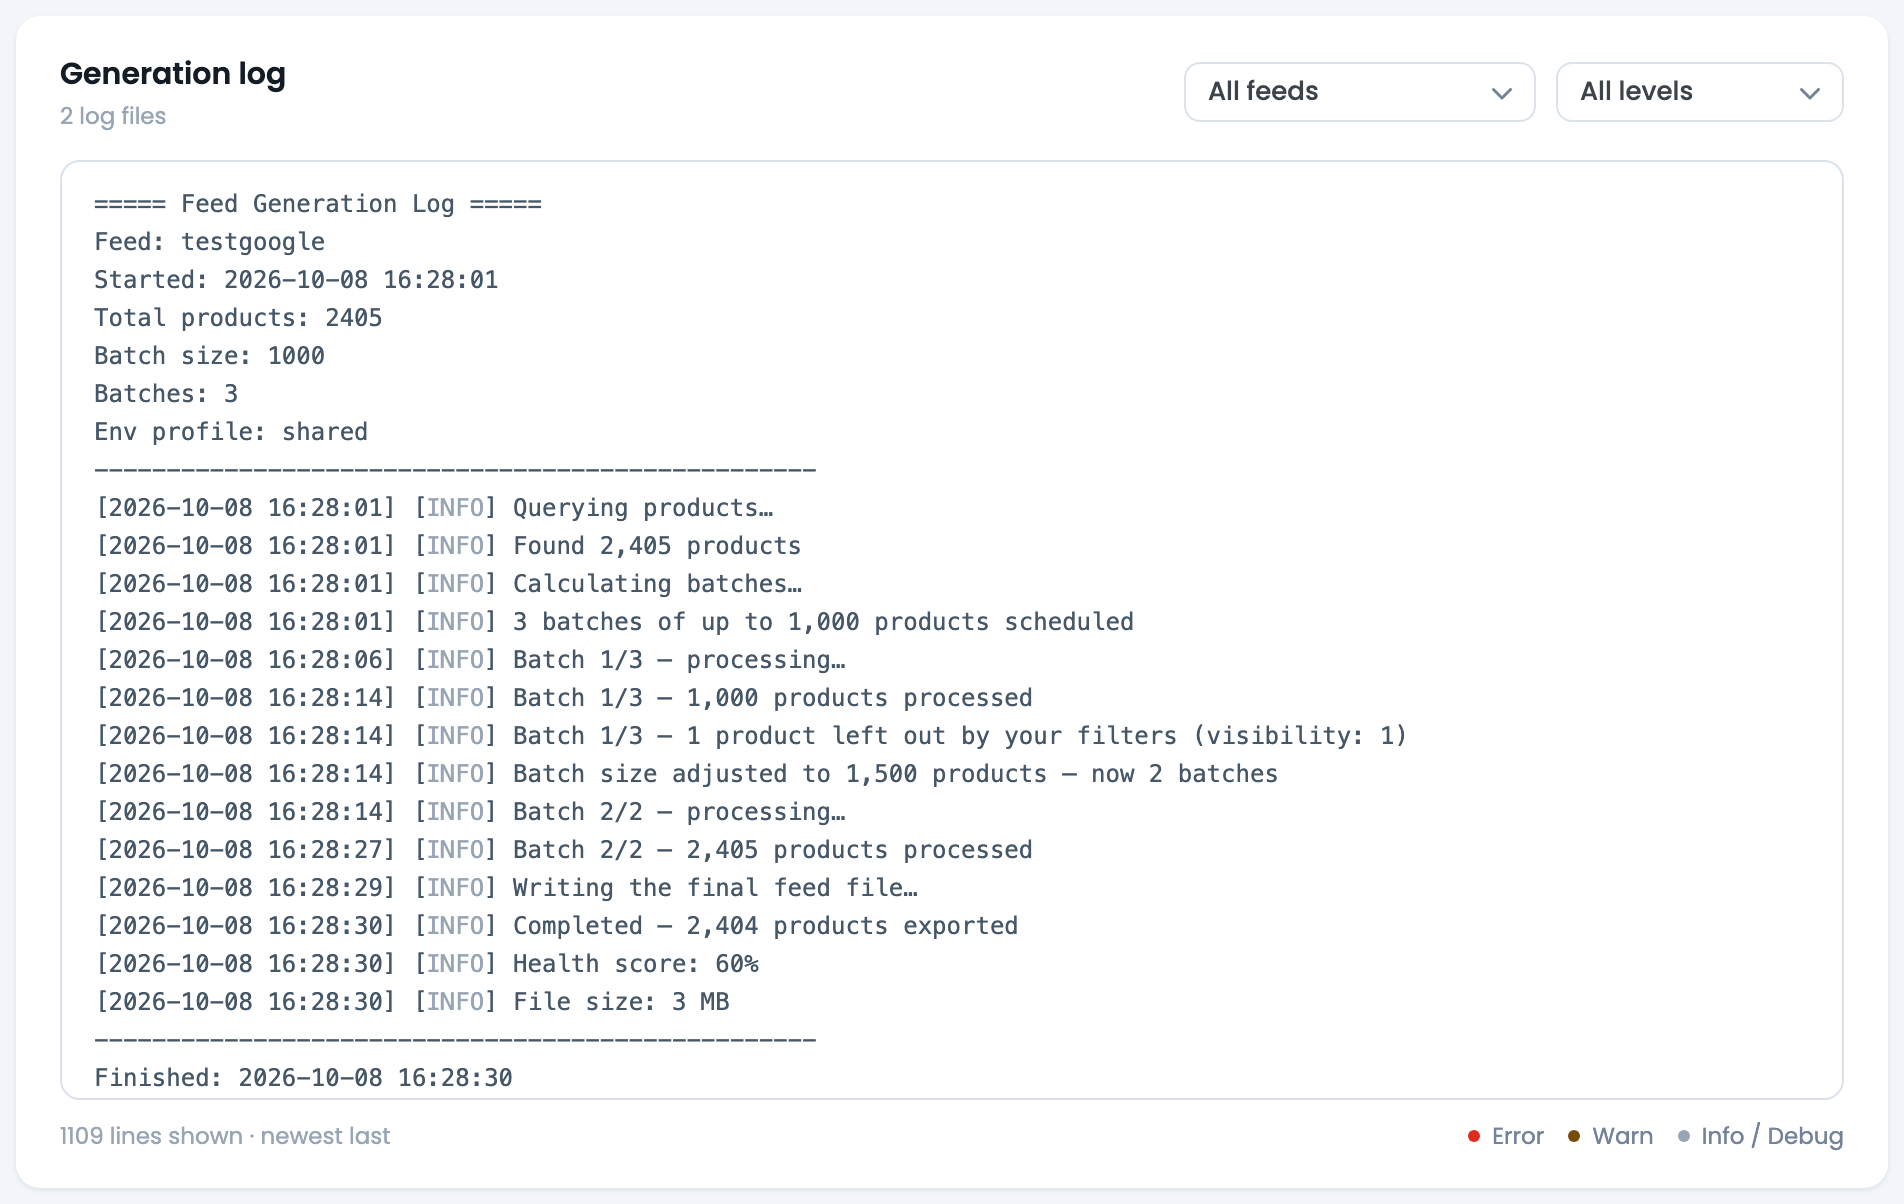
Start with the Error level to jump straight to failures, then widen to Warn for the softer issues (a product skipped for an empty price or missing image, for example).
Step 4: Download the log
To save the log — usually to attach to a support request — you have two convenient options.
From the Settings page (everything in one file):
- Go to CTX Feed → System → Settings → Diagnostics.
- Click Download log. Your browser saves a plain-text file named
ctx-feed-log.txtwith up to 256 KB of log data, most recently updated logs first (older lines are cut off and marked…(truncated)). If nothing has been logged yet, CTX Feed says “No log data to download.”
From the Manage Feeds list (one feed’s log):
- On CTX Feed → Manage Feeds, open the ⋮ (more actions) menu on the feed’s row.
- Choose Download Log to save that feed’s generation log.
- If CTX Feed says “No log yet for this feed — regenerate it to produce one.”, the feed simply has not been generated since the log system was installed — regenerate it once and download again.
Where the log files live
CTX Feed writes its log files to your WordPress uploads directory, under:
/wp-content/uploads/woo-feed/logs-<random letters and numbers>/Since CTX Feed 8.0.33 the folder name ends in a random code that is different on every site, so nobody can guess the address of your logs (older versions used /wp-content/uploads/woo-feed/logs/; the update moves the files over automatically).
There is one file per feed, named after the feed’s slug (for example, google-shopping-us.log) and started over on each run, so it always holds the feed’s latest generation. Alongside them sits ctxfeed-system.log — the system diagnostics trace that Debug logging turns on, capped at 5 MB so it can never grow unbounded. You normally never need to touch these files directly — the Settings download button and the System status Logs tab read them for you — but knowing the location helps if you are inspecting the server over FTP, which is the third way to get the logs.
Deleting a feed also deletes its log file.
PHP error logs (WooCommerce → Status → Logs)
The second kind of log lives outside CTX Feed’s own pages. When the plugin’s code hits an actual PHP error or a fatal crash, it records it through WooCommerce’s logging system:
- Go to WooCommerce → Status → Logs.
- Open the log whose source is
ctxfeed.
Only genuine PHP errors land here — never routine generation chatter — so if this log has entries, something really did break, and it is exactly what the support team will ask for alongside your generation log. If the ctxfeed source is not listed at all, the plugin has not hit any PHP errors.
Step 5: Turn debug logging back off
Once you have captured what you need, return to System → Settings → Diagnostics, switch Debug logging off, and Save changes. The per-feed generation logs keep working as always — you are only switching off the extra diagnostics detail.
If you want to wipe old log data as well, use Clear log data in the same Diagnostics card — it deletes the stored logs so the next run starts with a clean file.
What to look for in a log
A feed’s generation log is plain English, one line per event, and the same lines appear in the log console under the feed’s row while it generates. These are the lines that matter when something is wrong:
Product #123 skipped — <reason>— that one product could not be exported (a value that could not be read, a plugin that failed while resolving it). The rest of the feed continues without it. Search for the product ID if a specific item is missing.Batch 1/3 — 41 products left out by your filters (out_of_stock: 30, category: 11)— products that never reached the file because a filter excluded them, with the filter responsible. If a whole batch is excluded, a warning names the filter that removed everything — that is usually a filter you did not mean to leave on.Batch paused after 250 products in 180s to stay inside the scheduler time limit — continuing with the rest in the next batch— normal on large catalogs: the run hands the remaining products to the next batch rather than risk being cut off. The same line ending inthe site's PHP memory limitmeans the batch stopped early to stay under your memory limit; the feed still completes, it just takes more batches.Batch size adjusted to 120 products — now 9 batches— CTX Feed measured how long the last batch took and resized the next ones. Informational.Product #456 alone took 4s to resolve — worth investigating— one product is far slower than the rest (a huge description, an external call from another plugin). Worth a look if generation is slow.Every product failed — nothing was written, so the previous feed file was kept. Fix the errors above and generate again. (N products attempted)— every product hit an error, so CTX Feed did not publish an empty file over your good feed. (For a feed that has never generated, the line says there is no previous feed to fall back on.) The feed shows Failed on Manage Feeds and your channels keep receiving the previous file. The lines above it name the error; the usual causes are a plugin fatal during the run or a PHP limit.The feed file could not be written completely (the server disk or storage quota may be full) — the previous feed file was kept. Free up space and generate again.— the server ran out of space while writing; your previous file stays live.This run found 0 products, so the previous feed file was kept and "Last updated" was not changed.(CTX Feed 8.0.33 and later) — the feed’s filters excluded everything or no products are published. Check the filters, then regenerate.Completed — 91 products exported— the closing line counts the products actually written to the file. If that number is lower than your catalog, the skipped and filtered lines above explain the difference.
With Debug logging on, ctxfeed-system.log adds the internal trace behind these lines: per-batch timing broken down by stage, query counts, and notes such as Cache priming stopped early to stay inside the memory budget on memory-tight servers. Support may ask for it; you rarely need to read it yourself.
When a run stops partway with no closing line, open WooCommerce → Status → Logs (source ctxfeed) — a fatal PHP error recorded at the same time is the reason, and its message names the plugin or limit involved.
Debug mode vs. WordPress debug mode
CTX Feed’s debug logging is separate from WordPress core’s WP_DEBUG constant. CTX Feed’s toggle only affects CTX Feed’s own generation logs, and together with the ctxfeed log under WooCommerce → Status → Logs it covers everything feed-related. WordPress WP_DEBUG (set in wp-config.php) logs PHP-level notices and errors across the whole site to wp-content/debug.log; enable it only if support asks you to capture a site-wide problem that neither CTX Feed log explains.
Related guides
- Manage Feeds
- Introduction to CTX Feed plugin settings
- How to create a WooCommerce product feed
- How to set up cron for automatic feed updates
