Dynamically Add Gender to Google Product Feed
The gender attribute is required by Google Merchant Center for all products in the Apparel & Accessories category. Google only accepts three specific values — male, female, or unisex. If your WooCommerce store uses different labels (like “Men”, “Women”, “Boys”, “Girls”), you’ll need to map them to the accepted values.
Dynamic Attributes handle this automatically — no product editing required. You define the mapping once, and CTX Feed applies it every time the feed is generated.
📋 Google’s Gender RequirementRequired for all Apparel products. Sending unlisted values like “Men” or “Women” will cause product disapprovals in Merchant Center. Only male, female, and unisex are accepted. Google’s official gender attribute spec
Google’s Accepted Values
Regardless of how your store labels gender, the feed must output one of these three exact values:
- Male For men & boys Map from:
MenmenManBoysMale
- Female For women & girls Map from:
WomenwomenWomanGirlsFemale
- Unisex For both / all Map from:
UnisexAllBothKids
💡 Check Your Exact Labels First Go to Products → Attributes → Gender (or whichever attribute you use) in WordPress and note the exact spelling of each value. The condition match is case-sensitive —
menwill not matchMen.
Condition Mapping Reference
Use this as your reference when building conditions. Add one row per store label.
| Your Store Value (Condition) | Google Output (Text) |
|---|---|
| Men → | male |
| men → | male |
| Boys → | male |
| Women → | female |
| women → | female |
| Girls → | female |
| Unisex → | unisex |
| Kids → | unisex |
How to Set Up Gender to Google Product Feed with CTX Feed?
📋 Before You Start: This uses Dynamic Attributes. If you haven’t created one before, read the How to Configure a Dynamic Attribute guide first.
Step 1: Go to CTX Feed → Dynamic Attributes → Add New
Give it a descriptive name, e.g. “Google Gender Mapping”.
Step 2: Add the first condition: e.g. Gender = “Men”
Set Product Attribute to your gender attribute (e.g. Gender or Pa_gender), Condition to contain, and Value to Men. Set Output Type to Pattern and Output Value to male.
Step 3: Click “Add Condition” and repeat for each gender label
Add one condition for every gender label used in your store. Refer to the mapping table above. Remember — conditions are case-sensitive, so add a separate row for each spelling variant (e.g. “Men” and “men” are different conditions).
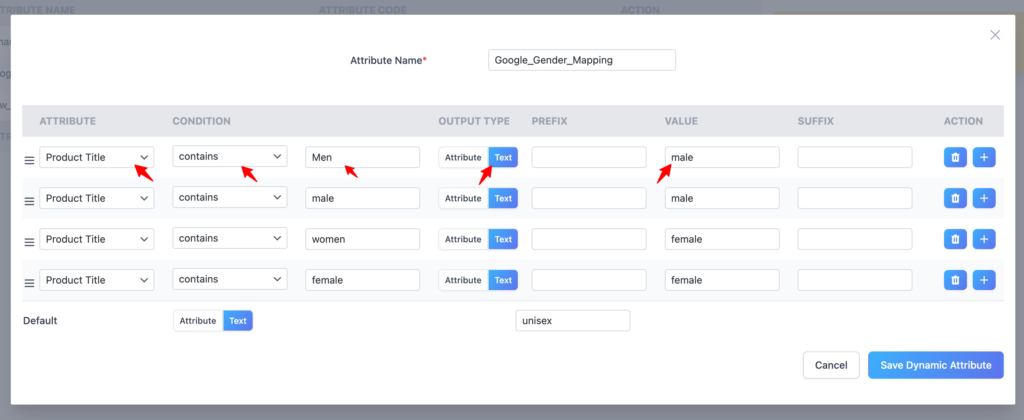
Step 4: Set a Default Value (optional)
Scroll to the bottom and set a fallback value. If most of your unmatched products are gender-neutral, enter unisex as the default. Products that don’t match any condition will use this value.
Step 5: Save the dynamic attribute — then Clear Cache
Click Save to store the attribute.
⚠️ Clear the Cache After Saving Go to CTX Feed → Manage Feed and click Clear Cache. Without this step your new dynamic attribute will not appear in the feed attribute dropdown — even after saving.
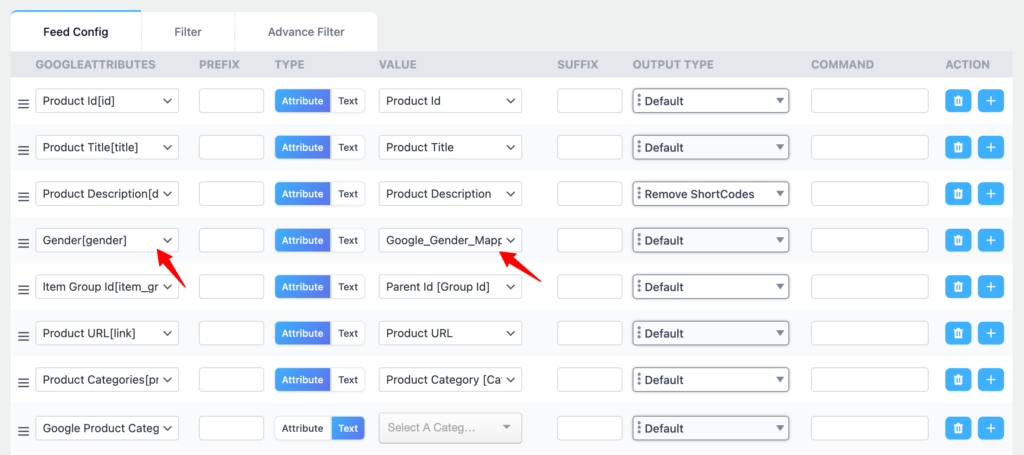
Step 6: Map it to the Gender field in your Google feed
Open your feed in CTX Feed → Make Feed. Find the Gender attribute row, open the Store Attribute dropdown, and select your new dynamic attribute from the Dynamic Attributes group.
✅ Result Your Google Shopping feed will now send male, female, or unisex for each product based on your WooCommerce attribute values. Store data stays unchanged — only the feed output is transformed.
💡 Same approach for Age GroupThe age_group attribute works identically. Google accepts only:
newborn,infant,toddler,kids, andadult. If your store uses different labels, create a second dynamic attribute using the same method and map it to the Age Group field in your feed. Google’s official age_group spec

