Google Merchant Center and most other shopping channels use unique product identifiers — GTIN, MPN, UPC, EAN, and ISBN — to match your products against the same items in their global catalog. Getting them right improves how often your products show, unlocks richer placements, and keeps items from being disapproved for “missing identifiers.” This guide shows how to store these values on your WooCommerce products with CTX Feed and then map them into your feed. No coding required, and every step works in the free version.
What each identifier is
Here is what each identifier means:
- GTIN (Global Trade Item Number) — the barcode number printed on retail packaging. It is the umbrella term that covers UPC, EAN, JAN, and ISBN.
- UPC — the 12-digit barcode used mainly in North America. A UPC is a GTIN, so you store it in the GTIN field.
- EAN — the 13-digit barcode used mainly in Europe. Also a GTIN; you can store it in the GTIN field, or use the dedicated EAN field if you prefer to keep it separate.
- MPN (Manufacturer Part Number) — the code the manufacturer assigns to a product. Use it for products that have no barcode (custom or handmade goods).
- ISBN — the identifier for books. Books use ISBN as their GTIN.
Google’s rule of thumb: send GTIN whenever the product has a barcode. For products without one, send brand + MPN instead.
Quickest option: WooCommerce’s own GTIN field
WooCommerce 9.2 and later has one built-in identifier field, GTIN, UPC, EAN, or ISBN, on the product’s Inventory tab (and in each variation). If you already fill it in, you don’t need CTX Feed’s fields for the barcode:
- On the Config tab of your feed, click Add attribute and choose the channel’s GTIN attribute.
- Keep Source on Attribute and pick GTIN, UPC, EAN, or ISBN from the Primary Attributes group of the Value dropdown.
- Save and regenerate.
A variation with an empty field uses its parent product’s value. For MPN, or to keep EAN and ISBN in separate fields, use CTX Feed’s identifier fields below.
Step 1: Turn the identifier fields on
The identifier fields are hidden until you enable them, so your product screens stay uncluttered.
- In your WordPress dashboard, open CTX Feed, then go to System → Settings.
- Scroll to the Product attributes card and find the Product identifiers group.
- Toggle on the identifiers you plan to use — GTIN, MPN, EAN, and ISBN. (Brand is here too; it works a little differently — see How to add brand plugin data into your feed.)
- Click Save changes at the top of the page.
Leaving fields you never use switched off keeps both the product editor and the feed attribute dropdowns short and focused.
Step 2: Enter identifier values on your products
Once the fields are enabled, CTX Feed adds a CUSTOM FIELDS by CTX Feed section to the product editor.
- Open a product in Products → All Products and click to edit it.
- In the Product data panel, click the Inventory tab. The CUSTOM FIELDS by CTX Feed section appears with a text box for each identifier you enabled.
- Type the product’s real GTIN, MPN, EAN, or ISBN into the matching box. Put a UPC in the GTIN box.
- Update the product to save.
For variable products, each variation can carry its own identifiers — a barcode usually differs per size or color. Expand a variation under the Variations tab and you will find the same CUSTOM FIELDS by CTX Feed inputs inside that variation’s panel. Fill in each variation and save.
A few accuracy tips that keep Google happy:
- Enter the number exactly as printed, digits only — no spaces or dashes.
- A valid GTIN is 8, 12, 13, or 14 digits and has a correct check digit. Never invent one; a wrong GTIN causes disapprovals.
- Do not reuse one product’s identifier on another product.
Step 3: Map the identifiers into your feed
Storing the values is half the job — you also tell CTX Feed which feed column each one fills. This happens on the Make Feed screen.
- Go to CTX Feed → Make Feed (or open an existing feed from Manage Feeds and choose Edit Feed).
- Pick your channel template (for example, Google Shopping) in the feed settings.
- Stay on the Config tab. It shows a mapping table with Channel attribute, Source, Value and Output columns.
- Add a row for each identifier: click Add attribute and pick the channel attribute. Google lists them as GTIN, MPN and Manufacturer (brand). The Google template already has an MPN row (set to the product SKU) and a Manufacturer row; it has no GTIN row, so add that one.
- Leave the Source toggle on Attribute, then open the Value dropdown, scroll to the Custom Fields by CTX Feed group, and choose the matching field — GTIN, MPN, EAN or ISBN.
- Click Save & generate to save and regenerate.
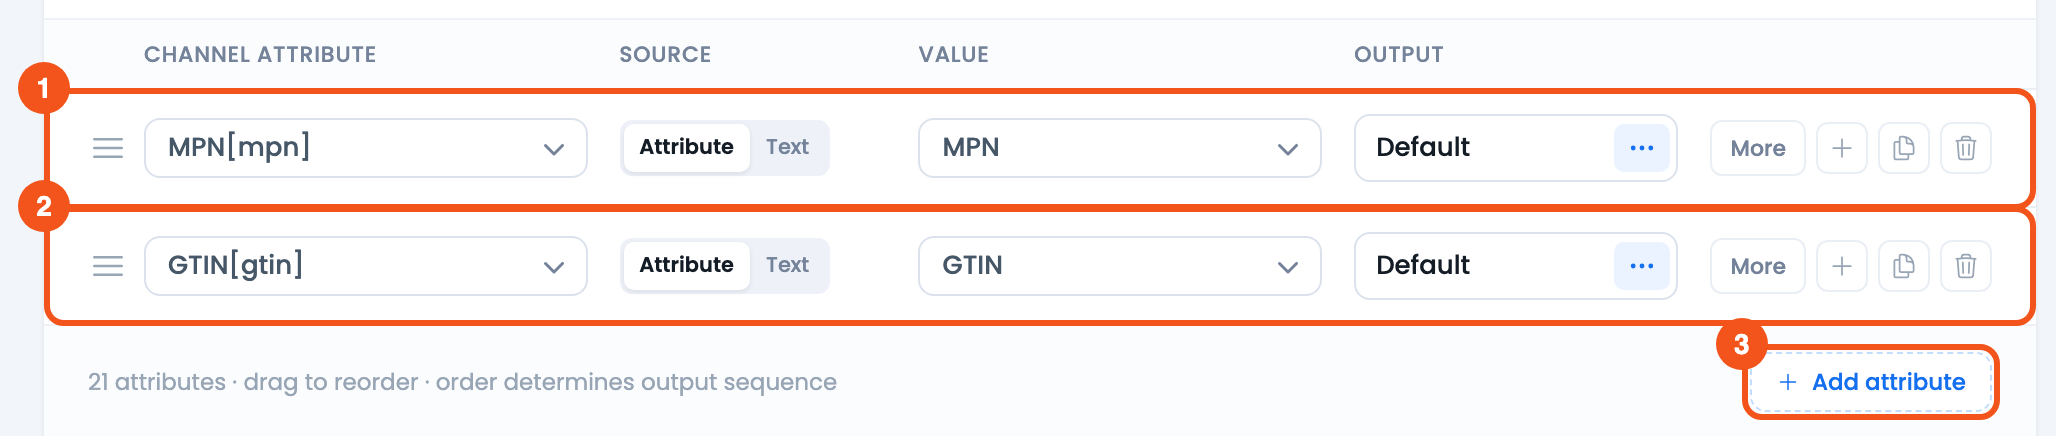
- The MPN row, switched from the SKU to the CTX Feed MPN field.
- The GTIN row, added with Add attribute and set to the CTX Feed GTIN field.
- Add attribute — adds another identifier row.
About the “identifier exists” attribute
Google also reads a identifier_exists attribute. Set it to no only for products that genuinely have no GTIN, MPN, or brand (such as one-of-a-kind handmade items) — that tells Google to stop expecting identifiers for them. For Google Shopping, Facebook, Bing, Pinterest and Perplexity feeds, CTX Feed adds this attribute automatically: it reports yes when the product has at least one identifier in the feed (GTIN, MPN, brand, SKU and the like), so you rarely have to touch it.
Other places identifiers can come from
If your identifiers already live somewhere else, you do not have to re-enter them:
- Yoast WooCommerce SEO (the WooCommerce add-on) exposes GTIN8, GTIN12 / UPC, GTIN13 / EAN, GTIN14 / ITF-14, ISBN and MPN. They appear in the Value dropdown’s Yoast SEO group, labelled [Yoast SEO].
- Rank Math Pro adds GTIN [RankMath Pro SEO].
- Germanized for WooCommerce adds GTIN and MPN to the Unit Price (CTX Feed) group.
- Any other custom field / meta key is listed in the Custom Fields & Post Metas group, so you can map it directly. To pick between several fields with rules, use a dynamic attribute — dynamic attributes require CTX Feed Pro.
Troubleshooting
- The identifier field is missing on the product screen. Enable it under System → Settings → Product attributes → Product identifiers and save, then reload the product editor. The fields sit on the Inventory tab.
- The value is blank in the generated feed. If you use WooCommerce’s own GTIN, UPC, EAN, or ISBN field, map that value instead of the CTX Feed field. Otherwise confirm the product actually has a value saved, and that the feed row’s Value dropdown points at the Custom Fields by CTX Feed field (not a different attribute). Then regenerate the feed.
- Google reports “invalid GTIN.” The number has a bad check digit or wrong length. Re-check it against the printed barcode; remove any leading/trailing spaces.
- Variations show no identifier. Variation identifiers are entered per variation, not on the parent — expand each variation and fill its own field.
Related guides
- How to add brand plugin data into your feed
- How to add a custom value to an attribute using pattern
- How to use commands to format attribute output
