
How to Add Apple Pay to WooCommerce? Two Easy Methods
You can add Apple Pay to WooCommerce using either WooCommerce Payments or Stripe Payment Gateway. Both methods let your customers check out quickly and securely using Apple Pay on supported Apple devices.
Apple Pay allows customers to make secure, one-touch payments using their Apple devices, speeding up the checkout process and reducing cart abandonment rates.
As a result, last year (2024) more than half (54.8%) of U.S. mobile payment platform users chose Apple Pay!
So, integrating Apple Pay to your WooCommerce store can significantly boost your conversions and make your customers feel more confident about their purchases.

That’s why in this guide, we’ll walk you through the easiest ways to integrate Apple Pay into your WooCommerce store and step-by-step guides on how to optimize it for seamless transactions.
Let’s get right into it!
Method 1. Using Stripe Payment Gateway
Stripe is one of the most popular payment gateways for WooCommerce, and it comes with built-in support for Apple Pay without requiring any additional cost.
With Stripe, you can easily enable Apple Pay to offer fast, secure, and seamless payments to your customers.
Whether they’re shopping on their iPhone, iPad, or Mac, Stripe ensures a smooth Apple Pay integration with minimal setup effort
Here’s how you can add Apple Pay to your WooCommerce store using the Stripe Payment Gateway:
Step 1: Open a Stripe Account
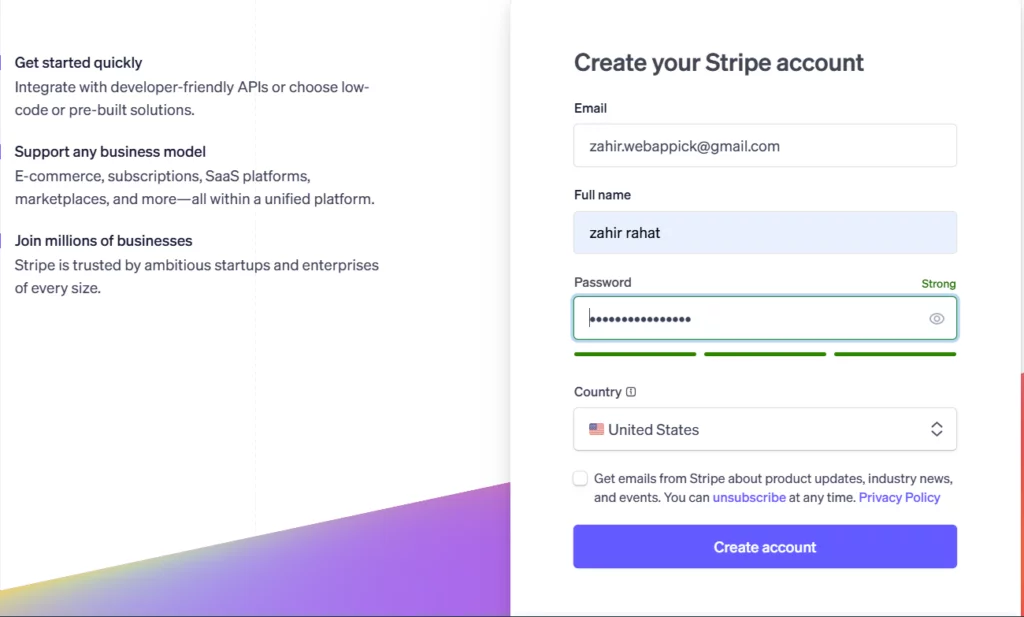
If you don’t already have a Stripe account, you can easily create one. To do this, you’ll have to visit their website, provide your email address, and click on “Start Now”.

On the next page, provide your name, select a password, choose your desired country, and click on the button below to create your account. Check your inbox for the verification email, and click on the button.
Step 2: Install and Activate Stripe for WooCommerce
The next step is to install and activate the plugin required to connect your WooCommerce store to Stripe.
To do this, go to Plugins → Add New Plugin in your WordPress dashboard and search for WooCommerce Stripe Payment Gateway on the search bar.
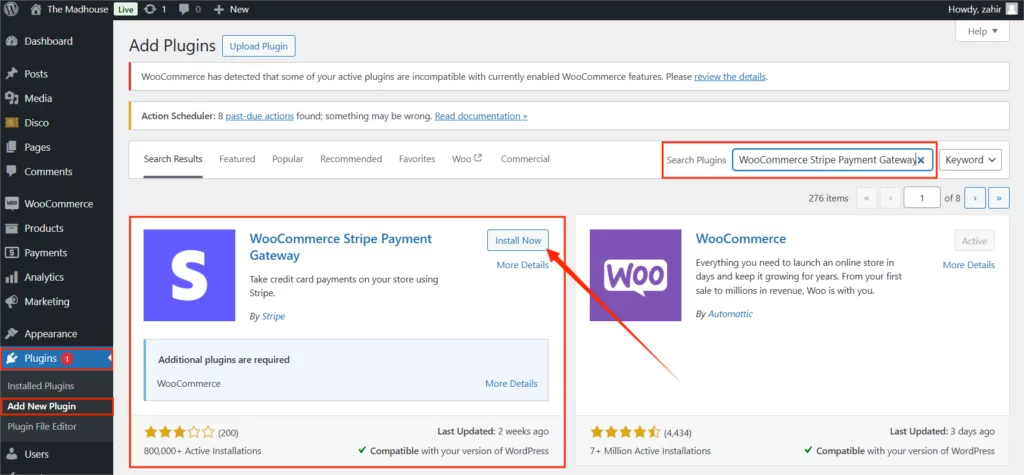
When the plugin appears click to Install and activate the plugin.
Step 3: Configure Stripe in WooCommerce
Now, you’ll need to connect your Stripe account to your WooCommerce store and configure the settings. Go to WooCommerce → Settings.
Under the payment tab, you’ll see a list of payment options. Click on the button next to Stripe to enable it.
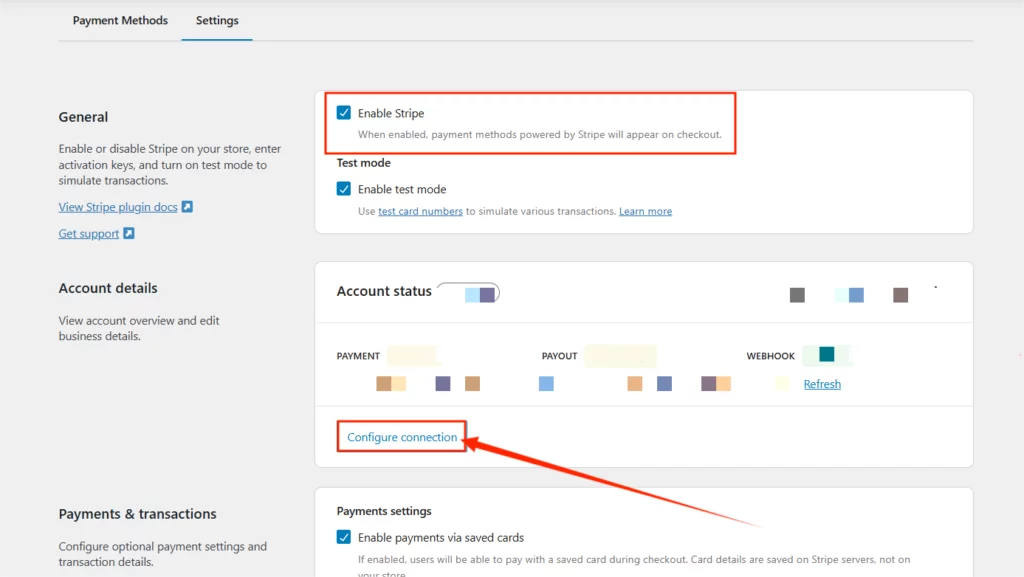
On the next page, you’ll get a prompt to connect your existing Stripe account to your WooCommerce store or create a new one.
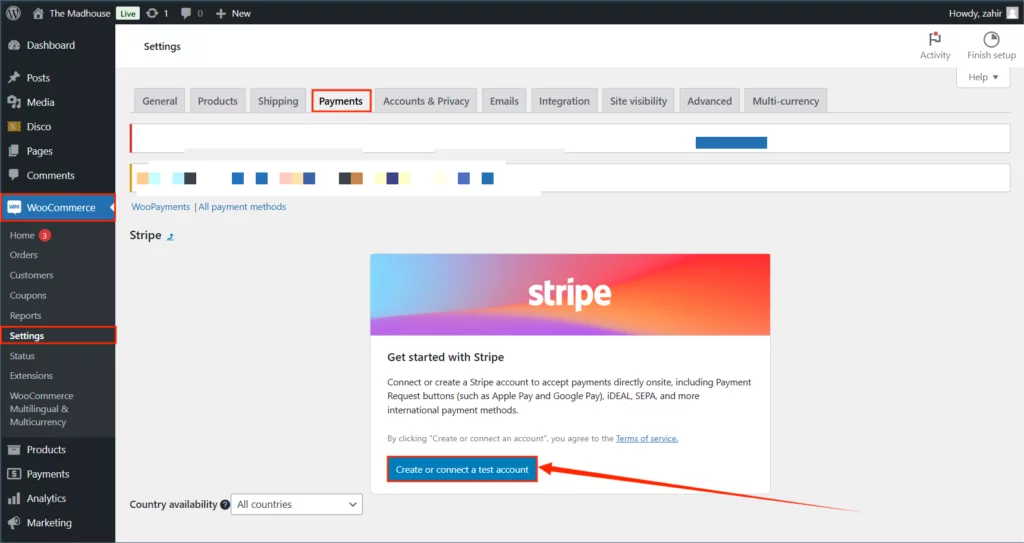
Click on the button to proceed and set up two factor authentication from the next page. You can also skip this for now, as you’ll be able to configure it later.
From the settings tab, enable Stripe. In the Account Status tab, enter your Stripe API keys, which you can find in your Stripe Dashboard. Once your store is successfully connected to Stripe, click on the “Save Changes” button below.
Step 4: Enable Apple Pay in Stripe
Next, we move onto enabling Apple Pay from your Stripe dashboard. To do this, go to Settings → Payments → Payment Methods.
Then scroll down to the “Wallets” section and enable Apple Pay as a payment method.
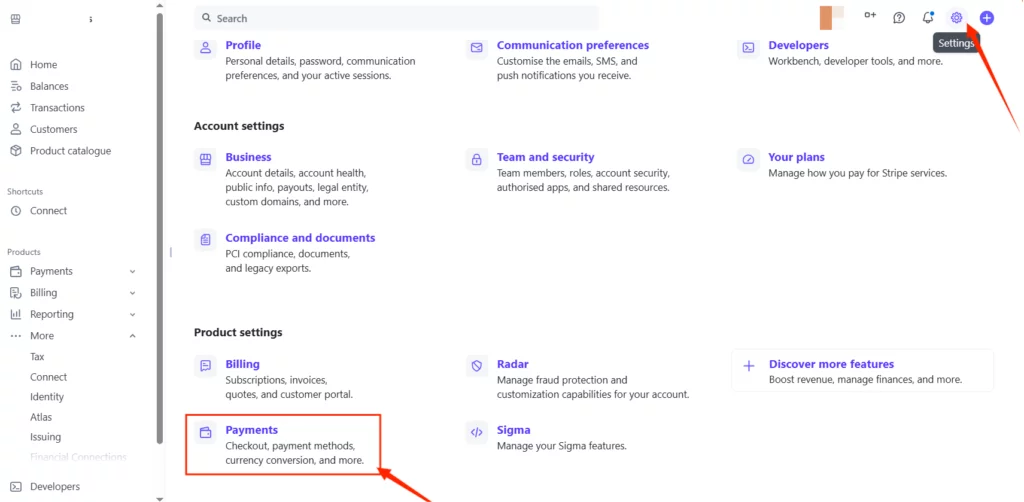
Moving on, you’ll need to add your domain from the “Payment Method Domains” tab. Click on “Add a New Domain”, enter your domain address and click on “Save”.

Stripe will ask you to upload the domain association file and iOS certificate.
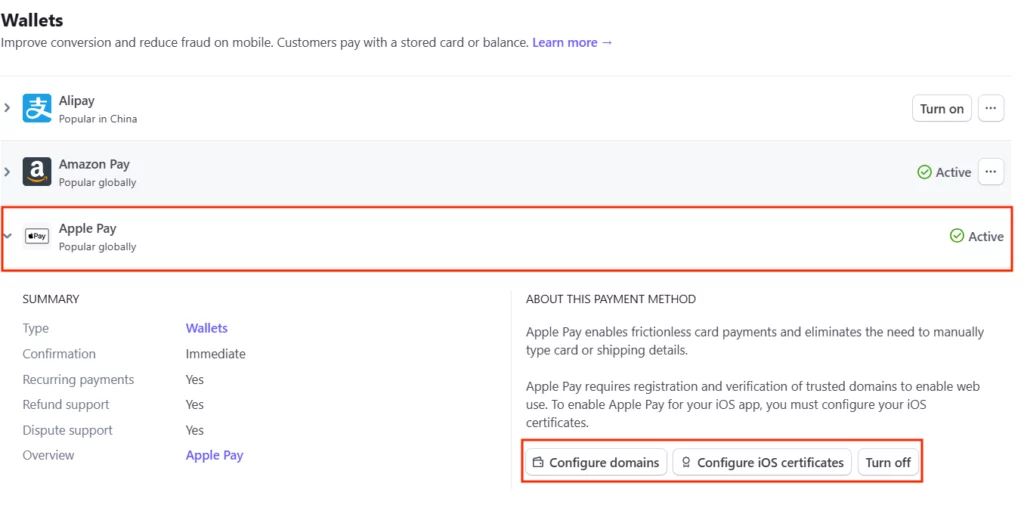
Once you’ve provided the info, Stripe will verify and activate your domain to receive payments from Apple Pay.
Step 5: Test Apple Pay
Lastly, you’ll need to check if the payment method has been activated or not. Simply Use an Apple device to visit your store and test Apple Pay at checkout.
Method 2. Using WooCommerce Payments
WooCommerce Payments is a native payment solution that also supports Apple Pay. You don’t need to install any third party plugins to do that if you’re opening a new online store.
If you already have an established online store, you’ll also be able to use this plugin. Just got to Plugins → Add New Plugin, search for WooCommerce Payments, and click to install and activate the plugin.
This plugin comes built-in with the WooCommerce plugin, and can help streamline your payment integration with Apple Pay. Here’s how to add Apple Pay to your WooCommerce store using WooCommerce Payments:
Step 1: Set Up WooCommerce Payments
Navigate to WooCommerce → Payments and follow the setup wizard. However, you’ll need a WordPress.com account to activate this plugin. Link your WooCommerce store to a WordPress.com account.
Step 2: Enable Apple Pay
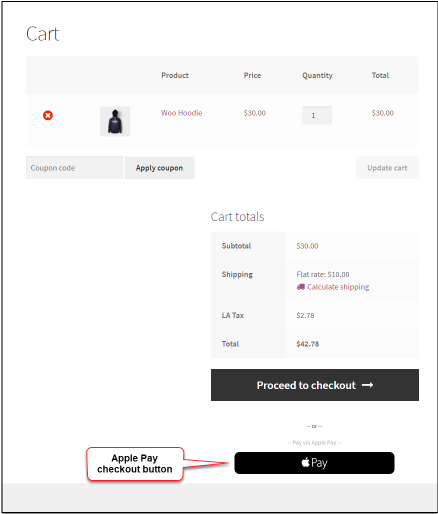
In the Payments Settings, enable Payment Request Buttons to activate Apple Pay. You can also customize the display settings for Apple Pay, such as where the button appears (e.g., product pages, cart page, checkout).
Step 3: Verify Apple Pay Functionality
Finally, use an Apple device to ensure Apple Pay is visible and functional during checkout.
Pro Tips for Adding Apple Pay to WooCommerce
Adding Apple Pay to your WooCommerce store is just the first step. Making the most of it is where the real growth begins.
For those who want to maximize the impact of Apple Pay on their store’s sales, improve customer satisfaction, and create a seamless shopping experience, we’re sharing a few Pro tips.

So, let’s explore a handful expert advice to help you unlock the full potential of Apple Pay and take your WooCommerce store to the next level:
- Ensure your store is fully responsive for mobile users, as most Apple Pay transactions happen on mobile devices.
- Highlight Apple Pay as a payment option on your homepage, product pages, checkout pages, and promotional campaigns to attract more customers.
- Display the Apple Pay logo prominently on your store to build trust and encourage usage.
- Test Apple Pay on multiple Apple devices (iPhone, iPad, Mac) to ensure compatibility and functionality.
- Enable other wallets like Google Pay to offer a wide range of payment options, catering to more customers.
Over to You
Adding Apple Pay to your WooCommerce store is a simple yet powerful way to enhance the checkout experience, boost conversions, and meet the expectations of today’s mobile-savvy shoppers.
This smart move can streamline your payments through one-touch transactions, safeguard your data with Apple’s advanced encryption, add convenience in your customer’s shopping experience, and ultimately foster seamless business growth.
Ready to deliver a frictionless checkout experience? Start integrating Apple Pay into your WooCommerce store today and give your customers the convenience they deserve!
Looking for more ways to optimize your WooCommerce store? Explore our blog for expert guides and strategies to grow your eCommerce business.
