
How to Sync Product Attributes to Form Fields In WooCommerce? 3 Easy Ways
Syncing product attributes to WooCommerce form fields can streamline your store management and improve the customer experience. Using WooCommerce’s built-in attributes, plugins, or custom code, you can easily map product details to forms for efficient data collection and display.
This allows customers to easily select or input product options based on defined attributes, reducing errors during order fulfillment and providing a seamless and personalized shopping experience.
Let’s say you’re selling clothing items with size and color options, or products that require additional input from the customer (like engraving text or custom dimensions).
In cases like this, syncing product attributes with form fields ensures accurate order processing and a smoother workflow.
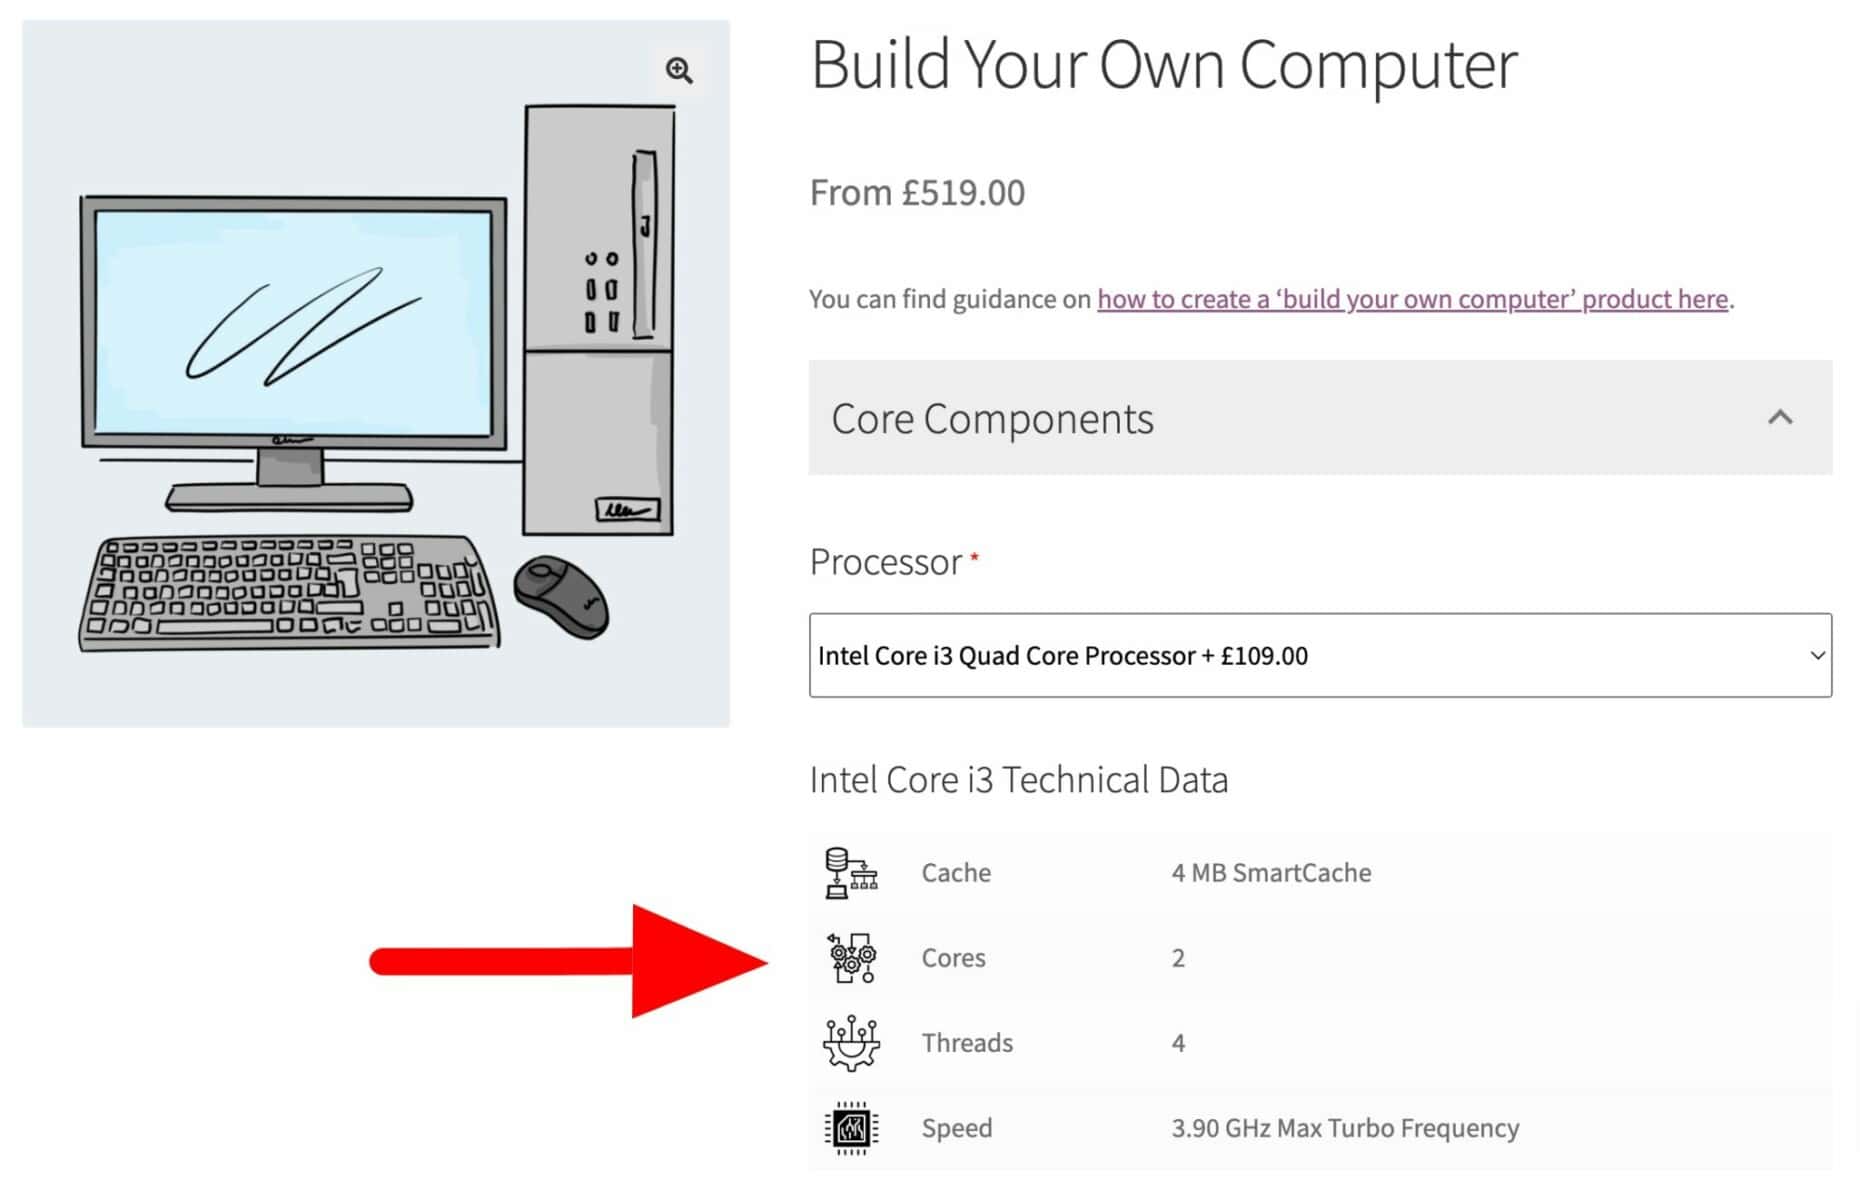
In this guide, we’ll explore how to sync product attributes to form fields in WooCommerce. We’ll discuss three proven methods, including built-in WooCommerce functionality, plugins, and custom code.
So, let’s get right into it:
Method 1: Using a Plugin for Custom Form Fields in WooCommerce
If you need to capture complex input from your customers, such as text fields, checkboxes, or file uploads, you can use a dedicated WooCommerce plugin that automatically syncs custom form fields with product attributes.
These plugins streamline inventory and store management for your WooCommerce store. They offer features like custom form elements, conditional logic, price adjustments, and real-time updates to ensure your product data stays consistent across all platforms.
There are many plugins in the market that can effortlessly sync product attributes to form fields In WooCommerce. Here’s the top plugins our experts recommend:
| Name | Key Features | Price |
|---|---|---|
| Advanced Product Fields (Product Addons) for WooCommerce | Add extra product options (text fields, checkboxes, dropdowns), Conditional logic, Price adjustments | Free |
| WooCommerce API Product Sync | Sync custom fields and attributes with supplier APIs, Real-time updates, Advanced authentication support | $499/year |
| WooCommerce Product Sync Pro | Sync products between multiple WooCommerce stores, Supports product attributes and custom fields | $99/site |
| Products and Orders Sync for WooCommerce | Sync products and orders across multiple WooCommerce stores, Supports product variations and categories | $3.25/month |
For our guide today, we’ll explore how you can sync your product attributes to form fields in WooCommerce using one of the most widely used plugins named, “Advanced Product Fields (Product Addons) for WooCommerce”.
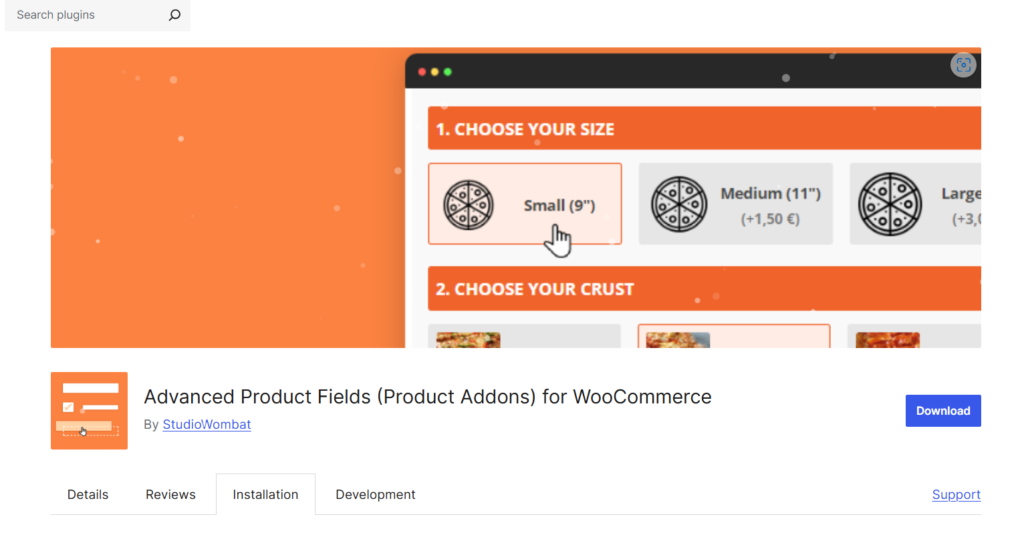
Here’s how to sync your product attributes to form fields in just a few steps:
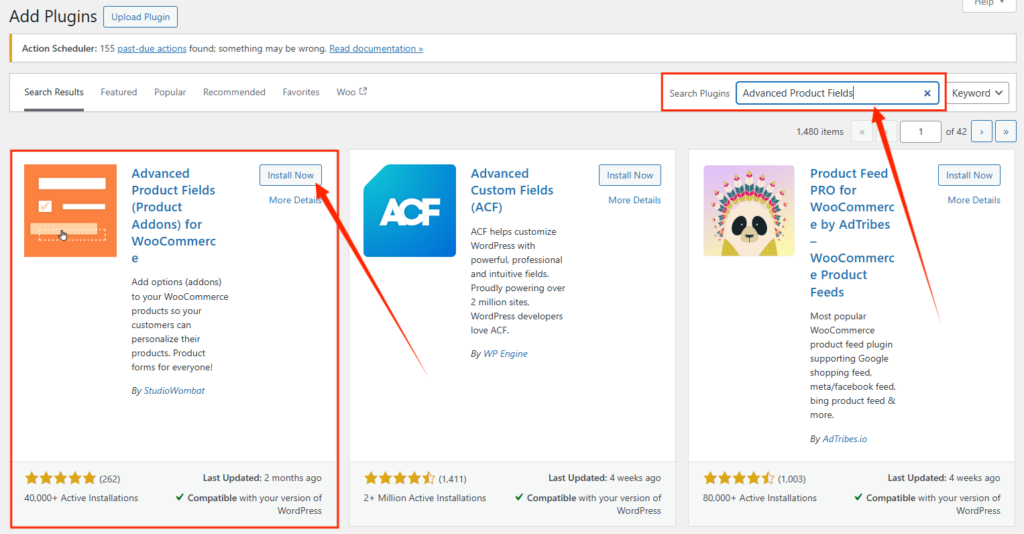
- Go to Plugins → Add New Plugin from your WP dashboard and search for Advanced Product Fields (Product Addons).
- Once the plugin appears, click to Install and Activate the plugin.
- Navigate to WooCommerce → Product Fields from your side menu bar. You can also add form fields for individual product menus. Just select the product you want to edit and go to “Custom Fields”.
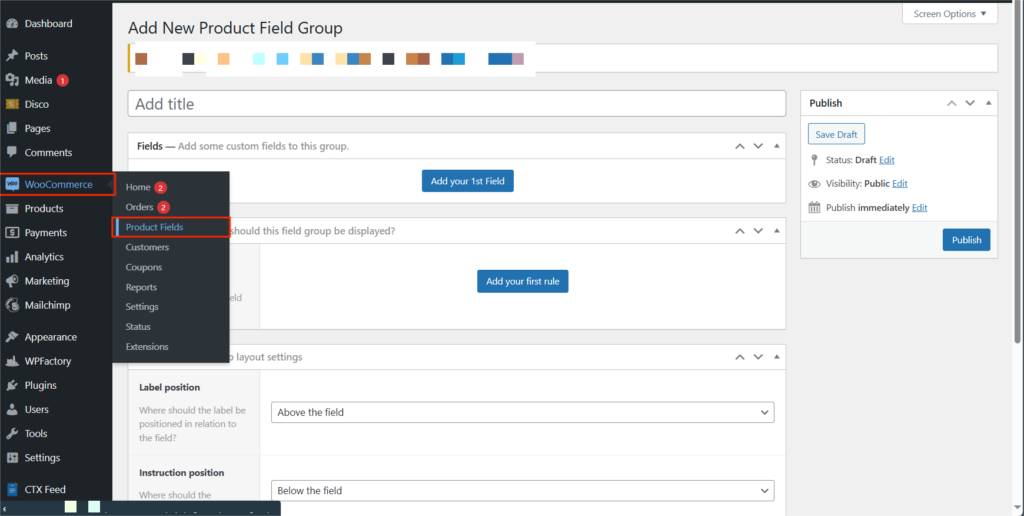
- Click on the “Add New” button to create a new Product Field Groups.

- Give your form field a name and select the type of the input field (i.e. text/number, checkboxes, radio buttons, dropdown).
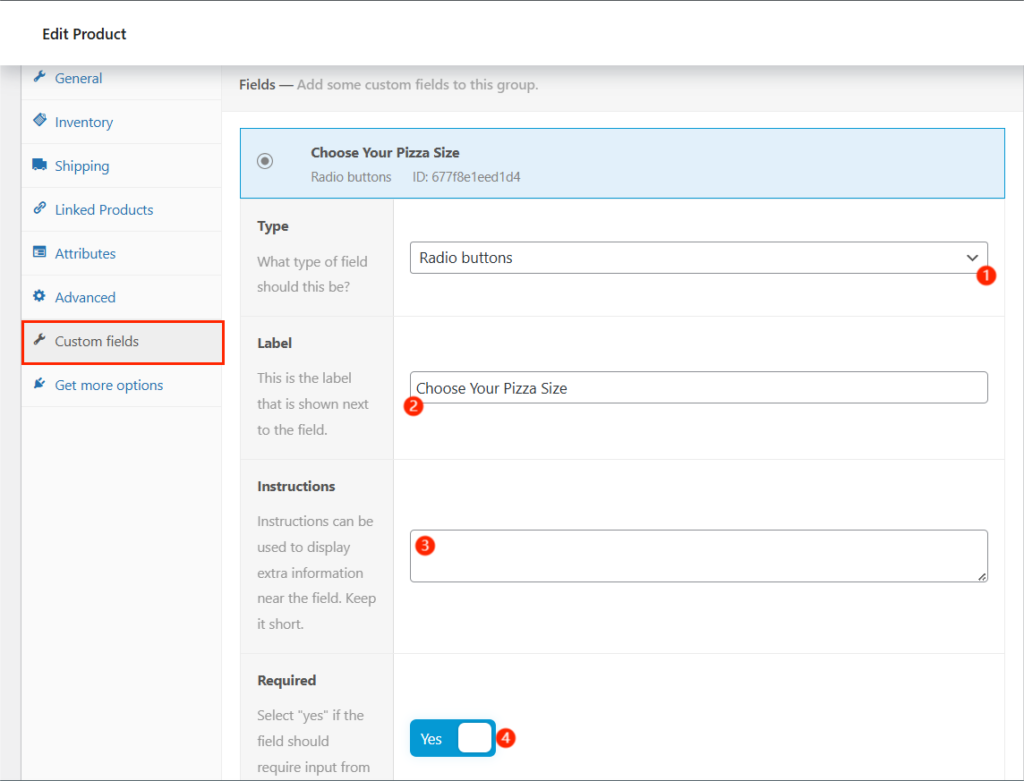
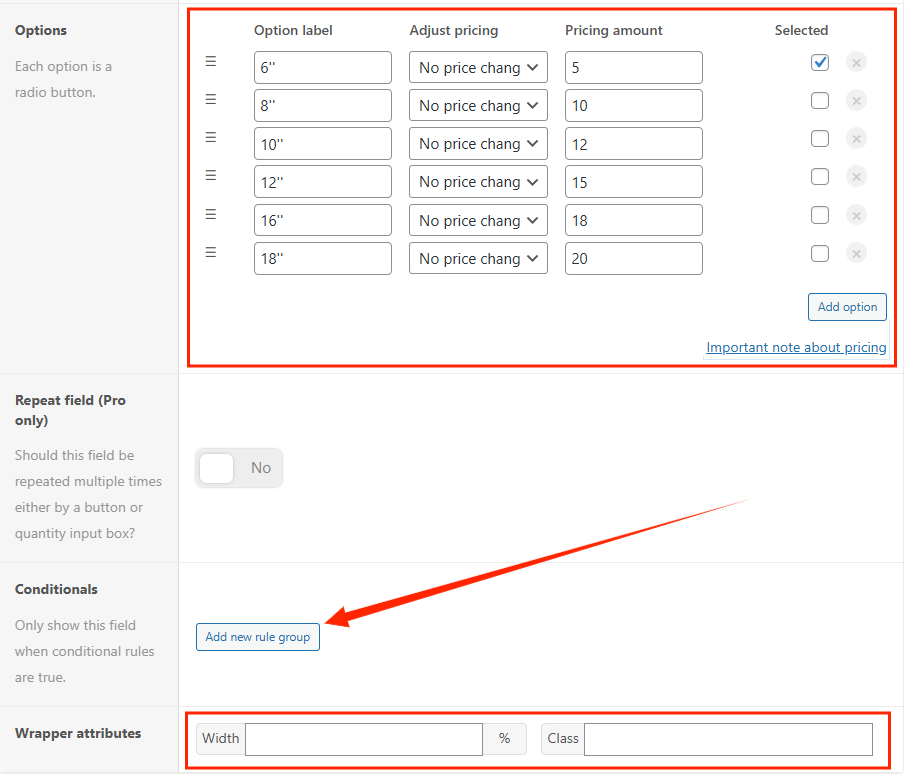
- Write necessary instructions about the field and check the required box in case you require input from the user. Scroll down to set default value, placeholder text, change the price depending on the input, add custom conditions and modify wrapper attributes.
- Once you are happy with the settings click on the “Publish” button and your form field will be visible to your shoppers. Don’t forget to reload your storefront to check the reflection of your changes.
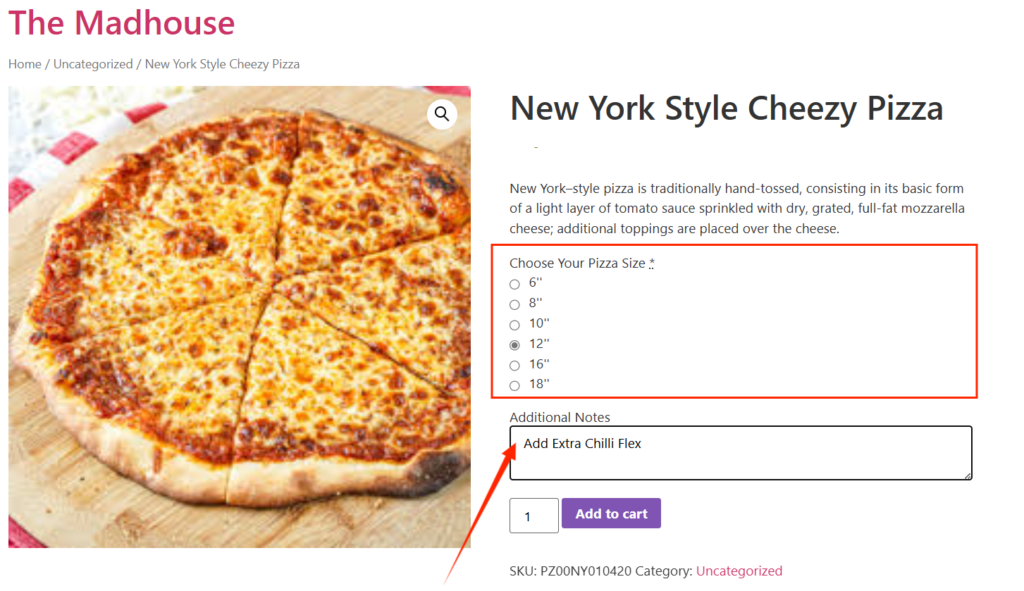
See how easy that was? This dynamic plugin is compatible with both simple and variable products, offering up to 10 different form elements, conditional logic, multilingual support, tax compatibility, and many other Pro features.
Now, let’s move onto the next method, using WooCommerce’s Built-In settings.
Method 2: Using WooCommerce Built-In Variable Product Feature
If your goal is to sync predefined product attributes (like size, color, or material) with dropdowns on the product page, WooCommerce’s variable product feature can handle this without needing additional plugins.
This is how to sync product attributes, to from fields in WooCommerce using the platform’s built in settings:
- Go to Products → All Products from your WordPress dashboard.
- Select and edit the product you want to customize.
- Under the Product Data section, choose Variable Product from the dropdown.
- Add a new attribute (e.g., Size, Color) and click Configure terms to add values (e.g., Small, Medium, Large).
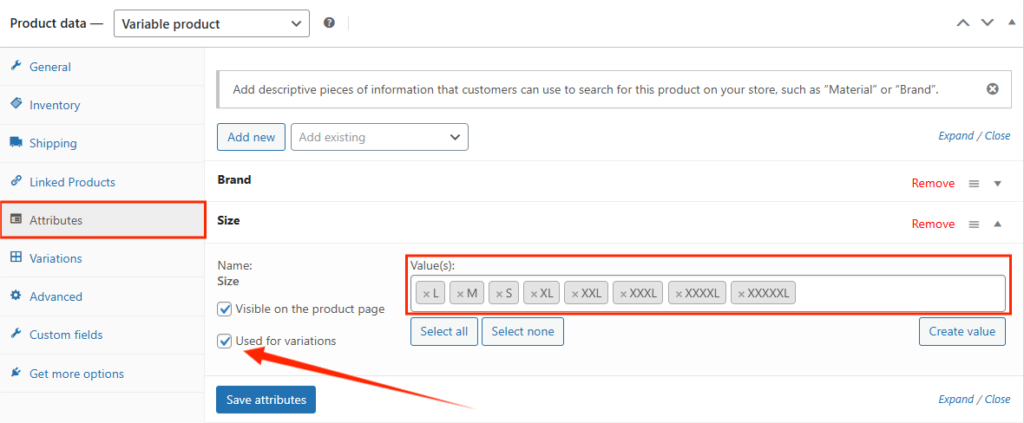
- Go to the Attributes tab and select the attribute you created. Check Used for Variations, then save.
- Go to the Variations tab and click Generate Variations. Thesis will automatically generate variation for each of the attributes you created earlier. You can also manually add variations one by one.
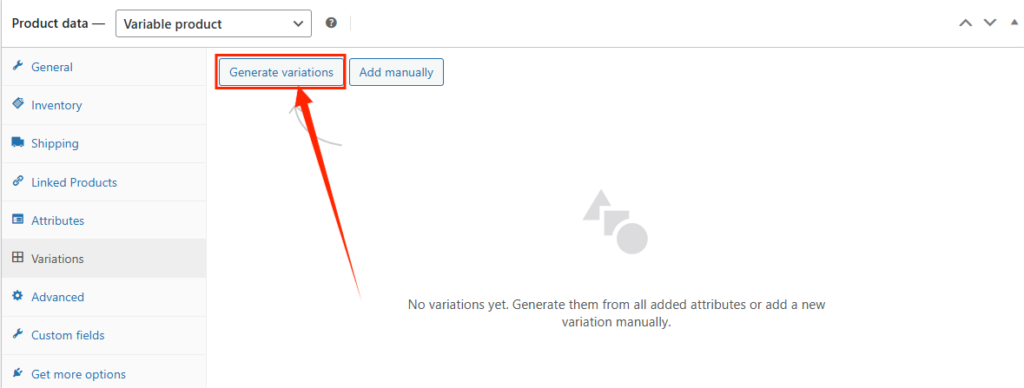
- For each variation, select the attribute values and set prices, stock, and other details.
- Save changes, and the product page will now display form fields (dropdowns) for selecting attributes.
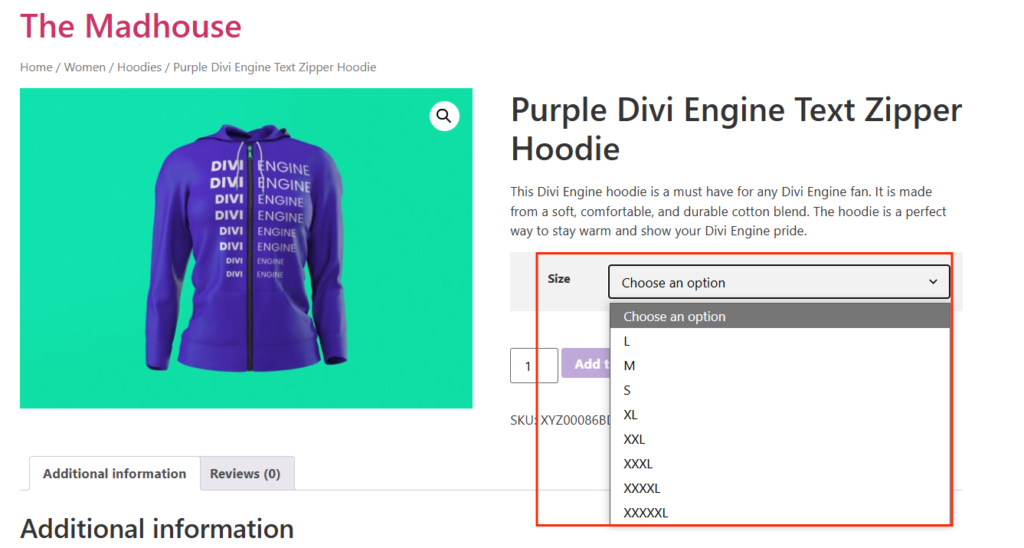
This method is especially helpful for small WooCommerce stores. However, as your WooCommerce store scales, and your inventory gets bigger, manually synching product attributes to form fields can quickly become tedious and error-prone.
Method 3: Custom Code for Advanced Attribute Syncing
Lastly, let’s talk technical. For more advanced scenarios, such as dynamically generating form fields based on selected attributes, you can use custom php code to achieve precise control over how attributes and form fields are synced.
If you have specific requirements that plugins can’t fulfill, using custom code is the most surefire way to ensure your product attribute gets synched with custom from fields. This approach is ideal for developers who want maximum flexibility in syncing attributes with custom form fields.
Here’s how to go about this:
- Go to Appearance → Theme File Editor in your WordPress dashboard.
- Select the functions.php file of your active theme.
- Next, add this code snippet to hook into WooCommerce to display custom fields:
add_action( 'woocommerce_before_add_to_cart_button', 'custom_attribute_form_fields' );

function custom_attribute_form_fields() {
    global $product;
    $attributes = $product->get_attributes();

    if ( ! empty( $attributes ) ) {
        echo '<div class="custom-form-fields">';

        foreach ( $attributes as $attribute_name => $attribute ) {
            if ( $attribute->get_visible() ) {
                echo '<label for="' . esc_attr( $attribute_name ) . '">' . esc_html( wc_attribute_label( $attribute_name ) ) . '</label>';
                echo '<input type="text" name="' . esc_attr( $attribute_name ) . '" placeholder="Enter ' . esc_html( wc_attribute_label( $attribute_name ) ) . '">';
            }
        }

        echo '</div>';
    }
}- The next step is to capture the input provided by customers when they add a product to the cart. To do this, add the code snippet below:
add_filter( 'woocommerce_add_cart_item_data', 'save_custom_field_data', 10, 2 );

function save_custom_field_data( $cart_item_data, $product_id ) {
    if ( ! empty( $_POST ) ) {
        foreach ( $_POST as $key => $value ) {
            if ( strpos( $key, 'pa_' ) !== false && ! empty( $value ) ) {
                $cart_item_data[ $key ] = sanitize_text_field( $value );
            }
        }
    }

    return $cart_item_data;
}- To display the captured custom input in the cart and checkout pages, use the following code:
add_filter( 'woocommerce_get_item_data', 'display_custom_field_data', 10, 2 );

function display_custom_field_data( $item_data, $cart_item ) {
    foreach ( $cart_item as $key => $value ) {
        if ( strpos( $key, 'pa_' ) !== false ) {
            $item_data[] = array(
                'name'  => wc_attribute_label( str_replace( 'pa_', '', $key ) ),
                'value' => $value,
            );
        }
    }

    return $item_data;
}- To ensure the custom input is saved with the order, use this code:
add_action( 'woocommerce_add_order_item_meta', 'save_custom_field_to_order', 10, 2 );

function save_custom_field_to_order( $item_id, $values ) {
    foreach ( $values as $key => $value ) {
        if ( strpos( $key, 'pa_' ) !== false ) {
            wc_add_order_item_meta( $item_id, wc_attribute_label( str_replace( 'pa_', '', $key ) ), $value );
        }
    }
}- Lastly, click Update File to save your changes. Visit a product page on your site to verify that your product attributes have been successfully synced to form fields.
Using custom code to sync product attributes with form fields in WooCommerce provides unmatched flexibility and control. If you’re comfortable with coding or have access to a developer, implementing this solution can provide granular control.
Pro Tips for Syncing Product Attributes to Form Fields
Syncing product attributes to form fields in WooCommerce can greatly enhance your store’s flexibility and user experience, but simply getting it to work isn’t enough.
To truly optimize this feature, you need to implement smart strategies. This will ensure seamless functionality, improve customer satisfaction, and streamline order management.

Here are a few actionable tips from experts that can help you get the most out of your custom product attribute from fields:
- Avoid overwhelming customers with too many form fields. Only display the fields necessary for the product configuration.
- Ensure that form fields are properly validated (e.g., required fields, correct formats) to prevent incomplete or incorrect orders.
- If certain form fields depend on the selection of specific attributes, use conditional logic to display fields dynamically.
- Before going live, test your setup thoroughly to ensure that all form fields sync correctly with product attributes and that the data is captured properly during checkout.
- Always take a backup before adding custom code to avoid data loss or downtime. Also, add custom code to a child theme’s functions.php file to prevent losing changes during theme updates.
Over to You
Syncing product attributes to form fields in WooCommerce can significantly enhance your store’s customization options, improve order accuracy, and boost customer satisfaction.
Whether you’re using WooCommerce’s built-in variable product feature, a plugin for custom fields, or custom code for advanced setups, the right approach depends on your store’s specific needs.

The methods we discussed are testes by experts. All of them can help you create a seamless and intuitive buying process, making it easier for your customers to configure products exactly the way they want.
Ready to take your WooCommerce store to the next level?
Explore our in-depth blog section to find more actionable tips, tricks, and insights to take your WooCommerce store to the next level.
Here’s to your WooCommerce success!
