WooCommerce Product Badges: Add, Customize, Remove & Replace the Sale Flash (2026)
If you have browsed an online store and noticed a small label on a product image, that is a product badge.
It may say “Sale,” “50% OFF,” “Limited Time Offer,” “BOGO,” “Summer Sale,” “Winter Sale,” “Hot,” or “New.”
These small visual cues are some of the most underestimated conversion tools in WooCommerce.
WooCommerce product badges are labels or stickers that appear on product images.
They can also show in the shop loop or on individual product pages.
They draw the eye, create urgency, and communicate value at a glance, all without the shopper having to read a word of product copy.
In this complete guide, you will learn:
- What WooCommerce product badges are and the different types available
- How to add badges using a plugin — with full steps using Disco (Discount Rules for WooCommerce)
- How to add custom badges programmatically with PHP and CSS
- How to remove or replace the default ‘Sale’ and ‘New’ badges
- Best practices for badge design that actually lifts conversions
What Are WooCommerce Product Badges?
A product badge is a visual label overlaid on a product image or placed near the product title. WooCommerce includes two default badges out of the box:
- Sale badge: shown automatically when a product has a sale price set
- ‘New’ badge: some themes add this for recently published products
But these defaults are just the starting point.
With the right plugin or custom code, you can show any badge you want. Use “Bestseller,” “Limited Stock,” “Free Shipping,” or “Hot Deal.” You can also add a branded sticker with custom colors and text.
Why product badges matter for your woocommerce store?
Product badges are small visual labels, but play a big role in how customers interact with your store.
Badges quickly highlight key details like “Sale,” “New,” “Discount,” or “Best Seller.” They help shoppers decide faster without reading full product details.
Badges also improve product visibility.
When you add eye-catching labels to key products, its stand out in crowded category pages.
This draws attention to high-margin items, promotions, or limited-time offers, directly impacting your conversion rate.
From a marketing perspective, product badges create urgency and trust.
For example, a “Limited Stock” or “Hot Deal” badge can push hesitant buyers to act quickly.
Similarly, “Top Rated” or “Best Seller” badges build social proof, making customers more confident in their purchase.
They also help you guide user behavior strategically.
You can promote specific categories, clear old inventory, or boost new arrivals—all without changing your store layout.
A brightly colored badge on an otherwise uniform product grid creates an instant focal point and focal points get clicks.
- Urgency signals (limited stock, countdown timers) reduce decision paralysis
- Trust signals (guarantee badges, secure checkout icons) reduce cart abandonment
- Social proof labels (‘Bestseller’, ‘#1 Pick’) increase perceived value
A well-placed badge can increase click-through rates on products by 10–30% without changing a single word of copy.
Types of WooCommerce Product Badges
Before adding badges to your store, it helps to understand the different types and when each one is most effective.
1. Sale badge (default WooCommerce sale flash)
WooCommerce automatically displays a ‘Sale!’ badge whenever a product’s regular price is higher than its sale price.
You can add an advanced custom badge to show any type of discount.It can display Fixed, Percentage, BOGO, or Free Shipping offers. For example, it can show “20% Off” as a strong conversion signal.
- Percentage Discount Badge (e.g., “-20% OFF”) Shows the exact discount rate to attract price-sensitive buyers.
- Fixed Amount Discount Badge (e.g., “$10 OFF”) Highlights a specific value reduction, ideal for clear savings messaging.
- Sale Flash Badge (Default WooCommerce “Sale!”) The standard badge that appears automatically on discounted products.
- Limited-Time Sale Badge (e.g., “Today Only”, “Ends Soon”) Creates urgency and pushes quicker purchase decisions.
- Clearance Sale Badge (e.g., “Clearance”, “Final Sale”) Helps move old or overstocked inventory faster.
- Seasonal Sale Badge (e.g., “Eid Sale”, “Black Friday Deal”) Connects promotions with events or holidays to boost relevance.
- BOGO Sale Badge (e.g., “Buy 1 Get 1 Free”) Promotes bundle-style offers and increases average order value.
- Free Shipping Badge (e.g., “Free Delivery”) Reduces purchase hesitation by highlighting added value.
- Exclusive/Member Sale Badge (e.g., “Members Only Deal”) Targets specific customer groups and builds loyalty.
- New Price Drop Badge (e.g., “Price Reduced”) Shows recent discounts to attract returning visitors.
2. New product badge
A ‘New’ badge signals recently added products. WooCommerce does not add this by default. Many themes include it for products published within a set number of days.
- New Arrival Badge (e.g., “New”) Highlights recently added products to grab immediate attention.
- Just Launched Badge (e.g., “Just In”)Creates excitement around freshly released items.
- Latest Collection Badge (e.g., “New Collection”) Works well for fashion or seasonal product launches.
- Trending New Badge (e.g., “Trending Now”) Combines “new” with popularity to boost interest and clicks.
- Hot New Item Badge (e.g., “Hot New”) Adds urgency and curiosity for newly added products.
- Recently Added Badge (e.g., “Added Recently”) Useful for stores that frequently update inventory.
- Limited New Stock Badge (e.g., “New & Limited”) Mixes freshness with scarcity to drive faster decisions.
- Exclusive New Badge (e.g., “New Exclusive”) Positions new products as premium or limited access.
- Featured New Badge (e.g., “New Featured”) Highlights selected new items you want to promote more.
Best used for new arrivals, recently restocked products, and seasonal additions.
3. Custom text badges
These are entirely up to you the text, color, shape, and placement are all custom. Common examples include:
- ‘Bestseller’ for your top-performing products
- ‘Limited Edition’ for scarcity messaging
- ‘Free Shipping’ for shipping incentives
- ‘Staff Pick’ / ‘Low Stock’ / ‘Bundle Deal’
4. Trust badges on the product page
Trust badges sit on the product detail page near the Add to Cart button.
Trust badges communicate security and reliability: ’30-Day Money Back’, ‘Secure Checkout’, ‘SSL Encrypted’, or payment method icons.
Best used for high-ticket products or stores where trust is a known barrier.
5. Category-based badges
You can assign badges to entire product categories. Every product in ‘Summer Sale’ automatically gets a badge.
This is a significant time saver for large catalogs and seasonal promotions.
Best WooCommerce Product Badge Plugins
There are several plugins for WooCommerce product badges. However, Disco – Discount Rules for WooCommerce stands out because it does more than badges.
It is a complete Discount Rules plugin for WooCommerce. The product badge display feature is one of its most powerful components.
What makes the Disco plugin different?
With Disco, you can:
- You can create any woocommerce dynamic discount rules with advance conditions
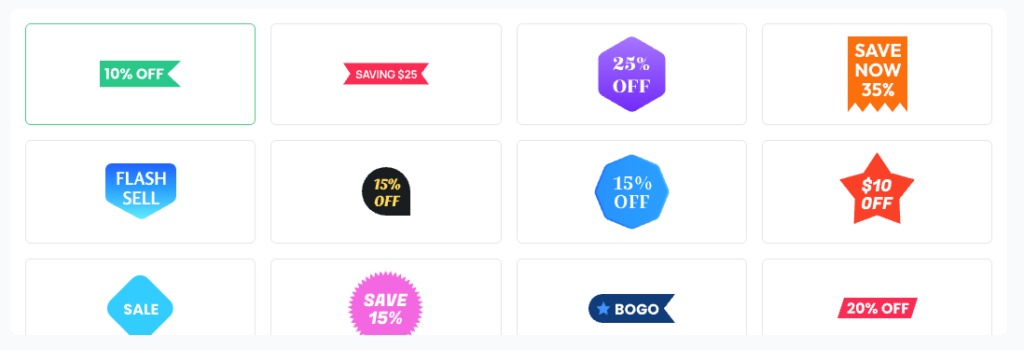
- Choose from a library of pre-made badge designs (circle, ribbon, corner, pill, starburst)
- Build fully customized badges with your own text, fonts, colors, and CSS
- Combine badges with discount rules, badge appears automatically when a discount triggers
- Add Countdown Timers to create urgency alongside the badge
- Use Text Highlight and Cart Notice for a full promotional experience
- Display Bulk Discount Tables on product pages so shoppers see tiered pricing
The best part is that you do not have to manage a badge plugin, a countdown plugin, and a discount plugin separately. Disco puts everything in one place
Product Badge Plugins comparison
| Plugin | Free? | Custom Rules? | Variable? | Rating |
| Disco – Discount Rules for WooCommerce | Free + Pro | Yes (advanced) | Yes | ⭐ 4.8 |
| YITH WooCommerce Badge Management | Free + Pro | Pro only | Pro only | ⭐ 4.5 |
| Badge & Product Label for WooCommerce | Free | Limited | Partial | ⭐ 4.3 |
| WooCommerce Product Badges (official) | Paid | Yes | Yes | ⭐ 4.4 |
| Advanced Product Labels for WooCommerce | Free + Pro | Pro only | Pro only | ⭐ 4.2 |
How to Add WooCommerce Product Badges Using Disco Plugin?(Step-by-Step)
Step 1: Install and activate Disco
- Go to WordPress Dashboard → Plugins → Add New
- Search for ‘Discount Rules for WooCommerce Disco’
- Click Install Now, then Activate
- The plugin appears in your sidebar under Disco or Discount Rules
Step 2: Create a new discount rule
- Navigate to Disco → Rules → Add New Rule
- Give your rule a descriptive name (e.g., ‘Summer Sale – 20% Off Shirts’)
- Set your discount conditions: product(s), category, or all products
- Set the discount type and date range if time-limited then
- Then click Continue
Tip: Even if you do not want a discount, and only want a badge, create a rule with 0%. Use it only to trigger the badge.
Step 3: Enable the product badge
- Inside the rule editor, scroll to the Badge section
- Toggle Enable Product Badge to ON
You will see two options:
Option A: Use a pre-made badge with advance customize Option
- Choose from built-in badge shapes: circle, ribbon, corner, pill, starburst
- Select a color scheme from the presets
- Type your badge text (e.g., ‘Hot Deal’, ‘Save 20%’, ‘New Arrival’)
- Set your own background color, text color, border radius, and font size
- Upload a custom badge image if desired
- Position the badge: top-left, top-right, bottom-left, or bottom-right
- Adjust padding and size to fit your theme
Option B: Upload Your Badge
Step 5: Review Your Summary & Badge Preview
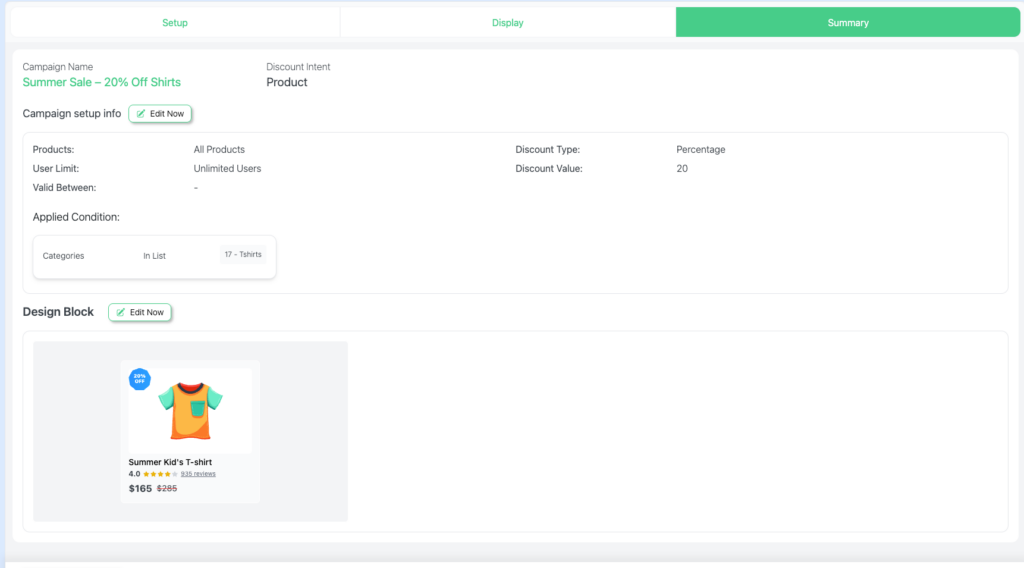
In the final step, you’ll see a complete summary of your discount setup. This page lets you review all the discount rules you created. It helps ensure everything is set up correctly before you go live.
You can also preview the product badges you’ve set, how they will appear on your store, including their text, style, and position.
This helps you confirm that your badges clearly communicate the offer and match your store design.
Step 6: Publish & Check Your Product Page
Once everything looks good, simply click Publish to activate your discount rules.
Now, visit your archive and product page to verify the results. You should see the discount applied correctly along with the badge displayed on the product.
This helps you confirm that both the pricing and badge visibility are working as expected.
If the discount or badge doesn’t appear, double-check your rule conditions and badge settings, then update and test again.
How to Add a Countdown Timer in WooCommerce?
Disco’s built-in Countdown Timer pairs urgency messaging directly with your badge. To enable it:
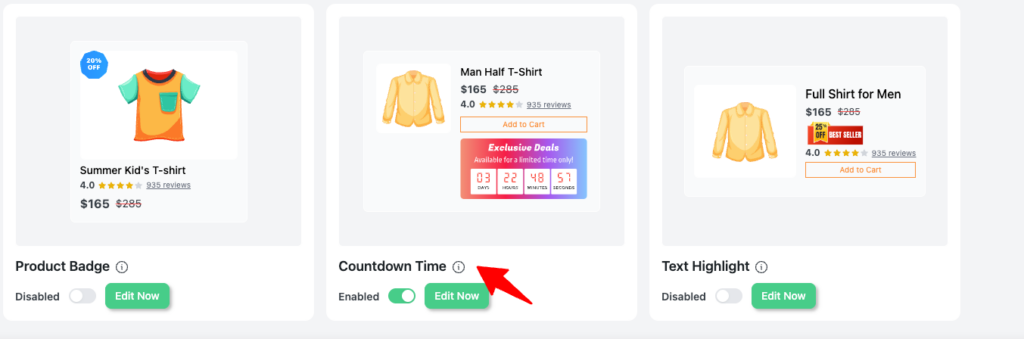
- Find the Countdown Timer section in the rule editor
- Toggle it ON and set the timer end date/time
- Customize the timer label and style
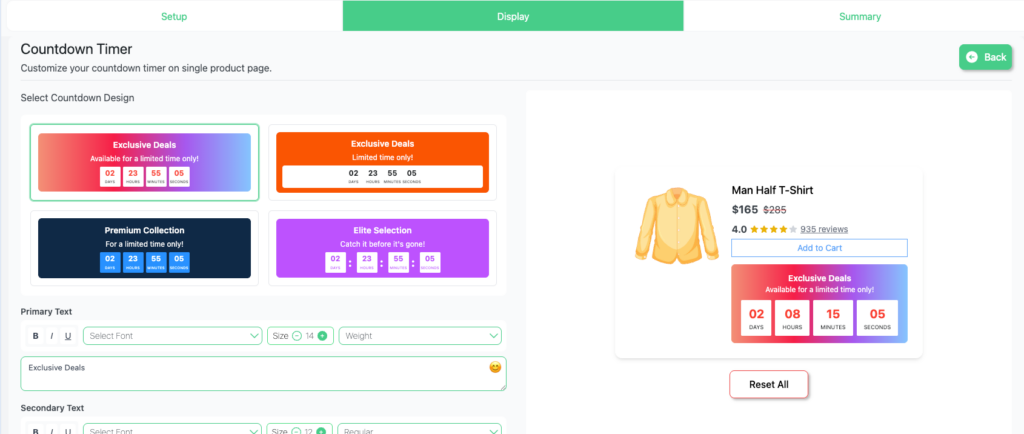
The countdown appears on the product page beneath the price. No separate plugin needed.
How to Add a Cart Notice in WooCommerce?
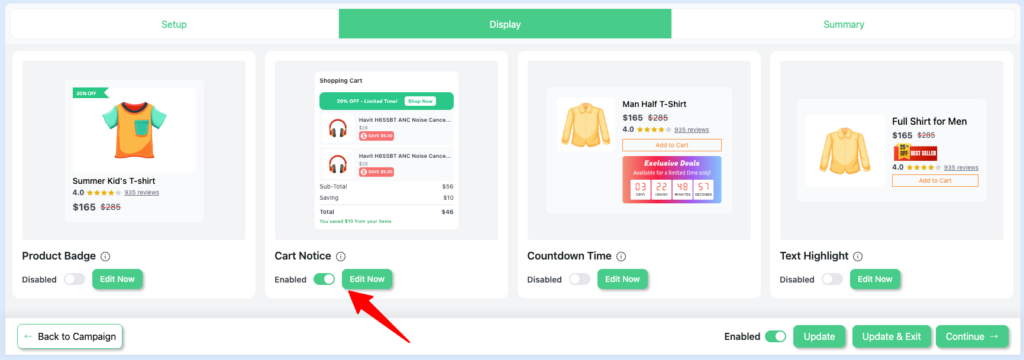
- Find the Cart Notice section in the rule editor
- Enable it and write your cart message (e.g., ‘Your 20% discount has been applied!’)
- Choose the notice position: top of cart, inline with product row, or mini-cart
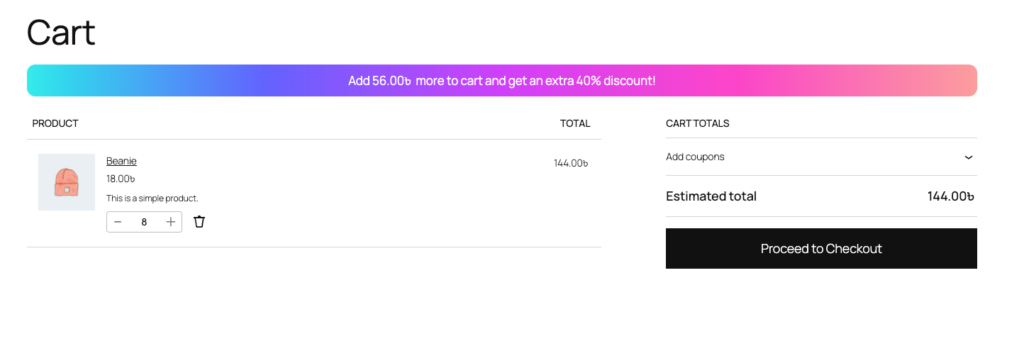
Note: The Cart Notice badge will appear only for cart-based discounts.
How to Show a Bulk Discount Table In WooCommerce?
For tiered discounts, Disco can show a Bulk Discount Table on the product page. For example, customers can buy 3 items and get 10% off. Or they can buy 5 items and get 20% off
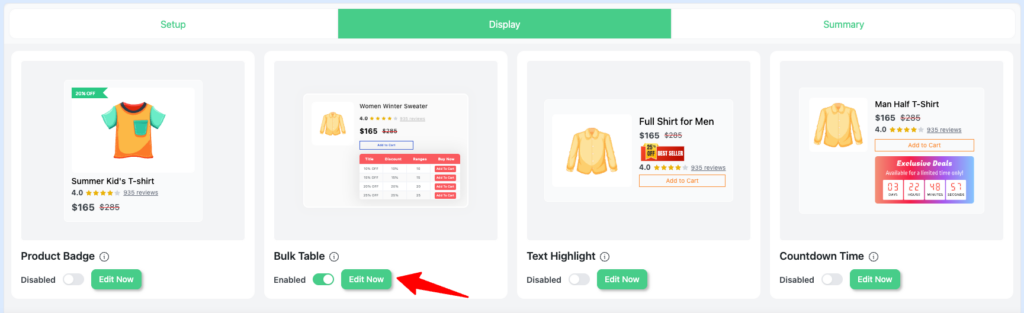
- Find Bulk Table in the rule editor
- Toggle it ON
- Customize the table header, row labels, and styling
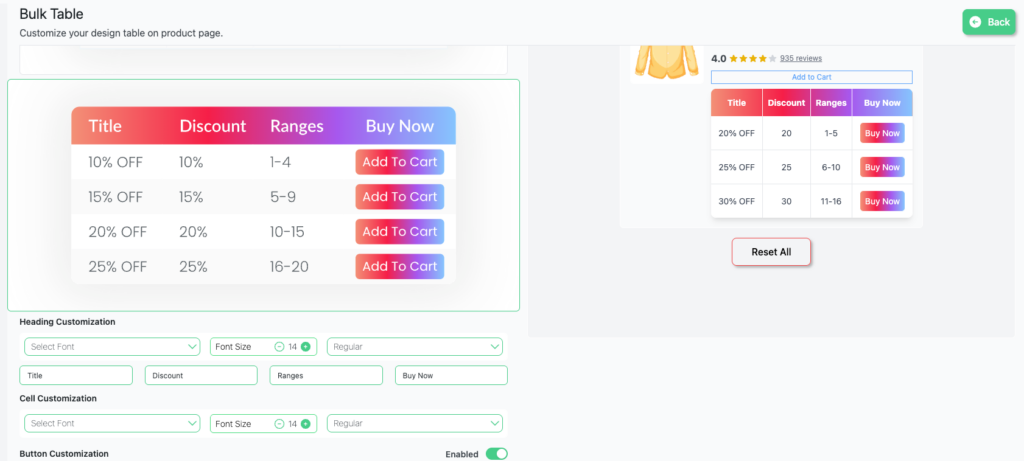
Note: The Bulk Table badge will appear only for WooCommerce bulk discounts.
Step 7: Publish & Verify Bulk Discounts
After reviewing your settings, click Publish to activate your bulk discount rules.
Then, visit your product page to check that both the discount and the Bulk Table badge appear correctly. This ensures your customers can see the savings and understand the bulk pricing structure at a glance.
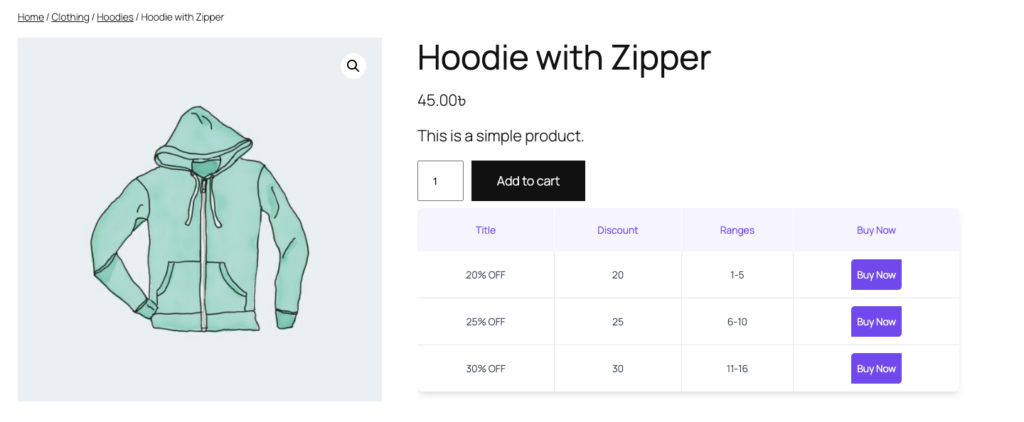
If the badge or discount does not show, check your bulk discount settings again. Make sure the conditions and display options are set correctly.
How to Add Custom Badges Programmatically (PHP & CSS)
For developers who want full control without a plugin, here are the core code methods.
Method 1: Add a badge via PHP hook (shop loop)
The cleanest way to add a badge to the shop loop. Add to your theme’s functions.php:
add_action( 'woocommerce_before_shop_loop_item_title', 'custom_product_badge', 10 );

function custom_product_badge() {

    global $product;

    $post_date      = get_the_date( 'U' );

    $thirty_days_ago = strtotime( '-30 days' );

    if ( $post_date > $thirty_days_ago ) {

        echo '<span class="custom-badge new-badge">New</span>';

    }

}
Add this CSS to Appearance → Customize → Additional CSS:
.woocommerce ul.products li.product { position: relative; }

.custom-badge { position: absolute; top: 10px; left: 10px; z-index: 10;

  padding: 4px 10px; border-radius: 4px; font-size: 12px;

  font-weight: bold; color: #ffffff; }

.new-badge  { background-color: #3AB54A; }

.sale-badge { background-color: #E63946; }
Method 2: Replace the default ‘Sale!’ text with a percentage badge
This filter calculates and displays the actual discount percentage for both simple and variable products:
add_filter( 'woocommerce_sale_flash', 'custom_sale_badge_percentage', 10, 3 );

function custom_sale_badge_percentage( $html, $post, $product ) {

    if ( $product->is_on_sale() && $product->get_regular_price() ) {

        $pct = round( ( ( $product->get_regular_price() - $product->get_sale_price() )

            / $product->get_regular_price() ) * 100 );

        return '<span class="onsale">-' . $pct . '%</span>';

    }

    return $html;

}
Method 3: Badge for specific product IDs
add_action( 'woocommerce_before_shop_loop_item_title', 'badge_specific_product', 10 );

function badge_specific_product() {

    global $product;

    $ids = array( 42, 87, 156 ); // Replace with your product IDs

    if ( in_array( $product->get_id(), $ids ) ) {

        echo '<span class="custom-badge">Bestseller</span>';

    }

}
Method 4: Category-based badges
add_action( 'woocommerce_before_shop_loop_item_title', 'category_based_badge', 10 );

function category_based_badge() {

    global $product;

    $badge_categories = array(

        'summer-sale'  => array( 'text' => 'Summer Sale', 'color' => '#ff6b35' ),

        'clearance'    => array( 'text' => 'Clearance',   'color' => '#e63946' ),

        'new-arrivals' => array( 'text' => 'New In',      'color' => '#2a9d8f' ),

    );

    foreach ( $badge_categories as $slug => $badge ) {

        if ( has_term( $slug, 'product_cat', $product->get_id() ) ) {

            echo '<span class="custom-badge" style="background:'

                . esc_attr( $badge['color'] ) . '">'

                . esc_html( $badge['text'] ) . '</span>';

            break;

        }

    }

}
How to Add Trust Badges to the WooCommerce Product Page
Trust badges sit below the Add to Cart button on the product detail page — not on product images. They reassure shoppers their purchase is safe.
add_action( 'woocommerce_after_add_to_cart_button', 'trust_badges_below_cart' );

function trust_badges_below_cart() {

    echo '<div class="trust-badge-row">';

    echo '<span class="trust-item">Secure Checkout</span>';

    echo '<span class="trust-item">30-Day Returns</span>';

    echo '<span class="trust-item">Free Shipping Over $50</span>';

    echo '</div>';

}
How to Remove or Modify the Default Sale & New Badges
Remove the default ‘Sale!’ badge entirely
// In functions.php — removes the badge from shop loop AND product page

remove_action( 'woocommerce_before_shop_loop_item',

    'woocommerce_show_product_loop_sale_flash', 10 );

remove_action( 'woocommerce_before_single_product_summary',

    'woocommerce_show_product_sale_flash', 10 );

Or hide with CSS only (no PHP needed):

.woocommerce span.onsale { display: none !important; }
Remove the ‘New’ badge
The method depends on your theme. Most themes use a CSS class — check your theme’s template files and disable it:
.badge.new, .product-badge.new, .label-new { display: none !important; }
Turn off the new badge via Disco settings
- Go to Disco → Settings
- Find Default Badge Behavior
- Disable the ‘Show New badge for recent products’ toggle
No code needed when using Disco.
Remove a theme-specific sale percentage icon
Some themes (Flatsome, OceanWP, Avada) add their own sale percentage badge. Find the function name by searching your theme files for:
add_action( 'woocommerce_before_shop_loop_item'
Then remove it with:
remove_action( 'woocommerce_before_shop_loop_item', 'THEME_FUNCTION_NAME', 10 );
WooCommerce Product Badges for Variable Products
Variable products need special handling. You may want a badge on one variant, like the “Red / Large” SKU on sale. But you may not want it on others.
Using Disco for variable product badges
Disco handles variable products natively. When you create a rule, set the condition to Specific Variations. Select the exact variations to target. The badge will appear only for qualifying variants. This is far cleaner than custom PHP.
Using PHP for variable product badges
add_action( 'woocommerce_before_shop_loop_item_title', 'variable_product_badge', 10 );

function variable_product_badge() {

    global $product;

    if ( ! $product->is_type( 'variable' ) ) return;

    $prices = $product->get_variation_prices();

    $on_sale = false;

    foreach ( $prices['regular_price'] as $id => $rp ) {

        if ( $prices['sale_price'][ $id ] < $rp ) { $on_sale = true; break; }

    }

    if ( $on_sale ) {

        echo '<span class="custom-badge sale-badge">From Sale Price</span>';

    }

}
WooCommerce Product Badge Best Practices & Design Tips
1. Less is more
The biggest mistake store owners make is badging too many products. When everything is ‘Hot’ or ‘Featured’, nothing is.
A good rule of thumb: no more than 20–30% of your visible product grid should carry a badge at any one time.
2. Badge placement
- Top-left is most expected — shoppers scan from top-left by habit
- Top-right works for secondary badges or when there is a left-side element
- Avoid bottom placements — they compete with the product title and price
3. Use color with intent
| Color | Signal | Best badge use |
|---|---|---|
| Red | Urgency, danger, discount | Sale, Clearance, Limited |
| Green | Safety, go, growth | New, In Stock, Eco |
| Orange | Energy, warmth | Bestseller, Popular |
| Blue | Trust, reliability | Staff Pick, Verified |
| Gold/Yellow | Premium, value | Exclusive, Premium |
4. Make badge text specific and benefit-led
- ‘Sale’ → ‘20% Off Today’
- ‘New’ → ‘Just Arrived’
- ‘Hot’ → ’48 Sold This Week’
- ‘Deal’ → ‘Bundle & Save’
5. Ensure mobile responsiveness
Badges that look great on desktop often become illegible on mobile. After setting up any badge, check on a real mobile device. Pay attention to font size (minimum 11px on mobile), badge width (max 40% of image width), and contrast against the product photo.
6. Pair badges with countdown timers
A ‘Sale’ badge alone creates mild interest. A ‘Sale’ badge plus a countdown timer creates urgency. Disco’s built-in Countdown Timer makes this seamless — the timer automatically disappears when the promotion ends.
7. A/B test your badge copy
Even small changes — ‘Bestseller’ vs ‘Top Pick’ vs ‘Most Popular’ — can produce measurable differences in add-to-cart rates. Use Disco’s rule-based badge system to test different messages for different product groups.
Frequently Asked Questions
How do I add a custom badge to a WooCommerce product?
The easiest way is with Disco – Discount Rules for WooCommerce. Go to Disco → Rules → Add New Rule. Scroll to the Badge section. Enable it. Choose a pre-made design. Or create a custom badge with your own text and colors. For a code approach, use the woocommerce_before_shop_loop_item_title hook in functions.php to output HTML, then position it with CSS.
What is the best free WooCommerce product badge plugin?
Disco offers a strong free tier that includes product badge functionality alongside discount rules, countdown timers, and cart notices. Other free options include YITH WooCommerce Badge Management and Badge and Product Label for WooCommerce. Both offer fewer features in their free versions.
How do I remove the ‘New’ badge in WooCommerce?
This depends on your theme. Most themes add a ‘New’ badge via a PHP function hooked to the product loop. Search your theme files for the function name, then use remove_action() in functions.php. Alternatively, hide it with CSS: .badge.new { display: none !important; }. If using Disco, look for the toggle in the plugin settings.
Can I add badges to variable products in WooCommerce?
Yes. With Disco, you can target specific product variations when creating a badge rule. Programmatically, use $product->get_variation_prices() to check if any variation is on sale and display a badge accordingly.
How do I show the discount percentage as a badge in WooCommerce?
Use the woocommerce_sale_flash filter to replace the default ‘Sale!’ text with the calculated percentage. The PHP snippet in the programmatic badges section of this guide covers both simple and variable products. Disco can also be configured to display the percentage in the badge text automatically.
How do I remove the sale percentage icon my theme adds?
Some themes (Flatsome, OceanWP, Avada) add a sale percentage badge via their own functions. Search your theme files for add_action( ‘woocommerce_before_shop_loop_item’ ).
Find the function name used there.
Then use remove_action() with the same hook, priority, and function name.
This will deactivate it.
Does WooCommerce have a built-in product badge feature?
WooCommerce includes a basic ‘Sale!’ badge for products on sale. WooCommerce also offers a premium Product Badges extension for more control. For most stores, a third-party plugin like Disco offers better value. This is most true when you need discount rules, timers, and cart notices in one workflow.
Do product badges affect WooCommerce SEO?
Badges have no direct SEO impact since they are HTML/CSS overlays, not primary indexed content. However, they can indirectly improve SEO by increasing click-through rates and reducing bounce rates — both positive behavioral signals. Ensure badge elements don’t introduce render-blocking CSS or large layout shifts (CLS), as these affect Core Web Vitals.
Conclusion
WooCommerce product badges are one of the highest-leverage, lowest-effort improvements you can make to your store. A small colored label on a product image shows a discount, urgency, or value in under a second. No copy needed.
For most store owners, the fastest path to well-designed, rule-based badges is Disco – Discount Rules for WooCommerce. You get ready-made badge templates, full control to customize, and tools to mix badges with countdown timers. You can also add cart notices and bulk discount tables, all in one plugin.
For developers who want full control, the PHP snippets in this guide cover every scenario. Add a badge to specific products. Replace the default sale flash with a percentage. Handle variable product variations. Clean up badges your theme adds by default.
The best badge is a specific, benefit-led badge used selectively. Give every product a badge and you’ve given none of them one.
Ready to add product badges to your store? Install Disco – Discount Rules for WooCommerce and create your first badge rule in minutes.
