Generating a large product feed is memory- and time-intensive. If your server’s PHP limits are too low, feed generation can stall, fail, or “get stuck” partway through. CTX Feed splits the work into background batches (Action Scheduler) to stay within a typical hosting time limit, and since version 8.0.26 it also watches the PHP memory limit while a batch runs (see below), but on big catalogs or tight servers you may still need more headroom. This guide shows how to check your current limits and how to raise the PHP memory limit and max execution time.
Changing PHP limits is a server/WordPress task, done outside CTX Feed. If you are on managed hosting, the quickest route is often to ask your host to raise the limits for you.
Check your current limits first
CTX Feed reports the values it cares about so you know whether they need raising:
- Go to CTX Feed → System → System status.
- Look at PHP Version, PHP Max Execution Time, and WP Memory Limit.
- CTX Feed flags a value as a warning when it is below the recommended level.
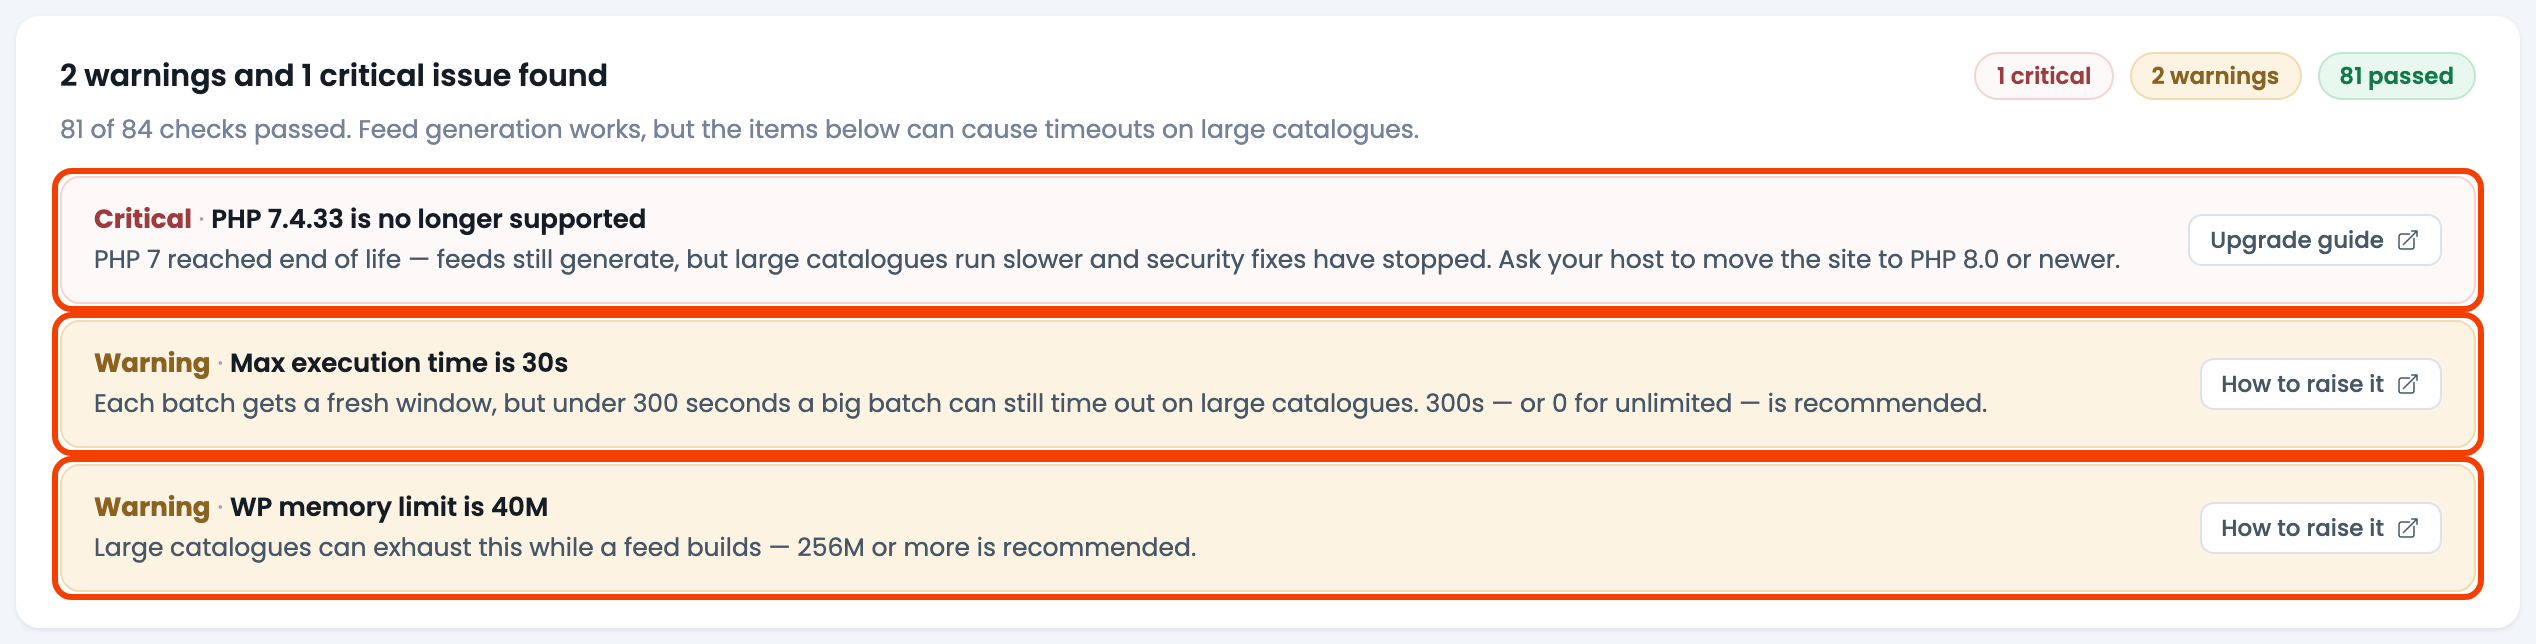
Recommended targets for smooth feed generation:
- WP Memory Limit: 256M or higher.
- PHP Max Execution Time: 300 seconds or higher (a value of
0means unlimited, which is fine). - PHP Version: a current, supported PHP version.
If your values are already at or above these, low limits are probably not your problem — see the “stuck generation” and “auto feed update” guides at the end.
How CTX Feed protects itself against a low memory limit (8.0.26+)
Before 8.0.26, a variation-heavy catalog on a tight memory limit could stop a scheduled run with Allowed memory size exhausted. Since 8.0.26 the engine works inside the limit instead of hitting it:
- Cache priming stops early. CTX Feed pre-loads product data in chunks and stops priming once it has used about three quarters of the PHP memory limit; the rest is loaded on demand. The feed log records
Cache priming stopped early to stay inside the memory budget; remaining data loads on demand. - A batch pauses instead of crashing. When a batch reaches about 85% of the limit, it hands its remaining products to the next batch. The log records
Batch paused after N products ... to stay inside the site's PHP memory limit — continuing with the rest in the next batch. A paused run is normal, not an error — it just takes more batches. - A run that fails keeps your previous file. If every product in a run fails, the run shows as Failed on Manage Feeds, the previous feed file stays live, and the feed log says why. An empty file is not published over a good one.
A higher memory limit still helps: fewer pauses mean fewer batches and a faster run. Treat the log lines above as the sign that raising WP Memory Limit will speed things up.
Increase the WordPress / PHP memory limit
Try these in order; the first that your host permits will take effect.
Option A — wp-config.php (works on most hosts)
- Edit
wp-config.phpin your WordPress root (via your host’s File Manager, or over SFTP). - Above the line that says
/* That's all, stop editing! */, add:
define( 'WP_MEMORY_LIMIT', '256M' );
define( 'WP_MAX_MEMORY_LIMIT', '512M' );- Save the file and reload System status to confirm the new value.
WP_MEMORY_LIMIT is the value the System status page checks; WP_MAX_MEMORY_LIMIT raises the limit for admin-side requests too.
Option B — php.ini
If your host uses a php.ini file you can edit, set:
memory_limit = 256MOption C — .htaccess (Apache only)
Add this line to the .htaccess file in your WordPress root:
php_value memory_limit 256MIf adding this line produces a 500 error, your host does not allow it — remove it and use Option A or D instead.
Option D — cPanel
- Log in to cPanel.
- Open MultiPHP INI Editor (or Select PHP Version → Options).
- Choose your domain, set memory_limit to
256M(or higher), and save.
Increase the PHP max execution time
Raise the time limit with the same file you used for memory.
- php.ini:
max_execution_time = 300- .htaccess (Apache):
php_value max_execution_time 300- cPanel → MultiPHP INI Editor: set max_execution_time to
300(or higher) for your domain and save.
A value of 300 gives each run five minutes; increase it further for very large catalogs. Some managed hosts cap this at the server level and ignore the file — if the value does not change on the System status page, ask your host to raise it.
After changing the limits
- Reload CTX Feed → System → System status and confirm the new values are showing without warnings.
- Go to Manage Feeds and Regenerate the feed that was failing.
- For large stores, let scheduled generation finish in the background — CTX Feed processes products in batches, so you do not need to keep the browser open.
Troubleshooting
- The value did not change. Your host may enforce a hard limit, or a server-level
php.inimay override your file. Contact your hosting provider and ask them to raisememory_limitandmax_execution_time. - Editing .htaccess broke the site (500 error). Remove the
php_valueline you added; that host does not permit it. Use wp-config.php or cPanel instead. - Generation still stalls with high limits. The cause is usually WordPress cron not firing, not memory. See the guides below.
- The run shows as Failed. Open the feed’s log (Manage Feeds → ⋮ → Download Log, or CTX Feed → System → System status → Logs). A memory pause is logged as a pause, not a failure; a Failed run names the error that hit every product. Your previous feed file is still in place.
- Not sure which PHP handler you use. cPanel’s MultiPHP INI Editor is the most reliable place to change limits on shared hosting; if you don’t have cPanel, ask your host how they want PHP limits set.
Related guides
- Fix auto feed update not working
- How to solve “processing 10% feed generation stuck” error
- How to solve the missing product issue
- How to configure FTP
