%22%2F%3E%0A%3Cpath%20d%3D%22M59.8894%2016.6974C60.1689%2016.9331%2060.5416%2017.1216%2060.9142%2017.0745C61.5664%2017.0273%2061.8925%2016.6031%2061.6596%2015.7547C61.5198%2014.4349%2061.4267%2013.1623%2061.2869%2011.8425C61.1006%209.72149%2060.8211%207.55331%2060.5881%205.38512L60.1689%201.70863C60.0757%200.81307%2059.6099%200.294591%2058.7713%200.106053C58.4918%20-0.0353509%2058.2123%20-0.0353509%2057.9328%200.106053C57.7931%200.106053%2057.6999%200.106053%2057.6067%200.153187C56.5353%200.483129%2055.4172%200.81307%2054.3458%201.19015C53.5073%201.47295%2052.6222%201.75576%2051.7371%202.03857C50.2929%202.50991%2048.8488%203.02839%2047.4047%203.49974C46.4264%203.82967%2045.4016%204.1596%2044.3768%204.48952L44.3767%204.48956C43.6313%204.72523%2043.3518%205.24371%2043.6313%205.85646C43.7711%206.13927%2044.004%206.32781%2044.2369%206.46921C44.7028%206.79915%2045.2152%207.08196%2045.6811%207.4119C45.8674%207.55331%2046.0537%207.69471%2045.8208%208.02465C45.7276%208.21319%2045.5879%208.35459%2045.4481%208.54313L45.355%208.73167L44.5164%2010.0986L43.9108%2010.9941L43.3052%2011.8897L43.2121%2011.9839L42.1406%2013.5865L44.5867%2019.8706C45.5713%2022.1447%2048.6357%2026.5713%2052.552%2023.6277L53.9265%2022.2593L54.3458%2021.5523C54.3924%2021.458%2054.4856%2021.3637%2054.5321%2021.2694L54.5787%2021.2223C55.2309%2020.1854%2055.883%2019.1956%2056.5352%2018.2059L56.5353%2018.2057C57.0477%2017.4044%2057.5601%2016.6503%2058.0726%2015.849C58.2123%2015.6604%2058.3055%2015.6133%2058.4918%2015.7076C58.9577%2016.0375%2059.4235%2016.4146%2059.8894%2016.6974Z%22%20fill%3D%22%233D89D0%22%2F%3E%0A%3Cpath%20d%3D%22M28.0259%2022.0232C27.9793%2022.0703%2027.9793%2022.1175%2027.9327%2022.1646C27.9793%2022.1175%2028.0259%2022.0703%2028.0259%2022.0232Z%22%20fill%3D%22url(%23paint1_linear)%22%2F%3E%0A%3Cpath%20d%3D%22M53.9265%2022.3064C53.7402%2022.5892%2053.5538%2022.872%2053.3675%2023.202C53.0414%2023.7204%2052.7153%2024.1918%2052.3892%2024.7103C51.3178%2026.4071%2050.1531%2027.9625%2048.4295%2029.0938C46.9388%2030.0365%2045.4015%2030.6021%2043.6779%2030.8849C42.1872%2031.1206%2040.7896%2030.9791%2039.3921%2030.5549C37.6219%2030.0365%2036.038%2029.1409%2034.687%2027.8211C33.7088%2026.8784%2032.9634%2025.7944%2032.3578%2024.616C32.0317%2023.9561%2031.7988%2023.2491%2031.4727%2022.5421C31.0534%2021.5522%2030.1683%2019.2427%2030.1218%2019.1012C30.0752%2019.0541%2030.0752%2018.9598%2030.0286%2018.9127C29.9354%2018.7242%2029.8422%2018.5828%2029.7957%2018.3942C29.6559%2018.0172%2029.4696%2017.6401%2029.3298%2017.2159C29.2366%2017.0273%2029.1901%2016.8388%2029.0969%2016.6503C28.9571%2016.3674%2028.864%2016.0846%2028.7242%2015.7547C28.5845%2015.3776%2028.4447%2015.0005%2028.2584%2014.6235C28.1652%2014.3407%2028.0254%2014.0579%2027.9323%2013.775C27.9323%2013.7279%2027.9323%2013.7279%2027.8857%2013.6808C27.7925%2013.4922%2027.7459%2013.3037%2027.6528%2013.1152C27.4664%2012.5967%2027.2335%2012.1253%2027.0006%2011.6069C27.0006%2011.5597%2026.954%2011.5126%2026.9074%2011.4655C26.8142%2011.2769%2026.7211%2011.1355%2026.5813%2010.947C26.5347%2010.8998%2026.4882%2010.8527%2026.4882%2010.8056C26.4416%2010.7584%2026.395%2010.7113%2026.395%2010.6642C26.3484%2010.617%2026.3018%2010.5699%2026.2552%2010.5228C26.2086%2010.4756%2026.2086%2010.4285%2026.1621%2010.4285L26.1155%2010.3814C26.0689%2010.3342%2026.0223%2010.2871%2026.0223%2010.2871C25.9291%2010.1928%2025.8826%2010.1457%2025.7894%2010.0514C25.7428%2010.0043%2025.6962%209.95715%2025.6496%209.95715C25.603%209.91002%2025.5565%209.91002%2025.5099%209.86288C25.4167%209.81575%2025.3701%209.76861%2025.277%209.67435C25.2304%209.62721%2025.1838%209.62721%2025.1372%209.58008C25.0906%209.53294%2025.044%209.53294%2024.9974%209.48581C24.9509%209.48581%2024.9043%209.43867%2024.9043%209.43867C24.8577%209.39154%2024.8111%209.39154%2024.7645%209.3444C24.7179%209.3444%2024.7179%209.29727%2024.6714%209.29727C24.5782%209.25014%2024.485%209.203%2024.3918%209.15587C22.9943%208.59025%2021.1775%208.77879%2020.1992%209.10873C19.2675%209.43867%2018.2893%2010.3342%2018.2427%2010.4285C18.6619%209.72148%2019.0812%208.96733%2019.547%208.26031C20.1526%207.36475%2020.7117%206.4692%2021.3638%205.62078C22.3887%204.63095%2023.4602%203.78253%2024.6714%203.07551C27.0006%201.75575%2029.4696%201.52007%2032.0317%201.89715C33.3361%202.08569%2034.5939%202.60417%2035.7585%203.35832C36.9231%204.06534%2037.9014%204.96089%2038.7399%206.04499C39.2989%206.79914%2039.8114%207.60043%2040.1374%208.49598C40.6033%209.67435%2041.1623%2010.8056%2041.5816%2011.9839C41.7679%2012.5496%2042.0008%2013.068%2042.2338%2013.6336C42.2338%2013.6336%2042.2338%2013.6336%2042.2338%2013.6808V13.7279L45.0288%2019.8554C45.4015%2020.8452%2045.9139%2021.6465%2046.7059%2022.3535C47.2183%2022.872%2047.8705%2023.1548%2048.5227%2023.3905C48.5693%2023.3905%2048.6158%2023.4376%2048.6624%2023.4376C49.7805%2023.7676%2051.2246%2023.3905%2052.3426%2023.0134C53.088%2022.6835%2053.6936%2022.4007%2053.9265%2022.3064Z%22%20fill%3D%22url(%23paint2_linear)%22%2F%3E%0A%3Cpath%20d%3D%22M28.0255%2022.0238C27.9789%2022.0709%2027.9789%2022.118%2027.9324%2022.1652C27.9324%2022.1652%2027.9324%2022.1652%2027.9324%2022.2123C27.7926%2022.448%2027.6063%2022.6836%2027.4665%2022.9664C25.8826%2025.8416%2024.4385%2028.1512%2021.6434%2029.6595C19.3142%2030.9793%2016.8452%2031.215%2014.2831%2030.8379C14.1433%2030.8379%2014.0501%2030.7908%2013.9104%2030.7908C12.7458%2030.6022%2011.5812%2030.0838%2010.4165%2029.2825C8.78607%2028.1512%207.52829%2026.5958%206.64318%2024.8047L6.17733%2023.9091L5.01272%2021.5524L0.726927%2012.6911C0.447419%2012.0784%200.214496%2011.4656%200.121327%2010.8529C-0.437689%207.8834%200.95985%204.77252%203.80151%203.35849C5.43198%202.51007%207.24878%202.4158%208.87924%202.93428C10.6029%203.45276%2012.1402%204.67825%2013.0253%206.46937L13.1184%206.6579L14.7489%209.95732C14.7955%2010.0516%2014.7955%2010.1459%2014.8421%2010.2401C15.075%2010.8529%2015.8204%2012.4083%2016.426%2013.5867C16.4725%2013.6809%2016.5191%2013.7752%2016.5657%2013.8223C16.6123%2013.9638%2016.7055%2014.1052%2016.752%2014.1994C16.7986%2014.2937%2016.8452%2014.3408%2016.8452%2014.4351C16.8452%2014.4822%2016.8918%2014.4822%2016.8918%2014.5294C16.9384%2014.5765%2016.9384%2014.6708%2016.985%2014.7179C16.985%2014.765%2017.0316%2014.765%2017.0316%2014.8122C17.0316%2014.8593%2017.0781%2014.8593%2017.0781%2014.9064C17.0781%2014.9536%2017.1247%2015.0007%2017.1247%2015.0478C17.1247%2015.095%2017.1713%2015.095%2017.1713%2015.1421C17.3111%2015.4249%2017.4042%2015.7549%2017.544%2016.0377C17.6372%2016.2262%2017.6837%2016.4147%2017.7769%2016.6504C17.9632%2017.1689%2018.1962%2017.6402%2018.3825%2018.1587C18.5223%2018.4415%2018.6154%2018.7715%2018.7552%2019.0543C18.8018%2019.1485%2018.8484%2019.29%2018.8949%2019.3842C18.9881%2019.5728%2019.0347%2019.7613%2019.1279%2019.9498C19.3608%2020.5154%2019.5937%2021.0811%2019.9664%2021.5995C20.1993%2021.8823%2020.3857%2022.1652%2020.6652%2022.4008C22.3888%2023.9563%2024.9975%2023.862%2028.0255%2022.0238Z%22%20fill%3D%22url(%23paint3_linear)%22%2F%3E%0A%3Cpath%20d%3D%22M68.0888%2024.8694L68%207.88696H71.9963L71.8187%2018.4448L76.8806%207.88696H80.6548L81.3209%2018.3999L85.5392%207.88696H89.713L82.4754%2024.8694H78.1683L77.5466%2013.9072L72.3959%2024.8694H68.0888Z%22%20fill%3D%22%230D5293%22%2F%3E%0A%3Cpath%20d%3D%22M92.7771%2025.1385C89.2693%2025.1385%2086.7383%2022.6675%2086.7383%2019.2081C86.7383%2015.3893%2089.8021%2012.1545%2093.4431%2012.1545C96.6402%2012.1545%2098.8603%2014.4458%2098.8603%2017.7704C98.8603%2018.5342%2098.8159%2019.1182%2098.7271%2019.6124H90.4237C90.6457%2021.0501%2091.7114%2022.0385%2093.2211%2022.0385C94.1536%2022.0385%2094.9528%2021.724%2095.5301%2021.095L97.617%2023.4762C96.0185%2024.6443%2094.5976%2025.1385%2092.7771%2025.1385ZM90.6457%2017.411H95.4857C95.3081%2016.0632%2094.4644%2015.2545%2093.2211%2015.2545C92.0666%2015.2096%2091.0898%2016.0632%2090.6457%2017.411Z%22%20fill%3D%22%230D5293%22%2F%3E%0A%3Cpath%20d%3D%22M105.965%2024.9589C104.411%2024.9589%20103.167%2024.24%20102.368%2022.8473L101.924%2024.869H98.1499L101.791%207.52717L105.698%206.89819L104.322%2013.5923C105.166%2012.7836%20106.32%2012.2894%20107.519%2012.2894C110.139%2012.2894%20112.181%2014.8054%20112.181%2018.0401C112.226%2021.814%20109.428%2024.9589%20105.965%2024.9589ZM103.789%2016.3778L102.945%2020.4212C103.478%2021.185%20104.366%2021.6792%20105.388%2021.6792C107.208%2021.6792%20108.54%2020.2415%20108.54%2018.3097C108.54%2016.6474%20107.43%2015.4793%20105.92%2015.4793C105.077%2015.4793%20104.411%2015.7937%20103.789%2016.3778Z%22%20fill%3D%22%230D5293%22%2F%3E%0A%3Cpath%20d%3D%22M120.44%207.88696H125.058L127.899%2024.8694H123.725L123.193%2020.8259H117.154L114.978%2024.8694H110.582L120.44%207.88696ZM122.704%2017.5912L121.949%2011.9304L118.886%2017.5463H122.704V17.5912Z%22%20fill%3D%22%230D5293%22%2F%3E%0A%3Cpath%20d%3D%22M131.23%2012.3347H135.004L134.782%2013.5927C135.626%2012.7391%20136.736%2012.2449%20137.935%2012.2449C140.555%2012.2449%20142.597%2014.7608%20142.597%2017.9955C142.597%2021.8143%20139.8%2024.9592%20136.336%2024.9592C134.782%2024.9592%20133.539%2024.2853%20132.828%2022.9824L131.274%2030.0809H127.456L131.23%2012.3347ZM134.205%2016.3332L133.317%2020.5114C133.85%2021.2303%20134.738%2021.6796%20135.715%2021.6796C137.535%2021.6796%20138.867%2020.2419%20138.867%2018.31C138.867%2016.6477%20137.757%2015.4796%20136.247%2015.4796C135.493%2015.4796%20134.827%2015.7492%20134.205%2016.3332Z%22%20fill%3D%22%230D5293%22%2F%3E%0A%3Cpath%20d%3D%22M144.595%2012.3347H148.369L148.147%2013.5927C148.99%2012.7391%20150.101%2012.2449%20151.299%2012.2449C153.919%2012.2449%20155.962%2014.7608%20155.962%2017.9955C155.962%2021.8143%20153.164%2024.9592%20149.701%2024.9592C148.147%2024.9592%20146.904%2024.2853%20146.193%2022.9824L144.683%2030.0809H140.865L144.595%2012.3347ZM147.57%2016.3332L146.682%2020.5114C147.214%2021.2303%20148.102%2021.6796%20149.079%2021.6796C150.9%2021.6796%20152.232%2020.2419%20152.232%2018.31C152.232%2016.6477%20151.122%2015.4796%20149.612%2015.4796C148.857%2015.4796%20148.191%2015.7492%20147.57%2016.3332Z%22%20fill%3D%22%230D5293%22%2F%3E%0A%3Cpath%20d%3D%22M159.115%2024.8694H155.296L158.005%2012.3347H161.824L159.115%2024.8694ZM158.449%208.47099C158.449%207.1681%20159.559%206%20160.847%206C161.912%206%20162.8%206.85361%20162.8%207.93186C162.8%209.27967%20161.69%2010.4029%20160.358%2010.4029C159.248%2010.4029%20158.449%209.54924%20158.449%208.47099Z%22%20fill%3D%22%230D5293%22%2F%3E%0A%3Cpath%20d%3D%22M169.727%2020.6909L171.592%2023.1619C170.304%2024.4648%20168.572%2025.1387%20166.752%2025.1387C163.466%2025.1387%20161.068%2022.7126%20161.068%2019.388C161.068%2015.3446%20164.088%2012.1099%20167.862%2012.1099C170.082%2012.1099%20171.947%2013.0983%20173.013%2014.7606L170.304%2017.0069C169.727%2015.9736%20168.927%2015.4794%20167.773%2015.4794C166.13%2015.4794%20164.842%2017.0518%20164.842%2019.0286C164.842%2020.6909%20165.819%2021.6793%20167.329%2021.6793C168.261%2021.7243%20169.016%2021.4098%20169.727%2020.6909Z%22%20fill%3D%22%230D5293%22%2F%3E%0A%3Cpath%20d%3D%22M175.722%207.52717L179.629%206.89819L177.365%2017.6807L182.426%2012.3344H187L180.517%2018.6691L184.691%2024.869H180.162L177.009%2019.5676L175.899%2024.869H172.081L175.722%207.52717Z%22%20fill%3D%22%230D5293%22%2F%3E%0A%3Cdefs%3E%0A%3ClinearGradient%20id%3D%22paint0_linear%22%20x1%3D%2223.1831%22%20y1%3D%2224.7007%22%20x2%3D%2223.3049%22%20y2%3D%228.44851%22%20gradientUnits%3D%22userSpaceOnUse%22%3E%0A%3Cstop%20stop-color%3D%22%23327ACD%22%2F%3E%0A%3Cstop%20offset%3D%221%22%20stop-color%3D%22%234696D2%22%2F%3E%0A%3C%2FlinearGradient%3E%0A%3ClinearGradient%20id%3D%22paint1_linear%22%20x1%3D%2227.9436%22%20y1%3D%2222.0876%22%20x2%3D%2228.0428%22%20y2%3D%2222.0876%22%20gradientUnits%3D%22userSpaceOnUse%22%3E%0A%3Cstop%20offset%3D%220.2029%22%20stop-color%3D%22%234C51BF%22%20stop-opacity%3D%220.9%22%2F%3E%0A%3Cstop%20offset%3D%221%22%20stop-color%3D%22%235A67D8%22%20stop-opacity%3D%220.9%22%2F%3E%0A%3C%2FlinearGradient%3E%0A%3ClinearGradient%20id%3D%22paint2_linear%22%20x1%3D%2232.4583%22%20y1%3D%222.22148%22%20x2%3D%2239.8371%22%20y2%3D%2230.0298%22%20gradientUnits%3D%22userSpaceOnUse%22%3E%0A%3Cstop%20offset%3D%220.3367%22%20stop-color%3D%22%2342B9FF%22%2F%3E%0A%3Cstop%20offset%3D%220.7818%22%20stop-color%3D%22%233B97E1%22%2F%3E%0A%3Cstop%20offset%3D%221%22%20stop-color%3D%22%233784D1%22%2F%3E%0A%3C%2FlinearGradient%3E%0A%3ClinearGradient%20id%3D%22paint3_linear%22%20x1%3D%2211.252%22%20y1%3D%220.972585%22%20x2%3D%2215.8771%22%20y2%3D%2225.7529%22%20gradientUnits%3D%22userSpaceOnUse%22%3E%0A%3Cstop%20offset%3D%220.3367%22%20stop-color%3D%22%2342B9FF%22%2F%3E%0A%3Cstop%20offset%3D%220.7818%22%20stop-color%3D%22%233B97E1%22%2F%3E%0A%3Cstop%20offset%3D%221%22%20stop-color%3D%22%233784D1%22%2F%3E%0A%3C%2FlinearGradient%3E%0A%3C%2Fdefs%3E%0A%3C%2Fsvg%3E%0A)


How to Add Additional Information in WooCommerce Products (3 Proven Ways)
 Mohammad Miraj
 You can add additional information to a WooCommerce product in three ways: install a dedicated custom tabs plugin, use WooCommerce’s built-in product attributes, or add custom code to your theme. Each method suits a different need.
This guide covers all three, plus how to edit the text WooCommerce already shows in the default Additional Information tab.
Method 1: Using a Dedicated Plugin to Include Additional Product Info
Plugins are the easiest way to add additional information to WooCommerce products, offering flexibility without requiring coding knowledge.
There are many plugins available on the market that can help you to create custom fields, add tabs, and display extra product details. However, our experts tested and identified a handful of plugins as they are lightweight, cheaper, and dynamic.
Here’s our top picks on the plugins that can help you add additional information in WooCommerce products:
| Name | Key Features | Starting Price |
|---|---|---|
| Custom Product tabs for WooCommerce | Unlimited reusable tabs, Flexible positioning, Image, HTML, and shortcode support, User-friendly interface | Free |
| Custom Product Tabs Manager for WooCommerce | Unlimited customizable tabs, contact form, image, code support, Tab display restriction | $5.75 Per month |
| WooCommerce Product Tabs | Unlimited horizontal/vertical tabs; text, images, audio, video, and shortcode support, tab customization, tab display control | $79 Per site |
| Advanced Product Information for WooCommerce | Fully customizable product tabs, condition-based display, coupon highlight, review/ratings display, custom badges, countdown timers | Free |
| WooCommerce Product Add-Ons Ultimate | Unlimited customizable tabs, support for file uploads, dropdowns, checkboxes, and more, conditional logic, superior compatibility, simple to setup and use | $69 Per site per year |
For our guide today, we’re highlighting the of the most frequently used plugin named, “Custom Product tabs for WooCommerce” from Web Builder 143.
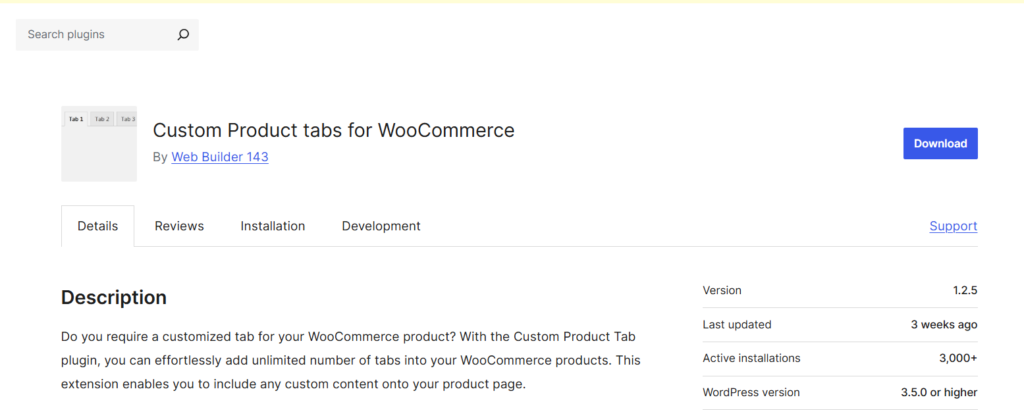
Aside from allowing you to effortlessly add an unlimited number of tabs into your WooCommerce products, this lightweight plugin also can help you incorporate any custom content onto your product page so you can personalize your WooCommerce product page to your liking.
Here’s how to add additional information in WooCommerce products using this plugin:
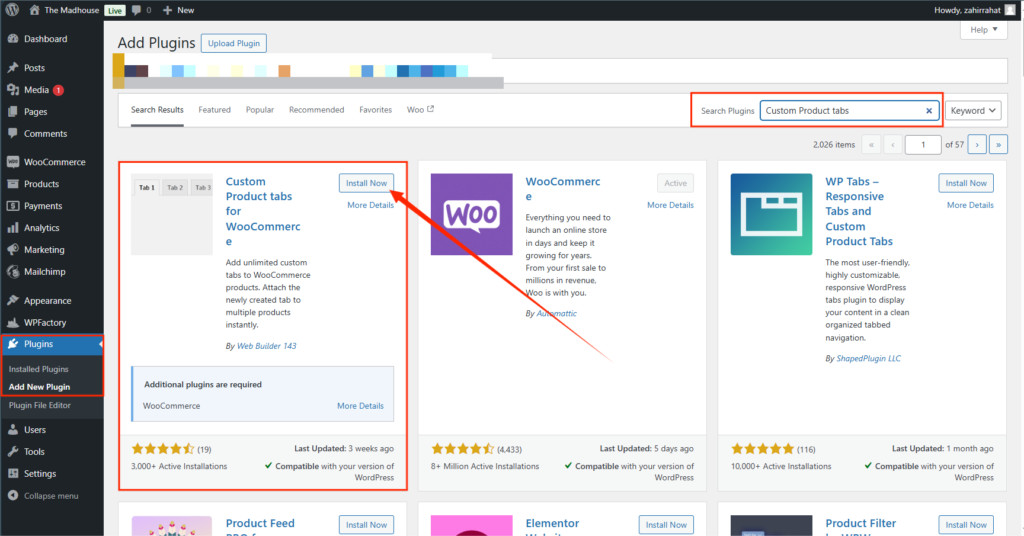
Step 1: Install and Activate the Plugin
First, go to Plugins → Add New Plugin from your WordPress dashboard. Next, search for “Custom Product tabs” in the search bar above. Once the plugin appears, click Install and Activate.
Step 2: Add Custom Tabs to a Product
Again, from your WordPress dashboard, navigate to Products → All Products, and then select the product you want to edit. You’ll find the new “Custom Tab” option there.
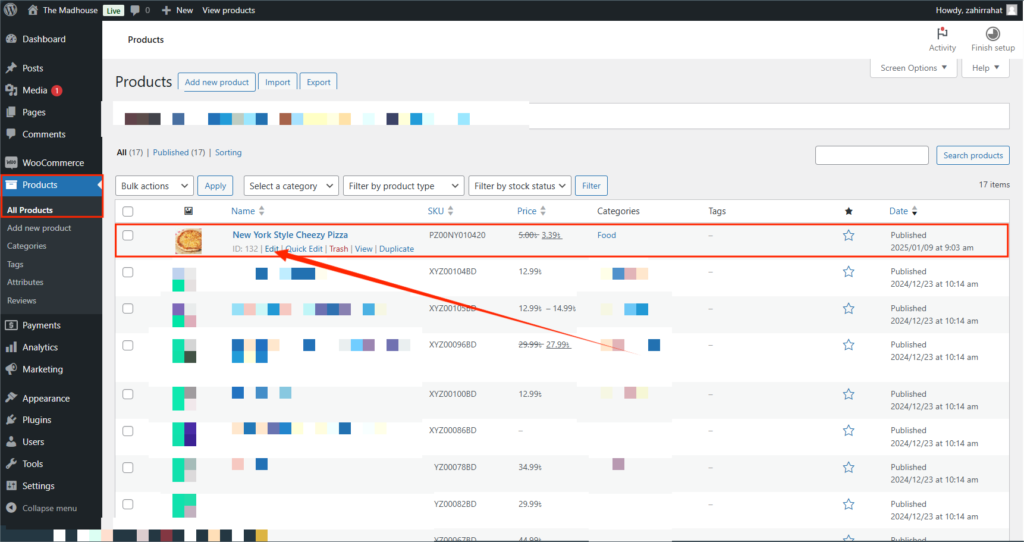
You can also access the plugin from Products → Tabs.
Once there, click on the “Add New Tab” Button.
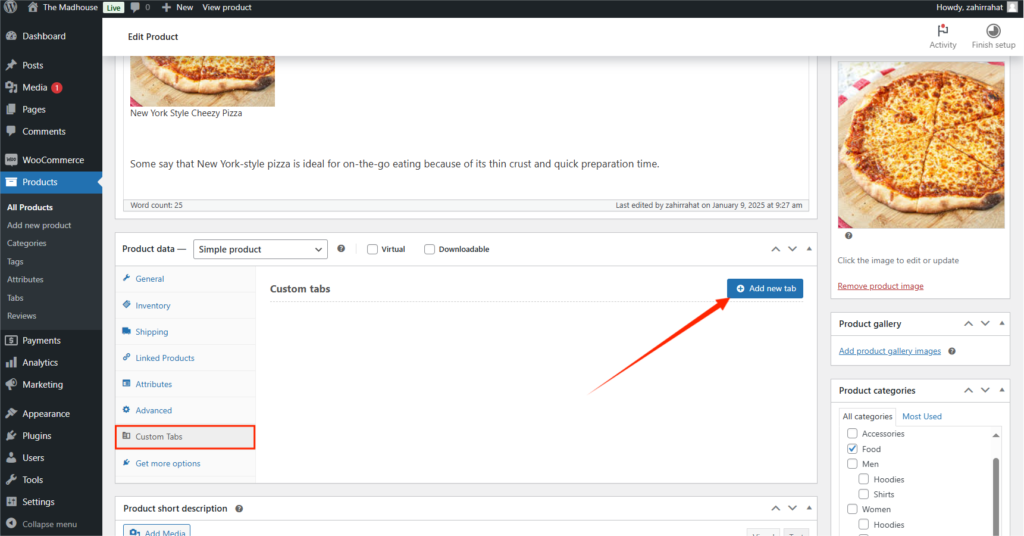
Next, enter a title (e.g., “Specifications”), and fill in the content (e.g., product dimensions, materials).
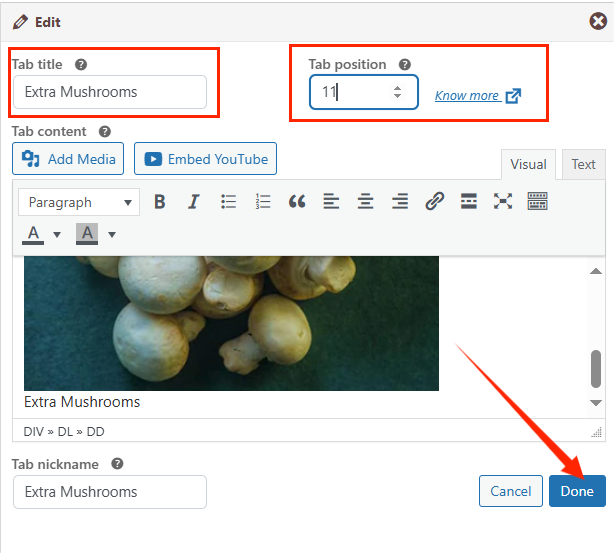
Don’t forget to specify the tab position. On the designated box, put your desired position where you and the additional product data to be displayed.
Here’s the list of positions:
- Blank/Zero (0): Before all default WooCommerce tabs.
- 1 to 10: Before the Description tab.
- 11 to 20: Between the Description and Additional Information tabs.
- 21 to 30: Between the Additional Information and Reviews tabs.
- 31 and above: After all default WooCommerce tabs.
Step 3: Save and Update the Product
Lastly, save your changes and click on the update button. And just like that, the custom tabs will be displayed on the product page.
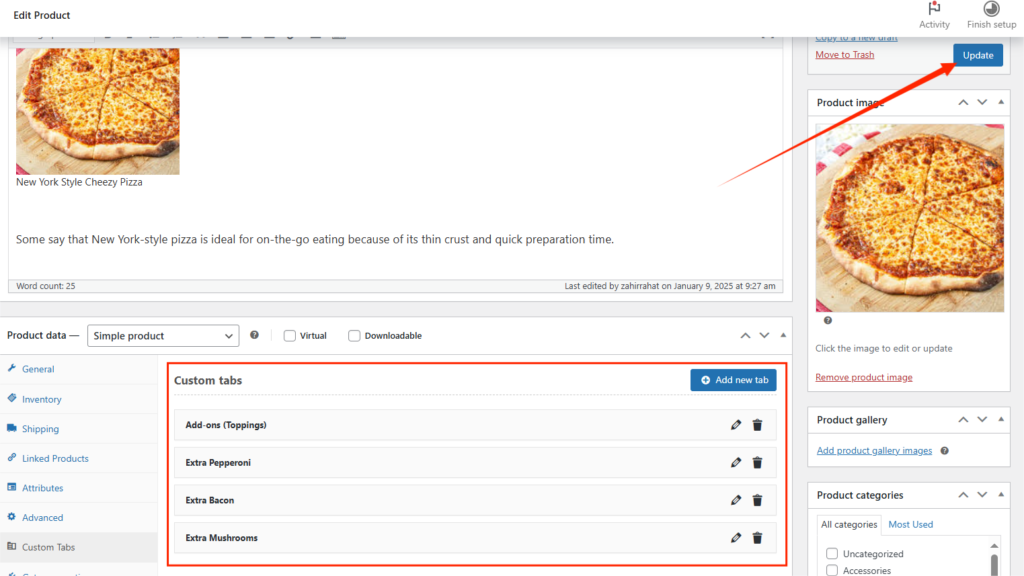
You can create as many tabs as you want with this dynamic plugin. Additionally, this plugin also allows you to embed the video of your choice directly to your WooCommerce product pages. Your updated product page will look something like this:
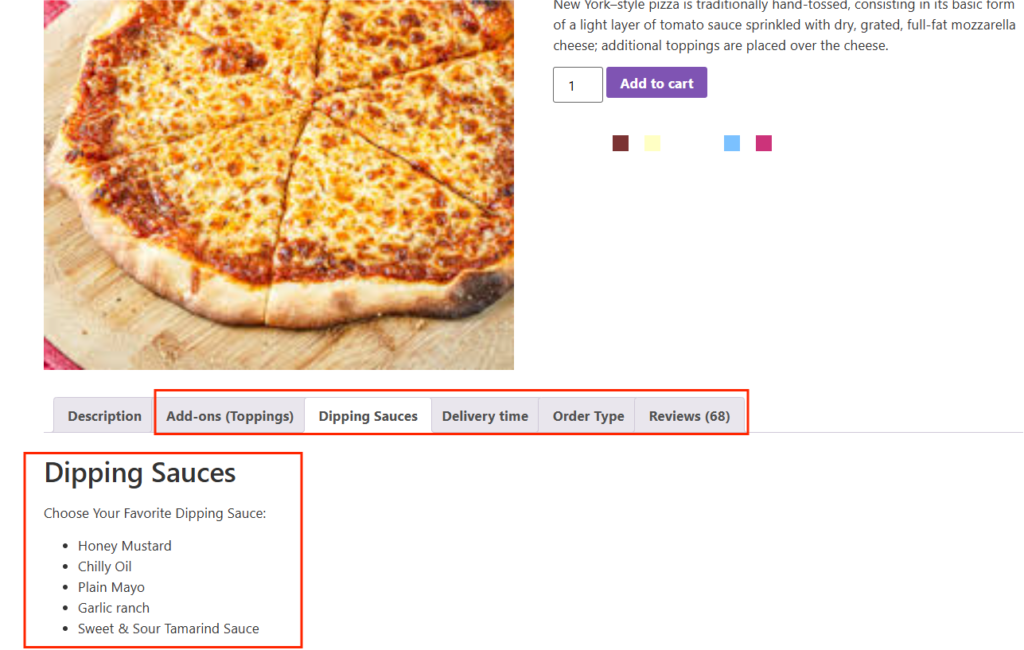
Using a plugin to add additional information in WooCommerce products is ideal for stores that need to display detailed product specifications, user guides, or FAQs in an organized format. It’s also great for non-technical users who prefer a no-code solution.
Method 2: Using WooCommerce’s Built-In Settings
Let’s move onto our second method: using WooCommerce’s default settings.
WooCommerce has built-in features for adding additional product information using attributes and the Additional Information tab. This method is straightforward and doesn’t require any third-party plugins.
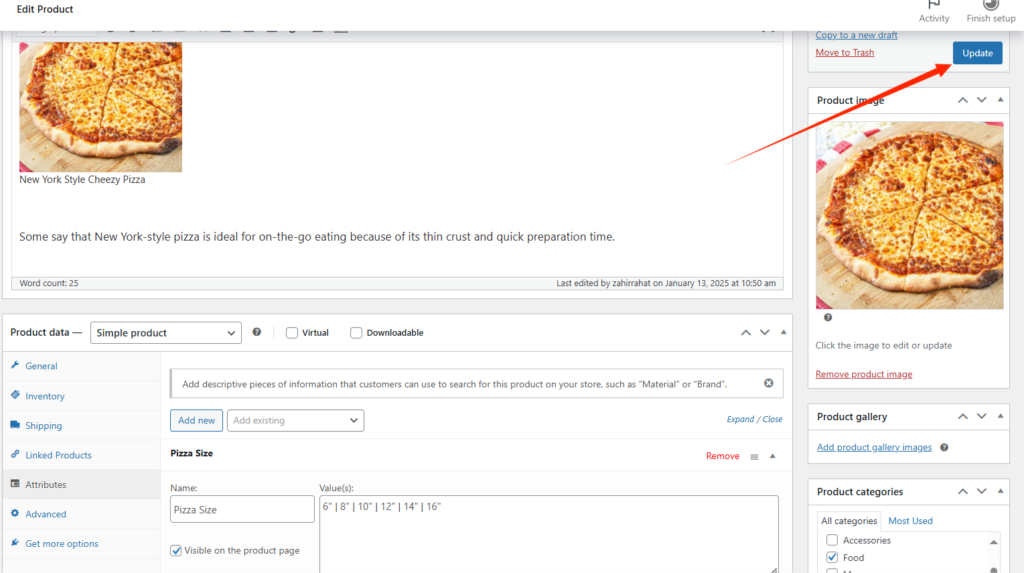
To add additional information in your WooCommerce products, you’ll need to create custom product attributes first.
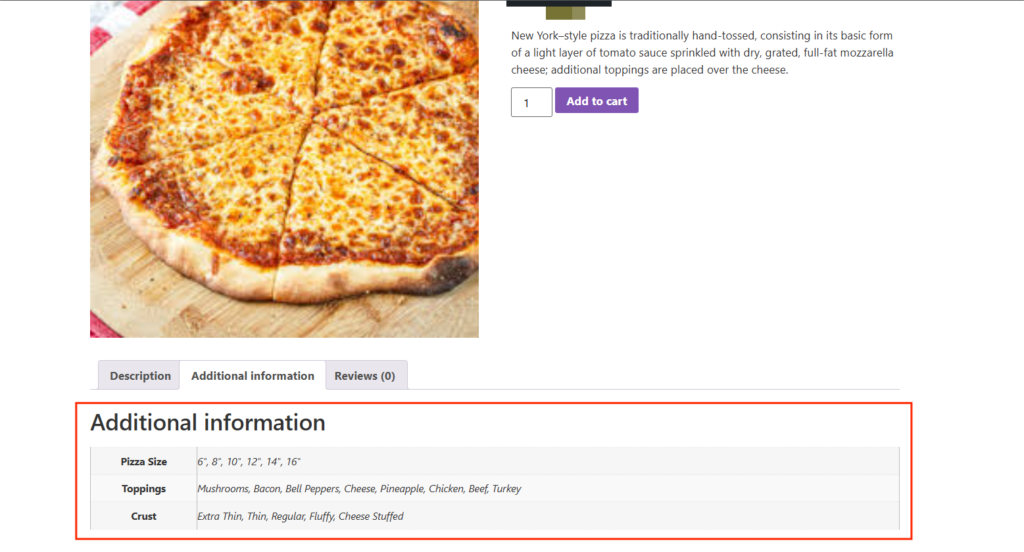
After defining and assigning attributes to your products, they’ll automatically appear in the ‘Additional information’ section on the product page.
Here’s how you can add additional information in WooCommerce products in just a few clicks:
- Navigate to Products → Attributes from your WordPress dashboard.
- Then, add a new attribute (e.g., “Size”) and
- Next, configure the terms for the new attribute (e.g., “Regular”, “Family”). Separate each term with the “|” symbol.
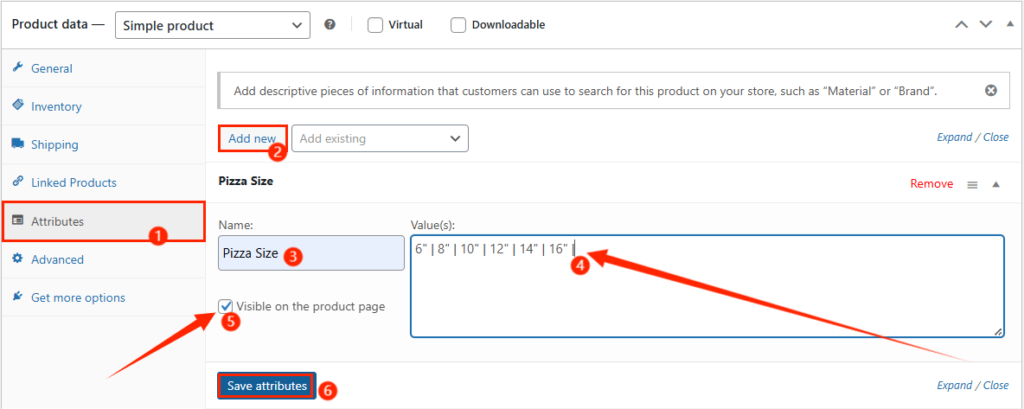
- Check the “Visible on the Product Page” box and save the attribute.
- Lastly, click on “Update” to apply the changes.
And that’s about it. The attribute information will now be displayed under the default Additional Information tab on your product page.
This method is ideal for stores with standard product data, such as size, color, or materials, where the information doesn’t need frequent changes. It’s also great for simple stores that want to avoid adding plugins or custom code.
How to Edit the Text in the Existing Additional Information Tab
If you already have content in the Additional Information tab and just want to change the wording, you’re editing an attribute value, not creating a new tab.
Go to the product’s edit screen, open the Attributes panel, update the value field for the attribute you want to change, then click Update. The new text replaces the old text in the tab immediately.
If you want to rename the tab label itself, for example changing “Additional Information” to “Specifications,” that requires a small code snippet since WooCommerce doesn’t expose this in the default settings:
add_filter( 'woocommerce_product_tabs', 'rename_additional_info_tab' );

function rename_additional_info_tab( $tabs ) {
    if ( isset( $tabs['additional_information'] ) ) {
        $tabs['additional_information']['title'] = __( 'Specifications' );
    }
    return $tabs;
}
Add this to your child theme’s functions.php file. If you’d rather avoid code, the plugin from Method 1 also lets you enable or disable default tabs from its settings, which is a simpler path if you’re already using it.
Method 3: Using a Custom Code
If you want advanced customization to suit your unique requirements, using custom code is the most flexible method.
With a little coding, you can add custom fields, display dynamic information, or create entirely new sections on the product page. Here’s how you can do this:
- Go to Appearance → Theme File Editor in your WordPress dashboard.
- Select the functions.php file of your active theme.
- Add the following php code snippet to add a custom meta box in the product editor:
add_action( 'add_meta_boxes', 'custom_product_info_metabox' );

function custom_product_info_metabox() {
    add_meta_box(
        'custom_product_info',
        'Additional Product Information',
        'custom_product_info_callback',
        'product',
        'normal',
        'high'
    );
}

function custom_product_info_callback( $post ) {
    $custom_info = get_post_meta( $post->ID, '_custom_info', true );
    echo '<textarea style="width:100%;" name="custom_info">' . esc_textarea( $custom_info ) . '</textarea>';
}- Next, add the following code snippet to save the data that are put into the custom field:
 add_action( 'save_post', 'save_custom_product_info' );

function save_custom_product_info( $post_id ) {
    if ( isset( $_POST['custom_info'] ) ) {
        update_post_meta( $post_id, '_custom_info', sanitize_textarea_field( $_POST['custom_info'] ) );
    }
}- Then, add the code below to display the Custom Field on the Product Page:
add_action( 'woocommerce_single_product_summary', 'display_custom_product_info', 20 );

function display_custom_product_info() {
    global $product;
    $custom_info = get_post_meta( $product->get_id(), '_custom_info', true );
    if ( ! empty( $custom_info ) ) {
        echo '<div class="custom-product-info"><h3>Additional Information</h3><p>' . esc_html( $custom_info ) . '</p></div>';
    }
}- Lastly save and update the file to check if the changes have been applied.
Although this method is a bit technical, it’s perfect for developers or advanced users who need highly customized product pages. This is the best approach for unique use cases where plugins or built-in features don’t offer enough flexibility.
Frequently Asked Questions
How do I edit the text in the WooCommerce Additional Information tab?
Open the product’s Attributes panel, update the value for the attribute showing in that tab, and click Update. The tab pulls directly from attribute values, so editing the attribute updates the visible text immediately. No plugin or code is required for this.
Can I add HTML or a video to a custom product tab?
Yes. Custom tab plugins like Custom Product Tabs for WooCommerce use the standard WordPress editor for tab content, which supports text, images, HTML, and shortcodes. This makes it possible to embed a product video or an iframe directly inside a tab.
How do I remove the Additional Information tab in WooCommerce?
Some custom tabs plugins let you disable default tabs, including Additional Information, directly from their settings screen. Without a plugin, you can remove it with a code snippet that unsets the tab from the woocommerce_product_tabs filter.
Do I need a plugin to add extra product information?
No. WooCommerce’s built-in attributes handle standard product data like size or color without a plugin. A plugin becomes useful when you need multiple custom tabs, conditional display, or content types like video and shortcodes that attributes don’t support.
Key Takeaways
- WooCommerce offers three ways to add product information: a dedicated plugin, built-in attributes, or custom code.
- Attributes are the fastest no-code option for standard data like size, color, or material.
- A custom tabs plugin like Custom Product Tabs for WooCommerce works best when you need multiple tabs, videos, or shortcode content.
- Editing the Additional Information tab’s text just means updating the attribute value on the product, not creating a new tab.
- Renaming or removing the default tab label requires either a small code snippet or a plugin that supports default tab control.
- Custom code gives full control but should be tested in staging before going live on a store.