How to Add Tracking Number to WooCommerce? Free
To add tracking numbers to WooCommerce, first, install and activate the free Advanced Shipment Tracking plugin. Next, choose your shipping carriers from the settings. Then, go to the edit order page and add tracking numbers to orders. And, your tracking number will be displayed on the WooCommerce order page for customer visibility.
Tracking numbers help you follow a shipment from start to delivery. They show updates on where the package is, including any stops along the way with address details. This makes it easy for both businesses and customers to track orders and stay informed.
Unfortunately, WooCommerce doesn’t have built-in settings for adding shipment tracking numbers to your WooCommerce store. Still, you can manually enter tracking numbers or provide tracking details within customer order emails.
However, it lacks automation for sending customer updates, which can be time-consuming.
But here’s an easy yet free solution.
The Advanced Shipment Tracking (AST) plugin is one of the best options to add order tracking numbers to WooCommerce orders for free. AST allows you to automate the process, giving customers easy access to their shipment details directly in their order emails.
So, let’s add the shipment track number to Woocommerce.
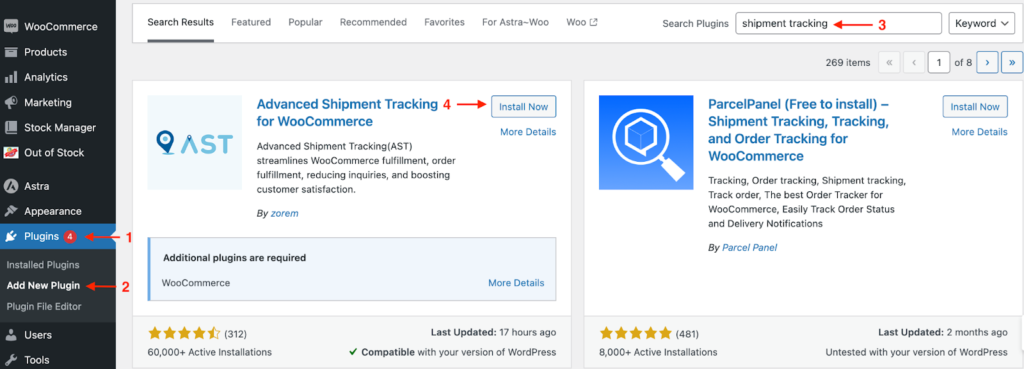
Step 1: Install Advanced Shipment Tracking Plugin
- Go to Woocommerce >> Plugins >> Add New Plugin.
- Search for shipment tracking.
- Install the Advanced Shipment Tracking Plugin & activate it.
Step 2: Choose Shipping Carriers
- Navigate to Woocommerce >> Shipment Tracking
- Select the Shipment Carriers tab
- Hit on the Enable Carriers button
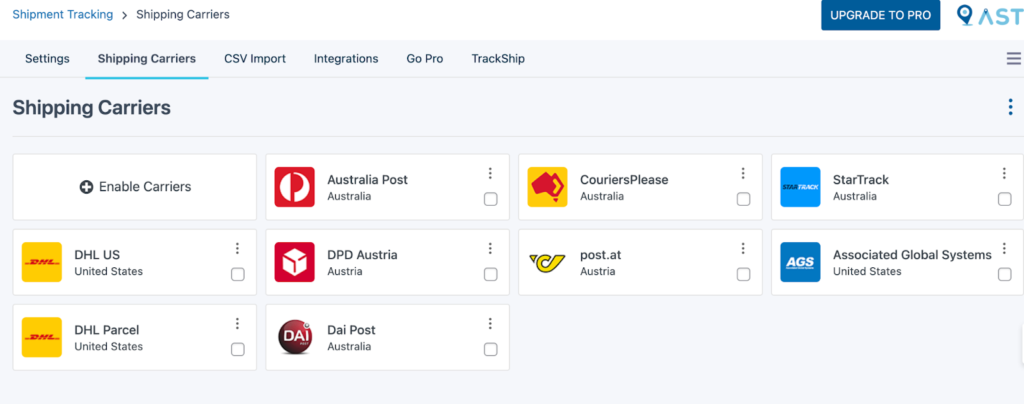
- Add shipment carriers according to your shipping preference from the sidebar menu.
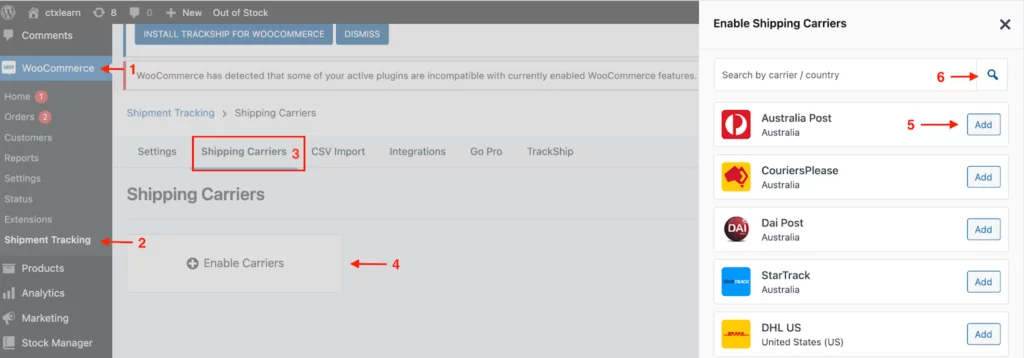
For now, I’ve added some shipping providers to continue the process of adding tracking numbers to Woocommerce orders.
Bonus Tip:
You can also search for shipment providers based on the carrier name or country in the search bar. Still, if you can’t find your preferred shipment provider, then you can add your carrier to the Add Custom Carrier section inside the navigation bar.
Here, you can also sync the carriers and select them all at a time.

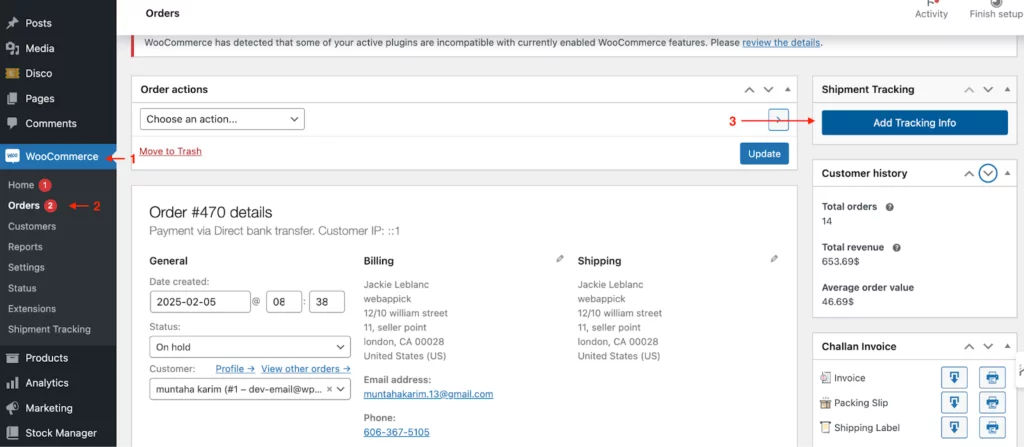
Step 3: Add Tracking Numbers to Orders
- Go to Woocommerce >> Orders.
- On the order page, click on the order for which you want to add the shipment tracking number.
- On the order page, hit Add Tracking Info on the right panel.
- Now, in the add tracking tab,
- Enter the tracking number for your order.
- Select the shipping provider and shipping date.
- Mark the order as “Completed.”
- Hit Fulfill order.

Note:
Make sure you enter a unique tracking code for each order to avoid any interruption.
And, if the Mark as Completed box is checked, the order status in your WooCommerce dashboard will automatically update. Additionally, the customer will receive an email with their tracking number and shipping confirmation.
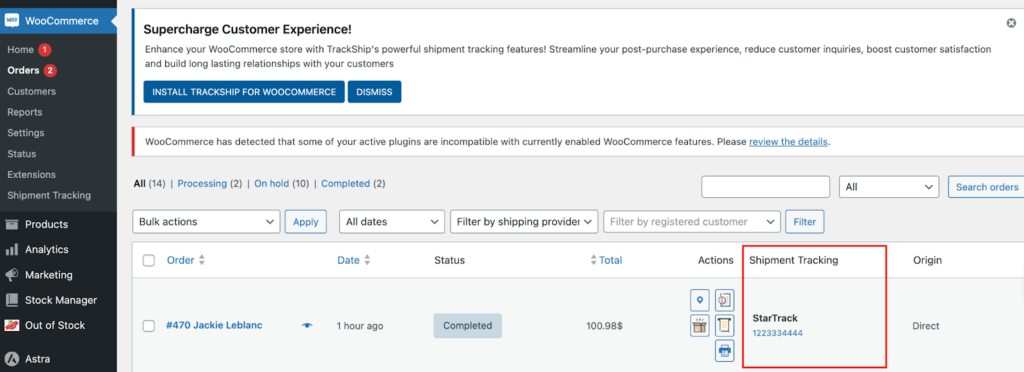
Step 4: Display the Tracking Number On Woocommerce Order Page
When you successfully add the order’s tracking number, the tracking code will be on the order page of your Woocommerce store.
To display the tracking number on your Woocommerce order page,
- Go to Woocommerce >> Order.
- In the orders list, there will be a dedicated tab of Shipment Tracking.
- Under this tab, all the tracking numbers for each particular order will be shown.
Bonus Tip:
To make a tracking number link, go to Woocommerce >> Orders. Hit on any order you want to make the tracking number link. In the edit order section, you’ll find the tracking number as a clickable link on the order page.
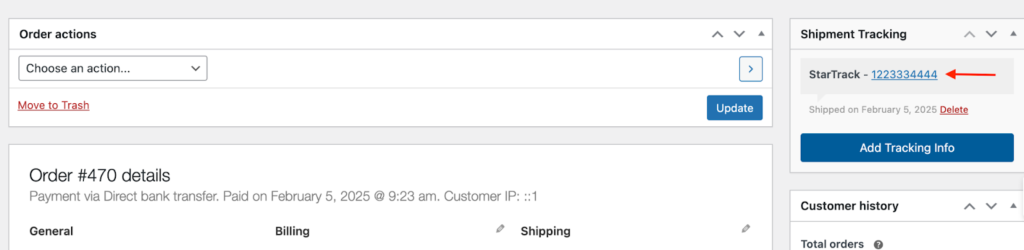
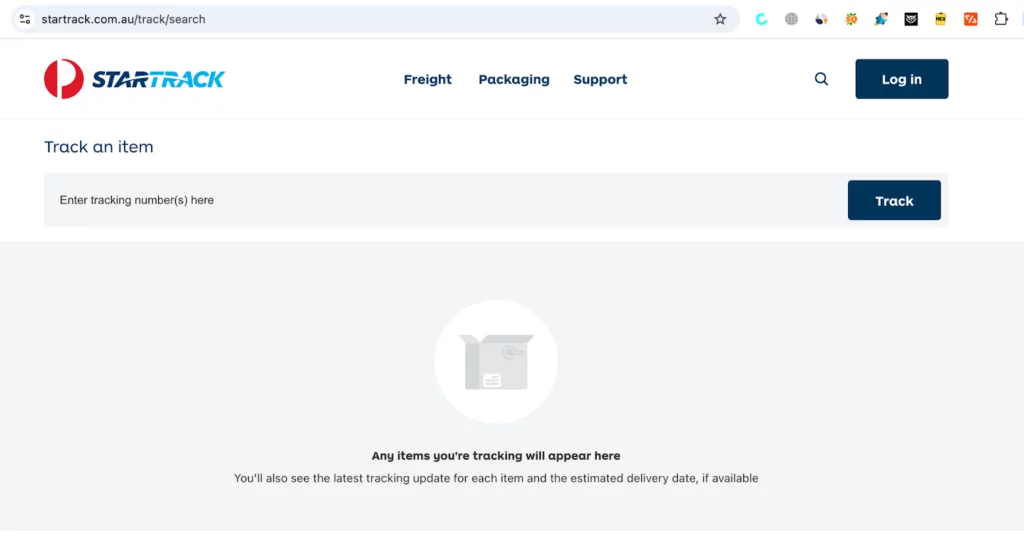
With this tracking number link, you can access the carrier’s tracking page directly.
Step 5: Settings to Send Tracking Numbers to Customers (Bonus Step)
Once the tracking numbers for your Woocommerce orders are set, let’s set up the settings to track the shipment through the tracking code.
To track orders with the tracking number, go to Woocommerce >> Shipment Tracking >> Settings.
- General Settings
- In the ‘Add Tracking Order Action’ section, select order statuses for the WooCommerce Order page.
- In the ‘Order Emails Display’ section, choose which emails include a custom tracking URL.
- Hit Save & Close.
Now, your customers can view their tracking information on the View Order or My Account page. And you can also create custom order statuses with the pro version.

- Order Statuses & Notifications
Under order status and notification settings, you can select the orders for which the tracking number will be send via customer order emails.
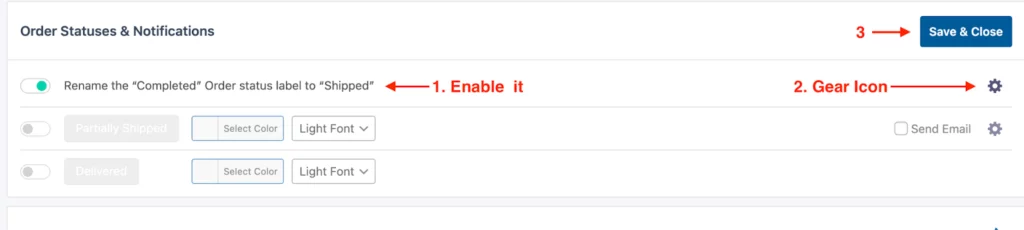
- Order Statuses & Notifications: Change the order status to ‘Completed’ or ‘Shipped’ when the order is finished.
- Edit email notifications: Click the gear icon to adjust WooCommerce email settings.
- Access Email Customizer: The Email Customizer looks like the WordPress Theme Customizer and allows design modifications.
- Modify Email Templates: Customize the design and content of WooCommerce order and shipping emails.
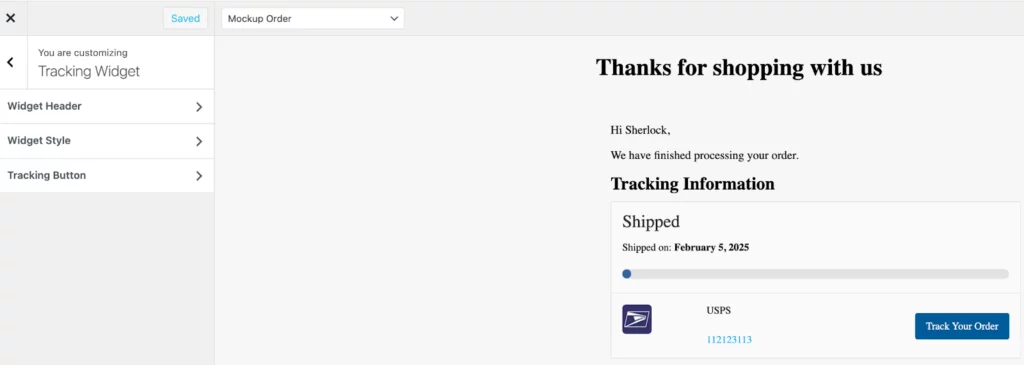
It will automatically send the tracking number in the completed or shipped order mails to the customers.
- Shipment Tracking API
The shipment tracking API feature lets you update tracking numbers automatically for your Woocommerce orders and complete orders directly from your store.
It also gives you the option to adjust the shipping date format whenever tracking information is updated from other platforms to keep everything in sync.

- PayPal Tracking
The PayPal Tracking integration for WooCommerce sends tracking numbers, shipping provider, and status to PayPal. This happens when orders are marked “Shipped/Completed.” Here, you can see the details in the PayPal transaction’s shipping section.
At the bottom, you can enable PayPal order tracking, but with only the Pro version of Advanced Shipment Tracking.
- It’ll automatically send tracking codes and statuses from WooCommerce to PayPal
- After editing the settings, click ‘Save & Close’ to save your changes.
How to Bulk Add Tracking Numbers in WooCommerce?
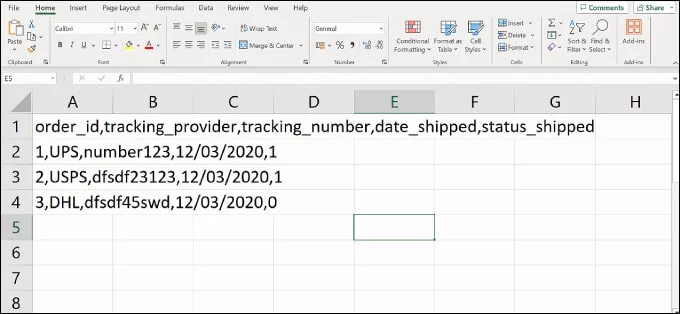
If you have a large inventory, it’s not possible to manually add each tracking number to all your Woocommerce orders. Then, you can create a CSV spreadsheet of your orders with their tracking information and bulk import this file into the Advanced Shipment Tracking panel.
Before proceeding, ensure your CSV file includes the following shipping tracking information:
- Order ID
- Shipping service
- Tracking number
- Order delivery date
- Shipped status (1 for shipped, 0 for not shipped)
This is the proper CSV file format for bulk adding tracking numbers:
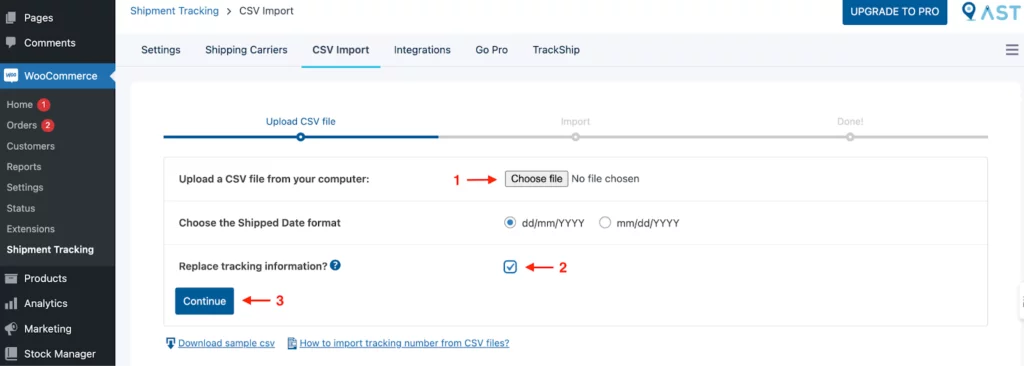
To bulk add tracking number to Woocommerce orders,
- Go to Woocommerce >> Shipment Tracking.
- Click on the CSV Import tab.
- Click the ‘Choose File’ button and select your spreadsheet.
- Pick your preferred date format for the tracking information.
- To replace existing tracking details, tick the ‘Replace tracking information?’ box.
- Click the ‘Continue’ button to start importing the file.
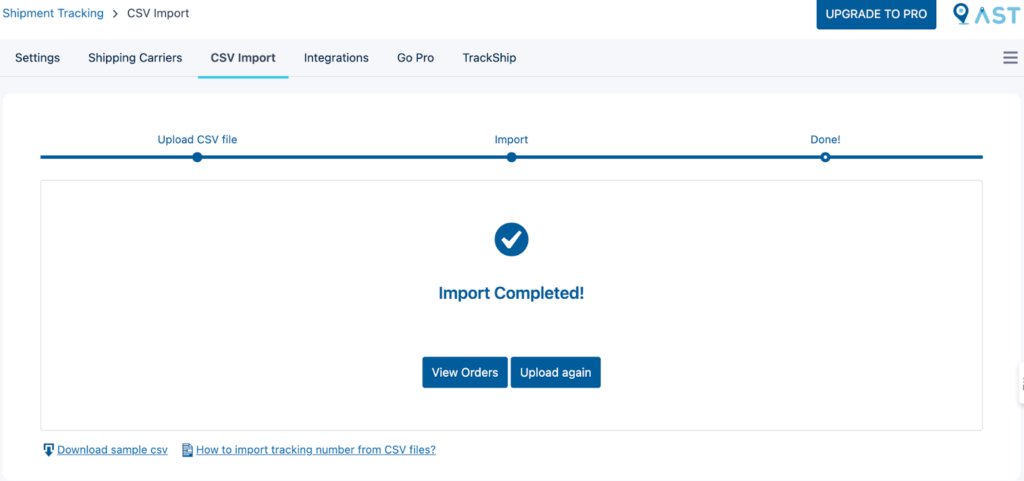
After submitting the tracking.csv file properly, you can view the bulk tracking number uploaded in your orders. If still there’s any issue, you can download the sample csv file to check the formatting.
Conclusion
The best way to add a tracking number to Woocommerce is with the free Advanced Shipment Tracking (AST) plugin. With features like carrier integration, bulk import of tracking numbers, and customizable email notifications, you can simplify order tracking management for both store owners and customers.
FAQS
How do I automatically generate a tracking number for WooCommerce orders?
To automatically generate tracking numbers for WooCommerce orders, you can use plugins like Advanced Shipment Tracking (AST) or WooCommerce Shipment Tracking. These plugins integrate with shipping carriers and automatically generate unique tracking numbers for each order.
Can I send a tracking number via email in WooCommerce?
Yes, you can send a tracking number via email in WooCommerce. For this, you can use plugins like Advanced Shipment Tracking (AST) to automatically send tracking details to customers when their order is marked as “Shipped” or “Completed.”

Helpful
Informative post.