How to Make a WooCommerce Product Feed?
Our state-of-the-art WooCommerce Product Feed manager plugin, named CTX Feed, comes in handy to relieve you from entering all the prerequisites one by one. Instead, you follow some steps to easily create, alter, or develop a product feed compatible with Google Shopping or any other channels. Let’s delve into the step-by-step guide to creating a product feed using the CTX Feed plugin.
Step-By-Step guidance to create product feed using CTX Feed Pro

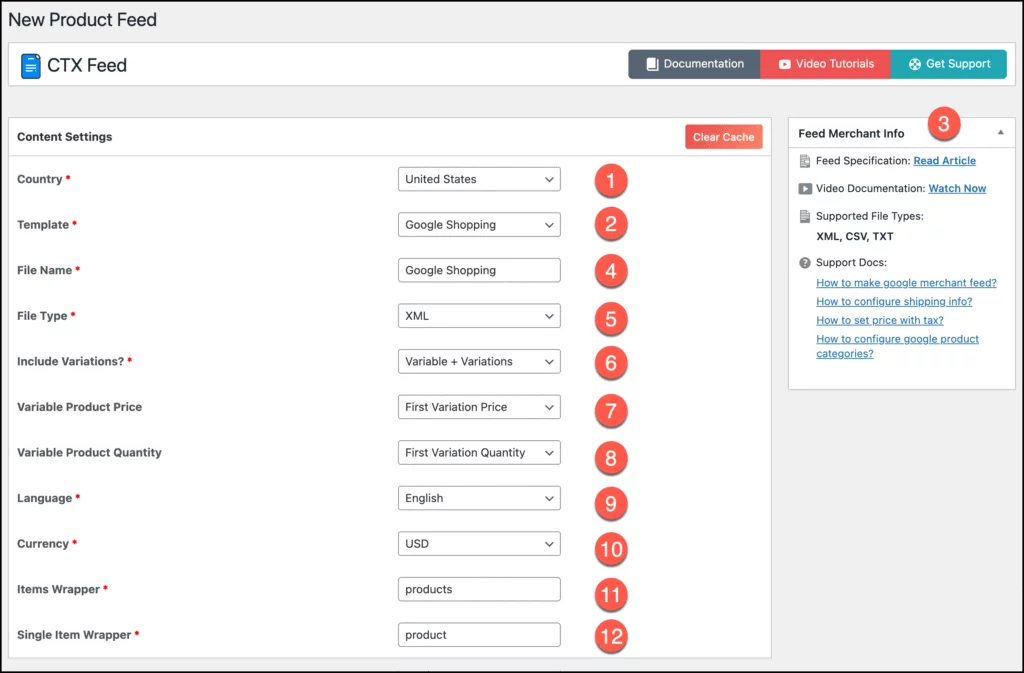
Content Settings

- Country – CTX Feed will automatically pick the country according to the country your WooCommerce store is based on. The country will come to an effect when you make a Google Shopping Feed or Bing Shopping Feed. However, you can manually select the country other than what’s entered into your WooCommerce setting. Don’t forget to add the shipping attribute into the feed configuration, as this will ensure whether your store will ship the items in selected countries or worldwide.
If your country is selected as the United States, CTX Feed will only store the shipping information of the United States in the product feed. But you can easily override this by adding shipping info for any country from CTX Feed > Settings.
- Template – It is one of the most vital options of the CTX plugin as it determines what essential attributes are needed to make a complete product feed for that particular Channel. There are more than 100 ready-made channel templates to choose from the drop-down list, including Google shopping, Bing shopping, Facebook Catalog, etc.
- Feed Merchant info – It consists of 4 essential pieces of information that denote your selected channels’ requirement at the right sidebar.
- Feed Specification: Specific articles will give insight into the feed’s specific requirements.
- Video Documentation: Video tutorials can help you navigate the product feed’s proper implementation using that specific template.
- Feed Type: The format type varies depending on the channel requirements. You can select any of the file format types to make your feed. For example; For Google Shopping, there are three formats (XML, CSV, TXT) available.
- Support Docs: It displays a variety of questions and their solutions according to your chosen template to solve a series of issues along with the product feed generation.
- File Name – A file name is a name you choose to create a feed within the manage Feed option. This name should be unique and devoid of overlapping with the other relevant names to avoid any overridden. Let’s assume; if our given filename is Google_Shopping, then the feed file name will be: google_shopping.xml
Feed Type – Feed type represents the file format of the feed, displaying all the items with their own unique arrangement. There are 5 types of Feed File Types available in CTX Feed, such as XML, CSV, TSV, TXT, and XLS.
XML: This extensible markup language is used to store and transport a large amount of data. This extension concerns how the selected attributed value defines each item rather than how it looks within the feed file. Each row in a feed configuration will appear as an element in a feed file for the XML. Items are enclosed by the angle brackets and are aligned vertically in the feed file.
CSV: This is another file type used to display a large spreadsheet into a plain-text file in which a comma along the column separates each item. This feed format can be opened either using TextEdit or for better visualisation; To open a CSV file using an MS Excel – which contains Unicode characters – MS Excel needs to have the UTF-8 encoding to present the file in the form of binary string to ease your reading.

TXT: It’s precisely the same as CSV, but the extension will have .txt as the file extension.
- Include Variations – This significant feature is used to include all the variations that a variable product can have. When a T-shirt has three different sizes – 1) Large, 2) Regular, & 3) Small; it indicates that the parent product has three variations. Having three sizes also means the product will have three different prices depending on the size. There are 6 options when you click on the drop-down menu.
- Variable Products (Parent): Variable Product breeds all three variations in our case, which is the T-shirt. When you select it, the product feed will only add the parent product of the variations. By selecting it, you will have two other options opened down the line – Variable Product Price and Variable Product Quantity. As a Variable product itself depends on Variations Price and Quantity, you need to set Product Variations Price and Quantity for the Variable product.
- All Variations: Excludes the parent product and includes all the variations.
- Default variation: When one of the variations is set as default into product setting, it will only show that particular variation in the feed.
- First Variation: Add the variation that is listed first in the variation list.
- Last Variation: Add the variation that is listed last in the variation list.
- Variables + Variations: This is the most typical example of this type as it will include the parent product and its all associated variations. If there are 3 variations, together with the parent product, there will be 4 products added in the feed for this instance.
- Variable Product Price – In the include variations section, when variables product or variables + variations is selected, you need to select the option whether you wish to choose the variation’s price or the variable’s price since the variable (parent) doesn’t have any price mentioned in the product listing. Therefore, You can pick either the first variation price or the maximum variation price, or the minimum variation price.
- Variable Product Quality – Likewise, choose either the first variation quantity or the maximum or the minimum, or the sum of variation quantities.
- Language – Creating your multi-language product feed is no longer a hassle since our CTX Pro Feed supports many distinctive multilingual plugins like WPML, Polylang, & TranslatePress. Once these plugins are installed and configured, you can choose any of your preferred languages to create the product listings.
- Currency – Whether it’s a dollar, Pound, or Euro, choosing the perfect currency in terms of your store is just a click away. CTX Feed Pro supports Multi-Currency plugins, such as Aelia, Currency Switcher, WPML, or WOOCS, to find suitable currencies from the drop-down list.
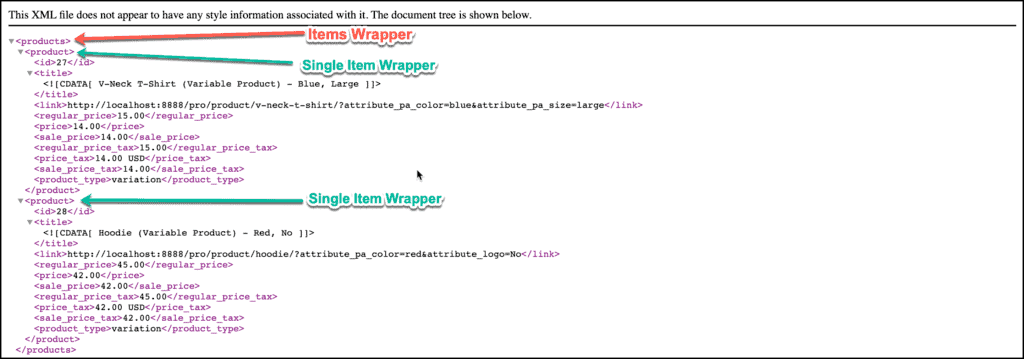
- Items Wrapper: When you make an XML feed, the default value is the products. Products enclose all the products into a single element. This option won’t apply in the case of the Built-In Templates. This option will only be effective when you make an XML feed using Custom Template 1.

- Single Item Wrapper – Being Product a default value, it encloses each product information into this element. Again, this single-item wrapper requires an XML feed type and Custom Template 1.

- Delimiter – When you choose CSV in the feed type toggle bar, it will open two extra options in lieu of items wrapper and Single item wrapper. One of them is the Delimiter, which mainly uses Comma (“,”) to separate the items in a line, but is not limited to since you can opt for
- The comma (“,”
- Colon “:”
- Space “ “
- Pipe “I”
- Semicolon “;”
- Tab “\t”


- Enclosure – Data that corresponds to the item in a column is enclosed with a ” sign.
FEED CONFIG:

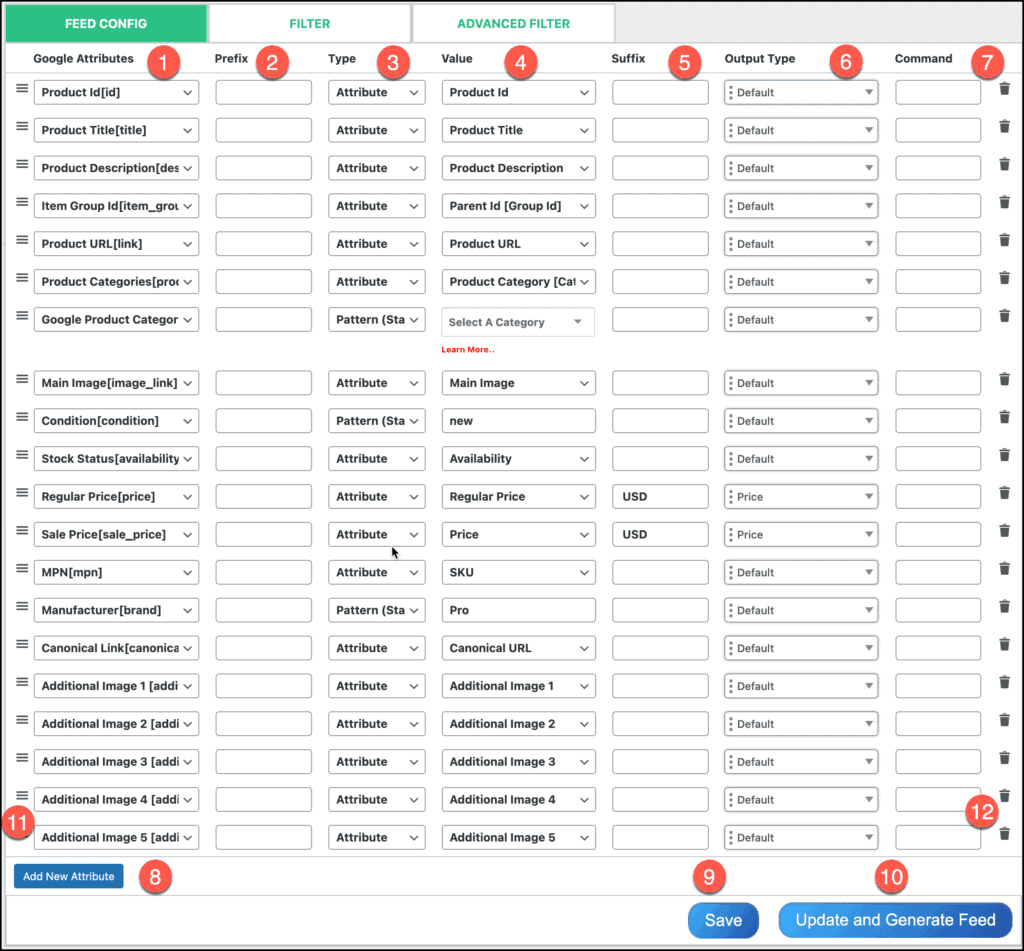
- Google Attributes – Whichever channel you select in the template drop-down list, the Attributes will be selected according to that channel. In this instance, the attributes are selected as per the Google Shopping Product Feed requirements. CTX Feed has enlisted those attributes which Google Shopping requires. The same goes for other channels too.
- Prefix – This is a series of letters that appear before each value in the column. For example, using a $ sign before the product price is a prefix.
- Type –
- Attribute – This helps to create value for individual products. The attribute value of one product will not overlap with the value of another product as this value is unique.
- Pattern (Static Value) – Clicking Static Value will keep the same value for all the products on your list. For example, if you want to add a single brand/manufacturer name to all of your products, then set the Type to Pattern(Static Value) and type your brand name into the Value field.
- Value – By looking at the attributes row for a specific template, you can choose your value that contains each product’s information.
- Suffix – A series of letters that tend to appear right after the attribute value. If your value is price, then the suffix can be set as USD or EUR. However, the currency might change according to your store currency. If you need a space between attribute value and suffix, then add a space before typing the suffix.
- Output Type – There are almost 20 outputs from which you can pick according to your needs. Let’s check out some of the most common outputs;
- Strip Tags: If the description contains any HTML coding, these strip tags will remove it. For example; <p>any string </p> ⇒ Strip Tags ⇒ any string
- Integer: It changes any fraction number into a whole number. For example; 2.89 ==> Integer ==> 3
- Remove Space: If the title or description has double space between them, this option eliminates the extra space.
- Rounded Price: It will round the figure of your product price. For example; 1.69 ==> Rounded Price ==> 1.7
- CDATA: If any word within the description box matches the main word (description), the XML will appear as an error. However, no error will be shown if CDATA is added, such as
<g: description> <![CDATA[ description] ]> </g:description>
For the Google Shopping template, we have already added CDATA, but for a custom template, no CDATA will be added automatically, but you can set CDATA for the custom template if you want.
- Command – Command has the same application as the Output Type, but it acts differently. It has few more options to process the feed than the output type itself. To know more about it, kindly read the documentation.
- Add New Attribute – This will help you add a new channel attribute.
- Save – Clicking the Save button will only save the feed, but the feed will not generate.
- Update and generate Feed – This will finally generate the product feed or update any changes you made on the feed configuration.

You must be logged in to post a comment.
How can I add attributes to an “Items Wrapper”?
Hi, Can you please explain it?
Hello,
My name is Alexandru and I use CTX Feed.
I need to make a feed with > sign delimiter for aditional image. How can I do that?
Thank you!
Hi,
Please, contact our technical support team from here – webappick.com/contact
Hi, am I able to set a second Item Wrapper? If so how does it work?
Thanks.
Hi EG,
To add a second item Wrapper, you need to use Custom Template 1 where you will find the option to add custom item Wrappers. However, in the pro version, there is a template option (Custom Template 2) which will enable you to create a template with any wrapper you want. Know more about custom template from here – https://webappick.com/docs/ctx-feed/configuration/custom-template-2-php-pattern/
Thank you,