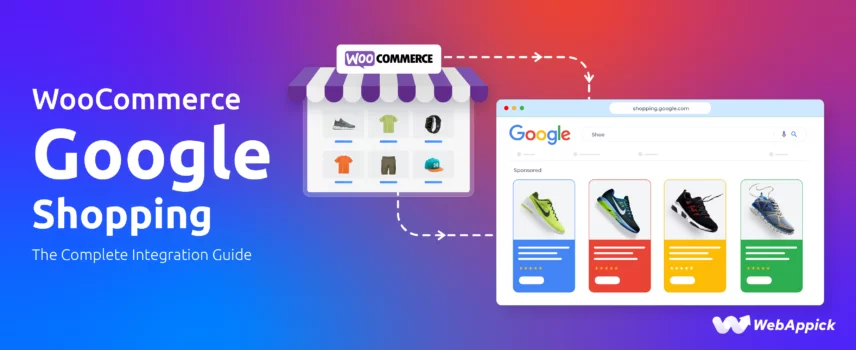
WooCommerce Google Shopping: The Complete Integration Guide
WooCommerce Google Shopping integration helps you list your WooCommerce products directly on Google Shopping to reach more buyers. This guide explains how to connect your WooCommerce store with Google Merchant Center and Google Ads to boost product visibility and drive more sales efficiently.
98% people now in the world shop online. Exciting news for online store owners, right?
However, the journey of a new eCommerce store isn’t as sweet as it may seem.
Ever upload your products only to watch the visitor counter sit stubbornly at zero? Wondering if anyone will ever find your new WooCommerce shop?
You’re not alone— 90% of new stores struggle to get their first wave of visitors.
But here’s the game‑changer: Google Shopping can place your products in front of billions of ready-to-buy shoppers every single day.
The Opportunity:
✅ For FREE: Display your products on Google Shopping’s organic listings without spending a dime.
✅ With Ads: Number one ad platform for products which instantly boost visibility.
✅ 24/7 Exposure: Your products stay front and center while you sleep.
The WooCommerce Bridge:
Your store already holds all the ingredients. In this WooCommerce Google Shopping integration guide, we’ll walk you through all the necessary steps to connect and display your products on Google Shopping.
What You’ll Get:
- Simple Setup: Connect WooCommerce to Google Merchant Center in minutes.
- Effortless Feeds: Create perfectly formatted product feeds with CTX Feed.
- Launch Fast: Go live and start attracting shoppers in under an hour.
Let’s get started.
WooCommerce Google Shopping Integration Guide: Step by Step
To upload and display your WooCommerce products to Google Shopping, you will need to follow these primary steps: –
1. Create a Google Merchant Center Account
- What it is: Your command center for all product listings on Google.
- Why you need it:
- Manages product data, compliance, and performance analytics.
- Required for both free listings and paid Shopping ads.
- Key tasks:
- Sign up at merchantcenter.google.com.
- Verify ownership of your WooCommerce store’s domain.
- Set up shipping, tax rules, and return policies.
2. Generate a Product Feed
- What it is: A structured file (XML/CSV) containing all product details (titles, prices, images, etc.).
- Why it matters: Google uses this feed to display your products accurately.
- How to create it:
- Use a plugin like CTX Feed (or Google’s official “Google for WooCommerce” plugin).
- Map WooCommerce product fields → Google’s required attributes.
- Critical fields: title, price, image_link, gtin, mpn, brand.
- Output: A dynamically updating feed URL (e.g., yoursite.com/feed/google-shopping.xml).
3. Connect the Feed to Google Merchant Center
- Methods:
- Direct upload: Manually add your feed URL in GMC.
- Plugin integration: Tools like CTX Feed auto-sync your feed with GMC.
- Validation:
- Google scans the feed for errors (missing IDs, policy violations).
- Fix issues → resubmit → products go live within 24-48 hours.
How Google Merchant Center Powers Your Listings?
Google Shopping does NOT have its own dashboard—it’s fully powered by Google Merchant Center (GMC). Here’s what GMC does:
| Function | Impact |
| Product Distribution | Shows products across Google Search, Shopping tab, Images, YouTube, Gmail. |
| Compliance Management | Enforces policies (pricing accuracy, image quality). |
| Performance Analytics | Tracks clicks, impressions, and conversion data. |
| Shopping Ads Requirement | Must link GMC to Google Ads to run paid campaigns. |
The Google Ads Connection
To run paid Shopping ads:
- Link your Google Ads account to GMC.
- Google Shopping Campaigns WooCommerce will use product data directly from your Merchant Center feed.
- Free listings + paid ads can run simultaneously for maximum visibility.
⚠️ Key Insight: GMC is your product database. Google Shopping is just one channel displaying that data. Without GMC, you can’t list anywhere on Google.
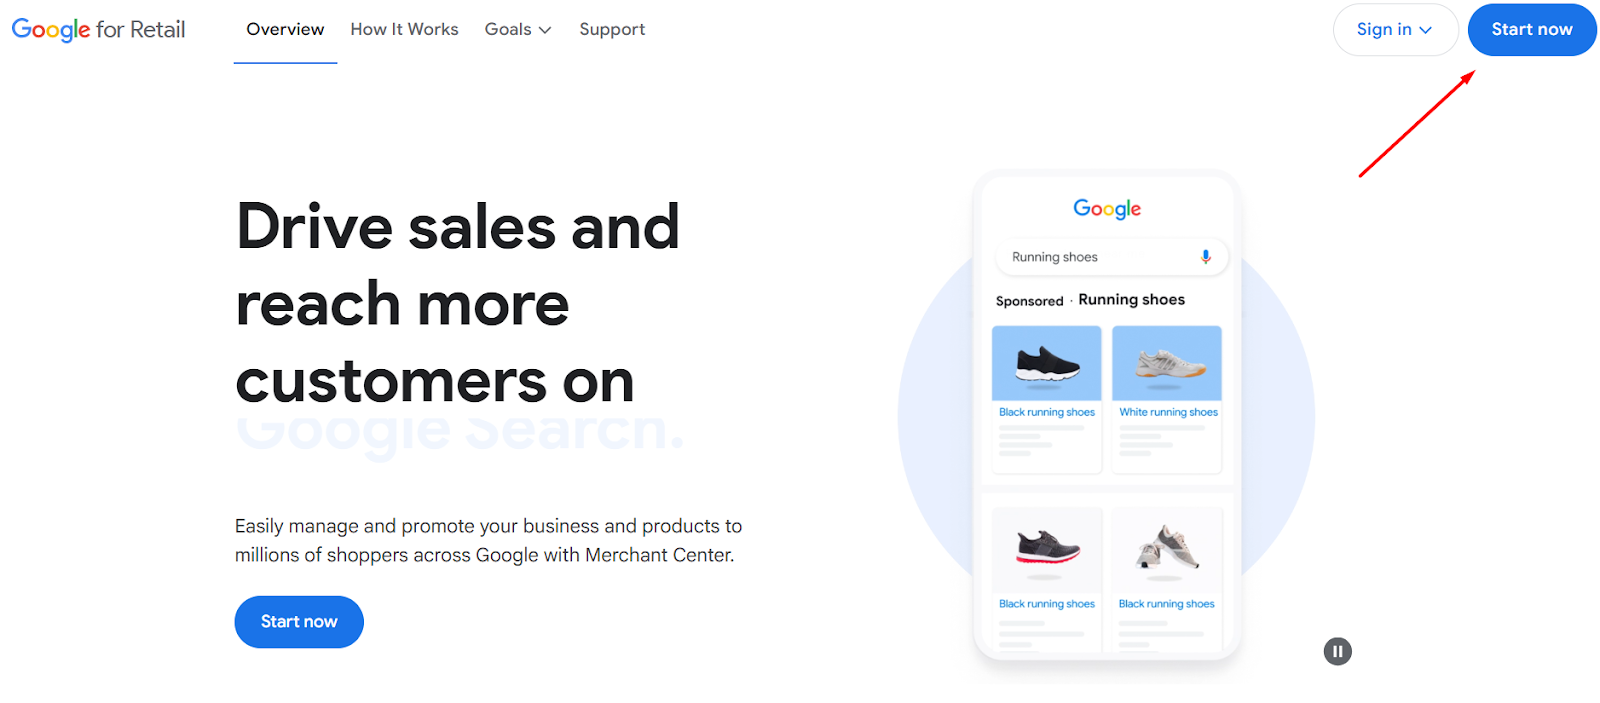
How to Set Up Google Merchant Center Next?
In our WooCommerce Google Shopping Integration Guide, the first step is to create a GMC account. Google Merchant Center is a free platform anyone can use.
- Requirement: A working Gmail account.
The latest version of GMC is called Google Merchant Center Next. Let us walk you through how to set up an account.
- Go to https://www.google.com/retail/ and click Start Now.
- “Do you sell products online?” – select Yes.
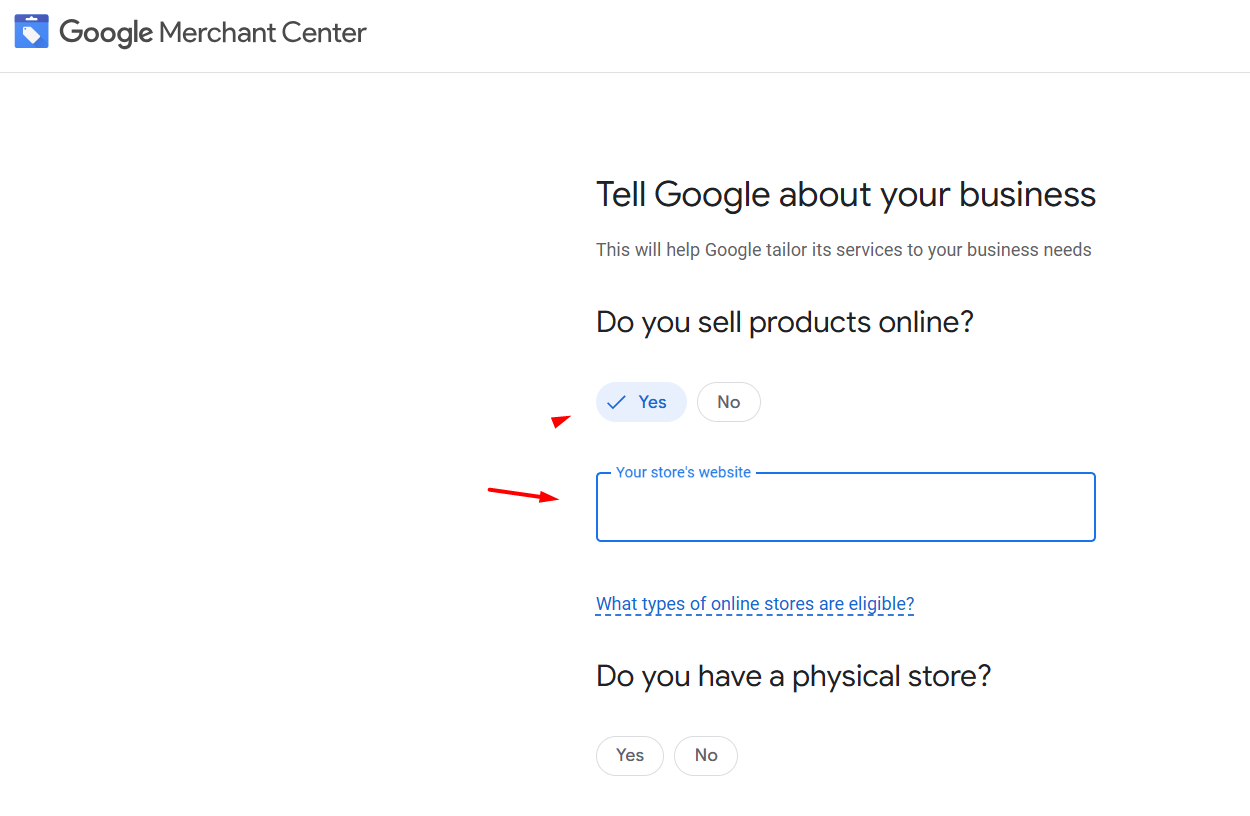
- Enter your website URL and continue.
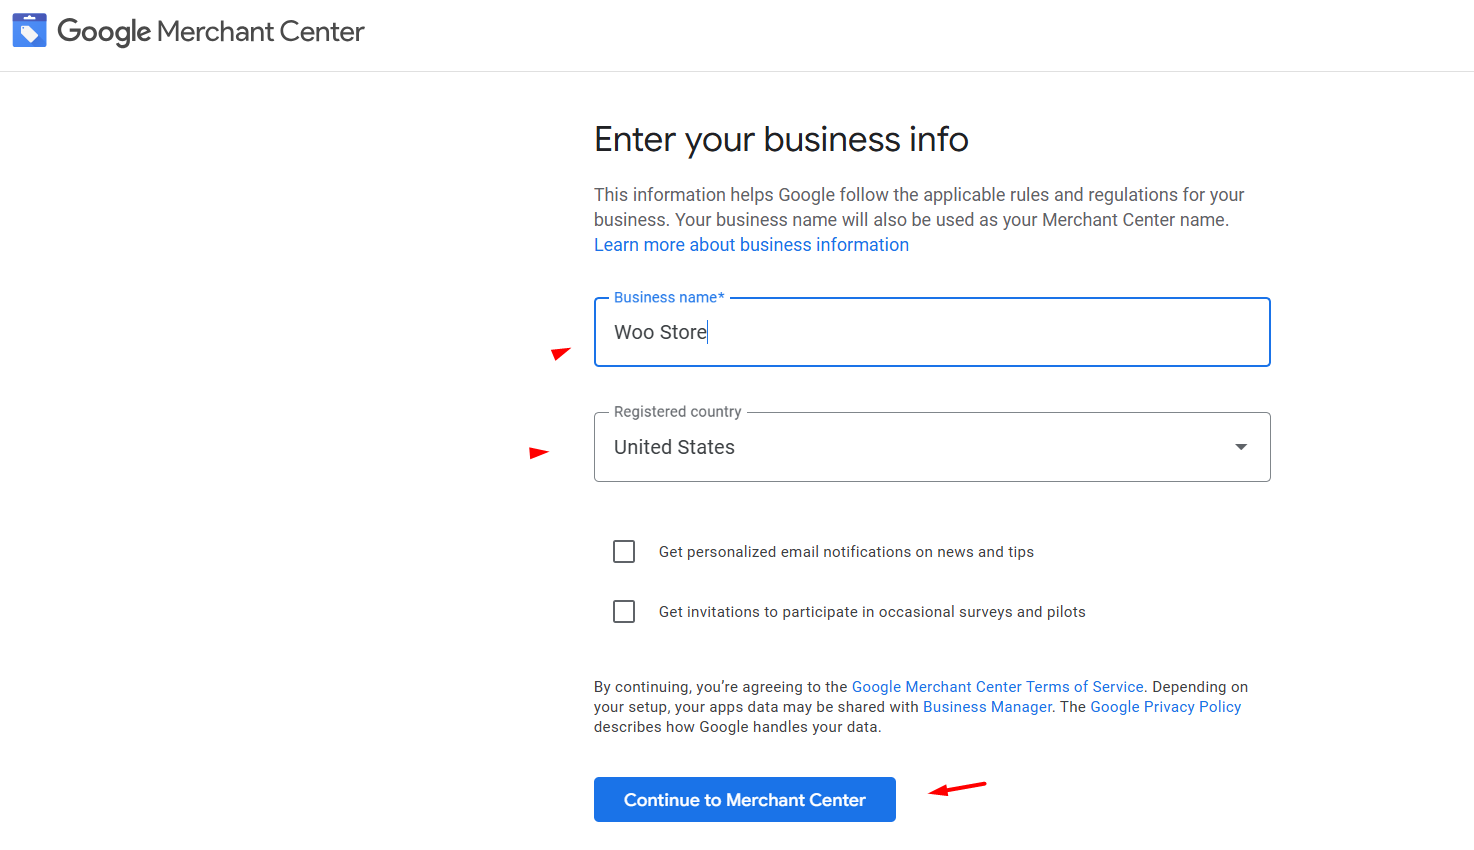
- On the next screen, click Continue To Merchant Center.

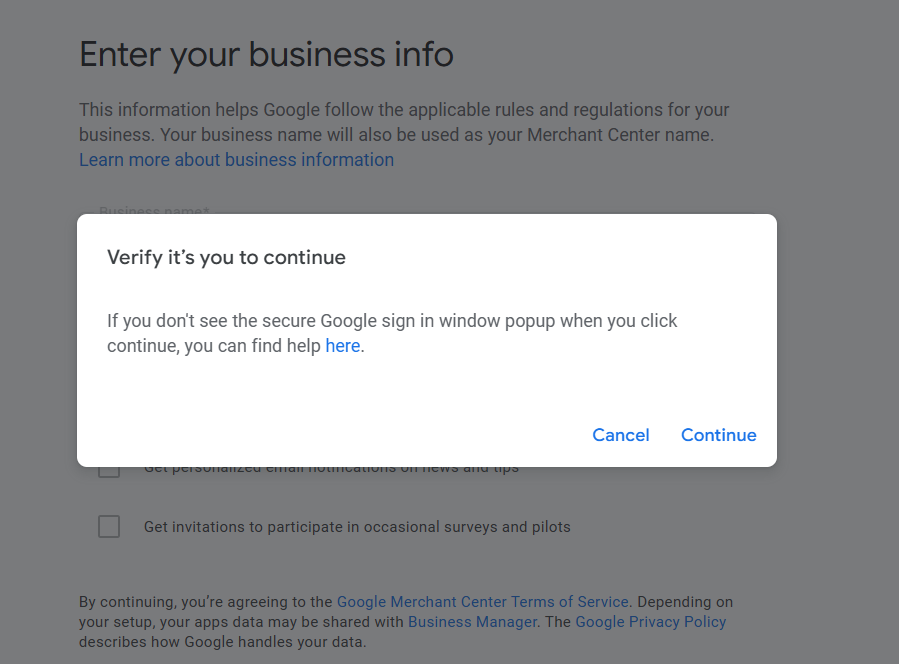
- Enter your business name and country of origin.
- It will redirect to your Gmail login window to verify it’s your own account.
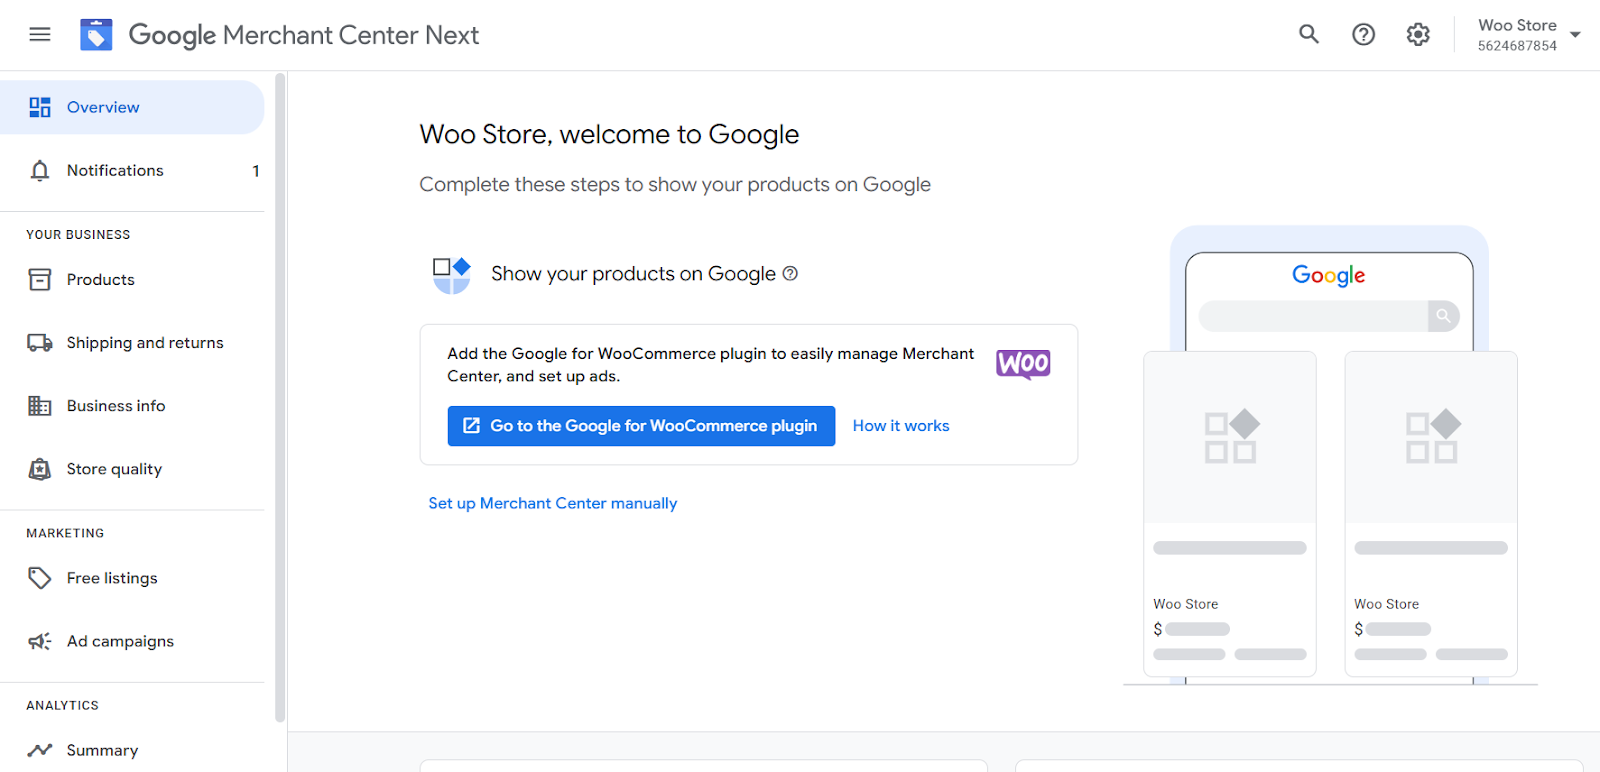
- Finally, it will land on the GMC dashboard.
You can install the Google for WooCommerce official plugin to setup Google Merchant Center WooCommerce. However, this plugin has multiple conflicting issues, and that’s why we encourage you to take the manual route.
Configuring Google Merchant Center Account
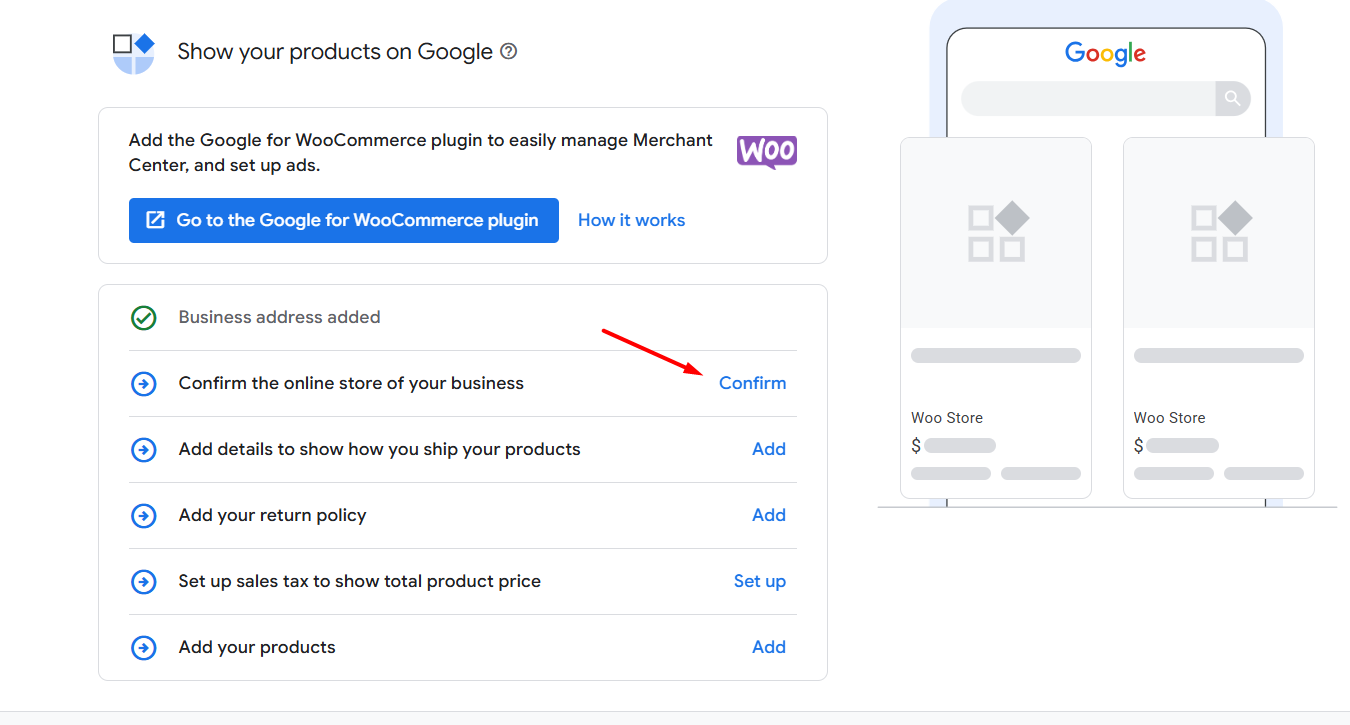
In this section of our WooCommerce Google Shopping integration guide, we will demonstrate how to add your business details and verify your WooCommerce store to the GMC account.
Here’s our actionable steps again.
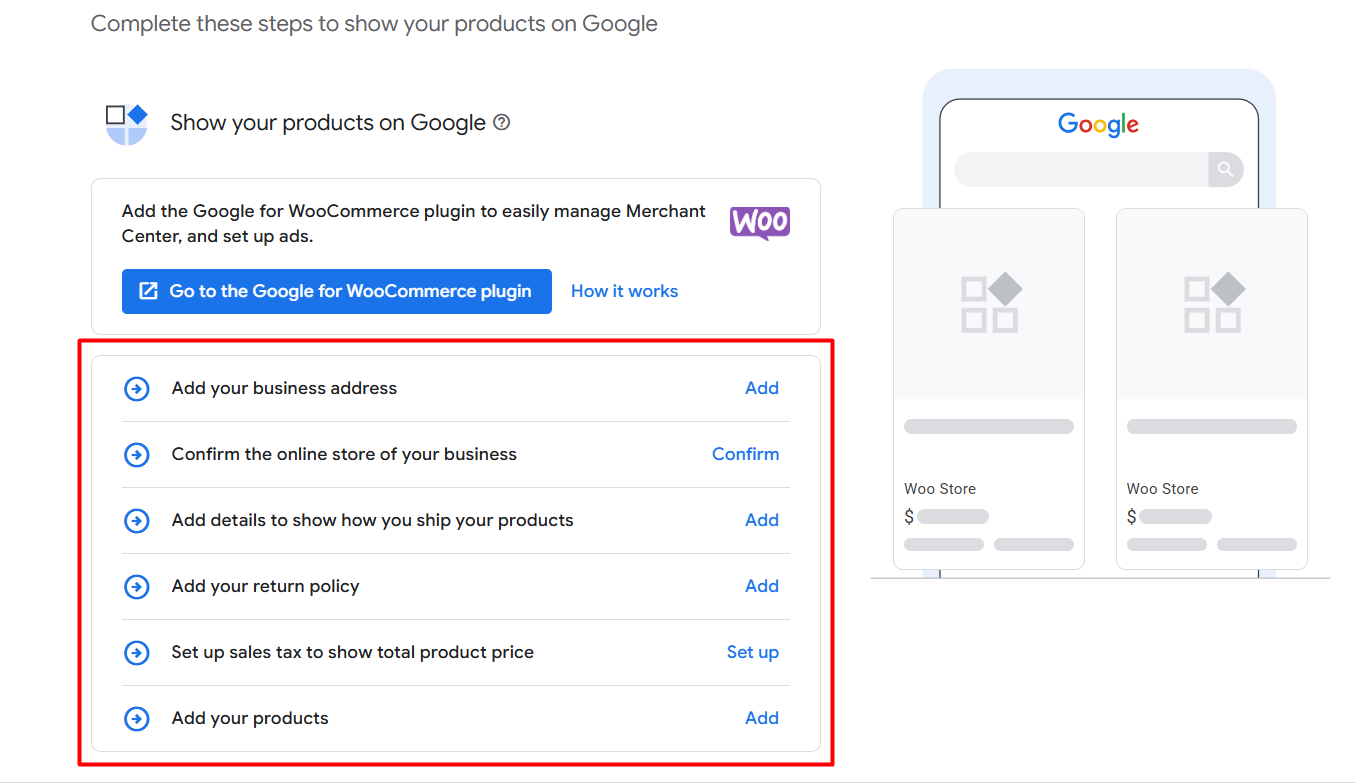
- Add Your Business Address
- Confirm The Online Store of Your Business
- Add Details to Show How You Ship Your Products
- Add Your Return Policy
- Set Up Sales Tax to Show Total Product Price
- Add Your Products
1. Add Your Business Address
- Click on Add.
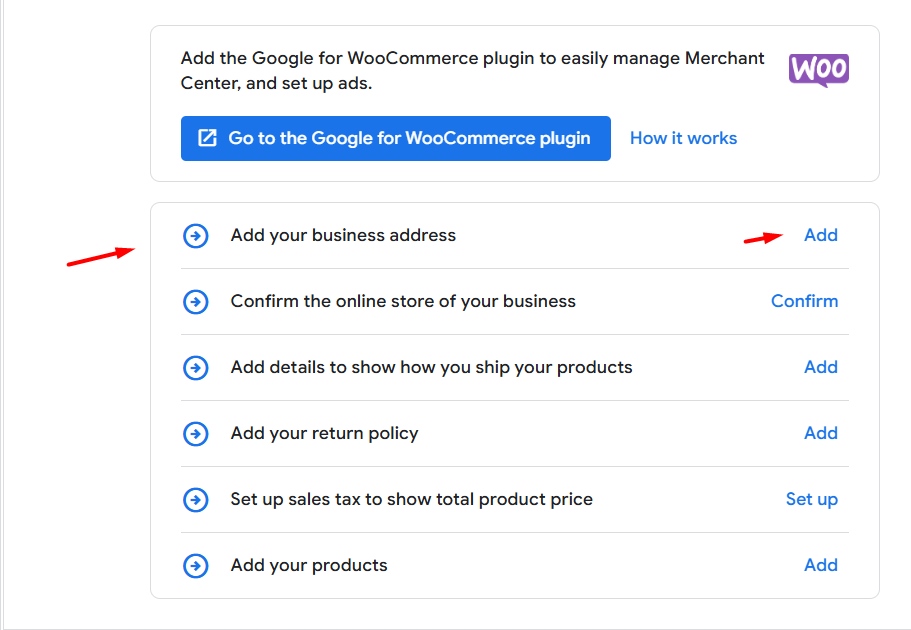
- Input your business details such as address, city, state, zip code, etc.
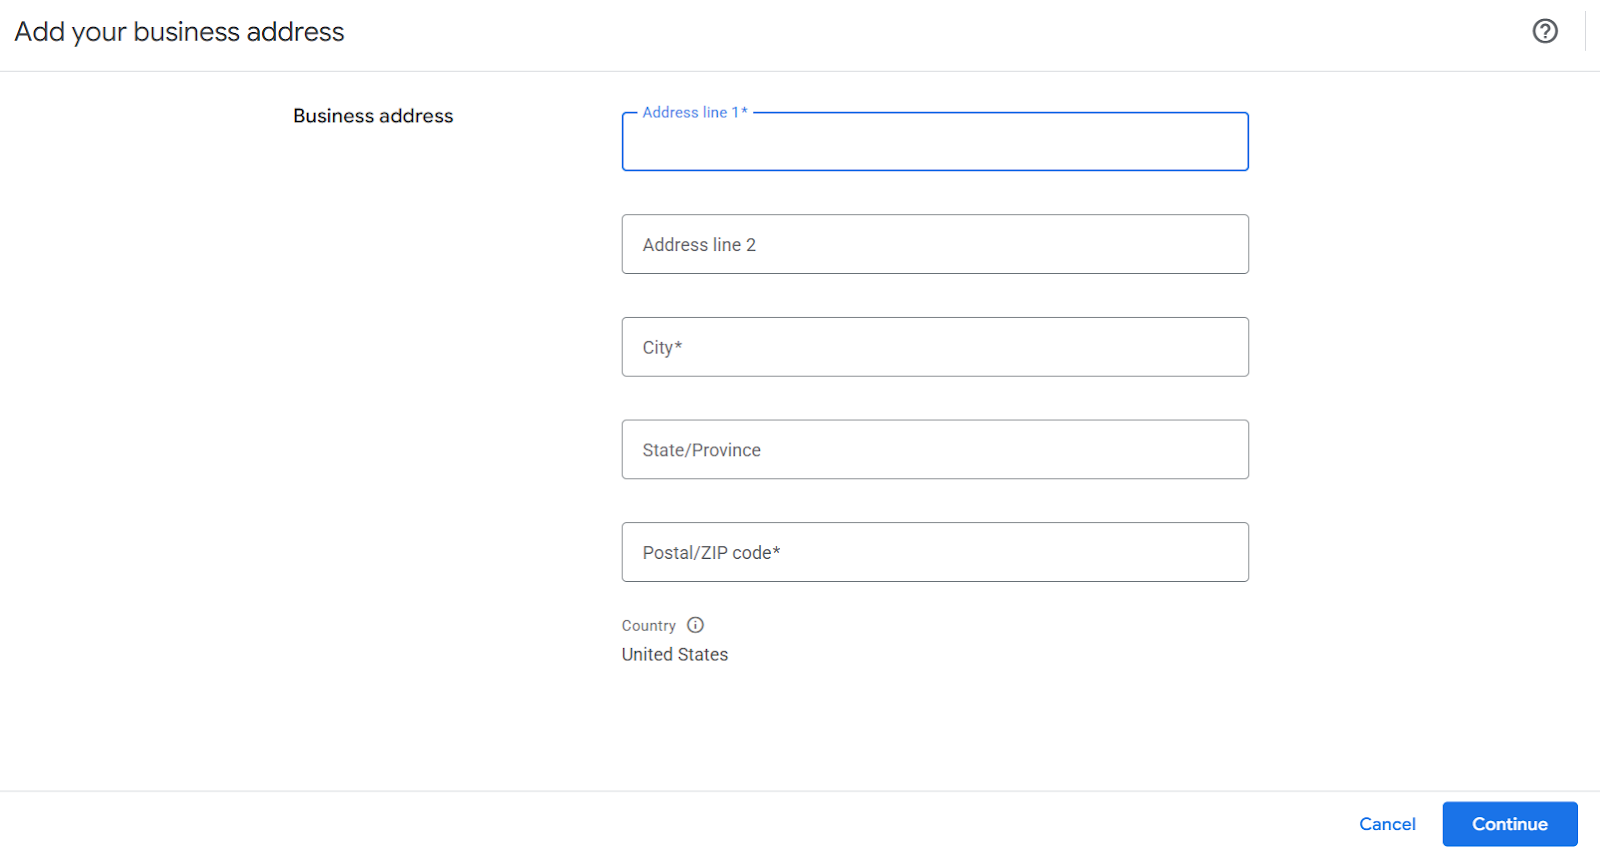
- Click Continue when done.
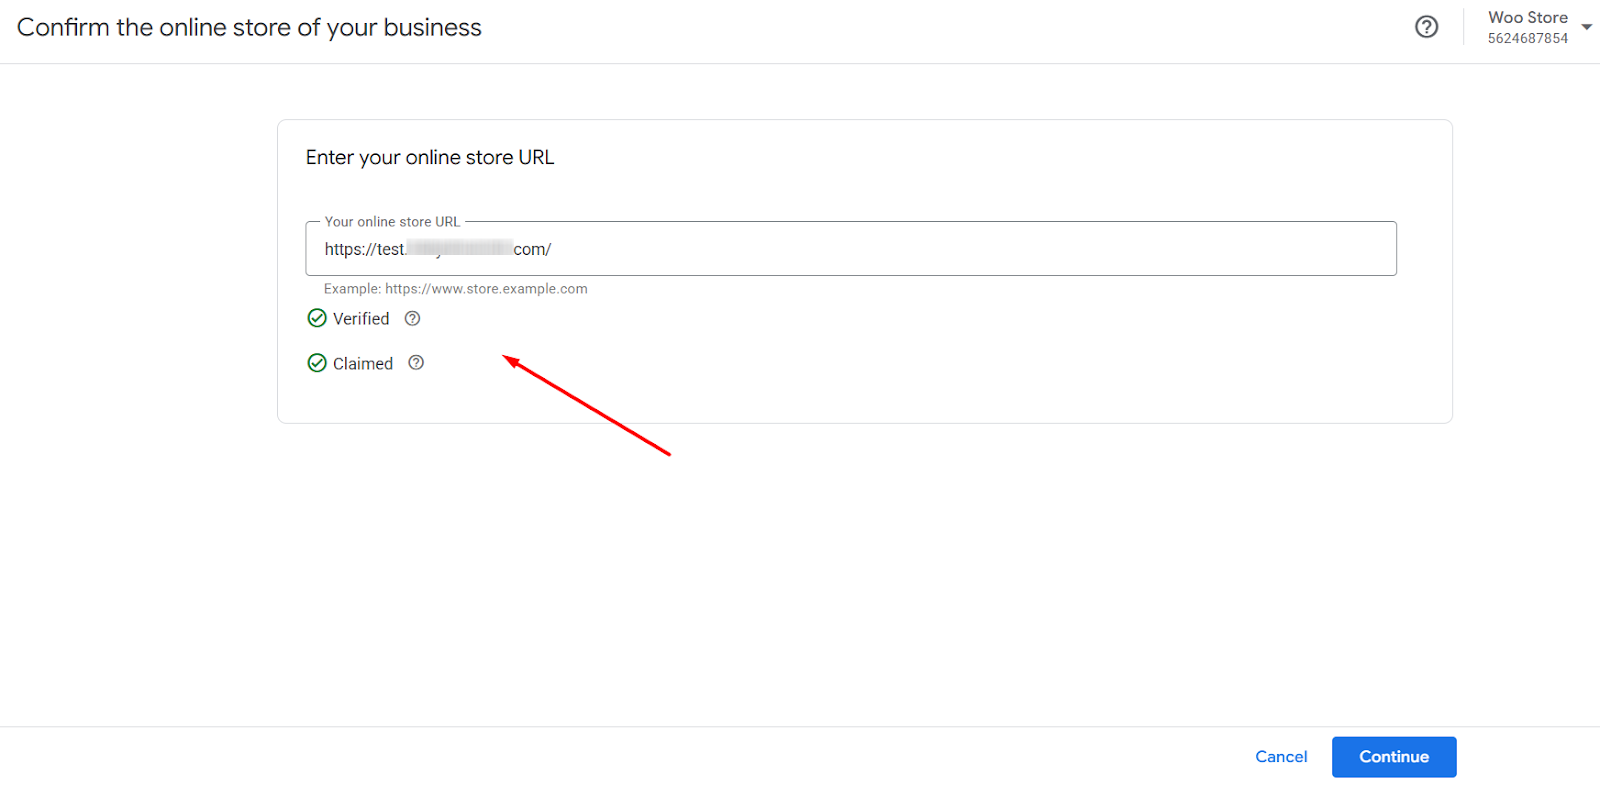
2. Confirm The Online Store of Your Business
Here’s where you connect your WooCommerce store to GMC.
- Click the Confirm button.
- Merchant Center will provide you with multiple options to verify your site with GMC.
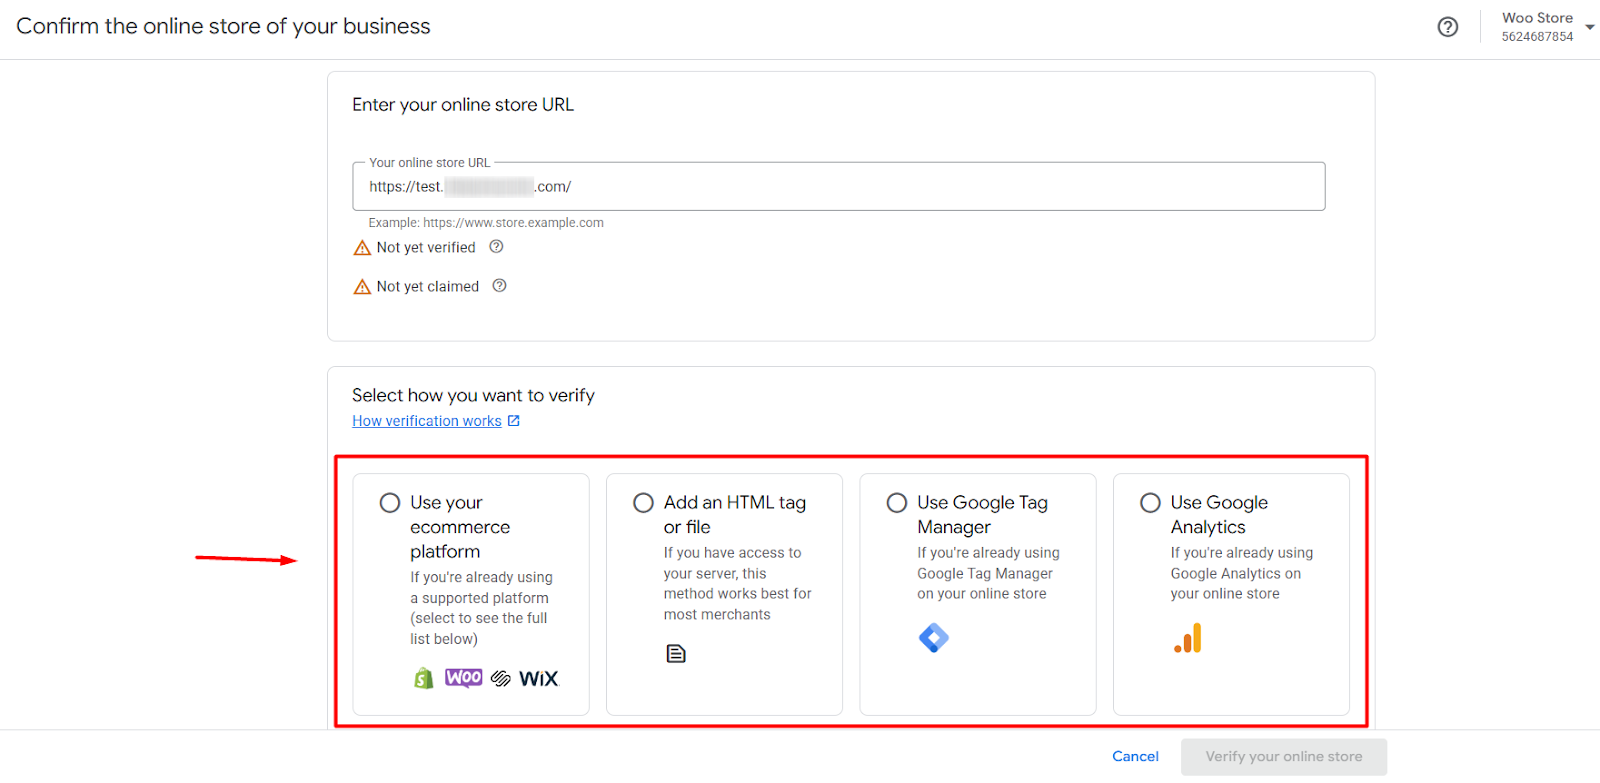
- We will use the Add and HTML Tag method.
- Copy the HTML tag from the window.
- Go to Appearance > Theme File Editor > header.php and Paste the meta tag right before the </head> tag. (Not recommended unless you’re comfortable editing theme files.)
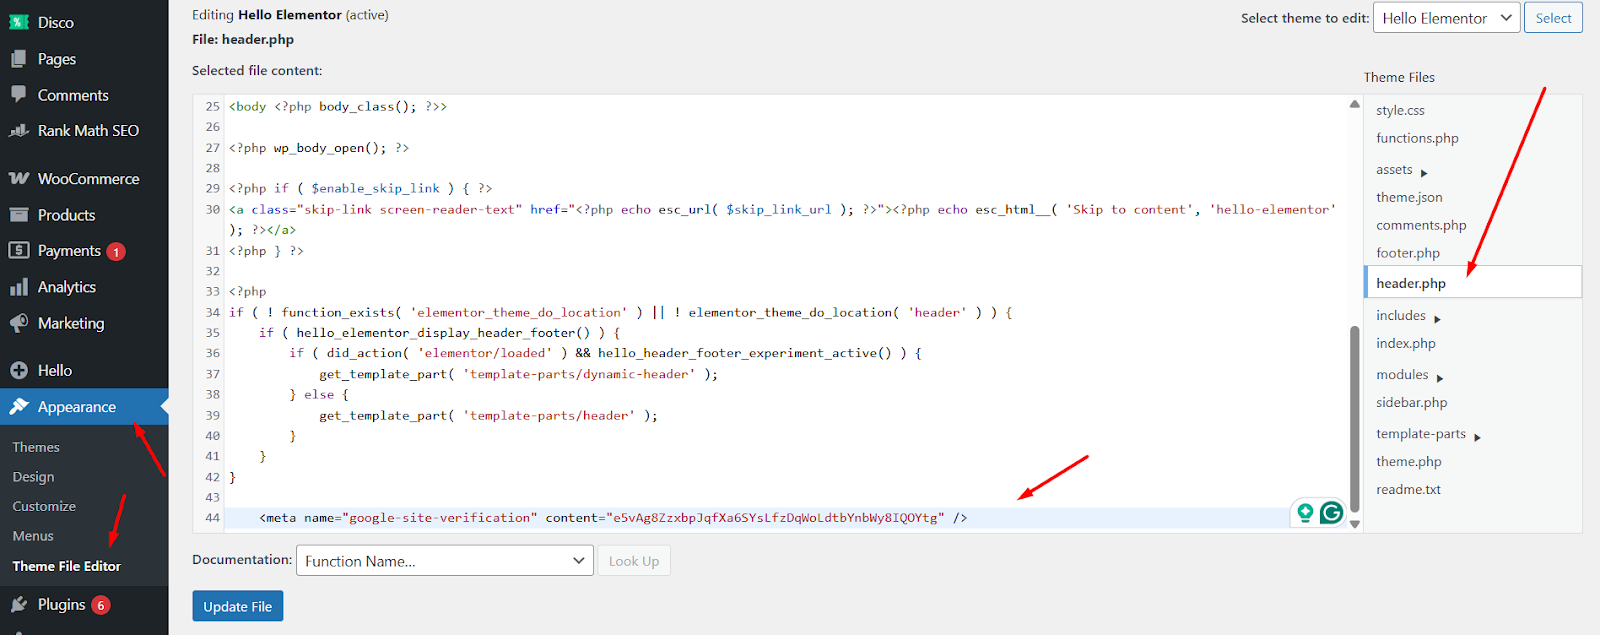
- Update the header.php file and return to the GMC window.
- Click Verify Your Online Store.
- If done right, it will lead to the following window.
Alternatively, you can add the tag using a plugin like Insert Headers and Footers by WPCode or an SEO plugin such as Yoast.
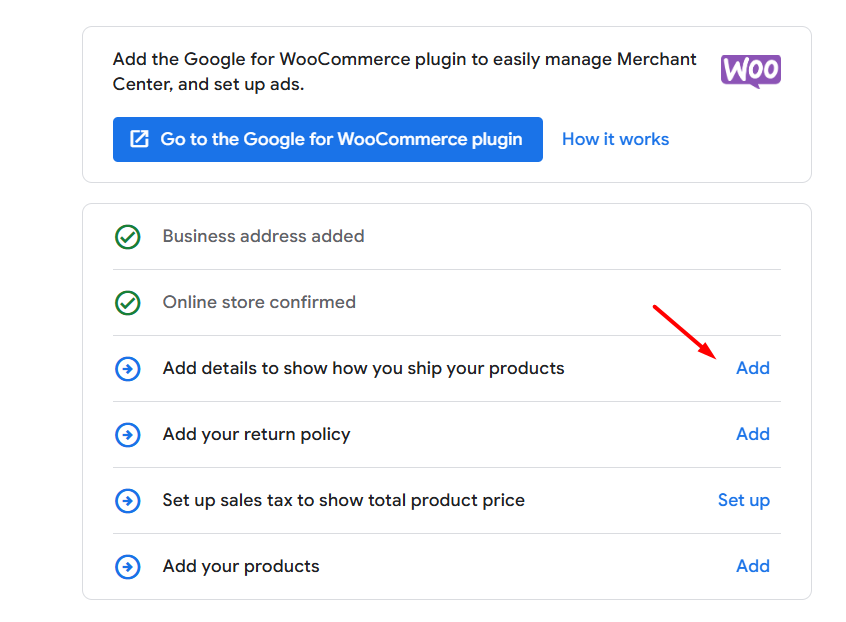
3. Add Details to Show How You Ship Your Products
- Click on Add.
- Add the countries where you ship to.
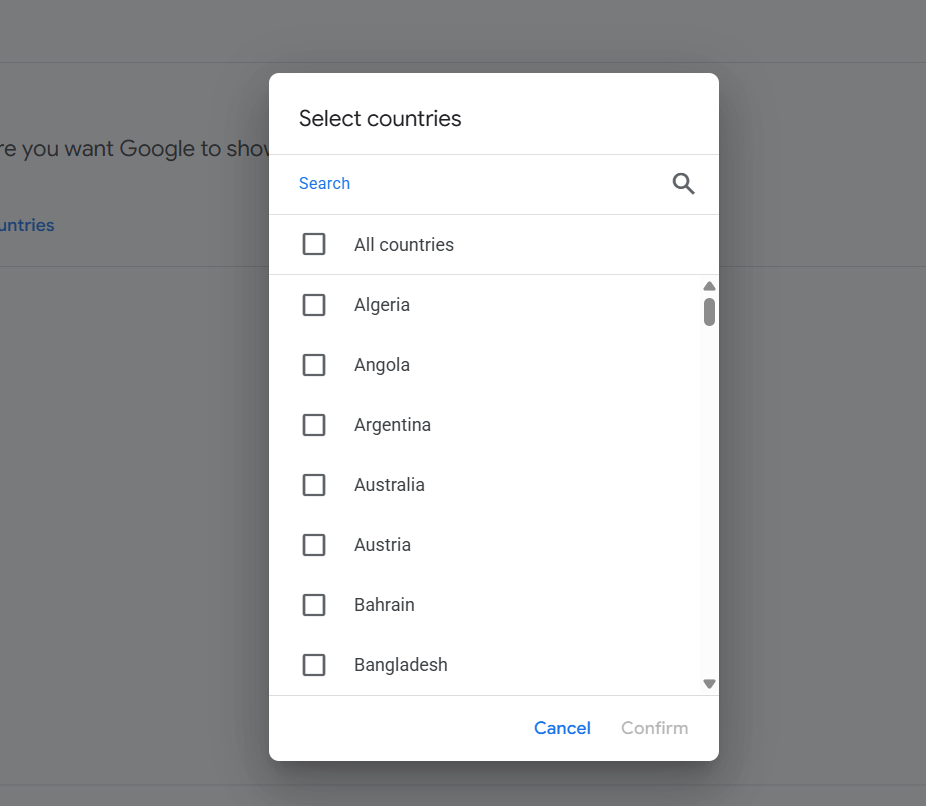
- GMC will automatically generate a policy name. Add or select your country where you want to ship.
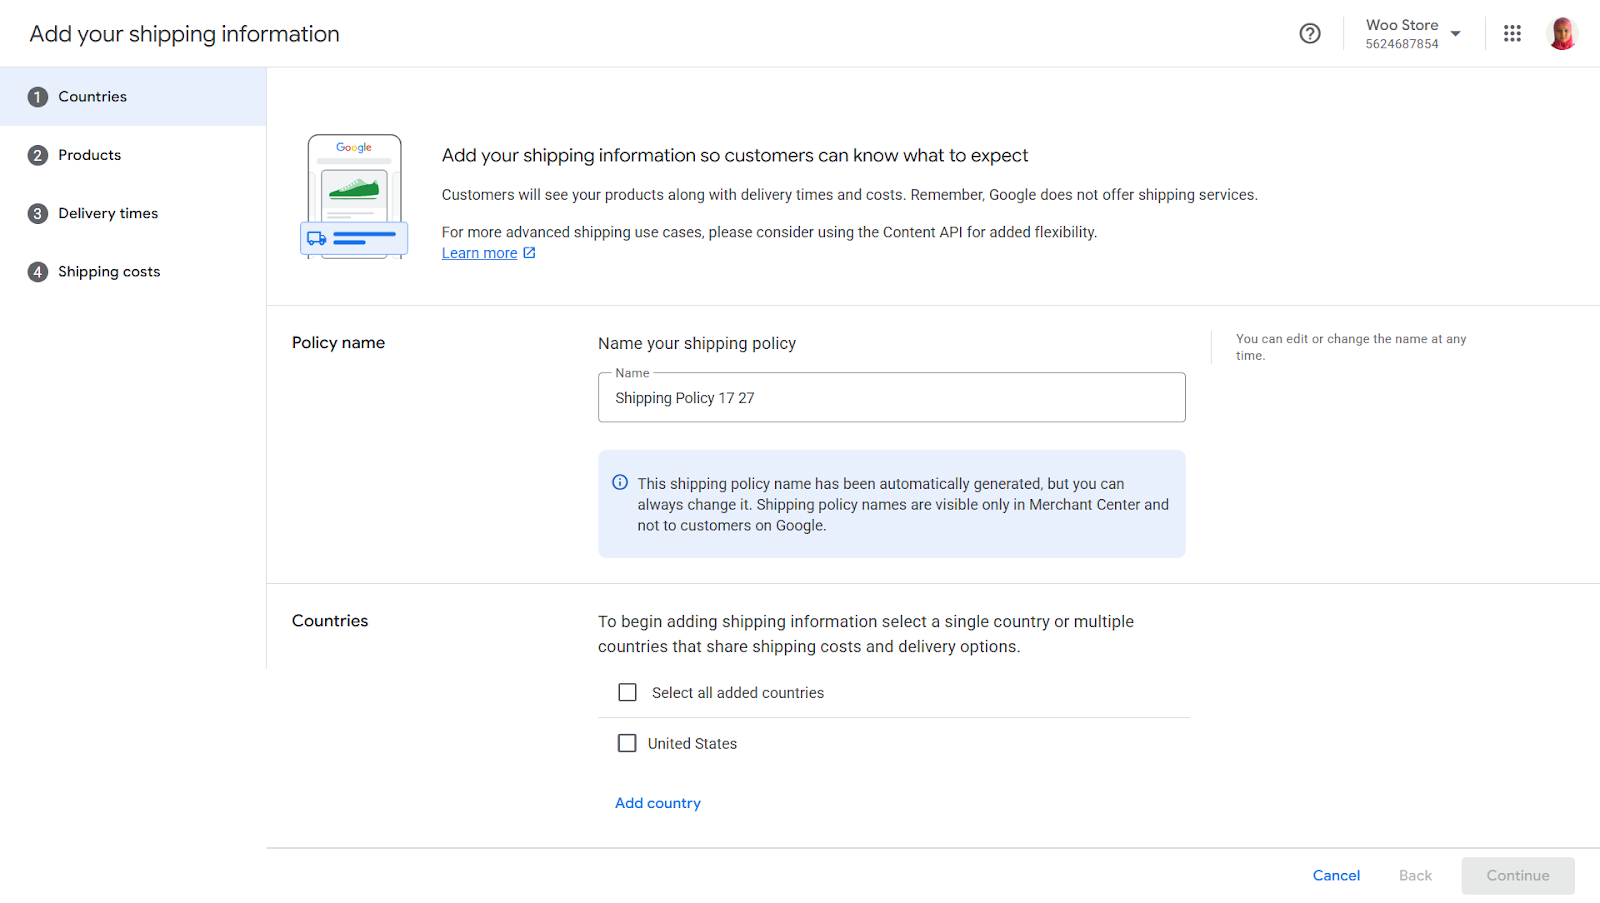
- Select the products that share shipping costs and delivery options.
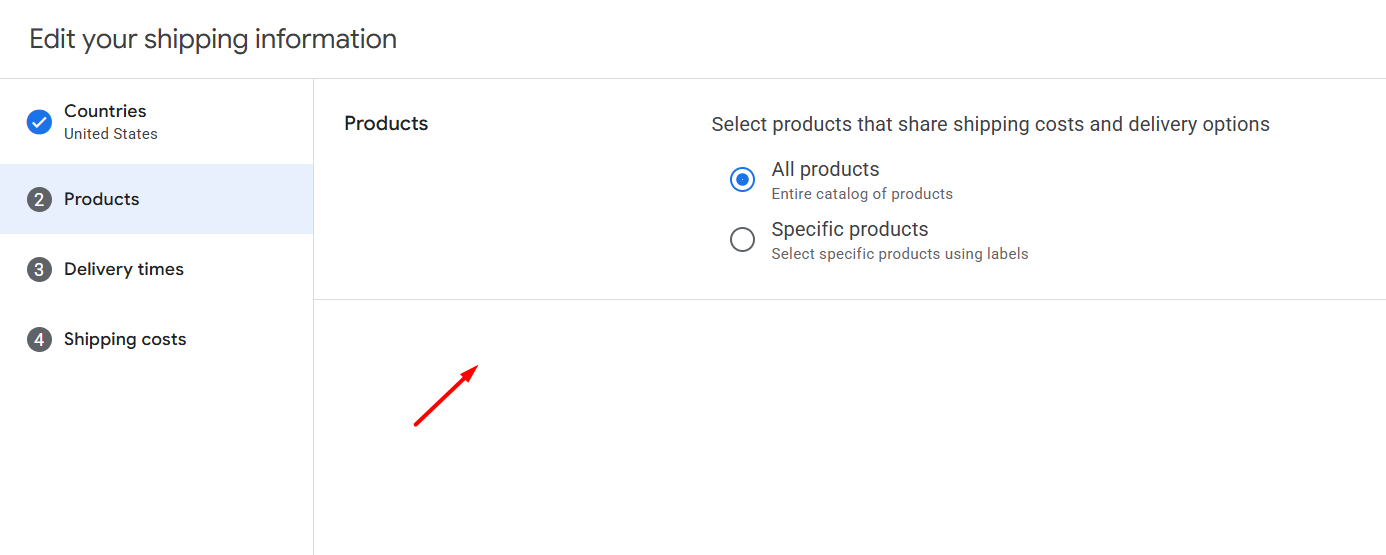
- Select how you determine delivery times.
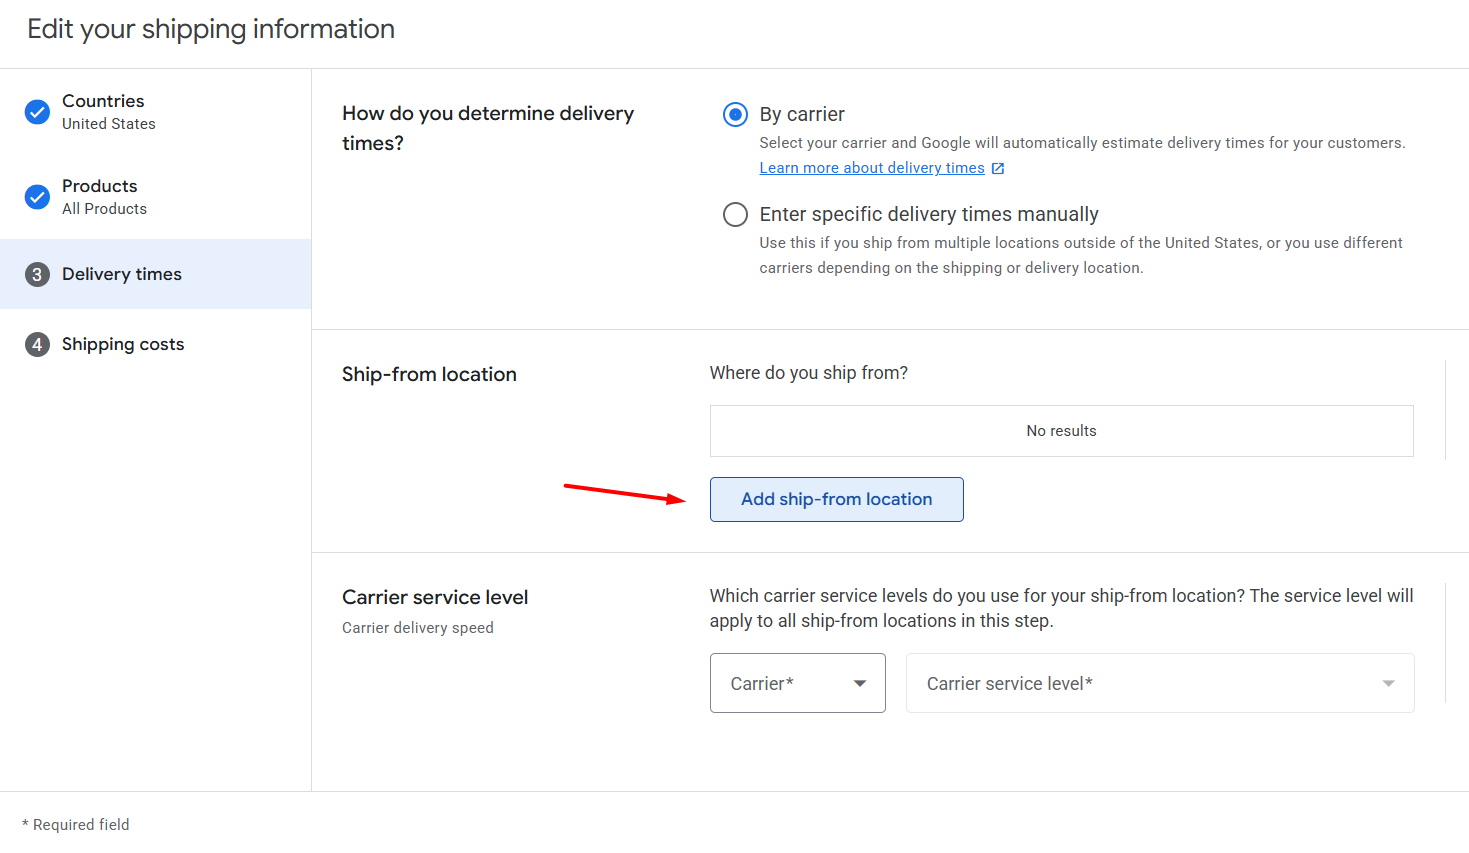
- Click Add Ship-From Location to set your store/warehouse location where you ship from.
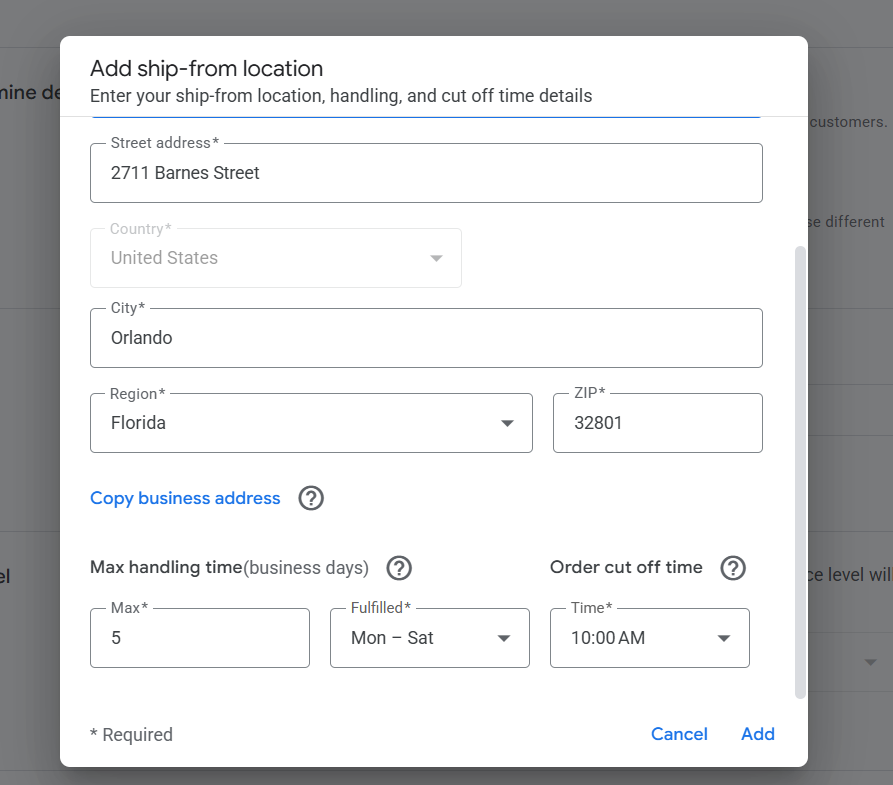
- Enter your details and click Add.
- Select your carrier.
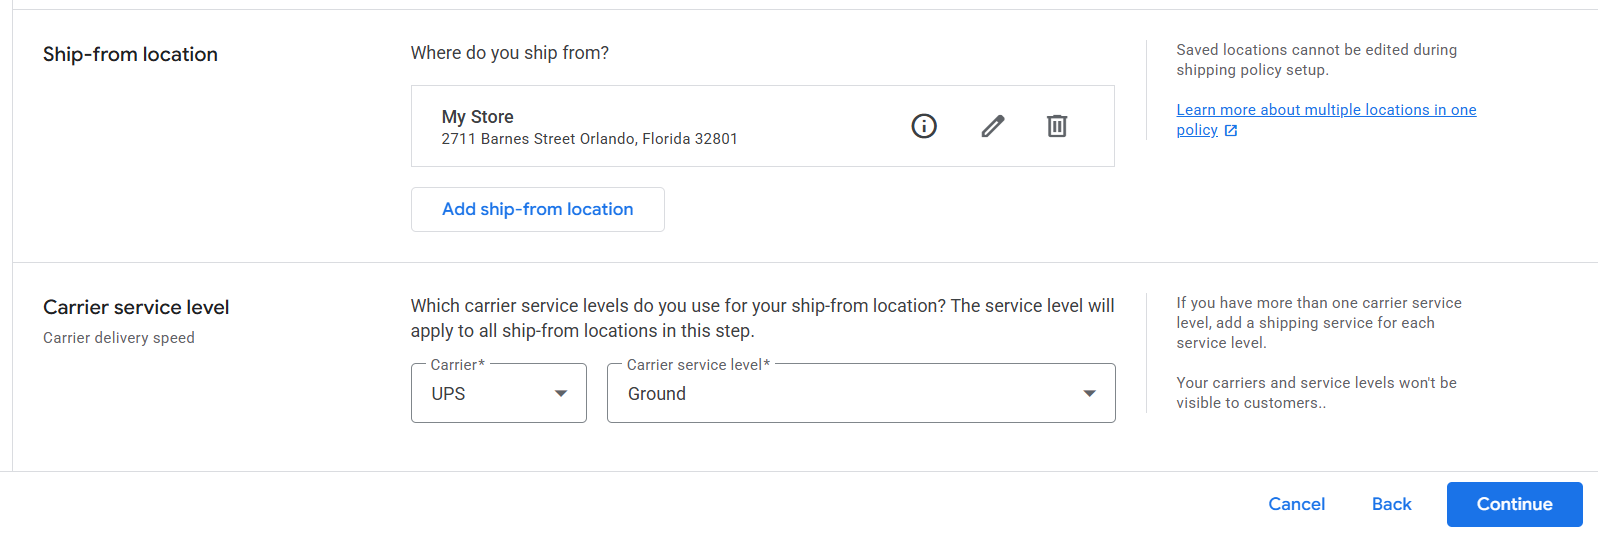
- Finally, set your shipping cost type and save.
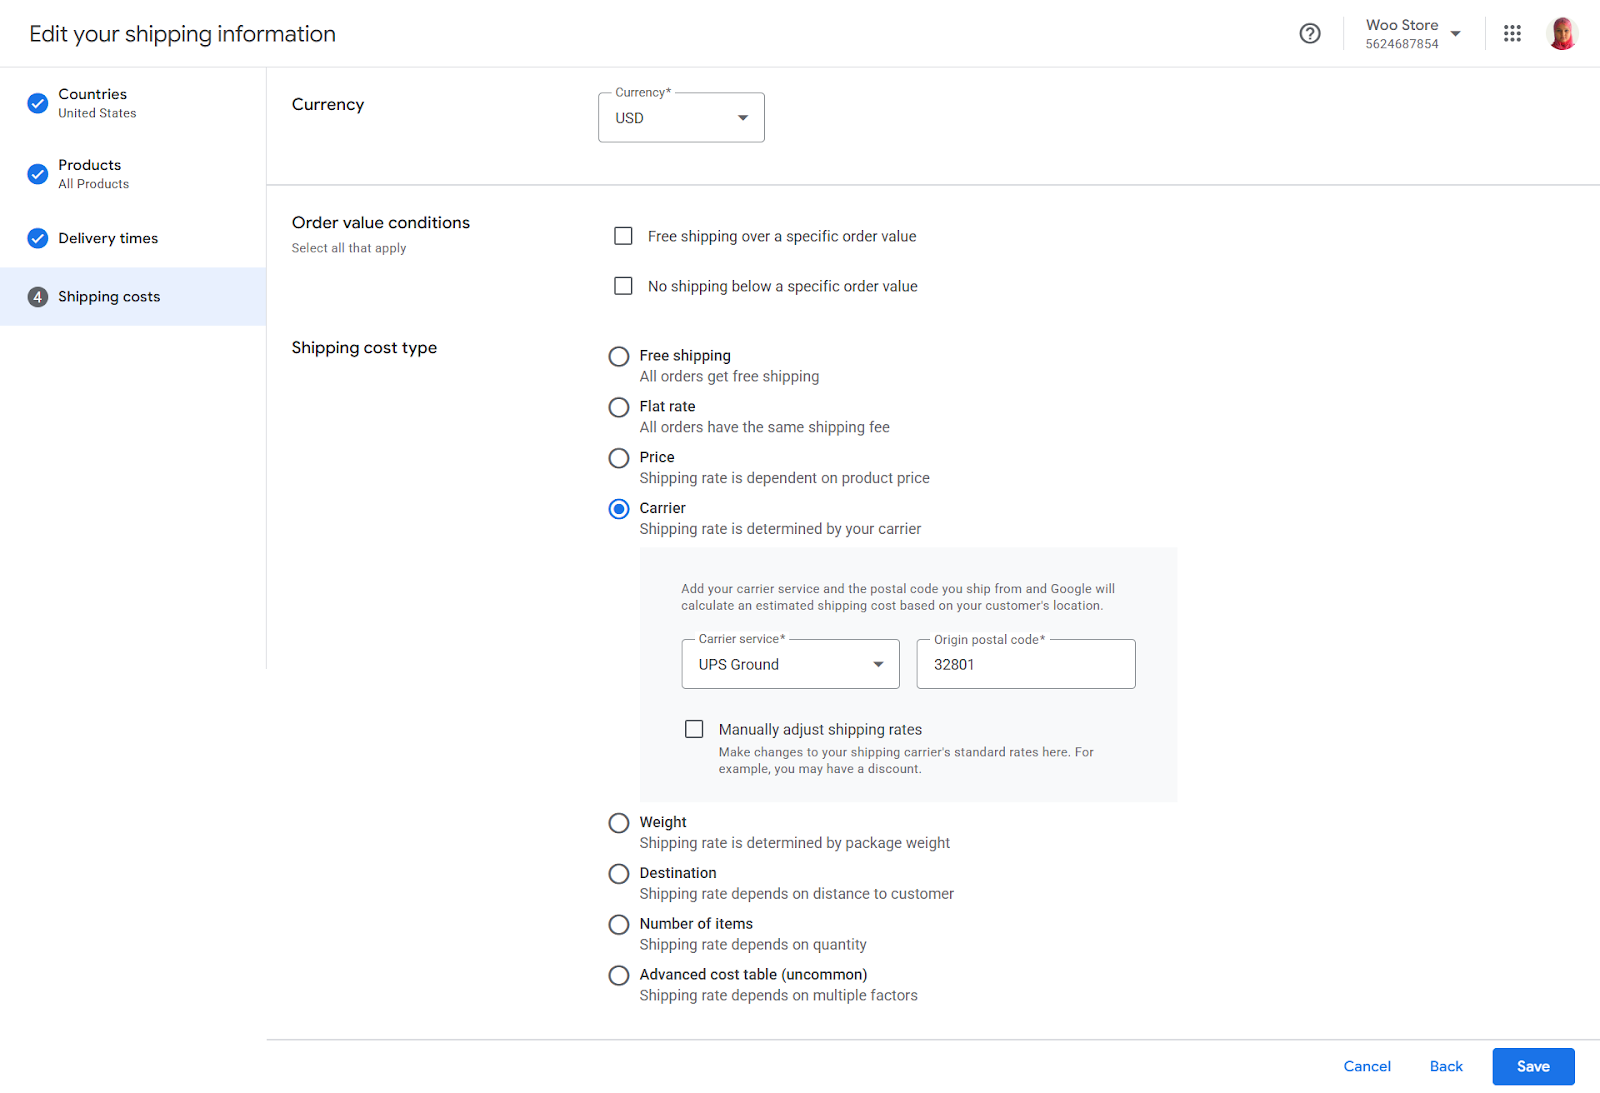
- The final screen will give you an overview.

This is pretty much what you need to do to get your GMC account all setup to display your products. You can now add your WooCommerce products through a WooCommerce Google product feed.
How to Generate WooCommerce Google Product Feed?
We have reached the next and most important step in our WooCommerce Google Shopping integration guide.
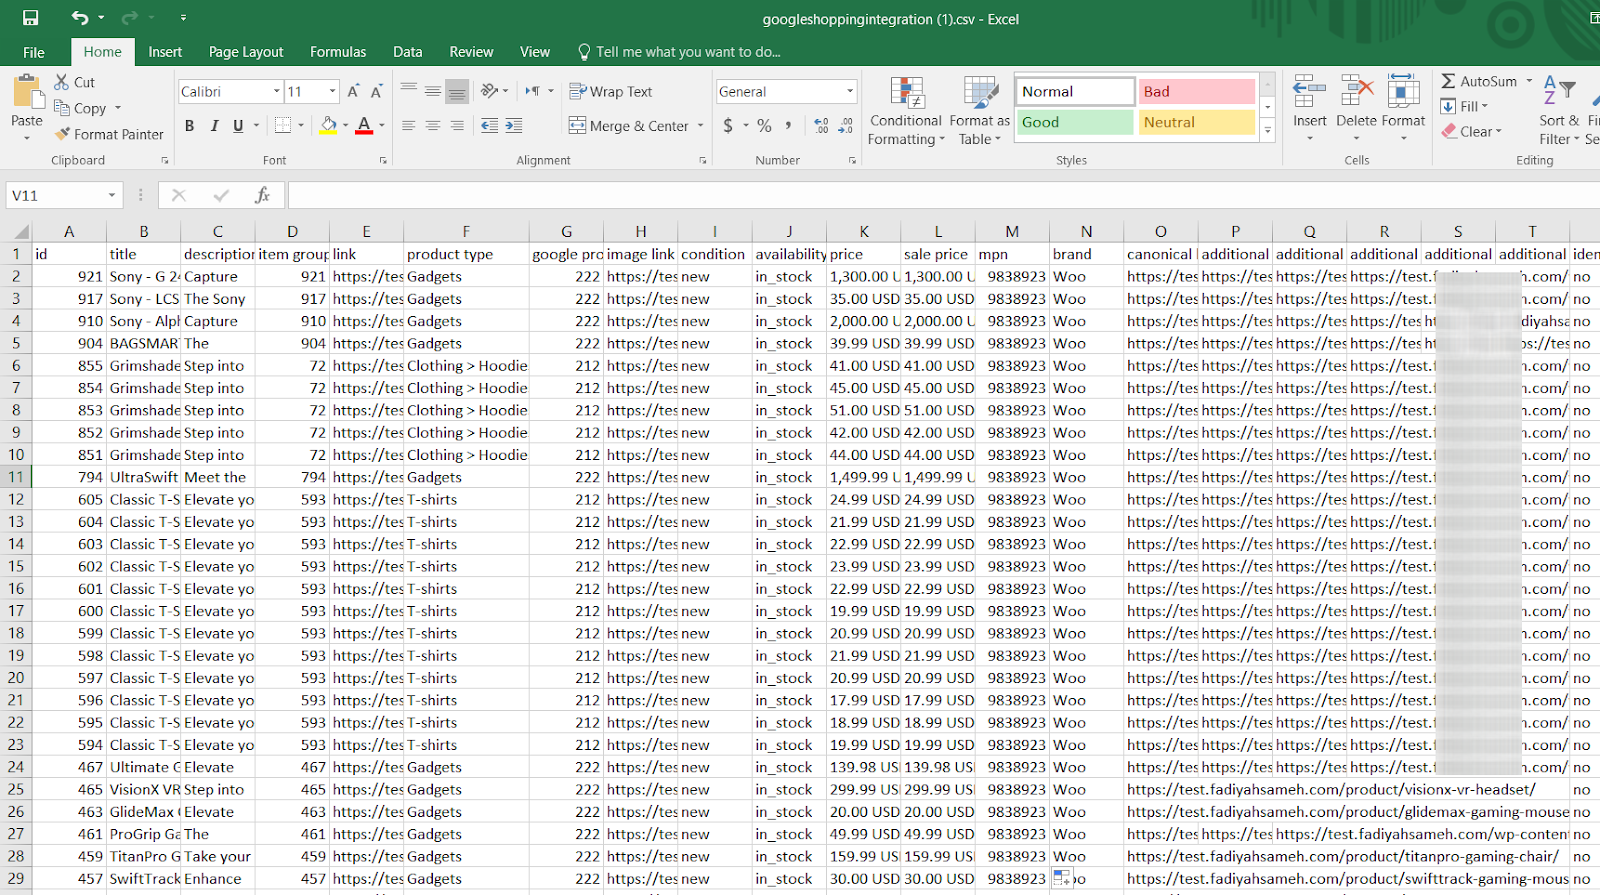
A product feed is basically a spreadsheet file (like what you see on a Microsoft Excel or Google Sheet). This feed file contains all your WooCommerce product information, such as product title, description, price, link to images & URLs, categories, etc.
Here’s an example –
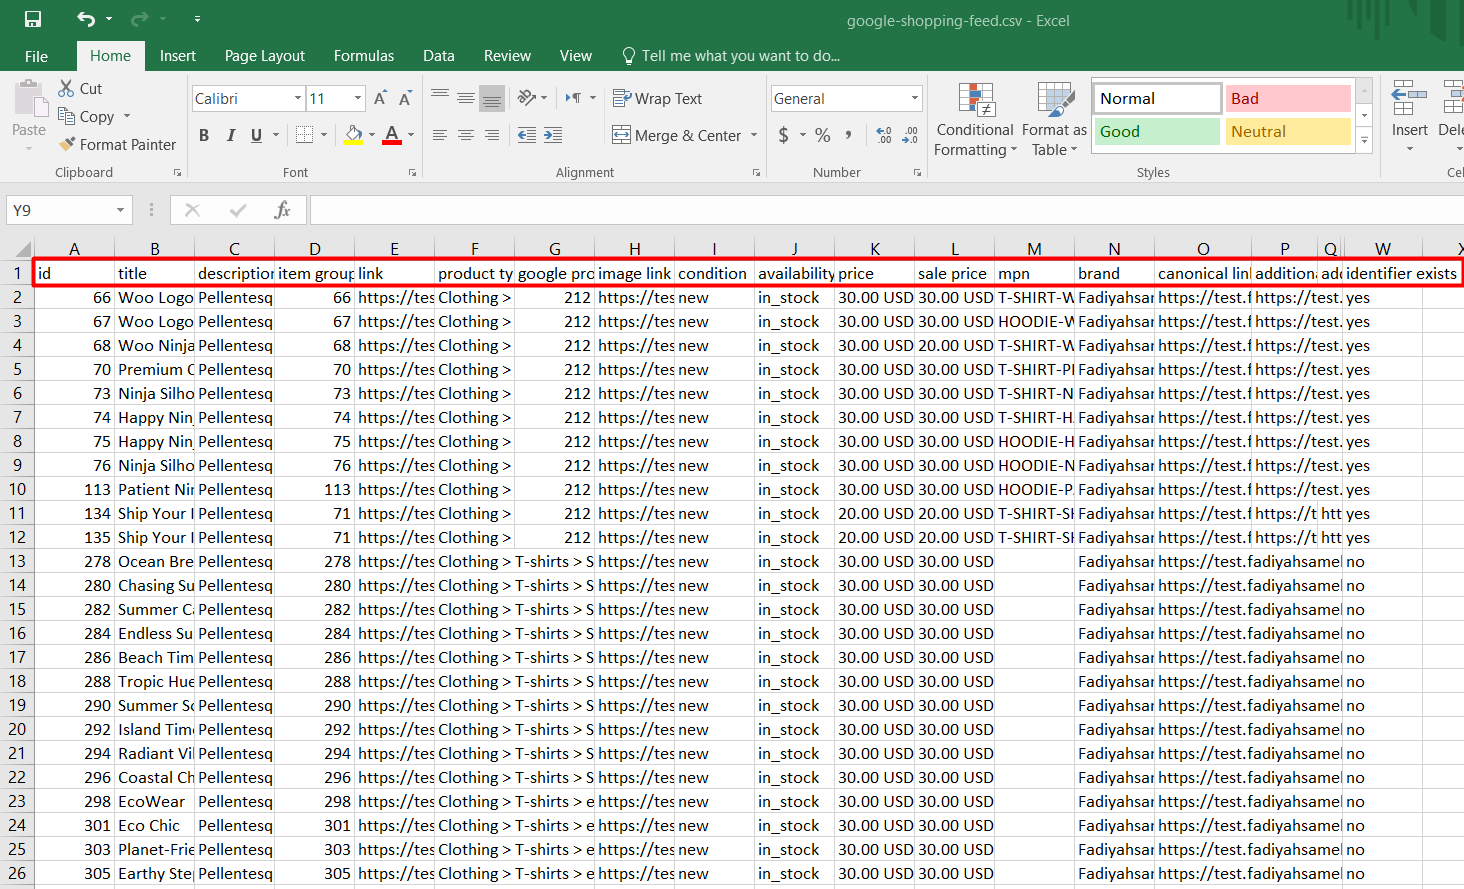
Notice the column headers marked in red? Those are the product characteristics, as you know, such as product title, price, description, etc.
In a product feed, these are referred to as Attributes. You can create product feeds, upload, and display your products on hundreds of channels, such as Amazon, Walmart, eBay, and more, through these feeds.
Requirements: You need to follow the channels e.g., Google Shopping attribute guidelines.
Every channel has its own list of attributes you need to follow when creating a feed. If you don’t include information the way they want, your feed will get rejected. 7% Google product feeds get rejected due to data feed errors.
So, what are the required Google Shopping Attributes?
Google Merchant Center supports a wide range of attributes in a feed. Some are required and some are optional. Here are the most common ones.
- ID or Product SKU
- Title
- Product Description
- URL / Product Link
- Product Category
- Image URL
- Stock Availability
- Regular Price
- GTIN/MPN
- Product Condition
- Brand
Attributes like GTIN, MPN are not part of WooCommerce product page attributes. You need to create custom attributes for them and assign a value.
All of these sounds complex, right? That’s where CTX Feed comes in. You practically don’t need to learn any of the above and generate the perfect Google Shopping feed blindfolded within a few clicks with this plugin.
How to Create a Google Shopping Product Feed Using a Plugin?
CTX Feed is the best WooCommerce product feed plugin on the market, supporting over 130 channels. It comes packed with pre-built templates for all channels. These templates are integrated with channel’s guidelines and attribute requirements.
It means all you need to do is select the target channel, and the plugin will do the rest. This includes arranging all the attributes, collecting all product data under those attributes, and generating the feed file.
To create a WooCommerce Google Shopping feed using this plugin, you need to go through some prerequisites to match Google’s requirements and finally create the feed. Here are the steps –
- Custom Attribute Generation
- Category Mapping
- Generating the Feed
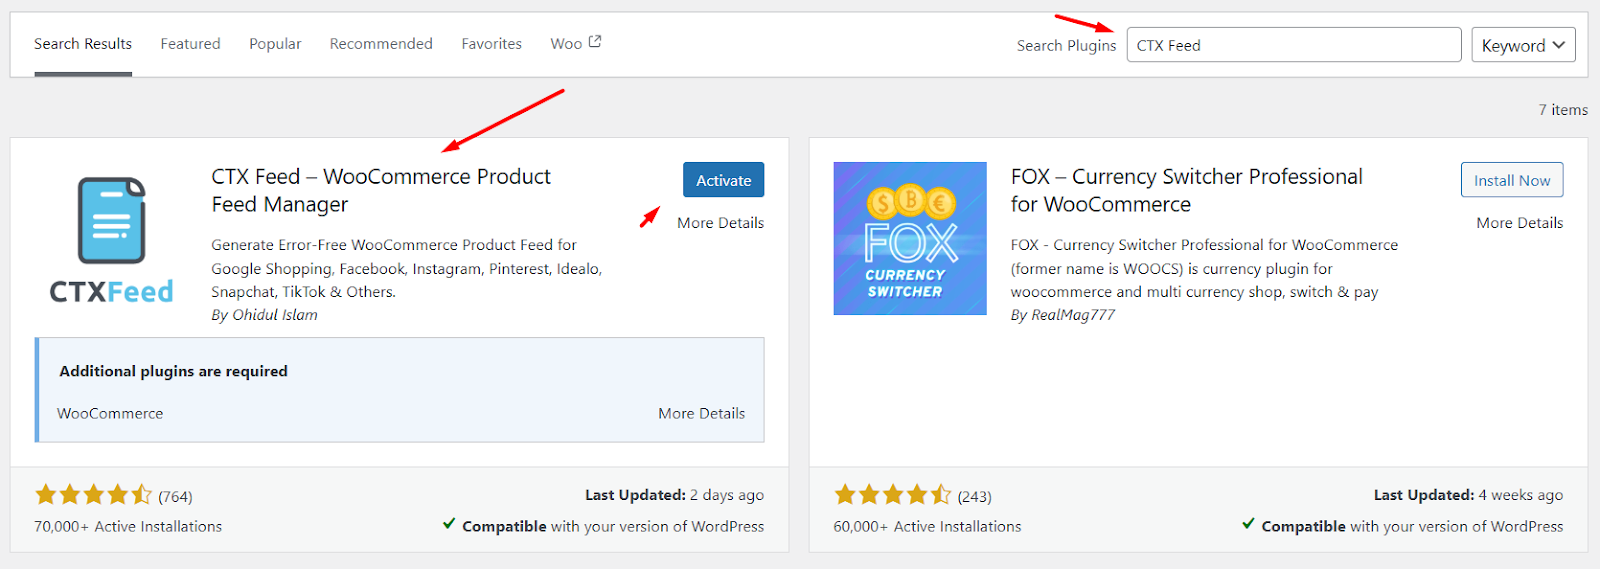
Start by installing the plugin. You can use the free version or opt for the Pro edition for the best results.
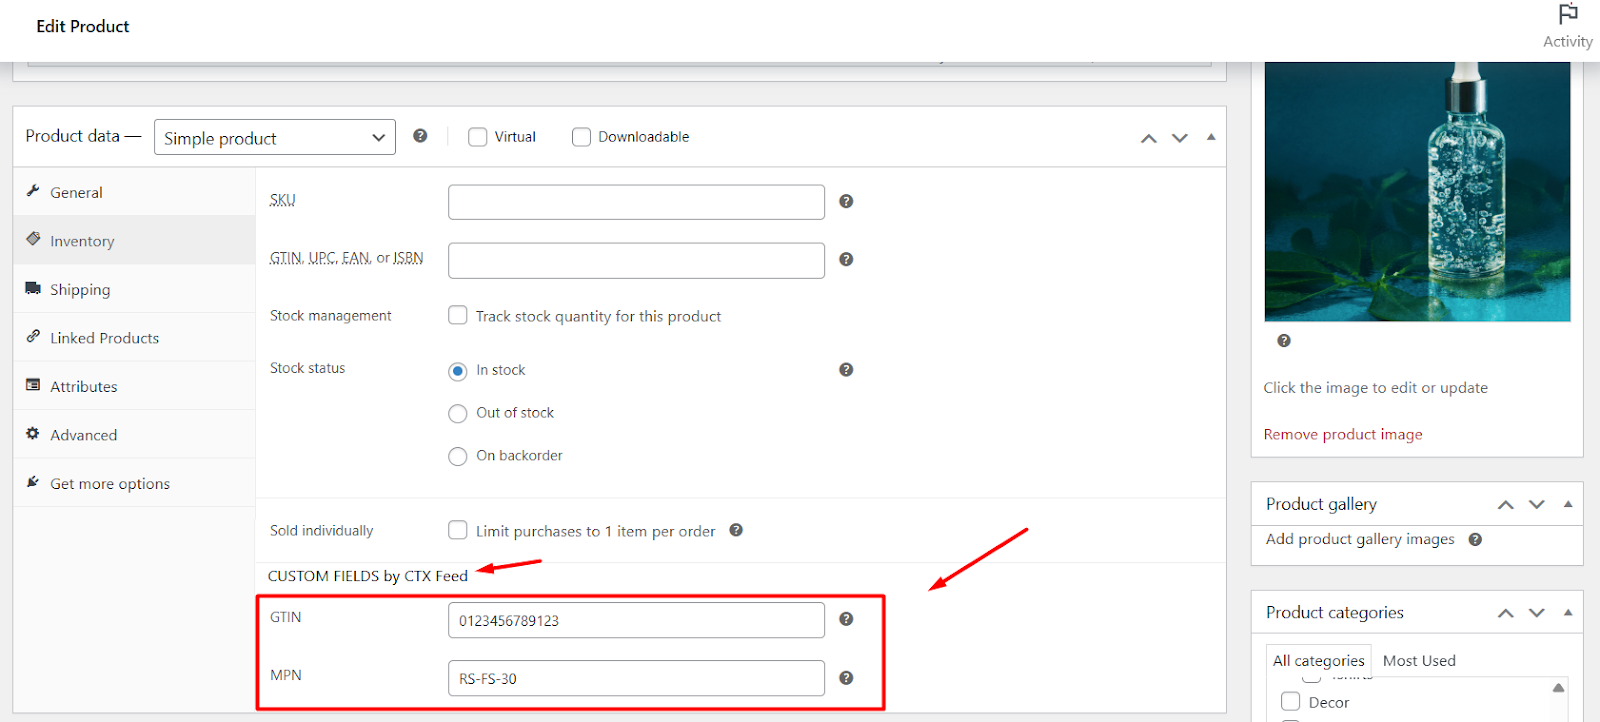
1. Custom Attribute Generation
Remember the attributes (GTIN, MPN) we mentioned that are not available in WooCommerce? No need to install any custom field plugin or custom code to add them. CTX Feed has your back.
- Go to CTX Feed > Settings.
- Click on the Custom Fields tab.
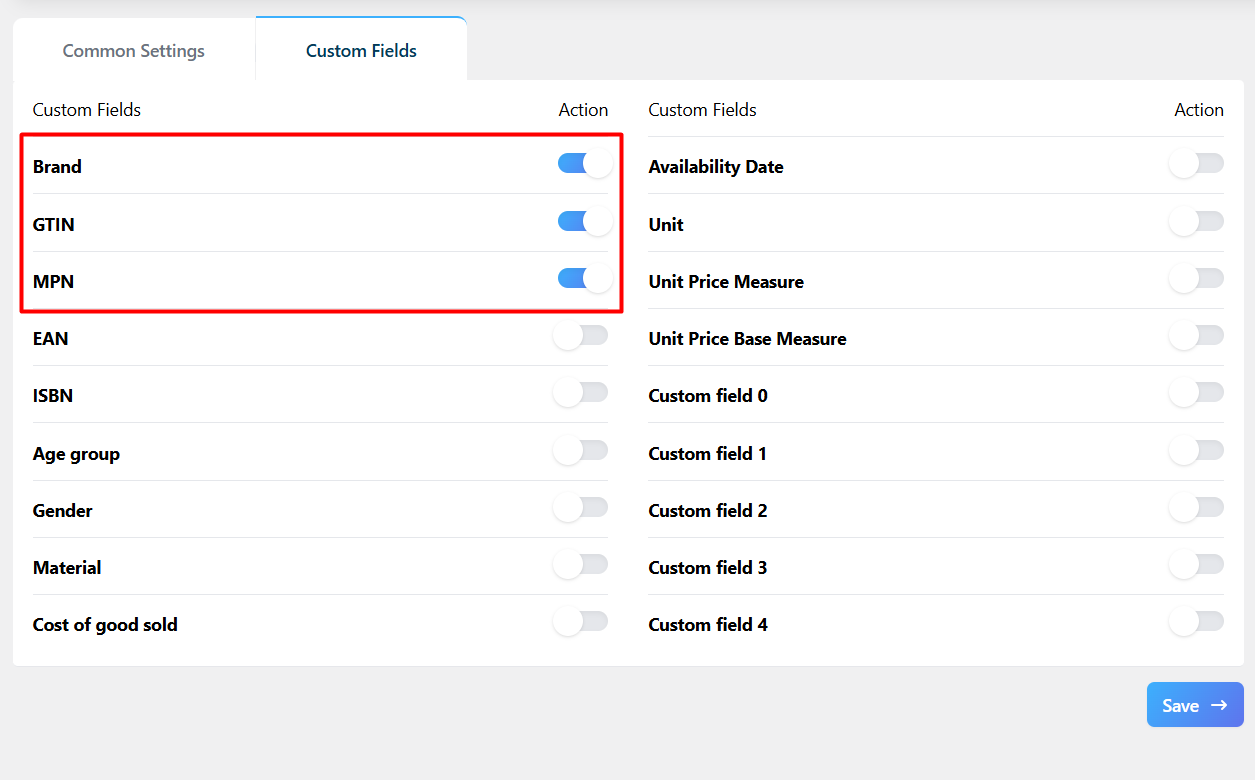
- Toggle to enable the fields you need and save. You are done, easy as that.
- Now you can go to your product pages and add values for the fields under Product Data > Inventory > CUSTOM FIELDS by CTX Feed.
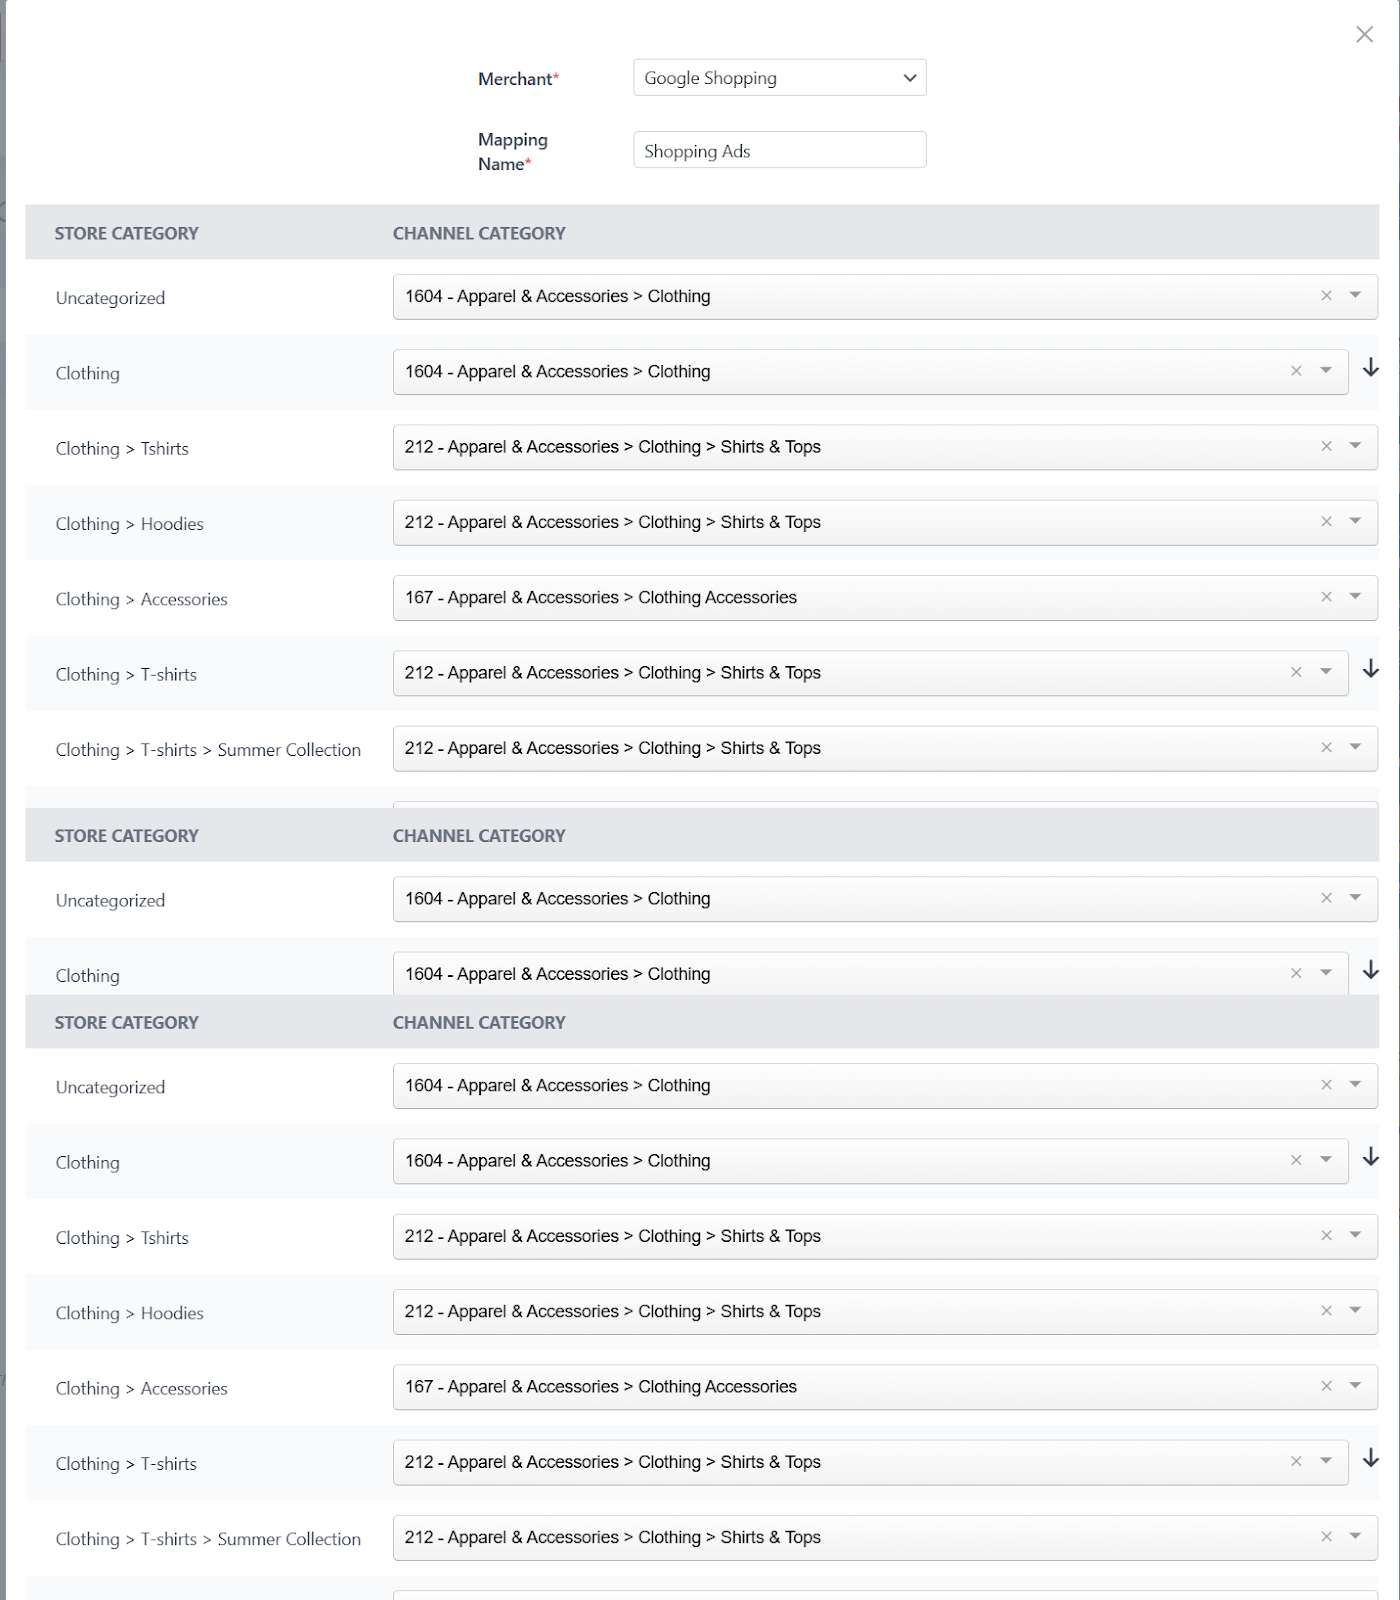
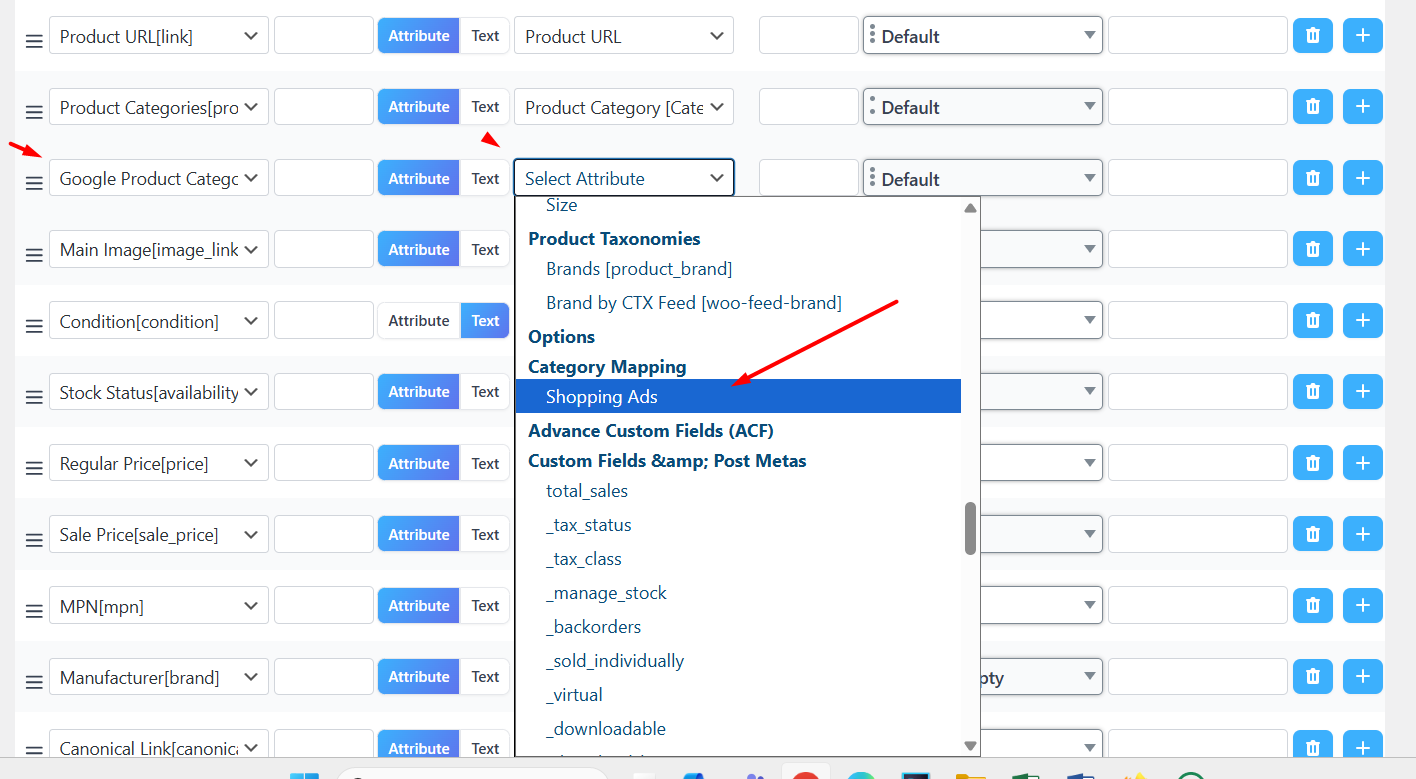
2. Category Mapping
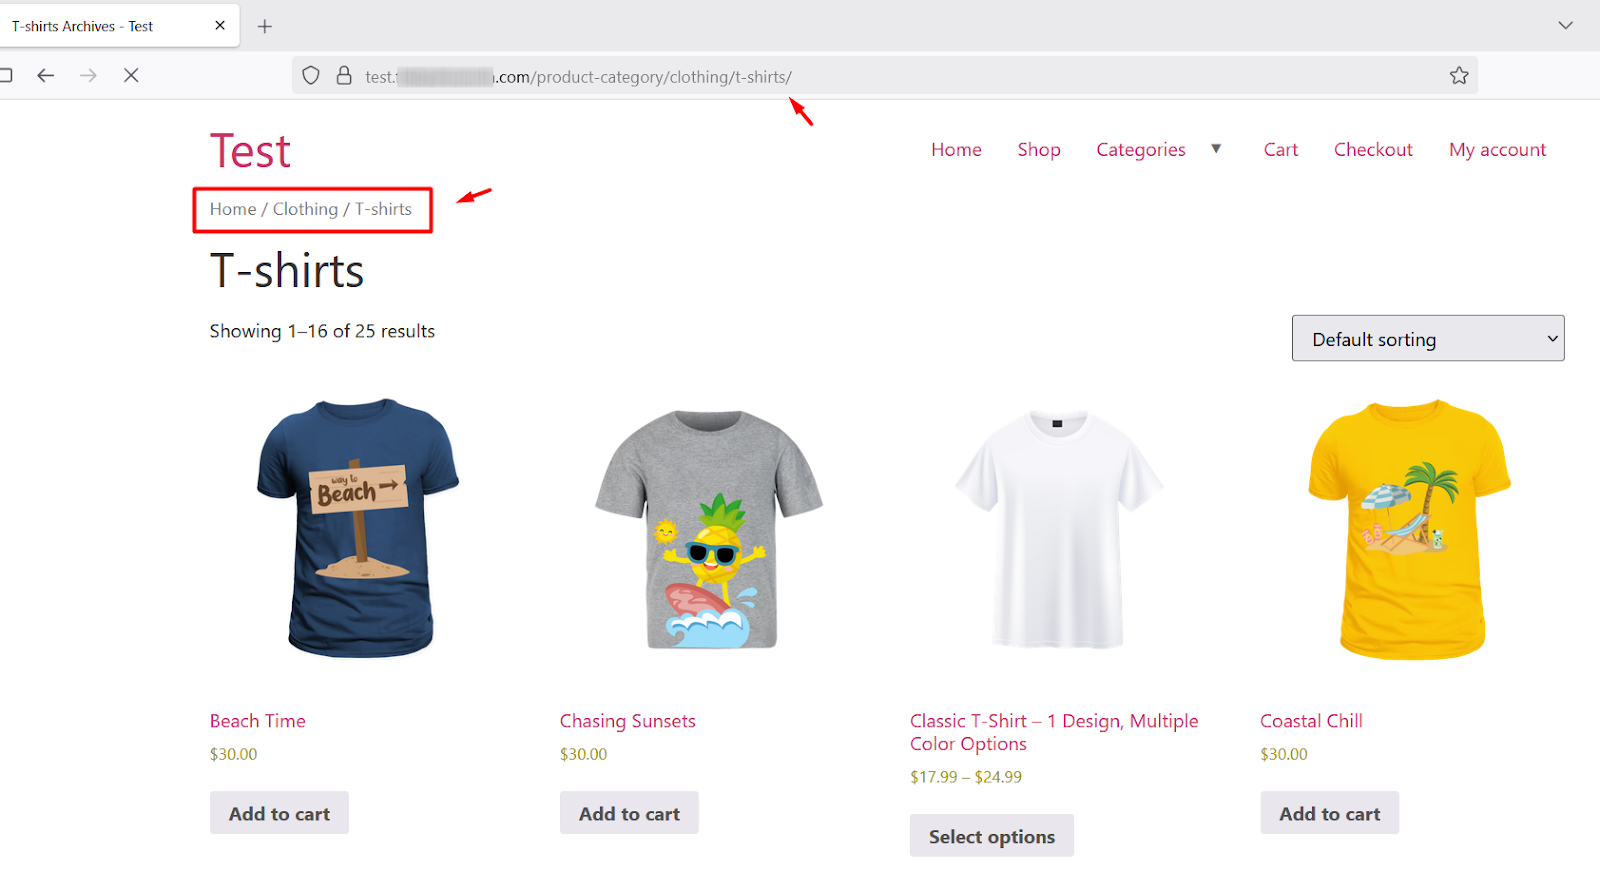
Every website or online store has its own category structure. For example, here’s taxonomy for T-shirts in my demo store.
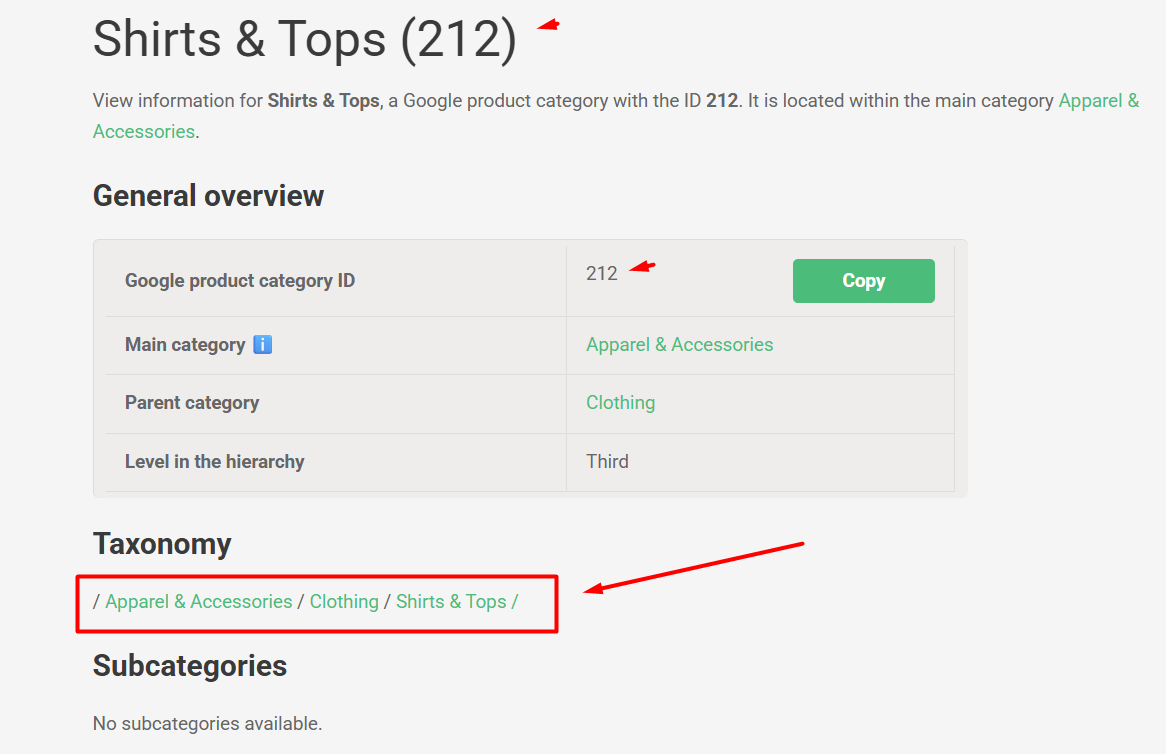
And here’s the Google Shopping taxonomy for the same –
Therefore, Google Shopping has its own set of category structure, and you need to match their taxonomy in order to display your products to the right audience. To achieve this, you need to design the category structure properly in your product feed.
This is called Category Mapping. And again, you don’t have to do much when using CTX Feed. The plugin will do the hard work for you.
All you need to do is select the appropriate ones that are closest to your taxonomy. Here’s how to do this.
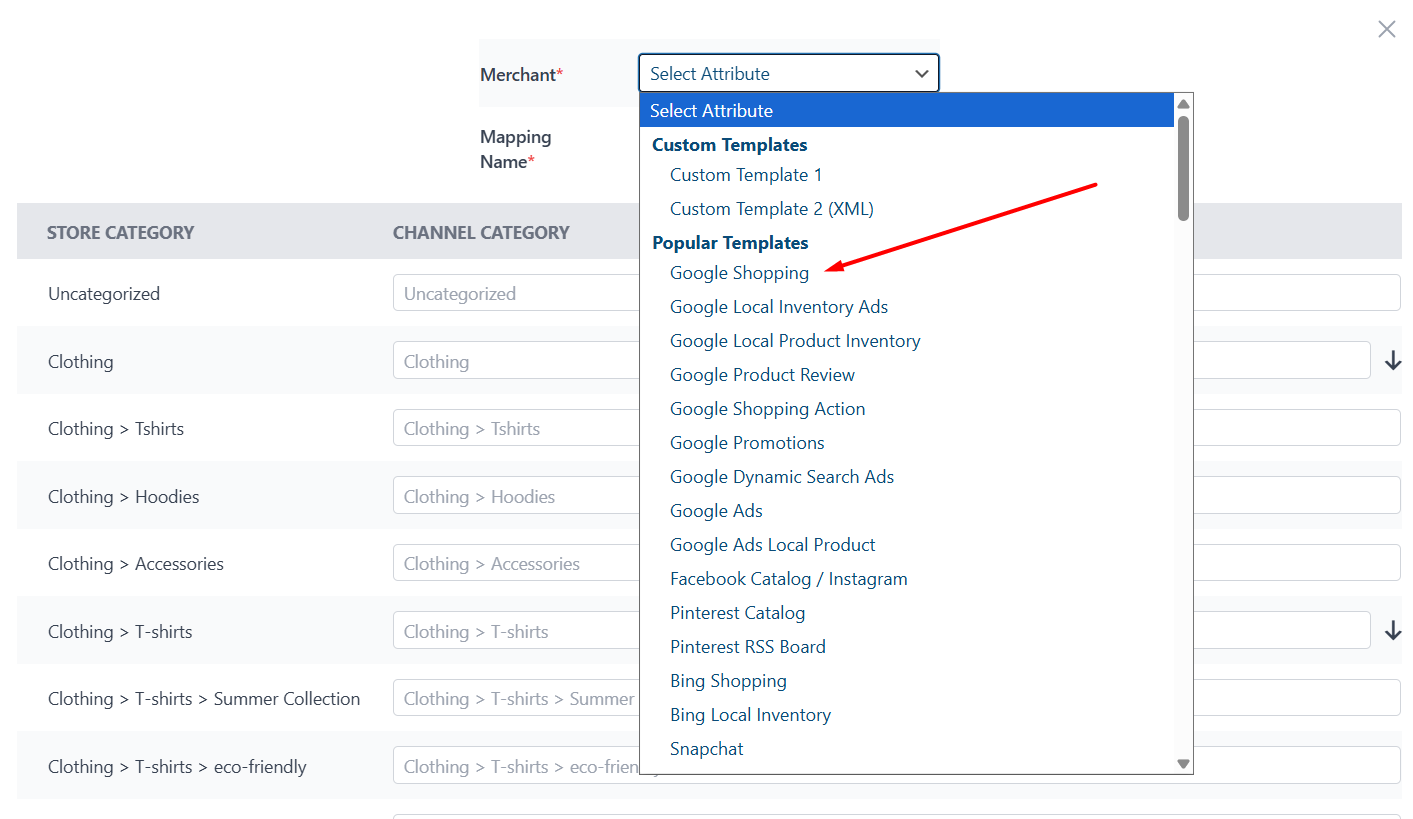
- Go to CTX Feed > Category Mapping.
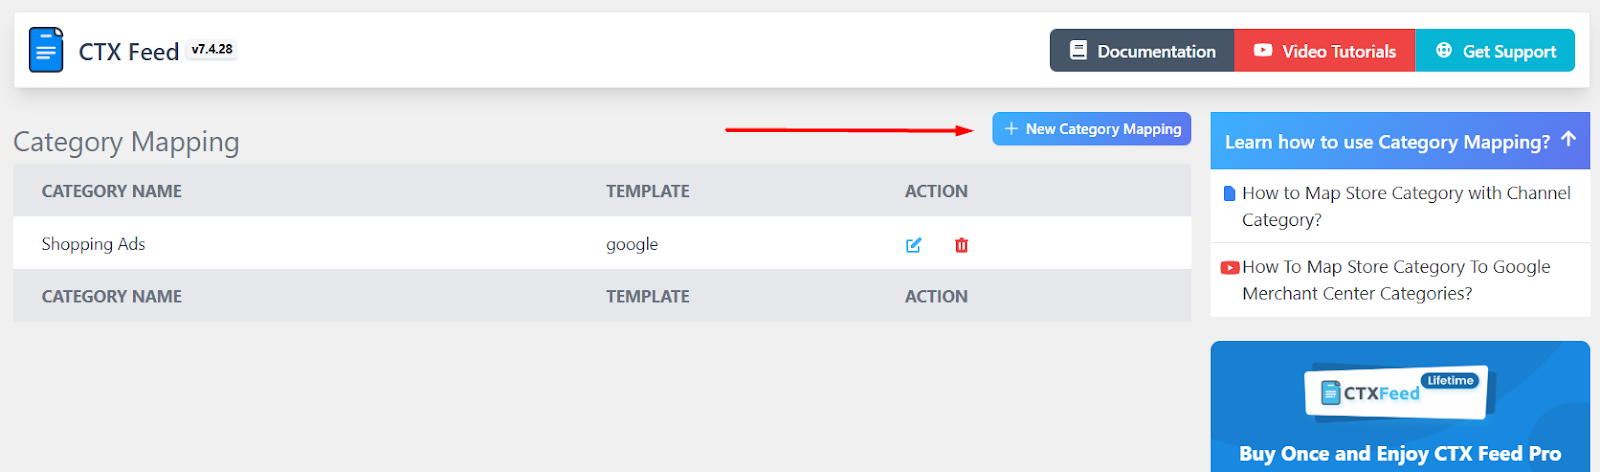
- Click on New Category Mapping.
- Select your target channel/merchant
 .
.
- Search and select the matching categories. On the left are your own categories, and on the right, you need to search and select the appropriate Google Shopping ones.
- Save your changes.
3. Creating a Google Shopping Product Feed
We have landed in the most important part of our WooCommerce Google Shopping Integration Guide. Here’s how to generate a feed using CTX Feed.
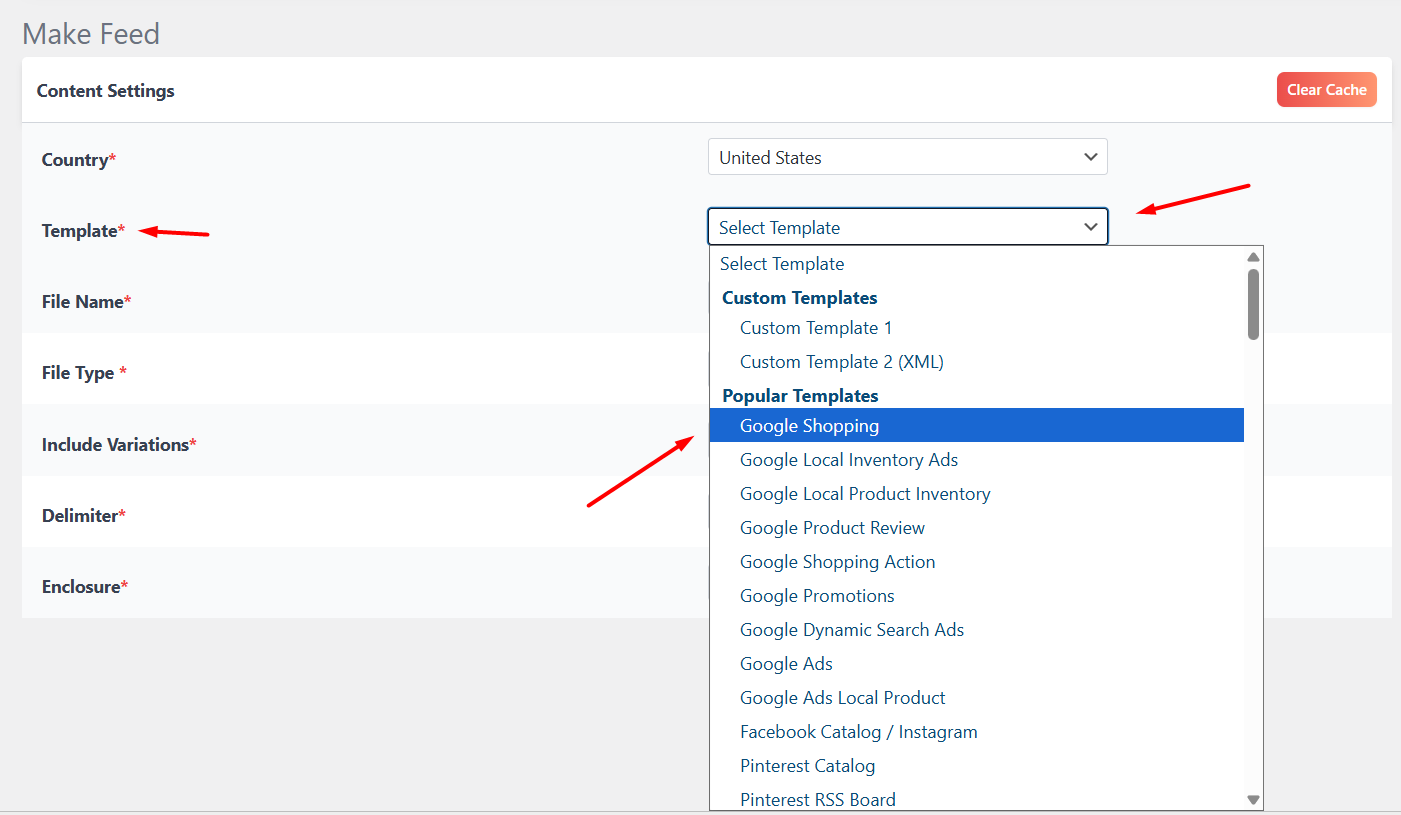
- Go to CTX Feed > Make Feed.
- Give your file a name and select a file type.
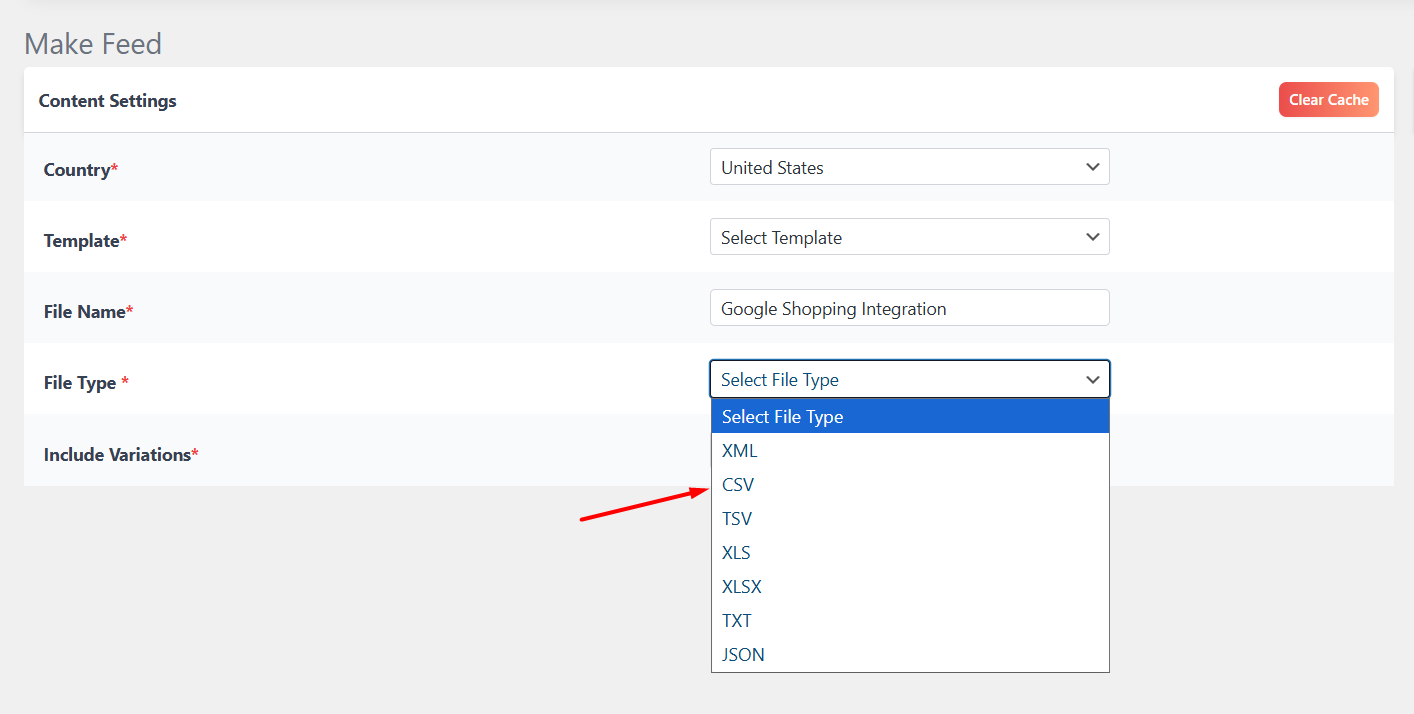
- Select the template from the dropdown. CTX Feed will automatically populate the necessary attributes.
- If not selected, select your newly created mapped category from the list for Google category attribute.
- Update and generate the feed. CTX Feed will automatically collect all your data and input it in a feed file.
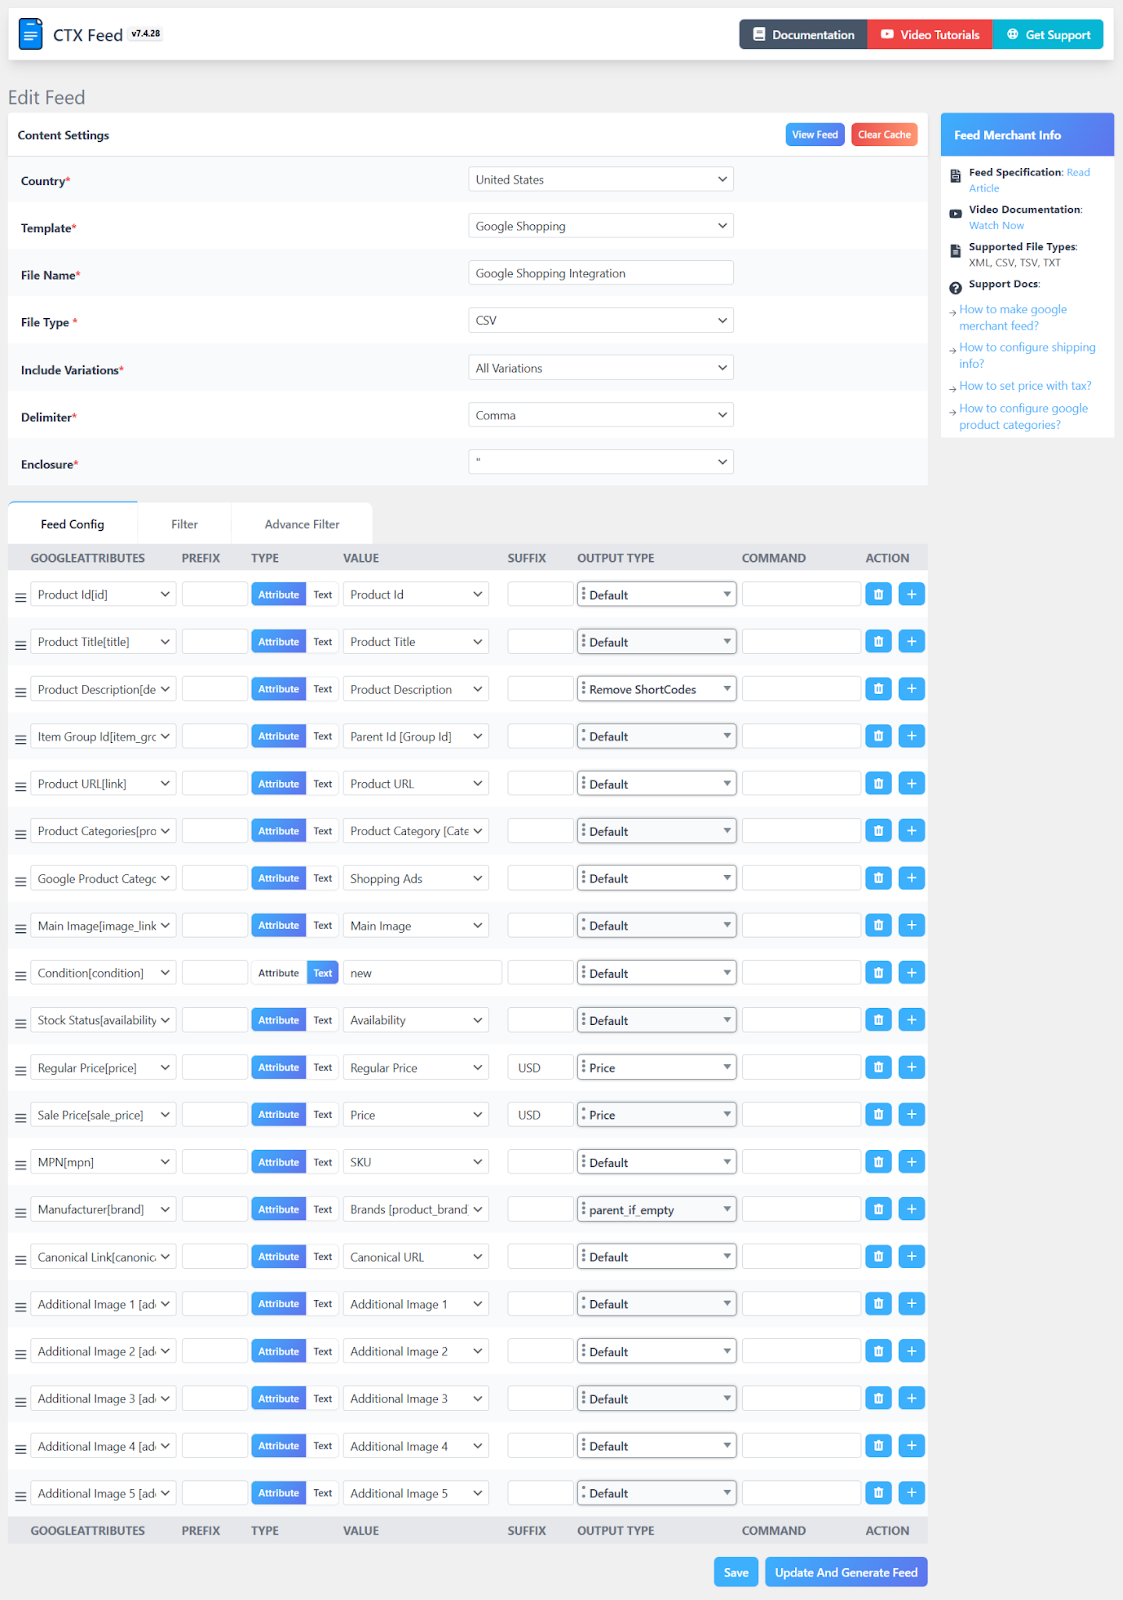
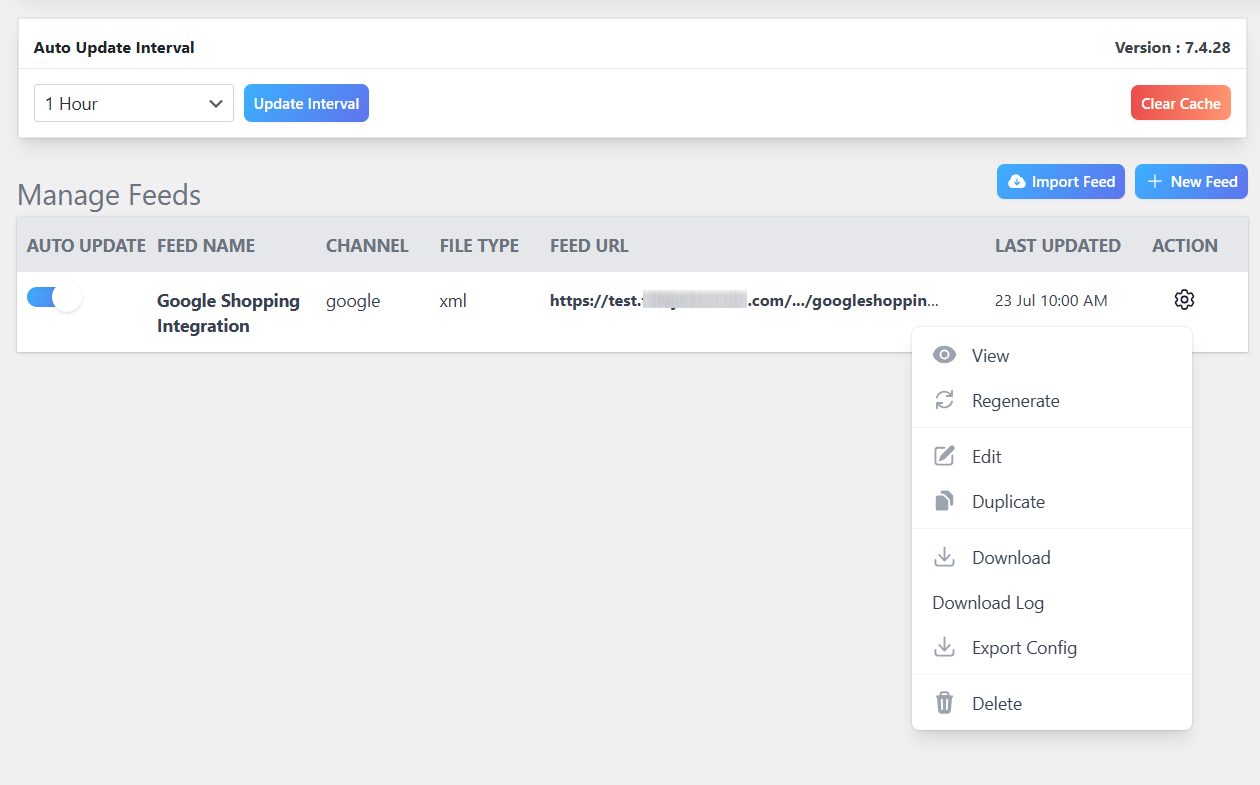
- To download or view the file, go to CTX Feed > Manage Feeds and View/Download the feed.
- Here’s how it looks.
Additionally, you can apply different filters to generate a custom feed if you are using CTX Feed Pro.
How to Upload (to GMC) and Display WooCommerce Products to Google Shopping
The final part of our WooCommerce Google Shopping integration guide involves how to connect WooCommerce to Google Merchant Center.
Under Manage Feeds, make sure you set an Auto Update Interval and toggle the Auto Update option beside your created feed. This allows CTX Feed to check your Woo site for changes as per your set time regularly and update the feed file accordingly.
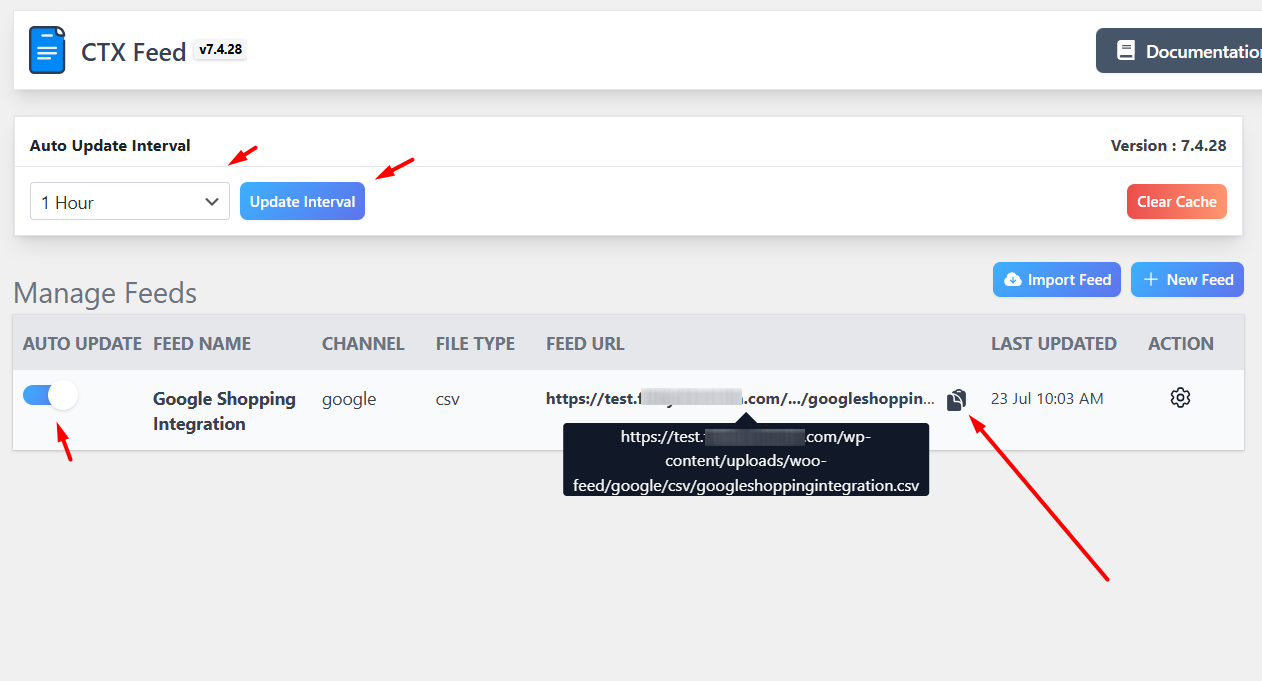
To connect the feed to Google Merchant Center,
- Copy the product feed link.
- Go back to GMC and navigate to Products > Add Products.
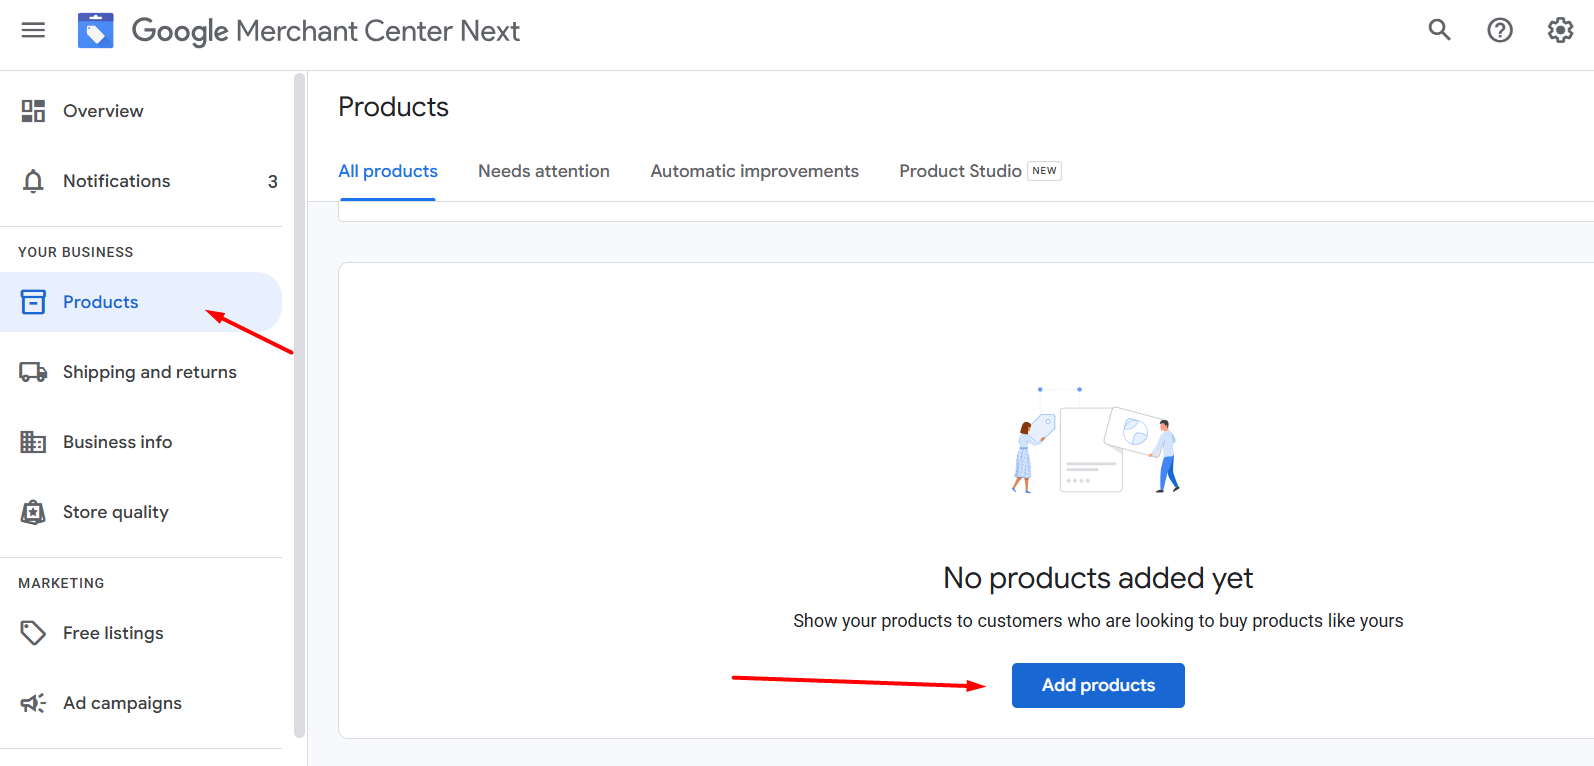
- Select the Add products from a file option.
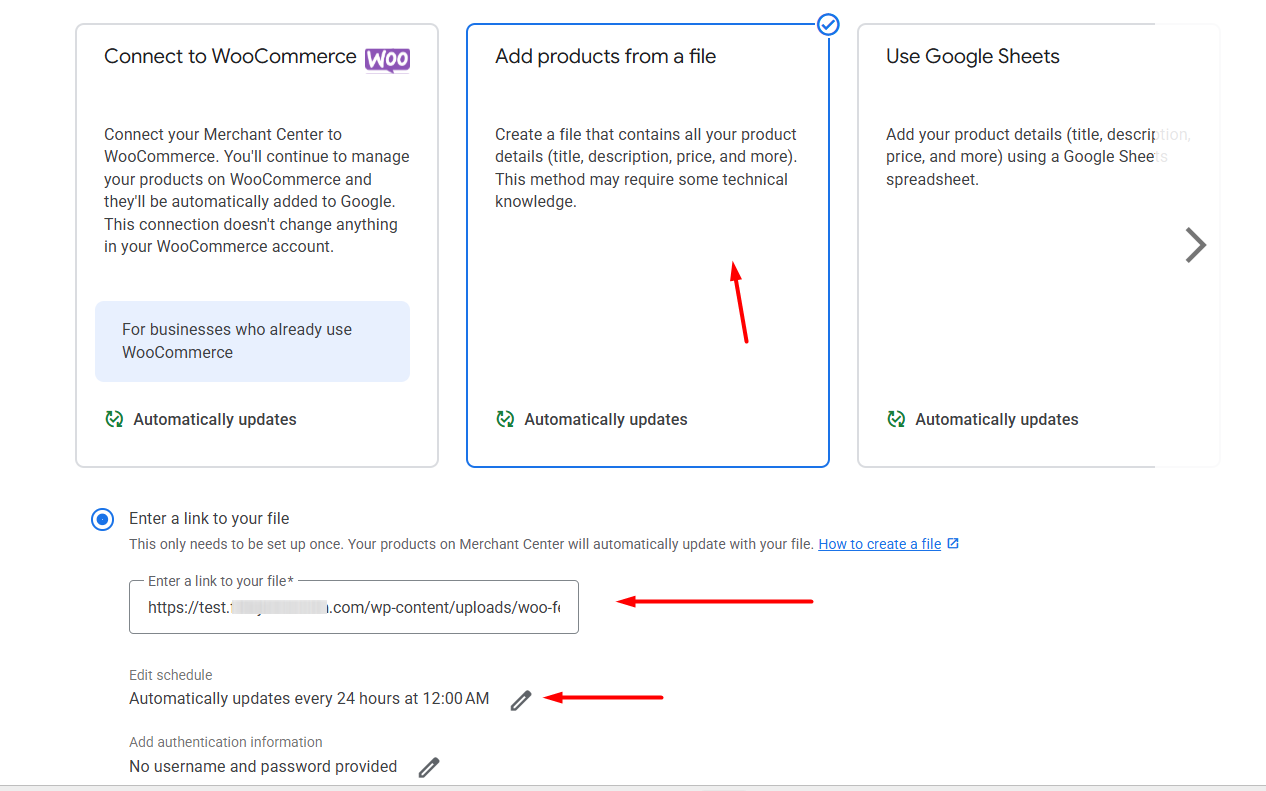
- Paste your WooCommerce product feed URL you copied from CTX Feed.
- Set automatic update timer for GMC.
- Click Continue. GMC will fetch your product information from the feed link and update its listings.
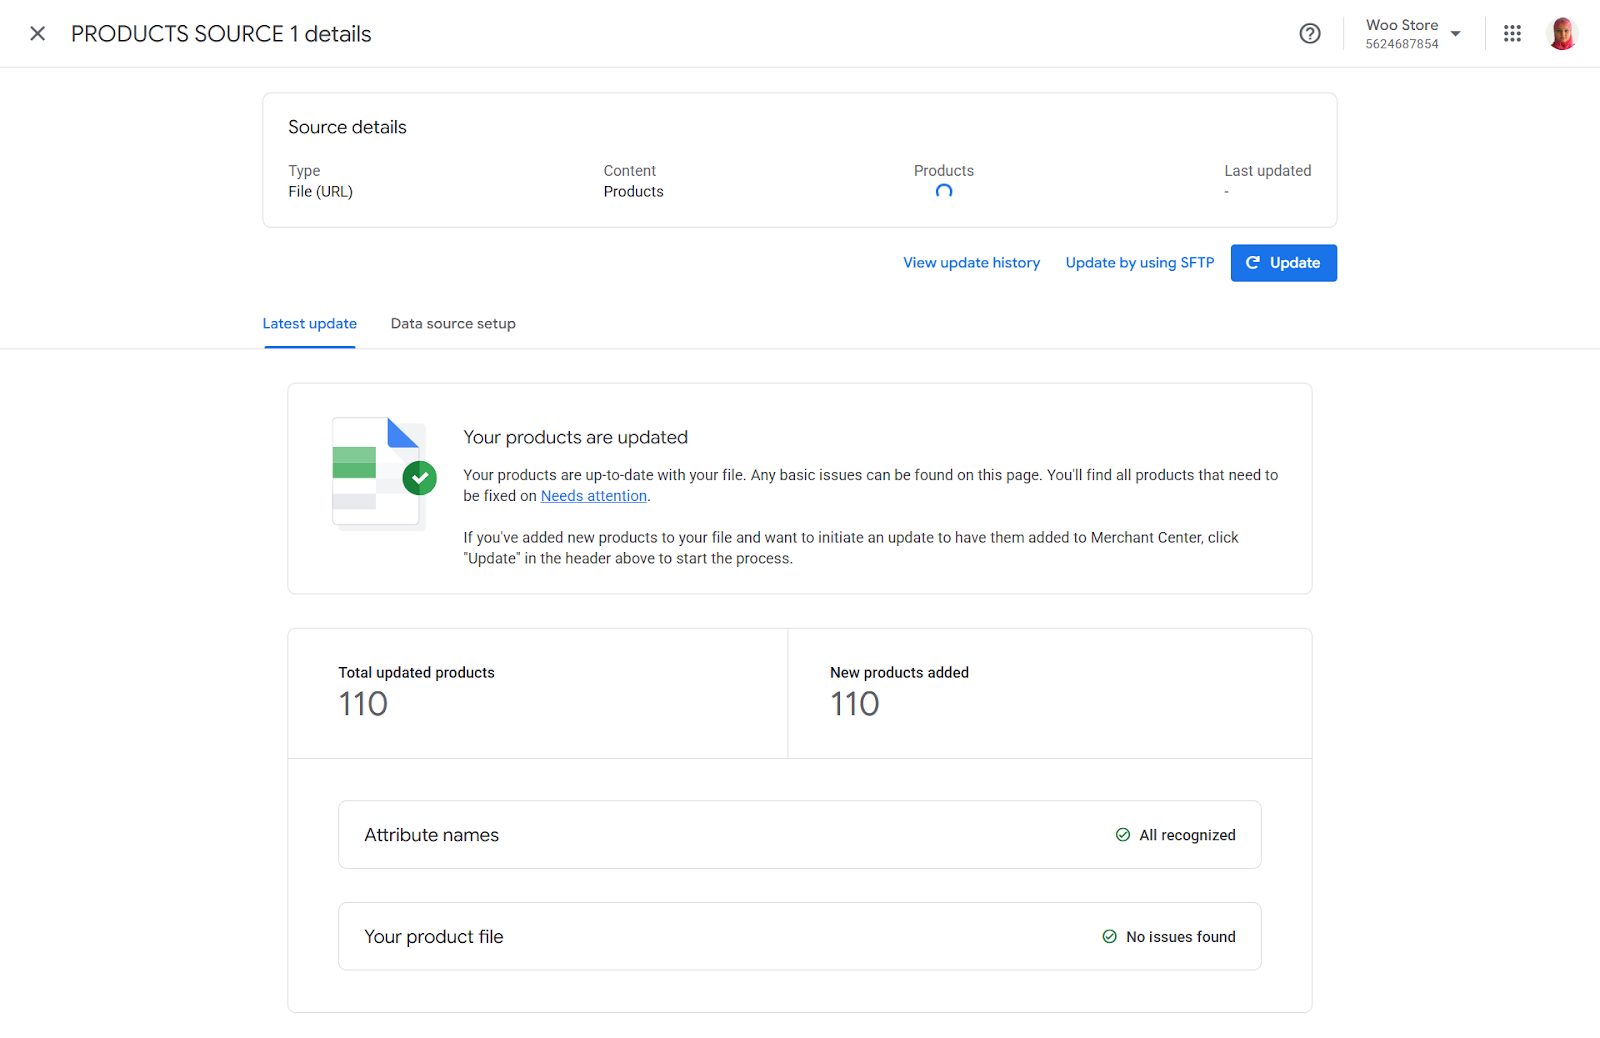
When you use CTX Feed, no worries about errors or need to optimize WooCommerce Google Shopping feed; the plugin generates an accurate feed for you automatically. As you can see above, no issues found.
Google Merchant Center will now review your products and begin displaying them in Google Shopping results.
Wrap Up
Launching a new WooCommerce store is thrilling, but watching sales trickle in can feel like shouting into an empty auditorium. You’ve poured hours into product pages, SEO, and social posts—yet traffic still lags. That’s a worry shared by countless shop owners: how do you break through the noise and actually get noticed?
That’s where Google Shopping provides a jaw-dropping opportunity to showcase your products to not millions but billions of potential customers without spending a penny. And you don’t need to spend countless hours to take advantage of this incredible opportunity.
Follow our WooCommerce Google Shopping integration guide step by step, and soon your products will be reaching customers around the clock—even while you sleep.
