How to Setup WooCommerce Guest Checkout (Easy Guide)
Enabling WooCommerce guest checkout allows shoppers to complete orders without creating a user account—reducing checkout friction and aligning with the eCommerce of “anonymous user purchasing.” WooCommerce manages this behavior through the Accounts & Privacy entity, where attributes like guest checkout permissions, login policies, and account creation settings determine whether the checkout flow requires authentication or supports guest sessions. By activating the “allow customers to place orders without an account” setting, merchants can streamline the purchase process, improve conversion rates, and offer a flexible identity model for both guest and registered users.
In this article, we will talk about what WooCommerce guest checkout is, why you need it, and how to enable guest checkout in WooCommerce.
Let’s get going.
What is WooCommerce Guest Checkout?
WooCommerce Guest Checkout allows customers to complete purchases on your online store without creating an account. This means they can browse your products, add items to their cart, and finalize their order – all without needing to register.
Think of it as letting customers walk into a physical store, grab what they need, and pay at the counter without needing to fill out any forms. It’s a faster and more convenient alternative to the traditional checkout process that requires account creation.
Benefits of WooCommerce Guest Checkout
WooCommerce checkout as guest offers a win-win situation for both your store and your customers. Here’s a deeper dive into the advantages it provides:
For Your Store
- Increased Conversion Rates: Adding guest checkout WooCommerce can significantly boost your conversion rates by removing a potential hurdle in the checkout process. Fewer abandoned carts due to account creation issues will translate to more completed sales for you.
- Improved Customer Experience: A smooth and convenient checkout experience is crucial for customer satisfaction and loyalty. WooCommerce allow guest checkout demonstrates your commitment to a hassle-free shopping experience, potentially encouraging repeat business.
- Optional Email Capture (Marketing Potential): Even though account creation isn’t required, you can still capture customer email addresses during guest checkout. This allows you to:
- Send targeted marketing campaigns based on their purchase history or browsing behavior.
- Keep them informed about new products, promotions, and special offers. (Remember to comply with anti-spam regulations when collecting and using email addresses.)
For Customers
- Faster Checkout: WooCommerce Guest checkout eliminates the need to create an account and fill out registration forms. This translates to a quicker and more streamlined checkout process, saving your customers valuable time, especially for impulse purchases or when they’re in a hurry.
- Reduced Friction: Creating accounts can feel like an unnecessary step for some customers, especially first-time visitors. WooCommerce Guest checkout removes this barrier, making the purchase journey smoother and more likely to be completed.
- Privacy Concerns Addressed: Some customers might be hesitant to share their personal information for account creation. Guest checkout allows them to make a purchase without having to provide more details than necessary for order fulfillment.
Additional Considerations
- While guest checkout offers numerous benefits, finding a balance is important. Consider offering an incentive (like a discount) for customers to create an account during checkout. This allows you to collect valuable customer data for future marketing efforts and personalized experiences.
- Allow guest checkout WooCommerce might not be ideal for all stores. If your business relies heavily on repeat customers or loyalty programs, offering account creation with its benefits might be a more suitable approach.
Your next question must be how I enable guest checkout in WooCommerce, right? Let’s get into that.
How to Enable WooCommerce Guest Checkout
To enable guest checkout on WooCommerce, do the following:
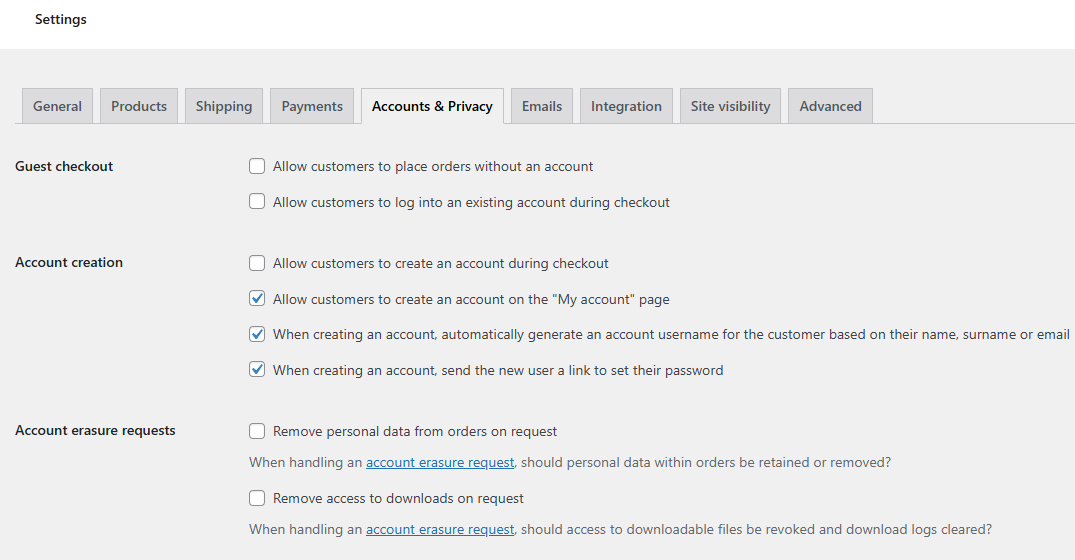
- Access WooCommerce Settings:
- Login to your WordPress back panel and navigate to WooCommerce >> Settings.
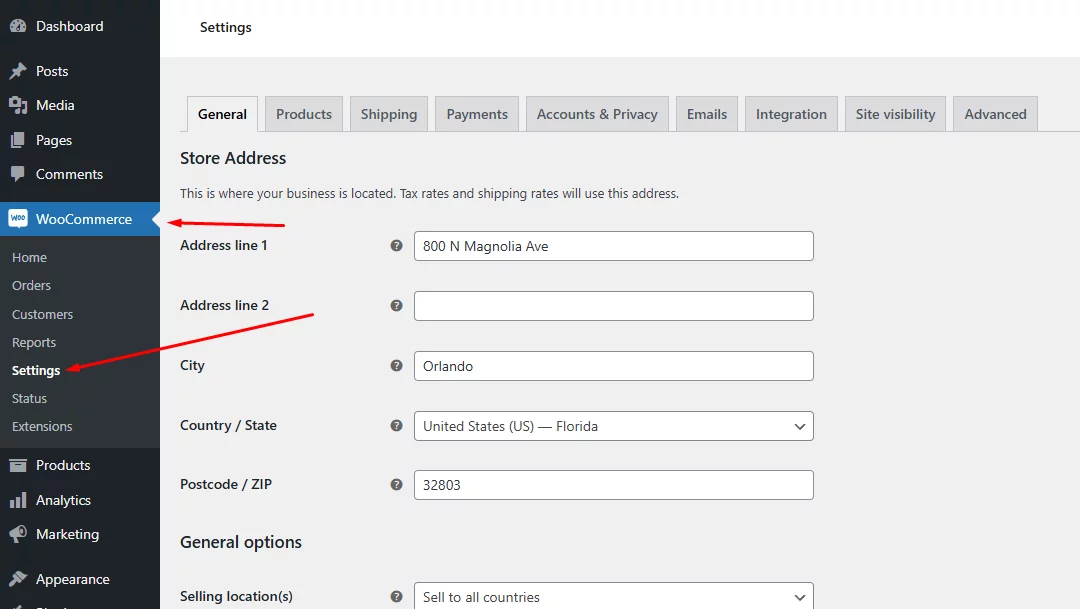
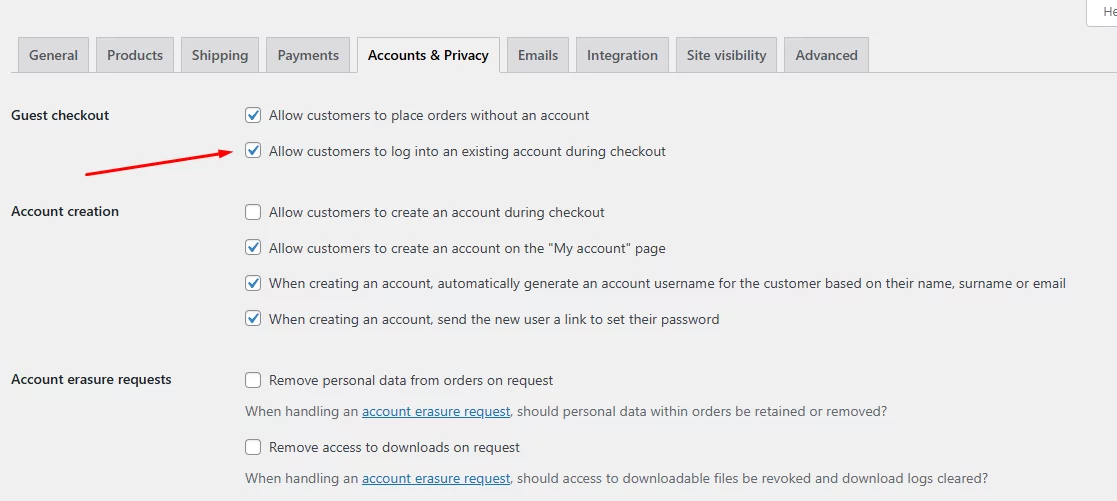
- Accounts & Privacy Settings:
- Go to the Accounts & Privacy tab.
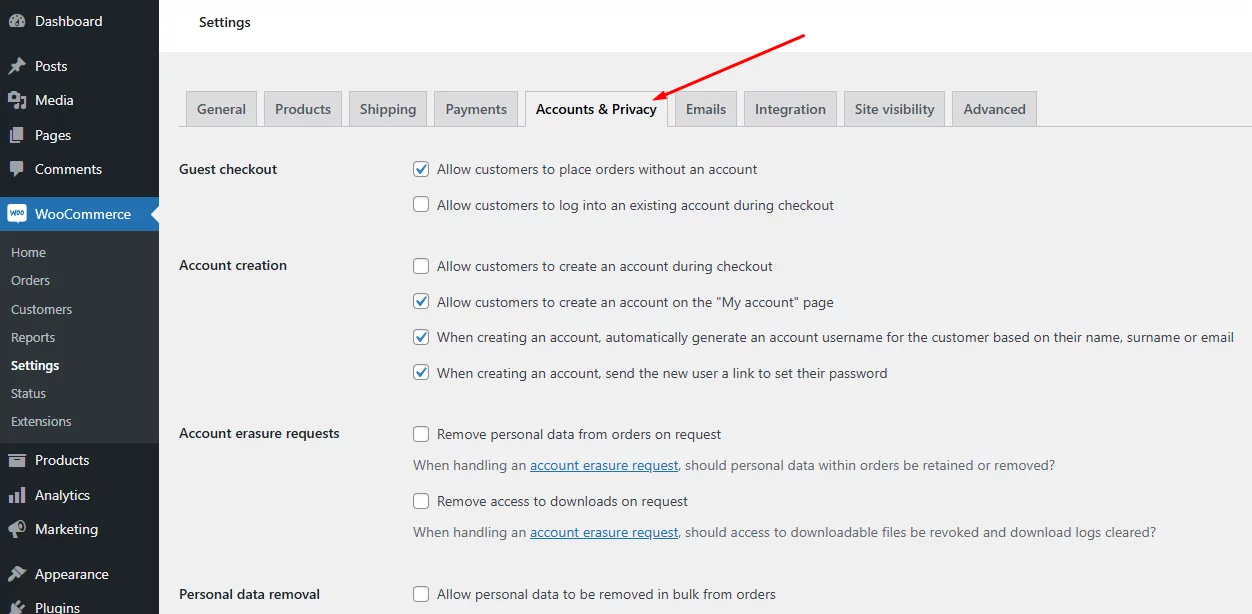
- Enable Guest Checkout:
There’s a dedicated section for WooCommerce Guest Checkout with the following options –
- Allow customers to place orders without an account
- Allow customers to log into an existing account during checkout.
Checkmark the first option to enable/disable guest checkout WooCommerce.
- Save Changes:
- Ensure that all your settings are saved by clicking the “Save changes” button at the bottom of the page.

Following these steps will enable guest checkout for your WooCommerce store. This will allow customers to complete their purchases without needing to create an account.
Testing WooCommerce Guest Checkout
We have walked you through the simple process of how to set up WooCommerce to allow guest checkout only. Let’s test it out from the front end.
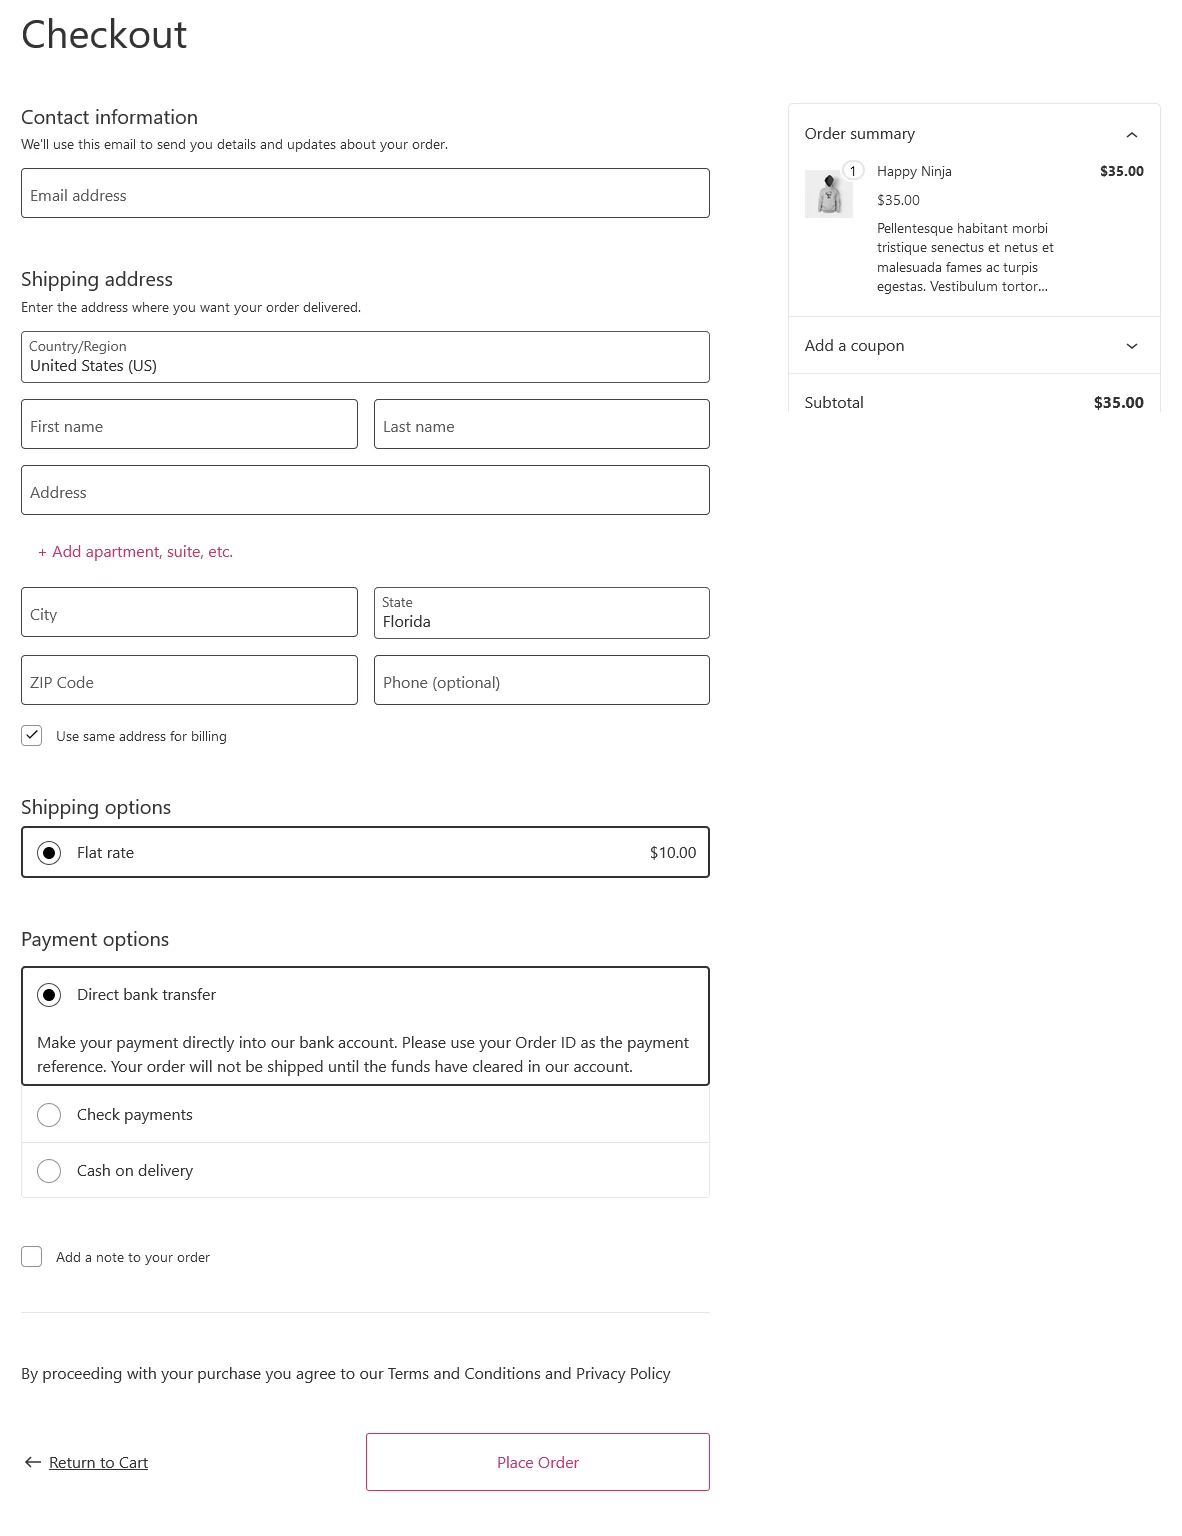
Before that, we want to show you what checkout page returns if you have not enabled guest checkout.
Add some products and click on the Checkout link.
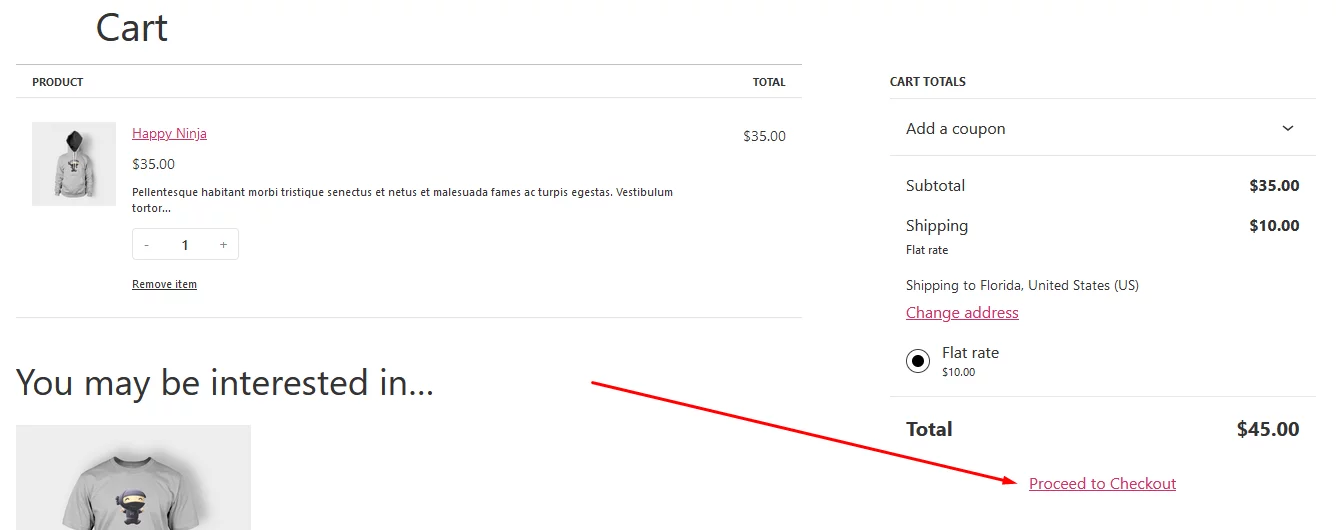
Here’s what the checkout page will return.
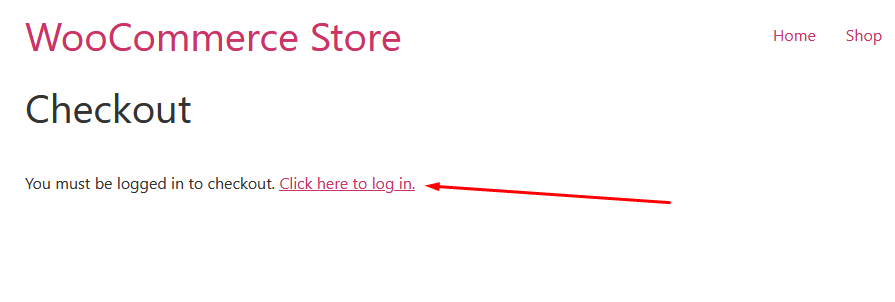
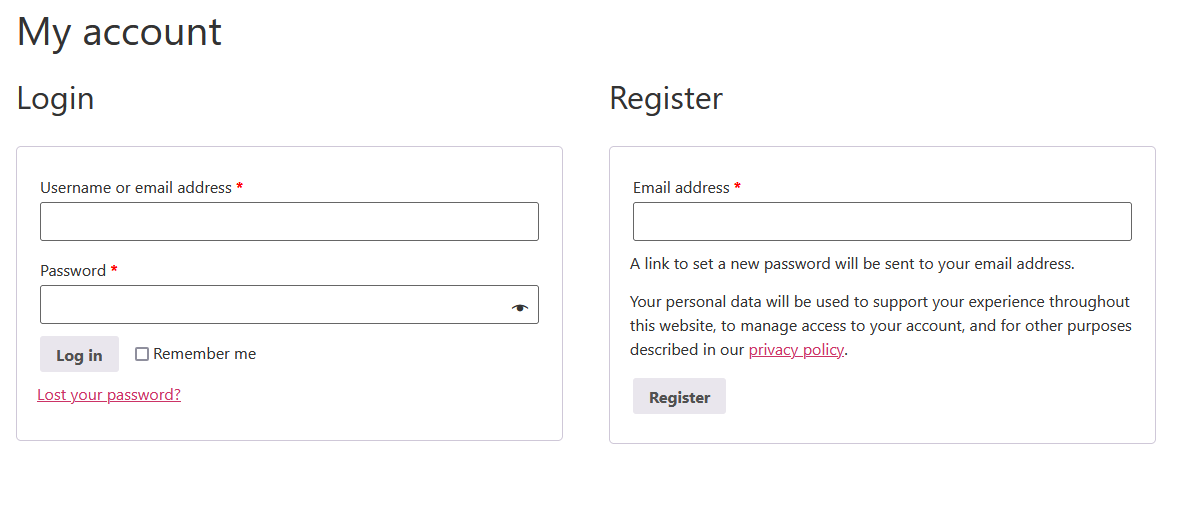
As you can see, WooCommerce guest checkout not working as you haven’t enabled it yet. As per the settings from the screenshot above, customers either have to log in to an existing account or register from the My Account page.
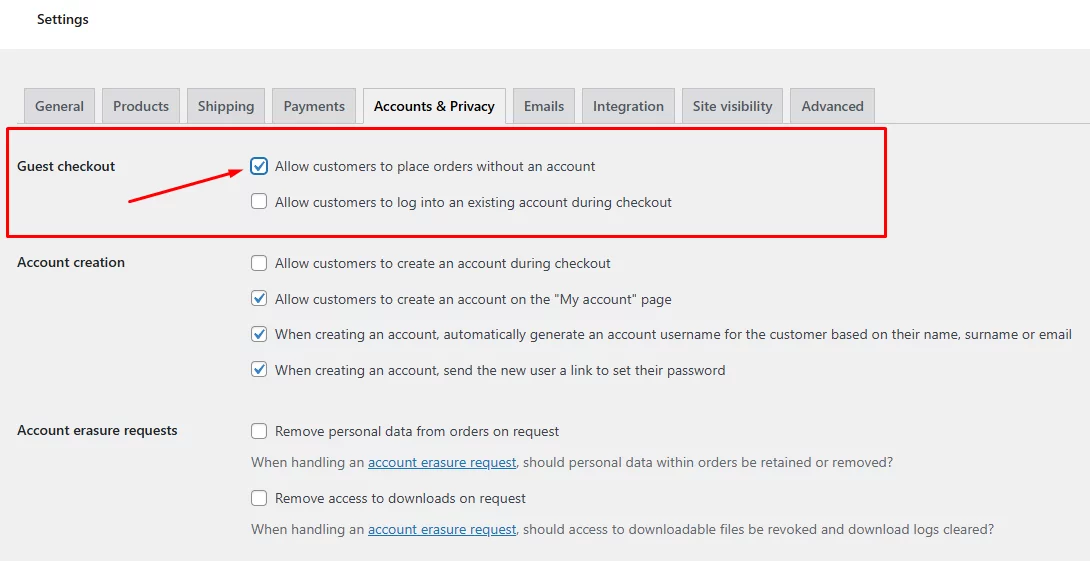
Return to the Accounts & Privacy tab and activate the checkmark – “Allow customers to place orders without an account.”

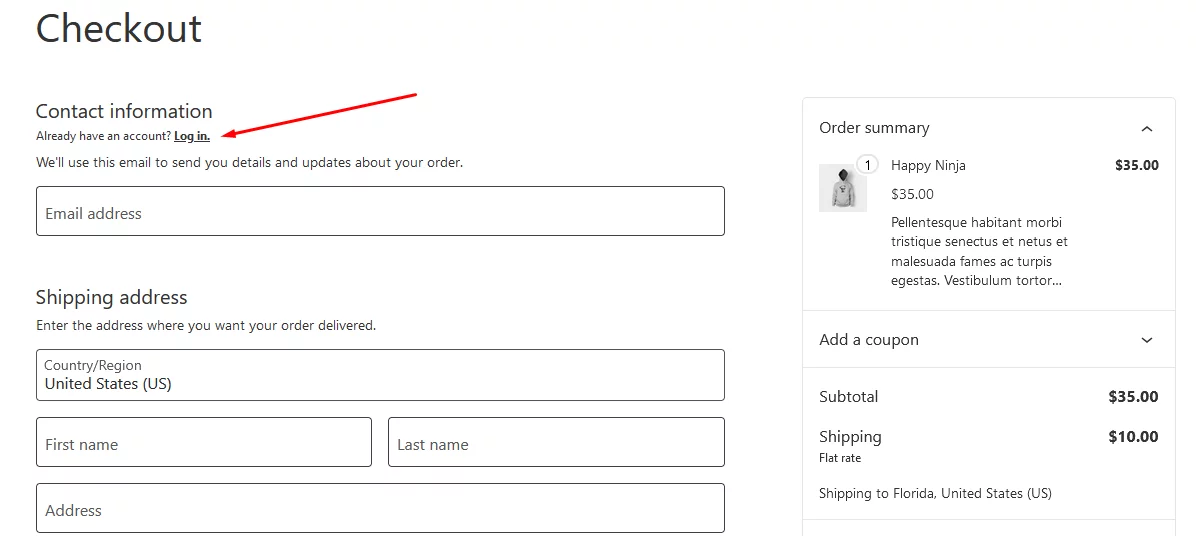
The Checkout page will now let the customer complete the order without creating an account.
How to Set Up WooCommerce to Allow Guest Checkout Only
We must mention that, with the current settings, your customers will still be able to create an account from the My Account page.

You can also allow your existing customers to log in to their account from the checkout page by check-marking the following option.
As a result of this, WooCommerce will display a login option in the checkout page.
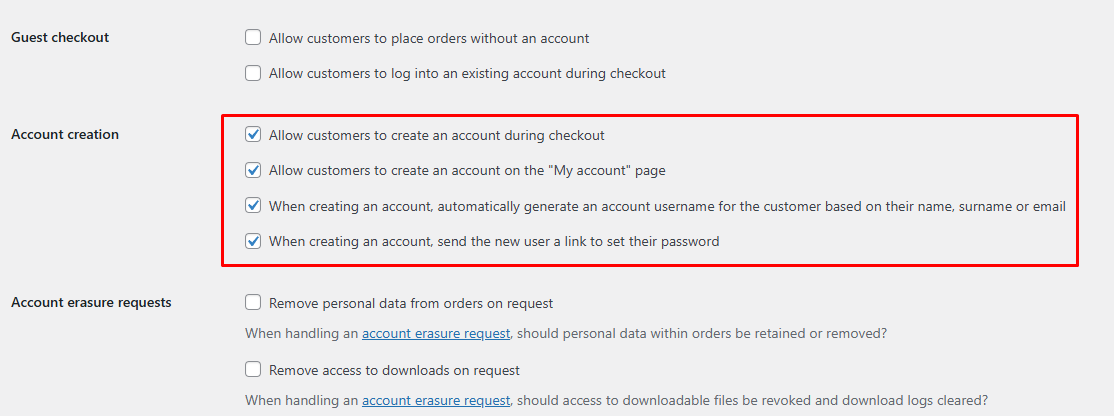
If you want to restrict users to WooCommerce guest checkout only, you can uncheck the following boxes –

- Allow customers to log into an existing account during checkout
- Allow customers to create an account during checkout
- Allow customers to create an account on the “My account” page
How to Automatically Register Guest Users on Checkout in WooCommerce
While WooCommerce guest checkout only offers convenience for customers, relying solely on it in your online store can have downsides. By allowing guest checkout, you are missing out on valuable customer data such as email, location, etc.
This limits your marketing opportunities. Without customer data, you can’t target past buyers with personalized promotions or send abandoned cart reminders. This limits your ability to recover lost sales and upsell future purchases.
Also, guest purchases are one-time transactions, so you are missing out on building customer relationships and loyalty programs, which makes repeat business less likely.
WooCommerce allows you to register any new users automatically at checkout. Simply enable the following options.
However, this doesn’t automatically register the guest users. To save guest user details and register an account for them automatically, you can add some custom codes to your WooCommerce theme file.
Let’s find out how.
Automatically Register Guest Users on Checkout Using Custom Codes
We must warn you that you must have the technical skills to play with codes. Let us walk you through the process.
Step 1: Create a Child Theme (if you don’t have one)
It’s best to add custom code to a child theme to prevent changes from being lost when the parent theme updates. If you don’t have a child theme or are unfamiliar with it, you should create a backup of your entire website.
Step 2: Edit the Functions.php File
Go to your WordPress WooCommerce dashboard. Navigate to Appearance >> Theme Editor.
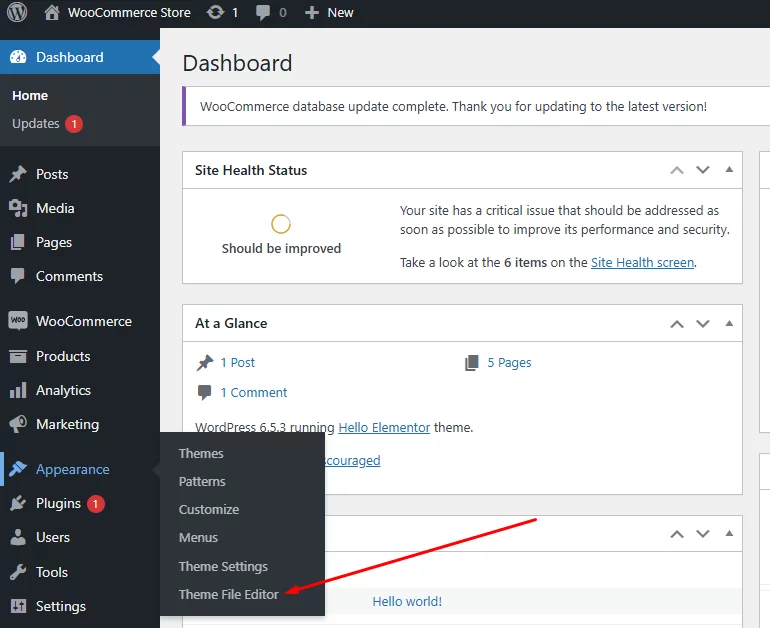
Find the functions.php file and scroll to the bottom.
Step 3: Add the Custom Code

Hit enter to create some empty space in the functions.php and paste your code.
Here’s a code you can try –
// Automatically create an account for guest users at checkout

/**

 * @snippet   Auto Register Guest Users @ WooCommerce Checkout

 * @how-to    Get webappick.com

 * @author    Fadiyah Sameh

 * @testedwith WooCommerce Latest

 * @community https://webappick.com/

 */

add_action( 'woocommerce_thankyou', 'fadiyah_register_guests', 9999 );

function fadiyah_register_guests( $order_id ) {

   $order = wc_get_order( $order_id );

   $email = $order->get_billing_email();

   if ( ! email_exists( $email ) && ! username_exists( $email ) ) {

   $customer_id = wc_create_new_customer( $email, '', '', array(

      'first_name' => $order->get_billing_first_name(),

      'last_name'  => $order->get_billing_last_name(),

   ));

   if ( is_wp_error( $customer_id ) ) {

      throw new Exception( $customer_id->get_error_message() );

   }

   wc_update_new_customer_past_orders( $customer_id );

   wc_set_customer_auth_cookie( $customer_id );

   } else {

   $user = get_user_by( 'email', $email );

   wc_update_new_customer_past_orders( $user->ID );

   }

}
This custom code will automatically create a WooCommerce account for guest users during the checkout process. It generates a random password and sends it to the user’s email address along with their new account details.
Step 4: Save the Changes
Save all the changes you have made in the functions.php file. Also, enable WooCommerce guest checkout (checkmark “Allow customers to place orders without an account”) from the settings.
Step 5: Test the Functionality
From a different browser, visit your shop page and add some products. Complete the checkout process with some demo data.
Finally, place the order. If the code is working, WooCommerce will automatically add the guest customer’s details to the user list.
One quick way to find out if the guest is registered is to go directly to the My Account page after placing the order. If the code works, it will display account pages; otherwise, it will ask for a login.
Optimizing the WooCommerce Guest Checkout Process for Better Conversions
Since WooCommerce guest checkout relies on a one-time interaction, optimizing the process is crucial for securing the sale. Here are some best practices to ensure a smooth and frictionless experience for your guest customers:
Simplified Checkout Flow
- Minimize the Number of Steps: The fewer steps involved in checkout, the faster and easier it becomes for guests to complete their purchase. Streamline the process by:
- Combining shipping and billing information into a single form. This reduces clicks and data entry for the customer.
- Pre-selecting default options for non-essential fields (e.g., country based on IP address).
- Offering clear and concise instructions throughout the checkout process.
Inline Validation
- Reduce Errors, Enhance Trust: Nobody enjoys filling out forms only to discover errors at the final step. Implement real-time validation to catch mistakes as they’re entered. This prevents frustration and abandoned carts due to invalid information.
- Highlight errors with clear and actionable messages next to the incorrect field, explaining the issue and suggesting a solution.
- Use color-coding to indicate valid and invalid fields visually.
- Consider offering auto-correction for minor typos (e.g., suggesting the correct spelling of a city name).
Address Autocomplete
- Speed Up Data Entry: Leverage tools like Google Address Autocomplete to streamline the checkout process. As customers begin typing their addresses, this feature suggests valid options. This reduces the need for manual input and minimizes errors, saving time and ensuring accurate delivery of information.
Additional Tips
- Offer Guest Checkout as a Prominent Option: Clearly label the guest checkout option during the checkout process. Don’t make them search for it.
- Guest Checkout Progress Bar: Implement a progress bar to visually indicate how far along the customer is in the checkout process, keeping them engaged and motivated to complete it.
- Mobile-Friendly Checkout: Ensure your guest checkout experience is optimized for mobile devices, as a significant portion of online shopping happens on smartphones.
How to Optimize WooCommerce Guest Checkout Process
There are multiple ways you can achieve the optimizations mentioned above.
- Using Themes: Your WooCommerce theme may come with customizable features to personalize your checkout page and guest checkout process
- Website Builder: Website builders like Divi, Elementor, Visual Composer, etc., allow you to customize your checkout process just the way you like.
- Using Plugins: Guest checkout WooCommerce plugins like Flux Checkout for WooCommerce or FunnelKit Funnel Builder allow you to personalize your WooCommerce guest checkout process exactly according to our above recommendations.
- Using Custom Codes: You can always add custom code to your theme file to add elements to your existing pages or customize them as per your requirements.
By implementing these best practices, you can significantly improve the guest checkout experience, which can lead to increased conversions and satisfied customers.
Wrap up
Remember, a smooth checkout process can make all the difference in securing the sale. This is especially true for first-time visitors who might not be familiar with your store.
WooCommerce Guest Checkout provides a flexible and convenient solution for both you and your customers. By understanding its advantages and potential drawbacks, you can decide how to best utilize it within your store’s specific needs and goals.
I hope this article will guide you in creating a well-optimized guest checkout process in your store.
