How to Set WooCommerce Multiple Shipping Options in 2026
WooCommerce multiple shipping options are set up by combining shipping zones, shipping methods, and shipping classes to control how delivery rates appear at checkout.
From WooCommerce → Settings → Shipping, you define geographic zones, assign methods like flat rate, free shipping, or local pickup, and configure attributes such as cost formulas, tax status, and order conditions.
This structured shipping lets WooCommerce automatically show the right shipping options based on a customer’s location, cart value, and product type—while extensions can add real-time carrier rates and advanced pricing rules.
In this article, we will discuss all about WooCommerce shipping options and how to set up shipping in WooCommerce.
How to set up shipping in WooCommerce
If you sell physical products in your WooCommerce online store, then you probably already know you can’t set one shipping method or option for all your customers around the world.
Depending on your store or warehouse location, you need to come up with a strong shipping strategy where you can offer WooCommerce multiple shipping options to your consumers.
WooCommerce core plugin allows you to set some shipping options. However, for advanced WooCommerce multiple shipping options, you will need to install third-party plugins.
Let’s begin with the default WooCommerce shipping settings.
Default WooCommerce shipping options
First, we need to set the shipping location. Go to WooCommerce >> Settings >> General and find the Shipping location field under General options.

There are four options for you to choose from.
- Ship to all countries you sell to
- Ship to all countries
- Ship to specific countries only
- Disable shipping and shipping calculations
Additionally, you have the option to select the Default customer location.
When a customer adds an item to their shopping cart on your website, they will be able to view the available shipping methods and rates based on the settings that you have chosen.

The available options for this section are –
- No location by default
- Shop base address
- Geolocate
- Geolocate (with page caching support)
For instance, with geolocation settings, the customer’s location will be determined based on their IP address, and shipping methods and rates will be displayed accordingly.
Now we can officially start the WooCommerce shipping setup.
Step 1: Setting up WooCommerce shipping zones
Setting up shipping zones on your WooCommerce store is the first step in configuring shipping settings. Shipping zones are geographical regions in which particular shipping methods and rates apply.
You have the option of adding WooCommerce multiple shipping options and prices for each shipping zone.
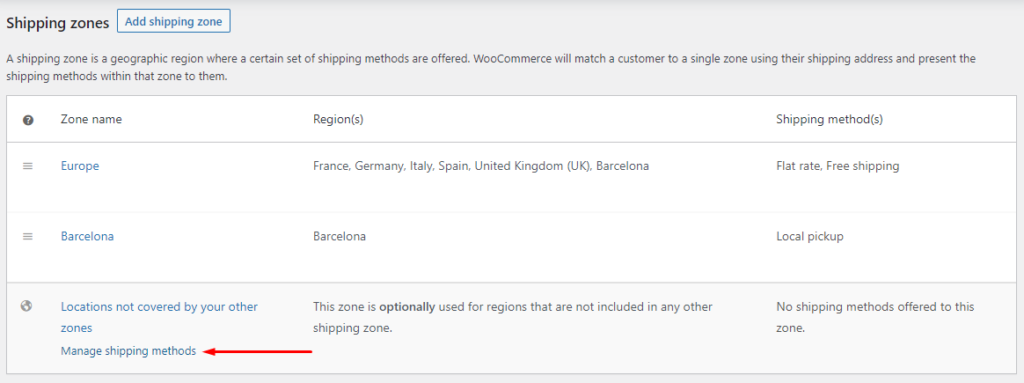
Go to WooCommerce >> Settings >> Shipping. Here’s how it looks now.
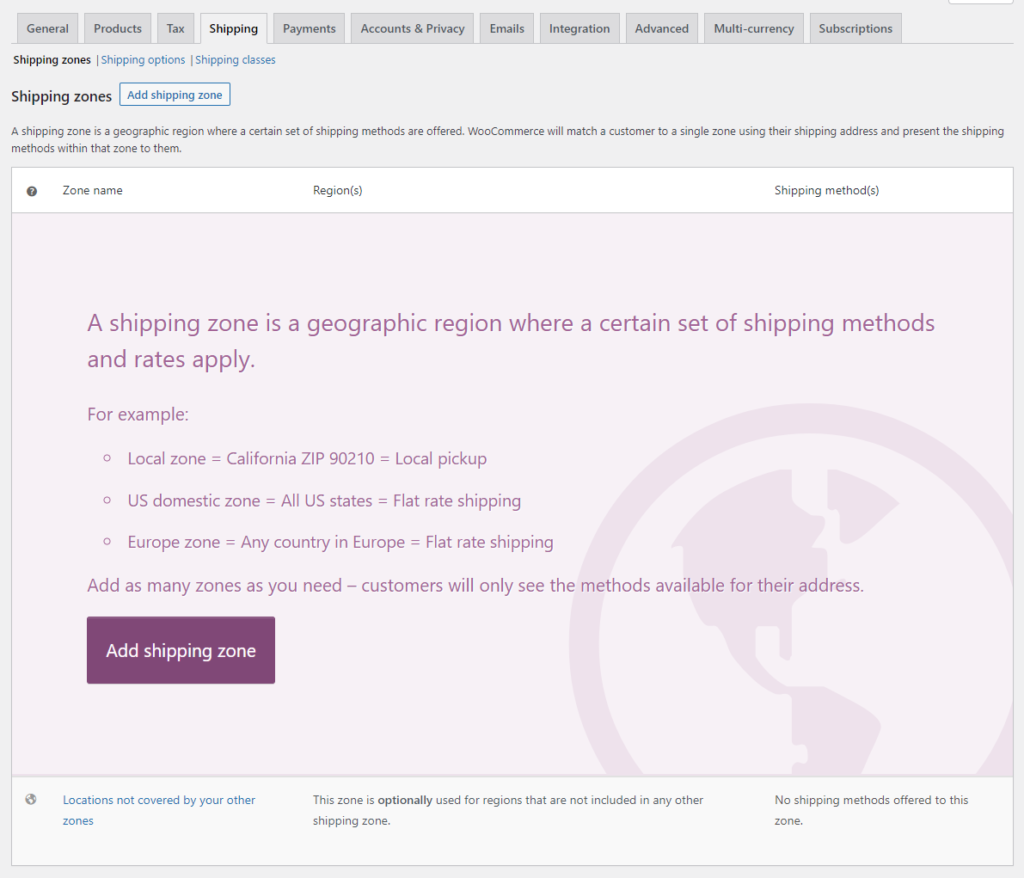
Locations not covered by your other zones: All countries and regions not covered by other shipping zones are included in this default shipping zone.
Click on the Add shipping zone button, and it will take you to a new window to configure your shipping zone settings.
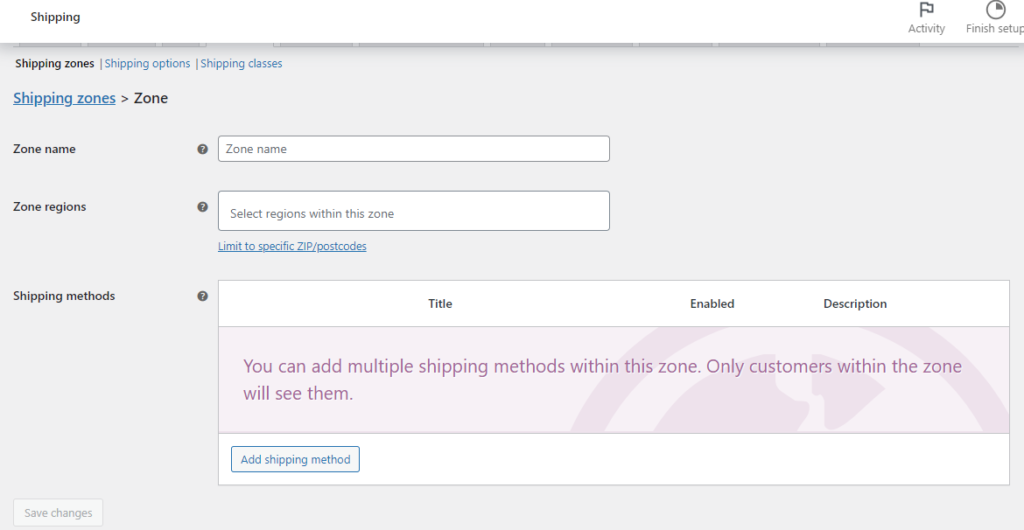
In the Zone name box, enter a recognizable name for your reference.
You can add a specific location to the Zone regions field by either searching for it or selecting it from the extensive list of locations that are currently available.
Also, you have the option of choosing a city/state, an entire country, or an entire continent. You can also add zip/postcodes.
Step 2: Adding Shipping methods WooCommerce
After defining the shipping zones, you can now add WooCommerce multiple shipping options/methods to the shipping zone.
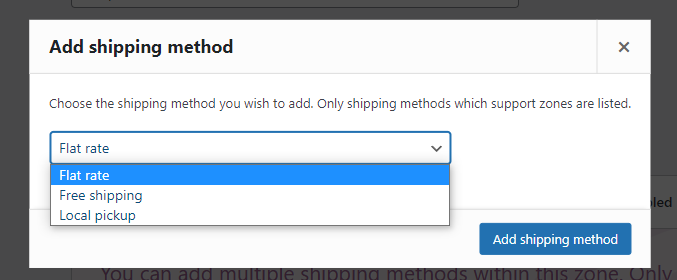
By default, WooCommerce offers three shipping methods.
- Flat rate
- Free shipping
- Local pickup
Click on the Add shipping method button from the zone editor window.
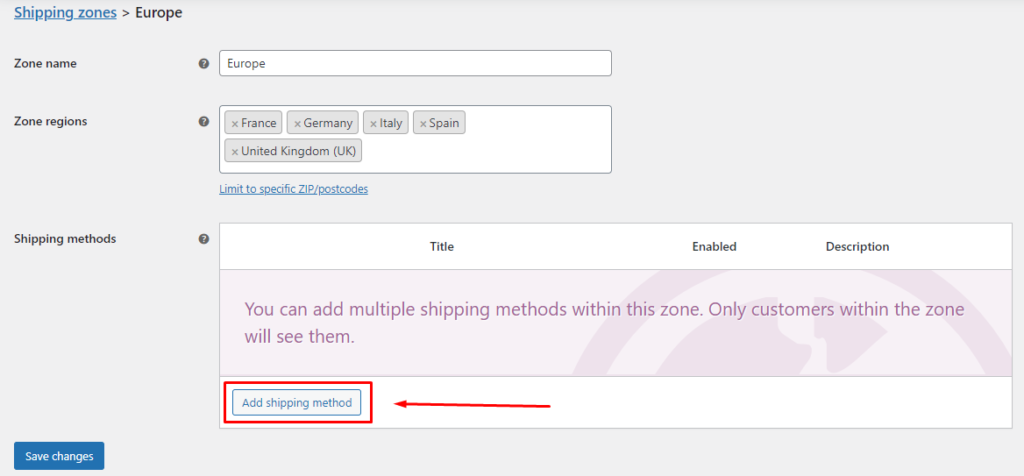
A new window will pop up with the available shipping methods in a dropdown field.
After adding the shipping methods you need, you’ll be able to see them in action in the shipping zone. You can see the shipping method’s name and description, as well as a button to enable or disable it.
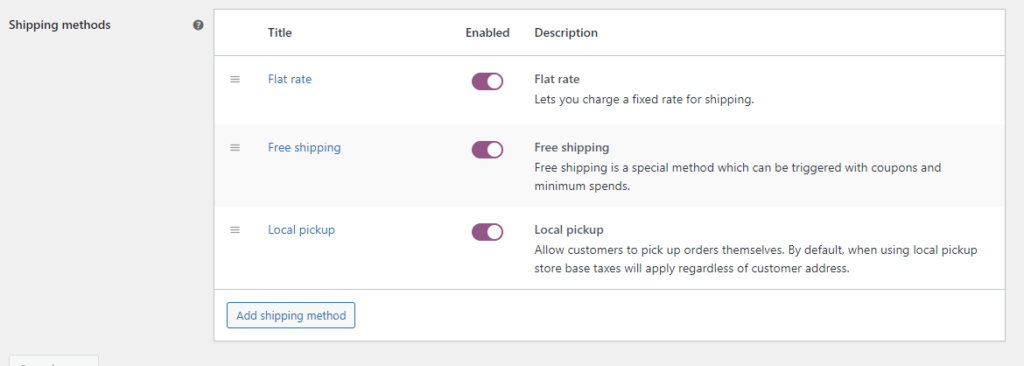
When you hover your cursor over the title of any of these methods, the Edit and Delete option will appear. The edit option allows you to add rates and other conditions.
Let’s click the Edit option of each of these options and check how to configure them.
Flat rate
After clicking the Edit option, a pop window will appear with three options.

You can change the method title. Your shoppers will see what you set here. For example, if you set the title as Fixed rate here, your customer will see this instead of Flat rate on the cart page.
In the Tax status field, you can set whether or not your shipping is taxable.
You can assign a fixed rate/cost for the shipping method in the Cost field. You can also set more sophisticated pricing policies for customer orders by setting variable values.
The placeholders available for this field are as below –
- [qty] – indicates the total quantity of items in the shopping cart.
- [fee] – You have the option of adding a supplemental fee to the cost of the shipping. There are two additional choices available for this.
- percent – You can set a percentage for shipping costs based on how much the whole order costs.
- min_fee – a base charge that would be applied to the total; can be combined with a percentage.
Example
Example 1: For instance, if you put 5 as a flat rate in the Cost field, it means for all orders of the customers from that zone, the shipping cost will be $5.
Example 2: Suppose you have put this in the Cost field, 5 + ( 2 * [qty] ). This means a fixed shipping rate of $5 + $2 for each item added to the cart.
Example 3: 5 + [fee percent=”3″ min_fee=”2″] – this means base shipping cost for every order is $5 + 3% of the total order value which must be minimum $2.
Free shipping
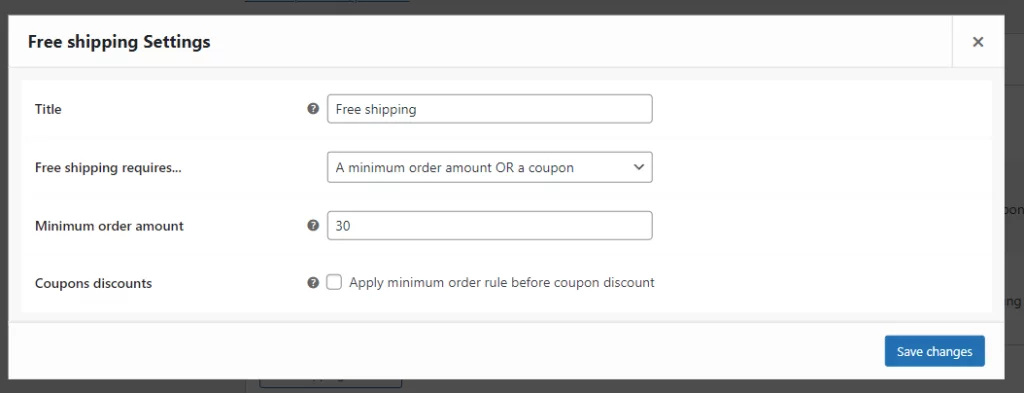
On the Free shipping modal window, you can specify a name and a condition for customers to qualify for free shipping on your store.

These are the available options/conditions –
- A valid free shipping coupon
- A minimum order amount
- A valid free shipping coupon OR a minimum order amount
- A valid free shipping coupon AND a minimum order amount
For example, if you set minimum order amount of 30, then your customers who order products worth $30 or more will see the free shipping option on the cart page.
Local pickup
You can also give customers the option of picking up their orders from a physical store rather than having them shipped out to them.
The Local pickup pop-up window looks pretty similar to the Flat rate window.
Let’s say you have a physical store in Barcelona, and you want to display the Local pickup method to the customers from that place and charge a $10 flat rate for this option. Here’s how it looks-
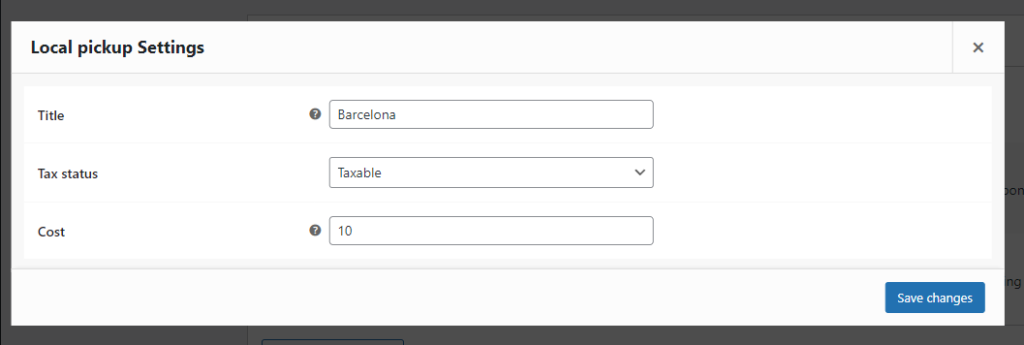
However, you need to create a separate zone for configuring WooCommerce shipping settings for a specific location.
We’ll review the front end later in the article but first, let’s configure shipping classes.
Step 3: Adding shipping classes
In addition to shipping zones, you also have the option of basing WooCommerce shipping rates on pre-defined groups that contain similar products. These different groups are referred to as shipping classes.
One thing to remember is that it’s not mandatory to create shipping classes for displaying WooCommerce multiple shipping options unless you have a long list of products of different sizes and weights.
Usually, you want to put items in the same shipping class if they have similar sizes or weights.
From the previous WooCommerce>>Shipping window, click on the Shipping classes tab.

For instance, if you create three shipping classes for large, medium, and small weight products, this is how it will look.
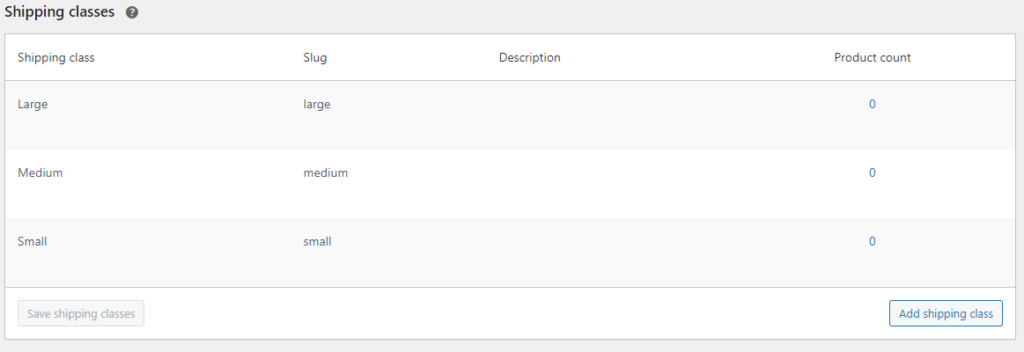
Save the changes and go back to the Shipping zones tab.
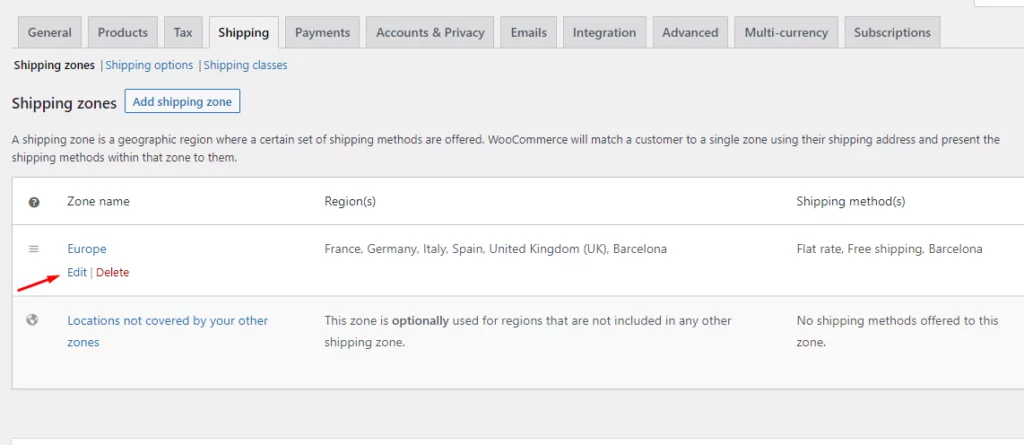
Click on edit and navigate to Flat rate WooCommerce shipping method and click on edit again.
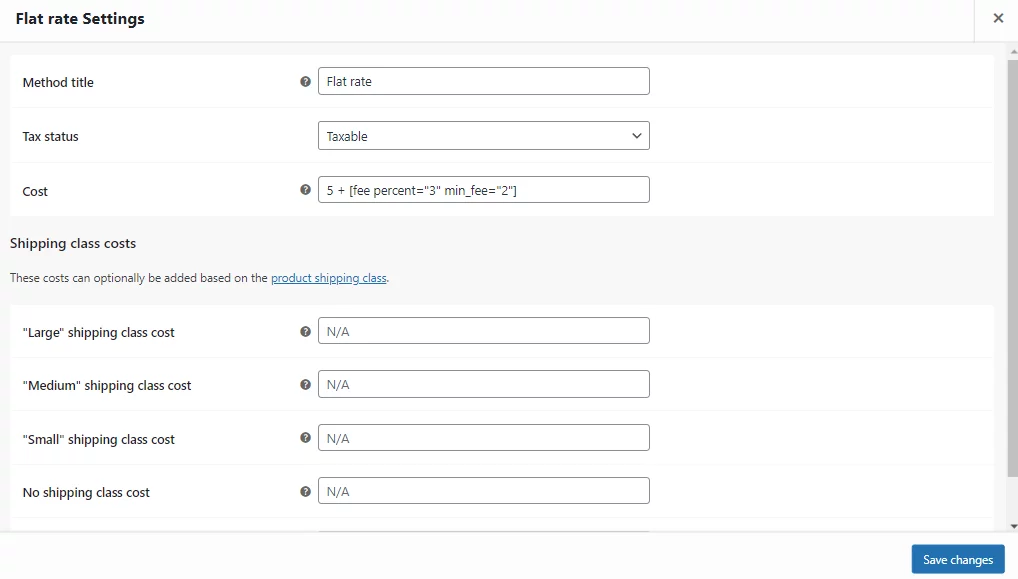
Now you will see additional fields for adding shipping class costs. You can assign individual extra costs for each class in addition to the original method cost.
Now that you have added WooCommerce shipping zones, methods, and classes, you can now assign this WooCommerce multiple shipping options to your products.
Go to any product’s editor page and scroll down to the Product data section and click on the Shipping tab.
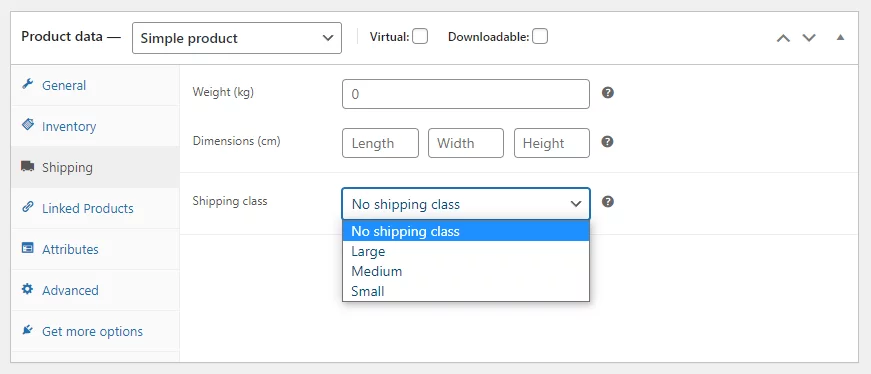
From there, you can assign your desired shipping class for that product, and the product will automatically follow all the rules for its (shipping class’s) flat-rate cost.
Step 4: Configuring locations not covered by your other zones
If you don’t configure the default shipping zone (Named as Locations not covered by your other zones), then customers from other locations will not see any WooCommerce shipping options.
Hover your mouse over the zone and click on the Manage shipping methods link.
Now add WooCommerce shipping methods and flat rates for other zones.
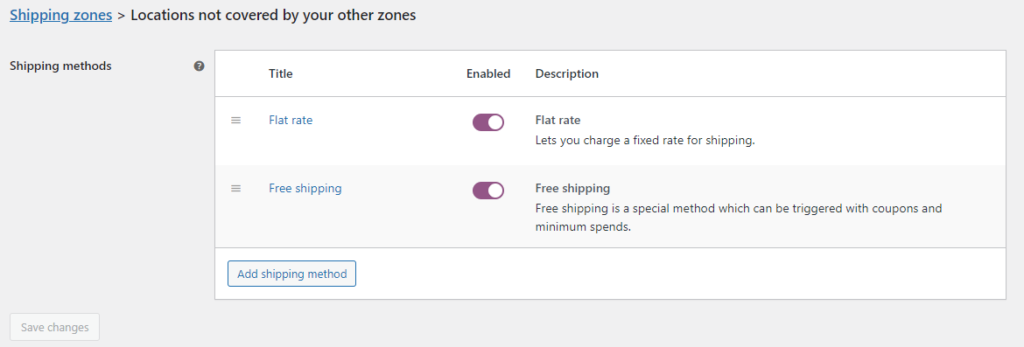
For this demo, we have set a flat rate of $20 and minimum order amount of $80 for the order to have a free shipping option.
Testing default WooCommerce multiple shipping options
We have checked all the default WooCommerce shipping settings and created some zones and methods.
Now let’s head over to our front end of the WooCommerce site to check whether the WooCommerce multiple shipping options are working or not.
We went to the Shop page and added some products to the cart. This is what the Cart Total section says-
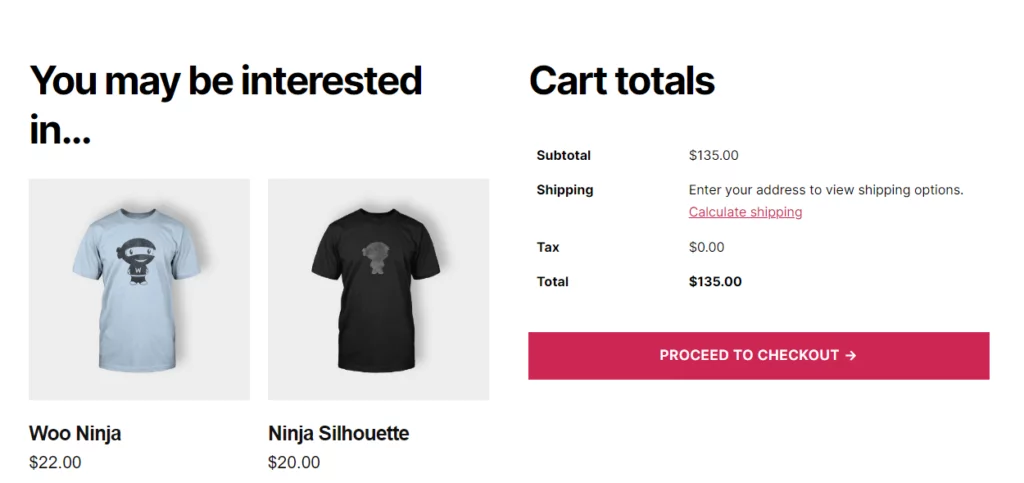
It’s asking for the customer’s location to display the WooCommerce multiple shipping options. Click on the Calculate Shipping link, and address fields will pop up.

The UK is on the list of our Europe shipping zone we created earlier. Let’s update and see what appears in the WooCommerce shipping options.
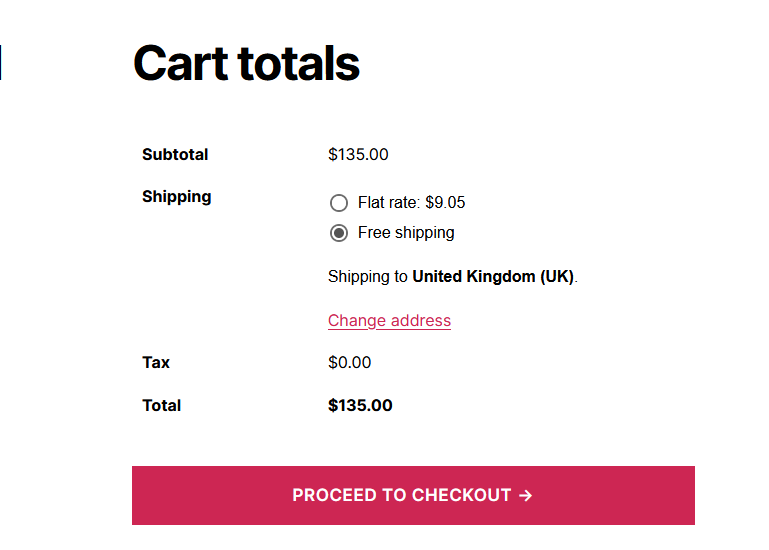
We had set earlier that if any order is above $30 the free shipping option will be enabled automatically for this shipping zone. If the order is below $30, then the free shipping option won’t appear.
Now let’s change the address to Barcelona, where we had set a local pickup WooCommerce shipping option.
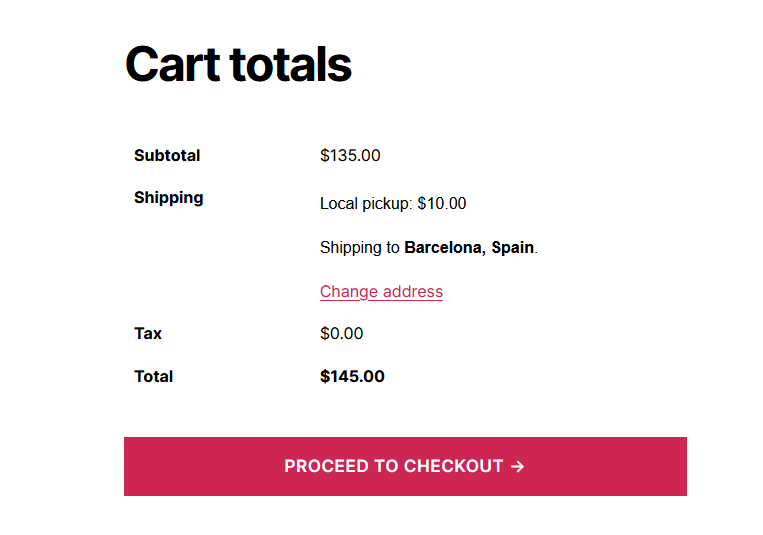
As you can see, it’s displaying the fixed local pickup shipping rate we had set.
Time to check WooCommerce multiple shipping options for locations not covered by our created zones. Let’s put Singapore and check the rates.
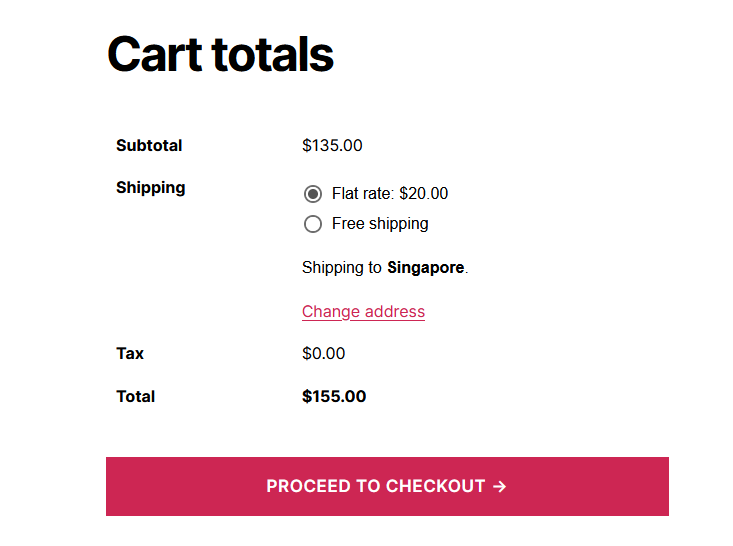
Working perfectly as we had set it.
The minimum order amount for free shipping for this zone is $80. Let’s remove some products from the cart and bring the total down below $80 and check what happens.
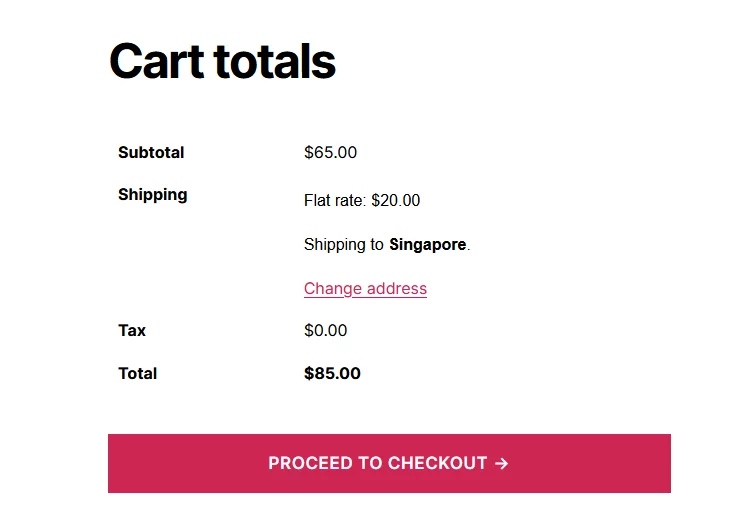
Here you go, now free shipping isn’t available as the total amount is less than $80.
Third-party WooCommerce shipping extensions
Even though the default shipping methods are helpful to some extent, it has some limitations, and you still need to send the packages to your buyers personally.
When your store begins to expand, you will probably require more flexibility to better attend to the needs of your clientele.
When there is a greater variety of buyers and site visitors, there is typically a need for more WooCommerce shipping options. They will want to be able to track their orders, view dynamic shipping rates, and select a carrier from a list of available options.
The WooCommerce shipping extensions are what you need in this situation. They are an excellent choice for including practically any kind of shipping option on your website.
Here are some advanced features premium plugins offers.
Carrier rates in real time
WooCommerce now allows you to connect shipping services directly to your store via API. Shoppers are able to view accurate shipping rates while they are shopping, regardless of whether you ship using DHL, USPS, or FedEx.
Table rate shipping
If you want to provide shipping rates that are dependent on conditions such as the dimensions, volume, or weight of the package, table rate shipping is a fantastic idea to implement.
Label printing
A helpful feature is the ability to buy and print shipping labels without leaving your dashboard. Third-party extensions can offer you this convenient feature.
Best WooCommerce multiple shipping options plugins
Premium third-party plugins enable WooCommerce store owners to customize their shipping rates based on variables such as product weight, total order price, product quantity, shipping zones, shipping classes per unit, additional weight price or quantity, and country, state, city, or zip code.
Customers enjoy having options, and the more choices you give them, the more likely they are to make a purchase from you.
There are plenty of WooCommerce shipping plugins available in the market. We have picked some of the best ones below.
Table Rate Shipping for WooCommerce
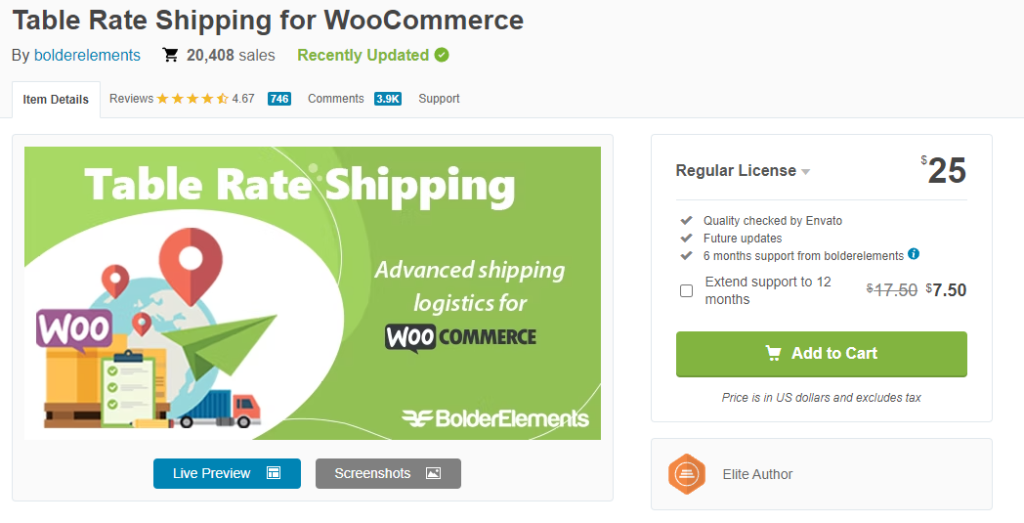
With more than 20K sales, this is one of the most popular plugins for creating WooCommerce multiple shipping options.
Setting up WooCommerce shipping rates for different scenarios/conditions is a snap with this tool. The options for configuration are extensive, and the setup process is relatively simple.
Table Rate Shipping for WooCommerce allows you to create an unlimited number of shipping rules with over 15 conditions.
In addition, you can apply these conditions to each individual item, order, or class. There is room for additional flexibility by restricting certain shipping methods to specific user roles.
Price
One-time fee of $25.
Table Rate Shipping by WooCommerce
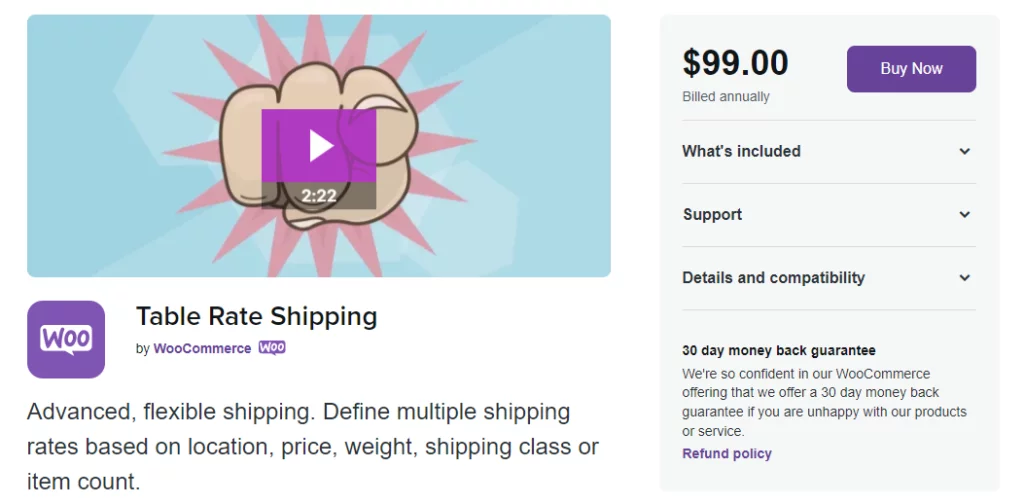
The official developer team behind WooCommerce was responsible for the development of this plugin as well.
The table rate shipping extension extends WooCommerce’s default shipping options with highly configurable options.
You have the ability to define multiple shipping rates that are dependent on factors such as location, price, item count, or weight. It is also possible to use wildcards to match more than one region.
As complicated as table rate shipping can be, adding it can be a time-consuming task. However, the user interface of this plugin makes it as simple as possible to add, duplicate, and remove rates.
Price
It costs $99 per year.
WooCommerce Table Rate Shipping
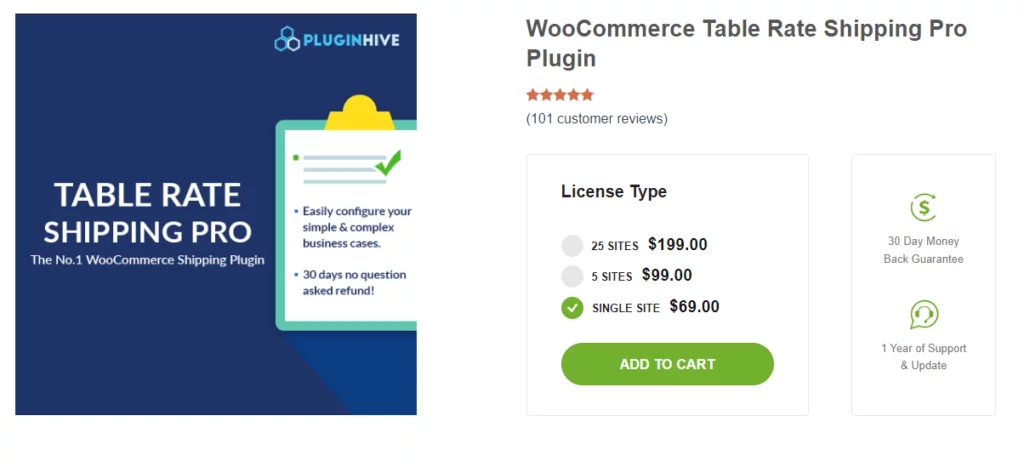
The WooCommerce Table Rate Shipping plugin is widely regarded as one of the most sophisticated shipping plugins available to create advanced WooCommerce multiple shipping options.
It gives Woo store owners the ability to create shipping rules based on a variety of factors, including weight, price, quantity, destination address, and so on.
This advanced plugin has a feature called “Method Group” for store owners who need more than one way to ship a single product. With method groups, you can easily set up more than one shipping rule for a product category.
Overall, this is a very advanced WooCommerce shipping plugin that is packed with useful features for Woo store owners like you.
Price
For a single-site license, the plugin costs $69 (USD). A five-site license costs $99, while a twenty-five-site license costs $199.
Best WooCommerce shipping plugins for printing labels
Now that you have taken care of WooCommerce multiple shipping options, the next step of your shipping strategy should be order fulfillment.
In order to give your customers a flawless experience, you need to excel in order fulfillment processes. These processes include creating and sending invoices with all the essential information about the order, creating and printing packing slips and shipping labels, and finally, packaging and sending the products to your customers.
Challan print packing slips, shipping label, and invoicing plugin
Challan is your one-stop solution to your order fulfillment document creation. This advanced plugin can create invoices automatically and attach them to order confirmation emails as soon as your customer completes the order.
In addition to that, you can download shipping labels, packing slips, credit notes, and invoices from your individual order pages. This plugin also allows you to bulk download packing slips and invoices as well.
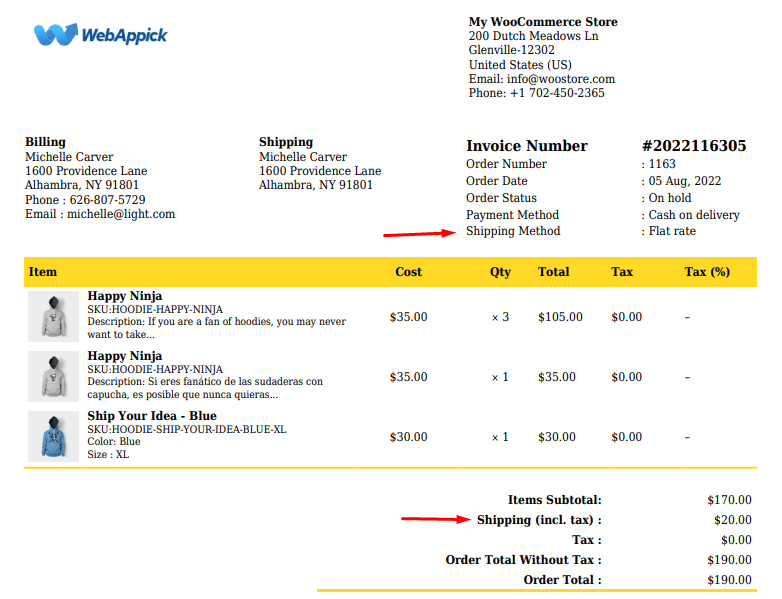
Invoices are an essential part of your order fulfillment process, which you mustn’t ignore. Challan lets create custom invoice templates and add your shipping details out of the box.
Here’s an example of a custom invoice created with Challan.
Price
Challan is a freemium plugin. It’s available for free in the WordPress repository.
However, the pro version has advanced features that can customize your documents extensively. It offers both annual and lifetime licenses.
Annual cost –
- Single Site – $29.00
- Five Sites – $59.00
- Ten Sites -$129.00
Lifetime cost –
- Single Site – $119.00
- Five Site – $229.00
- Ten Site – $457.00
WooCommerce Shipping (Official Plugin)
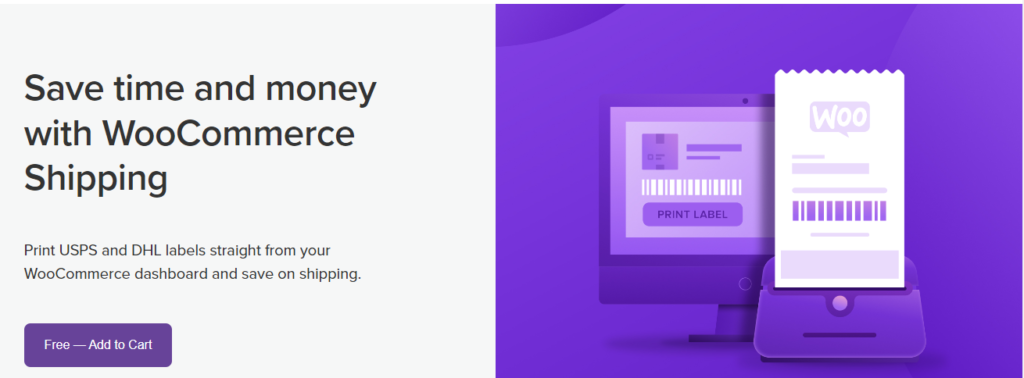
This is an official plugin from WooCommerce that comes integrated inside the core plugin. However, you need to enable it from the WooCommerce shipping settings.
This extension’s primary purpose is to make the entire process of shipping and fulfillment more straightforward.
You will no longer have to manually enter order details into your fulfillment software by copying and pasting them. You will be able to save a significant amount of both time and money this way.
Price
Free
Frequently Asked Questions (FAQs)
You first need to create a shipping zone from the WooCommerce shipping settings. Then inside that zone, you can create multiple shipping methods for that zone.
The core WooCommerce plugin allows you to create and offer WooCommerce multiple shipping options to your customers. However, it has some limitations. In order to provide advanced shipping options, you can use third-party premium plugins.
Go to WooCommerce>>Shipping>>Shipping zones and create as many zones as you may need by clicking the Add shipping zone button.
Wrap up
When configuring your WooCommerce store to sell physical products, one of the core settings you must configure is shipping. Although WooCommerce provides extensive shipping settings, there are multiple ways to configure them.
In this article, we have shown you setting up the default WooCommerce multiple shipping options as well as the premium shipping methods. Don’t hesitate to let us know your opinion in the comment box, or you can also ask us any questions you have regarding the topic.
