
How To Link The Instagram Shop With WooCommerce
Online stores have become a significant platform for shopping. Lots of new stores are joining the chain to offer more product choices and create new products. At the same time, the number of online shoppers is also increasing significantly.
E-commerce sales are jumping from one pick to another each year. Back in 2014, the total e-commerce sales worldwide were 1.3 Trillion Dollars. If we put a close look, we will find that in 2018 it became 2.8 Trillion Dollars. And in 2021, it is expected to reach 4.9 Trillion Dollars.
It was predicted that e-commerce would be the leading platform due to modern technology and our living patterns. We currently see this in action. Instagram shop for WooCommerce is a brilliant way to connect your WooCommerce store with the Instagram shop.
It allows you to reach more people and create a strong connection with your customers. Many online store owners have already moved to the Instagram shop to increase their revenue and create a strong bond with their customers.
This is also a perfect opportunity for a WooCommerce store owner like you. Connect Instagram shop for WooCommerce and boost your store sales.
Instagram is one of the largest social media networks. Currently, it has an impressive one billion monthly active users. With the large population that actively uses Instagram and the new features introduced by Instagram like Instagram shopping, the possibilities are endless. Online store owners can plan and execute the best Instagram shopping strategies and enjoy more sales on their online store.
For WooCommerce store owners, this brings a mind-blowing opportunity for their store. First of all, you need to know the best method to connect the Instagram shop for WooCommerce.
Are you eligible for the WooCommerce Instagram shop?
Before you can publish shoppable posts on Instagram, you will need to go through several steps to connect your store with Instagram. Instagram also implies different rules that you need to follow to earn eligibility for posting shoppable posts.
Following the rules will keep you on the safe side and ensure that you are not doing anything wrong that can trigger a penalty for your WooCommerce Instagram adventure.
Here is a list of the eligibility requirement that you must know
- First of all, you will need an Instagram business account. You will have to wait for Instagram to approve your account. Currently, Instagram does not support all countries, so you will have to check if your country is on the supported list. You can check for the supported countries from this post on Facebook.
- Secondly, you need to agree on different policies introduced and regulated by Instagram. Among them, the commerce policies and the merchant agreement are the most important ones.
- Thirdly, you must have a Facebook page.
- Apart from that, you will need to have or create an Instagram business page.
- Most importantly, keep a note that Instagram only supports physical products at this moment. So, if you do not have physical products, you should think otherwise.
- Finally, you need to create a Facebook catalog and link it to Instagram.
For an established business, this should not be any problem. Lucky for you that you already have a website where you sell products. Most likely, you also have a Facebook page for your business. The final thing that you will need is an Instagram Business account.
How to set up your Instagram shop for WooCommerce and create shoppable posts
We hope that you have a running WooCommerce store. If you plan for one, you can also gather some information on linking your Instagram shop with WooCommerce. Let’s walk you through the steps associated with creating your first shoppable posts.
Create a Facebook page
For most businesses, we assume that you already have a Facebook page. It is important to have Facebook for selling your products on Instagram. If you do not have a ready-to-go Facebook page, you can follow the steps below to create one for you.
First of all, to create a Facebook page, you need to go to Facebook and find the option to create a page. Here is the link that will directly take you to the Facebook page creation landing page for your ease. Facebook will offer two options, and you need to select the option that says Business or Brand. Click on the Get Started button below to jump into the next steps.
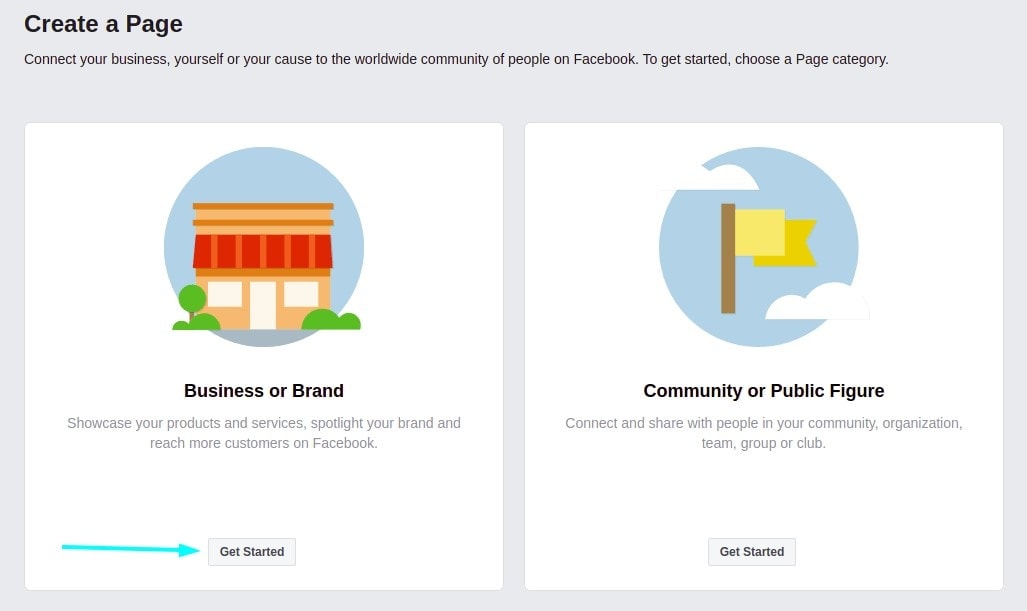
Facebook will prompt you to log-in to proceed with your page creation. After you log in to Facebook, it will redirect you to the Create a page section. First of all, you will have to give your page a name. You should create a page that properly represents your brand. You can either create the page with your business or a brand name.
Secondly, you will have to select categories that best describe your business. Facebook will show you suggestions as you start typing the category name. You can add up to three categories for your Facebook Page.
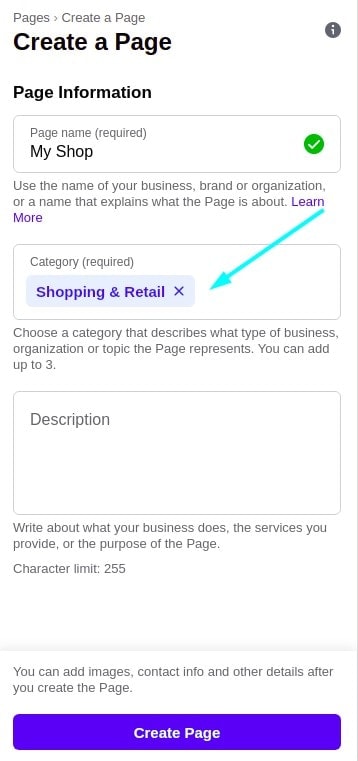
Now you will have to add a description for your page. Facebook suggests you write about your business or the service that you provide. The description is limited to 255 characters. So, it would be best if you were precise and transparent with your message.
After adding a sweet description for your Facebook page, click on the Create Page button to create your page. What about images! Well, you will be able to add images, contact information, and other details after creating the page.
Facebook offers exact options and instructions to create a page on its platform properly. You need to be careful and creative with filling up the information for the Facebook page. Most importantly, you need to ensure a complete Facebook page with all the required information.
A complete page will add more value to your business compared to an incomplete one. You need to be creative with the images that you add to your Facebook page. The image should be both attractive and meaningful at the same time.
We believe that you have completed all the steps carefully and created your Facebook page. It is time to move forward with the next steps.
Create a Catalog
There should be an option called Manage Shop on the left side panel of your Facebook page. If you click on this, Facebook will take you to the shop management dashboard. Here, you will find another option called Go to Commerce Manager. You need to click on this option to enter your Commerce Manager dashboard.

You need the Commerce account approved by Facebook to proceed here. If you have not applied for approval, quickly apply for it first. Once the commerce account is verified, you will see a banner like below on your Commerce Manager overview.

You can also click on this link to jump over to the Commerce Manager. Let’s find Catalogs and click on the option to add a new catalog.

When you click on add a new catalog, Facebook will take you to a new page. First of all, you will have to select the catalog type for your business. Like us, you should also select E-commerce as your catalog type.
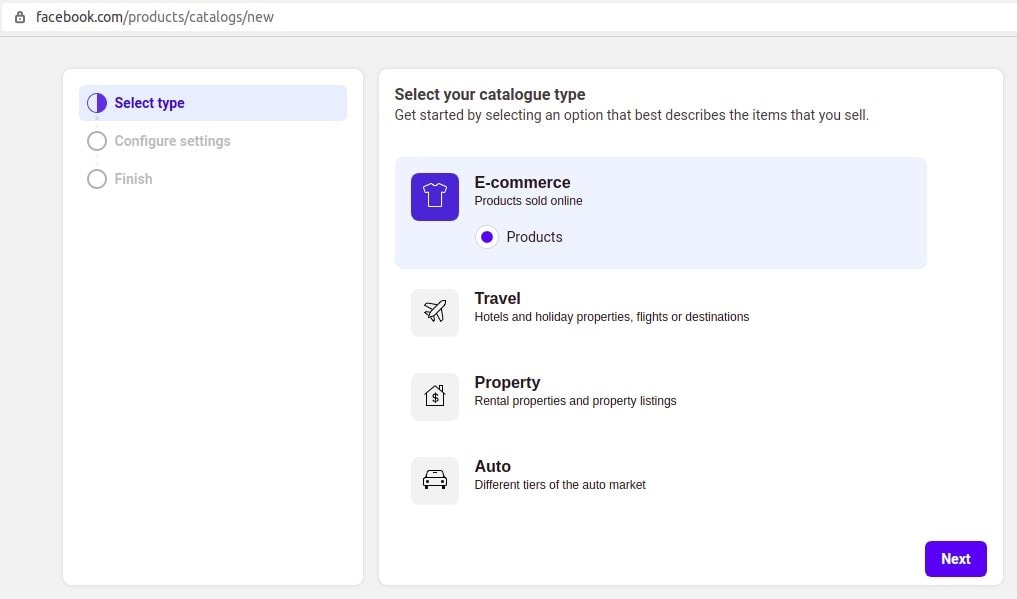
The next step is the configure settings. You will have to select your product upload method, catalog owner, and catalog name. For the product upload method, Facebook offers two different ways.
First of all, you can upload your product info. Secondly, Facebook also offers a way to connect your E-commerce platform to it. We are going to stick with the first option and Upload our product info.
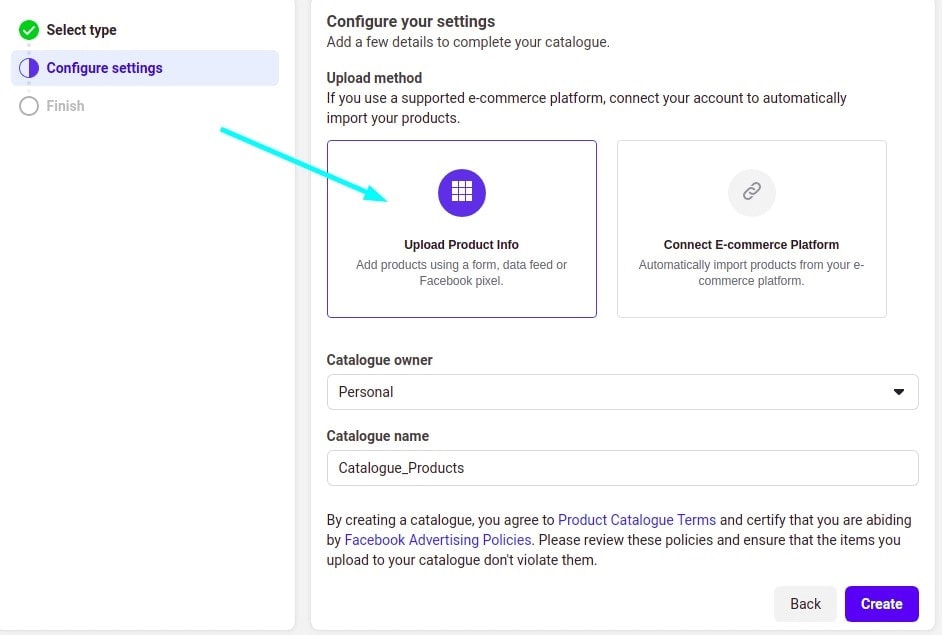
Now, you have to click on the create button to create your first catalog. On the success page, you will have an option to go to the catalog. Click on the option to view your newly created catalog. At this point, your catalog is empty as it does not have any products.
Adding products to your Facebook Catalog

Right on the overview section, you will find an option to add your products in bulk. Click on Add Items. You will find multiple options to add products to your catalog. You can add manually, use bulk upload, use a partner platform, and finally use a pixel. After that, use the second option called Use Bulk Upload. Select the option and click on next.
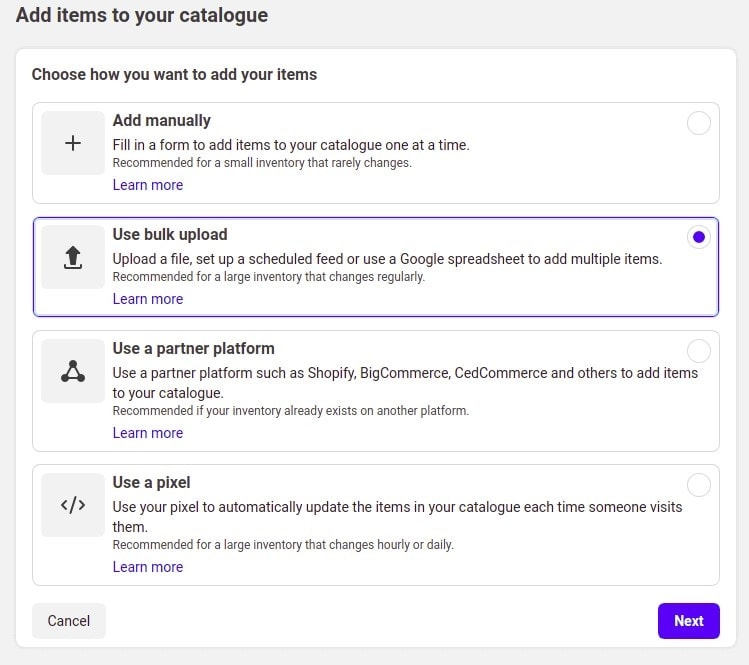
In the next section, there are several options to upload your products. You will need a feed file or a product feed file to complete the step. Facebook also has unique requirements for the feed file. A product feed file usually contains the most important information associated with the product. You can leave your worries behind and create a product feed file for Facebook with CTX Feed.
CTX Feed – WooCommerce Product Feed Generator

CTX Feed is a brilliant WooCommerce extension that allows you to create and manage product feeds or data feeds for multiple platforms. It has extended support for more than 100 merchant sites.
Your go-to platforms like Google Shopping, Facebook, Instagram, Pinterest, and Amazon are already supported and have built-in templates for you to give you a quick start. The plugin is straightforward to use and will significantly increase your productivity.
Creating a product feed is very easy, and we have this step-by-step guide to assist you with the process. Additionally, we have another guide on creating a product feed for Facebook with this WooCommerce Instagram shop plugin.
It is loaded with all the necessary options to think of while creating the best and most optimized product feeds. You can learn more about the plugin from here. Most importantly, you can download it and use it for free from the link above.
We hope that you are back after creating the product feed file for Facebook with CTX Feed. Let’s upload the feed file to Facebook.
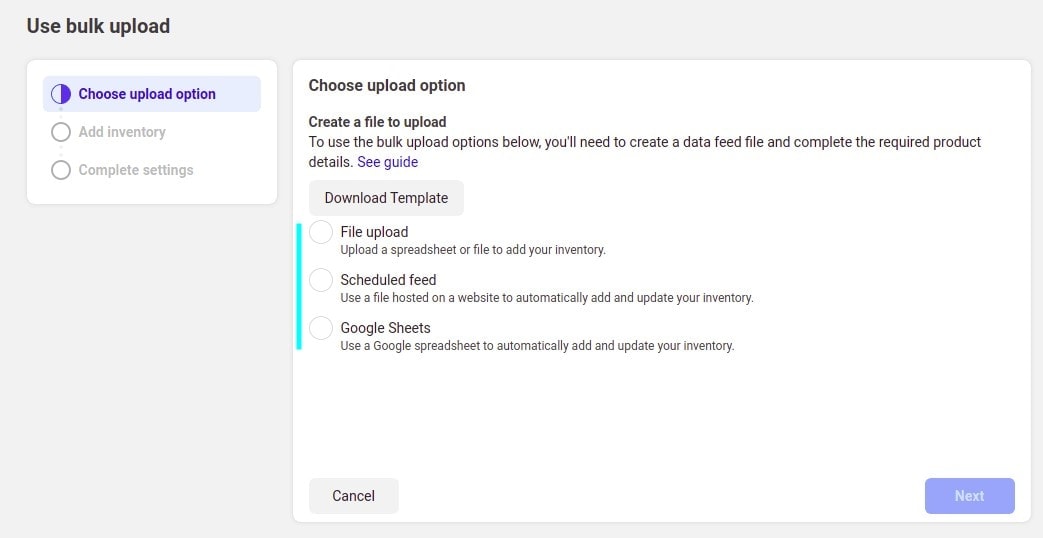
Currently, there are three options to upload your feed file. You can select between the File Upload, Scheduled Feed, and Google Sheets. All of those options are supported by CTX Feed. You can create a feed file with the plugin and directly upload it to your Facebook catalog with the first option.
The Scheduled Feed option will be more convenient for you to manage the catalog more professionally because you have the option to update the inventory at your preferred intervals. Like the first option, the third option is also very straightforward. Create your product feed with CTX Feed, upload the file to Google Drive, and convert it to a Google Sheet.
Facebook will also update the inventory from the feed file that you provide from Google Sheets. Thus you can ensure a regularly updated catalog on Facebook.
Let’s focus on the second option a little. With CTX Feed, this can be a more pleasant option for you. CTX Feed creates the product feed file for your desired campaign and saves the file on your file server. You can access the file and also copy the URL of the file from the manage feed section. Then copy the link of the file and paste it to Facebook.
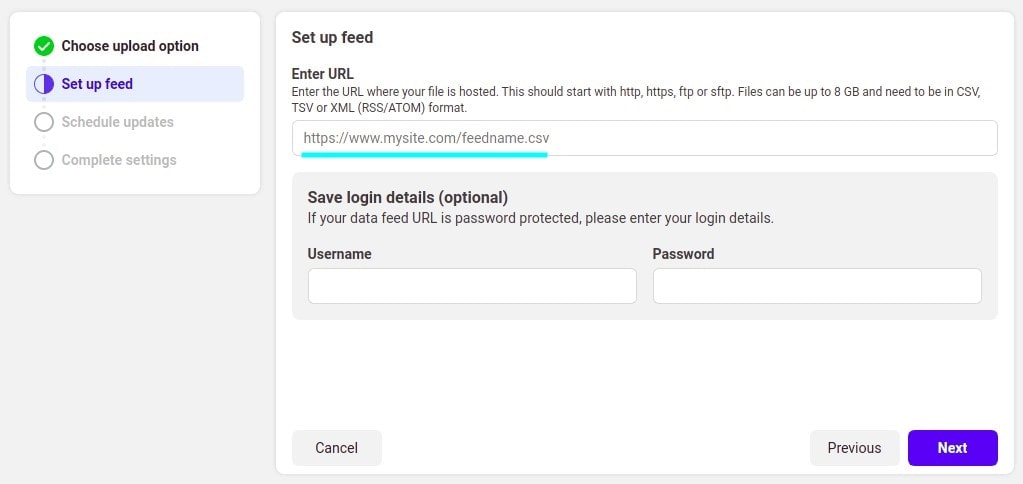
In case the file is password-protected, you will also have to provide the username and password to Facebook. If you are done, click on the Next button to take care of the scheduling.
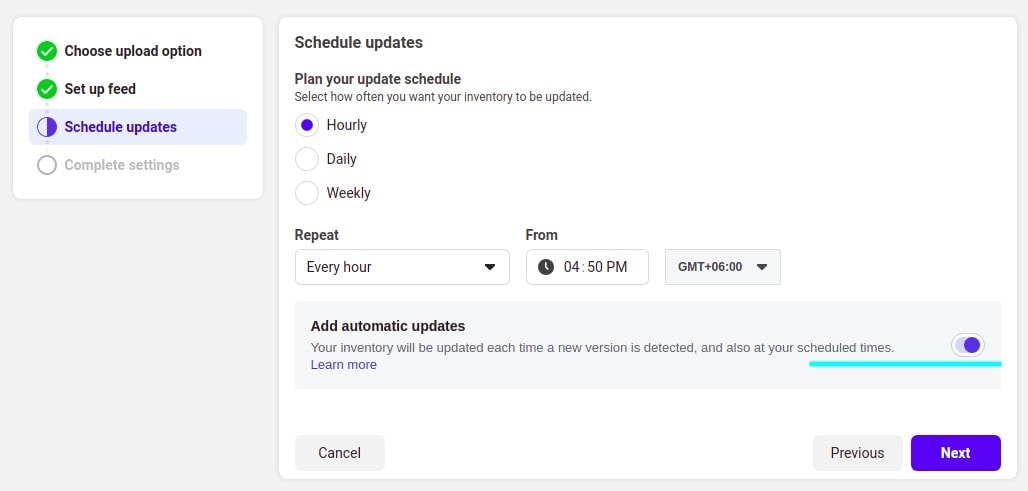
There are options to set an hourly, daily, and weekly update frequency for your Facebook catalog. Most importantly, make sure the Add automatic updates option is enabled.
We have made significant progress connecting our Instagram shop for WooCommerce. The Facebook catalog is ready. You have also added products to the catalog with CTX Feed, the WooCommerce Instagram shop plugin. Now it comes to get an approved Instagram Business profile.
You have almost linked your Instagram shop with WooCommerce. Most of the steps are completed. To follow the next steps and get your hand to the final piece of the puzzle, follow this link. A complete guide on setting up and optimizing WooCommerce Instagram shop is ready to guide your next steps. We hope that you enjoyed linking your WooCommerce store with Instagram.

Best plugin for Instagram shop to generate Instagram product feed.
Thank you.