

To list WooCommerce products on Amazon, you generate a structured feed file containing your product data, then upload it through Amazon Seller Central or sync it automatically with WooCommerce product feed plugin..
This guide walks through setting up your seller account, building the feed, uploading it, fixing common rejection errors, and adding a price markup to cover Amazon’s fees.
Amazon isn’t just a marketplace. For most shoppers, it’s the starting point. Research from Jungle Scout’s 2024 Consumer Trends Report found that 56% of consumers begin their product search on Amazon before checking anywhere else, ahead of Google and every other retailer. Amazon’s own 2025 annual results put net sales at $716.9 billion for the year, so the audience is not shrinking.
Required Amazon feed attributes for WooCommerce products
Amazon rejects incomplete feeds, so before generating anything, it helps to know which fields it actually requires. The exact list varies slightly by category, but these attributes appear in nearly every Amazon feed template:
- Title: A clear product name that includes brand and key specs.
- Description: A short overview of features and benefits.
- Price: Current selling price, excluding any store-side discount logic Amazon doesn’t recognize.
- SKU / ASIN: Your unique identifier or Amazon’s existing catalog match.
- Availability: In stock, out of stock, or preorder.
- Images: URLs to images that meet Amazon’s size and background rules.
- Brand: Manufacturer or brand name.
- Category: Mapped to Amazon’s category tree, not your WooCommerce category.
- GTIN: UPC, EAN, or ISBN, depending on product type.
- Variants: Size, color, or other variation data, tied to a parent listing.
- Shipping details: Cost, method, and region.
Amazon updates its taxonomy often enough that a template downloaded a year ago may already be missing a field it now requires. Always pull a fresh template for your category before building a feed rather than reusing an old one.
How to create an Amazon product feed for WooCommerce
There are two ways to build the feed: manually through Amazon’s own template tools, or automatically through a plugin that pulls from your WooCommerce catalog. Most stores use the plugin route once the catalog grows past a handful of SKUs, but it helps to understand where the data actually comes from first.
Step 1: Setting Up Your Amazon Seller Account
Before you can create an Amazon product feed for your WooCommerce store, the first step is to set up an Amazon Seller Account. In case you already have a seller account with Amazon, you can skip this step and move onto the next one.
Also, keep in mind that Amazon offers two subscription plans for those who want to sell their products on its platform depending on how much you’re planning to sell. These plans are:
- Individual Plan
- Professional Plan
If you’re selling less than 40 items, the Individual plan is a more cost-effective option at $0.99 per item. Conversely, for businesses with higher sales volume, the Professional plan offers additional features for $39.99 per month.
Here’s the easiest way to do set up your Amazon seller account:
- Visit the Amazon Seller Central website and click the “Sign Up” button.
Amazon Seller Central Homepage

- The next screen will ask you to login with your existing Amazon account. If you don’t have an account with Amazon, you can easily create one from the link given below. Just provide your info, input the OTP, and you’re good to go.
Login Screen for Amazon Seller Central

- Then, you’ll be shown a few general instructions on how to get started. Follow the instructions and input necessary business info, including your location, business name, type, and more.
Amazon’s Seller Verification Workflow
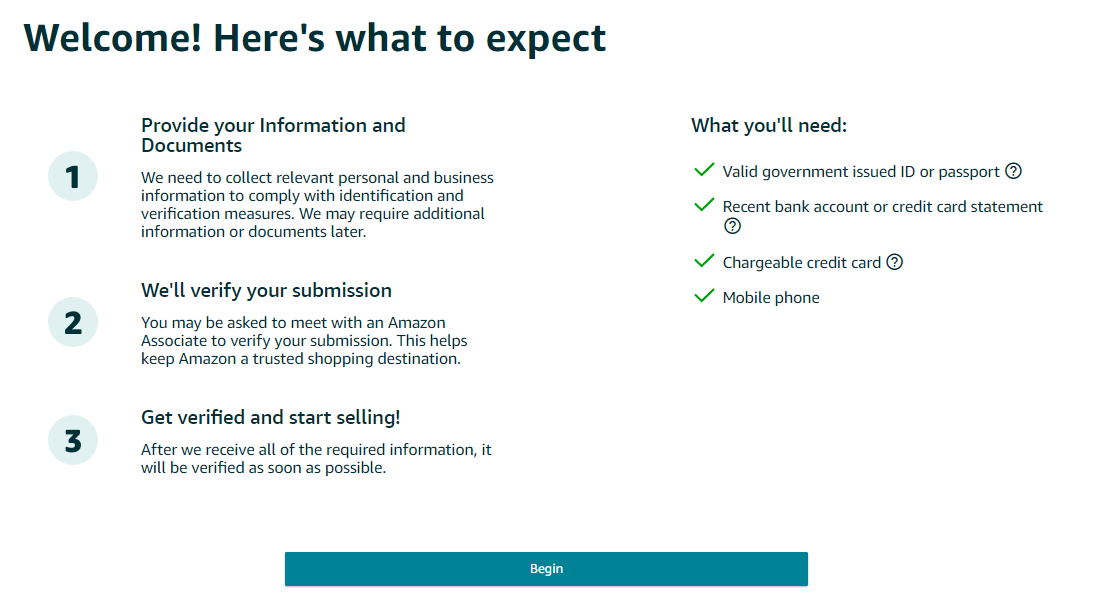
- Amazon will show you a list of necessary information. Read all the information thoroughly as Amazon has different policies based on your response. Once you are okay with everything, agree with Amazon’s terms and move onto the next step.
- Next, enter your details, including name, date of birth, citizenship details, address, identity proof details, phone number, and more.
ASC Seller Information Form
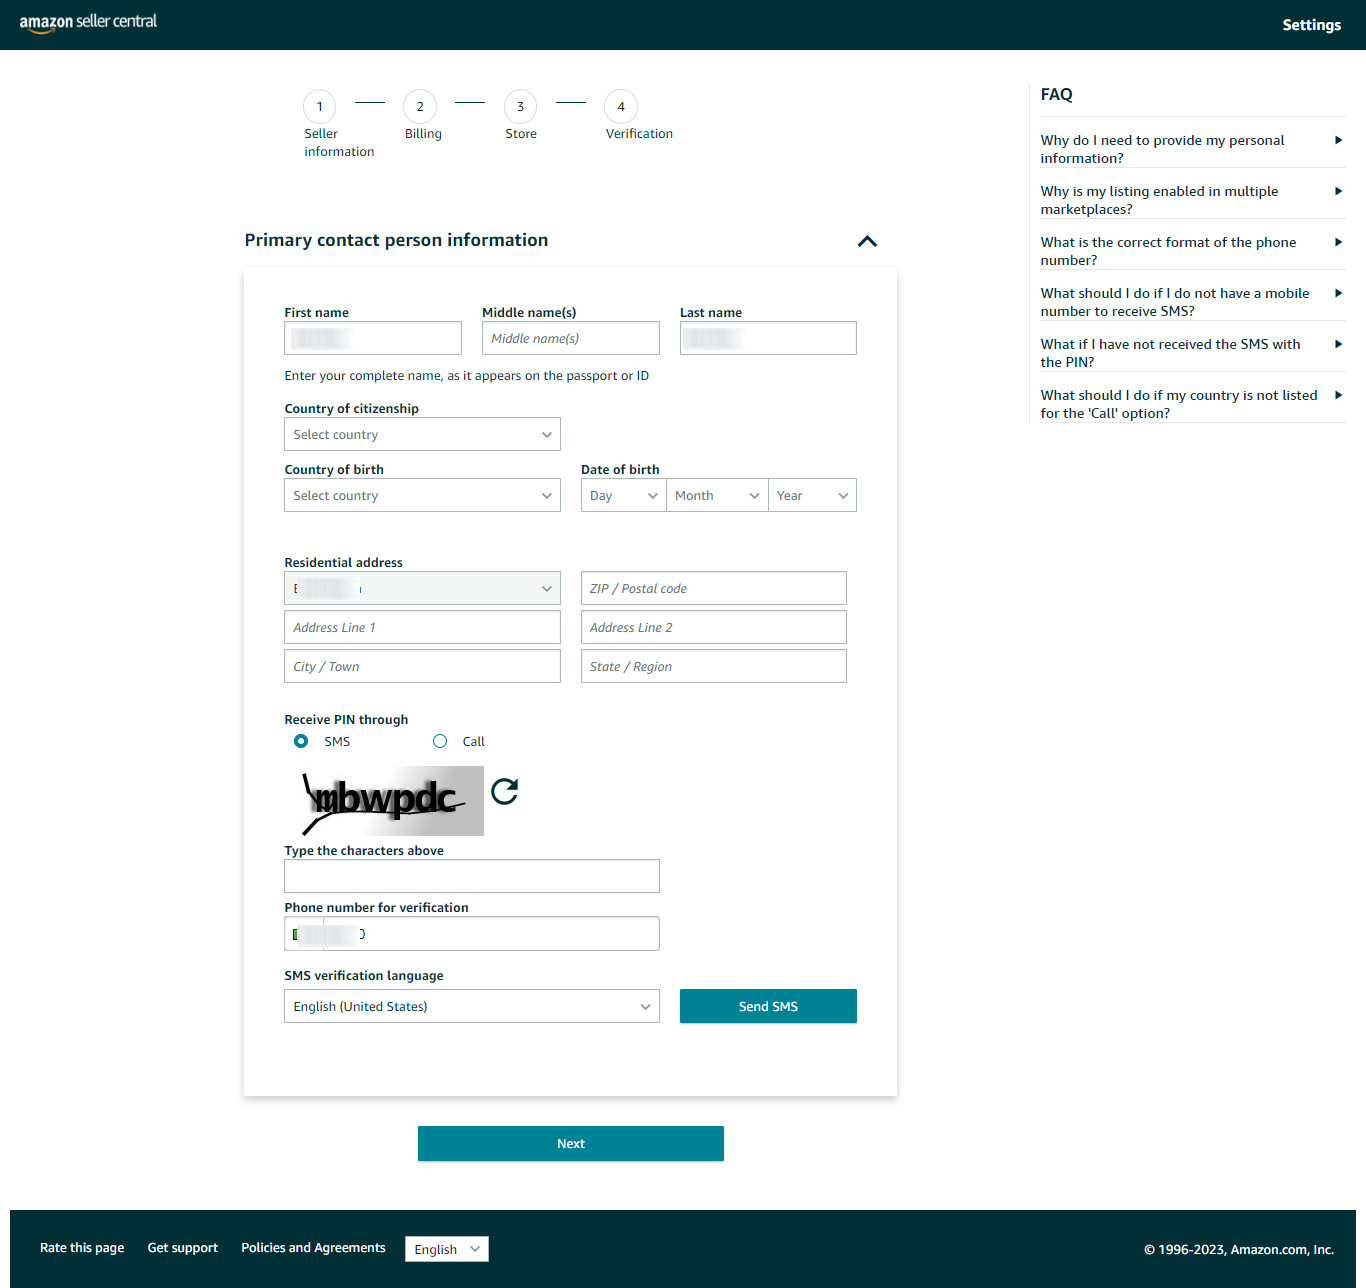
- In the next page, provide your billing info. This is where Amazon will deposit your earnings, so make sure to provide valid banking details and credit/debit card info. You’ll also need to verify all that info to move forward.
ASC Billing Information Form
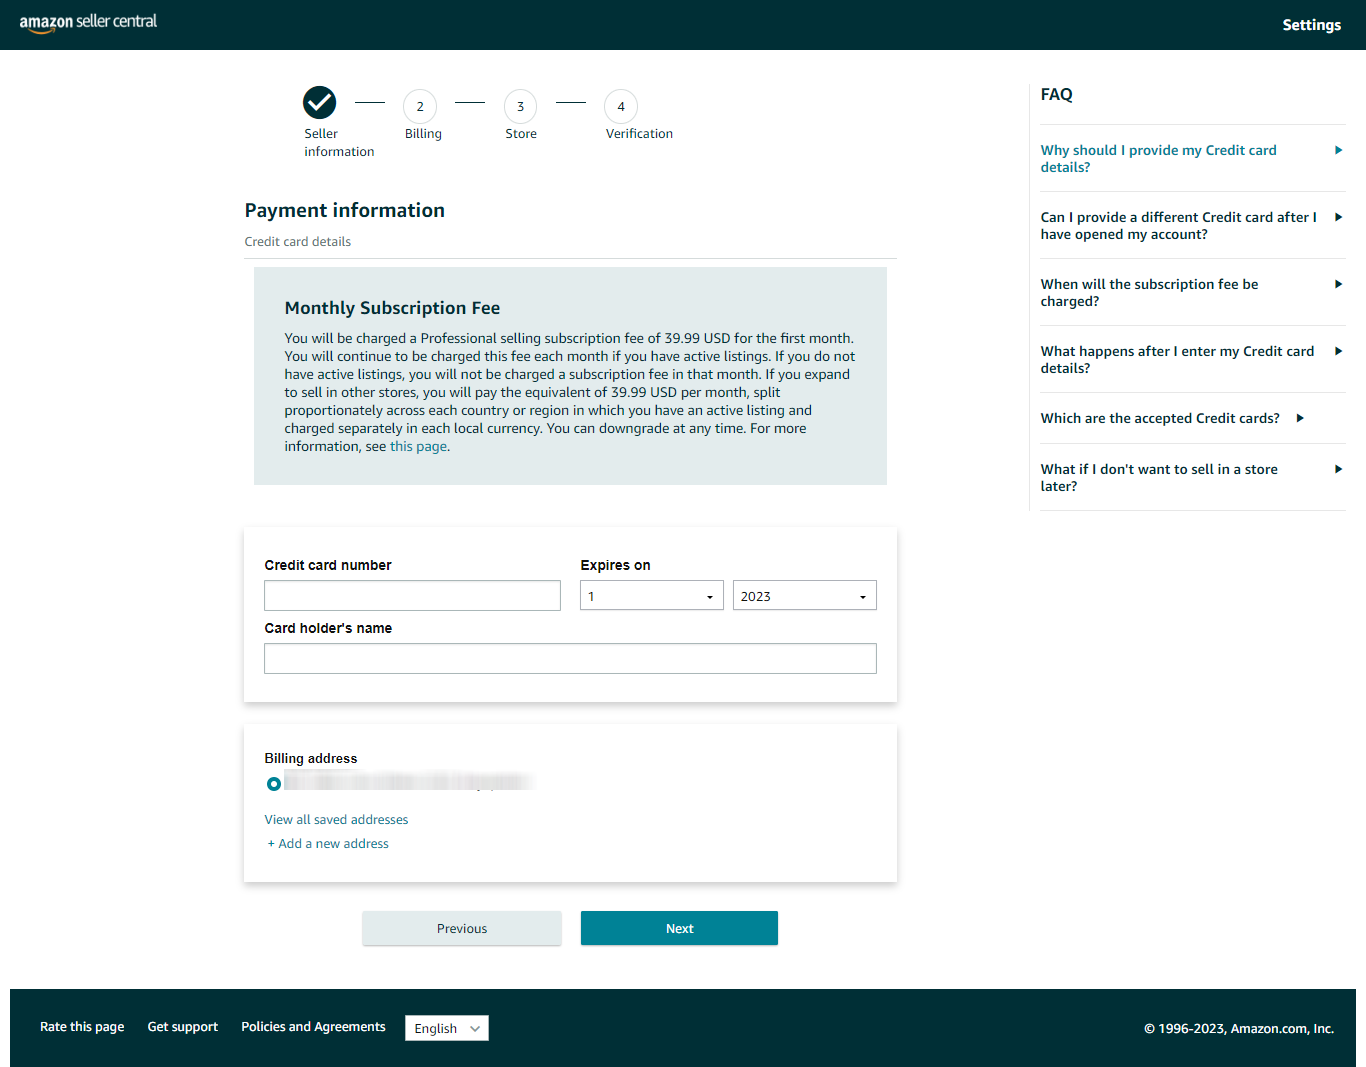
- Next, provide information on your business, including name, location, products, and tax information. The requirements will vary depending on your local policies.
ASC Business Information Form
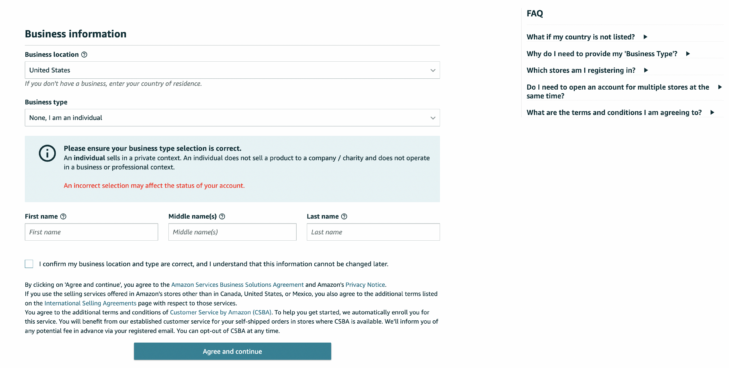
- Next, provide information on your business. Once all the information have been provided, move onto the next tab.
ASC Store Information Form

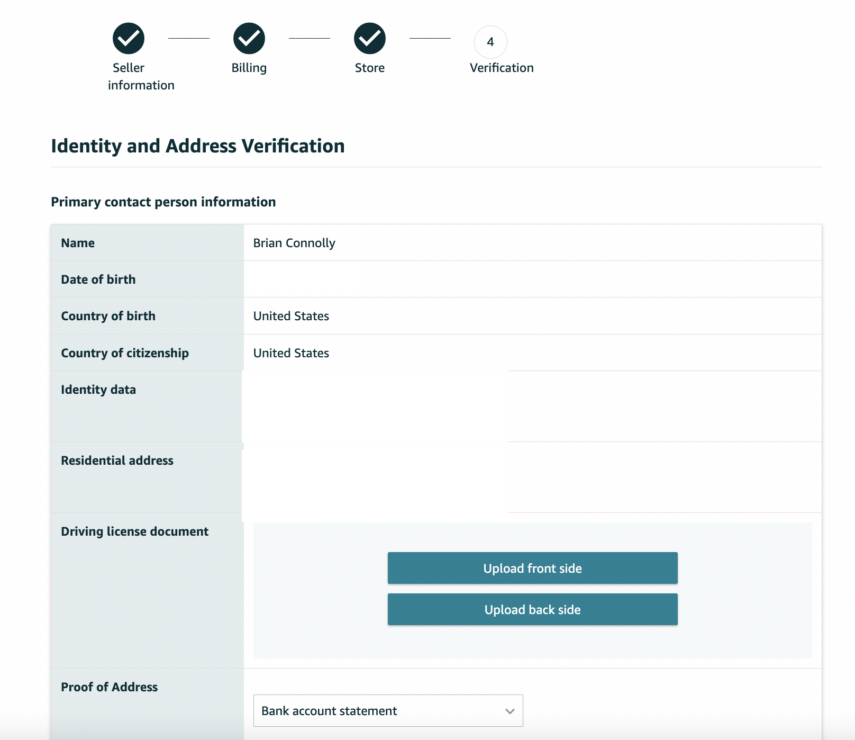
- Lastly, go through with the Identity verification. Upload necessary images and documents like your bank credentials, passport, and personal ID.
ASC User Information Screen
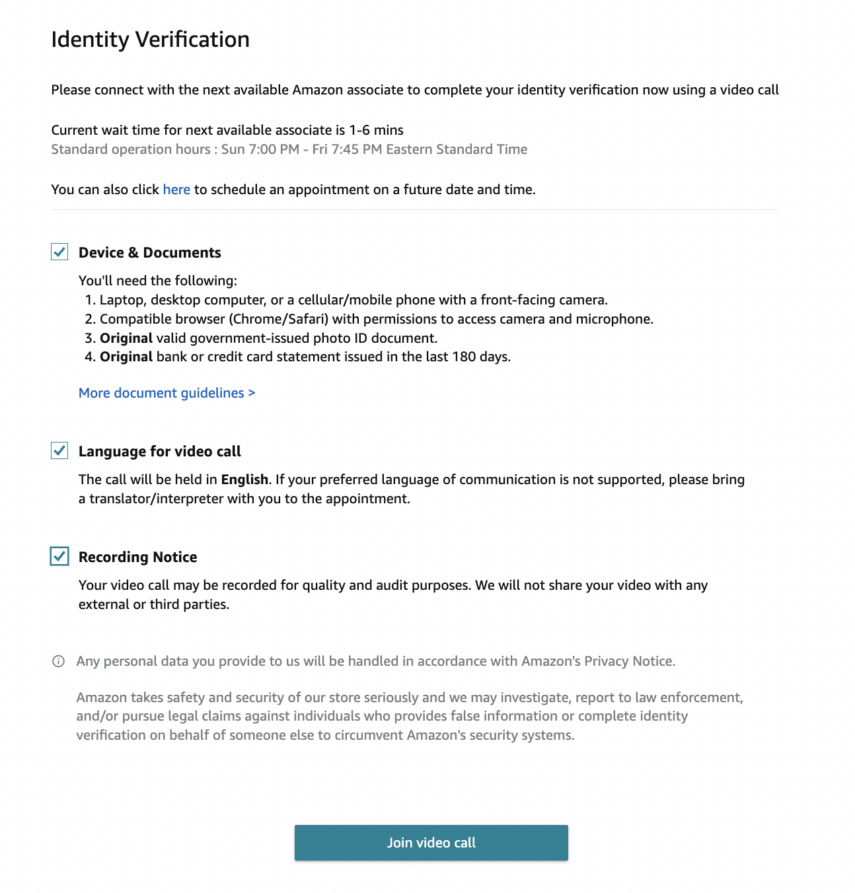
- After submitting your paperwork, an Amazon representative will contact you via video call to verify your identity. This is required so that they can check your references and other information you submitted.
ASC User Verification Form
And that’s about it. Now, your Amazon Seller Account is up and running. It’s time to move onto the next step, setting up necessary tools for automating your Amazon feed management.
However, if you want more in-depth guidance on how to sell on Amazon, they also have a beginners tutorial that you can follow along.
Step 2: Generate Your First Amazon Product Feed
Unlike many other marketplaces, Amazon’s taxonomy is highly dynamic and can change frequently, sometimes even on a monthly basis.
This makes it challenging to keep your product feed updated and consistently aligned with Amazon’s required format. Staying on top of these changes is crucial to ensuring your listings remain accurate and compliant.
Additionally, what if you don’t find all the key attributes that Amazon needs in order to approve your feed?
For example, Amazon asks for attributes like EAN, UPC, MPN, Brand, etc. which may not exist on your WooCommerce product pages. Amazon will not accept your product listing without these fields present in the feed.
So, how do you do it?
The first step here is to download the latest feed requirements. But how can you download the feed requirements from Amazon?
As a part of their Feed Specifications Program (Est. July 2018), Amazon has actually made it easy for sellers to find out the exact product feed specifications for their products. You just need to know your way around it.
Now the question is, where do you find this ’Amazon Feed Specifications’ ?
Here’s a simple guide for you.
- Log in to your Amazon seller’s account and go to the Inventory menu. Hover over to the Add Products via Upload option and click it.
ASC Inventory Tab

- As we don’t have any Amazon feed files prepared yet. So we will jump to the Download An Inventory File tab.
Download Your Inventory File from Here

- From this tab, you can search and find your WooCommerce product’s categories and select them.
Search or Select Your Preferred Category

- Once you are done, click on the Generate Template button below.
Generate Template for Amazon Product Feed

- It will download your Amazon product feed WooCommerce template. The downloaded Excel file will contain all the data needed to list the product for that category. This includes:
- Detailed instructions on how to use the template.
- Amazon’s requirement for using product images.
- Data definitions to define each attribute inside the inventory file template.
- An Amazon product feed template to fill out your product information.
- A sample template for additional guidance.
- Valid values on how to use the proper terms to fill the template.
- And other useful information.
- Next, fill out the required fields in the template, including product title, description, price, quantity, and shipping details. Mention the product condition and discount where necessary.
And that’s how you create an optimized product feed for amazon. For advanced sellers, you can also use an XML file to upload your inventory into Amazon.
However, this topic deserves a separate guideline on how to create and manage amazon XML feeds. If you want us to cover that topic too, let us know in the comment section below.
All that is good and done. But how do I create and manage my Amazon product feed automatically, you might be thinking at this point, right?
Well, using a dedicated tool is the easiest way to create and optimize your amazon product feed.
Let’s explore how:
Create an Amazon Product Feed Through a Dedicated Plugin
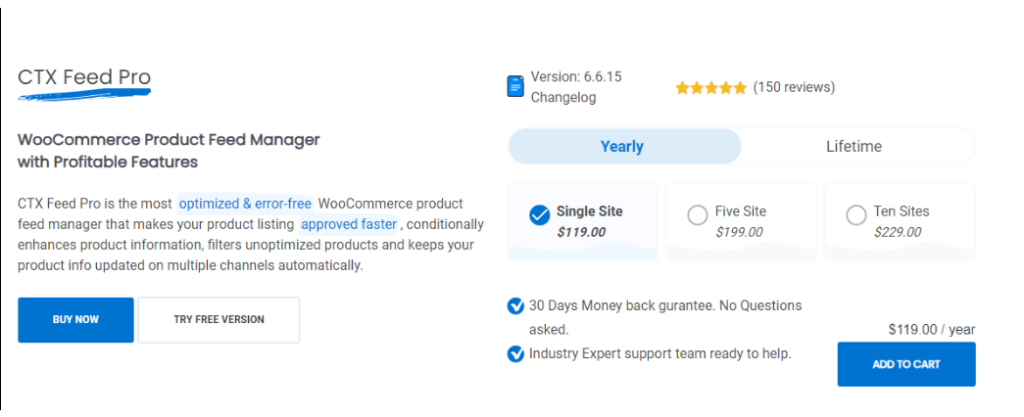
Today, we’ll feature one of the most widely used feed manager plugins across the globe, CTX Feed.
This versatile ECommerce feed management solution can help you automate your product data feed management with pre-built product feed templates for 130+ major online marketplaces.
So, how do you do it?
Here’s how:
- Log in to your WordPress admin panel. From your Dashboard go to “Plugins > Add New Plugin”.
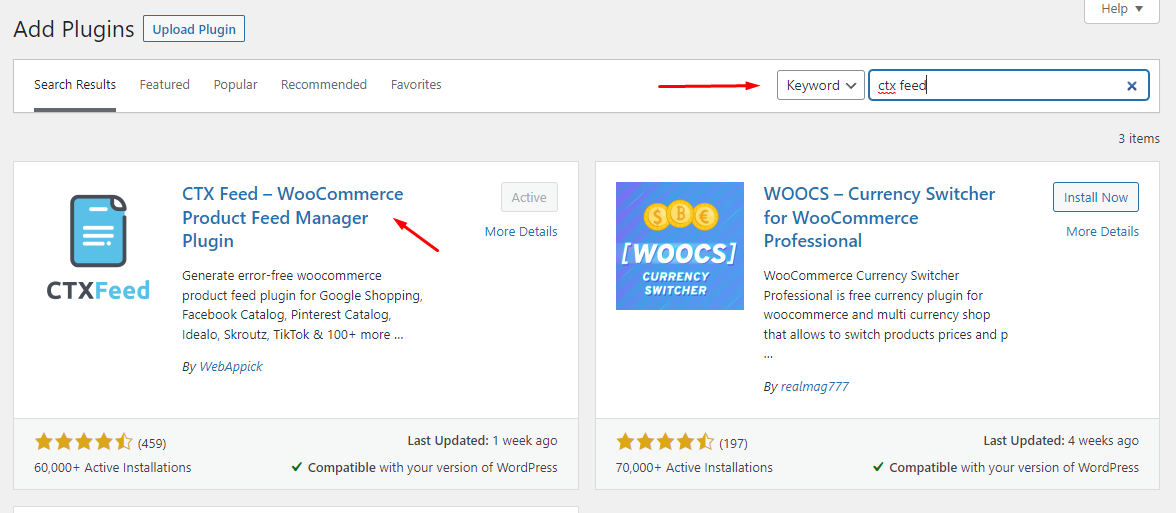
- On the next page, search for ‘CTX Feed’ in the search bar. When the plugin appears, install and activate the plugin.
Search, Install, and Activate CTX Feed from Your WordPress Dashboard
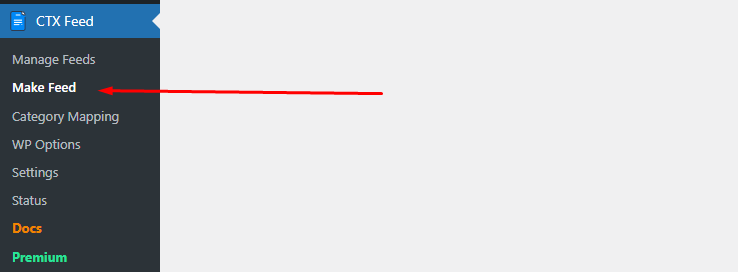
- To create your first Amazon product feed, access the plugin settings by navigating to “CTX Feed” on the left-hand menu from your WordPress admin dashboard. And then click on “Make Feed”. Here’s where the magic begins.
Make a New Feed with CTX Feed
- From the Template dropdown, select a custom template, name it, and select the file type. Also, choose the country you want to create the feed for. We’re choosing CSV for easier understanding.
Select a Custom Template

- CTX Feed will automatically populate some common attributes at the bottom. Remove them and start from scratch.
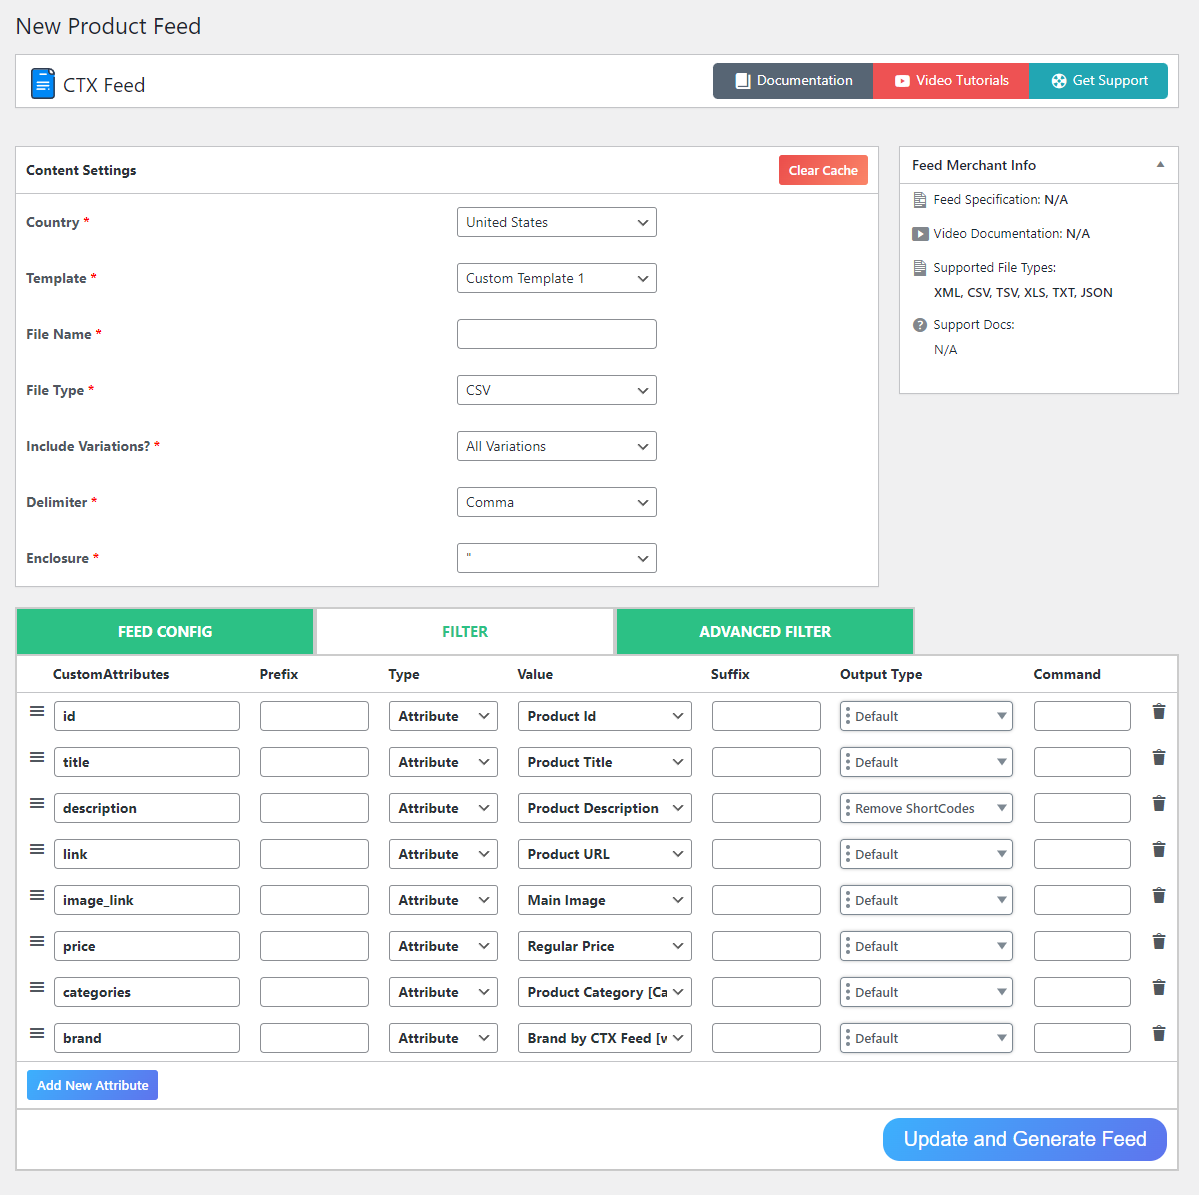
But if I remove all that, how do I set up product attributes for an Amazon feed in WooCommerce, right?
Don’t worry, follow along as we create new custom product attributes specifically for amazon —
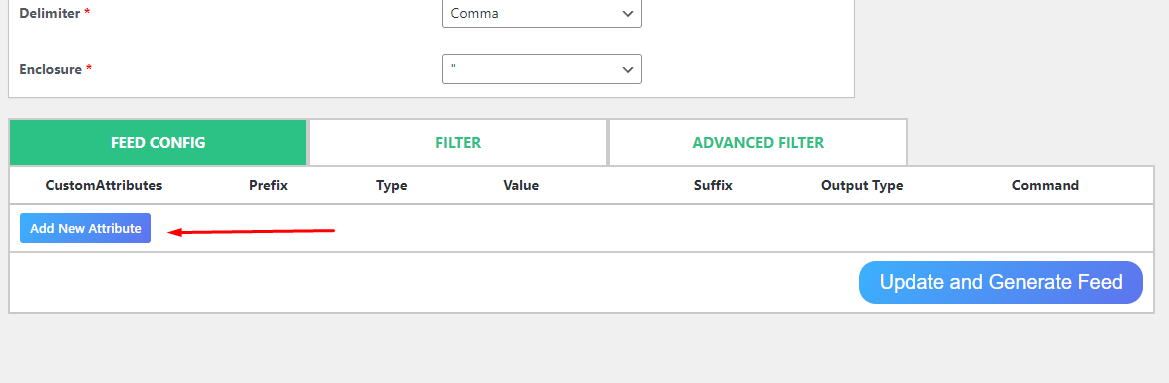
- Click on Add New Attribute to add a new attribute field.
- Generally, an Amazon product feed contains the product category or type first. Name your attribute – Product Type and from the Value field, select the appropriate WooCommerce field.
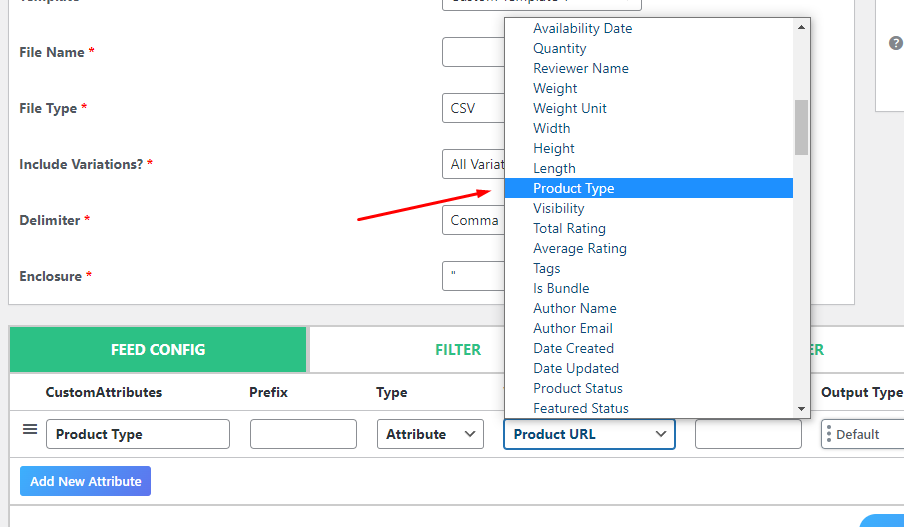
- Category taxonomy in your WooCommerce store may or may not match Amazon’s category tree. You can adjust this in multiple ways. You can also directly set a static value if you have one single category. CTX Feed also has options to create custom category mapping for different channels.
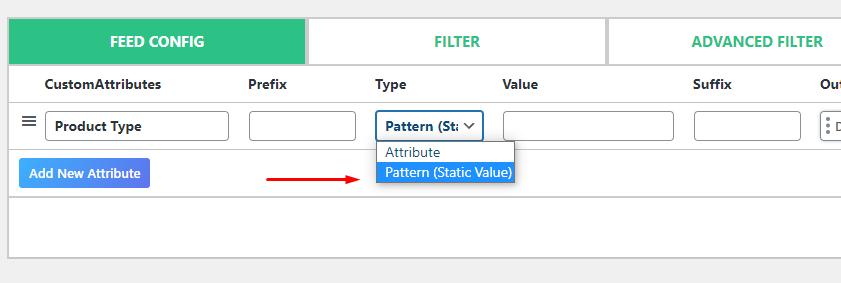
- Next, create a field for the product name or title. You may have noticed in the inventory template that there are some field name parameters for all labels.
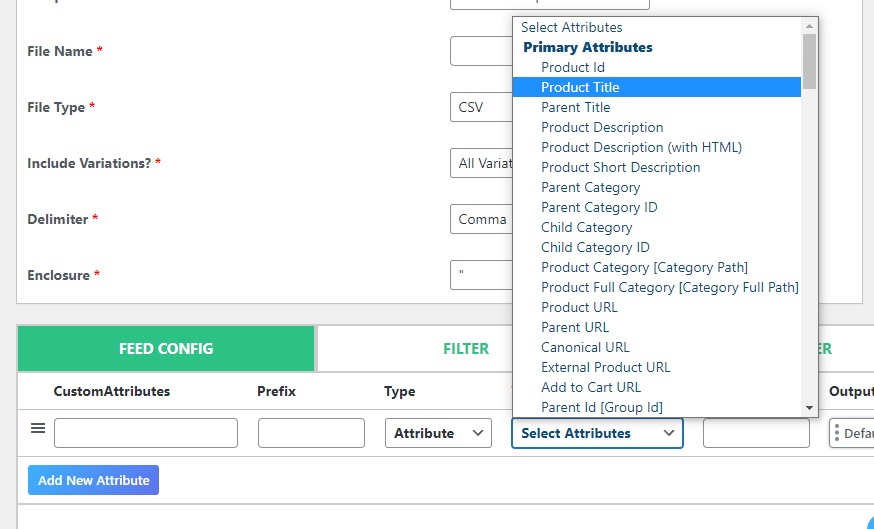
For example, for product type, the field name is feed_product_type. You need to use these field names in these forms when you create a feed file manually.
For example, if you are creating a WooCommerce XML product feed for Amazon, then you need to insert the data like this –
< feed_product_type >
<![CDATA[ Clothing]]>
</ feed_product_type >
The beauty of CTX Feed is that the plugin has integrated all of these field parameters under the attribute values.
You only need to select the type and value and write the label. If you don’t find the specific attribute you are looking for, you can create and map as many as you want within just a few clicks!
- Once you are done with all the attributes, click the Update and Generate Feed button. CTX Feed will automatically collect all your WooCommerce product data and generate the file for you.
- Next, go to Manage Feeds. Here you will find your feed list, update interval (For URLs), and download options. Click the red down arrow button to download your feed.
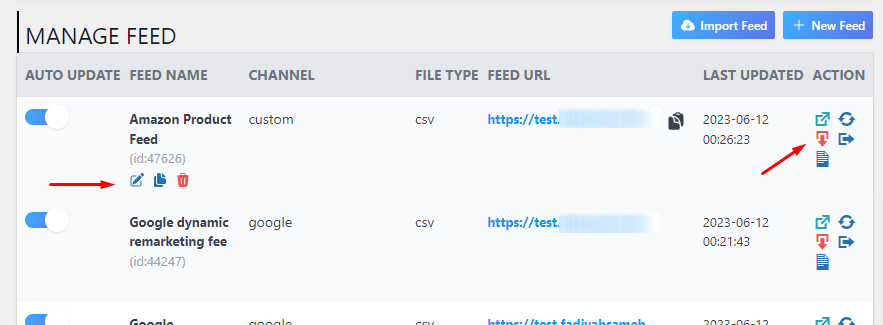
See how simple it was? This is how you can create unlimited product feeds for your Amazon store! The Pro version of this plugin comes with a lot more advanced features to streamline your product feed management across multiple channels.
Step 3: Upload the Product Feed to Amazon Seller Central
Now that your product feed is ready, it’s time to submit the feed to Amazon for verification and approval. You’ll need to submit the update excel file in the same place from where you downloaded the template.
But how to submit a feed on amazon the easiest way?
Here’s how:
- To do this, go to Inventory> Add Products via Upload> Upload your Spreadsheet> Upload Now. You can also drag and drop the file from your device to start the upload.
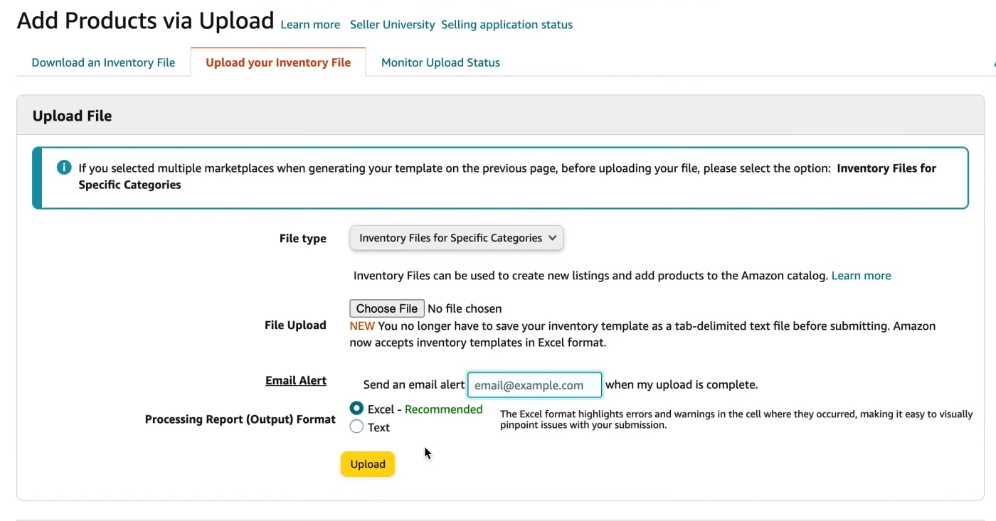
- If you want to receive email notification on the completion of the feed upload, enter your email address and click on “Submit Products”.
And that’s about it! It’ll take a couple of minutes, and once your products are done being uploaded, you’ll receive a confirmation mail. It’ll take a few hours to verify and approve your feed. Once your feed is approved, your products will be live on Amazon.
You’ll also receive email alerts in case you have any issues with your amazon product feed. In that case, you’ll need to optimize your product feed and resubmit it following the same instruction.
If you want a more hands-on guide on manual feed creation, here’s a video tutorial for you:
Step 4: Monitoring and Optimizing Your Feed
Congratulations on getting your very first amazon product feed approved. Your products are now there to be seen by billions of shoppers on the world biggest digital marketplace, Amazon!
However, our work isn’t over just yet. Continuous monitoring and optimization of your feed are essential to ensure that your listings remain accurate and perform well.
Here’s what you’ll need to keep in mind:
- Use Amazon Seller Central’s reporting tools to monitor key metrics such as impressions, clicks, conversions, and sales for your listed products. This will give you insight into how well your products are performing.
- Check for any feed errors or listing rejections in Amazon Seller Central. Common issues include missing product attributes, incorrect category assignments, or image problems. Resolving these quickly ensures your products remain visible to potential buyers.
- Amazon is highly competitive, so regularly review your pricing strategy. Use dynamic pricing tools or adjust prices manually to stay competitive without cutting into your profit margins.

- All things considered, customer reviews play a big role in Amazon rankings. So, try to respond to reviews, address customer concerns, and ensure your product quality is consistently high. This helps in maintaining a positive seller rating and better product visibility.
- Revisit your product titles, descriptions, and keywords regularly. Incorporate relevant search terms to improve product discoverability on Amazon.
Amazon product feed XML example
CSV works fine for most Amazon categories, but larger catalogs or advanced sellers sometimes need XML instead, particularly when a category requires nested variation data that a flat spreadsheet can’t represent cleanly. The structure follows Amazon’s field names directly. For a product type attribute, the XML looks like this:
<feed_product_type>
  <![CDATA[Clothing]]>
</feed_product_type>
Each field in your Amazon template maps to a tag with the same name as the column header in the inventory file: item_sku, standard_price, quantity, main_image_url, and so on. If you’re building the feed manually, cross-check every tag name against the current template rather than reusing tag names from an older export, since Amazon occasionally renames fields between taxonomy updates. If you’re using CTX Feed, the plugin maps these tag names to WooCommerce fields automatically when you select XML as the output format, so you rarely need to write the raw markup by hand.
How to increase your Amazon feed price to cover marketplace fees
Amazon takes a referral fee on every sale, typically 6-45% depending on category, averaging around 15%. Selling at your regular WooCommerce price on Amazon without adjusting for that fee quietly erodes your margin on every order.
CTX Feed handles this through its Dynamic Attribute feature, which changes the price sent in the feed without touching your actual WooCommerce price. When setting the Value field on a Dynamic Attribute, set the Output Type to Pattern and use one of these operators:
- Increase by percentage:
+10%adds a percentage on top of the base price. A $100 product becomes $110.00 in the feed. - Decrease by percentage:
-10%subtracts a percentage, useful for a promotional price sent only to a specific channel. - Multiply:
*5multiplies the price by a fixed number, useful for currency conversion. - Divide:
/4divides the price, useful for converting a bundle price into a per-unit figure.
For Amazon specifically, a common setup adds a fixed percentage (for example, +15%) to offset the referral fee for that category, so your net payout after Amazon’s cut still matches your intended margin. One caveat: the plugin calculates the value as entered, so a price like $12.99 marked up by an odd percentage can produce more than two decimal places. Amazon rejects prices formatted that way, so round the output before publishing.
Common Amazon feed errors and how to fix them
Missing or incorrect product identifiers are the most frequent rejection cause. An incomplete ASIN, GTIN, or UPC, or a title that’s missing required category attributes, sends the whole listing back. Cross-check every mandatory field against the current template before uploading, and use a plugin that syncs automatically so a manual edit on one platform doesn’t quietly fall out of sync with the other.
Category mismatches trip up sellers just as often, especially with variable products. WooCommerce and Amazon structure categories differently, so a term that maps cleanly in your store may not exist in Amazon’s tree at all. Amazon’s Browse Tree Guide is the fastest way to confirm the correct category before you build the mapping, rather than guessing and finding out after a rejection.
Then there’s the gap between what your store shows and what Amazon has on file. If inventory or pricing isn’t synced in real time, a sale on one platform can leave the other showing stock that no longer exists, or a price that no longer matches. Real-time sync through your feed plugin, plus a periodic manual audit, catches this before a customer does.
Image problems are easy to miss until Amazon flags them. Files need to be JPEG or PNG, at least 1000×1000 pixels for the zoom feature to work, and shot on a plain white background. TIFF and BMP files get rejected outright, and low-resolution or pixelated images may pass the upload but hurt conversion anyway.
Duplicate listings usually trace back to a missing or inconsistent unique identifier. If two feeds submit the same product without a matching SKU or ASIN, Amazon can create two listings for one item, which splits your reviews and hurts your ranking on both. Amazon does allow merging duplicate listings after the fact, but it’s faster to map identifiers correctly the first time.
Shipping and fulfillment errors tend to surface later, once orders start coming in rather than at upload. Mismatched delivery windows or carrier settings between WooCommerce and Amazon lead to missed delivery estimates, and Amazon weighs seller performance metrics heavily enough that repeated shipping issues can affect account standing, not just one listing.
Finally, policy violations in the product description itself, phone numbers, links to outside websites, all-caps text, requests for reviews, will get a listing pulled regardless of how clean the feed data is. Amazon’s content rules change periodically, so it’s worth a quick recheck against current policy before a big catalog push, not just when you first wrote the description.
Best plugin for Amazon feed management: CTX Feed
Manually rebuilding a spreadsheet every time a price changes works for ten products. It doesn’t work for a few hundred. CTX Feed automates that sync between WooCommerce and Amazon, so feed updates happen on a schedule instead of by hand.
Key features
- Prebuilt templates for 220+ marketplaces, including Amazon-specific category mapping.
- Custom attribute mapping for fields Amazon requires that don’t exist as default WooCommerce fields.
- Dynamic Attributes for price markup, currency conversion, and conditional formatting.
- Scheduled auto-updates so feed changes reflect store changes without a manual regeneration.
- A free version on WordPress.org, with a Pro version adding FTP upload, ACF support, and priority support.
Frequently Asked Questions
How often should I update my Amazon product feed?
It depends on how often your prices or stock levels change. A store with frequent price changes should sync daily; a stable catalog can get away with weekly updates. At minimum, update whenever a price, stock status, or product detail changes, since a stale feed is one of the more common causes of order cancellations.
Can I sync WooCommerce products to Amazon automatically?
Yes. A feed plugin like CTX Feed can regenerate and re-upload the feed on a set schedule, which removes the need to manually rebuild a spreadsheet every time something changes in your catalog.
What causes an Amazon feed to get rejected after it previously worked fine?
Amazon updates its category requirements and taxonomy periodically, sometimes without much notice. A feed that passed last month can fail this month if a category now requires a field it didn’t before. Re-download the current template for your category if a previously working feed suddenly starts failing.
Do I need the Professional Amazon plan to use a feed plugin?
No, feed plugins work with either plan, but Professional is required for bulk uploads and several categories that are otherwise gated. If you’re managing a feed of any real size, Professional is close to a requirement in practice even if it isn’t one on paper for every category.
Key takeaways
- Amazon feeds require category-specific attributes that shift over time, so pull a fresh template rather than reusing an old export.
- CSV covers most Amazon categories; XML is worth it mainly for complex variation data.
- A price markup through Dynamic Attributes protects your margin against Amazon’s referral fees without touching your actual store price.
- Most feed rejections trace back to missing identifiers, category mismatches, or image formatting, all fixable before resubmission.
- Automating the sync with a plugin like CTX Feed removes the manual spreadsheet rebuild once your catalog grows past a handful of products.

Free version on WordPress.org. Every Pro licence includes a 30-day money-back guarantee.

