
How to Generate Criteo Product Feed for WooCommerce Store
Generating a Criteo product feed for your WooCommerce store allows you to sync structured product data—such as ID, title, description, price, availability, image link, and category attributes—with Criteo’s dynamic advertising platform.
Instead of building feeds manually, plugins like CTX Feed – WooCommerce Product Feed Plugin
automate the entire driven process by applying Criteo’s required attributes, mapping product variations, and offering advanced filters to exclude missing or unoptimized products.
With one-click XML/CSV feed generation and a ready-to-use feed URL, you can easily upload your WooCommerce catalog to Criteo and run more accurate, personalized retargeting and performance marketing campaigns.
In this article, we will walk you through all the steps you need to follow to create a Criteo product feed in just a few minutes.
However, apart from learning about the step-by-step process to generate a Criteo product feed, you need to know the Criteo feed specifications and requirements.
This article will cover all of these. Let’s get started.

How to Export Your WooCommerce Products into Criteo?
There are multiple ways you can take your WooCommerce products to Criteo.
However, one of the easiest ways to export your WooCommerce products into Criteo for advertising your products on this platform is to create a product feed using a plugin like CTX Feed.
But, to create an effective CTX Feed, you should know about all the required (and optional) product feed specifications.
Criteo Feed Specifications (Required Fields)
Let us show you the required catalog specifications for a Criteo product feed that applies to general or retail store owners.
id (string)
An ID is a unique identifier assigned for each product. You can assign only one ID for one product, and it can’t be exchanged.
Note that a product id for Criteo should not contain any quotation marks. Also, you must write it in ASCII characters. The character limit for an id is 240.
Sample: bdx455-white-9.5
title (string)
It’s the name of the product that you usually place on the product page to introduce a product to your customer. A product title is the first thing a visitor usually views on your WooCommerce website. A title should be catchy and describe the product briefly.
A product title must start with either a letter or a number. The character limit for product titles is 150.
Sample: Formal White Shoes – Size 9
link (string)
This is the unique product page URL of your website. Make sure that the information on the product page’s URL does match that of the catalog you create.
The product page link should start either with http:// or https:// protocols followed by the domain name. Make sure that the symbols are encoded. The character limit of a link string is 1024.
Sample: https://abcyz.com/formal-white-shoes
Image_link (String)
The image_link indicates the file path of the main image of a product. When it comes to size, it should of under 16 MB and at least 800×800 pixels. You must specify the content-type header. The image_link usually starts with http:// or https:// followed by the rest of the URL of the product page. The character limit is 2000.
Sample: https://abcdefg.com/product/image/casual-formal-shoes
Price (String)
A price lets the customers know how much they will need to spend to buy the product. Make sure that the currency is set as per your website’s currency.
When using a price, make sure that you use a period (.) decimal separator without any thousand separators. The character limit is 14.
Sample: 999.99
Criteo Feed Specifications (Optional Fields)
Apart from the required product feed specifications mentioned above, there are some optional fields that you can use on your product feed and that are recommended for some special cases:
- additional_image_link
- sale_price
- availability
- description
- google_product_cateegory
- brand
- star
- item_group_id
- adult
By the way, Check out these required and optional product feed specifications for Criteo in detail from the Criteo website.
How to Generate a Criteo Product Feed (Step-by-step)
Now that you know the specifications of a Criteo product feed, it’s time to learn the steps to generate a Criteo product feed.
Let’s dive right in.
Step 1: Install CTX Feed Plugin
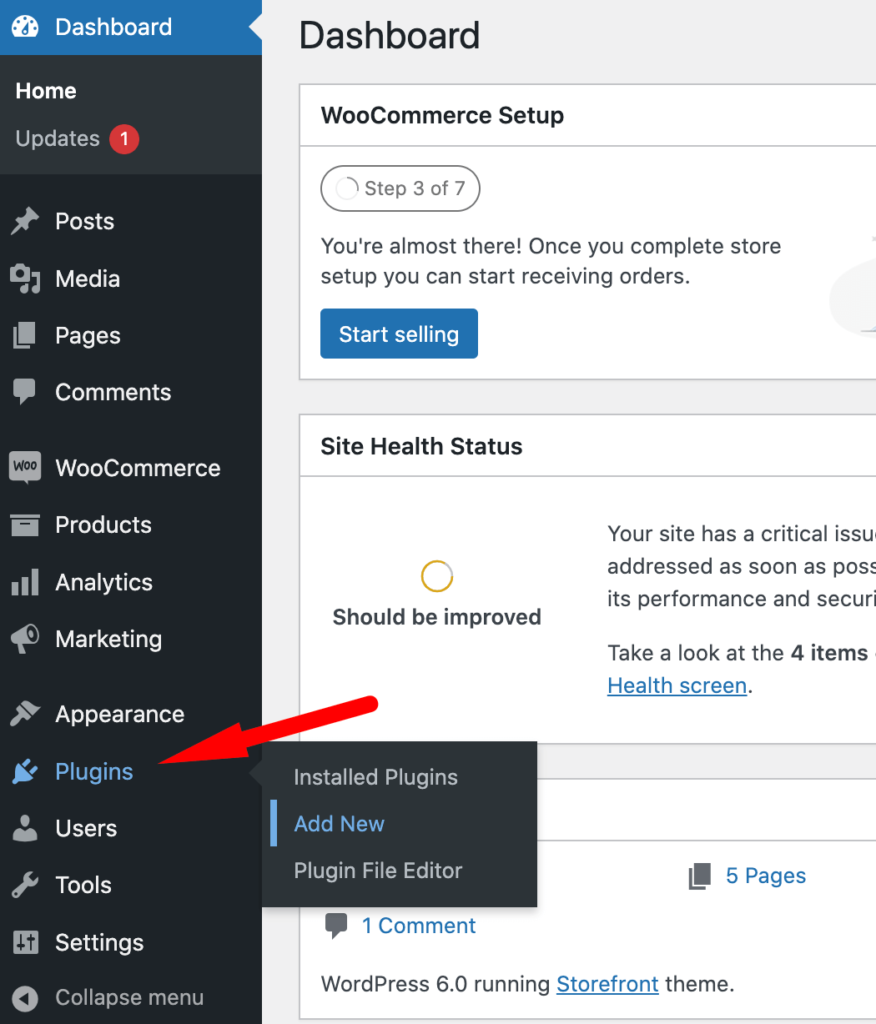
Go to WordPress dashboard>> Plugins>> Add New.
Search CTX Feed on the search bar. Then, install and activate CTX Feed Free.
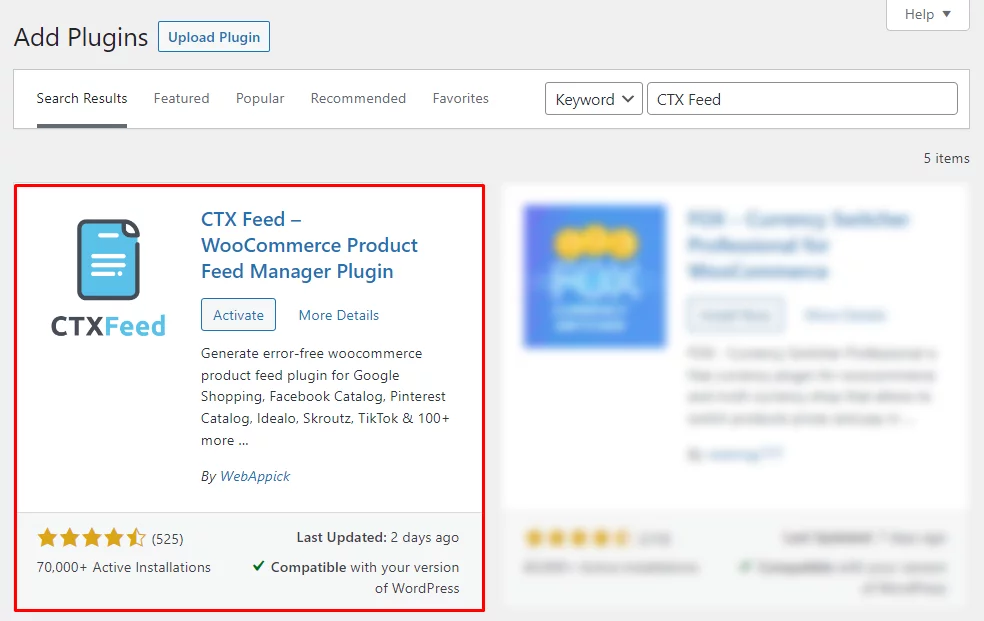
If you have the Pro version of the CTX Feed plugin, upload the plugin from Plugins>>Add New page.
However, we recommend the CTX Feed Pro version to use advanced features like filters, attribute mapping, dynamic attributes, and more.
Step 2: Make a Criteo Product Feed
As you’ve got the CTX Feed Free or Pro plugins installed on your WordPress website, let’s go ahead and generate a Criteo product feed now.
We can assure you that the feed creation process with the CTX Feed plugin is smooth and easy.
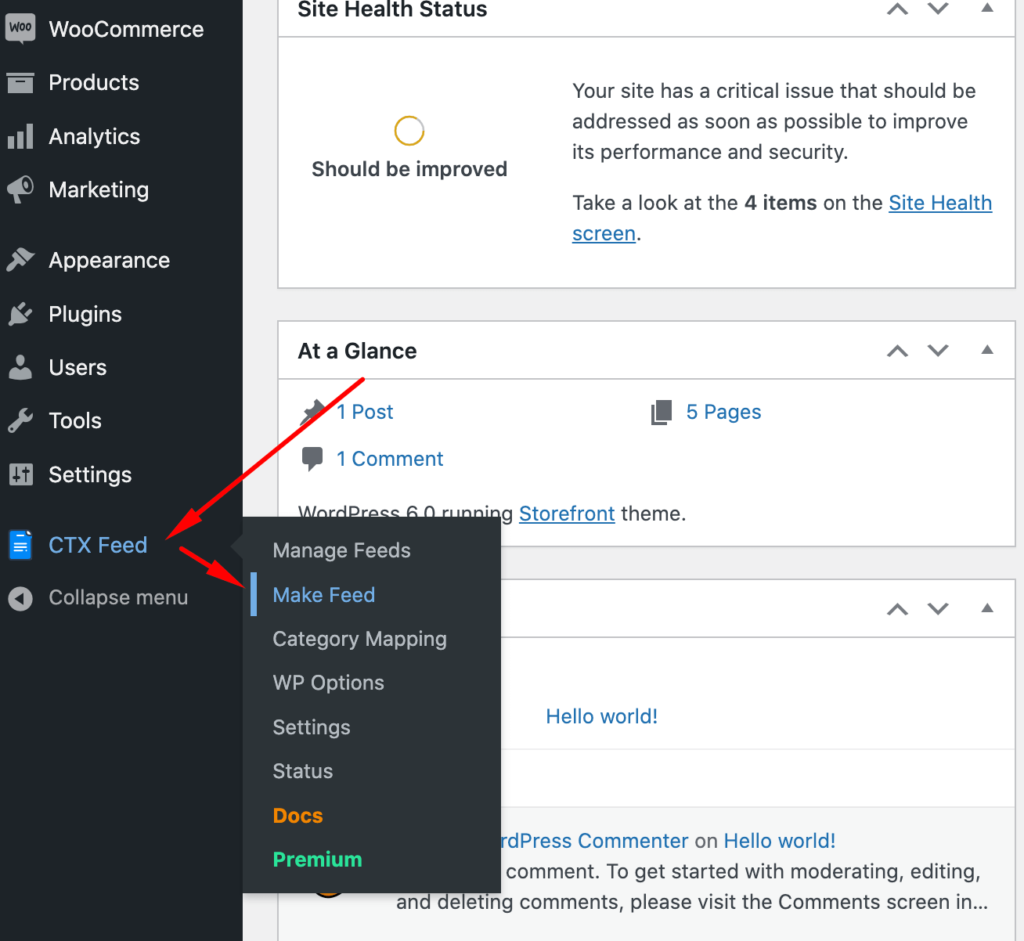
Go to your WordPress Dashboard and find out the CTX Feed menu on the left sidebar. Hover on CTX Feed. Now, you’ll see the “Make Feed” option. Click on that to enter the feed creation page.
Content Settings
Once you enter the feed creation page, Content Settings will appear first in front of you. You need to enter the following information on your Criteo product feed:
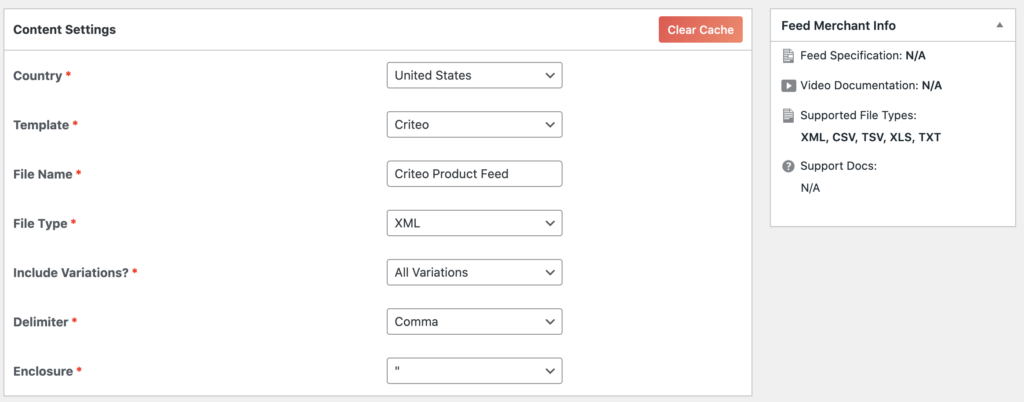
Country: Though this field is automatically populated based on your business location, you can also set it up as your preference.
Template: Choose Criteo from the list of 100+ templates.
File Name: Give your Criteo product feed a name of your choice.
File Type: Criteo supports a variety of file types. Choose one from the list.
Include Variations: You can define the type of variations you want to include in your product feed for Criteo.
Delimiter: Choose a delimiter type
Enclosure: Choose how you want to use enclosure for a product
Step 3: Configure the Feed
FEED CONFIG
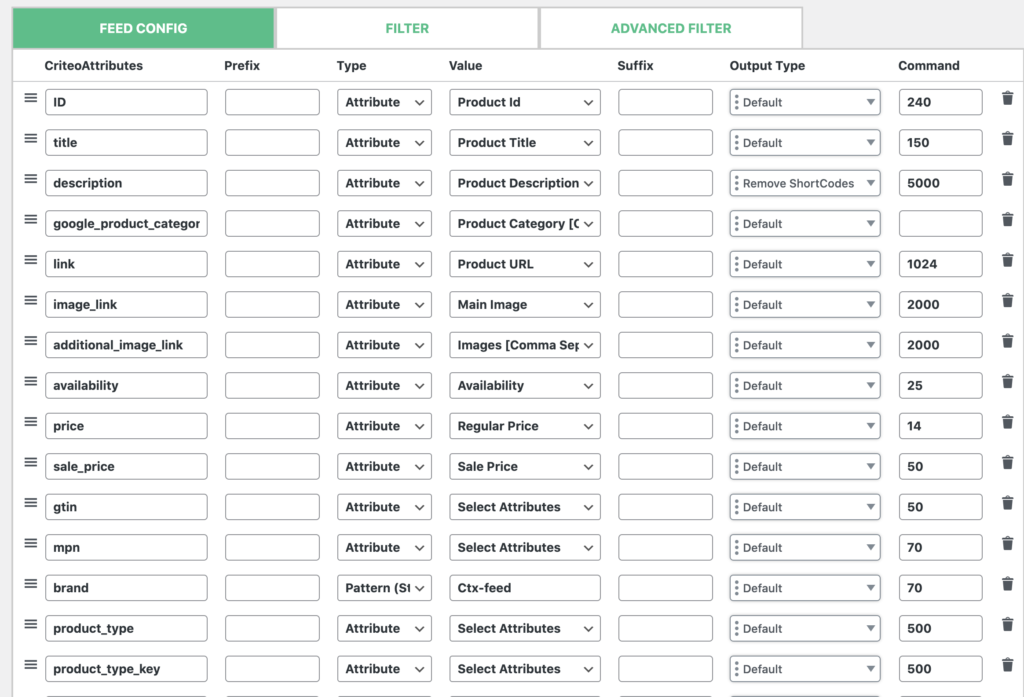
Once you’re done with the Content Settings, you’ll now be required to work with the FEED CONFIG tab.
The feed configuration page is created based on the Criteo product feed specifications. The Feed Configuration tab comes with the required and some optional attributes of a Criteo product feed.
You do not need to change much of it. However, if you want to add any suffix, prefix, value, and more, you can do so easily from this page.
Use the delete button placed on the right side of each attribute to delete any attribute from the Criteo product feed you’re making.
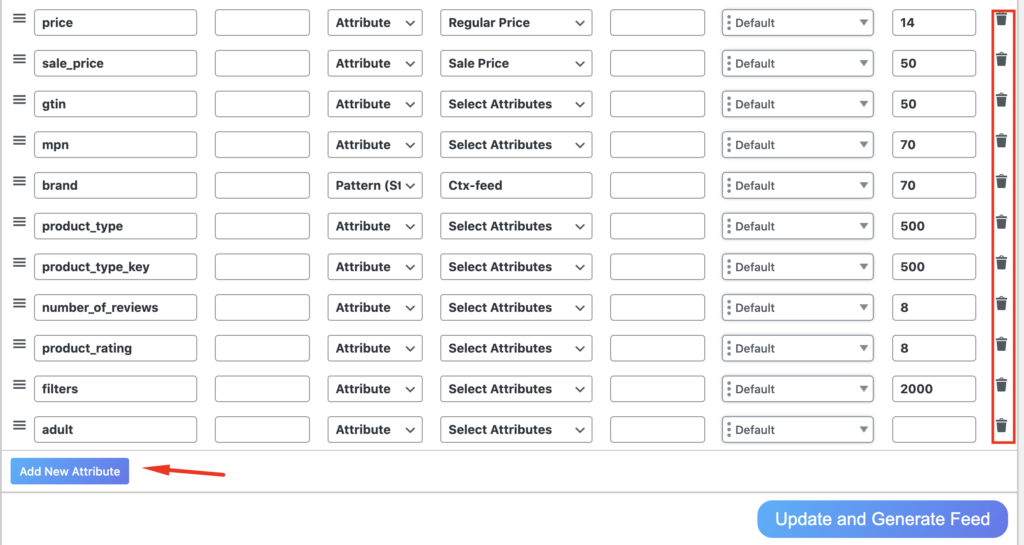
In case you want to add any new attribute for your Criteo product feed, you can use the Add New Attribute button.
FILTER and Advanced Filter
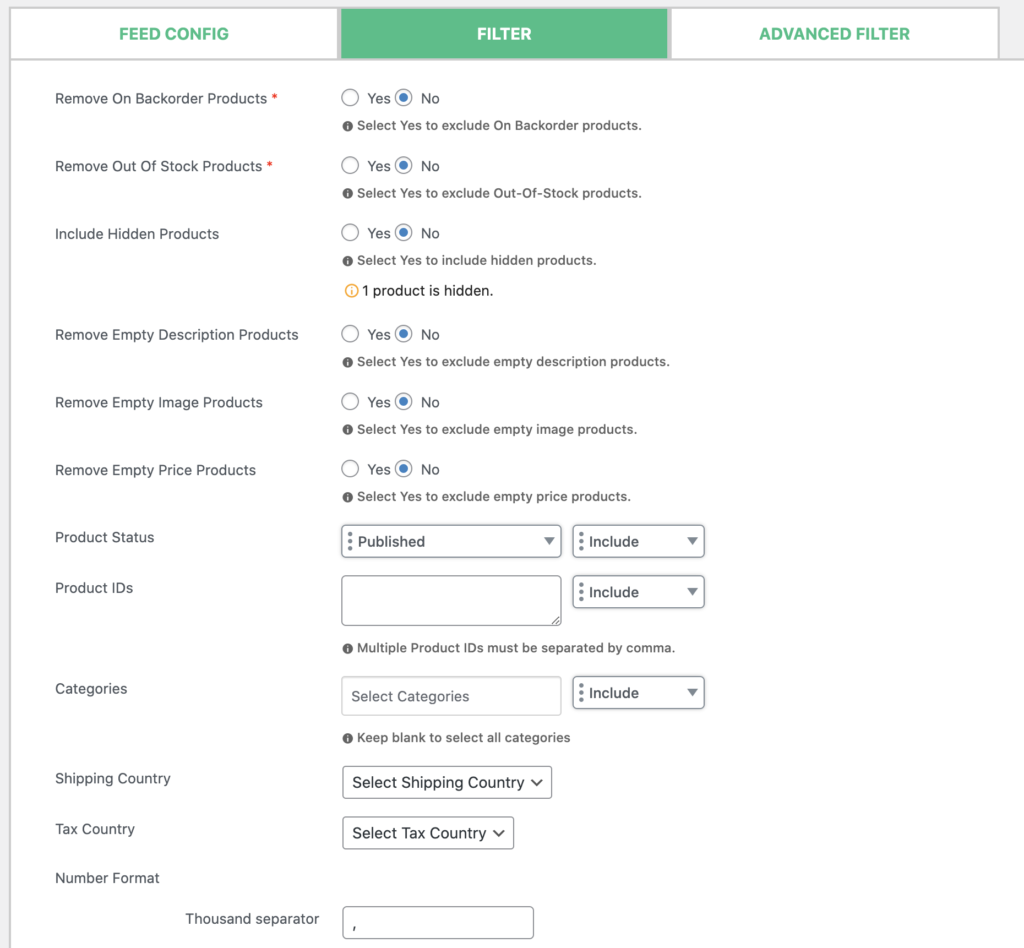
You’ll find the Filter and Advanced Filter tab on the left side of the FEED CONFIG tab.
These are pro features, and you can do the following with the Filter and advanced filter features:
- Remove the backorder products from the feed
- Remove out-of-stock products from the feed
- Include/exclude the hidden products
- Remove empty description products from the feed
- Remove empty image products from the feed
- Include/exclude any product from the feed
- Remove empty price products from the feed
- Include/exclude products based on product status
- Include/exclude products by product IDs
- Include or exclude certain product categories
- Select the shipping country
- Create the campaign URL and more.
- Replace the string
- Add multiple conditions for the feed you’re creating. (advanced filter)
When you’re all done, click on the “Update and Generate Feed” button.

That’s it. Your Criteo product feed generation will start now. Once it’s done, you’ll get a success message with the link to the generated product feed file.
Step 4: Manage the feed
Once the feed generation process is done, you’ll be shown a Manage feed page (which you can also visit from CTX Feed >> Manage Feed). From the Manage Feed page, you can see the feed type, feed URL, view, regenerate, download, export feed config, and more.
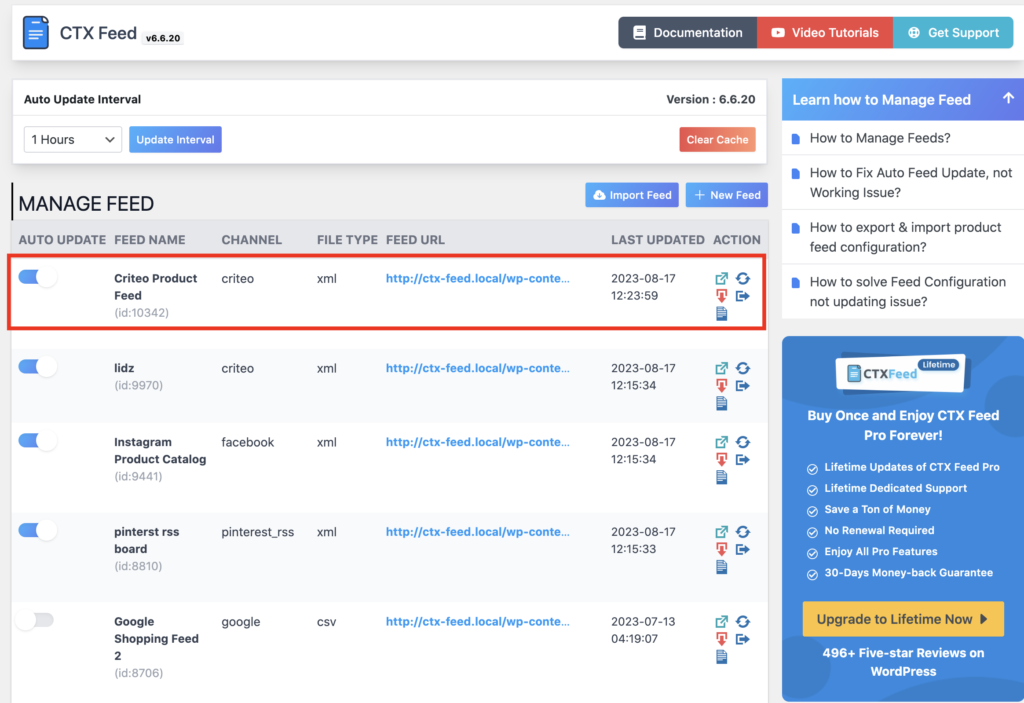
Once you’re done with the feed creation and optimization, the last thing you have to do is upload the product feed on Criteo.
Final Thoughts
By now, you know the Criteo product feed specifications and how you can generate Criteo product feed for WooCommerce within a few minutes. We hope that you’ve found this guide very helpful. Subscribe to our blog to get more blogs like this. Happy Selling on Criteo.
