How to Generate Heureka Product Feed in WooCommerce (Easy Way)
Heureka Group is the largest price comparison website and online shopping advisor in Europe region.
This platform covers a network of more than 55 thousand online stores.
When it comes to traffic, they get about 23 million visitors.
Heureka run their operation in 9 countries for which they maintain separate websites. Heureka.cz for Czechia and Heureka.sk for Slovakia are two of the online marketplaces run by them.
However, if you’re a WooCommerce store owner and you’re planning to promote your products on different websites of the Heureka group, this blog is for you.
In this blog, we’re going to discuss why you should promote your WooCommerce products on Heureka, the required product attributes you need to upload your products on their platforms, and lastly but most importantly how you can create a Heureka product feed within a few simple steps using the amazing CTX Feed plugin.
Let’s get started.

11 Reasons Why You Should Sell on Heureka
By selling on Heureka, you can easily reach a large audience of potential customers and increase your sales and revenue.
On top of that, Heureka offers a variety of tools and services to help you manage and optimize your online store.
Let us tell you 11 reasons why you should sell your WooCommerce products on Heureka:
Large customer base: As already mentioned in the intro, Heureka has a large number of customers in the Czech Republic, Slovakia, and other countries. So, when you sell your products on Heureka, you can expect to get a wide audience for your products from the very beginning.
Wide variety of products: Heureka offers a wide range of products, from electronics to fashion. That’s why it’s quite easy for you to find a suitable niche where your products suit best.
Increased visibility: Heureka’s search algorithm promotes products with high customer satisfaction and reviews. This is quite beneficial to increase the visibility of your products.
Ease of use: Heureka offers a user-friendly interface to manage and optimize your online store.
Payment options: Heureka supports a wide range of payment options, including credit card and online banking, to make it easy for customers to purchase from your store.
Customer reviews: Heureka allows customers to leave reviews of products, which can help build trust and increase sales.
Strong partnerships: Heureka has partnerships with major companies such as Google and Sklik which help increase the visibility and drive traffic to your store.
Secure platform: Heureka uses SSL encryption and other security measures to protect customer information and provide a secure shopping experience.
Mobile optimization: Heureka is optimized for mobile devices. It helps to attract mobile shoppers and thus contributes to more sales.
Competitive fees: Heureka’s fees are competitive with other e-commerce platforms, making it a cost-effective way to sell your products online.
Big community: Heureka has a large community of sellers and buyers, which provides a perfect place to get feedback and support from other sellers and customers.
Required Product Attributes for Heureka Product Feed
To make sure your products get sales from Heureka, one of the most important things you have to do is to submit your product data to Heureka in the right format.
You must include all the mandatory product attributes required by the shopping platform.
And, before you start making your product feed, you must know about these attributes.
Below are the mandatory or required product attributes you must submit to Heureka in an XML product feed:
| Required Attribute | Definition | Example |
| ITEM_ID | This is the unique ID of a product | <ITEM_ID>569</ITEM_ID> |
| PRODUCTNAME | A product name defines what a product is. A product name may also include the product size, color, variation, and more. Information you should add to the product title depends on the product type and category. | <PRODUCTNAME>V-Neck T-Shirt – Red</PRODUCTNAME> |
| DESCRIPTION | A product should have a description to explain the product and its characteristics. However, make sure that you use plain text. Avoid using any shortcodes and HTML tags. | <DESCRIPTION>Pellentesque habitant morbi tristique senectus et netus et malesuada fames ac turpis egestas. Vestibulum tortor quam, feugiat vitae, ultricies eget, tempor sit amet, ante. Donec eu libero sit amet quam egestas semper. Aenean ultricies mi vitae est. Mauris placerat eleifend leo.</DESCRIPTION> |
| URL | This is the link to the product on your WooCommerce website. Make sure that the URL of each product or variant is unique. | <URL><![CDATA[ https://yourdomain.sk/product/long-sleeve-tee/?utm_source=Heureka.sk&utm_medium=cpc&utm_campaign=heureka ]]></URL> |
| IMGURL | The main product image URL goes here. Make sure to avoid any spaces in the link. | <IMGURL><![CDATA[ https://yourdomain.sk/wp-content/uploads/2022/06/long-sleeve-tee.jpg ]]></IMGURL> |
| PRICE_VAT | Here you have to include the total amount of all the fees excluding the shipping cost. This price vat includes the product price plus tax plus extra packing cost and more. Note that you do not need to enter any currency symbol here. | <PRICE_VAT>25.00</PRICE_VAT> |
| MANUFACTURER | You have to mention the name of the product brand here. By the way, you can also use the brand name in the product name as well. | <MANUFACTURER>Nike</MANUFACTURER> |
| CATEGORYTEXT | You have to submit your products based on the category set by Heureka. You can see a list of Heureka categories in XML view. Note that you don’t have to change the actual category of products in WooCommerce if you use the category mapping feature of the plugin with which we’re going to show you the tutorial below. | <CATEGORYTEXT>Decor</CATEGORYTEXT> |
| DELIVERYDATE | This attribute is used to indicate the status of stock and how soon the product is ready for shipping. An in-stock product will get the value of 0. However, in case the product is not in stock currently, you have to use the number of days after which the product will be available in stock. | <DELIVERY_DATE>0</DELIVERY_DATE> |
| ITEMGROUP_ID | This attribute requires you to submit the common item group ID to indicate the variants of the same product | <ITEMGROUP_ID>4563</ITEMGROUP_ID> |

How to Create a Heureka Product Feed (step-by-step)
Step 1: Install CTX Feed plugin
At first, you have to install a WooCommerce product feed generator plugin named “CTX Feed”. This plugin has both free and pro versions.
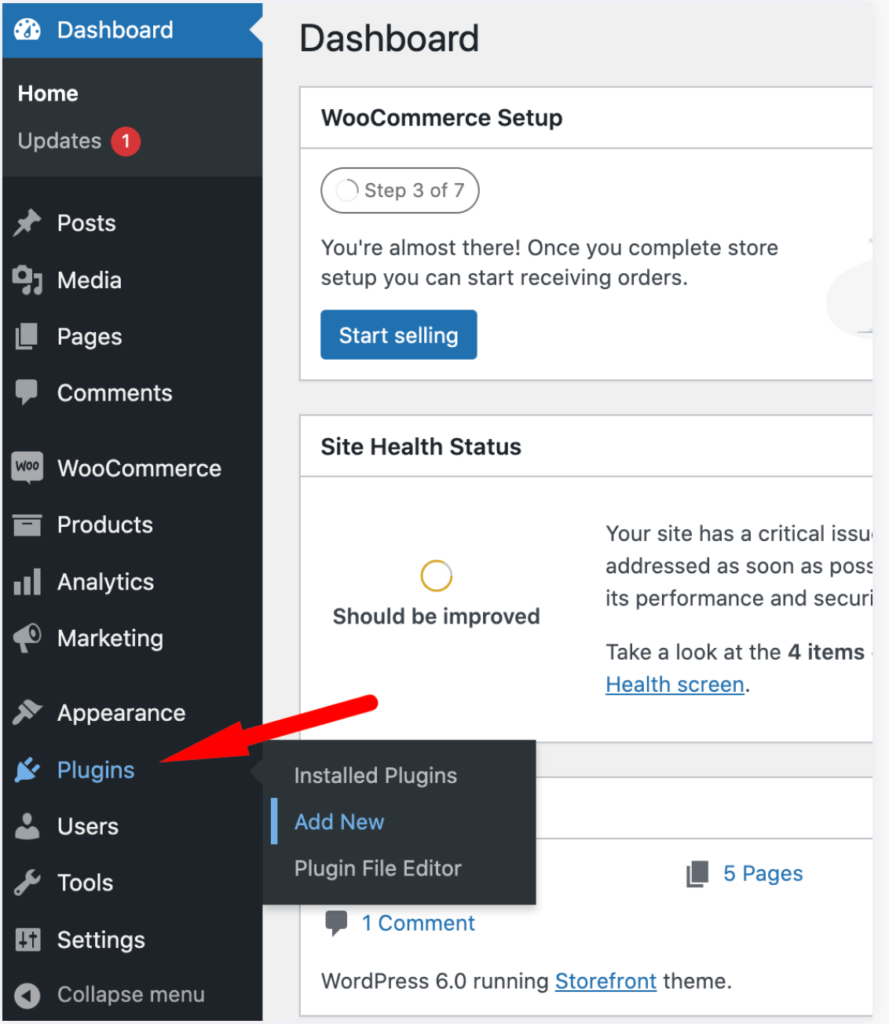
To install the free version, go to your WordPress Dashboard: go to Plugins > Add New.
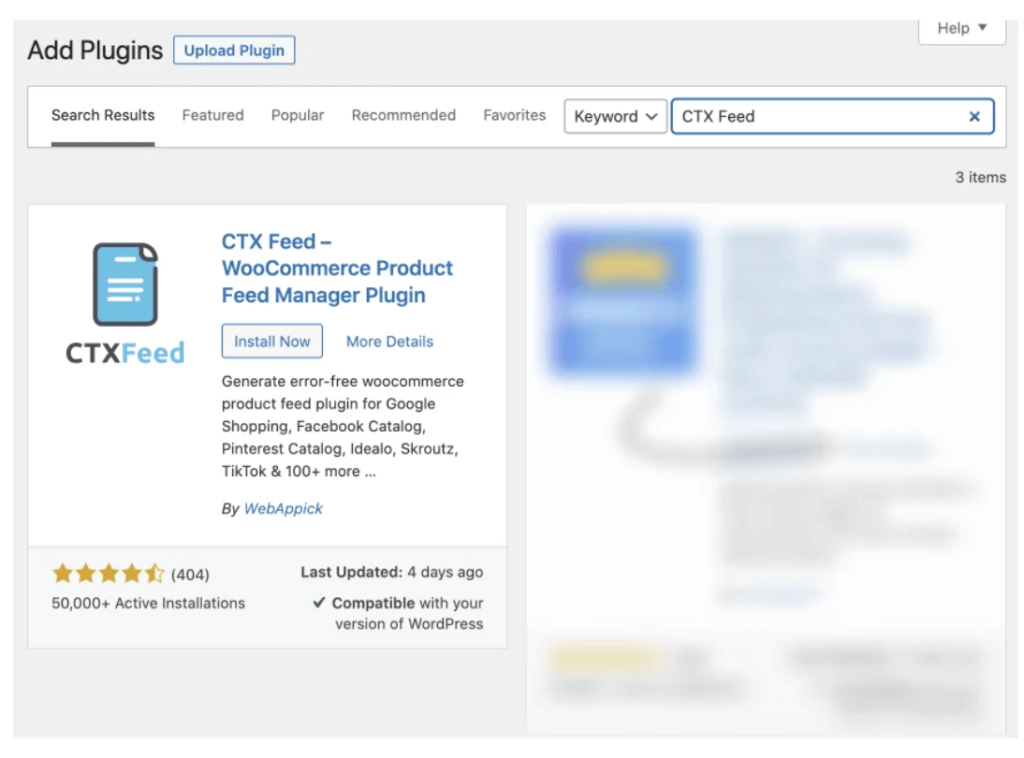
Search for the CTX Feed plugin on the search bar. And then install and activate the plugin.
To install or know about the pro version of CTX Feed, click on the following button.
Once you’re done installing and activating the CTX Feed plugin, you’ll see the menu on your WordPress website’s sidebar from the admin panel.
By the way, we suggest you try the Pro version if you need to use features like advanced filters, attribute mapping, dynamic attributes, etc.
Below is a video to show you how you can upgrade your free CTX Feed free plan to Pro.
Step 2: Start Making Your Heureka Product Feed
Now it’s time to start making your Heureka product feed more easily.
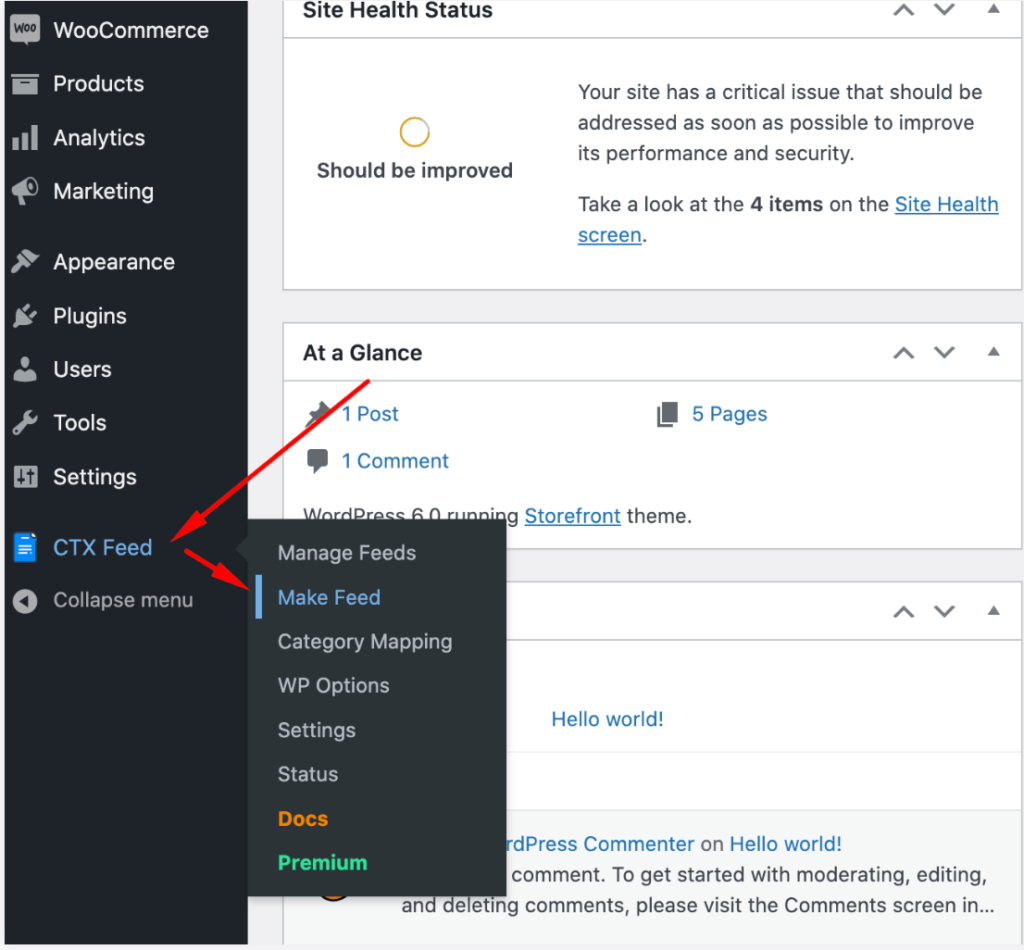
To begin with, hover on the CTX Feed menu and then click on the Make Feed option.
Content Settings
Once you’ve clicked on the Make Feed option, you’ll be redirected to a new page that comes with content settings and other configurations.
Let’s start with the content settings.
Country: Though this field is automatically populated as per the country setting of your WooCommerce website, you can change it if you want.
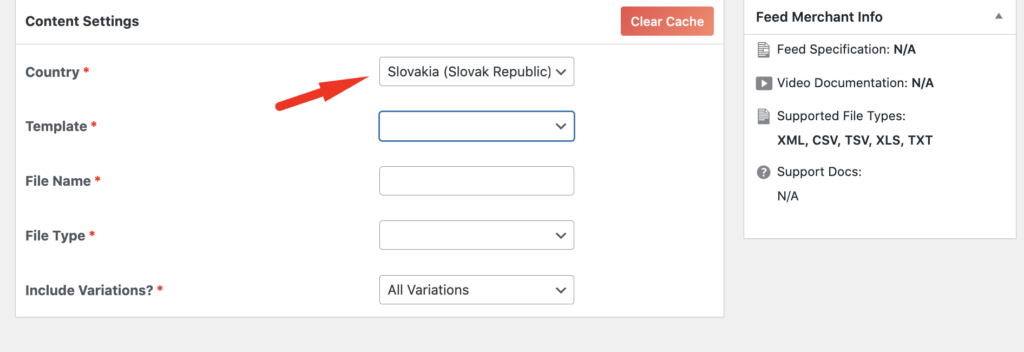
Template: Choose Heureka.sk template from the list of premade templates.
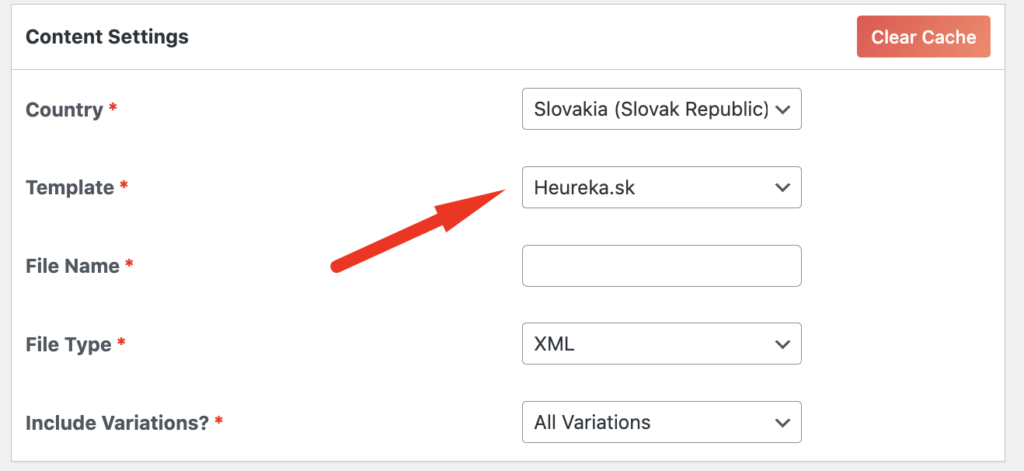
File Name: Give your Heureka product feed file a name. However, if you make more than one feed for Heureka, make sure to use unique names for every file.

File Type: Heureka supports .XML file format. So, choose that from the list.
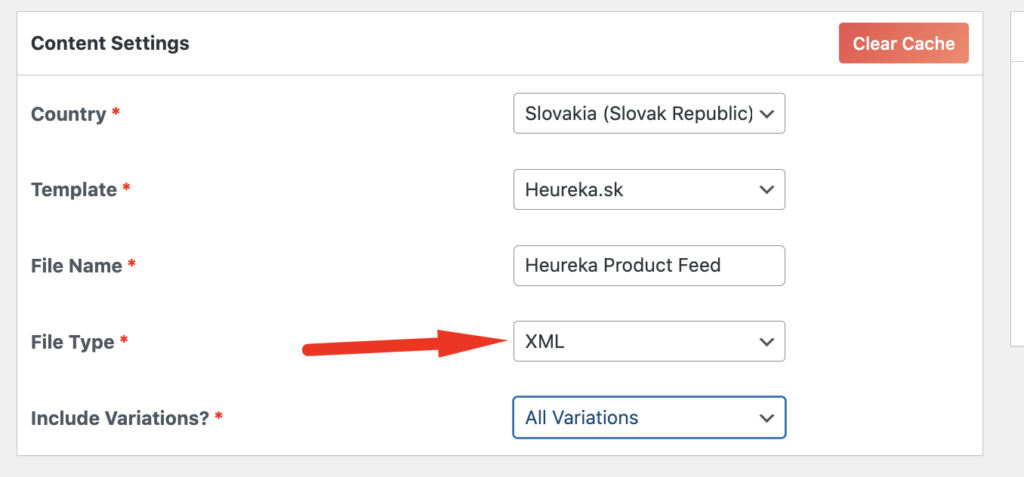
Include Variations: Here is the place where you need to choose the variation you want to use in your Heureka product feed.
Delimiter: Determine how the items in your Heureka product feed will be separated. The default is the comma which you can change if you want.
Enclosure: Here you have to choose the type of enclosure. You can go either with none, single-inverted comma, or double-inverted comma as per your preference.
Step 3: Configure the Heureka Product Feed
Once the content setting is done, you’ll see the feed config, filter, and advanced filter options just below that.
In the FEED CONFIG, you’ll find a list of attributes required for Heureka product feed creation, if you need to make any changes to this, you can do so.
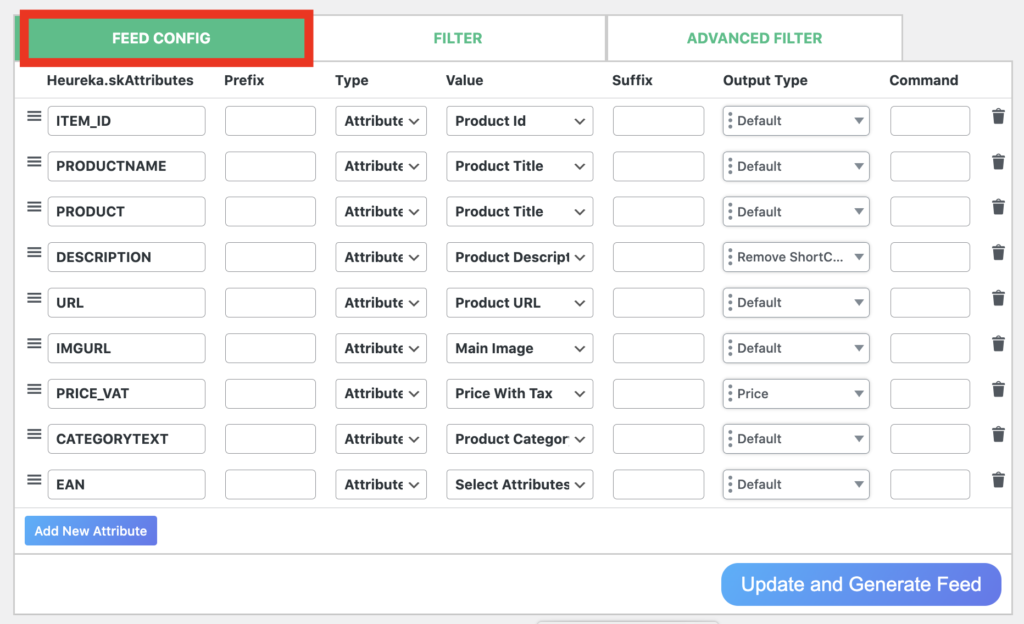
To add a new attribute, click on the “Add New Attribute” button at the end of the FEED CONFIG option. On the other hand, if you need to delete any attribute from the list, you can also do that as well by clicking on the delete boxes placed at the end of each attribute.
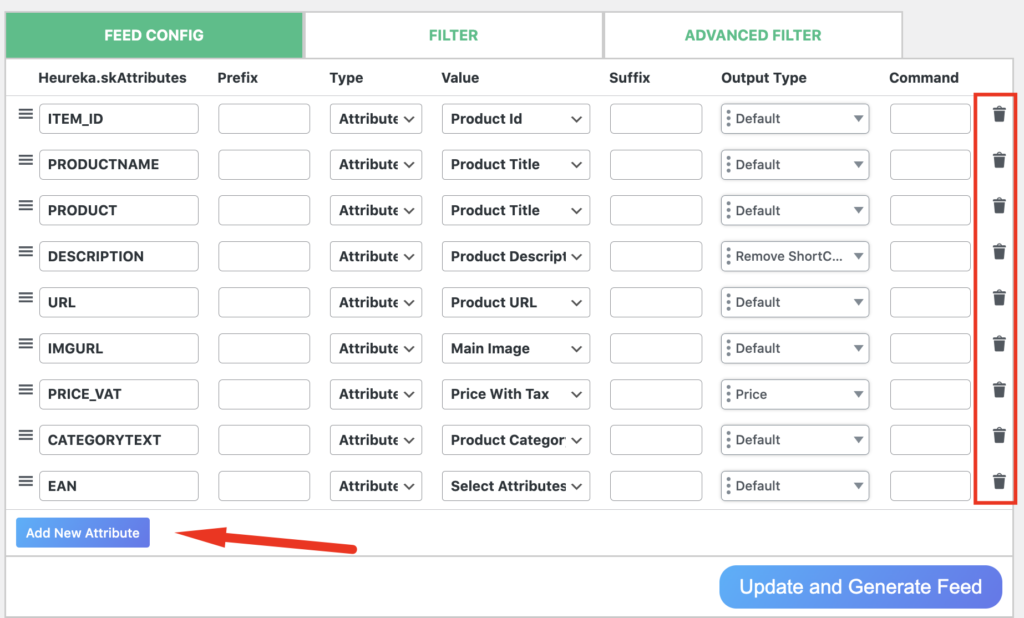
Note that, CTX Feed also lets you add any suffix or prefix to your attributes.
Once you’re done with the FEED CONFIG tab, you can explore the Filter and Advanced Filter tabs.
In the filter options, there are a lot of options that allow you to customize your Heureka product feed as per your preference. You can do things like removing empty price products, including hidden products, removing out of products, and more.
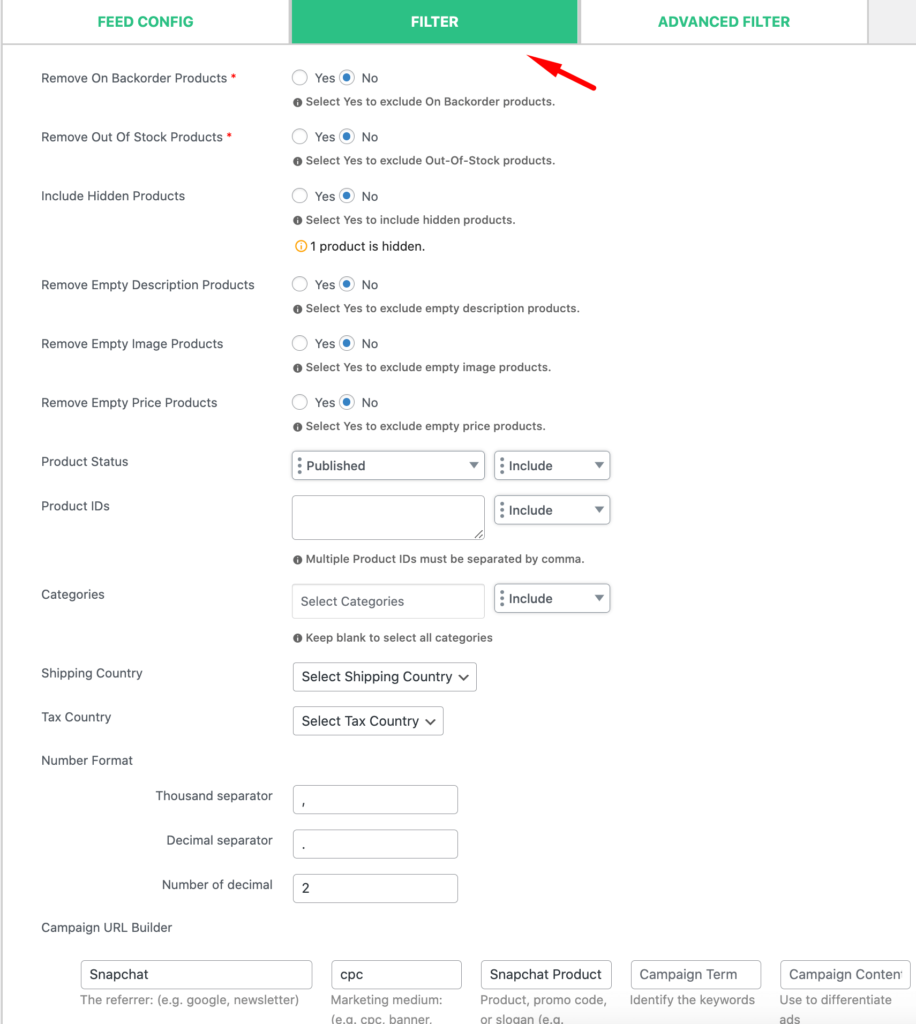
There are also advanced filters along with attribute mapping, dynamic attribute, and category mapping options if you use the CTX Feed Pro version on your WordPress website.

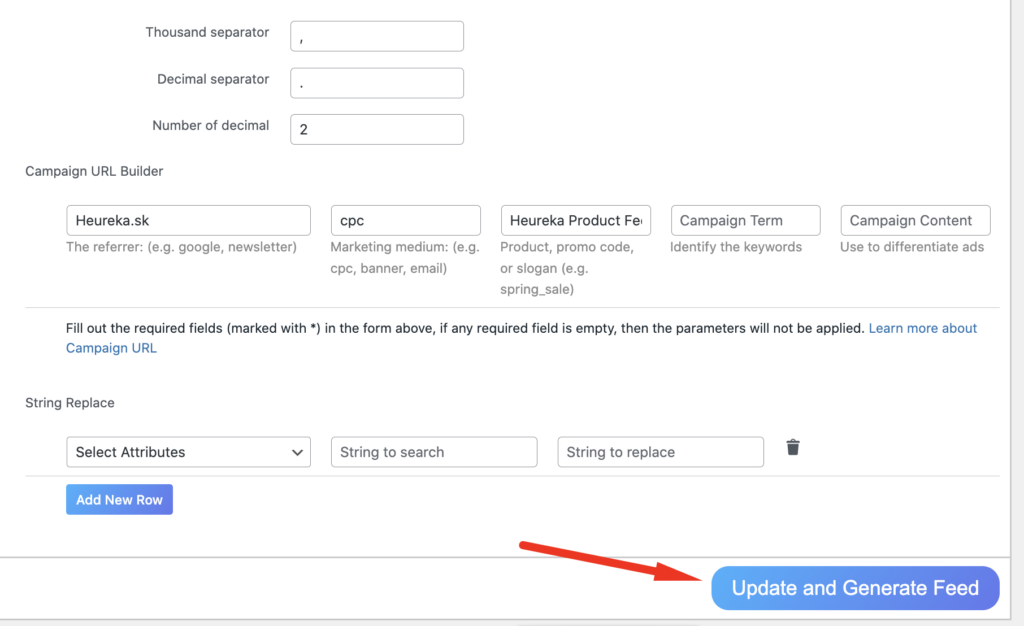
Once you’re all done, click on “Update and Generate Feed”. Wait a few seconds, CTX Feed will generate a new product feed for Heureka soon.
Note: You can read this comparison post if you’re interested to know how CTX Feed Pro is different from the CTX Feed Free version.
Step 4: Manage the Feed
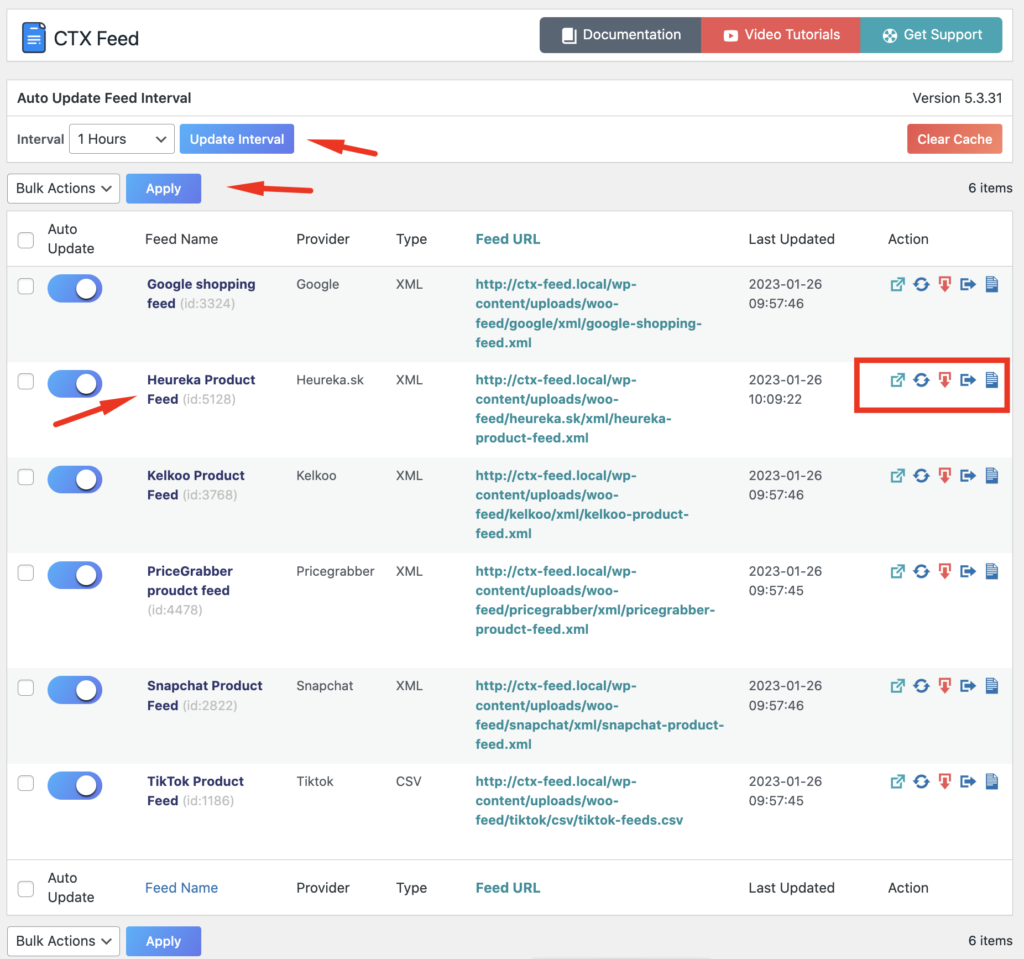
Once your Heureka product feed is done, you can see that from the Manage feed option (CTX Feed> Manage Feeds).
Here you can also take multiple actions for your Heureka product feed such as viewing, regenerating, downloading, and more.
Step 5: Upload the Feed on Heureka
It’s the last step where you need to upload the product feed you just created with CTX Feed on Heureka. Follow the steps for uploading product feed on the Heureka website and you should be good to go.

Final Thoughts
By now you know 11 reasons why you should sell on Heureka, the required fields of a Heuraka product feed, and how to generate a Heureka product feed step-by-step using a freemium plugin, CTX Feed plugin.
If you need more help while creating a Heureka Product Feed, feel free to let us know in the comment section. Subscribe to our website to stay tuned.
