
WooCommerce Shipping Setup: Ultimate Guide (2024)
It’s nothing new that WooCommerce reigns supreme in the realm of eCommerce platforms. This incredibly powerful plugin, with its vast range of features, allows you to build a fully functioning online store with minimum effort.
However, even the most stunning website with excellent products needs to provide a smooth buying journey for customers.
💡 Did you know, 70% of your customers will leave your Woo store even after adding products to your cart if you don’t have an appropriate shipping strategy in place?
True that, they will abandon the carts in your WooCommerce store if the shipping cost isn’t clear and convenient. WooCommerce shipping plays a pivotal role in bridging that gap and in turning your visitors into buying customers.
💡 In this guide, we will explore every detail you need to know about WooCommerce shipping and walk you through the steps to WooCommerce easy shipping setup.
Let’s get started.
Understanding WooCommerce Shipping
WooCommerce shipping settings allow you to define how your products will be delivered from your store to your customer’s doorsteps. A well-configured shipping strategy is crucial for a smooth online shopping experience.
Here’s a breakdown of the key functionalities you should be aware of:
- Shipping Location: This lets you specify where your store ships from. It can be a single location or set to all countries you sell to.
- Customer Location: You can choose to pre-populate the customer’s location based on their IP address (geolocation) or leave it blank for them to enter manually.
- Shipping Zones: Imagine dividing the world into regions with specific shipping rules. You can create zones based on countries, states, or even zip codes. This allows you to offer different shipping options and costs depending on the customer’s location.
- Shipping Methods: These are the ways you’ll get your products to customers. WooCommerce offers core options like flat rate (one price for all), free shipping (based on conditions), and local pickup. Plugins can unlock more advanced methods like real-time carrier rates (e.g., USPS, FedEx).
- Shipping Classes (Optional): This allows you to group products based on similar characteristics like size or WooCommerce weight-based shipping. You can then set specific shipping costs for each class, offering more granular control over pricing.
In essence, WooCommerce shipping settings give you the tools to create a flexible and efficient shipping system for your online store.
How to Setup WooCommerce Shipping
WooCommerce shipping configuration may seem daunting. Fear not—we’ll break down the entire process into manageable steps to make it easy for you.
However, you must know that every online store is unique, and what works for one might not work for another. Similarly, no single shipping strategy fits all situations.
Therefore, you need to offer your customers multiple shipping options in your Woo store. And there’s the most desired option – free shipping, which 74% of customers expect or look for.
We will walk you through all these WooCommerce shipping methods in the following sections.
Step 1: WooCommerce Shipping Integration Using Default Options
Now, we will discuss step by step how to integrate shipping with WooCommerce using existing options.
First things first, you need to set the location where you are selling from and to or capable of shipping your products. Login to your WordPress admin panel and go to WooCommerce >> Settings>>General.
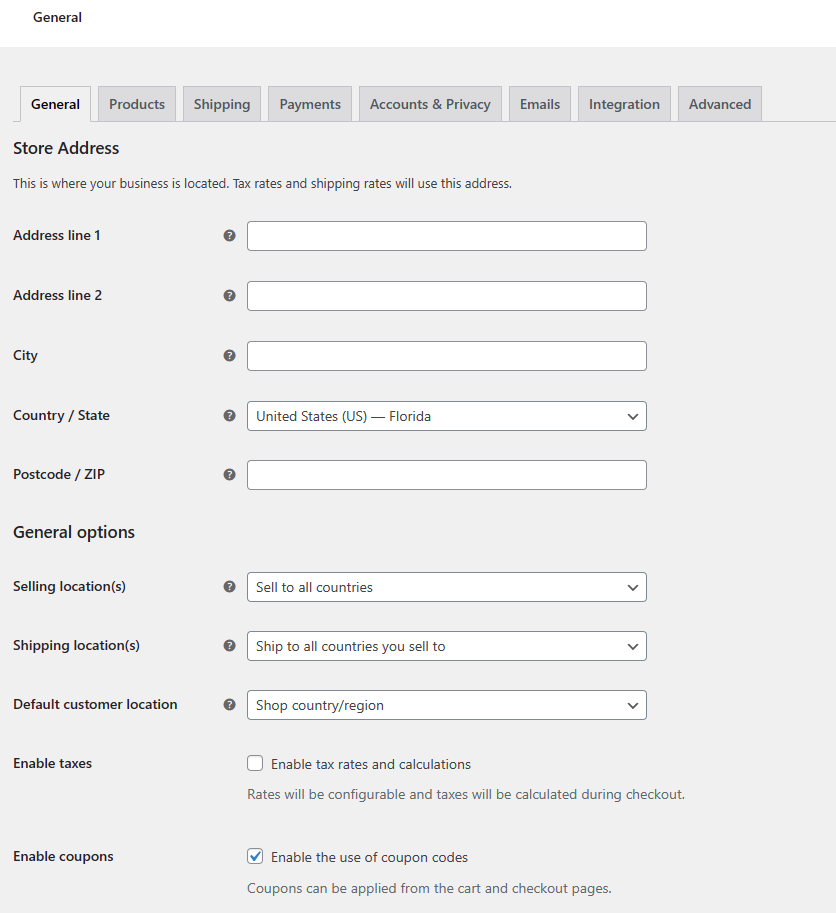
Input your store’s address. This is your store’s default location from where shipping costs will be calculated.
Under General>>General Options, you will find the following settings.
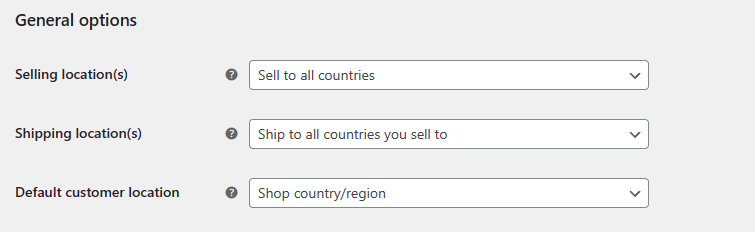
- Selling location(s)
- Shipping location(s)
- Default customer location
Selling location(s): Allows you to set which countries you are willing to sell your products to. You can select all countries or exclude some.
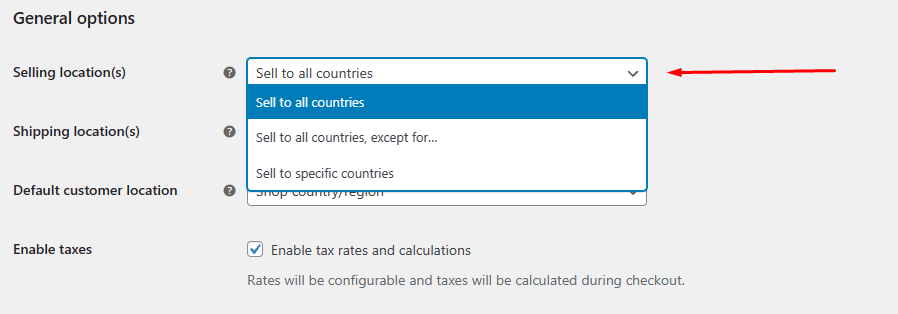
You can also select specific countries.
Shipping location(s): These are the available options –

- Ship to all countries you sell to
- Ship to all countries
- Ship to specific countries only
- Disable shipping and shipping calculations
You can ship to the countries you are selling, which you selected in the previous section. You can choose to exclude some countries or disable shipping calculations.
Generally, you would want to ship to countries you are willing to sell. In addition, you can offer local pickups from nearby locations to your store or warehouse. We will cover this later in the article.
Default customer location: The available options are –
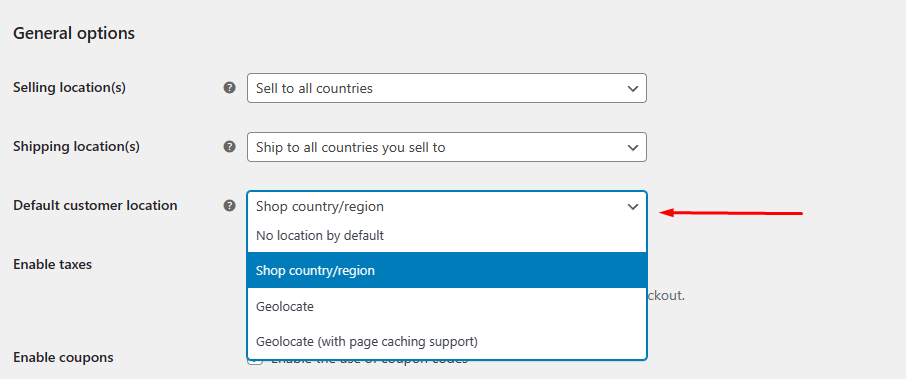
- No location by default
- Shop base address
- Geolocate
- Geolocate (with page caching support)
If you don’t set a location, the WooCommerce shipping calculator will calculate based on the customer’s address they put manually. When you select Geolocate, WooCommerce will detect your customer’s location automatically based on their IP address.
How does it work?
WooCommerce will periodically download a database called MaxMind GeoLite Database to your wp-content directory. This database helps WooCommerce automatically detect your customer’s location and calculate shipping costs.
Step 2: Configuring WooCommerce Shipping Settings
Now, we can jump to the Shipping settings and start the WooCommerce shipping setup.
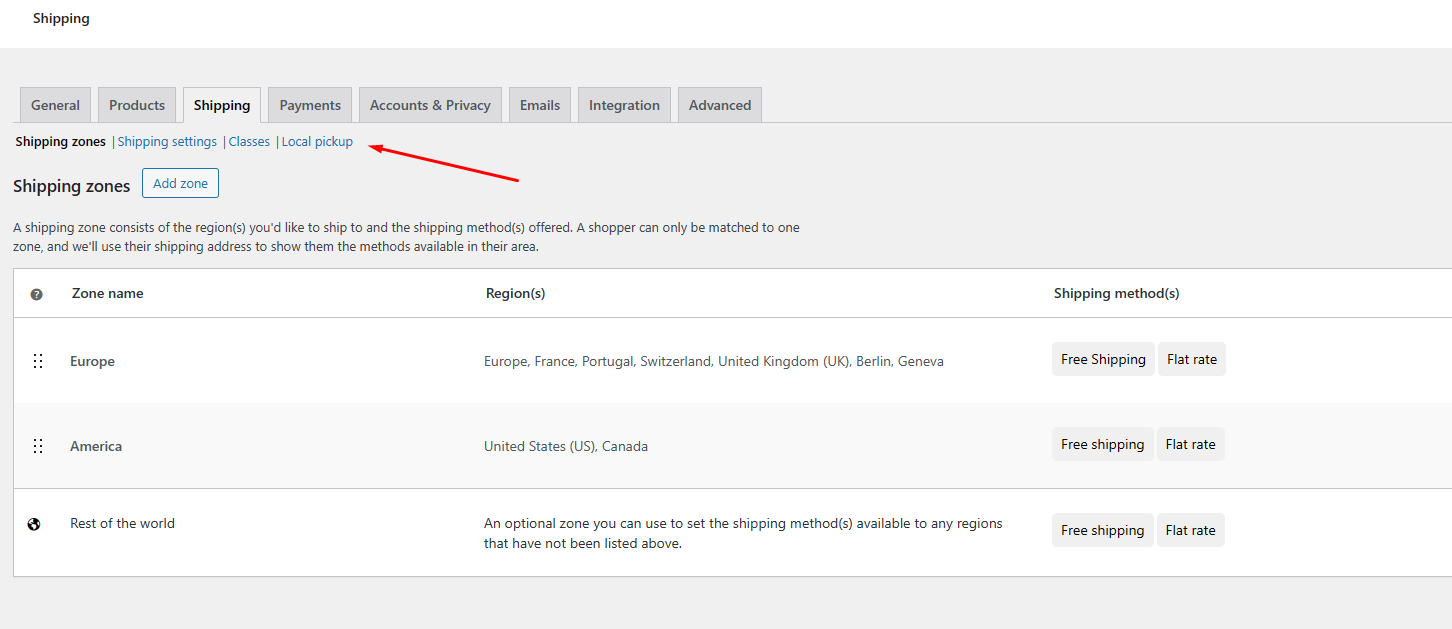
Go to WooCommerce >> Settings and click the Shipping tab.
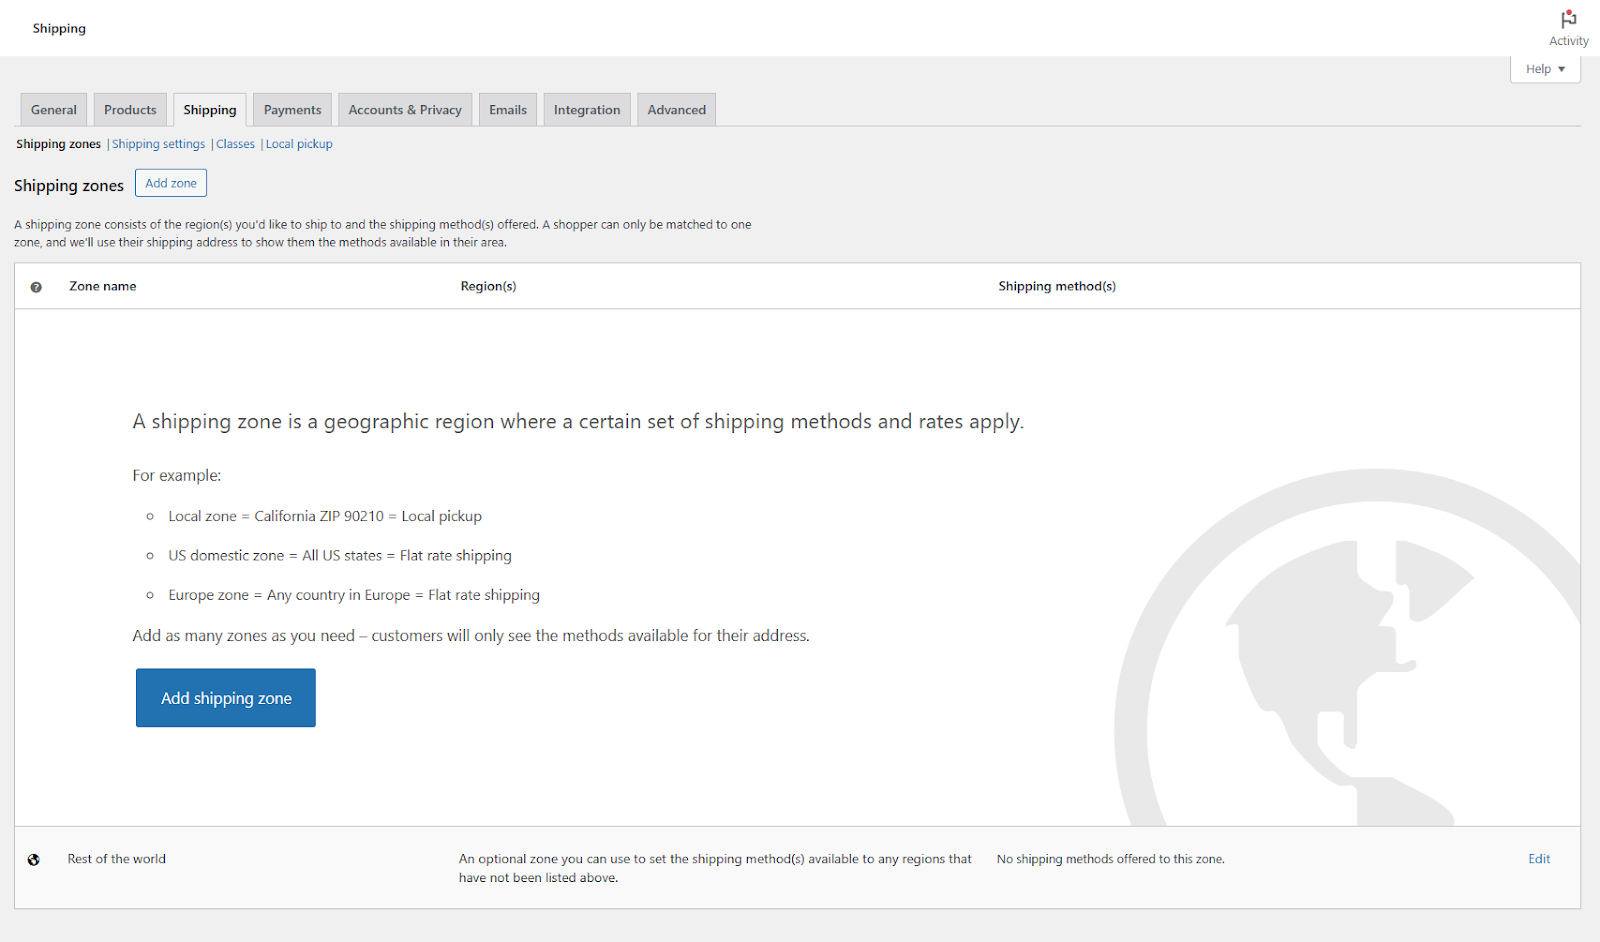
You will find four top-tier menus there –
- Shipping zones
- Shipping settings
- Classes
- Local Pickup
Let’s start with Shipping Settings.
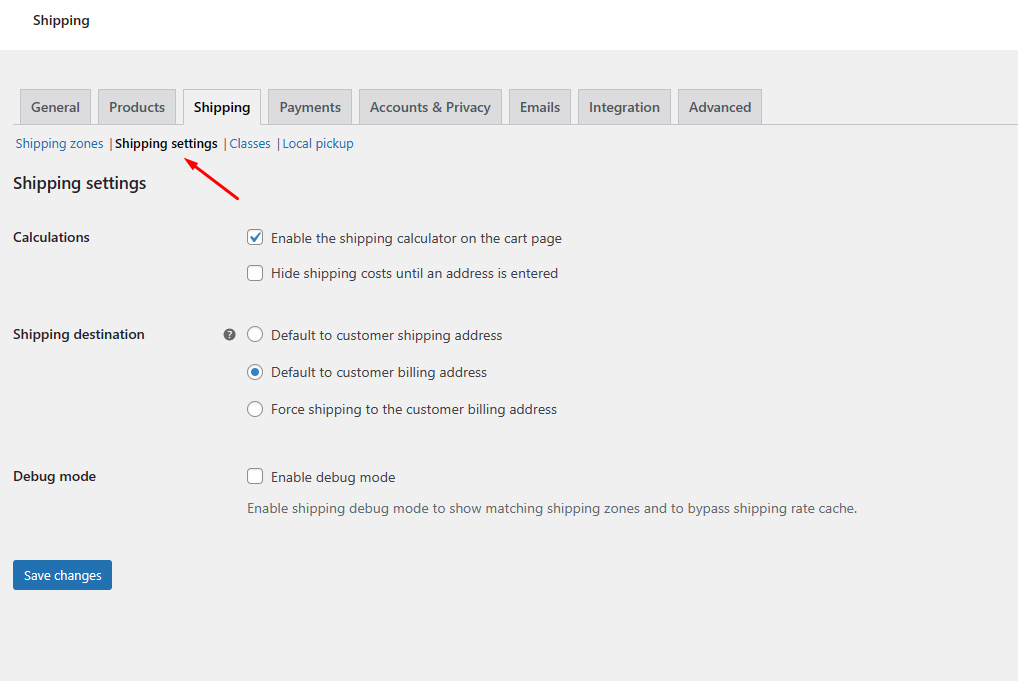
This page allows you to enable shipping calculators on your cart pages. Along with that, you can set the default shipping address.
Here’s what you can set it to –
- Default to customer shipping address
- Default to customer billing address
- Force shipping to the customer billing address
In addition, you can enable the Debug mode. This feature does two main things –
- Shows matching shipping zones: This means it helps identify which areas (zones) are covered by certain shipping options. It’s like turning on a map to see where your packages can go.
- Bypass shipping rate cache: Normally, when you visit a website, it saves some information (like shipping rates) to make things load faster next time. Debug mode skips this saving step temporarily. It’s like peeking at the real-time shipping prices instead of relying on saved ones.
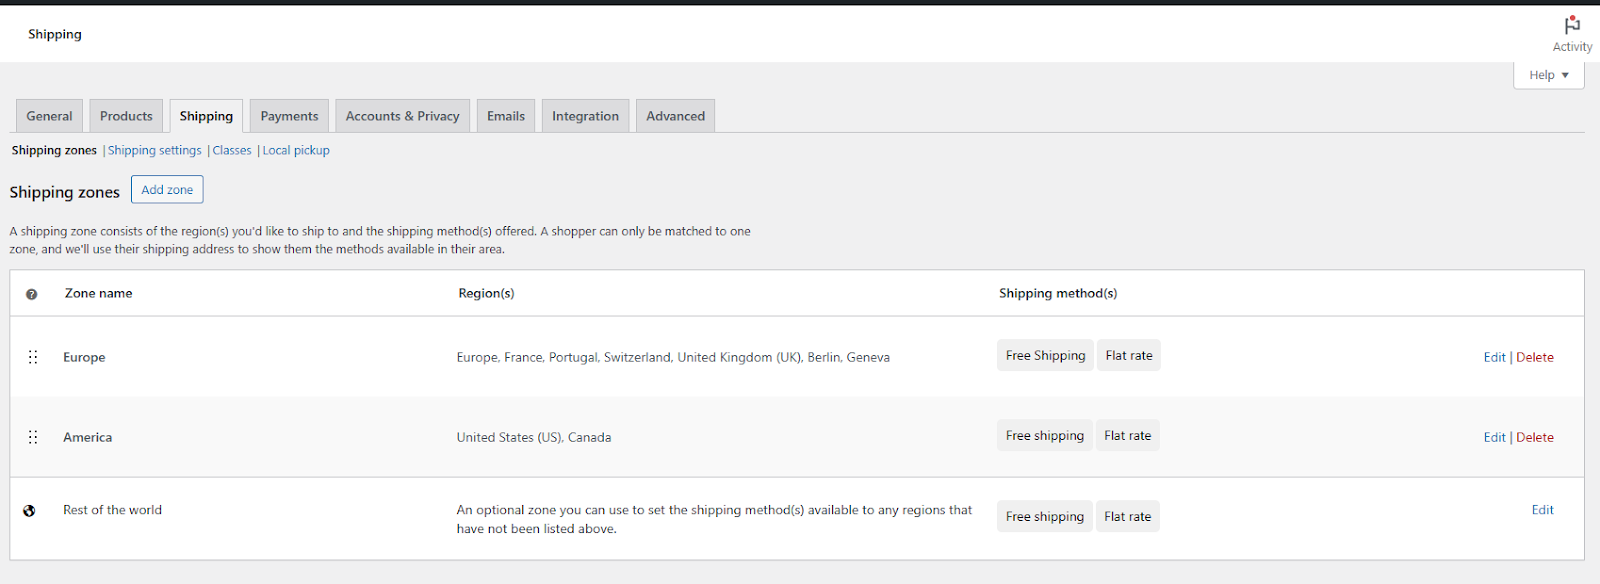
Step 3: Creating Shipping zones
Now that we have our general settings configured, let’s define the geographical areas you ship to by creating shipping zones. These zones will allow you to set specific shipping rates and methods for different regions.
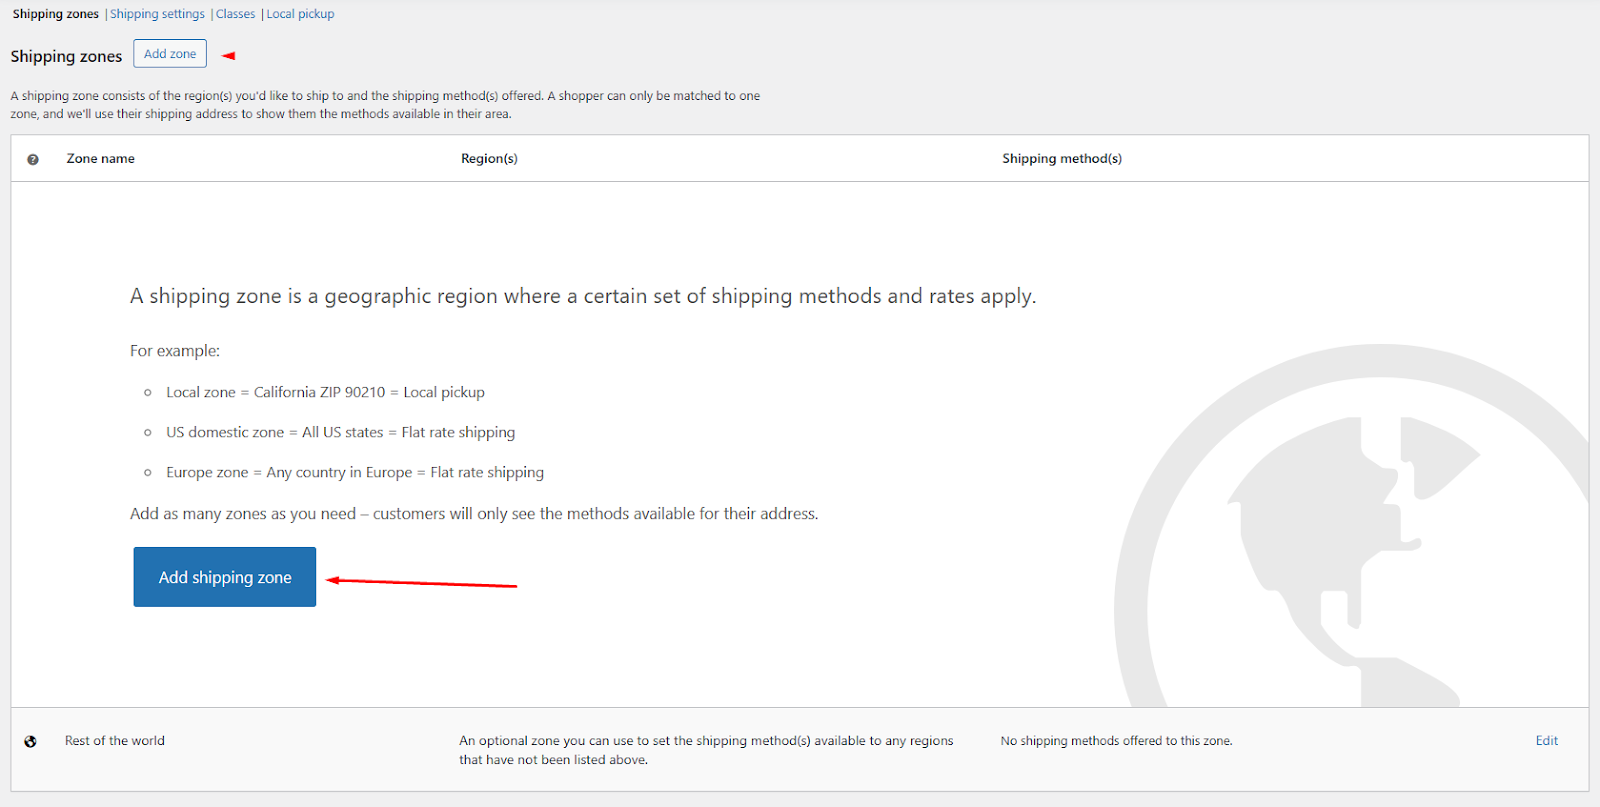
In simple words, shipping zone means the area/country/part of the country/world where you can ship your products to.
For example, your store is from America, but you can also ship products to Europe. So, you have two shipping zones – Europe and America.
Let’s check it out practically. Click on the Add Shipping Zone button.
Here are the available settings.
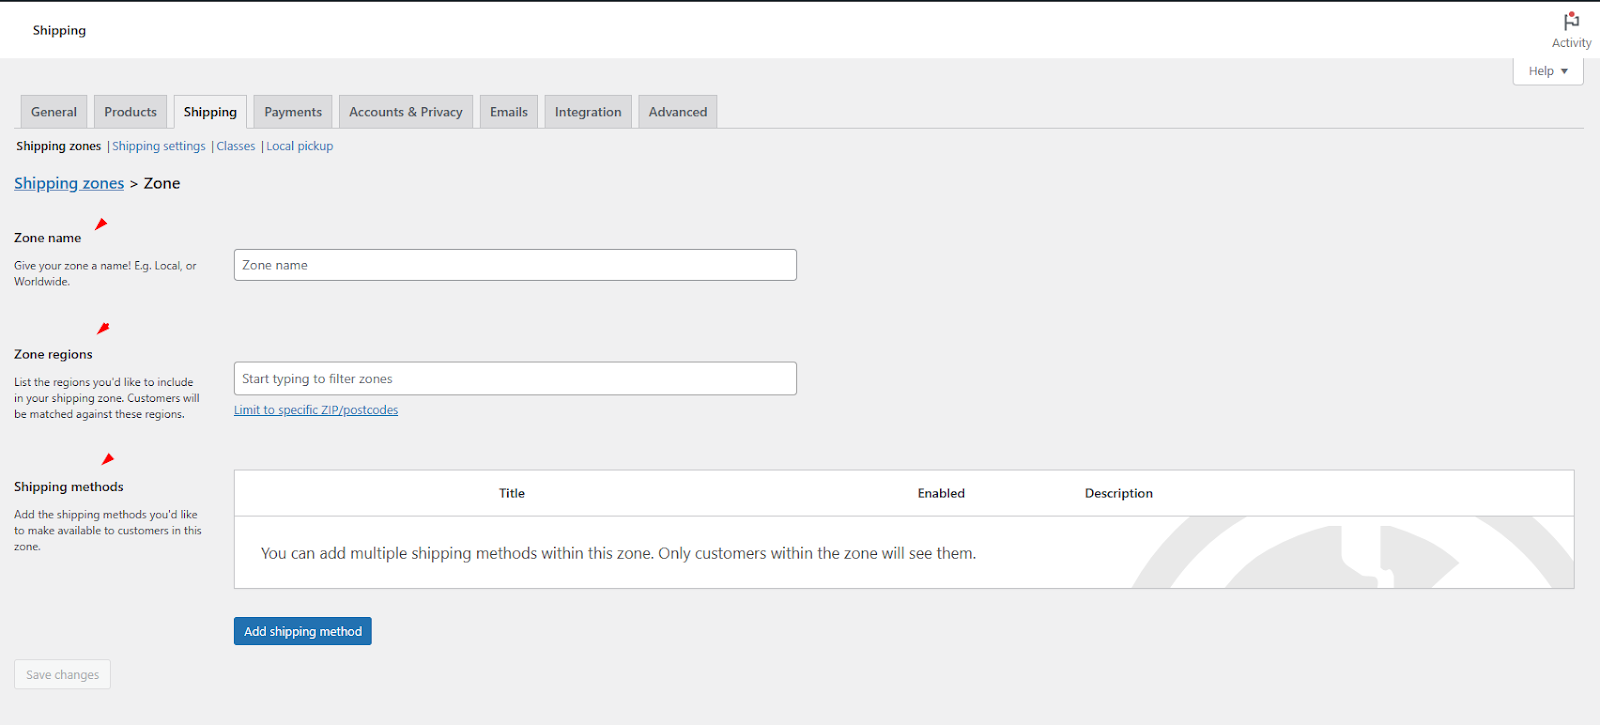
- Zone name – Set your zone name.
- Zone regions – Select the location for this region.
- Shipping methods – Add shipping methods and WooCommerce shipping price for this particular zone.
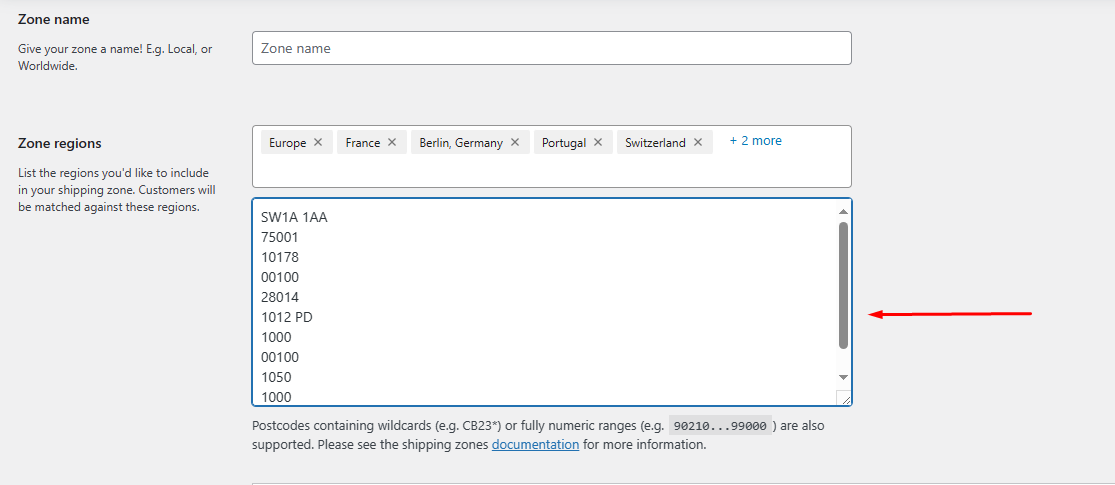
From the Shipping regions dropdown, you can filter your locations by continent, country, and city.
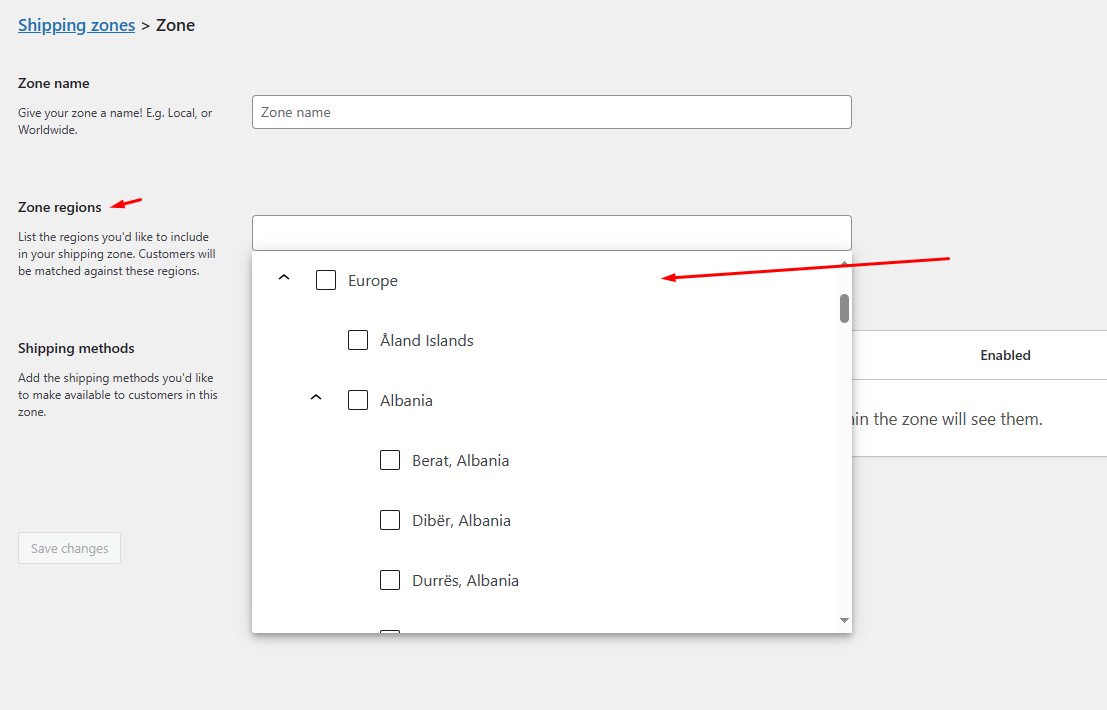
You can also set or limit your WordPress WooCommerce shipping locations by zip codes.
Step 4: Adding WooCommerce Shipping Methods to Zones
Click on the Add Shipping Method button to get started.
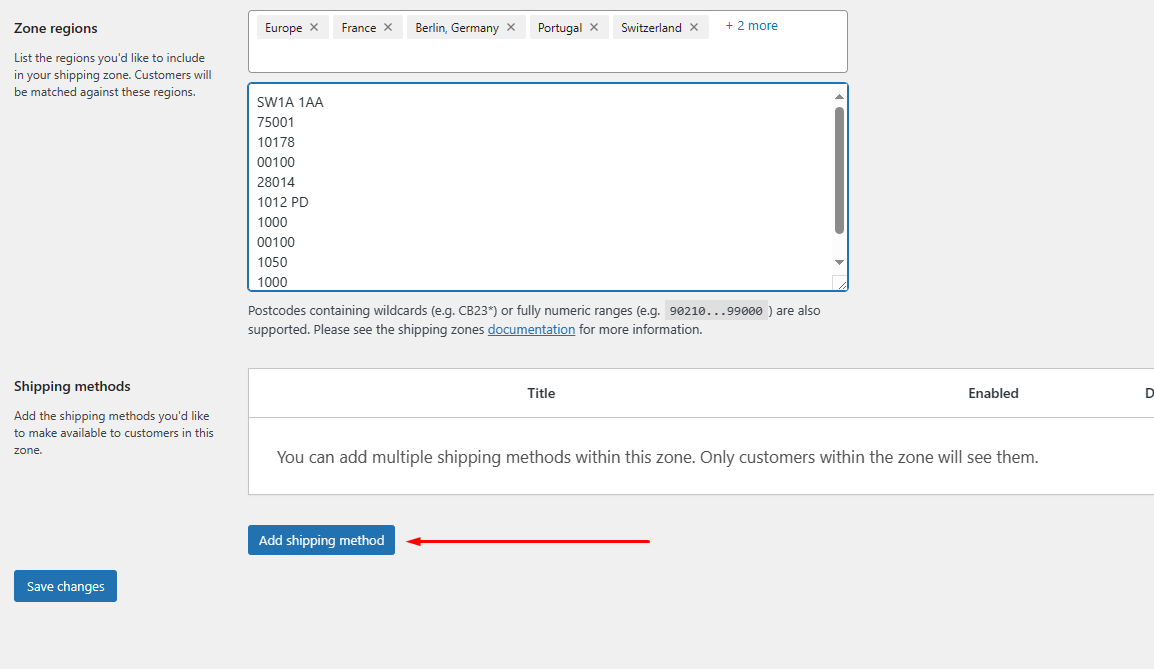
The following window will pop up with available WooCommerce shipping methods.
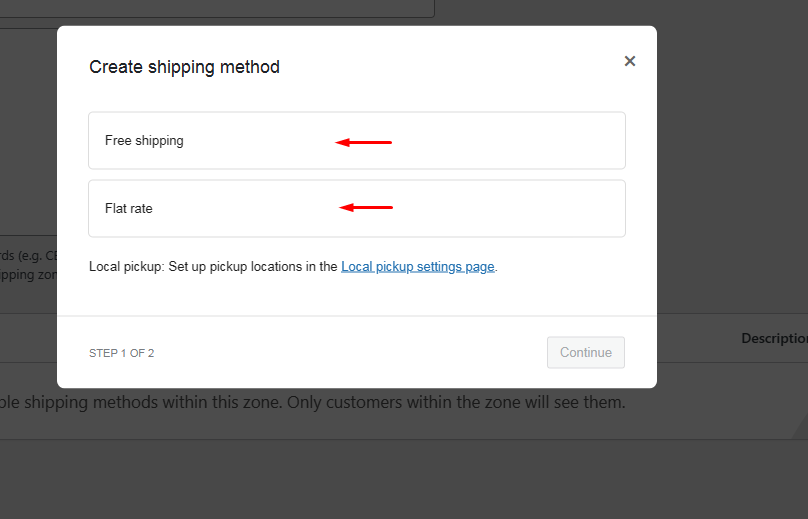
In previous versions of WooCommerce, you would see an additional local pickup option.
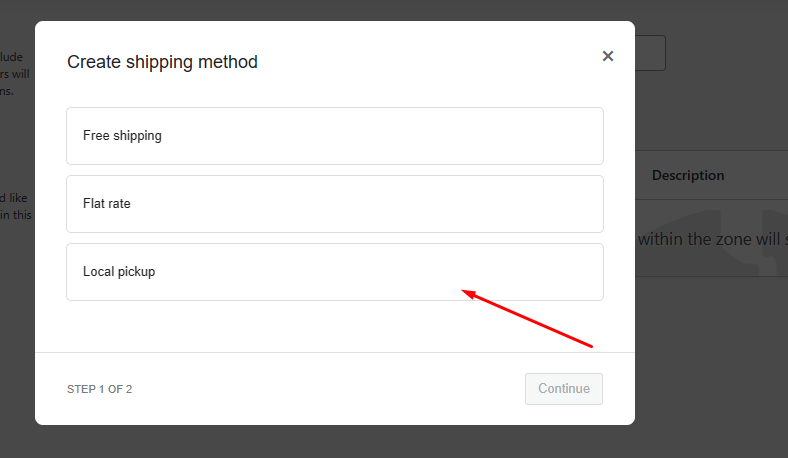
However, it has now been moved to a separate window.
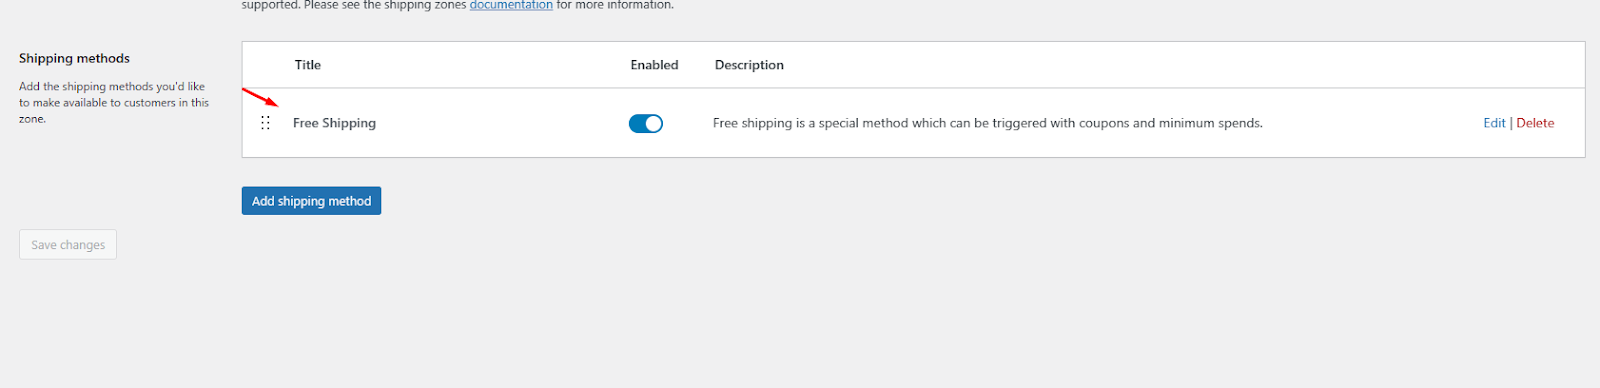
Adding Free Shipping Method
Let’s start with Free Shipping.
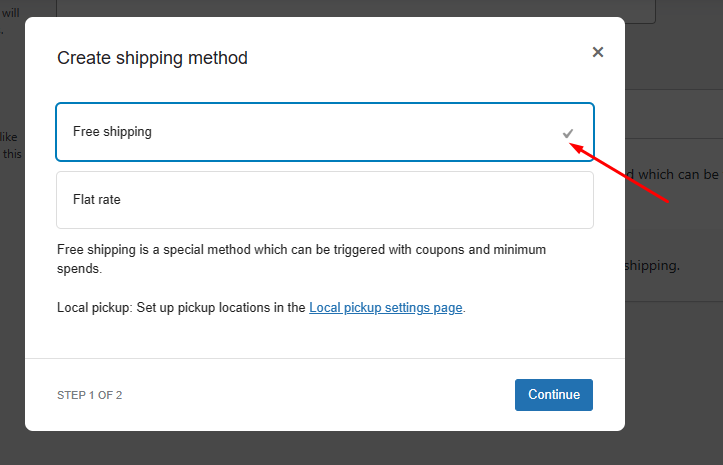
Click Continue to configure this method.
From the next window, you can set one of the following conditions to apply free shipping to the customer’s orders.
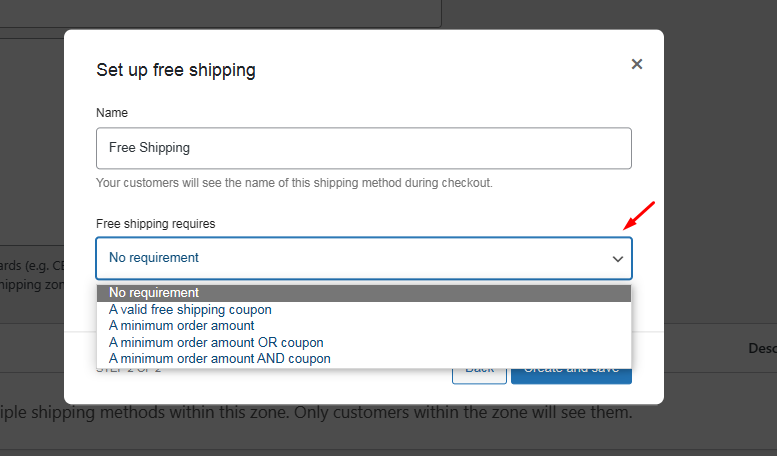
- No requirement: Customers get free shipping automatically without needing to do anything special. It’s like a gift with purchase, no strings attached.
- A valid free shipping coupon: Customers need to have a specific free shipping coupon WooCommerce code to qualify for free shipping. They enter the code during checkout to unlock free shipping.
- A minimum order amount: Customers get free shipping only if their total order amount meets a certain minimum. It’s like saying, “Spend this much, and shipping’s on us!”
- A valid free shipping coupon OR a minimum order amount: Customers can either use a specific coupon code or meet a minimum order amount to qualify for free shipping.
- A valid free shipping coupon AND a minimum order amount: Customers must meet both conditions: they need to have a specific coupon code, and their order total must also reach a minimum amount. It’s a bit like a double-check to ensure they’re eligible for free shipping.
Let’s try out the “A minimum order amount OR coupon” option. We have set free shipping at $200, which means the customer’s total order value must be at least $200 to enjoy free shipping.
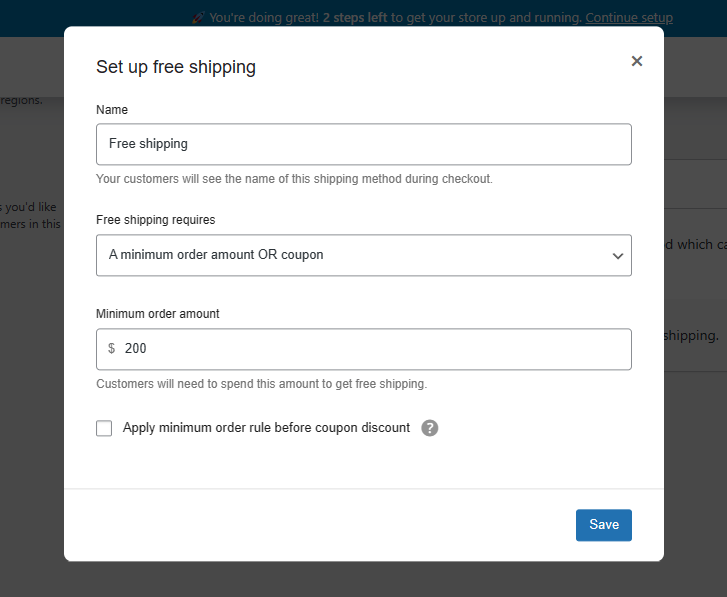
If you check the “Apply minimum order rule before coupon discount,” it means the store will look at the customer’s order total before applying any discounts to determine if they qualify for free shipping. So, even if a coupon reduces the total to below $200, customers still get free shipping if the pre-discount order amount meets the minimum requirement.
Click on create and save.
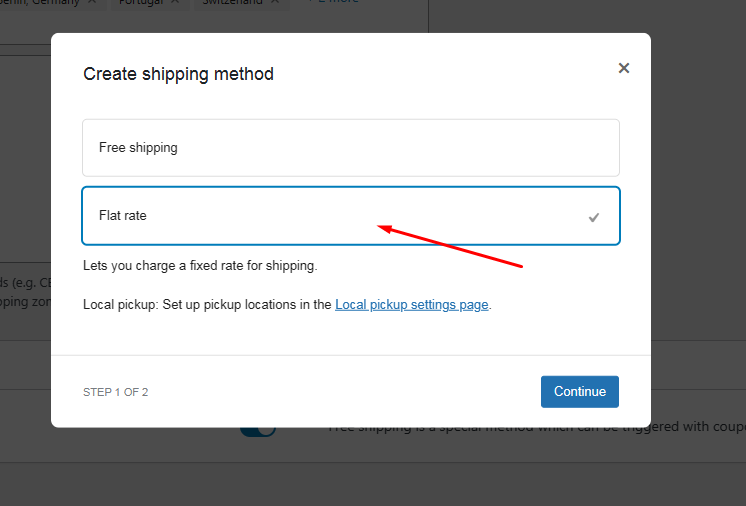
Adding Flat Rate WooCommerce Shipping Method
Click on the Add Shipping Zone button again, and this time, select Flat Rate.
Here are the available settings –
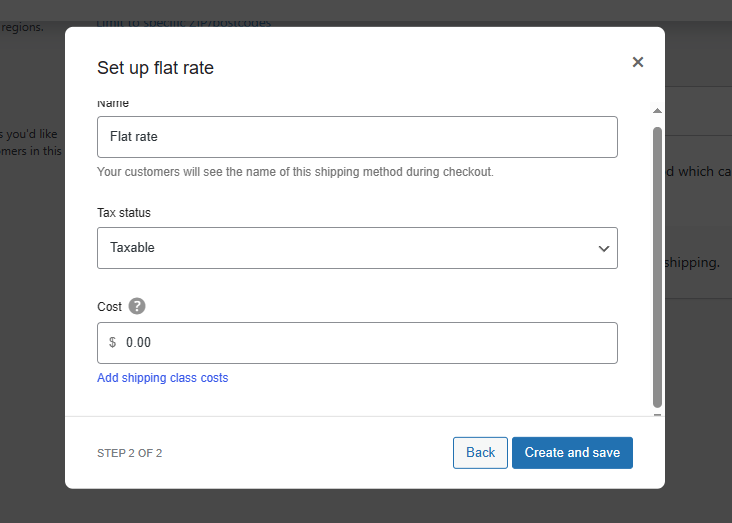
Name: This is the name that will appear to your customers during checkout. For example, you might call it “Standard Shipping.”
Tax status: This indicates whether the WooCommerce shipping cost is taxable. If it’s taxable, the store will add taxes to the shipping cost. If not, taxes will not be applied.
Cost: This is where you enter the per-order shipping charge in WooCommerce. For example, if you want to charge $10.00 for shipping regardless of the number of items ordered, you would enter “10.00” here.
Add shipping class costs: This feature allows you to add extra costs based on shipping classes. Shipping classes are used to group products with similar shipping requirements. For instance, if you have a “Heavy Items” shipping class with an extra $2.00 cost, and a customer buys two heavy items, they would pay an additional $4.00 for shipping.
Additional variables for Flat Rate Shipping
You have the power to create complex pricing rules for customer orders by using variable values. These values can dynamically adjust shipping costs based on factors like the number of items in the cart and the total order value.
Here are the placeholder options you can use –
1. [qty]:
- This represents the quantity of items in the customer’s shopping cart.
- For example, if a customer has 3 items in their cart, [qty] will be replaced by 3.
2. [fee percent=”numeric value”]:
- This placeholder calculates a shipping fee based on a percentage of the total order cost.
- For instance, if you set [fee percent=”10″], it means the shipping fee will be 10% of the total order cost.
3. min_fee=”numeric value”:
- This allows you to specify a minimum shipping fee to ensure that you never charge too little for shipping.
- For example, if you set min_fee=”5″, it means that even if the calculated shipping fee is less than $5, it will be bumped up to $5.
4. max_fee=”numeric value”:
- Conversely, this sets a maximum shipping fee to prevent overcharging.
- For instance, if you set max_fee=”20″, it means that even if the calculated shipping fee exceeds $20, it will be capped at $20.
Seems complex? No worries. Let us explain it with examples.
Flat Rate Setting Examples
Let’s create a few examples to better understand how flat rate variables work.
Example of Flat Rate for All Orders
Cost field data – $5.00
Explanation:
- This means every order, regardless of size or value, will have a flat shipping rate of $5.00.
Example of Quantity-Based Flat Rate
Cost field formula – 5 + (1 * [qty])
Suppose you’re selling clothing items online and want to charge a flat rate for shipping based on the number of items in the cart.
Your standard flat rate is $5, and you want to add $1 for each item in the cart.
Using the formula 5 + (1 * [qty]), the shipping cost for different quantities of items would be:
- 1 item: $5 + (1 * 1) = $6
- 2 items: $5 + (1 * 2) = $7
- 3 items: $5 + (1 * 3) = $8
Example of Percentage-Based Flat Rate:
Cost field formula –8 + [fee percent=”5″]
Let’s say you operate an online electronics store and want to charge a flat rate plus a percentage of the order total.
Your standard flat rate is $8, and you want to add a 5% shipping fee based on the order total.
Using the formula 8 + [fee percent=”5″], the shipping cost for different order totals would be:
- Order Total: $100.00, Shipping Cost: $8 + (5% of $100) = $13.00
- Order Total: $200.00, Shipping Cost: $8 + (5% of $200) = $18.00
- Order Total: $300.00, Shipping Cost: $8 + (5% of $300) = $23.00
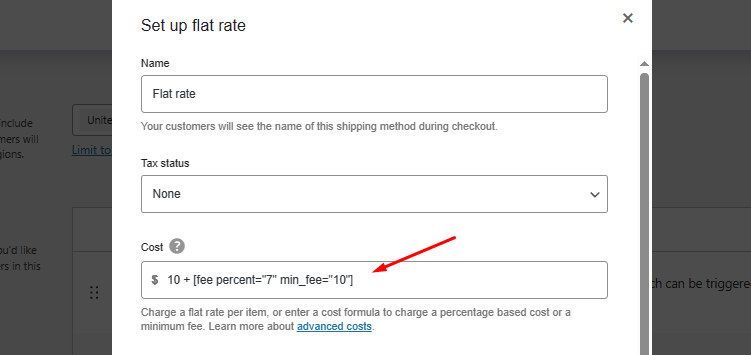
Example of Percentage-Based Flat Rate with Minimum Fee
Cost field formula – 10 + [fee percent=”7″ min_fee=”10″]
Let’s continue with the electronics store example, but now you want to ensure a minimum shipping fee of $10, even for smaller orders.
Your standard flat rate is $10, and you want to add a 7% shipping fee based on the order total.
Using the formula 10 + [fee percent=”7″ min_fee=”10″], the shipping cost for different order totals would be:
- Order Total: $150.00, Shipping Cost: $10 + (7% of $150) = $20.50 (but since it’s above the minimum, it remains $20.50)
- Order Total: $50.00, Shipping Cost: $10 + (7% of $50) = $13.50 (but since it’s below the minimum, it’s adjusted to $10.00)
- Order Total: $300.00, Shipping Cost: $10 + (7% of $300) = $31.00
I hope you get the idea behind setting different flat-rate shipping costs now. Create and save your settings. Also, save your Zone to apply these changes.
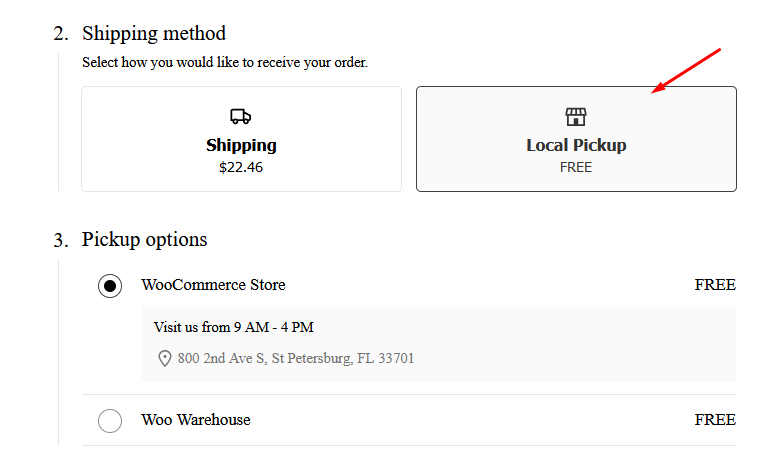
Adding Local Pickup Shipping Method
By enabling local pickup, you can allow your customers to receive the ordered products from a physical store/warehouse location. Previously this method was available under zones along with flat rate and free shipping. Now it has a dedicated window.
If by any chance, you don’t see the Local pickup settings in an individual tab, you will find them under regular shipping methods. Click on the link to visit the settings for local pickup.
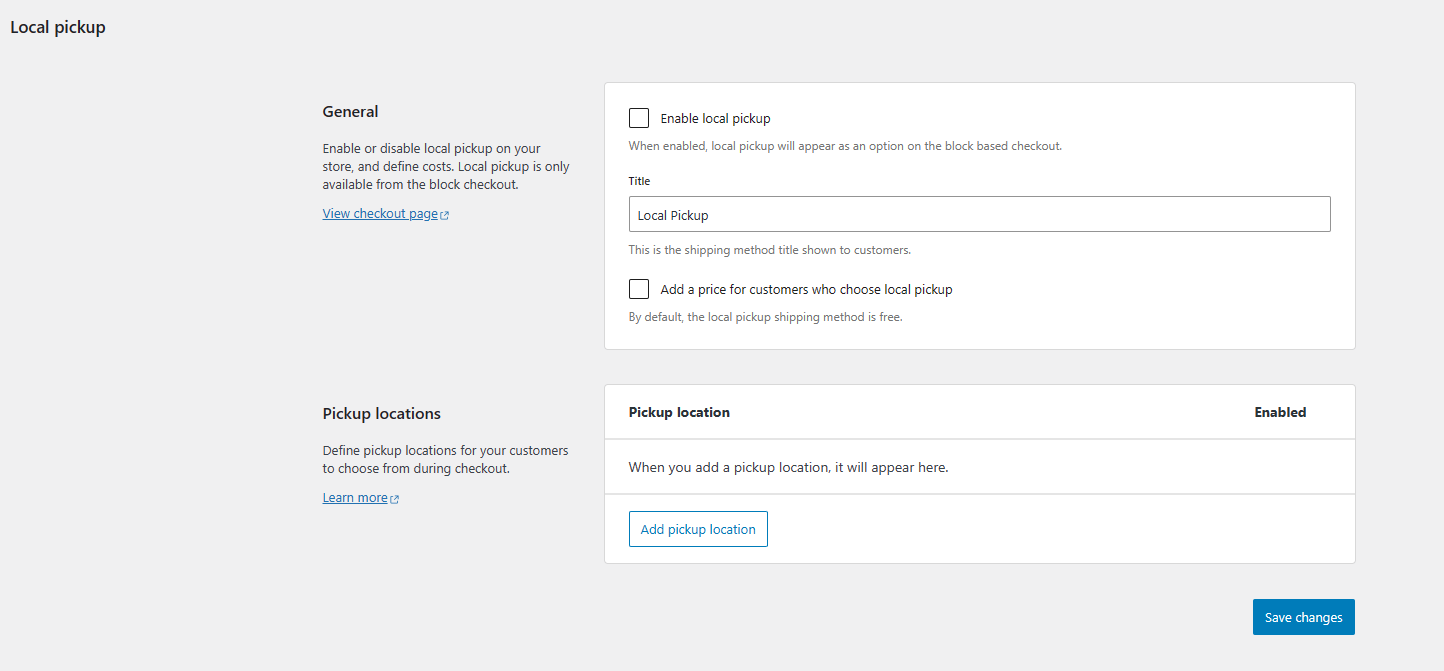
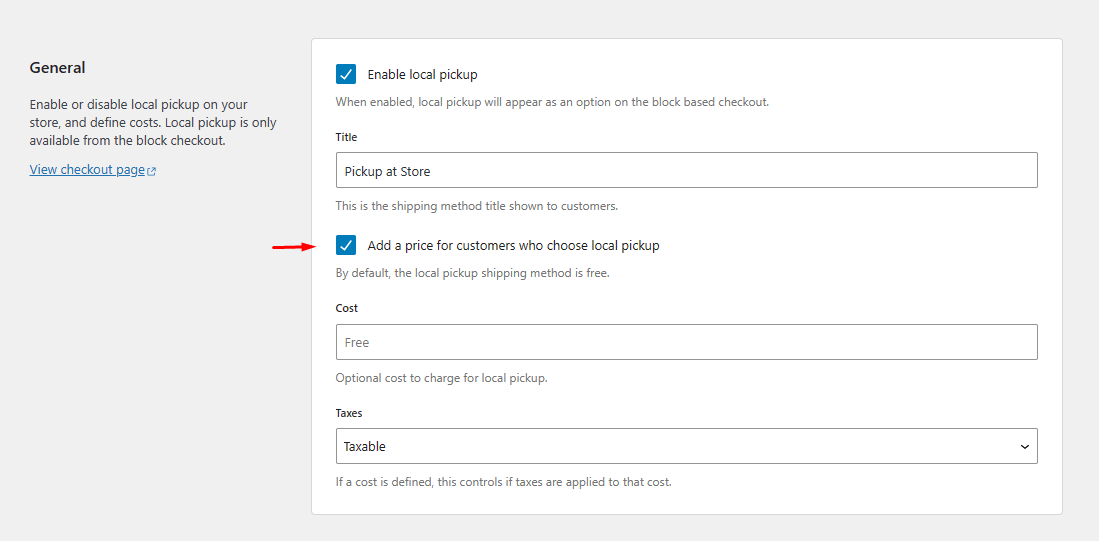
Checkmark to enable the method and set the name that your customers will see on the checkout page.
By default, WooCommerce will set the local pickup shipping method free of cost. However, you can choose to set a cost for this method as well.
From the Pickup Locations section, you can set your location from where your customers will go to receive the packages.
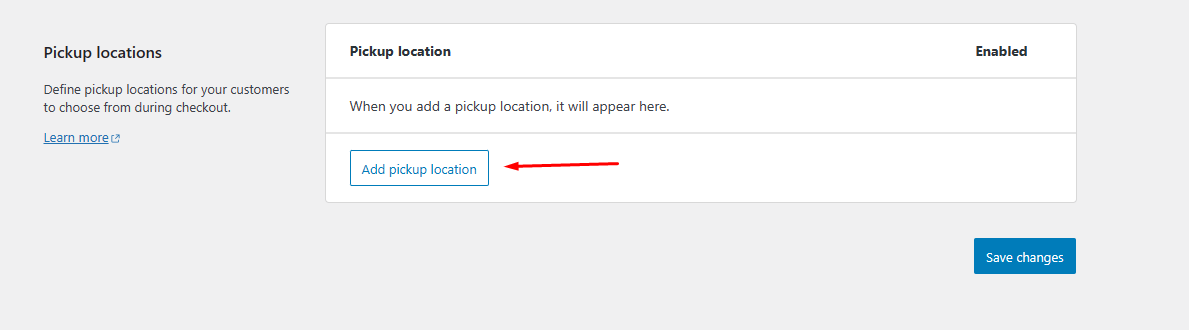
Input your location details in the following window.
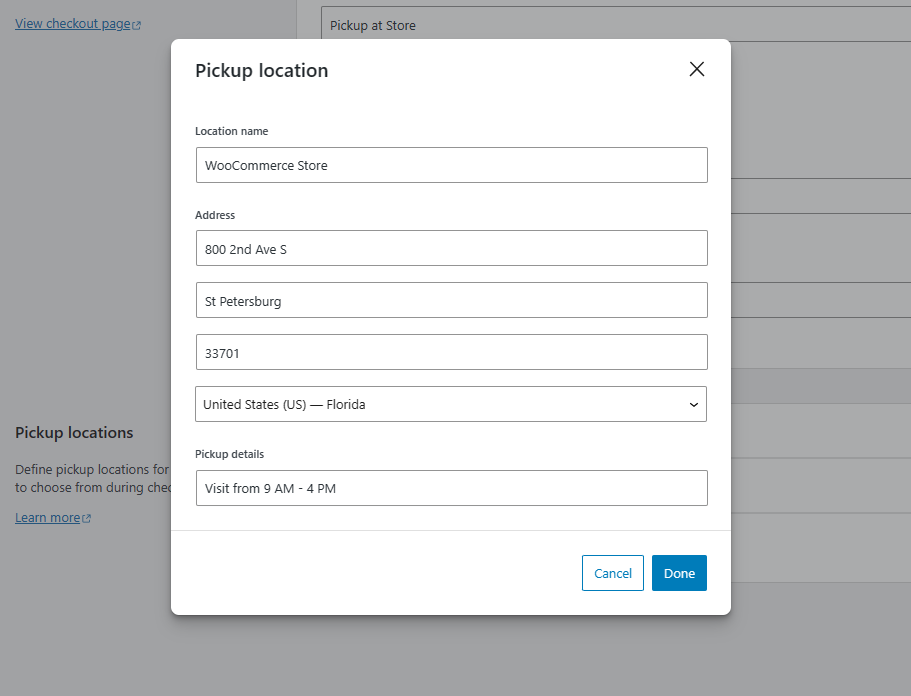
If you have multiple stores or warehouses, or pickup locations, you can set it up from this page.

Remember to save your changes for all your WooCommerce shipping settings to take effect.
Problem with WooCommerce’s New Local Pickup Settings
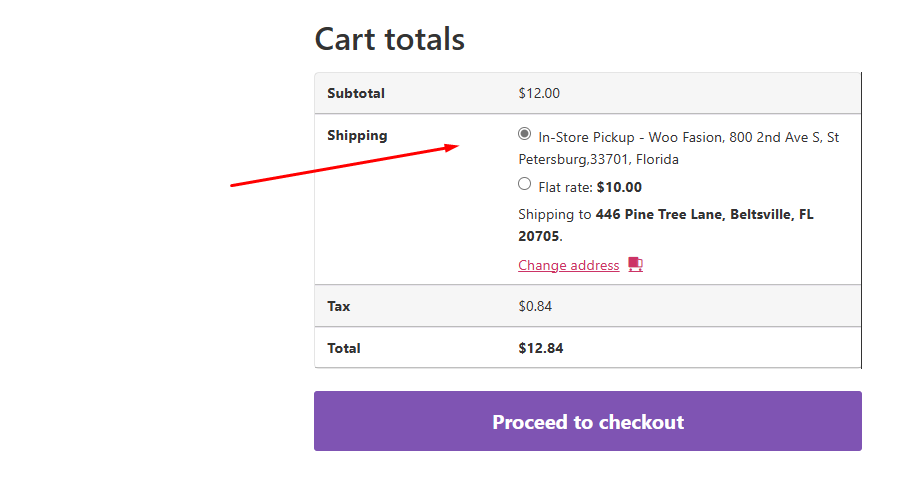
We found a major flaw in the new local pickup settings of WooCommerce Shipping options. Once you set a location, it will appear on all customer’s carts and checkout pages no matter where they are located.
For example, if your local pickup is in Florida, people from London, UK, cannot possibly pick up the products from your store location. Therefore, displaying the local pickup option to them is useless.
As we have mentioned already, in the previous WooCommerce versions, you were able to add a local pickup method to any shipping zone.

You could create a specific zone for local pickups.
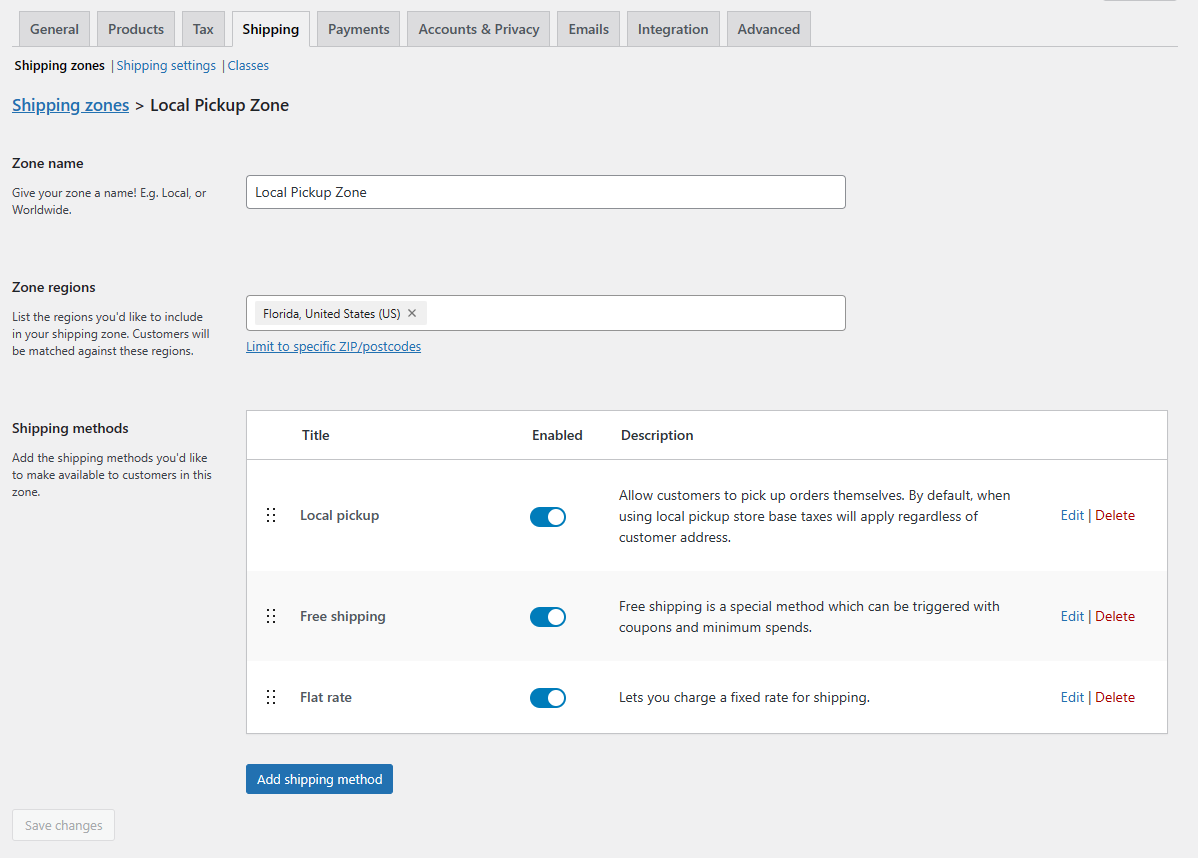
That way, the Local Pickup WooCommerce shipping option would appear only when the customer’s address matches the local pickup zone area.
However, despite allowing you to customize your local pickup and WooCommerce shipping methods using the block editor, the new local settings don’t seem to work on area-specific conditional logic.
This is a letdown for the users who want to use default shipping integration for WooCommerce. You will need to use a third-party plugin to apply conditional logic to your local pickup shipping method.
You can take a look at the practical example of how local pickup used to work based on area conditional logic in our previous article.
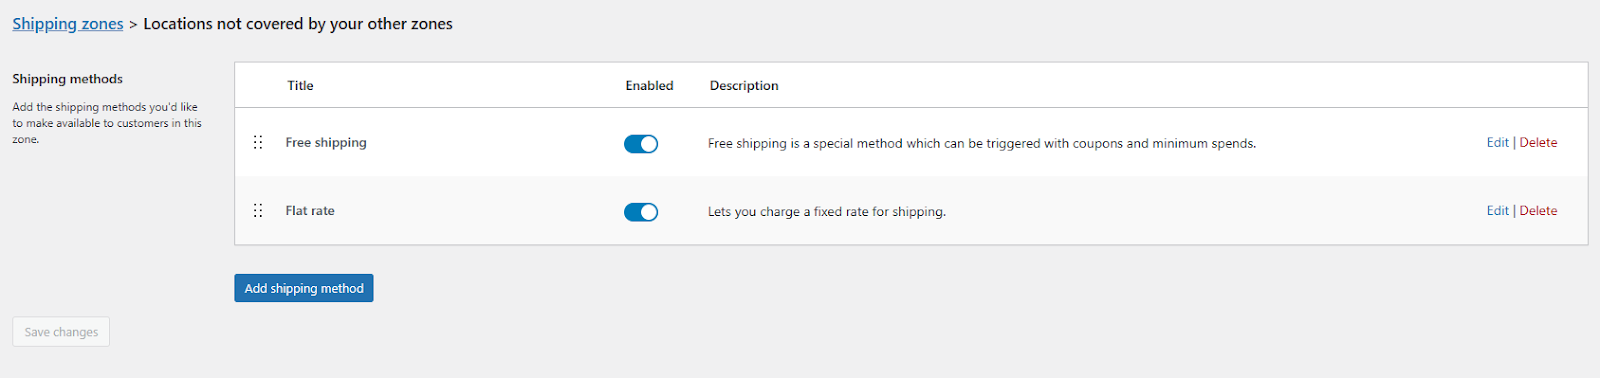
Step 5: Configuring Rest of the World WooCommerce Shipping Zone
After you add your primary zones, you need to define WooCommerce shipping zone for the rest of the world (previously known as – locations not covered by your other zones).
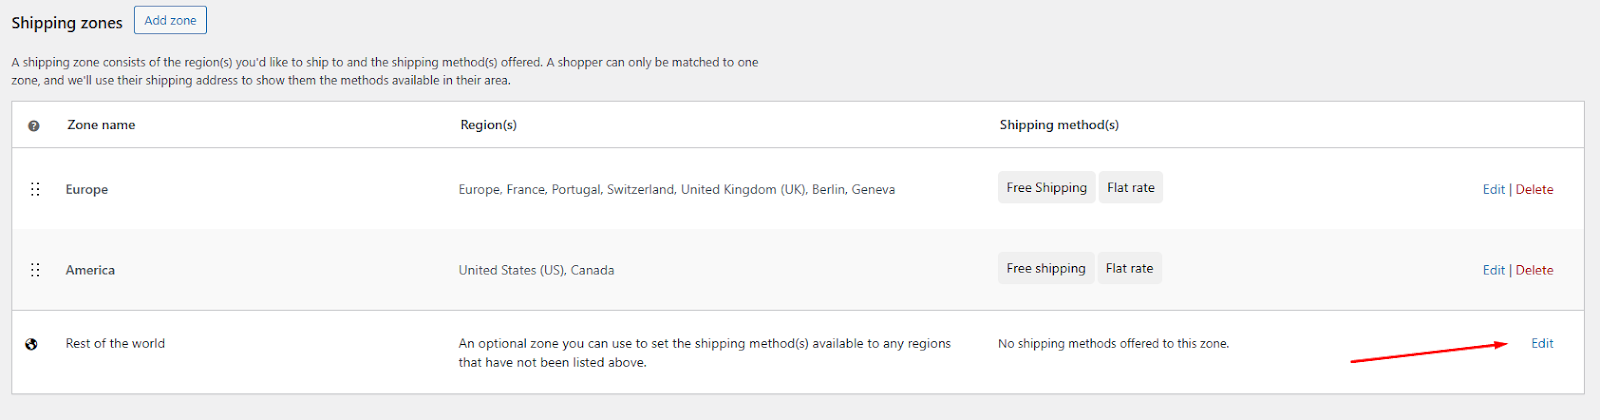
Click on the edit button from the Shipping Zones window.
The process is the same for adding shipping methods. We have added a $50 flat rate and a minimum of $500 worth of orders for free shipping.
After you set up all your zones, you can view/edit them from the Shipping Zones tab.
Step 6: Adding WooCommerce Shipping Classes (Optional)
Shipping classes allow you to apply an extra layer of control to your WooCommerce shipping strategy. They enable you to group your products based on similar characteristics, most commonly size or weight, and apply specific shipping costs for each class.
This can be particularly beneficial if you have a wide variety of products with varying shipping needs. For example, some of your products are heavy items and require more expensive shipping options. You can group them under a specific WooCommerce shipping class and rate them appropriately for your customers.
Shipping classes are generally applied with a flat-rate shipping method. Let’s say you run an online store selling various items, including bulky furniture and small accessories.
With shipping classes, you can categorize these products into groups based on their size or weight. For instance, you might create two shipping classes: “Bulky Items” and “Small Items.”
Now, when a customer purchases a bulky piece of furniture, you can apply the “Bulky Items” shipping class to it. With Flat Rate Shipping, you can then set a specific flat rate cost for shipping bulky items.
On the other hand, if a customer buys a small accessory like a keychain, you can assign it the “Small Items” shipping class and set a different flat rate cost for shipping small items.
This allows you to tailor your shipping costs to match the characteristics of each product type, ensuring fair and accurate shipping charges for your customers.
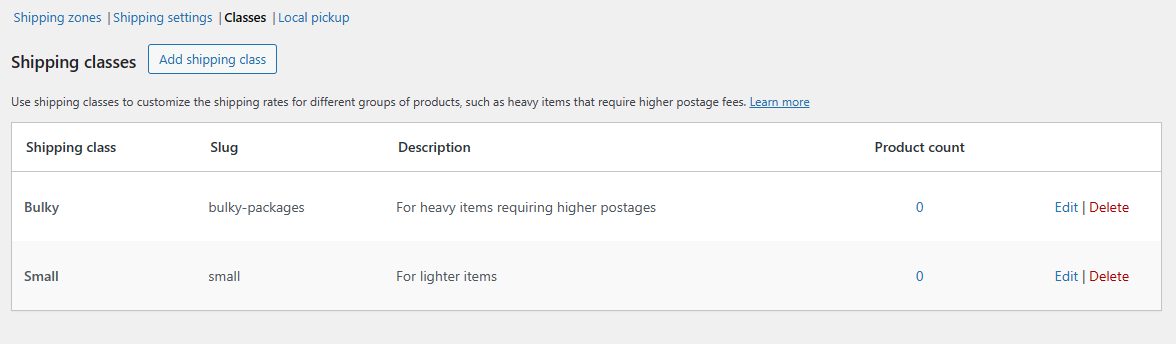
How to Create WooCommerce Shipping Classes
There is a dedicated window for shipping classes in the Shipping tab.
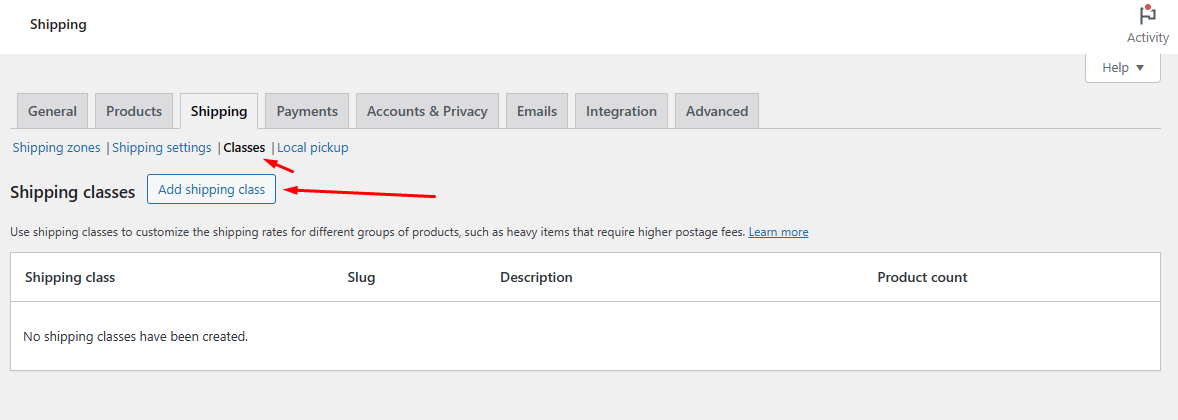
Click on the add shipping class button.
You will be given the following options to fill out.
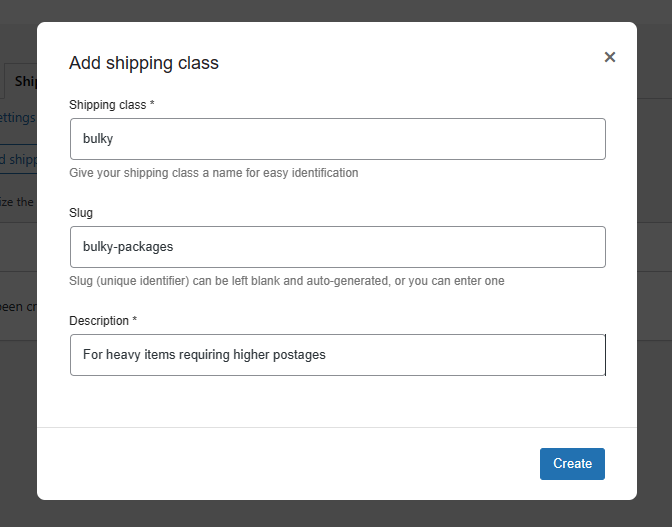
- Shipping class – Name your shipping class.
- Slug – It’s a unique identifier for your class. If you leave it blank, WooCommerce will auto-generate one for you.
- Description – Reminder why you are creating this class.
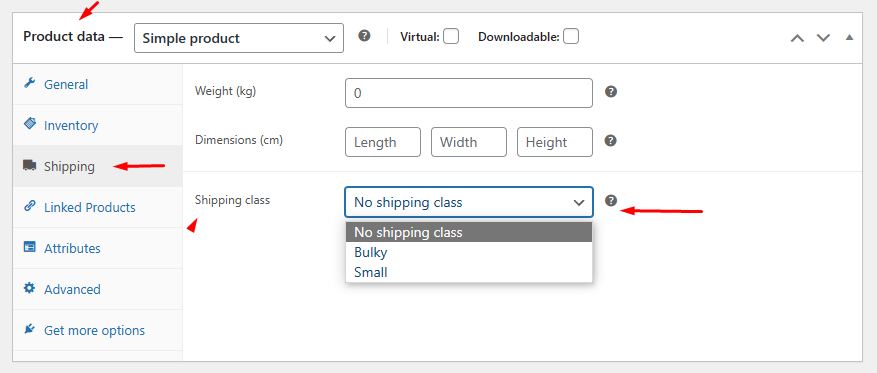
Now that you have created the classes, you need to assign products to them. To individually assign products, you can visit any product’s page and jump to Product Data >> Shipping and assign shipping class.
To assign a large number of products at once, you can filter your products from the All Products page and click on Quick Edit.
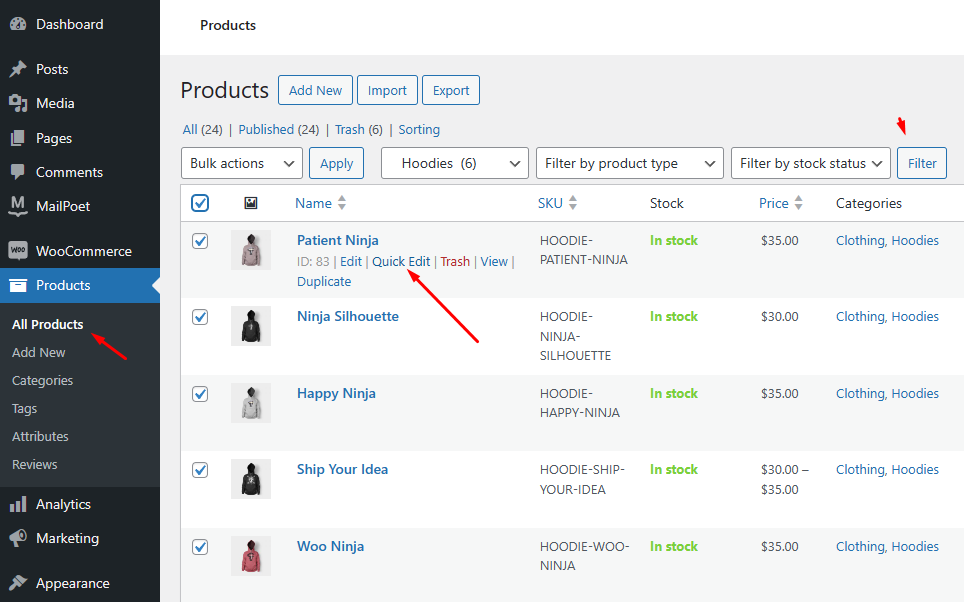
From the Quick Edit window, you can assign a shipping class to the entire selection of products.

Now, we need to apply the cost to these shipping classes. Go to your desired zone and click on the Flat rate option.
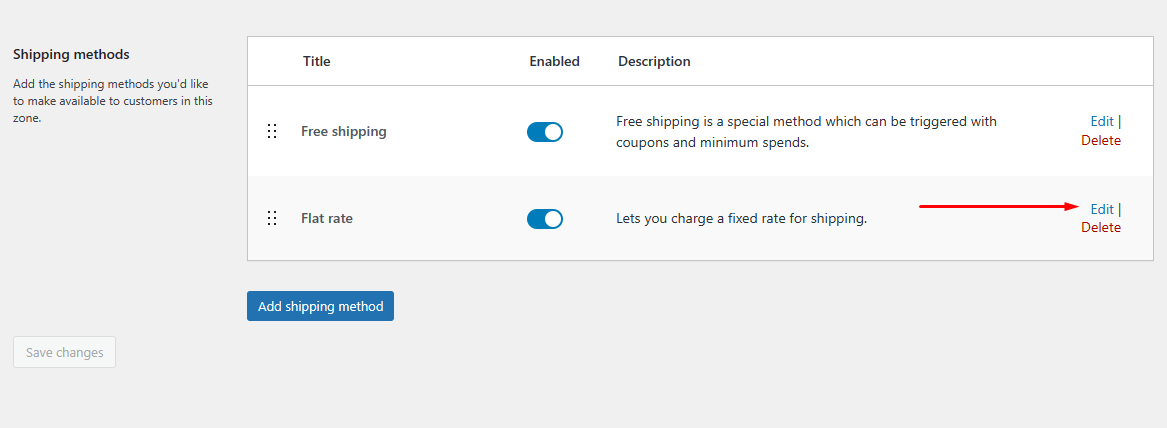
Scroll down to find the shipping class options.
From there, you can define your shipping class cost and calculation type.
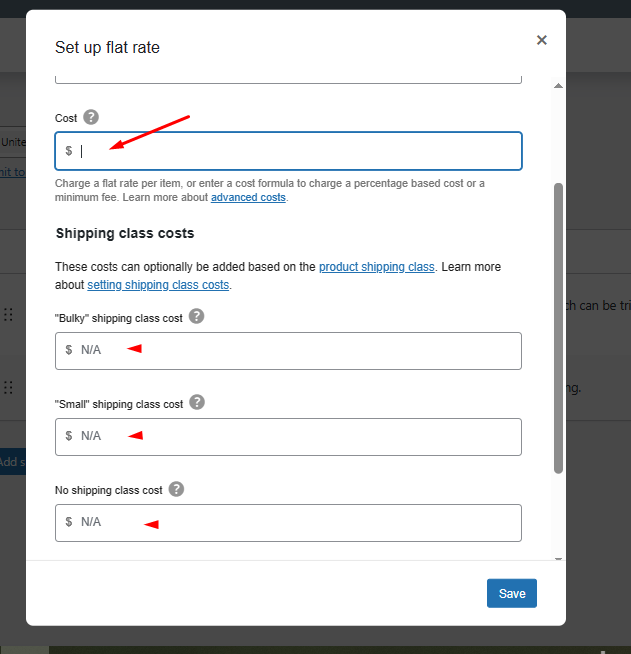
Setting Shipping Class Costs
Let us explain the fields. Each shipping class has a cost field associated with it.
For products not assigned to any category, there’s a field called “no shipping class cost.” The costs you enter here are added to the primary cost field at the top of the Flat Rate WooCommerce shipping configuration form.
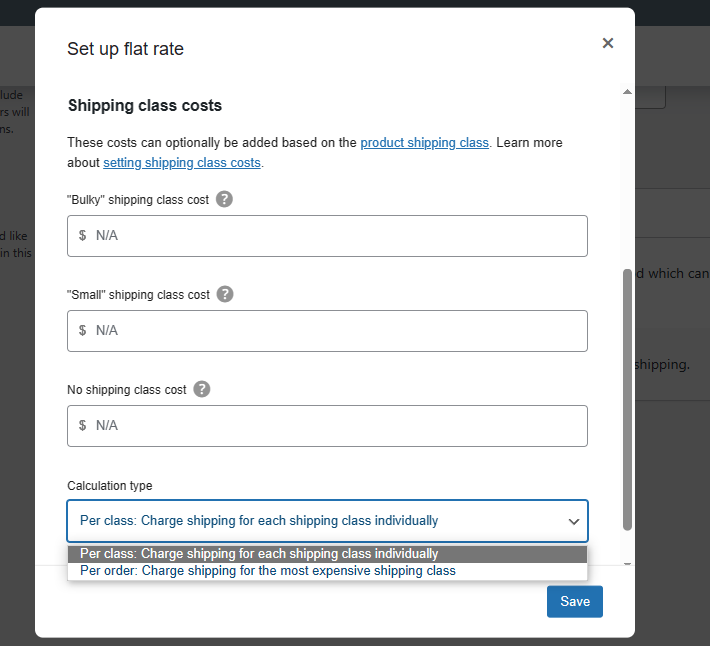
Calculation Type
At the bottom, there’s a dropdown for the calculation type. You can choose between two ways to calculate shipping costs when customers have products from multiple shipping classes in their cart:
Per Class: This charges shipping for each shipping class individually.
Per Order: This charges shipping based on the most expensive shipping class in the order.
Here are two examples to understand the difference:
Example 1: Flat Rate calculated per shipping class:
- Bulky Shipping Class: $10.00
- Small Shipping Class: $1.00
- Total Shipping Costs: $11.00
- The customer pays $11.00 because shipping is calculated separately for each shipping class.
Example 2: Flat Rate calculated per order:
- Bulky Shipping Class: $10.00
- Small Shipping Class: $1.00
- Total Shipping Costs: $10.00
- The customer pays $10.00 because shipping is calculated based on the most expensive shipping class in the order, which is the Heavy Shipping Class.
You can also apply the same flat rate cost variables formulas, such as qty, percent, etc., in these boxes as well.
Test Drive WooCommerce Shipping Costs from the Frontend
We have explored how to set up shipping in WooCommerce. Now it’s time to check how your customers will see them.
Let’s add some products to the cart. To remind you again, we have applied this flat rate formula –
10 + [fee percent=”7″ min_fee=”10″].
Let’s see our current WooCommerce shipping costs.
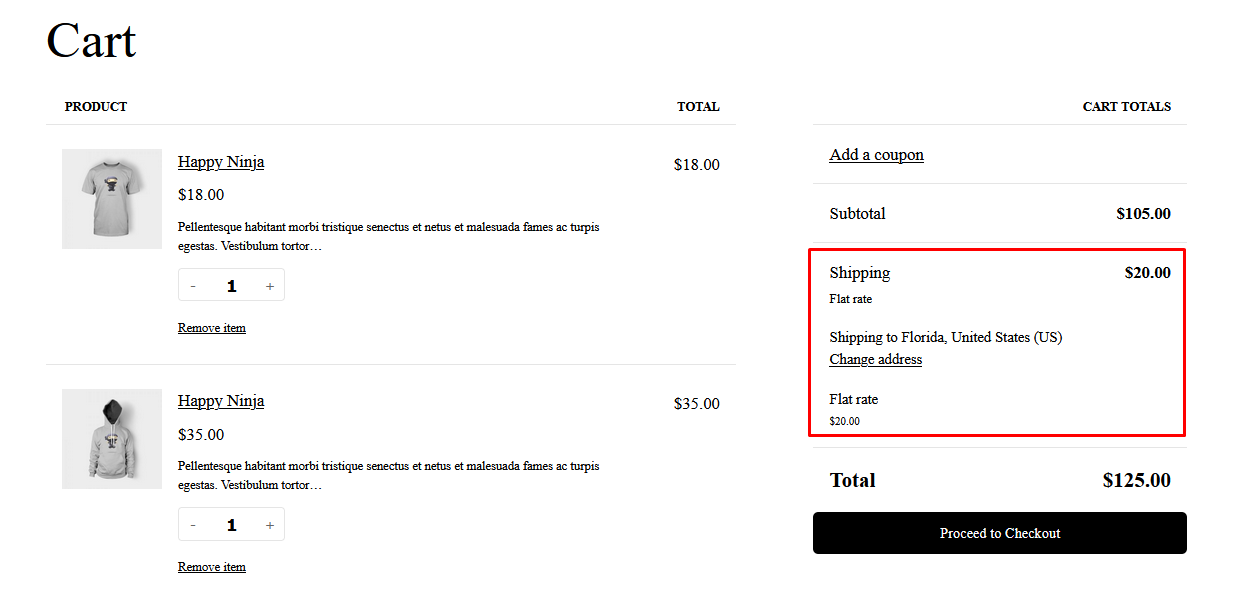
Because the current cost is below the minimum fee, a fixed $20 is applied. Let’s add some more products.

As it goes above the minimum cost, it starts calculating based on the formula.
Here’s how it was calculated – $10 + [7% of 177 (total added products cost) = 12.39]. So, $10 + $12.39 = $22.39, as you can see in the image above.
We had set free shipping on a minimum order amount of $200. Let’s add some more products to trigger the free shipping method.
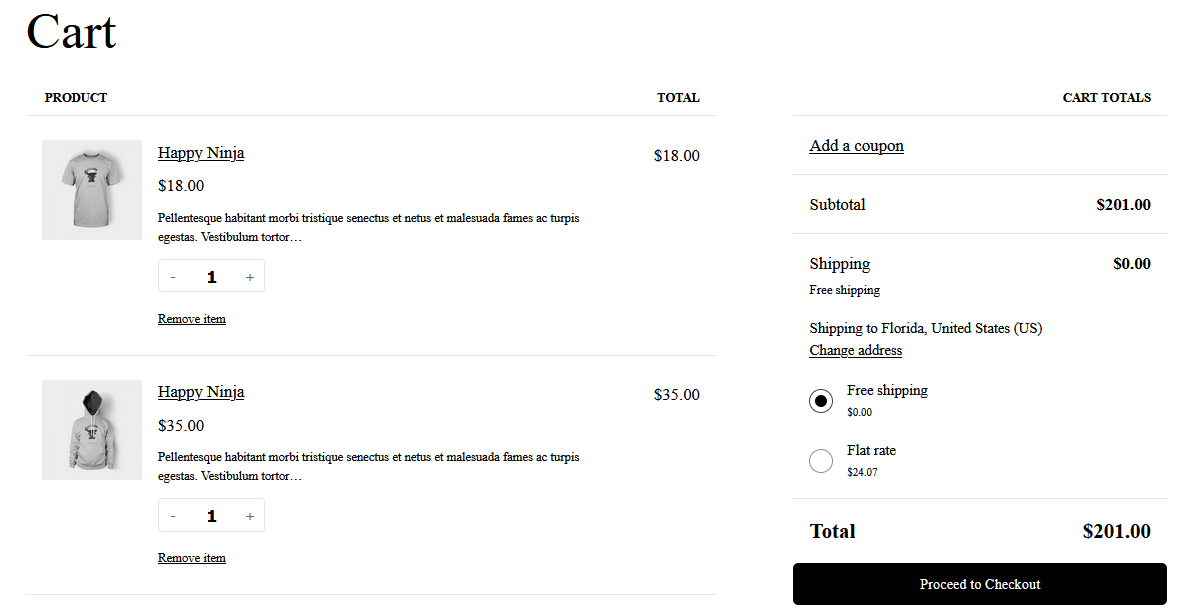
As you can see, free shipping appears when the subtotal reaches $200.
Advanced WooCommerce Shipping with Plugins
While the core WooCommerce shipping features offer a solid foundation, they can become limiting as your store grows or your shipping needs become more complex. This is where WooCommerce shipping plugins come in.
These powerful extensions unlock a whole new level of functionality, allowing you to create a more sophisticated and customer-centric shipping experience.
Limitations of Core WooCommerce Shipping:
- Limited Shipping Methods: The core options (flat rate, free shipping, local pickup) are basic and might not cater to all business models.
- Static Rates: Setting a single flat rate for a zone can be inaccurate and potentially disadvantageous for both you and your customers.
- Manual Work: Manually calculating and entering shipping costs can be time-consuming, especially for WooCommerce international shipping orders.
Benefits of WooCommerce Shipping Plugins
WooCommerce shipping plugins bridge the gap between basic shipping features and a truly robust shipping system. They offer a variety of advanced functionalities to streamline your workflow and enhance your customer experience.
Popular Plugin Functionalities:
- Real-time Carrier Rates: Integrate with major carriers like DHL, USPS, and FedEx to display accurate shipping rates at checkout based on the customer’s location and order weight/dimensions. This transparency builds trust and allows customers to make informed decisions.
- Table Rate Shipping: Create complex table rate shipping rules based on various factors like weight, dimensions, order total, or even product category. This provides fine-grained control over shipping costs, ensuring you’re fairly compensated for heavier or bulkier items.
- Label Printing Integration: Say goodbye to manual label creation! Certain plugins integrate seamlessly with shipping carriers, allowing you to print shipping labels directly from your WooCommerce dashboard. This saves you significant time and reduces the risk of errors.
- Order Tracking: Many shipping plugins offer WooCommerce shipping tracking capabilities. Once an order is shipped, the plugin can automatically generate a tracking number and link it to the order within your WooCommerce dashboard. Customers can then easily access the tracking information from their account or order confirmation email. This transparency builds trust and reduces customer inquiries about their orders.
These are just a few examples of the many functionalities offered by WooCommerce shipping plugins. By leveraging these advanced features, you can create a dynamic and efficient shipping system that adapts to your specific needs and provides a seamless experience for your customers.
Best WooCommerce Shipping Plugins and Extensions
Choosing the right WooCommerce shipping plugin depends on your specific needs and budget. Here is a look at some popular options to get you started.
WooCommerce Table Rate Shipping by WooCommerce
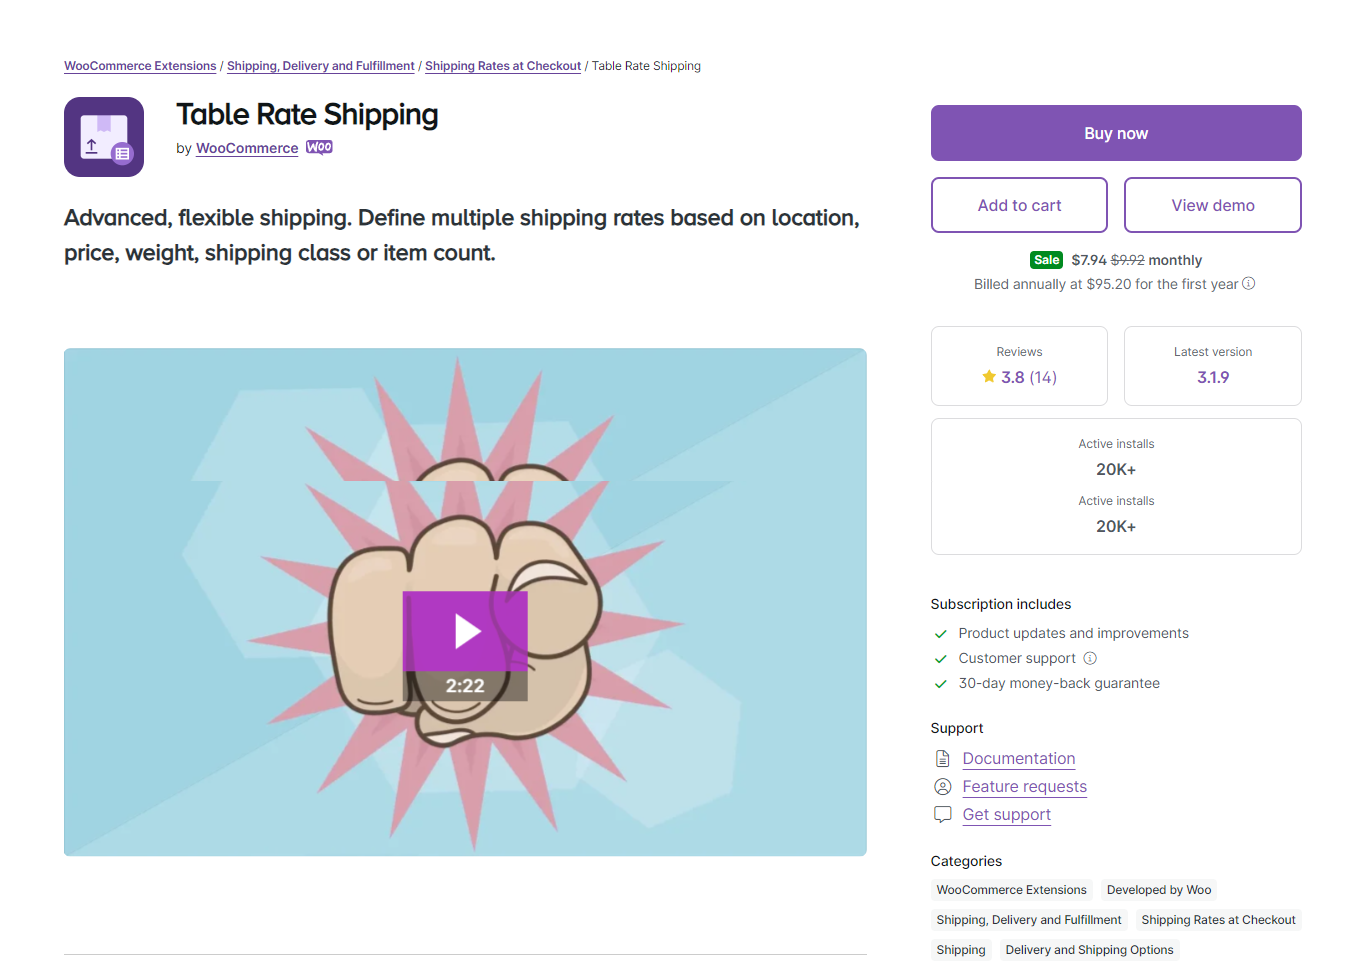
Developed by the official WooCommerce team, Table Rate Shipping is an extension that enhances WooCommerce’s default shipping options with highly customizable features.
With Table Rate Shipping, you can define multiple shipping rates based on various factors such as location, weight, item count, or price. You can even use wildcards to match multiple regions effortlessly.
While table rate shipping can seem complex, this plugin simplifies the process with its user-friendly interface. Adding, duplicating, or removing rates is made easy, saving you time and effort.
Key Features
- Define multiple shipping rates based on location, weight, item count, and more.
- Create multiple rate tables per shipping zone.
- Choose different rate calculation methods such as per order, item, line, or class.
- Set conditions based on weight, item count, and price.
- Easily manage complex data with options to duplicate, remove, and modify rates.
- Specify costs per row, item, percentage, or weighing units.
ShipStation WooCommerce Extension
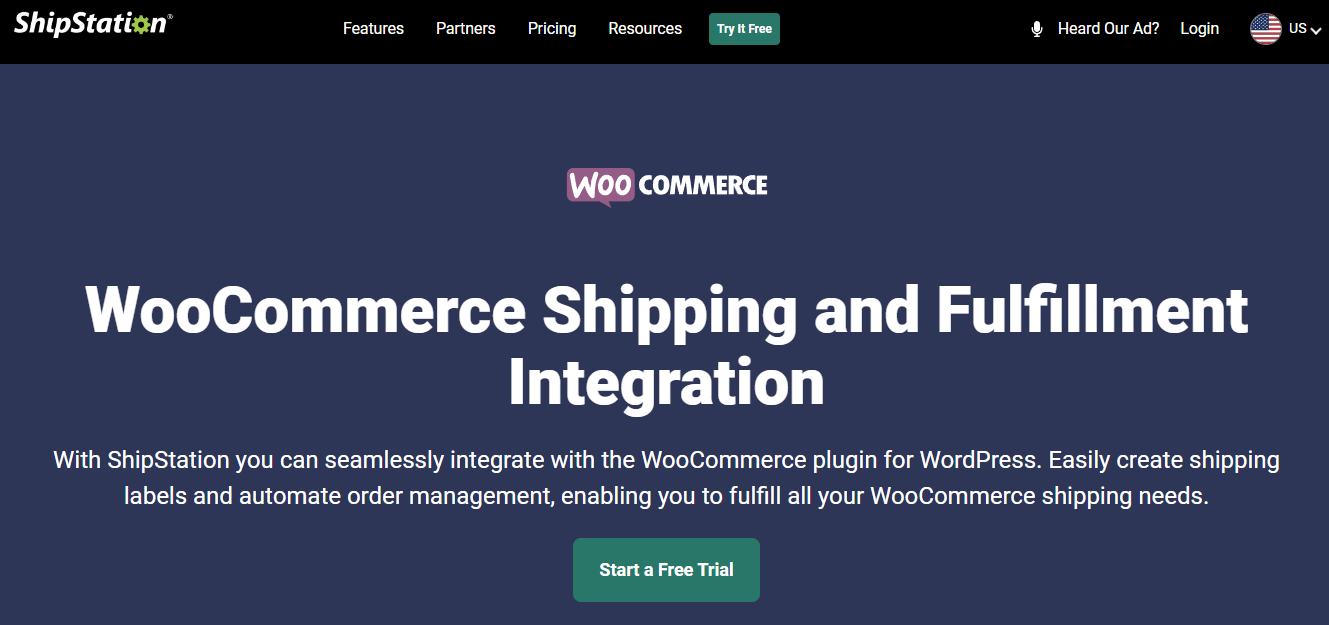
When it comes to managing shipping efficiently on your WooCommerce store, the ShipStation plugin stands out as one of the top choices. This plugin seamlessly integrates with WooCommerce and offers a range of features to streamline your shipping processes.
The plugin connects your WooCommerce store to the ShipStation platform and allows you to import orders and quickly manage shipments with ease. Whether you’re shipping domestically or internationally, ShipStation provides the tools you need to efficiently fulfill orders and keep your customers happy.
Key features
- Easy setup and quick connection to your WooCommerce store.
- Effortless order syncing from WooCommerce and other platforms.
- Detailed product information import, including weights, images, and options.
- Customizable automation rules based on special fields like Fraud Risk and Customer Loyalty.
- Automatic updates of shipping details back to WooCommerce after label creation.
- Flexible shipping confirmation emails, customizable to match your brand’s style.
- Web-based and mobile-compatible platform for managing orders from anywhere.
WooCommerce Table Rate Shipping Pro Plugin
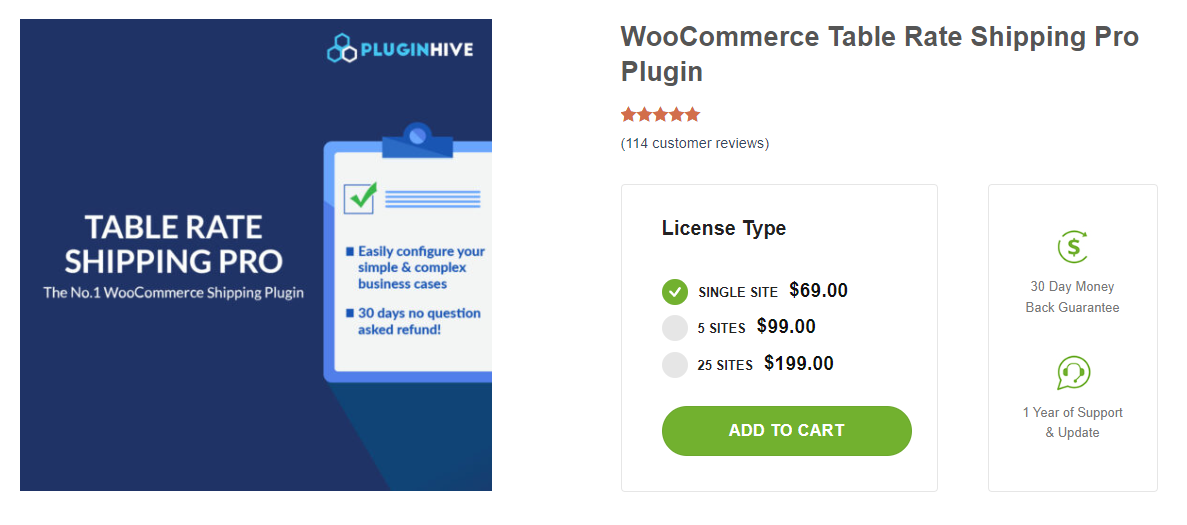
WooCommerce Table Rate Shipping Pro by PluginHive offers a feature-rich solution for stores seeking an extended range of control over shipping costs.
This plugin empowers you to create unlimited rules for calculating shipping rates tailored to your specific needs. Whether you’re setting up table rate or flat-rate shipping, you can define rules based on factors like product weight, quantity, price, categories, shipping classes, zones, countries, and even ZIP codes.
Key Features
- Create unlimited shipping rules based on factors like weight, quantity, price, categories, and more.
- Support for both table rate and flat-rate shipping methods.
- Define shipping rules based on various conditions, including product weight, quantity, price, categories, shipping classes, zones, countries, and ZIP codes.
- Bulk import/export shipping rules using CSV files for efficient management.
- Easily set up shipping costs per product, per item, or per price to offer discounts or upsell opportunities.
- Customize shipping methods and rates based on destination city, state, or ZIP code.
- Comprehensive multilingual support, including German, English, Spanish, French, Italian, Polish, and Portuguese.
- Compatibility with WPML for seamless translation into your preferred language.
🔥 Bonus: Challan
While not a shipping plugin per see, Challan helps streamline your order fulfillment process. It allows you to create professional packing slips and invoices directly from your WooCommerce dashboard, saving you time and ensuring clear communication with your customers.
Frequently Asked Questions (FAQs)
To set up shipping in WooCommerce:
>> Define your store location (WooCommerce > Settings > General).
>> Create shipping zones based on regions or zip codes (WooCommerce > Settings > Shipping > Shipping Zones).
>> Assign shipping methods (flat rate, free shipping, etc.) to each zone and configure costs (Edit Shipping Zone).
>> Utilize shipping classes (optional) to set costs based on product size/weight (WooCommerce > Settings > Shipping > Shipping Classes).
For advanced options like real-time carrier rates, explore WooCommerce shipping plugins.
While the core WooCommerce shipping features don’t offer this directly, several powerful plugins can help. These plugins integrate with popular carriers, allowing you to display real-time shipping rates based on the customer’s location and order weight/dimensions. They can also automate label generation and even offer shipment tracking features (depending on the plugin).
Go to WooCommerce >> Settings >> Shipping and create shipping zones. Under every zone, you can create the Free Shipping method. Read on to find out a step-by-step walkthrough.
Wrap up
Remember, a smoother and seamless shipping experience is a vital part of the overall customer journey and can significantly impact your store’s reputation and repeat business. Therefore, you must be in the know how to setup powerful WooCommerce shipping strategies.
A well-defined WooCommerce shipping strategy is an essential element for any successful online store. By implementing the strategies outlined in this WooCommerce shipping guide, you can create a transparent and efficient shipping system that fosters customer trust and satisfaction.
