How to Use Google Pay for WooCommerce: A Definitive Guide
Using Google Pay in WooCommerce allows customers to complete purchases faster through a secure digital wallet, without manually entering card details.
By integrating Google Pay via the Stripe payment gateway, WooCommerce adds a modern payment method to its checkout system, handling attributes like tokenized card data, device-based authentication, and instant payment capture.
This payment —wallet → gateway → WooCommerce checkout—helps improve conversion rates while keeping transactions safe and friction-free.
Benefits of Using Google Pay for WooCommerce
- A better and more secure way to pay: Google Pay is a faster and more secure way to pay on WooCommerce websites and applications using payment methods saved to a Google Account.
- Availability: Google Pay is accepted in millions of regions all around the globe. It is accessible on Android, iOS, and PC, and it works with a variety of browsers, including Chrome, Firefox, Safari, etc.
- Increase Conversions: Google Pay eliminates the need to input billing and shipping information throughout the checkout process. Using Google pay as the payment method you can Increase conversions by providing customers with a more convenient option to pay.
- Increase Security: Google Pay protects your payment information with multiple layers of security, including tokenization of card networks.
Enable Google Pay on WooCommerce
WooCommerce Google pay integration supports the WooCommerce Stripe payment gateway. But the easiest Google pay integration with WooCommerce would be if you use the WooCommerce Payment method.
To enable Google to pay in WooCommerce with WooCommerce payment you need to go to Settings>Payments, then checkmark the “Enable Express Checkouts” options. By doing this you have successfully enabled the Google pay option for WooCommerce checkout. Moreover, you’ll also have the opportunity to pick where you want your Google pay button to appear on the checkout page.
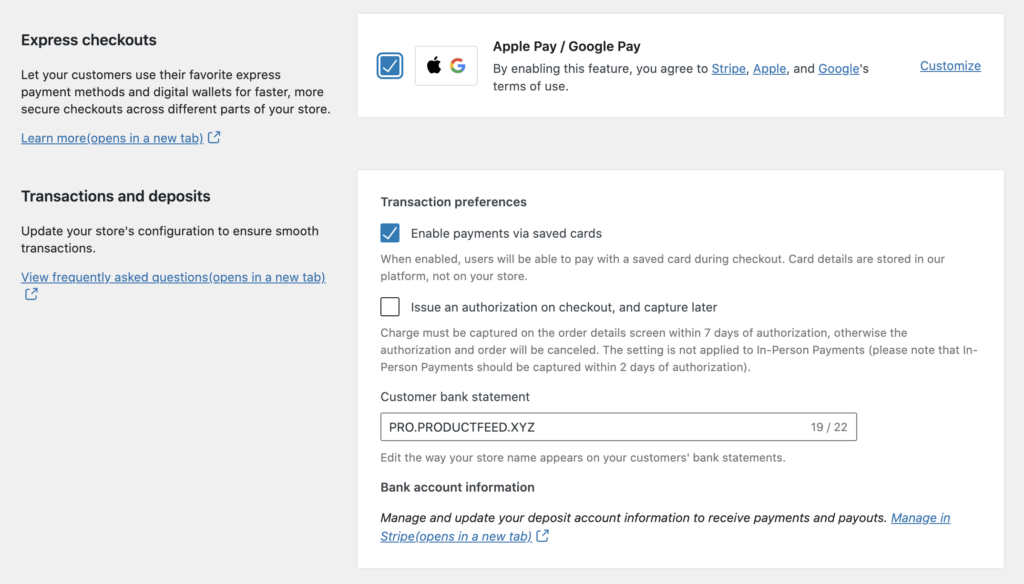
You will have to have several prerequisites, such as having an HTTPS site, but with eCommerce in general, it is not optional, and you’re most likely already running one.
You Don’t Need an Additional Account
When it comes to Paypal, you need to create a Paypal account to make it work. However, this is not the case in Google pay with WooCommerce. Here, with G-pay WooCommerce you don’t need to create an account for yourself and they don’t keep a balance either.
They simply transfer the money directly to the WooCommerce Payments so that you can access it like you would with any other transactions using the WooCommerce Payments gateway.
User Experience
So far the user experience on Google pay in WooCommerce has been excellent. Google pay works great on any Android phone as well as on desktop Chrome browser.
However, there is one strange little quirk with Google Pay and desktop Chrome! Cards in your desktop Chrome autofill area with the words “Google Pay” next to them do not work with the WooCommcere Google Pay buttons. Only credit cards have been manually entered into the system without the use of a label. Just something to keep in mind when testing:
This is a very strong argument in favor of using WooCommerce for eCommerce. And the most exciting part is these features on WooCommerce come totally for free. All you need to do is checkmark a box in settings, and it will create a significant beneficial influence on your business.
Payment Procedure with Google Pay
Step-1: Simply click on the Google Pay button on the checkout page.

Step-2: Open the Google Pay Payment Page
You will find the payment page sheet on top of the checkout page. Here, the users can select choose their payment method. Further, they can also add or change any of their billing and shipping information.

Step-3: Payment Authorized by Users
The customer can authorize their payment by clicking the “CONTINUE” button.
STep-4: Show Confirmation Page
The checkout page then gets updated and you’ll see the confirmation page like below.

Sandbox Testing
Google Pay does not come with a test card; however, you can use a “live” card within Google’s test environment. Here, Google pay will return a dummy token, which can never be charged.
Google Pay API
You can use Google Pay API in various marketplaces including WooCommerce stores. However, before trying out tokenized cards, take a look at Google’s integration guidelines.
Google Pay on WooCommerce Website
Integrate Google Pay straight into your WooCommerce store’s checkout page to allow your customers to buy physical products like groceries and apparel, as well as intangible/downloadable/subscription-based services such as gym memberships and hotel reservations. With the integration of Google pay into your WooCommerce shop, your customers will be able to purchase products and services from your website effortlessly.
Google Pay in Android App
Implementing Google Pay in your Android app allows your consumers to purchase physical products, such as groceries and clothing, as well as services, such as gym memberships and hotel reservations.
Integrate Google Pay with WordPress-WooCommerce in 3 Simple Steps
Nowadays Google Pay is becoming even more popular than mobile banking and merchant wallets. According to Accenture, digital wallet systems have a 49% adoption rate, compared to 28% for mobile banking applications and 39% for merchant wallets. According to these statistics, implementing a simplified checkout system on your WooCommerce-WordPress website may be a viable option for making purchases for your consumers.
Besides that, Google Pay is secure enough to keep your customer’s payment information safe. Unlike the traditional checkout process which requires consumers to enter their credit card information, these online payment systems retain all payment data on the client’s smartphone. Visitors who are aware of basic cybersecurity precautions and the frequent attacks on websites based on the WordPress CMS – Content Management System may prefer online retailers who accept payments via digital wallets such as Google Pay over retailers who only implemented the conventional checkout processes on their online store.
Let’s have a look at how you can add google pay to WooCommerce in just 3 simple steps.
Step #1: Create Stripe Account
Considering G-Pay is a payment data interchange method, you’ll need a payment gateway to complete a transaction by charging a consumer and transferring funds to your account. Stripe payment gateway is now one of the most convenient and widely available payment gateways, making Google Pay integration with WooCommerce a piece of cake. This is why you need to create a Stripe account first.
When a customer uses Google Pay on your WooCommerce website, you will receive a payment on your Stripe account balance.
- Go to stripe.com and click on the “Start Now” button.
- Enter your full name, email address, and password.
- After that click on the “Create your Stripe Account” button.
- Once created, you need to activate your account. So sign in and navigate to the dashboard.
- On the left side menu, click on “Activate Your Account“.
- Choose your country, specify your business, and enter the URL of your website.
- Choose your account type, provide your Tax ID, and enter your company address (if you don’t have one, just copy your home address).
- Connect to your social media account and enter your legal name, date of birth, and Social Security Number (SSN) to verify your identification.
- Enter your bank information and the details of your credit card statements.
- Click on the “Activate Your Account” button.
Your account will be activated instantly as soon as you click on the Activate button. Despite the fact that the account activation page takes a lot of information, the process is considerably simpler than it appears. It is hardly distinguishable from any other registration procedure.
Stripe’s pricing:
- Local payments – 2.9%+$0.30 per transaction
- International payments – 3.9%+$0.30
- Chargeback protection – 0.4% per transaction
Step #2: Install Stripe Plugin

To connect your Stripe account to your WooCommerce website, now you have to install the Google Pay WordPress plugin. Go to the Plugins menu option on your WordPress admin page to set things off.
- Click on the “Add New” button.
- Enter “WooCommerce Stripe Payment Gateway” and press the Enter key.
- Install this purple-branded plugin by clicking the “Install Now” button.
- Click the “Activate” button to activate the plugin.
It’s a free Google Pay WordPress plugin developed by Automattic, the mother contributor team of WordPress, and a handful of additional developers. That’s how you can get assured that it’s compatible with your WooCommerce store.
Step #3: Enable Stripe Payment Method
WooCommerce Stripe Payment Gateway simply extends the functionality of the WooCommerce plugin. The add-on offers an extra payment method for Woocommerce. So you need to activate it in the settings section of the Woocommerce plugin.
- On the WordPress admin page, navigate to “Woocommerce >> Settings”.
- Then click on “Payments”.
- Toggle the Stripe payment method, labeled as “Stripe – Credit Card (Stripe)”.
- Enter your Stripe Account’s live Secret and Publishable Key, which can be located in the API section of the left side menu.
- Check the boxes that says ‘Capture Charge Immediately’, ‘Enable Stripe Checkout’.
- Click on the “Manage” button to the right of the Stripe payment method.
- Enable Google Pay for WooCommerce by checking the box called “Payment Request” buttons.
- Save your changes.
Your customers can now make purchases in your WooCommerce online store using Google Pay by clicking on the Buy button. It is also possible that the Payment Request Buttons checkbox was selected by default. If this is the case, you can skip the last three steps in this ordered list.
You have to ensure that you have successfully enabled the Google Pay purple buttons on your WooCommerce-WordPress website. Each one will be represented with a Stripe-branded Buy button. Remember that these payment methods will be available to clients who visit your site using their mobile devices and have their payment cards linked to the corresponding mobile app.

Final Verdict
In this article, we tried to cover and explain how you can make perfect use of Google pay and integrate it on your WooCommerce website in a step-by-step process. We hope that it will help you to enhance the functionality of your WooCommerce store, hence, increasing the total sale of your store.
However, if you have any further inquiries or are confused about this topic, please leave them in the comment section. We guarantee that our specialists will respond to all of your questions as soon as they get them. Thank you very much for taking the time to read my blog.

Great detailed post, well done, have evernoted for future reference
You are most welcome. Glad to know that our article helped you.