How to Set WooCommerce Order Confirmation Email
To set up a WooCommerce order confirmation email, you simply enable the Processing order email from WooCommerce → Settings → Emails, then customize its header, footer, and content using WooCommerce’s built-in email settings, template overrides, or PHP hooks. WooCommerce uses a hierarchy of email templates—such as email-header.php, email-footer.php, and order-specific templates—and you can further modify attributes like colors, layout, and order details through custom code or visual email-builder plugins like YayMail.
This gives you full control over both the structure and styling of the order confirmation message your customers receive.
In this article, we will discuss what a WooCommerce order confirmation email is and how to customize order confirmation email in WooCommerce.
But first, let’s get familiar with emails in general for your WooCommerce website.
WooCommerce emails
There are two types of emails you can send from your WooCommerce store.
- Marketing emails
- Transactional emails
Marketing emails
Marketing emails are the promotional emails you can send to your customers to promote your brand or promote specific offers or products. These are not obligatory emails you must send but rather an option for you to promote your business.
However, they are mighty handy for your marketing campaigns. According to research, properly segmented email marketing campaigns are responsible for a staggering 760% increase in revenue.
Some examples of WooCommerce marketing emails are:
- Abandoned cart emails
- Product recommendation emails
- Special occasion emails (Christmas, Black Friday offers)
- Welcome emails
- Discount offers
- Upsells and cross-sells
- Newsletters
- Review requests
- Birthday emails
Marketing emails are one of the most effective methods of generating revenue. However, you will need the help of a third-party email service provider to run email marketing campaigns.
To get the most out of your WooCommerce store, I recommend learning about email marketing strategies. Our guide, “WooCommerce Email Marketing Guide: Tools, Tips & Best Practices,” provides valuable insights to help you succeed.
Transactional emails
When a customer completes a transaction on your store, WooCommerce will automatically send out a transactional email. If a customer makes a purchase, or their order status changes, or their products are shipped, WooCommerce will automatically generate and send them an email with the appropriate information.
There is no substitute for transactional emails when it comes to informing customers of crucial details about their accounts and orders. The good news is that these emails are generated and sent to your customers automatically by the core WooCommerce plugin.
Let’s check out the existing WooCommerce transactional emails. Go to your WordPress dashboard and jump to WooCommerce>>Settings, and click on the Emails tab.
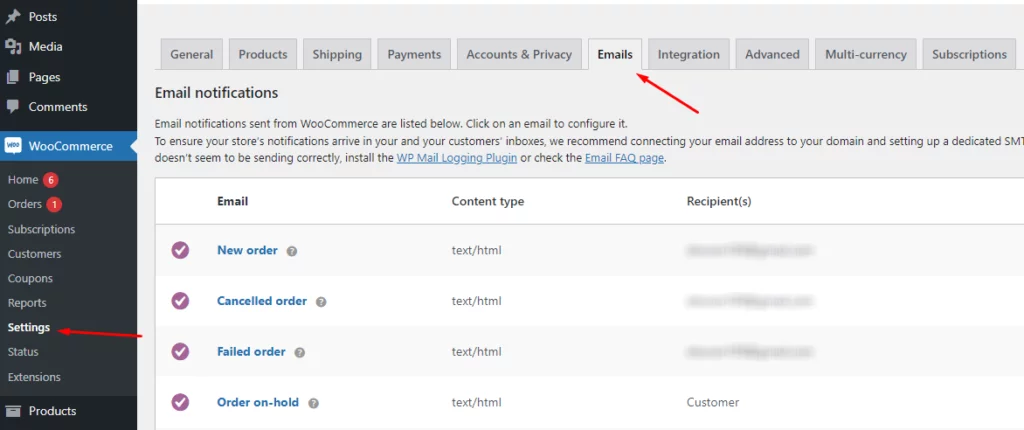
WooCommerce offer 10 transactional emails for different state of the orders. However, if you have a WooCommerce membership website, then you will see 13 transactional emails.
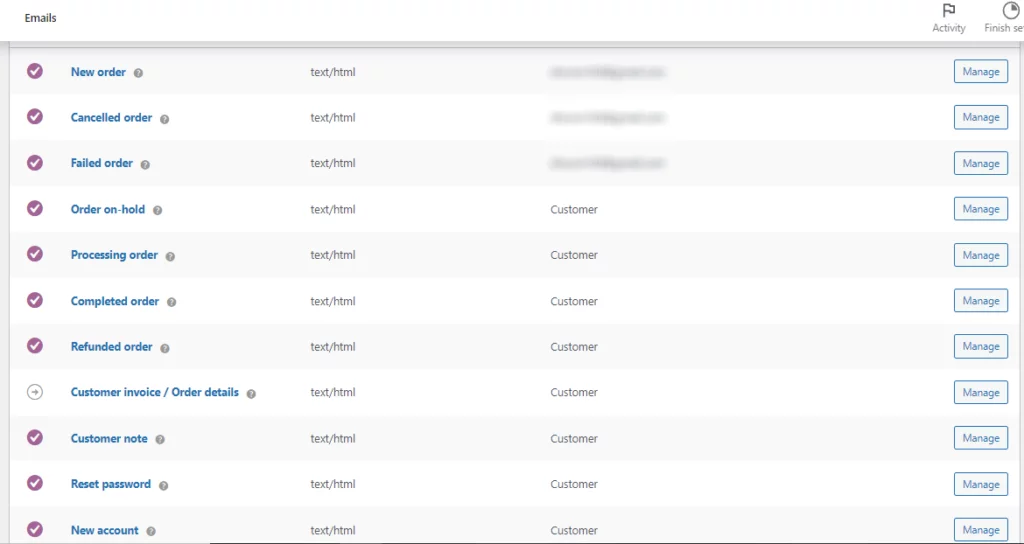
WooCommerce transactional emails
Let’s learn a little more about these transactional emails.
- New order email – triggered and sent to you and your customers when a new order is received.
- Order on hold – If somehow an order is on hold, the customers will receive this email with details.
- Processing order – sent to customers after they complete their payment.
- Completed order – this email is sent to the customers after you ship their product and mark the order as complete.
- Cancelled order – If an order gets canceled, the customer will receive this email.
- Failed order – sent to customers when an order has failed.
- Refunded order – generated and sent to the customer when a refund happens.
- Customer note – When a customer note is added to an order in the edit order admin, this email is sent to the customer.
- New account – Customers will receive this after they create a new account in your store.
- Reset password – When a customer requests a password reset.
These WooCommerce order emails are immediately and automatically triggered when a customer takes a specific action on your store.
But what about the WooCommerce order confirmation email?
How do you enable and send that?
Let’s find out.
How to send order confirmation email in WooCommerce?
As we know already, the order confirmation email WooCommerce is the email your customers receive right after they successfully completes an order in your store. Let’s find out how to enable it in WooCommerce.
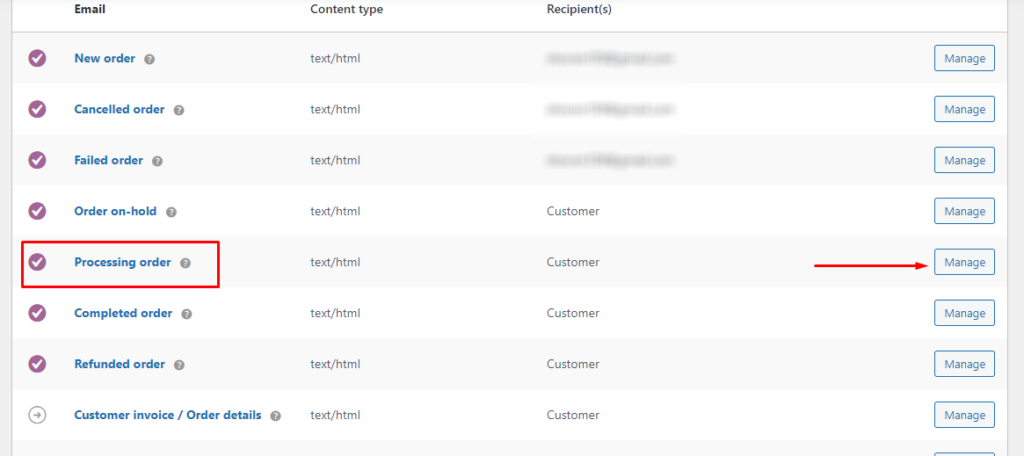
Login into your WordPress back panel and go to WooCommerce>>Settings. From there, click on the Emails tab.

Now click on the Manage button beside the Processing order email. It will take you inside the WooCommerce order confirmation email configuration page.
From the Enable/Disable section, you can enable the WooCommerce send order confirmation email.
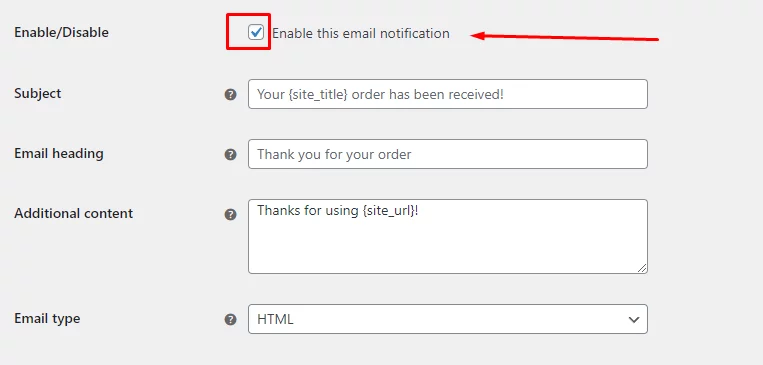
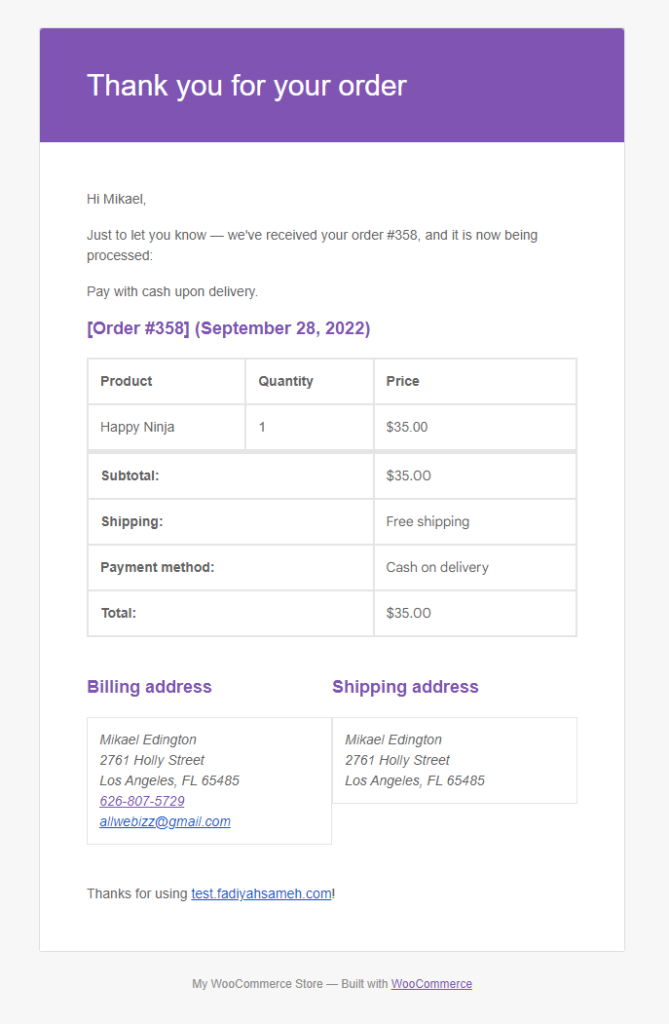
Additionally, you can edit the email header, and title, and add additional content like thank you note. This is how it may look in your customer’s email.
Modifying WooCommerce order confirmation email template with code
You can modify the WooCommerce email order confirmation template directly by clicking on the Copy file to theme button and then clicking on the View template button.
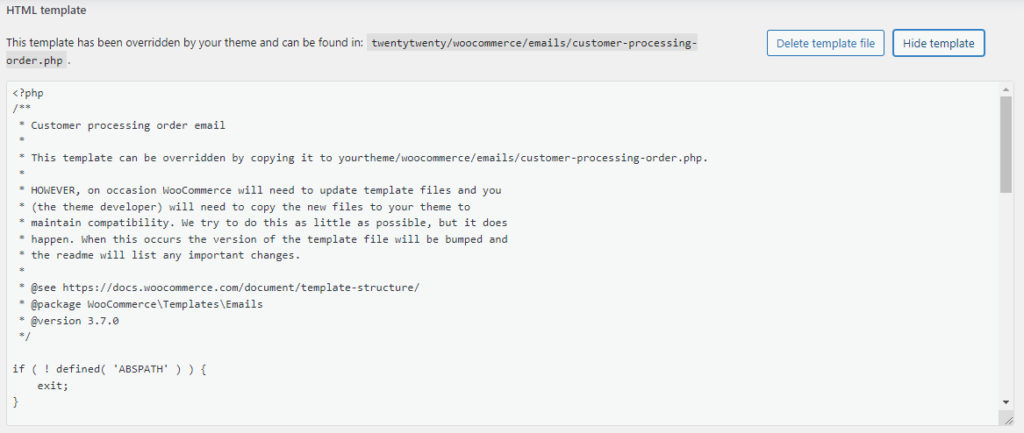
From here, you can make changes. However, you need to be a developer or expert in PHP to be able to customize this.
You may notice that, at the top of the edit section, it says where you can find the template file on your server. You can create your own PHP email template file and replace it with this one.
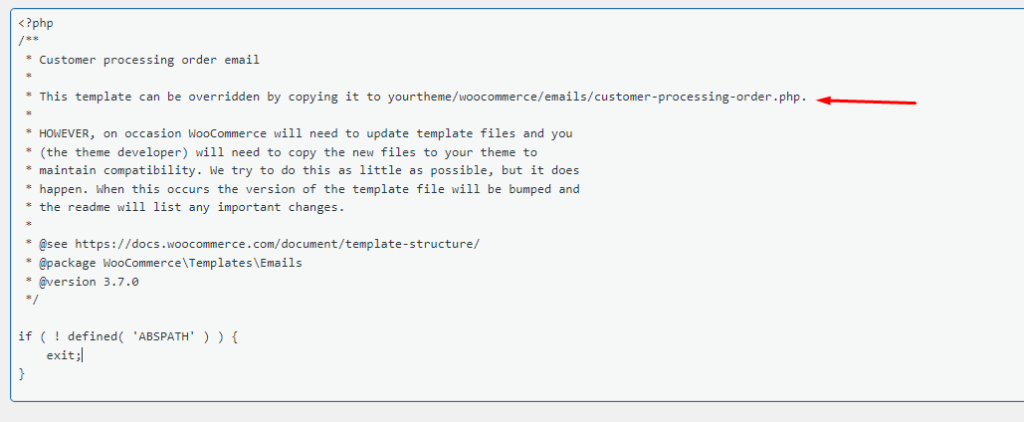
Each and every one of those transactional emails is made up of a collection of templates. If you only want to change the information in your email header, for instance, you will only need to make changes to the file named email-header.php.
Working with email-footer.php will allow you to make modifications to the footer. If you want to modify just the invoice email template, you’ll need to edit customer-invoice.php.
For instance, we want to change the color of the links in the email. Jump to your web server and go to your-store\wp-content\plugins\woocommerce\templates\emails and find the email-styles.php file.
Open it and search for the link class and replace it with the following code. You can choose any color code of your choice.
.link {
color: #279100;
}
You can modify your WooCommerce order confirmation email in countless different ways.
WooCommerce email customization using hooks
You can add content to your WooCommerce order confirmation email using hooks. However, you can’t edit existing elements with them.
You need to add code snippets in your function.php file to add hooks. We recommend you use a child theme.
Let’s check out some examples of how to edit order confirmation message on WooCommerce using hooks. For example, let’s say you want to add a custom note below your header.
The hook we need here is: woocommerce_email_header( $email_heading, $email )
And the code may look like this:
<?php
add_action( ‘woocommerce_email_header’, ‘mm_email_header’, 10, 2 );
function mm_email_header( $email_heading, $email ) {
echo “<p> Thanks so much for your order! We appreciate you and hope you enjoy your new items.</p>”;
}
As you have already seen, the WooCommerce order confirmation email contains a table detailing the order information. If you want to place a custom text after that table, then you will need this hook:
woocommerce_email_after_order_table ($order, $sent_to_admin, $plain_text, $email)
And the code in function.php may look like this:
<?php
add_action( ‘woocommerce_email_after_order_table’, ‘mm_email_after_order_table’, 10, 4 );
function mm_email_after_order_table( $order, $sent_to_admin, $plain_text, $email ) {
echo “<p> It’s important for us to make sure our customers feel appreciated and valued. We want to make sure you’re happy. As a way of saying thanks, here’s a coupon code for your next purchase: 20OFF</p>”;
}
If you want to say something above the footer, then use the hook: woocommerce_email_footer($email)
And the code will be:
<?php
add_action( ‘woocommerce_email_footer’, ‘mm_email_footer’, 10, 1 );
function mm_email_footer( $email ) { ?>
<p><?php printf( __( Thank you for choosing us! We’re dedicated to giving you the best products possible. Here’s our special sale colleciton: %s’, ‘woocommerce’ ), ‘<a href=”‘ . get_permalink( wc_get_page_id( ‘shop’ ) ) . ‘”>’ . __( ‘Shop’, ‘woocommerce’ ) . ‘</a>’ ); ?></p>
<?php
}
Customize WooCommerce order confirmation email with built-in options
WooCommerce system does provide some email template customization options for the email templates. However, they are for all email templates in general.
Let’s go back to the Email tab on Woo Commerce’s settings page. Now scroll down below the email templates, and you will see a dedicated section for customizing your email templates, including the WooCommerce order confirmation email.
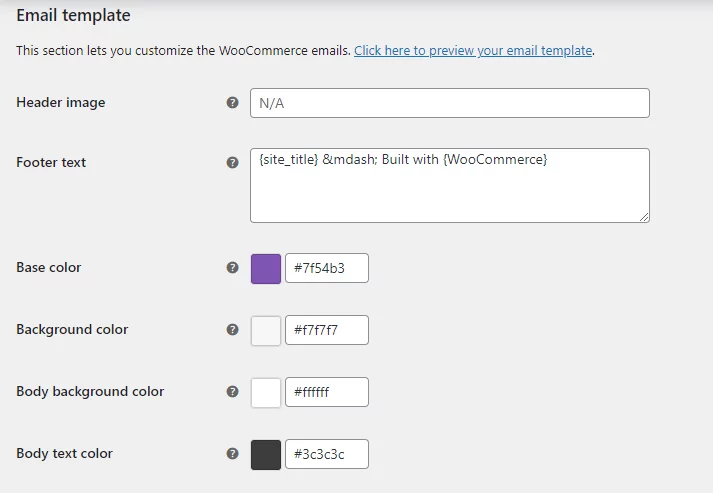
Let’s preview the current template by clicking the Click here to preview your email template link.
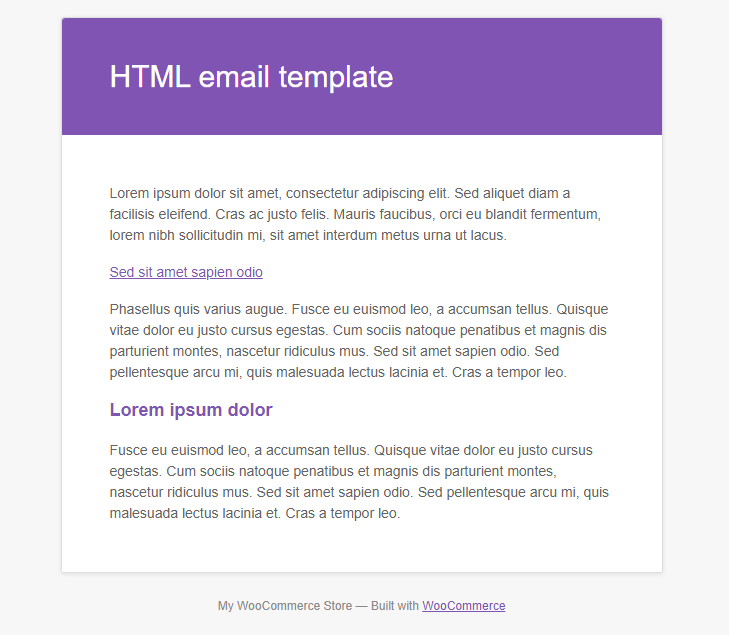
Now, let’s try and make some modifications to the template. You can upload your own header image in your server or any other server of your choice and input the URL of the image in the Header image section.
You can add a custom footer note or links to your terms and conditions page in the Footer text section.
To change any color, click on the color code, and a color panel will pop up. You can select your color from there or copy-paste your color code.
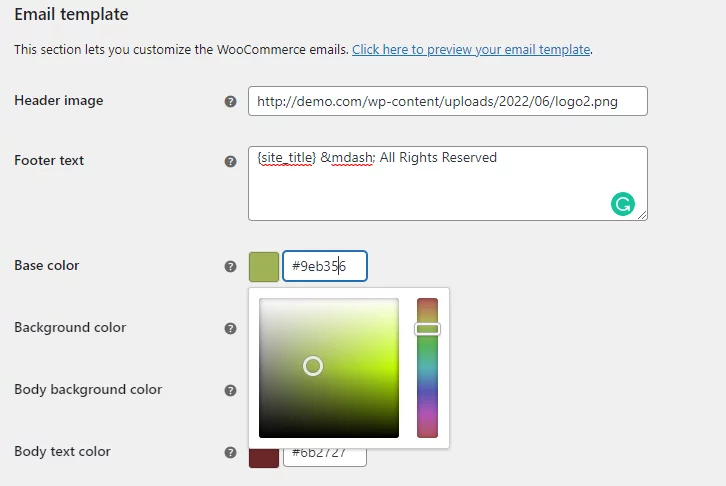
Let’s check how the final template looks.
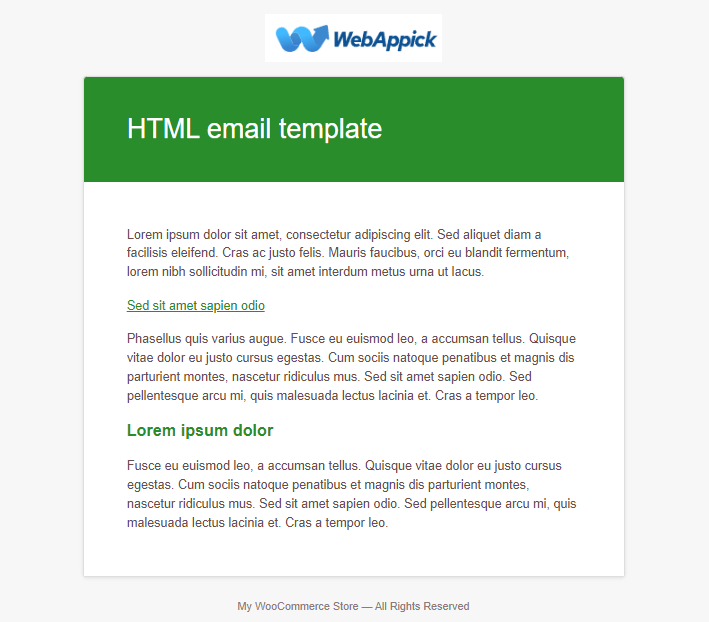
You can play with different colors and images to customize your email templates. However, these customizations are for all email templates and are very limited. If you want to customize your WooCommerce order confirmation email extensively, you will need to use a plugin.
Customize WooCommerce custom emails using a plugin
If you are looking for a quicker and more flexible solution, then you need to go for a plugin that can make your life easier. There are a number of plugins available for WooCommerce email customization.
We are going to show you how to customize your WooCommerce order confirmation email using one of them.
YayMail – WooCommerce Email Customizer
YayMail lets you create customize or create stunning email templates within minutes. You can add components to your email templates by dragging and dropping them with YayMail.
Within the WooCommerce visual email editor, each component is represented by a block. In addition, it is not difficult at all to modify content or design email layouts; the process is very similar to that of using the Gutenberg editor or the Elementor page builder.
You will also be able to send personalized email templates by using the conditional logic provided by WooCommerce. This plugin is available for free in the WordPress repository.
Let’s install and check out how you can customize your WooCommerce order confirmation email.
Go to Plugins and type the name in the search box. Install and activate.
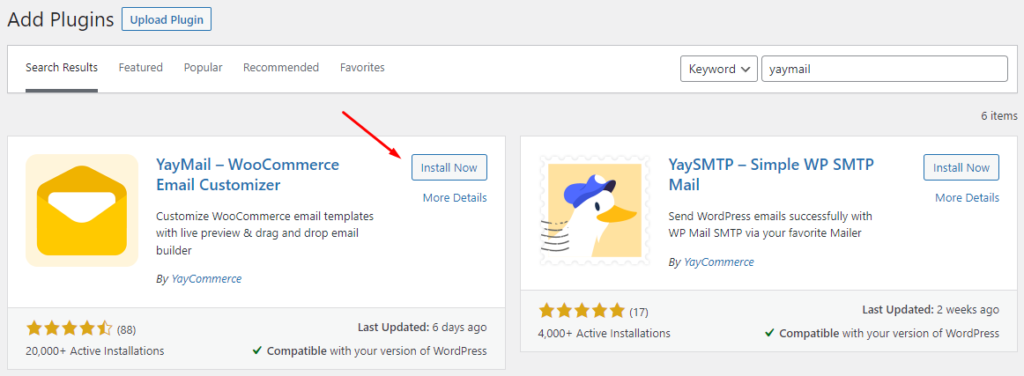
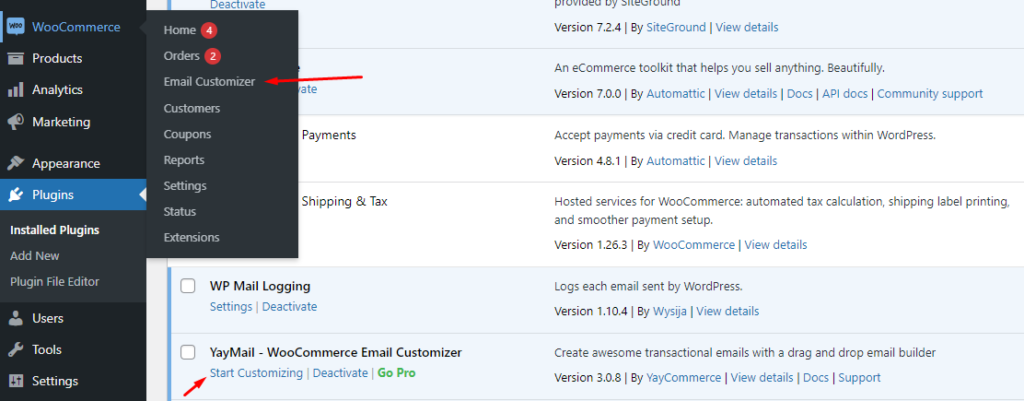
After you install the plugin, it will create a new menu item inside the WooCommerce sub-menu panel called the Email Customizer. Go ahead and click on it.
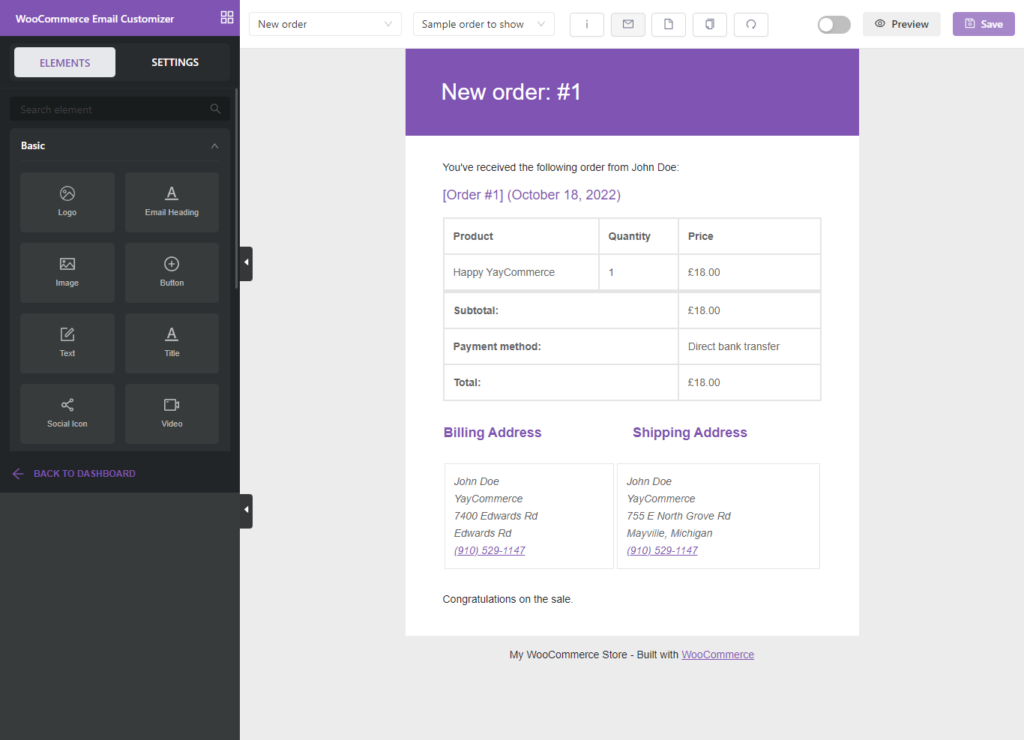
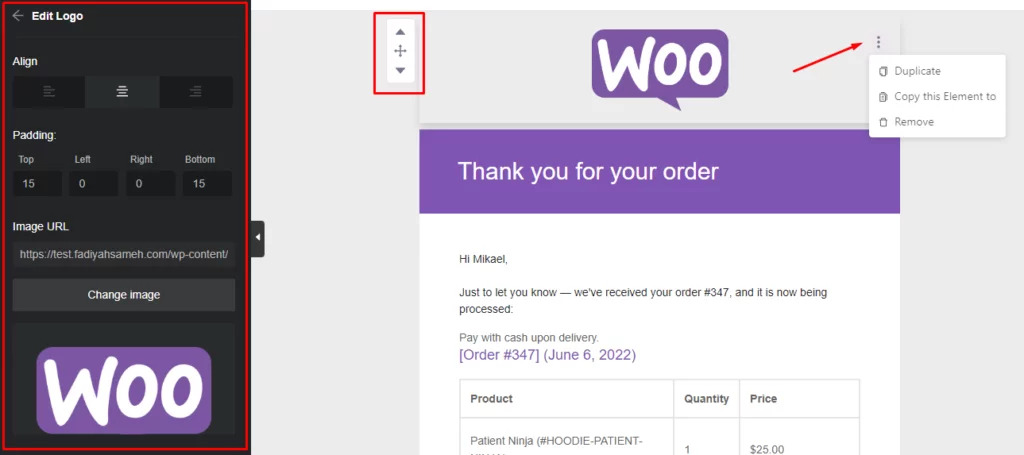
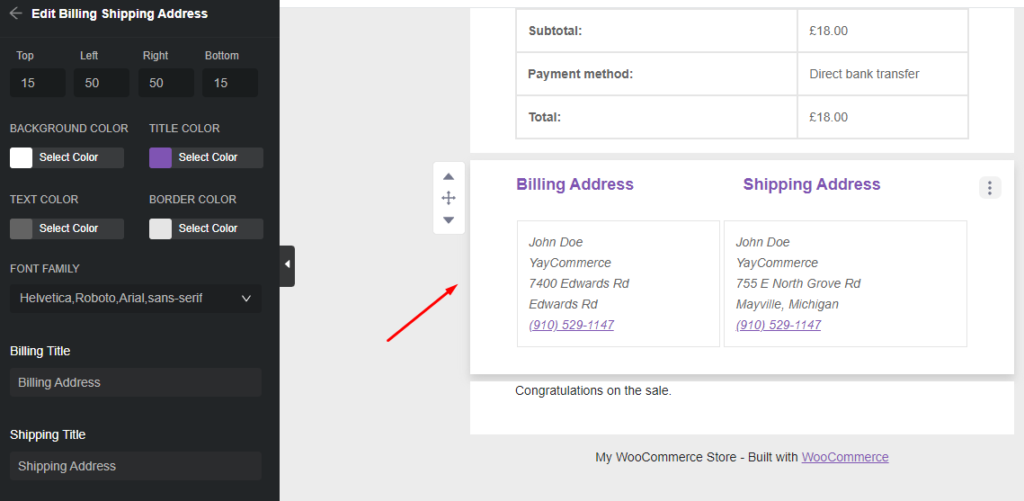
This will take you to the email customization window. Available customization settings will pop up at the left window, and from the preview panel’s three dots, you can move, duplicate or delete the element.
Customize WooCommerce order confirmation email with YayMail
As our target is customizing the WooCommerce order confirmation email, we will directly jump into editing that particular email. From the top panel drop-down, select the Processing order and select an existing order for previewing.
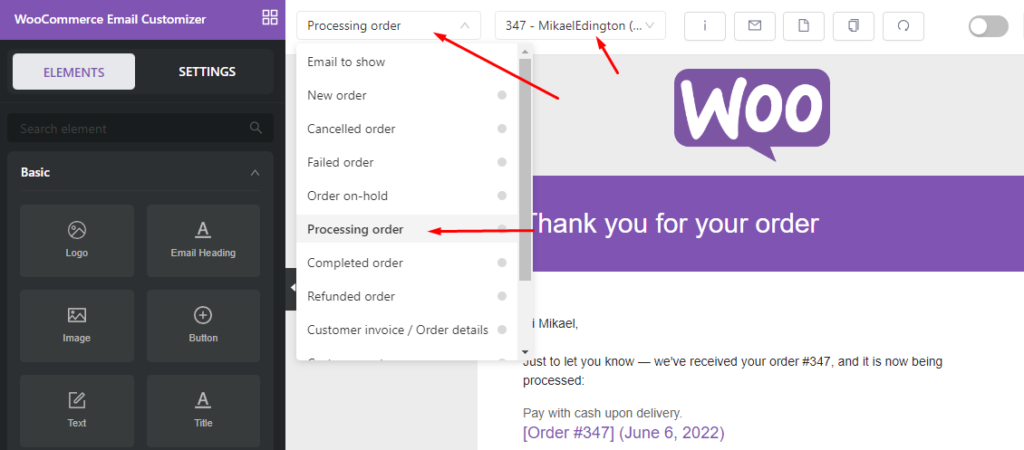
You can drag and drop any element from the left panel or edit existing ones by clicking on them. For example, click on the logo at the top.
You can upload your own logo, resize them according to your choice or align them in different places. You can also change the background color and add links to the logo.
Now let’s edit the header. Click on it, and the edit panel on the left will pop up.
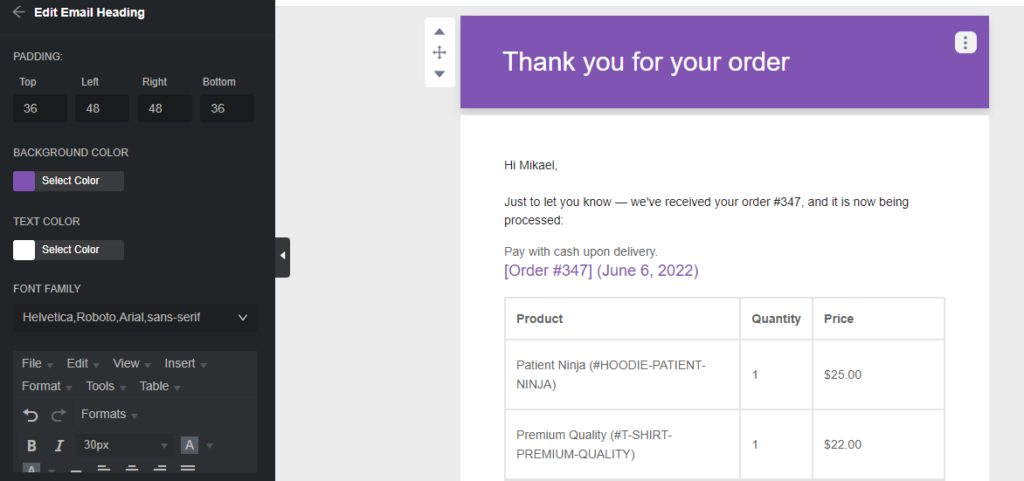
You can change the background and text color. Scroll down to the text editor.
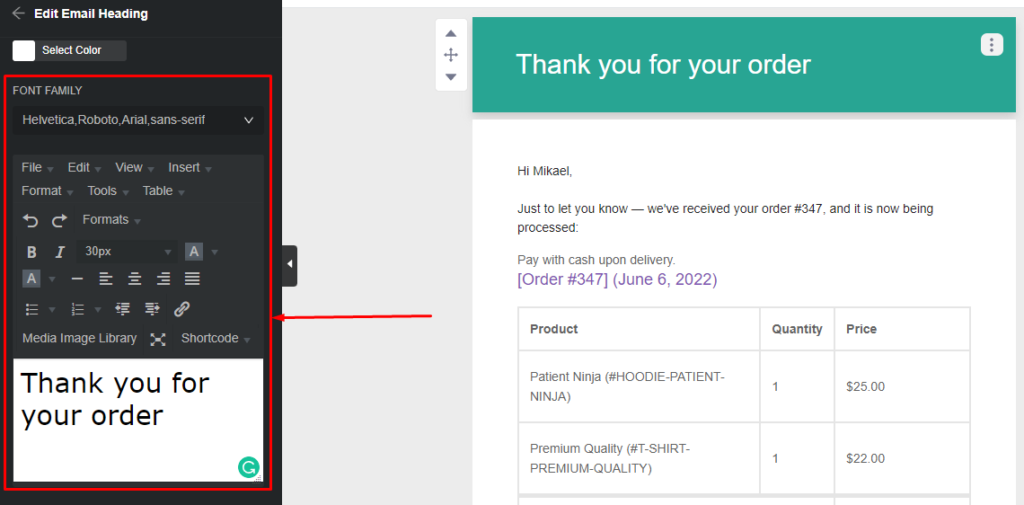
As you can see, it’s a fully functional text editor, even more advanced than the WordPress editor. You can insert images, tables, and horizontal lines, add links, format texts, and even add codes.
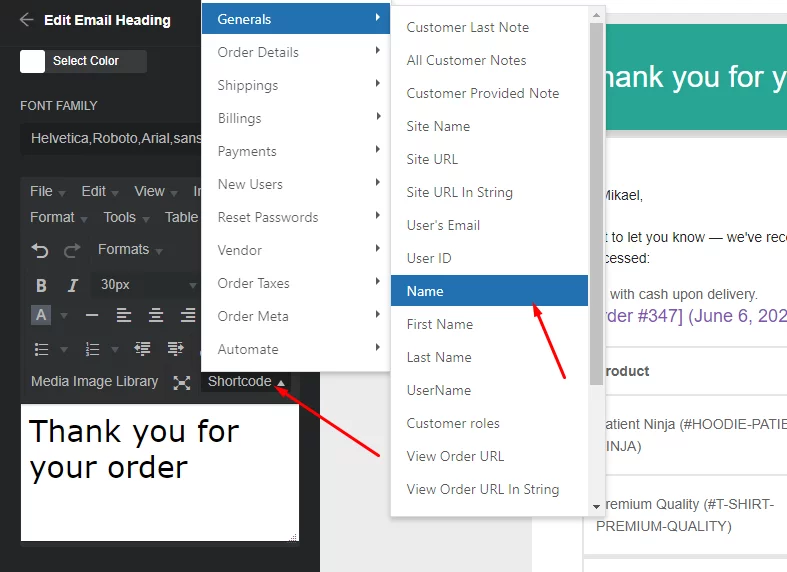
You can even add shortcodes. It’s a mini Microsoft Word here which is absolutely fantastic because it lets you add just about anything to your email layout.
Let’s check out the shortcodes and add one.
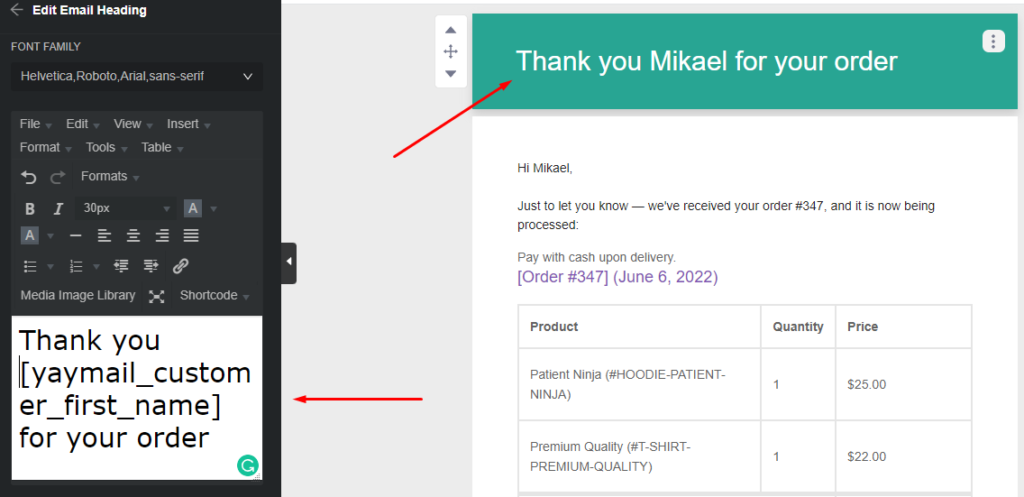
Here’s the change in the email.
Customize email body
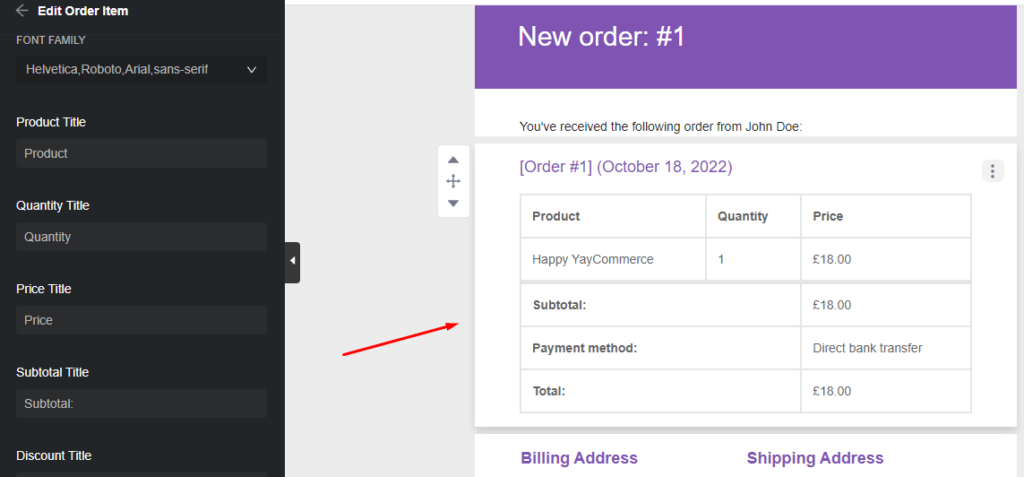
The body or the main section where the email mentions all the important details, including the list of products and prices; YayMail calls it the order item section.
As the item details are collected from the order, the plugin lets you edit the table heading and subheadings, such as the product title, quantity, price, total, etc.
One unique and great feature of this plugin is that you can display product details, including product images, descriptions, SKUs, etc.
To do that, you need to click on the Settings tab. From there, click on the General tab.

Under the General tab, you will find the following options for the product table.
- SHOW PRODUCT IMAGE
- SHOW PRODUCT SKU
- SHOW PRODUCT DESCRIPTION
- SHOW PRODUCT HYPERLINKS
- CUSTOM CSS
Let’s toggle to enable product image. A new set of options will appear.
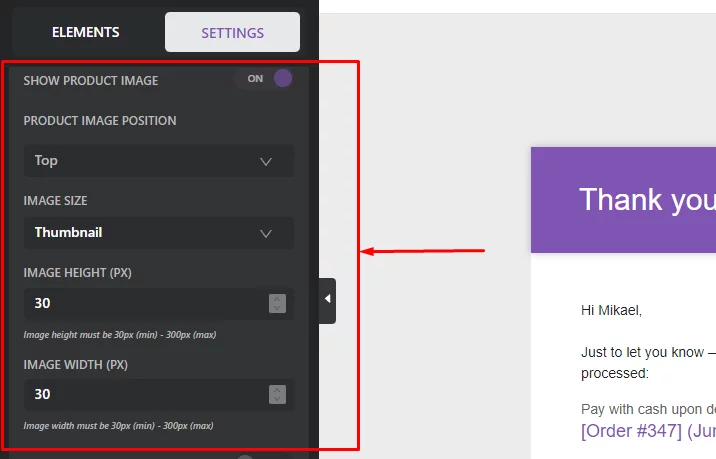
From these options, you can choose the height and width of the images and also set them to full resolution or thumbnail. You can also set the alignment of the images.
Let’s save the changes and have a look at how our changes appear in the email.
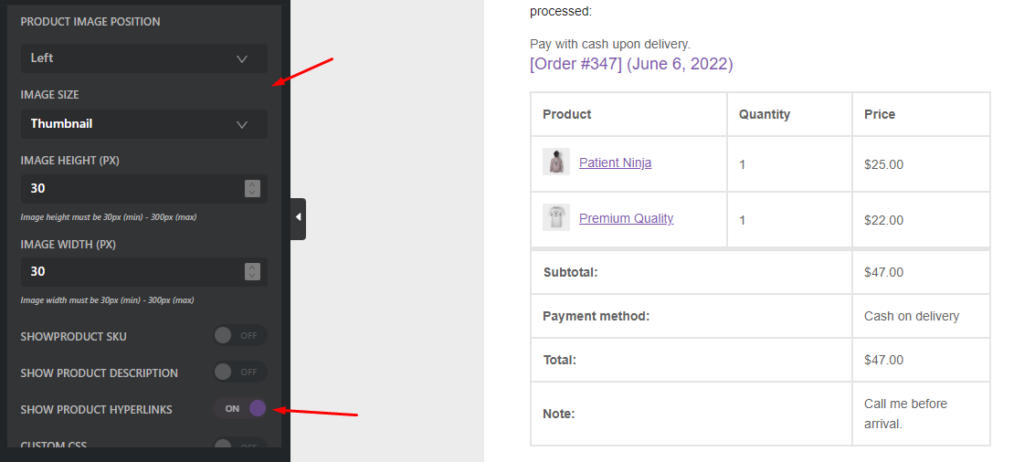
We have also enabled hyperlinks that your customers can click and visit those product’s pages if they want. Similarly, you can change font size, color, and text in the address section.
YayMail customization elements
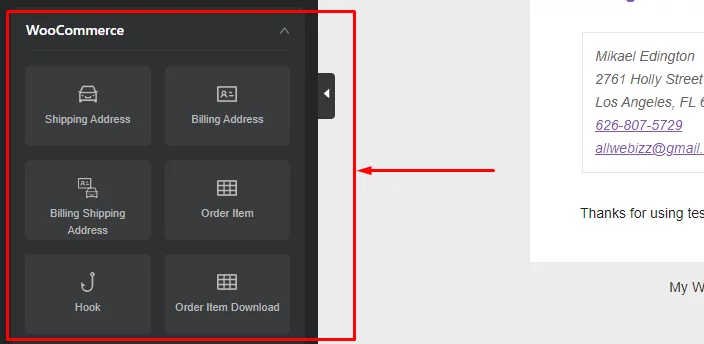
Let’s get familiar with the left panel independent elements.
There are three sections in the elements tab.
- Basic
- General
- WooCommerce

The basic section contains the elements through which you can personalize your WooCommerce order confirmation email. For example, you can add your logo, add images, videos, text, buttons, custom footer, social icons, and even custom HTML codes.

The general tab is for spacing and columns.

The WooCommerce panel contains the order-related elements we can already see in the preview panel. If you want to design a template from scratch, this panel will come in handy.
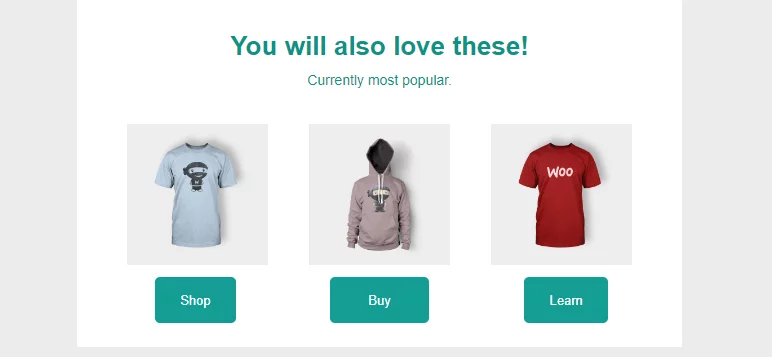
Now let’s jump back to the basic tab and drag and drop a title element, and underneath that, bring an image list element. We will use this as a product recommendation section.
The image list contains three image spaces. Upload some of your most popular product images there, and after that, drag & drop three buttons below the images.
In order to bring three buttons just below the images, go to the General tab and drag & drop a three-column element. After that, drop there buttons in the columns.
Adjust padding and radius of the section as well as button texts and alignments. Let’s check the final output.
Customizing the footer of the WooCommerce order confirmation email
Footer is a very important section of any email or landing page. You can display your brand elements, such as your social media accounts, custom notes, offers, discounts, or even popular products in the footer.
Footer plays a vital role in audience engagement and can have an impact on revenue growth. Therefore, it’s important for you to design an effective footer section for your WooCommerce order confirmation email.
Let’s do that with YayMail.
Drag and drop a title section, two-column section, and social icon element. You can add your app links with images in the two-column section if you have apps for your store.
You can also add necessary links, such as the refund policy and terms and conditions links, as well as the unsubscribe link.
Lastly, you can add your address and contact details for your customers to contact you in case of emergency or include them in anyway to show your professionalism.
Here’s how it may look.

When you are done customizing your WooCommerce order confirmation email, the end result may look like this.

Attach the invoice to the WooCommerce order confirmation email
Invoices are an integral part of your WooCommerce business and significantly crucial for both you and your customers. Woo invoices are necessary for record-keeping and can serve as legal proof of purchases if needed.
Invoices also show your professionalism and can help earn the trust of your customers. When it comes time to do your GST and income tax returns, you’ll need invoices. Businesses can use invoices to monitor for tax discrepancies.
As the owner of a WooCommerce business, you must keep accurate records of all sales invoices. As a result, you’ll be able to accurately report your income and pay the appropriate taxes.
Therefore, you must create and send invoices to your customers. What better way than to attach it to your WooCommerce order confirmation email?
However, unfortunately, WooCommerce doesn’t have the tools to create invoices. You will need a plugin like Challan to do the job for you.
Challan PDF invoicing plugin
Challan is a freemium pdf invoicing plugin that automatically generates invoices and attaches them to the WooCommerce order confirmation email. Along with invoices, it also can create packing lists, shipping labels, and credit notes.
The best thing about this plugin is you don’t need to manually design and create invoices individually. You can design a custom invoice template using the settings of Challan, and it will automatically create the documents according to your template.
You can choose from different pre-made invoice layouts and also set your own background image. Additionally, you can add custom fields in the invoice template.
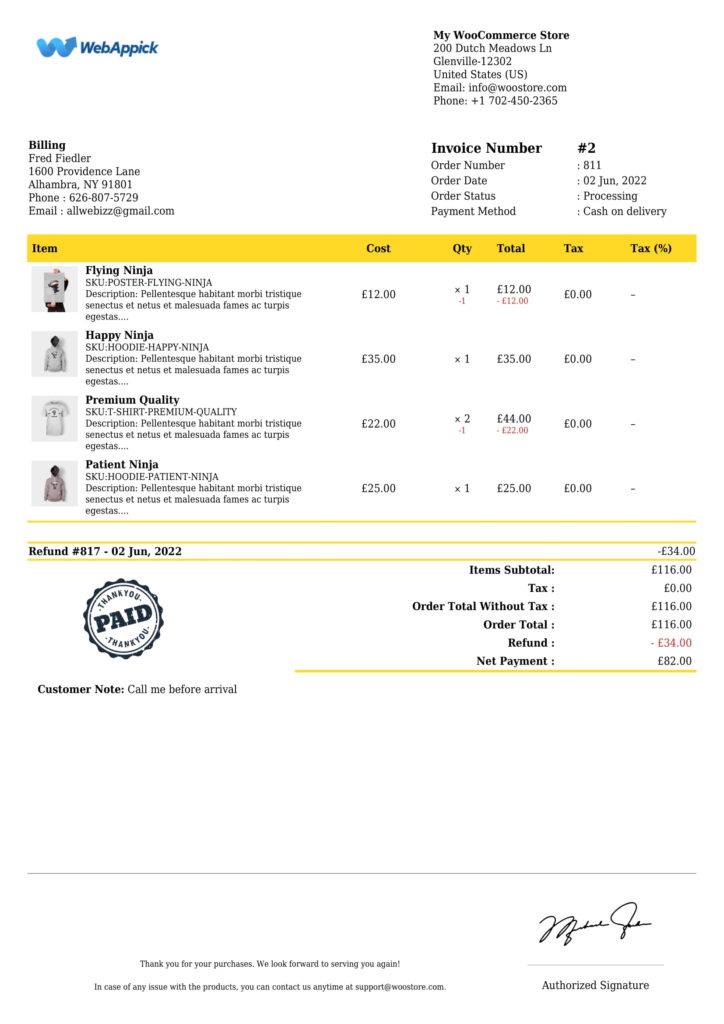
You can also customize the invoice template extensively using CSS. Along with that, you can display payment methods, QR, bar codes, signatures, paid stamps, etc., in the invoice or even create a WooCommerce payment invoice for getting paid.
The pro version of Challan is the most advanced premium invoice plugin with loads of added features. Overall, Challan is a fantastic plugin that creates eye-catching invoices to attract your customer’s attention and turn them into returning customers.
Key features
- Generates invoices automatically and attaches them to the WooCommerce order confirmation email.
- Allows you to choose from a number of pre-made templates.
- Enables you to add custom fields, bar codes, QR codes, tax information, etc.
- Allows you to add brand elements such as logo, custom footer, links, signature, paid stamps, etc.
- Supports adding static files.
- Allows you to download the documents in bulk.
- Lets you customize your invoice template extensively with CSS.
Price
You can find the free version of this freemium plugin in the WordPress plugins repository. The premium version has two sets of packages.
Annual cost –
Single Site – $29.00
Five Sites – $59.00
Ten Sites -$129.00
Lifetime cost –
Single Site – $119.00
Five Site – $229.00
Ten Site – $457.00
How to attach an invoice to the WooCommerce order confirmation email with Challan?
Install the plugin the same old way you install a plugin. Go to Plugins>>Add new and type in the plugin name and install.
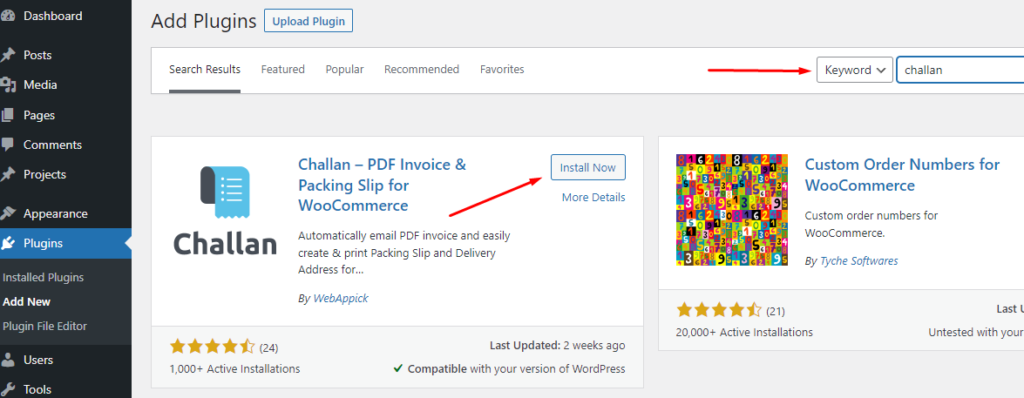
That’s it; you have successfully completed the task! Each new order will trigger the generation of a WooCommerce invoice, which will then be attached to appropriate transactional emails like the order confirmation email.
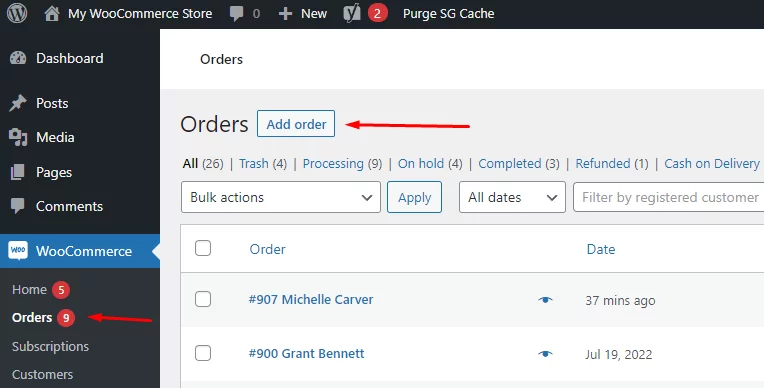
Let’s check it out by creating a manual order from the back panel. Go to WooCommerce>>Orders and add a new order.
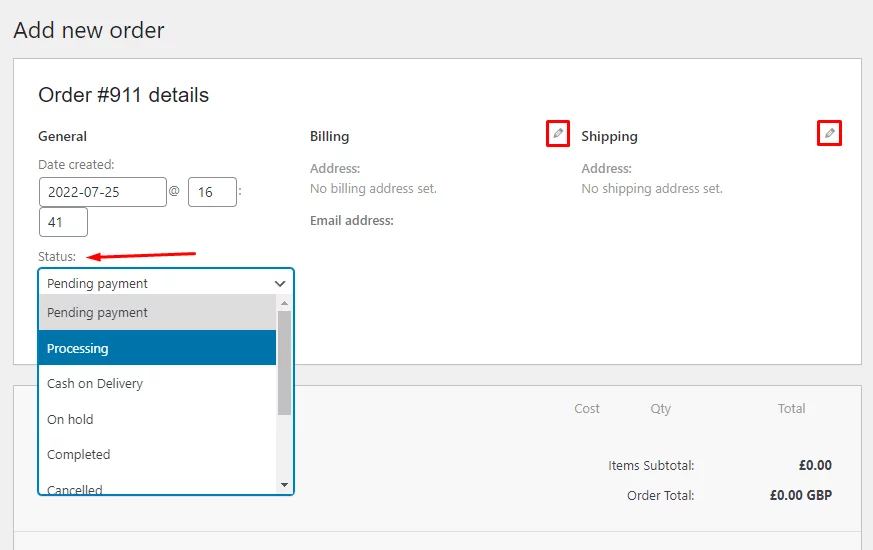
Set the order status to processing.
Now input your demo customer details in the billing address section.
Click on the Add Items button and then Add Products to add some products to the demo order.
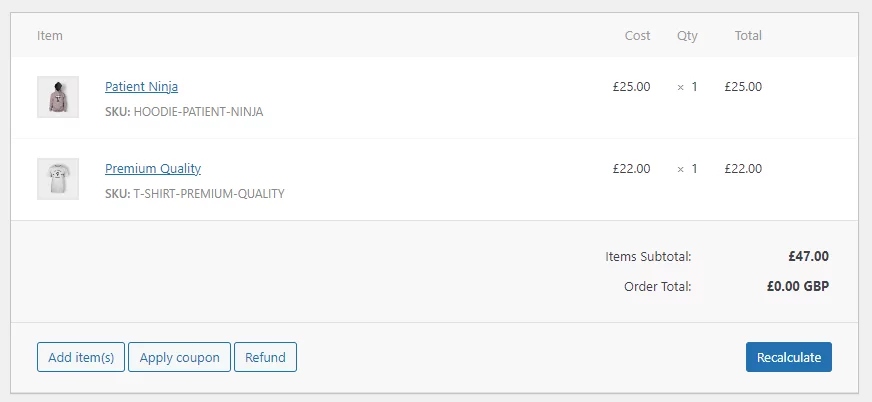
Finally, when you click on the Create button, Challan will automatically generate an invoice and attach it to the order confirmation email. Here’s how it may look in the email inbox.
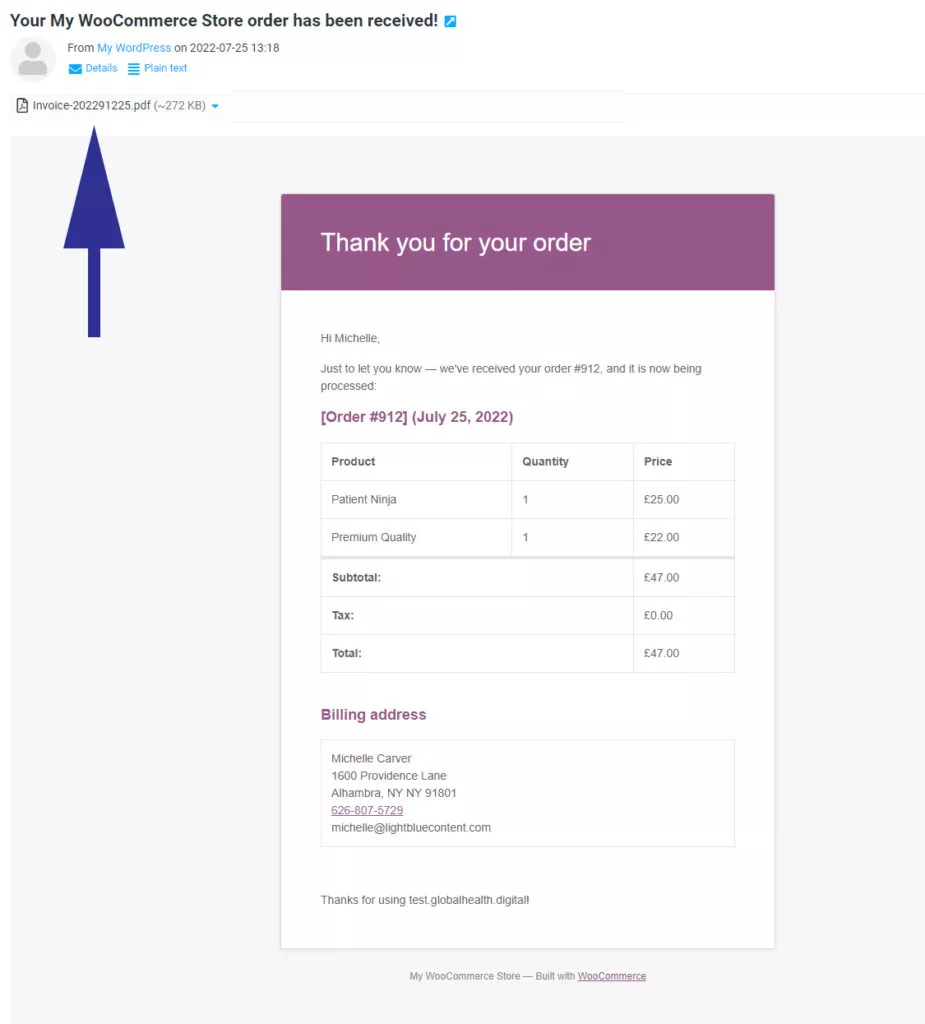
As you can see, an invoice is attached to the email.
Here’s how a Challan invoice looks.
Are customers not receiving WooCommerce order confirmation emails?
By default, WordPress employs the use of PHP mail to carry out its transactional emailing. This indicates that WordPress is sending transactional emails from your hosting server.
Inadequate email-sending capabilities are a common problem with WordPress hosting, and most providers do not have the necessary server settings. As a result, there is a chance that your emails won’t actually be sent or will have other problems en route.
In addition, email providers like Yahoo and Google Mail are fighting an ongoing war against spammers. A primary step in processing incoming emails is verifying that they originated from the addresses given.
In the event that the necessary authentication cannot be provided, the email will either be moved to the junk mail folder, or it will not be delivered at all. If your customers aren’t getting your emails, they won’t get the invoices that WooCommerce sends out automatically.
What, then, is the answer?
An SMTP plugin is highly recommended. The acronym “SMTP” refers to the Simple Mail Transfer Protocol, which is the standard method of sending emails.
By utilizing authentication methods that are acceptable to email service providers, an email that has been properly configured to use SMTP will have a better chance of being delivered. However, in order for SMTP plugins to function correctly, you will need to configure them, which is a process that can be considered somewhat technical.
Installing the free plugin WP Mail Logging is another quick option. One of the best features of this plugin is that it requires zero configuration. In our own testing, we found that using this plugin significantly increased the rate at which emails were delivered.
Wrap up
If you want more customers and a better reputation for your WooCommerce store, you can’t afford to ignore the importance of the WooCommerce order confirmation email.
That’s why it’s important to provide accurate order information, order status updates, and other resources via email. A customer’s brand recognition and willingness to return for future purchases will increase with this considerate form of communication.
Attaching the invoice to your order confirmation email is equally important for your online business. Hope this article helped to understand the total process, including customizing emails and sending invoices along with them.
Let us know if you have any questions.
