%22%2F%3E%0A%3Cpath%20d%3D%22M59.8894%2016.6974C60.1689%2016.9331%2060.5416%2017.1216%2060.9142%2017.0745C61.5664%2017.0273%2061.8925%2016.6031%2061.6596%2015.7547C61.5198%2014.4349%2061.4267%2013.1623%2061.2869%2011.8425C61.1006%209.72149%2060.8211%207.55331%2060.5881%205.38512L60.1689%201.70863C60.0757%200.81307%2059.6099%200.294591%2058.7713%200.106053C58.4918%20-0.0353509%2058.2123%20-0.0353509%2057.9328%200.106053C57.7931%200.106053%2057.6999%200.106053%2057.6067%200.153187C56.5353%200.483129%2055.4172%200.81307%2054.3458%201.19015C53.5073%201.47295%2052.6222%201.75576%2051.7371%202.03857C50.2929%202.50991%2048.8488%203.02839%2047.4047%203.49974C46.4264%203.82967%2045.4016%204.1596%2044.3768%204.48952L44.3767%204.48956C43.6313%204.72523%2043.3518%205.24371%2043.6313%205.85646C43.7711%206.13927%2044.004%206.32781%2044.2369%206.46921C44.7028%206.79915%2045.2152%207.08196%2045.6811%207.4119C45.8674%207.55331%2046.0537%207.69471%2045.8208%208.02465C45.7276%208.21319%2045.5879%208.35459%2045.4481%208.54313L45.355%208.73167L44.5164%2010.0986L43.9108%2010.9941L43.3052%2011.8897L43.2121%2011.9839L42.1406%2013.5865L44.5867%2019.8706C45.5713%2022.1447%2048.6357%2026.5713%2052.552%2023.6277L53.9265%2022.2593L54.3458%2021.5523C54.3924%2021.458%2054.4856%2021.3637%2054.5321%2021.2694L54.5787%2021.2223C55.2309%2020.1854%2055.883%2019.1956%2056.5352%2018.2059L56.5353%2018.2057C57.0477%2017.4044%2057.5601%2016.6503%2058.0726%2015.849C58.2123%2015.6604%2058.3055%2015.6133%2058.4918%2015.7076C58.9577%2016.0375%2059.4235%2016.4146%2059.8894%2016.6974Z%22%20fill%3D%22%233D89D0%22%2F%3E%0A%3Cpath%20d%3D%22M28.0259%2022.0232C27.9793%2022.0703%2027.9793%2022.1175%2027.9327%2022.1646C27.9793%2022.1175%2028.0259%2022.0703%2028.0259%2022.0232Z%22%20fill%3D%22url(%23paint1_linear)%22%2F%3E%0A%3Cpath%20d%3D%22M53.9265%2022.3064C53.7402%2022.5892%2053.5538%2022.872%2053.3675%2023.202C53.0414%2023.7204%2052.7153%2024.1918%2052.3892%2024.7103C51.3178%2026.4071%2050.1531%2027.9625%2048.4295%2029.0938C46.9388%2030.0365%2045.4015%2030.6021%2043.6779%2030.8849C42.1872%2031.1206%2040.7896%2030.9791%2039.3921%2030.5549C37.6219%2030.0365%2036.038%2029.1409%2034.687%2027.8211C33.7088%2026.8784%2032.9634%2025.7944%2032.3578%2024.616C32.0317%2023.9561%2031.7988%2023.2491%2031.4727%2022.5421C31.0534%2021.5522%2030.1683%2019.2427%2030.1218%2019.1012C30.0752%2019.0541%2030.0752%2018.9598%2030.0286%2018.9127C29.9354%2018.7242%2029.8422%2018.5828%2029.7957%2018.3942C29.6559%2018.0172%2029.4696%2017.6401%2029.3298%2017.2159C29.2366%2017.0273%2029.1901%2016.8388%2029.0969%2016.6503C28.9571%2016.3674%2028.864%2016.0846%2028.7242%2015.7547C28.5845%2015.3776%2028.4447%2015.0005%2028.2584%2014.6235C28.1652%2014.3407%2028.0254%2014.0579%2027.9323%2013.775C27.9323%2013.7279%2027.9323%2013.7279%2027.8857%2013.6808C27.7925%2013.4922%2027.7459%2013.3037%2027.6528%2013.1152C27.4664%2012.5967%2027.2335%2012.1253%2027.0006%2011.6069C27.0006%2011.5597%2026.954%2011.5126%2026.9074%2011.4655C26.8142%2011.2769%2026.7211%2011.1355%2026.5813%2010.947C26.5347%2010.8998%2026.4882%2010.8527%2026.4882%2010.8056C26.4416%2010.7584%2026.395%2010.7113%2026.395%2010.6642C26.3484%2010.617%2026.3018%2010.5699%2026.2552%2010.5228C26.2086%2010.4756%2026.2086%2010.4285%2026.1621%2010.4285L26.1155%2010.3814C26.0689%2010.3342%2026.0223%2010.2871%2026.0223%2010.2871C25.9291%2010.1928%2025.8826%2010.1457%2025.7894%2010.0514C25.7428%2010.0043%2025.6962%209.95715%2025.6496%209.95715C25.603%209.91002%2025.5565%209.91002%2025.5099%209.86288C25.4167%209.81575%2025.3701%209.76861%2025.277%209.67435C25.2304%209.62721%2025.1838%209.62721%2025.1372%209.58008C25.0906%209.53294%2025.044%209.53294%2024.9974%209.48581C24.9509%209.48581%2024.9043%209.43867%2024.9043%209.43867C24.8577%209.39154%2024.8111%209.39154%2024.7645%209.3444C24.7179%209.3444%2024.7179%209.29727%2024.6714%209.29727C24.5782%209.25014%2024.485%209.203%2024.3918%209.15587C22.9943%208.59025%2021.1775%208.77879%2020.1992%209.10873C19.2675%209.43867%2018.2893%2010.3342%2018.2427%2010.4285C18.6619%209.72148%2019.0812%208.96733%2019.547%208.26031C20.1526%207.36475%2020.7117%206.4692%2021.3638%205.62078C22.3887%204.63095%2023.4602%203.78253%2024.6714%203.07551C27.0006%201.75575%2029.4696%201.52007%2032.0317%201.89715C33.3361%202.08569%2034.5939%202.60417%2035.7585%203.35832C36.9231%204.06534%2037.9014%204.96089%2038.7399%206.04499C39.2989%206.79914%2039.8114%207.60043%2040.1374%208.49598C40.6033%209.67435%2041.1623%2010.8056%2041.5816%2011.9839C41.7679%2012.5496%2042.0008%2013.068%2042.2338%2013.6336C42.2338%2013.6336%2042.2338%2013.6336%2042.2338%2013.6808V13.7279L45.0288%2019.8554C45.4015%2020.8452%2045.9139%2021.6465%2046.7059%2022.3535C47.2183%2022.872%2047.8705%2023.1548%2048.5227%2023.3905C48.5693%2023.3905%2048.6158%2023.4376%2048.6624%2023.4376C49.7805%2023.7676%2051.2246%2023.3905%2052.3426%2023.0134C53.088%2022.6835%2053.6936%2022.4007%2053.9265%2022.3064Z%22%20fill%3D%22url(%23paint2_linear)%22%2F%3E%0A%3Cpath%20d%3D%22M28.0255%2022.0238C27.9789%2022.0709%2027.9789%2022.118%2027.9324%2022.1652C27.9324%2022.1652%2027.9324%2022.1652%2027.9324%2022.2123C27.7926%2022.448%2027.6063%2022.6836%2027.4665%2022.9664C25.8826%2025.8416%2024.4385%2028.1512%2021.6434%2029.6595C19.3142%2030.9793%2016.8452%2031.215%2014.2831%2030.8379C14.1433%2030.8379%2014.0501%2030.7908%2013.9104%2030.7908C12.7458%2030.6022%2011.5812%2030.0838%2010.4165%2029.2825C8.78607%2028.1512%207.52829%2026.5958%206.64318%2024.8047L6.17733%2023.9091L5.01272%2021.5524L0.726927%2012.6911C0.447419%2012.0784%200.214496%2011.4656%200.121327%2010.8529C-0.437689%207.8834%200.95985%204.77252%203.80151%203.35849C5.43198%202.51007%207.24878%202.4158%208.87924%202.93428C10.6029%203.45276%2012.1402%204.67825%2013.0253%206.46937L13.1184%206.6579L14.7489%209.95732C14.7955%2010.0516%2014.7955%2010.1459%2014.8421%2010.2401C15.075%2010.8529%2015.8204%2012.4083%2016.426%2013.5867C16.4725%2013.6809%2016.5191%2013.7752%2016.5657%2013.8223C16.6123%2013.9638%2016.7055%2014.1052%2016.752%2014.1994C16.7986%2014.2937%2016.8452%2014.3408%2016.8452%2014.4351C16.8452%2014.4822%2016.8918%2014.4822%2016.8918%2014.5294C16.9384%2014.5765%2016.9384%2014.6708%2016.985%2014.7179C16.985%2014.765%2017.0316%2014.765%2017.0316%2014.8122C17.0316%2014.8593%2017.0781%2014.8593%2017.0781%2014.9064C17.0781%2014.9536%2017.1247%2015.0007%2017.1247%2015.0478C17.1247%2015.095%2017.1713%2015.095%2017.1713%2015.1421C17.3111%2015.4249%2017.4042%2015.7549%2017.544%2016.0377C17.6372%2016.2262%2017.6837%2016.4147%2017.7769%2016.6504C17.9632%2017.1689%2018.1962%2017.6402%2018.3825%2018.1587C18.5223%2018.4415%2018.6154%2018.7715%2018.7552%2019.0543C18.8018%2019.1485%2018.8484%2019.29%2018.8949%2019.3842C18.9881%2019.5728%2019.0347%2019.7613%2019.1279%2019.9498C19.3608%2020.5154%2019.5937%2021.0811%2019.9664%2021.5995C20.1993%2021.8823%2020.3857%2022.1652%2020.6652%2022.4008C22.3888%2023.9563%2024.9975%2023.862%2028.0255%2022.0238Z%22%20fill%3D%22url(%23paint3_linear)%22%2F%3E%0A%3Cpath%20d%3D%22M68.0888%2024.8694L68%207.88696H71.9963L71.8187%2018.4448L76.8806%207.88696H80.6548L81.3209%2018.3999L85.5392%207.88696H89.713L82.4754%2024.8694H78.1683L77.5466%2013.9072L72.3959%2024.8694H68.0888Z%22%20fill%3D%22%230D5293%22%2F%3E%0A%3Cpath%20d%3D%22M92.7771%2025.1385C89.2693%2025.1385%2086.7383%2022.6675%2086.7383%2019.2081C86.7383%2015.3893%2089.8021%2012.1545%2093.4431%2012.1545C96.6402%2012.1545%2098.8603%2014.4458%2098.8603%2017.7704C98.8603%2018.5342%2098.8159%2019.1182%2098.7271%2019.6124H90.4237C90.6457%2021.0501%2091.7114%2022.0385%2093.2211%2022.0385C94.1536%2022.0385%2094.9528%2021.724%2095.5301%2021.095L97.617%2023.4762C96.0185%2024.6443%2094.5976%2025.1385%2092.7771%2025.1385ZM90.6457%2017.411H95.4857C95.3081%2016.0632%2094.4644%2015.2545%2093.2211%2015.2545C92.0666%2015.2096%2091.0898%2016.0632%2090.6457%2017.411Z%22%20fill%3D%22%230D5293%22%2F%3E%0A%3Cpath%20d%3D%22M105.965%2024.9589C104.411%2024.9589%20103.167%2024.24%20102.368%2022.8473L101.924%2024.869H98.1499L101.791%207.52717L105.698%206.89819L104.322%2013.5923C105.166%2012.7836%20106.32%2012.2894%20107.519%2012.2894C110.139%2012.2894%20112.181%2014.8054%20112.181%2018.0401C112.226%2021.814%20109.428%2024.9589%20105.965%2024.9589ZM103.789%2016.3778L102.945%2020.4212C103.478%2021.185%20104.366%2021.6792%20105.388%2021.6792C107.208%2021.6792%20108.54%2020.2415%20108.54%2018.3097C108.54%2016.6474%20107.43%2015.4793%20105.92%2015.4793C105.077%2015.4793%20104.411%2015.7937%20103.789%2016.3778Z%22%20fill%3D%22%230D5293%22%2F%3E%0A%3Cpath%20d%3D%22M120.44%207.88696H125.058L127.899%2024.8694H123.725L123.193%2020.8259H117.154L114.978%2024.8694H110.582L120.44%207.88696ZM122.704%2017.5912L121.949%2011.9304L118.886%2017.5463H122.704V17.5912Z%22%20fill%3D%22%230D5293%22%2F%3E%0A%3Cpath%20d%3D%22M131.23%2012.3347H135.004L134.782%2013.5927C135.626%2012.7391%20136.736%2012.2449%20137.935%2012.2449C140.555%2012.2449%20142.597%2014.7608%20142.597%2017.9955C142.597%2021.8143%20139.8%2024.9592%20136.336%2024.9592C134.782%2024.9592%20133.539%2024.2853%20132.828%2022.9824L131.274%2030.0809H127.456L131.23%2012.3347ZM134.205%2016.3332L133.317%2020.5114C133.85%2021.2303%20134.738%2021.6796%20135.715%2021.6796C137.535%2021.6796%20138.867%2020.2419%20138.867%2018.31C138.867%2016.6477%20137.757%2015.4796%20136.247%2015.4796C135.493%2015.4796%20134.827%2015.7492%20134.205%2016.3332Z%22%20fill%3D%22%230D5293%22%2F%3E%0A%3Cpath%20d%3D%22M144.595%2012.3347H148.369L148.147%2013.5927C148.99%2012.7391%20150.101%2012.2449%20151.299%2012.2449C153.919%2012.2449%20155.962%2014.7608%20155.962%2017.9955C155.962%2021.8143%20153.164%2024.9592%20149.701%2024.9592C148.147%2024.9592%20146.904%2024.2853%20146.193%2022.9824L144.683%2030.0809H140.865L144.595%2012.3347ZM147.57%2016.3332L146.682%2020.5114C147.214%2021.2303%20148.102%2021.6796%20149.079%2021.6796C150.9%2021.6796%20152.232%2020.2419%20152.232%2018.31C152.232%2016.6477%20151.122%2015.4796%20149.612%2015.4796C148.857%2015.4796%20148.191%2015.7492%20147.57%2016.3332Z%22%20fill%3D%22%230D5293%22%2F%3E%0A%3Cpath%20d%3D%22M159.115%2024.8694H155.296L158.005%2012.3347H161.824L159.115%2024.8694ZM158.449%208.47099C158.449%207.1681%20159.559%206%20160.847%206C161.912%206%20162.8%206.85361%20162.8%207.93186C162.8%209.27967%20161.69%2010.4029%20160.358%2010.4029C159.248%2010.4029%20158.449%209.54924%20158.449%208.47099Z%22%20fill%3D%22%230D5293%22%2F%3E%0A%3Cpath%20d%3D%22M169.727%2020.6909L171.592%2023.1619C170.304%2024.4648%20168.572%2025.1387%20166.752%2025.1387C163.466%2025.1387%20161.068%2022.7126%20161.068%2019.388C161.068%2015.3446%20164.088%2012.1099%20167.862%2012.1099C170.082%2012.1099%20171.947%2013.0983%20173.013%2014.7606L170.304%2017.0069C169.727%2015.9736%20168.927%2015.4794%20167.773%2015.4794C166.13%2015.4794%20164.842%2017.0518%20164.842%2019.0286C164.842%2020.6909%20165.819%2021.6793%20167.329%2021.6793C168.261%2021.7243%20169.016%2021.4098%20169.727%2020.6909Z%22%20fill%3D%22%230D5293%22%2F%3E%0A%3Cpath%20d%3D%22M175.722%207.52717L179.629%206.89819L177.365%2017.6807L182.426%2012.3344H187L180.517%2018.6691L184.691%2024.869H180.162L177.009%2019.5676L175.899%2024.869H172.081L175.722%207.52717Z%22%20fill%3D%22%230D5293%22%2F%3E%0A%3Cdefs%3E%0A%3ClinearGradient%20id%3D%22paint0_linear%22%20x1%3D%2223.1831%22%20y1%3D%2224.7007%22%20x2%3D%2223.3049%22%20y2%3D%228.44851%22%20gradientUnits%3D%22userSpaceOnUse%22%3E%0A%3Cstop%20stop-color%3D%22%23327ACD%22%2F%3E%0A%3Cstop%20offset%3D%221%22%20stop-color%3D%22%234696D2%22%2F%3E%0A%3C%2FlinearGradient%3E%0A%3ClinearGradient%20id%3D%22paint1_linear%22%20x1%3D%2227.9436%22%20y1%3D%2222.0876%22%20x2%3D%2228.0428%22%20y2%3D%2222.0876%22%20gradientUnits%3D%22userSpaceOnUse%22%3E%0A%3Cstop%20offset%3D%220.2029%22%20stop-color%3D%22%234C51BF%22%20stop-opacity%3D%220.9%22%2F%3E%0A%3Cstop%20offset%3D%221%22%20stop-color%3D%22%235A67D8%22%20stop-opacity%3D%220.9%22%2F%3E%0A%3C%2FlinearGradient%3E%0A%3ClinearGradient%20id%3D%22paint2_linear%22%20x1%3D%2232.4583%22%20y1%3D%222.22148%22%20x2%3D%2239.8371%22%20y2%3D%2230.0298%22%20gradientUnits%3D%22userSpaceOnUse%22%3E%0A%3Cstop%20offset%3D%220.3367%22%20stop-color%3D%22%2342B9FF%22%2F%3E%0A%3Cstop%20offset%3D%220.7818%22%20stop-color%3D%22%233B97E1%22%2F%3E%0A%3Cstop%20offset%3D%221%22%20stop-color%3D%22%233784D1%22%2F%3E%0A%3C%2FlinearGradient%3E%0A%3ClinearGradient%20id%3D%22paint3_linear%22%20x1%3D%2211.252%22%20y1%3D%220.972585%22%20x2%3D%2215.8771%22%20y2%3D%2225.7529%22%20gradientUnits%3D%22userSpaceOnUse%22%3E%0A%3Cstop%20offset%3D%220.3367%22%20stop-color%3D%22%2342B9FF%22%2F%3E%0A%3Cstop%20offset%3D%220.7818%22%20stop-color%3D%22%233B97E1%22%2F%3E%0A%3Cstop%20offset%3D%221%22%20stop-color%3D%22%233784D1%22%2F%3E%0A%3C%2FlinearGradient%3E%0A%3C%2Fdefs%3E%0A%3C%2Fsvg%3E%0A)


How to Add a WooCommerce Sale Badge (3 Methods)
 Fadiyah Sameh
 WooCommerce displays a sale badge automatically when you set a sale price on a product. The default badge shows a plain “Sale” label on the product image. To show custom text, a discount percentage, or a fully branded badge, you need either a CSS/PHP snippet or a WooCommerce sale badge plugin.
This guide covers all three methods:
- Using WooCommerce’s built-in sale badge (no code)
- Customizing the sale badge with code (CSS and PHP)
- Adding a custom WooCommerce sale badge using a plugin
Let’s find out how to add sale tag in WooCommerce.
Method 1: How to Add a Sale Badge in WooCommerce (Built-In)
WooCommerce shows a sale badge on any product that has a sale price set. Here is how to enable it.
Step 1: Log in to Your WordPress Dashboard
Log in to your WordPress site as an administrator.
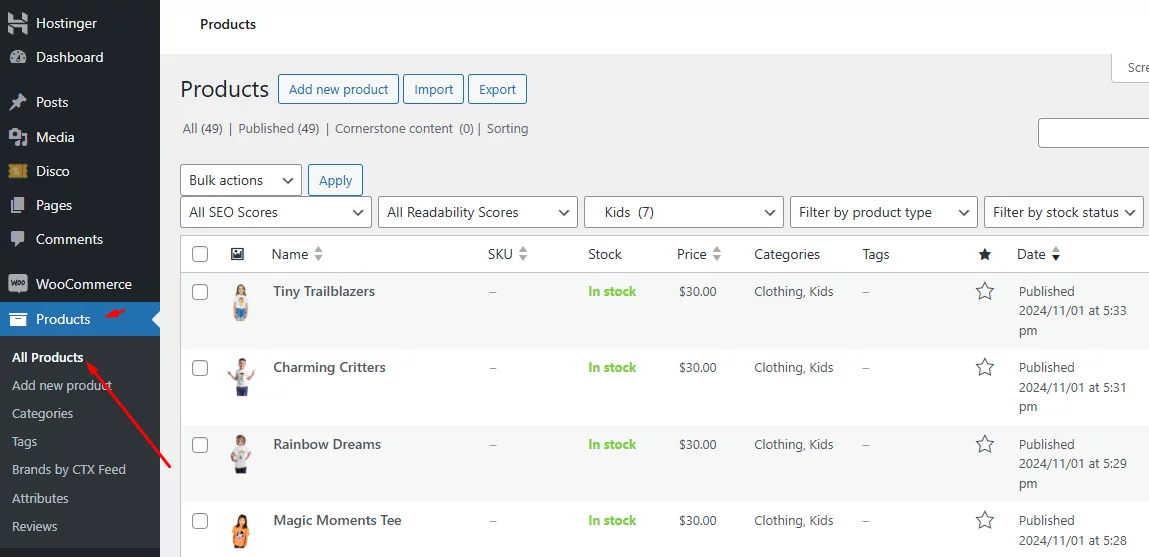
Step 2: Go to Products
Click Products in the left menu, then select All Products.
Step 3: Edit the Desired Product
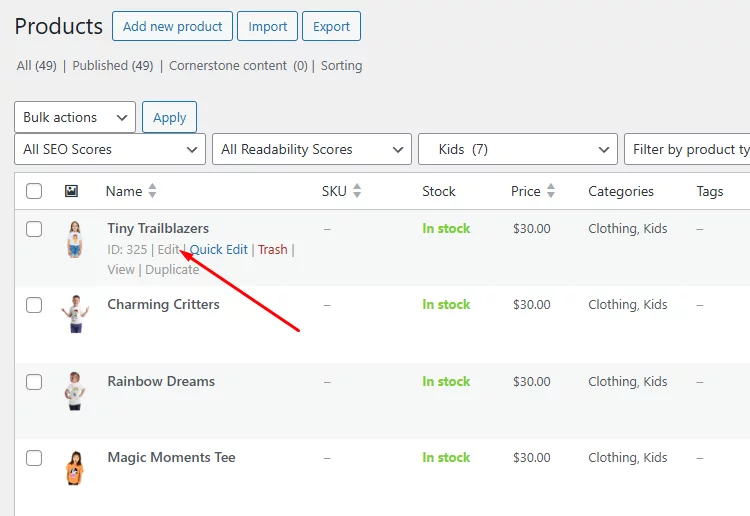
Find the product you want to put on sale, hover the mouse over and click Edit.
Step 4: Set a Sale Price
Scroll to the Product Data section. Under the General tab, you will see two fields:
- Regular Price: The standard price for the product.
- Sale Price: The discounted price to display.
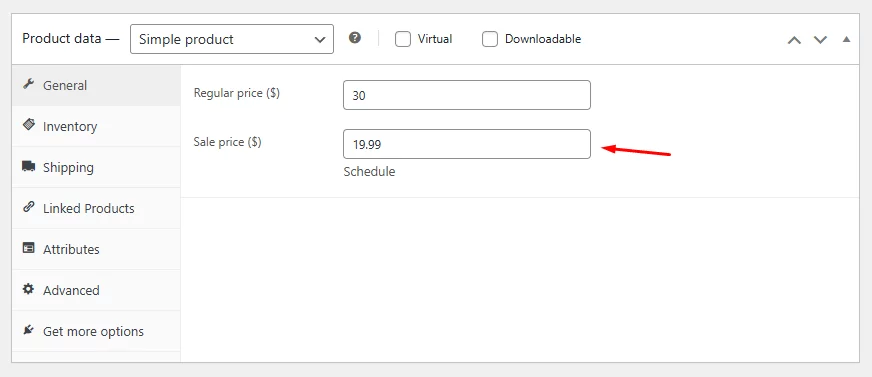
Enter the discounted amount in the Sale Price field.
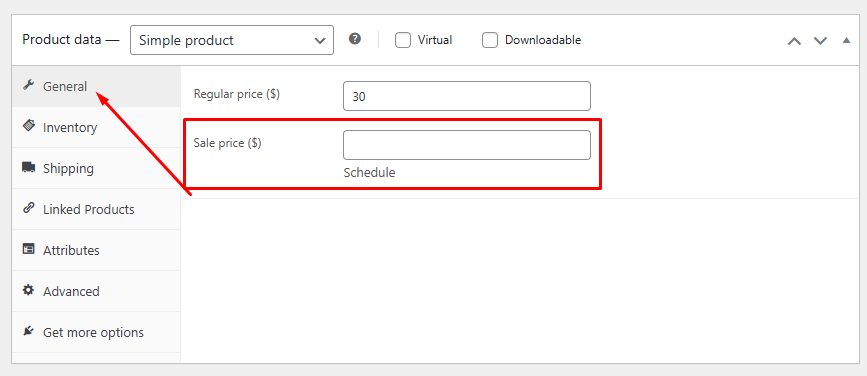
- Enter the discounted price in the Sale Price field.
Step 5: Schedule the Sale (Optional)
Click the Schedule link next to the sale price to set a start and end date. WooCommerce will show and hide the sale badge automatically based on those dates.
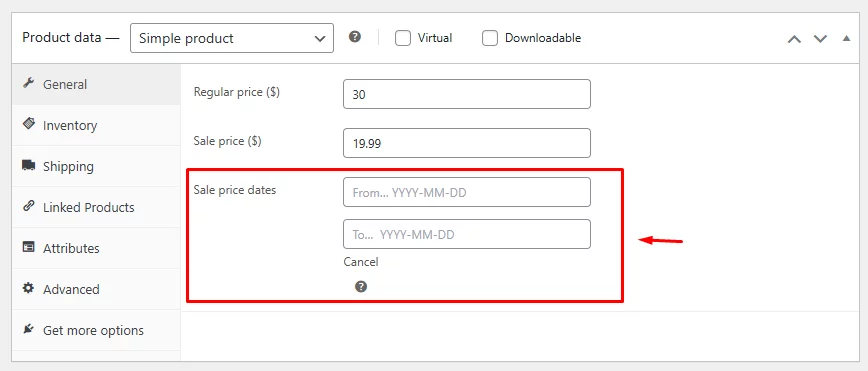
Set the start date in the From field and end dates in the To field for the sale, and WooCommerce will automatically display the sale tag during this period.
Step 6: Save the Changes
Click Update to save. The WooCommerce sale badge will now appear on the product image on your shop and product pages.
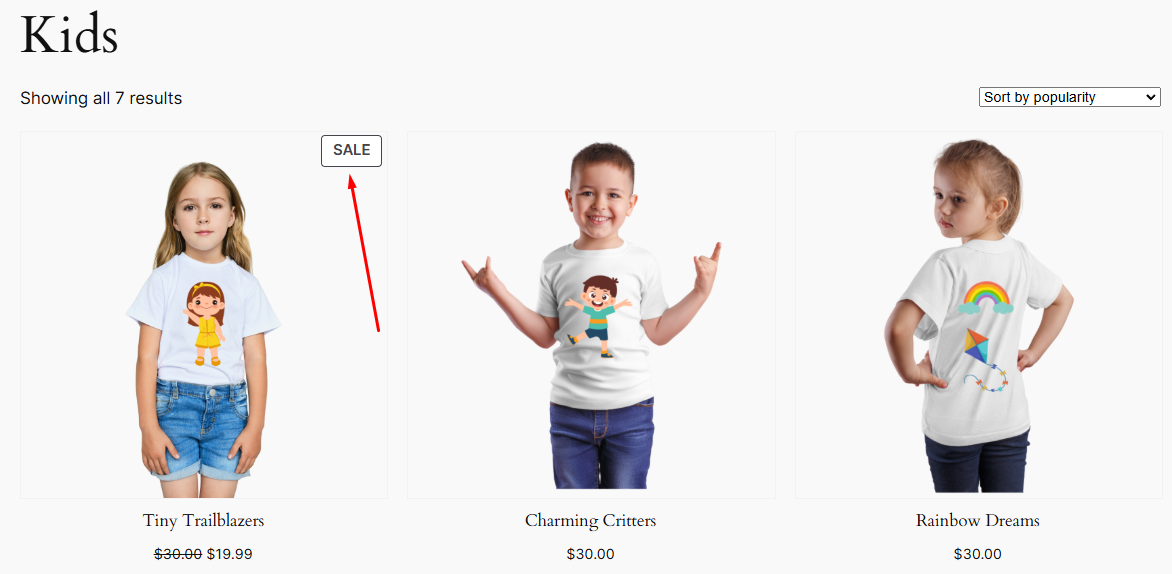
The default badge shows the word “Sale” at the top-left corner of the product image. The product price area also reflects the discount by showing the original price with a strikethrough next to the sale price.
Here’s how our current theme displays the WooCommerce sale flash badge on the Shop page.
Here’s the product page view.
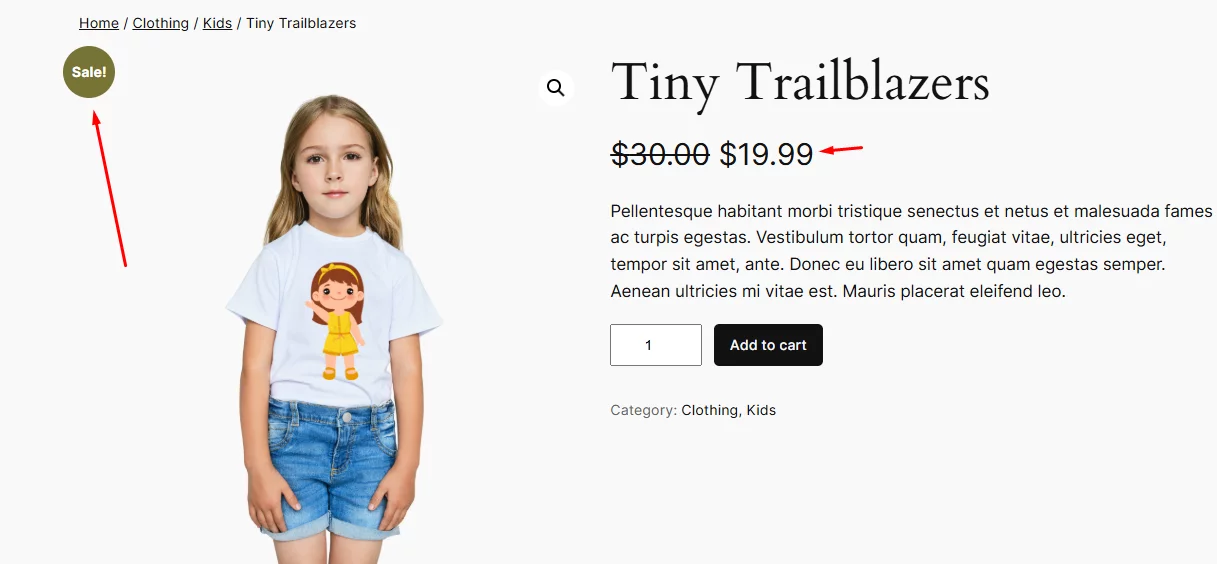
In addition to the sale badge, the price display also reflects the discount. The original price is shown with a strikethrough, while the discounted price is displayed prominently.
This is how to add sale tag in WooCommerce using the default options.
Default WooCommerce Sale Badge: Limitations
The built-in WooCommerce sale badge works out of the box but has several constraints:
- Badge text: Displays “Sale” only. You cannot change the text without custom code or a plugin.
- No percentage display: The badge does not show how much is discounted (for example, “20% Off”) unless you add custom code.
- No style control: Color, shape, font, and position are controlled by your theme, not WooCommerce.
- No scheduling per badge: You can schedule the sale price, but you cannot control badge visibility independently.
If your store needs custom badge text, a discount percentage badge, or branded styling, use Method 2 or Method 3 below.
Method 2: How to Change the WooCommerce Sale Badge with Code
Here’s a simple guide to customize WooCommerce sale badges using codes:
Step 1: Change the Sale Badge Text (PHP)
To replace the default “Sale” text with custom text, add this snippet to your theme’s functions.php file. Go to Appearance > Theme File Editor and locate functions.php.
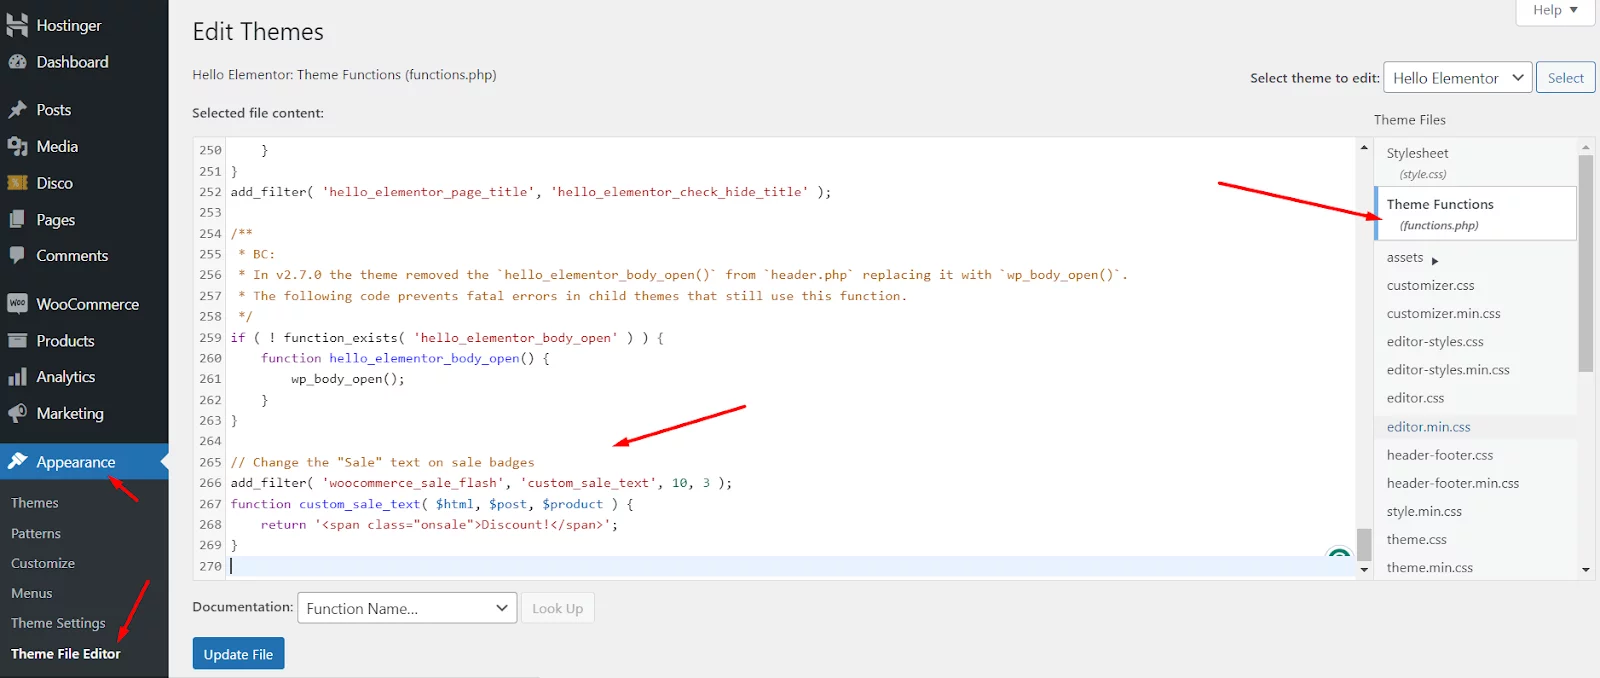
add_filter( 'woocommerce_sale_flash', 'custom_sale_badge_text', 10, 3 );

function custom_sale_badge_text( $html, $post, $product ) {
    return '<span class="onsale">Discount!</span>';
}
Save the file. Your WooCommerce sale badge will now display “Discount!” instead of “Sale.”
To show the discount percentage on the badge, use this snippet instead:
add_filter( 'woocommerce_sale_flash', 'wc_sale_badge_percentage', 10, 3 );

function wc_sale_badge_percentage( $html, $post, $product ) {
    if ( $product->is_type( 'variable' ) ) {
        return $html;
    }
    $regular_price = (float) $product->get_regular_price();
    $sale_price    = (float) $product->get_sale_price();
    if ( $regular_price && $sale_price ) {
        $percentage = round( ( ( $regular_price - $sale_price ) / $regular_price ) * 100 );
        return '<span class="onsale">-' . $percentage . '%</span>';
    }
    return $html;
}
This displays a WooCommerce sale badge percentage (for example, “-20%”) directly on the product image.
Step 2: Change Badge Color and Style (CSS)
Go to Appearance > Customize > Additional CSS and add the following.
Change badge color:
.onsale {
    background-color: #ff5733 !important;
    color: #ffffff !important;
}
Change badge position (move to top-left):
.onsale {
    position: absolute !important;
    top: 10px !important;
    left: 10px !important;
    right: auto !important;
}
Change badge shape (rounded square):
.onsale {
    border-radius: 5px !important;
    width: auto;
    height: auto;
    padding: 5px 10px !important;
    display: inline-flex;
    justify-content: center;
    align-items: center;
    font-size: 14px !important;
    white-space: nowrap;
}
You can combine all of these properties into a single .onsale {} block rather than writing separate blocks for each change.
Method 3: How to Add a WooCommerce Sale Badge Using a Plugin
A WooCommerce sale badge plugin gives you full control over badge design, placement, scheduling, and targeting without touching code. This is the best approach for stores that run frequent promotions or want branded sale badges.
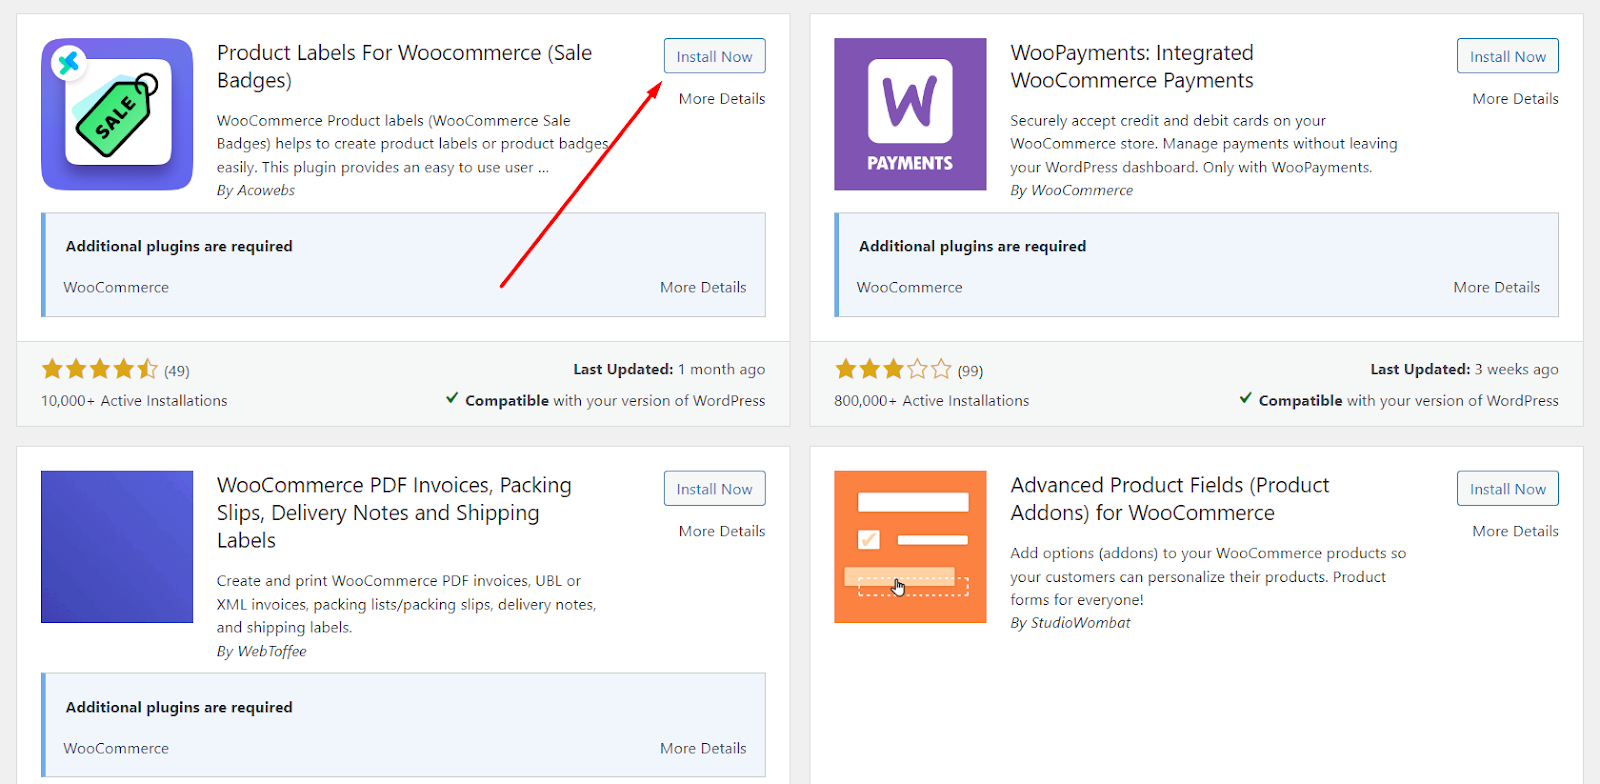
The plugin used in this guide is Product Labels For WooCommerce (Sale Badges) by Acowebs.
Step 1: Install the Display Sale badge WooCommerce Plugin
Go to Plugins >> Add New. Search, find, install and activate the plugin.
Step 2: Hide the Default WooCommerce Sale Badge
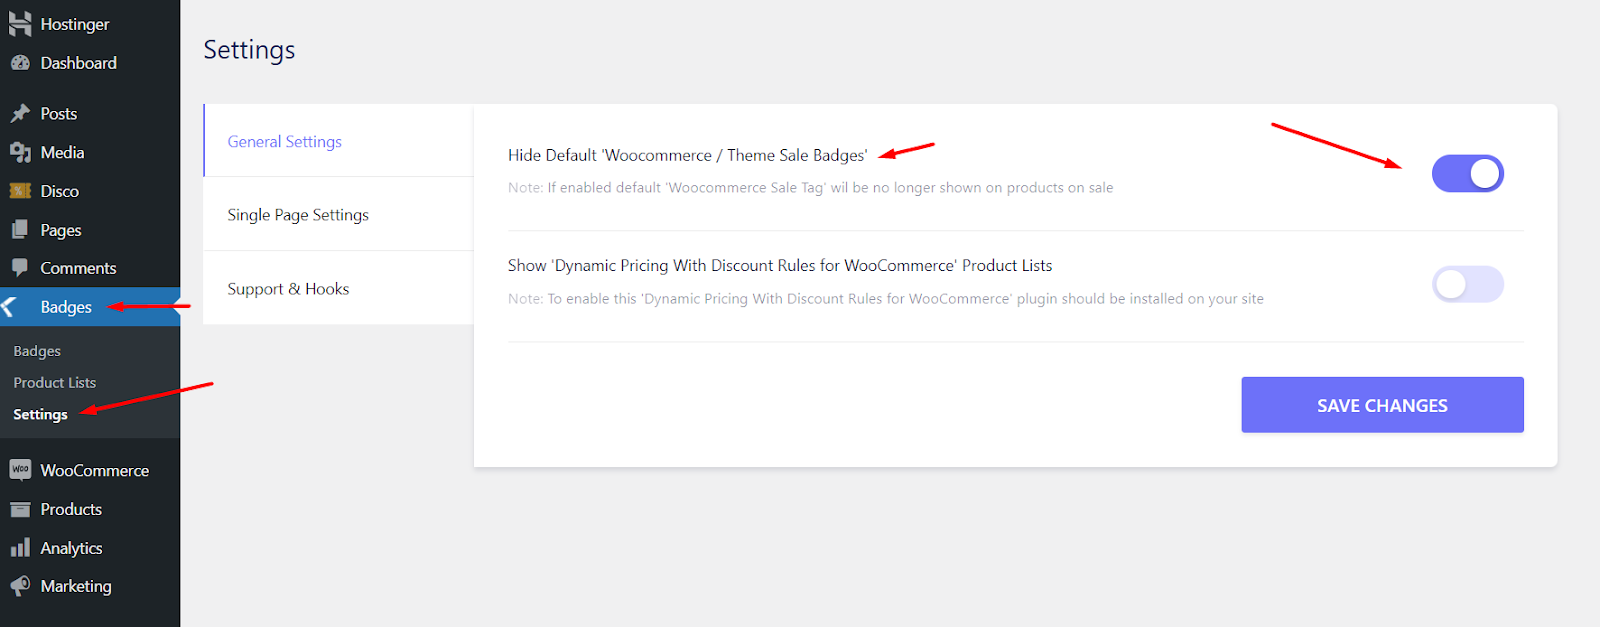
Before creating your custom badge, disable the default WooCommerce sale badge to avoid overlap. Go to the plugin’s settings and enable “Hide Default WooCommerce / Theme Sale Badges.”
Before we start designing our custom sales badge, we need to hide the default WooCommerce badge. This will prevent any visual overlap or conflict between the two.
Go to the plugin’s dedicated menu and click Settings. Enable the option “Hide Default ‘Woocommerce / Theme Sale Badges”
Step 3: Create the WooCommerce Sales Tag/Badge
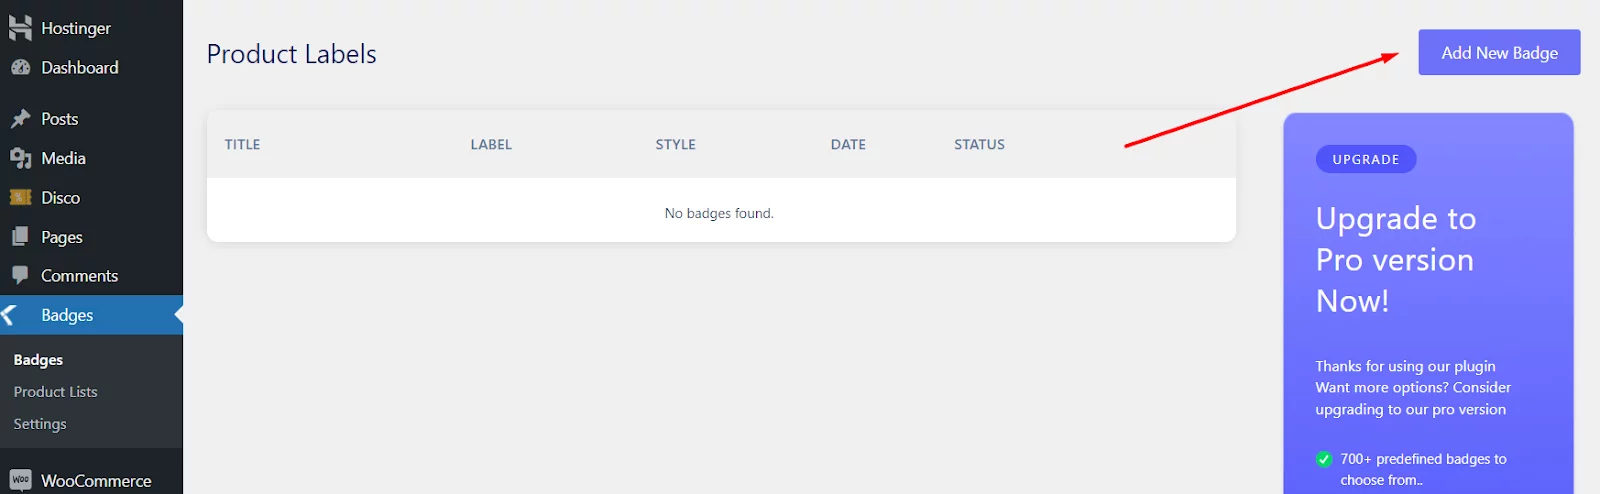
Go to Badges and hit the Add New Badges button.
Give your badge a name. After that, set your sales badge label text in the Badge Label box.
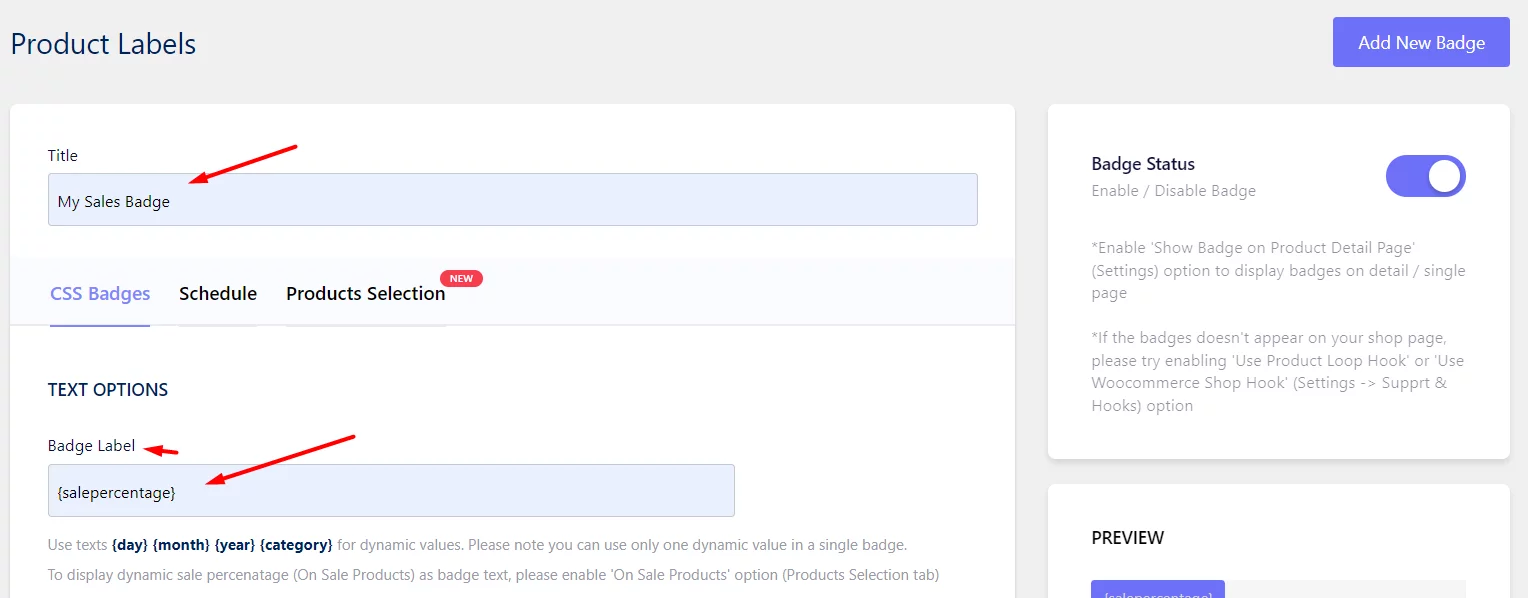
You can also set dynamic values instead of custom texts. Here are some possible dynamic values you can insert – {day} {month} {year} {category} {salepercentage}.
Step 4: Customizing the Sales Badge
Set the visual properties of the badge:
- Text Color: Choose a hex color for the badge text.
- Font Size: Set the size in pixels.
- Font Weight: Select normal or bold.
- Line Height: Set in pixels.
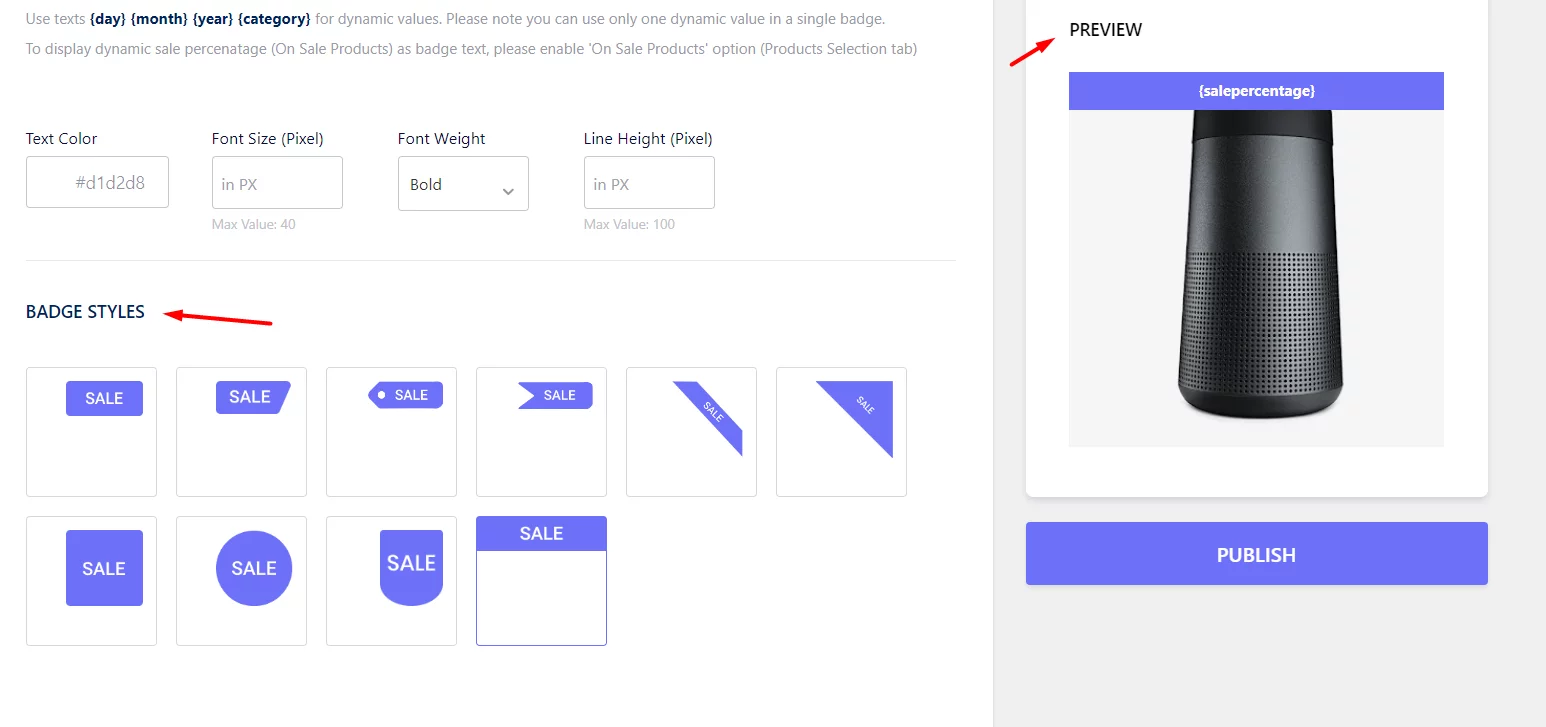
- Badge Style: Select from preset shapes (circle, rectangle, ribbon, and others).
A live front-end preview updates as you make changes.
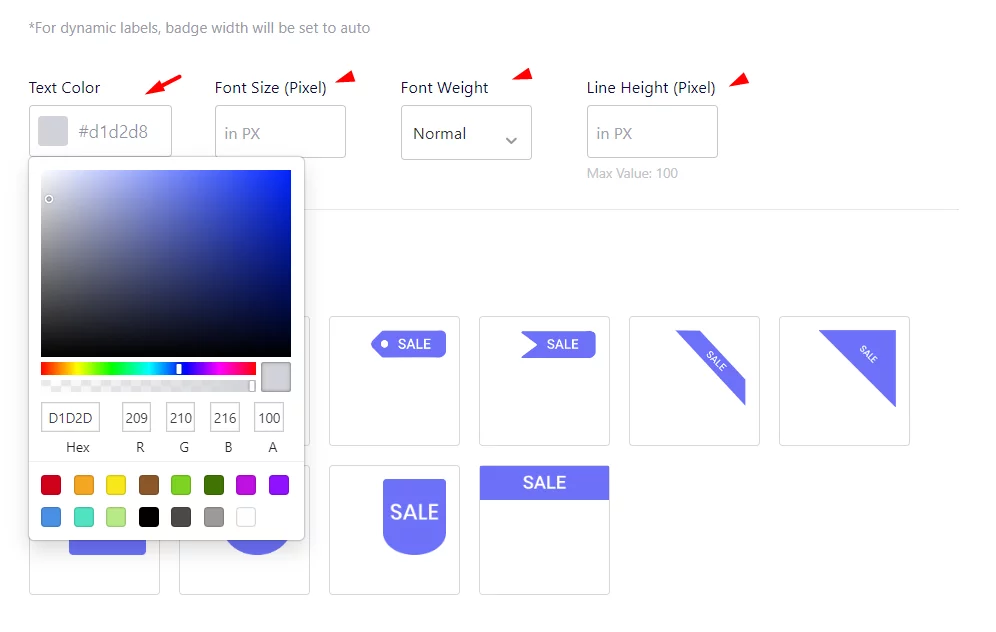
You can select the sales badge style from the following section and check the front-end preview from the right panel.
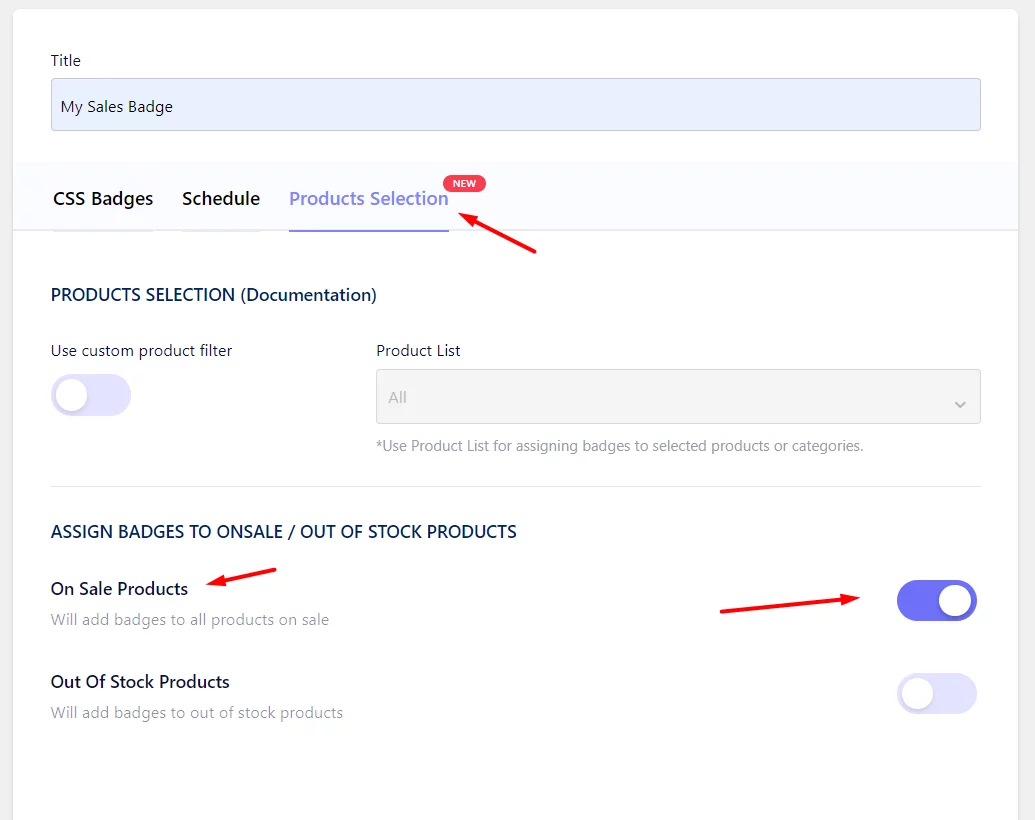
Step 5: Selecting Products for the Badge
Next, you need to select which products will display the badge. If you only want the On Sale products to display badges, go to the Products Selection tab and enable the following option.
If you want to display the badge on a custom list of products, you can create the list from the Product Lists menu.
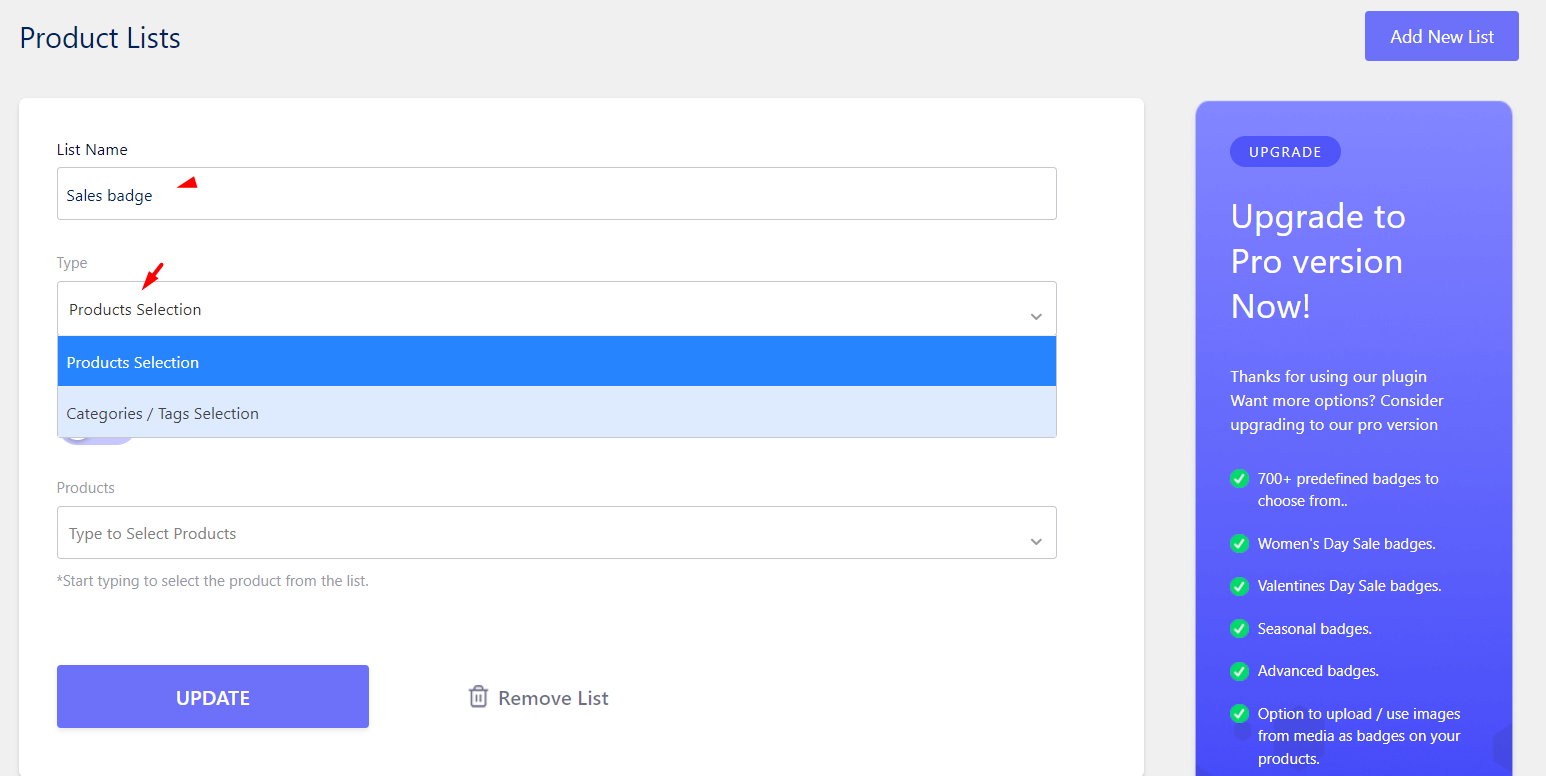
After that, come back to the Products Selection tab and assign the list.
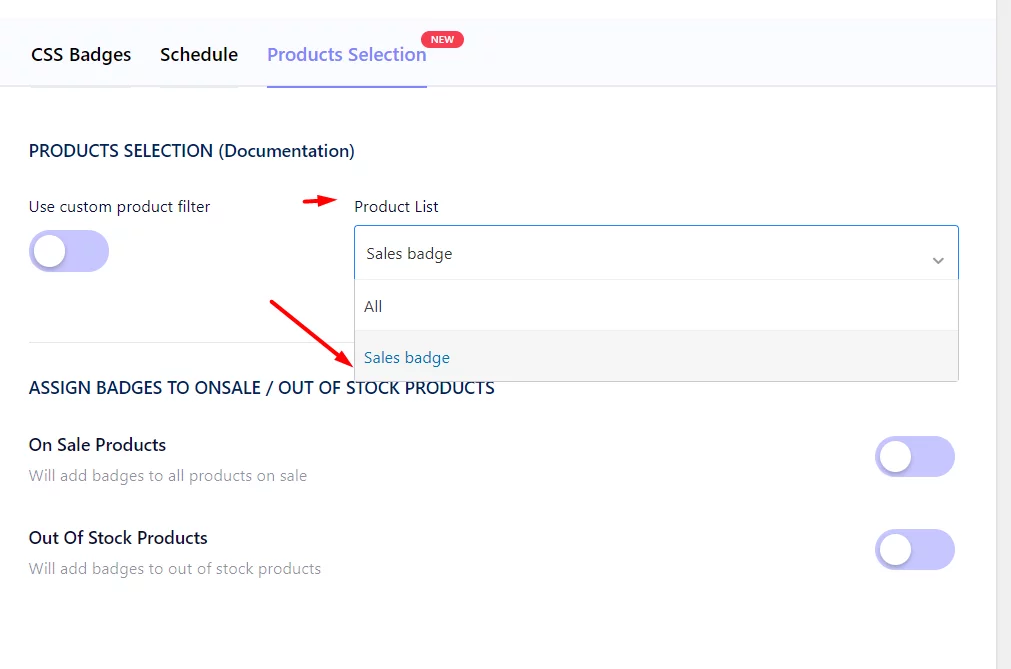
For this example, we will continue with the On Sale Products option.
Step 6: Publish The WooCommerce Sales Badge
The plugin allows you to set a custom schedule for displaying the sales badge on the front.
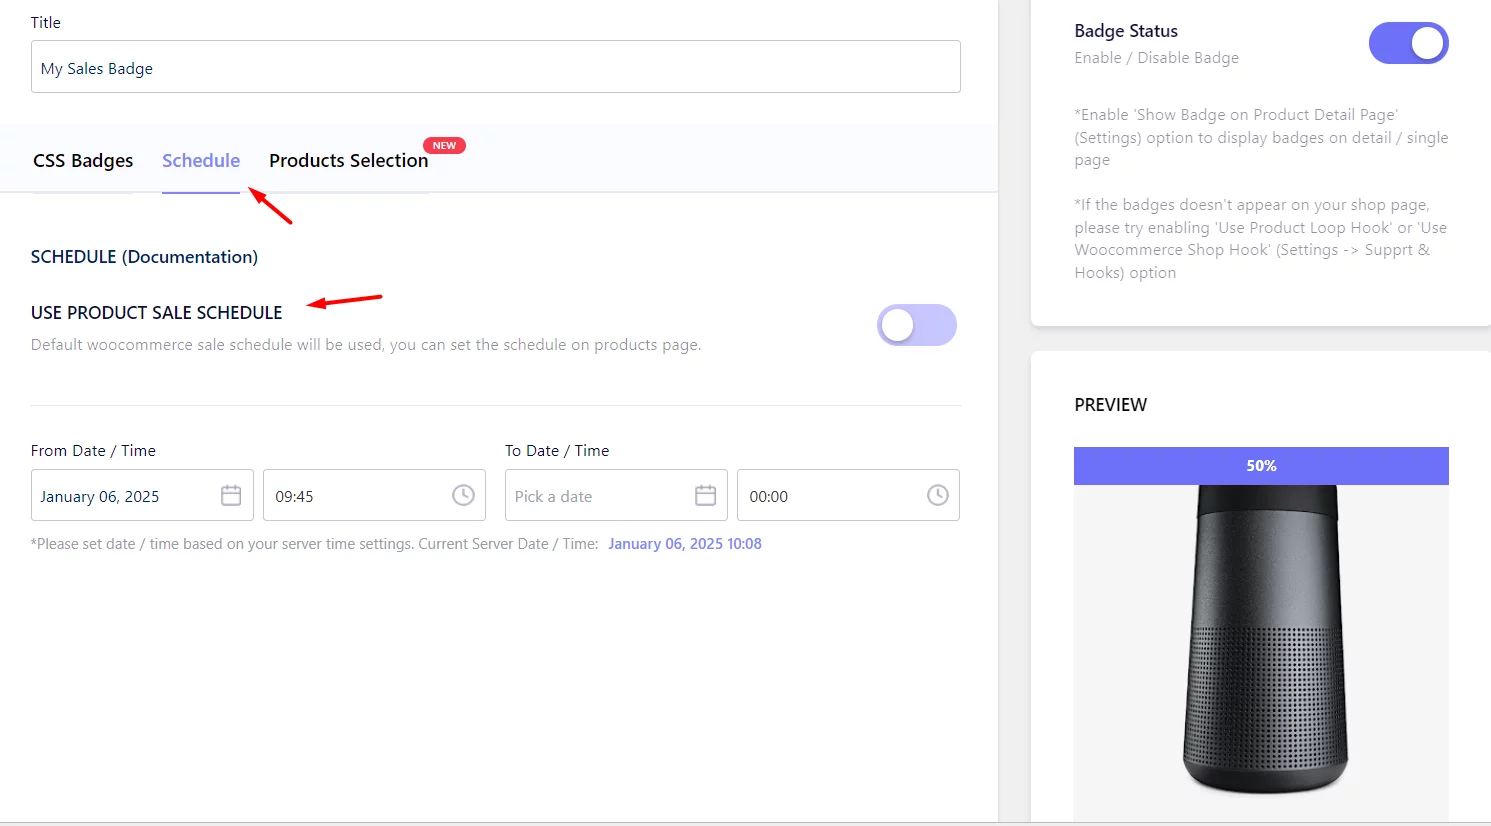
If you want to display it right away, hit the Publish button without scheduling any specific date. Here’s how the front page displays the badge now.
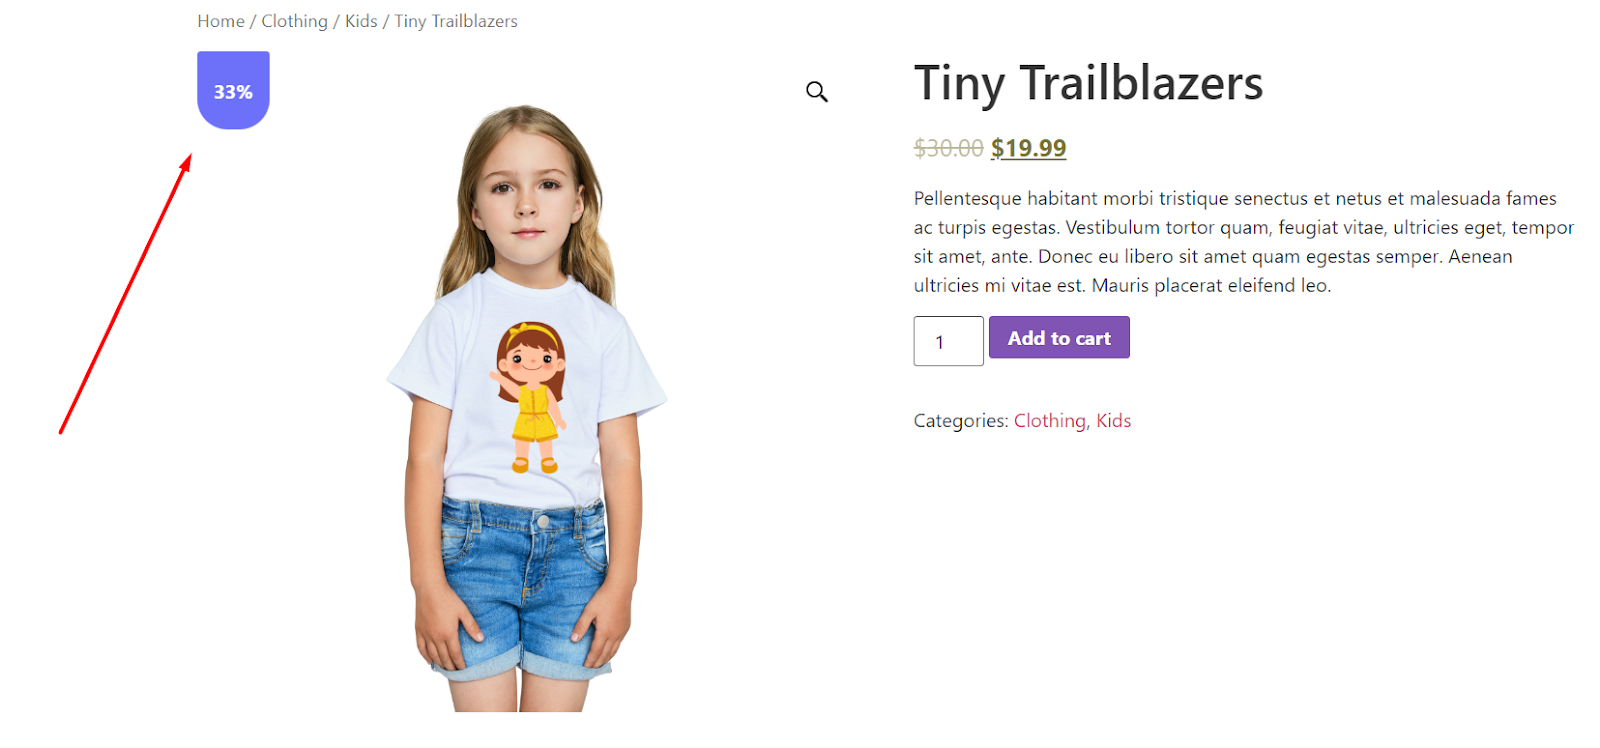
This is how to add sale tag in WooCommerce using a plugin. As you can see, adding sale tags in WooCommerce using a plugin is a simple and effortless process, yet it offers surprisingly advanced capabilities for managing your promotions.
If you are using a dedicated discount plugin such as Disco and running multiple discount campaigns you can display custom badges for your offered discounts using the combination of these plugins.
How to Show the Sale Percentage in the WooCommerce Badge
Showing the discount percentage on a WooCommerce sale badge (for example, “Save 25%”) is one of the most effective ways to communicate value to shoppers. There are two ways to do it.
Using code: Use the PHP snippet from Method 2, Step 1 above. It calculates the percentage from the regular and sale price and injects it into the badge.
Using a plugin: In the Acowebs plugin (and similar tools), add {salepercentage} to the badge label field. The plugin calculates and displays the discount percentage automatically, including for products with multiple price points.
Note: The code method does not work for variable products without additional customization. A plugin handles variable products more reliably.
Best WooCommerce Sale Badge Plugin: Product Labels For WooCommerce
Product Labels For WooCommerce (Sale Badges) by Acowebs is a dedicated WooCommerce sale badge plugin with a free version available on WordPress.org.
Key Features
- Custom badge text and dynamic values including {salepercentage}
- Full style control: colors, fonts, shapes, sizes
- Badge position control including top-right and top-left placement
- Product targeting: apply badges to on-sale products, specific products, or custom lists
- Scheduling: set start and end dates per badge
- Hides the default WooCommerce sale badge to prevent overlap
The free version covers core badge customization. Check the official plugin page for paid plan details before publishing, as pricing may change.
Freequently Asked Questions
How do I add a sale badge to WooCommerce products?
Set a sale price on a product in WooCommerce (Products > Edit > Sale Price). WooCommerce will add a “Sale” badge to the product image automatically. To customize the badge text, color, or show a percentage, use a CSS/PHP snippet or a WooCommerce sale badge plugin.
Which WooCommerce plugin adds a sale badge to products?
Several plugins add sale badges to WooCommerce products. Product Labels For WooCommerce (Sale Badges) by Acowebs is a widely used free option. It lets you create custom badges with dynamic percentage values, choose badge styles, and control which products display the badge. Other options include YITH WooCommerce Badge Management and Advanced Product Labels for WooCommerce.
How do I show the discount percentage on a WooCommerce sale badge?
Use the PHP snippet with wc_sale_badge_percentage to calculate and display the discount percentage automatically (see Method 2). If you prefer a no-code solution, install a WooCommerce sale badge plugin and use the {salepercentage} dynamic value in the badge label field.
How do I change the WooCommerce sale badge text?
Add a filter to woocommerce_sale_flash in your functions.php file and return custom HTML with your preferred text (see Method 2, Step 1). To change it without code, use a plugin like Acowebs Product Labels and set a custom badge label.
How do I move the WooCommerce sale badge to the top right?
Add the following CSS to Appearance > Customize > Additional CSS:.onsale {
position: absolute !important;
top: 10px !important;
right: 10px !important;
left: auto !important;
}
Note that theme styles may override this. Add !important to each property if the position does not update.
Can I schedule a WooCommerce sale badge?
Yes. WooCommerce lets you schedule the sale price itself using the Schedule link in the Product Data panel. The default sale badge appears and disappears based on those dates. For badge-specific scheduling independent of the sale price, use a plugin like Acowebs Product Labels, which includes its own date range controls per badge.
Key Takeaways
- WooCommerce adds a sale badge automatically when a product has a sale price set. No plugin is needed for the default badge.
- The default badge displays “Sale” only. Customizing text, color, shape, or position requires CSS, a PHP filter, or a plugin.
- To display the sale percentage on the badge (for example, “-20%”), use the
woocommerce_sale_flashPHP filter or a plugin with a{salepercentage}dynamic value. - A WooCommerce sale badge plugin gives you the most control: custom design, dynamic values, scheduling, and product targeting without any code.
- For the top-right badge position, adjust
.onsalewithright: 10pxandleft: autoin CSS. - Showing a percentage discount on the badge is one of the clearest ways to communicate value on product and shop pages.
- Variable products require a plugin or custom PHP logic to show accurate badge percentages.