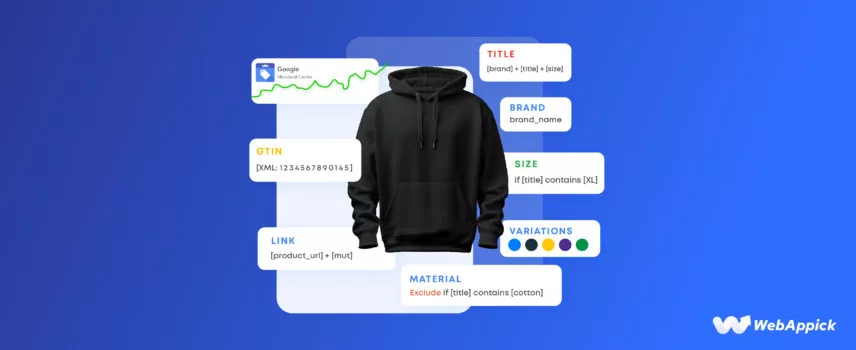
How to Generate WooCommerce Google Merchant Product Feed
To generate a Google Merchant product feed for your WooCommerce store, you need a structured data file containing key attributes—such as id, title, description, price, availability, condition, image_link, brand, GTIN, MPN, and google_product_category—formatted according to Google’s Product Data Specification.
Using a feed management tool like CTX Feed – WooCommerce Product Feed Plugin simplifies this process by providing a pre-built Google Shopping template that automatically maps WooCommerce product data to Google’s required adds custom fields when needed, and keeps your feed updated in real time.
This ensures your products remain accurate, compliant, and ready for Google Shopping ads and free listings.
Without further ado, let’s begin.
How to display your WooCommerce products on Google Shopping
Google Shopping has no direct product control panel where you can upload and manage your products. Google Merchant Center does the managing and distribution tasks for the platform.
Let us quickly give you an overview of the whole process.
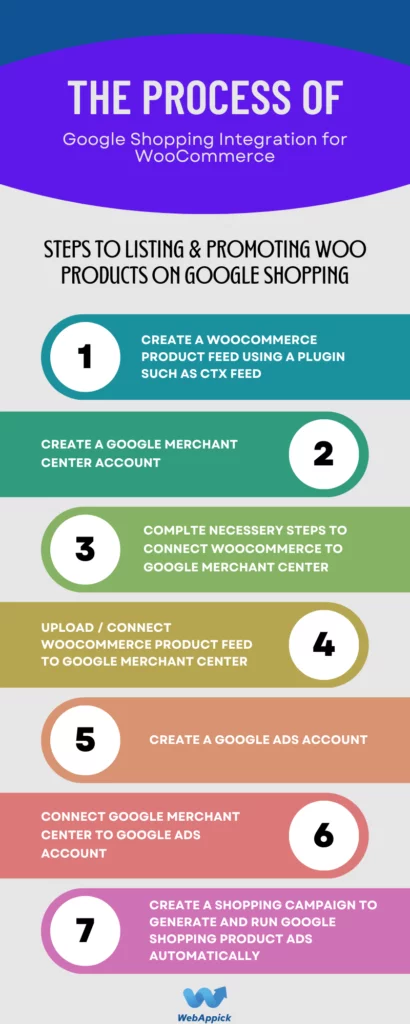
- The first thing you will need is a Google Merchant product feed. It’s an export file that contains all your WooCommerce online store’s products.
- Next, create a Google Merchant Center account. It’s free to register.
- Google Merchant Center requires you to complete some necessary steps before uploading your WooCommerce Google merchant product feed.
- Finally, upload your WooCommerce product feed to GMC (Google Merchant Center).
- To run Shopping ads, you must create a Google Ads account.
- After creating an ads account, you must link that GMC account with this Google Ads account.
- To generate Google Shopping ads, you finally need to create a Shopping campaign on Google Ads.
Therefore, the WooCommerce Google merchant center product feed is the most essential element of this entire process.
Now, we will walk you through all the steps we mentioned above.
What is a Google Merchant account export product feed?
The Google Merchant product feed bridges your WooCommerce store and Google Shopping.
It’s a structured data file containing all your product details, like titles, descriptions, prices, and images, which tells Google what you’re selling.
Here’s an example –
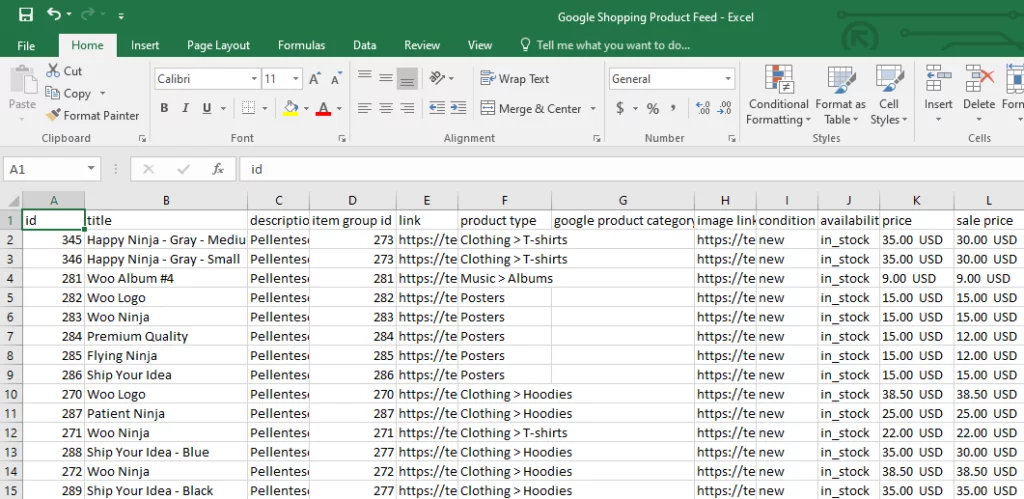
Notice the column headers?
These are the characteristics of the products you fill in your WooCommerce product pages.
In a product feed, these are called attributes. Google Merchant Center supports an extensive array of attributes you can include in your feed file.
Google Merchant Center divided the attributes into 10 categories.
Let’s take a look.
- Basic product information (9 attributes): This category encompasses product titles, descriptions, prices, and images.
- Comprehensive product details (4 attributes): Additional information like dimensions, weight, and materials falls under this category.
- Product categorization (11 attributes): Specifies the product’s category within Google’s taxonomy.
- Pricing and availability details (8 attributes): Information about the product’s price, availability, and shipping options is covered in this section.
- Product identification (5 attributes): Unique product identifiers such as GTIN or MPN are essential attributes in this category.
- Destination specifics (2 attributes): Includes information about the product’s shipping destinations.
- Shipping details (4 attributes): Information about the product’s shipping costs is included in this category.
- Tax-related information (2 attributes): Details regarding the product’s tax status are covered here.
- Marketplace specifications (3 attributes): Specifies where the product is available for purchase.
- Shopping campaign details (7 attributes): Provides information on how the product is being promoted within Google Shopping campaigns.
Types of Google Merchant product feed
Google Shopping or Google Merchant Center supports a number of feeds.
1. Google Shopping Feed: The foundation of it all, this core feed houses all your product details. It’s your passport to showcasing your entire catalog on Google Shopping and reaching millions.
2. Google Local Inventory Ads Feed: Want to attract nearby shoppers? Google Local Inventory Feed lets you display real-time inventory levels and store locations for specific products in designated regions. Imagine customers walking right into your local store virtually!
3. Google Product Review Feed: Build trust and boost conversions with the power of customer voices. Google Product Review Feed gathers and displays product reviews directly on your listings, adding social proof and authenticity to your offerings.
4. Google Search Dynamic Ads Feed: Adapt to evolving searches and make your products easily discoverable. Google Search Dynamic Ads Feed creates dynamic ads that match users’ queries in real time, ensuring your products appear precisely what they want.
5. Google Promotions Feed: Turn up the sales volume! Google Promotions Feed lets you shout your temporary deals and discounts to bargain hunters across Google Shopping. Time-sensitive offers give your products an edge and grab attention.
6. Google Shopping Action Feed: Leap voice-activated shopping! This feed enables your products to be purchased through Google Assistant, opening up a whole new customer journey.
7. Google Ads Local Product Feed: Fine-tune your product listings for local search ads campaigns. This feed optimizes your data for local searches, ensuring your physical store shines for nearby customers.
Besides these Google merchant feed product types, Google Merchant Center also allows you to add supplemental feeds.
Creating a Google merchant product feed
Let’s look at the most common or required attributes for Google Shopping.
- ID
- Title
- Description
- Product URL
- Category
- Image URL
- Stock Availability
- Regular Price
- GTIN/MPN
- Product Condition
- Brand
You can set these as column headers in a spreadsheet file using tools like Google Sheets.
However, this manual method will be your nightmare for many reasons. First, you will have to copy-paste every product detail under the attributes.
This will take a long time and is highly prone to mistakes and errors. Google may reject your Google Merchant product feed WooCommerce if you are lucky!
If not, your customers will see wrong information about your products literally all over the internet. As a result, your shoppers will lose trust in you, and your online reputation and conversion will drain.
Another hurdle is that there’s no field for MPN, ISBN, Brand, or GTIN on WooCommerce product pages. But they are required in the Google Merchant product feed.
You need to add these fields through either coding or custom field plugins. That’s very technical, and we intend to simplify the process, not complicate it for you.
Therefore, manually creating a product feed comes with a lot of challenges.
Here’s what Google statistics say about manual feeds.
- In 2022, about 7% of Google Shopping Feeds were rejected because of many data mistakes.
- If the correct GTIN values (those unique product codes) weren’t given, it affected roughly 5.53% of products.
- And guess what caused most of these rejections? Problems with shipping info – that made up a whopping 23.49% of all the rejected product feeds.
Therefore, you need to find a more accessible and automated solution.
Don’t worry; we’ve got you covered.
Simply install the CTX Feed plugin, and it will take away all your labor and headaches.
How to create a Google Merchant product feed using CTX Feed
When using CTX Feed, you don’t need to learn the attributes, guidelines, and formatting of any channel. It has integrated everything under pre-made channel templates.
The plugin also saves you from all the copy-pasting of your product information manually. Moreover, once you create a feed, you don’t need to manually update it when you make any product changes.
Before we jump to explaining the features of CTX Feed, let’s first use the plugin to create a Google Merchant product feed.
This will demonstrate how straightforward and easy the plugin makes the entire process.
You can find the CTX Feed free version on the repository. Install and activate.
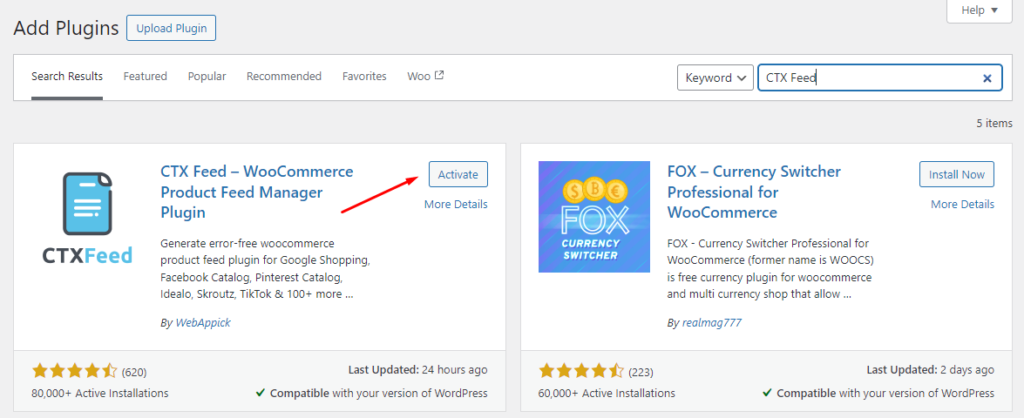
Start the feed creation process through the following menu.
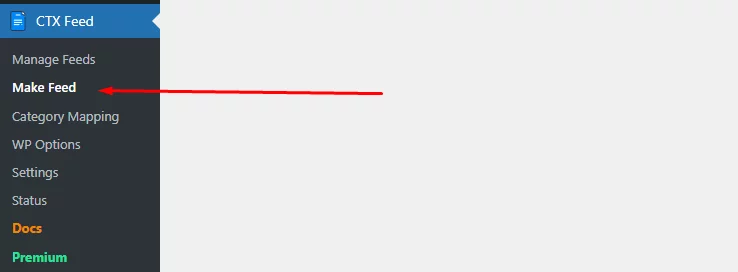
Here’s a new window.
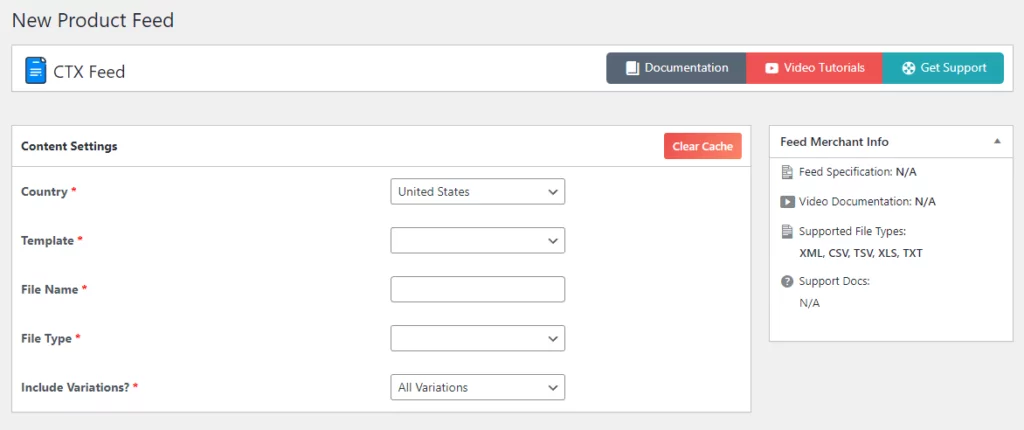
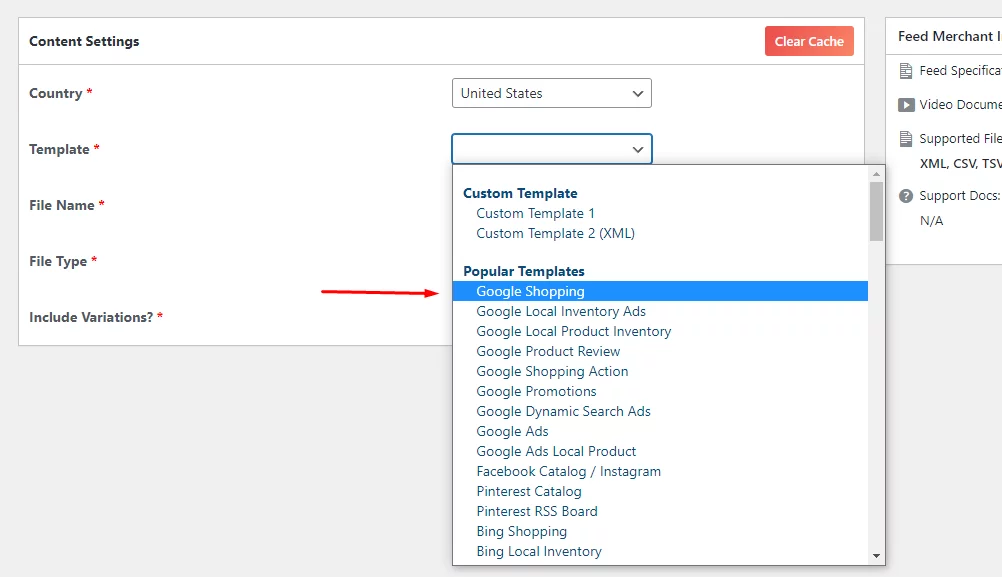
The Templates dropdown is where the magic lies.
Let’s say we want to create the primary Google Shopping feed. Select the template and file type from the dropdown.
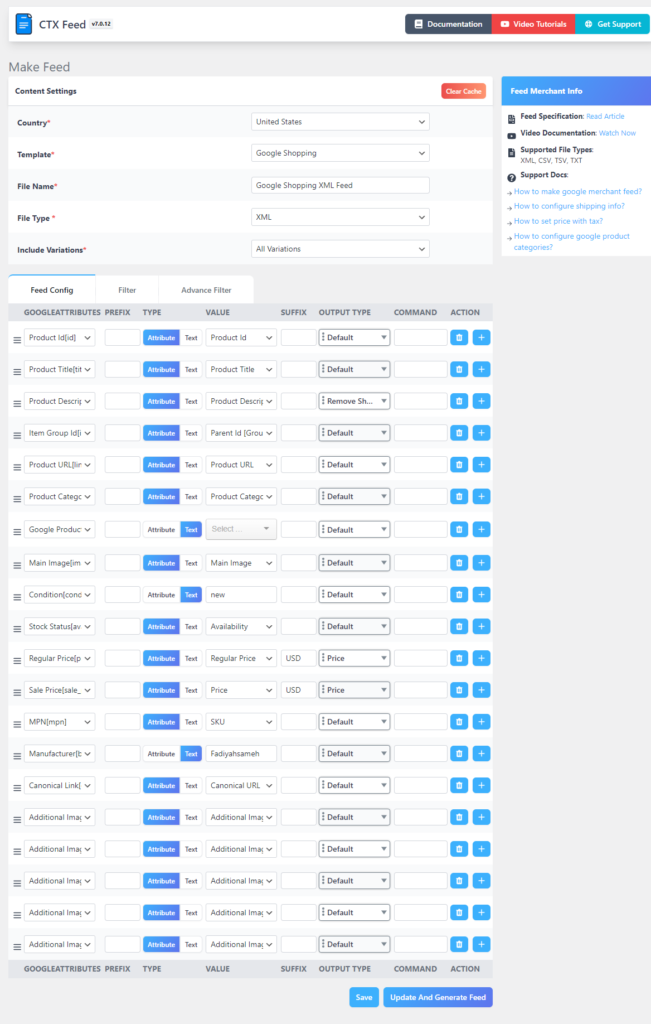
CTX Feed will automatically populate/generate the necessary attributes at the bottom section.
After clicking the generate button, CTX Feed will automatically collect and paste your product data under the attributes and create the feed file.
The pro version comes with a bundle of added features. One such feature is the filter.
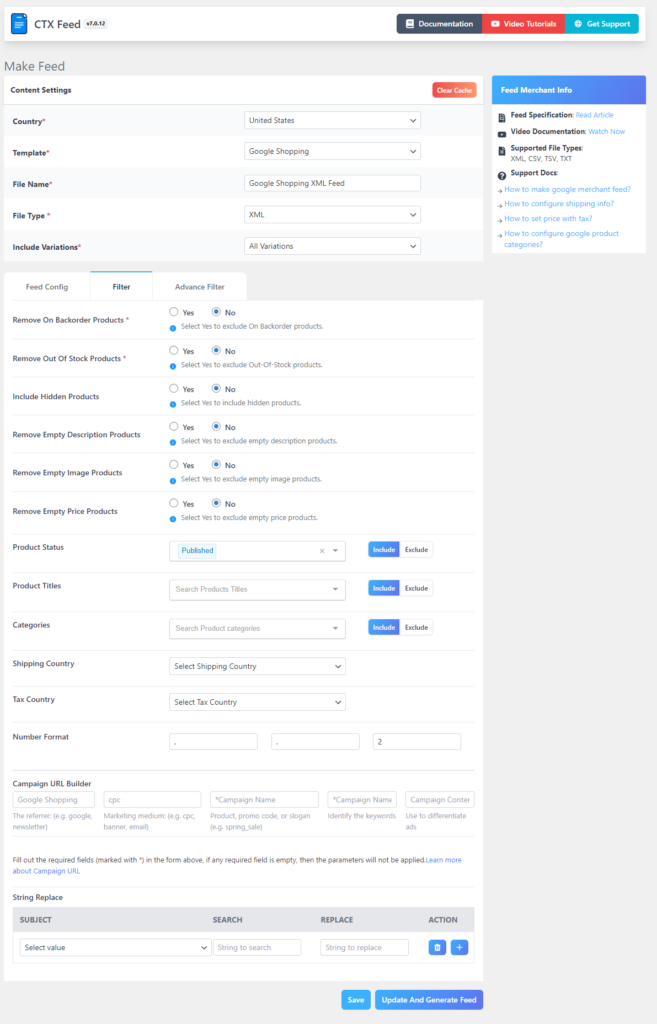
You can extensively filter your feed by different conditions. For example, you can exclude all incomplete and out-of-stock products from the feed.
By excluding just out-of-stock products, you can increase your ROI by a staggering 181%!
In addition to the above filters, you can also create condition-specific feeds.
For example, you can create a feed for specific products or product categories. You can also create a feed for specific shipping and tax countries.
Moreover, you can create a custom URL for Google Analytics to track your Google Merchant product feed performance.
How to add custom fields on WooCommerce and the product feed
We have already explained some attributes that need to be added as custom fields and how technical it is to add them on WooCommerce.
CTX Feed saves you from that hassle as well.
The plugin has included all possible attributes as custom fields in its settings. To include them in your Woo product pages, all you have to do is toggle and enable them.
Go to the CTX Feed menu and click on Settings. You will find a dedicated tab called Custom Fields.
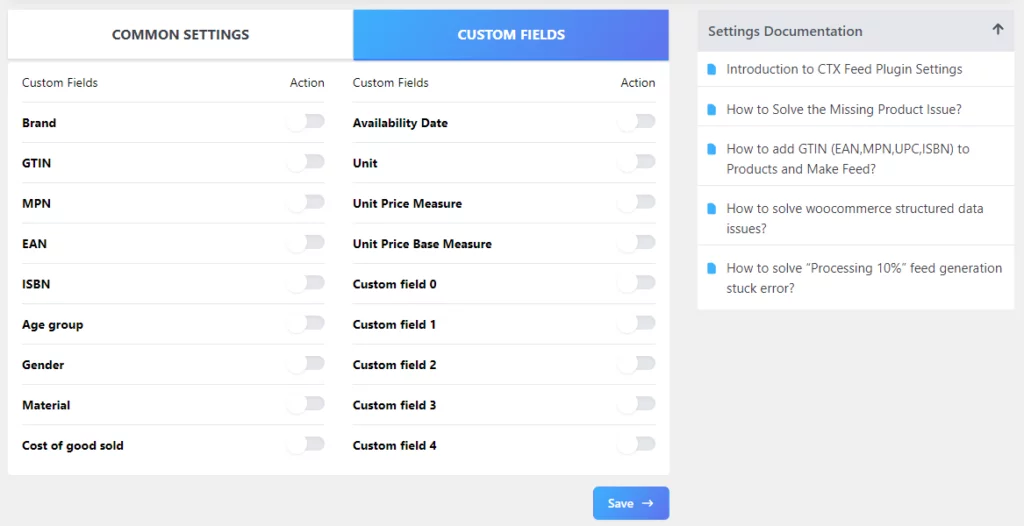
Let’s say we want to enable GTIN, Brand, and MPN. Toggle to enable the fields, and this will add these fields to your Woo product pages.
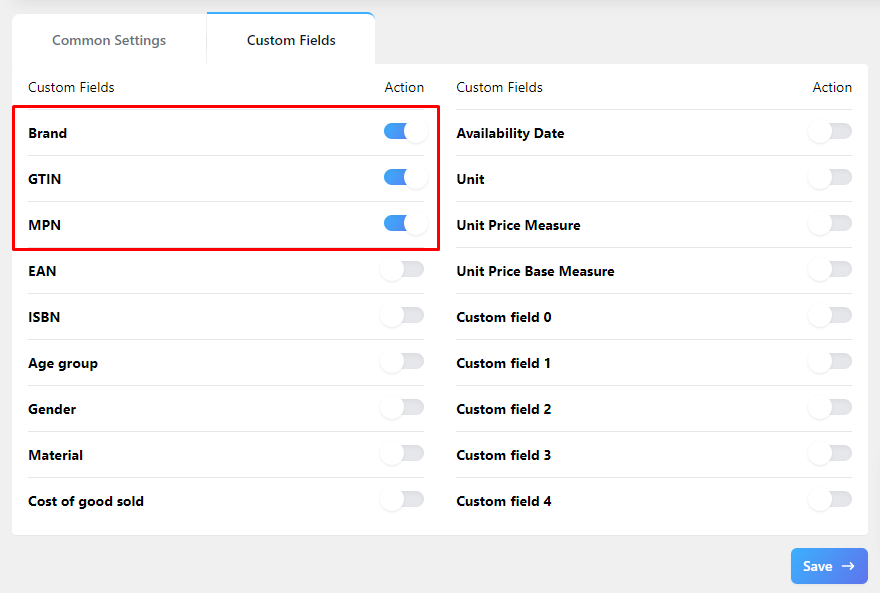
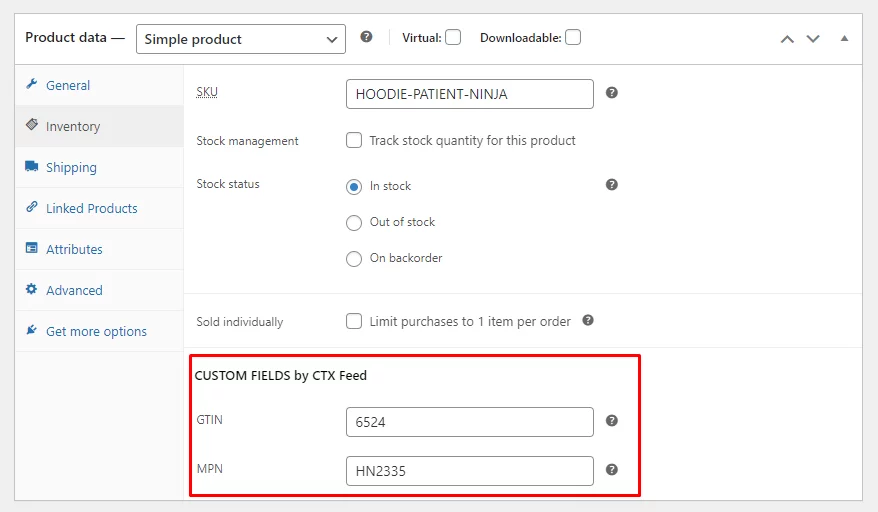
Now, you need to input value for these fields, and CTX Feed will automatically collect them when generating feed files.
Let’s check out how CTX Feed adds these fields on WooCommerce product pages.
Go to the Product Data section of a product page and click on the Inventory tab. Custom Fields are under CUSTOM FIELDS by CTX Feed.
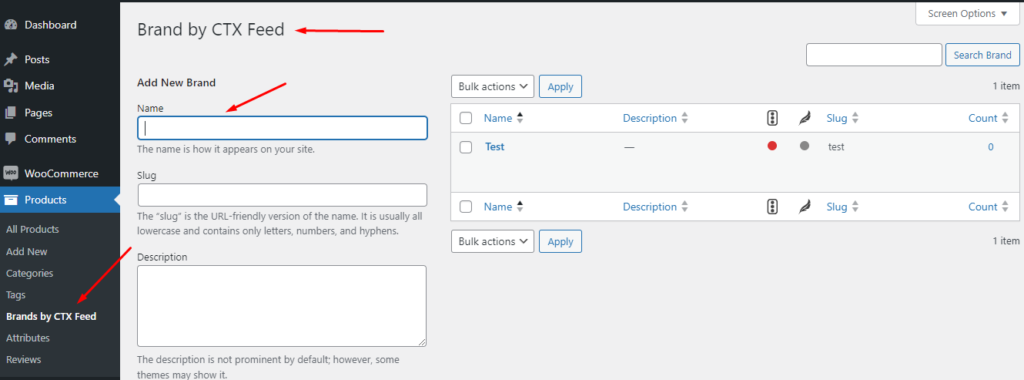
To add brands, go to Products>> Brands by CTX Feed.
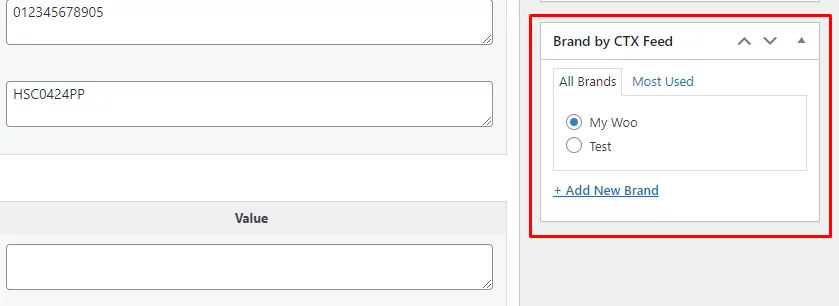
After that, assign the brand from the product pages.
Mapping WooCommerce categories with CTX Feed categories
Even though adding the google_product_category attribute is optional, it’s a mighty powerful option. If you map your categories with Google’s categories, it will significantly increase the chances for your products to appear in relevant searches.
We wouldn’t go into how you can do it manually. CTX Feed makes it incredibly easy as well. It has a dedicated menu for mapping categories.
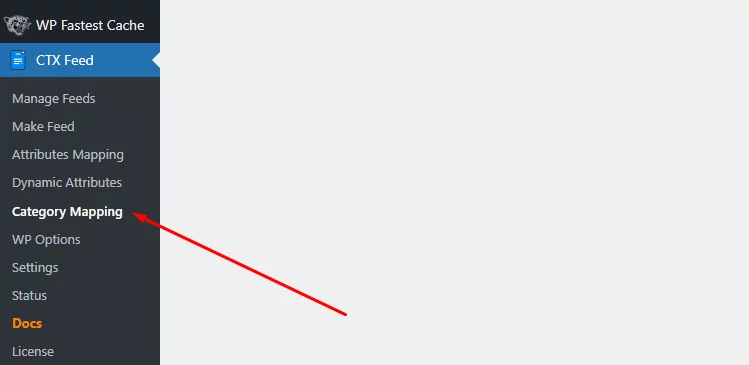
Start a new category mapping and select Google Shopping as your merchant.
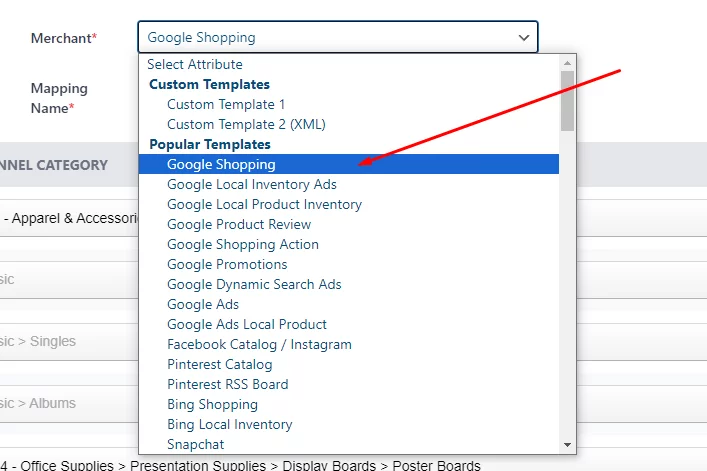
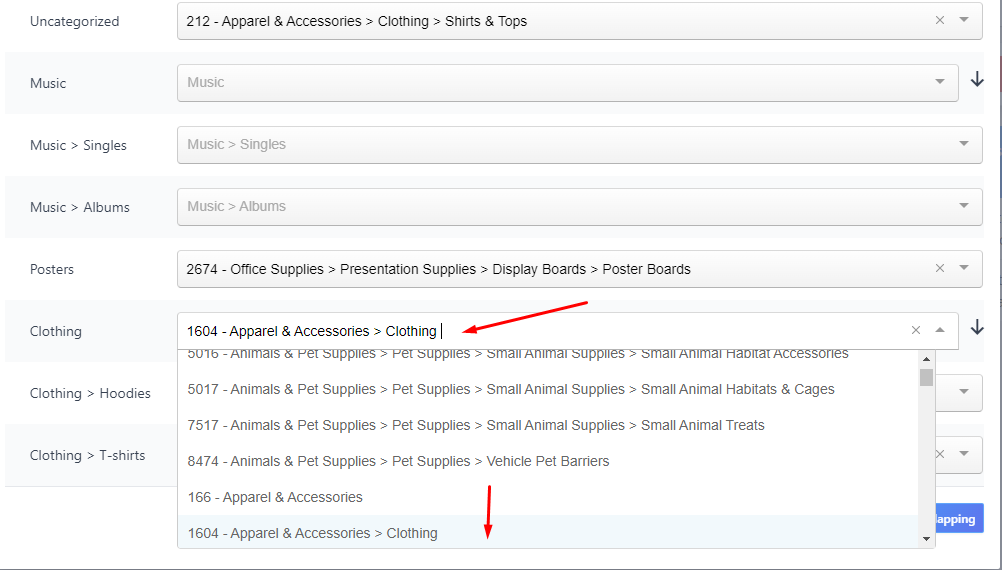
Here’s a demonstration of how to map your existing WooCommerce categories with Google categories.
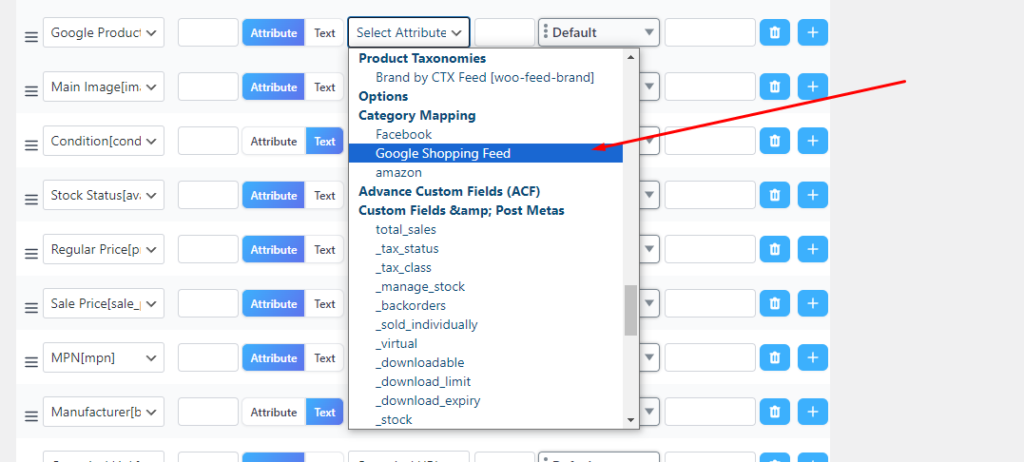
After you are done creating the custom attribute, you can assign it to the feed generation page.
Find all your feed, including the WooCommerce product feed XML Google merchant file, in the Manage Feeds menu page.
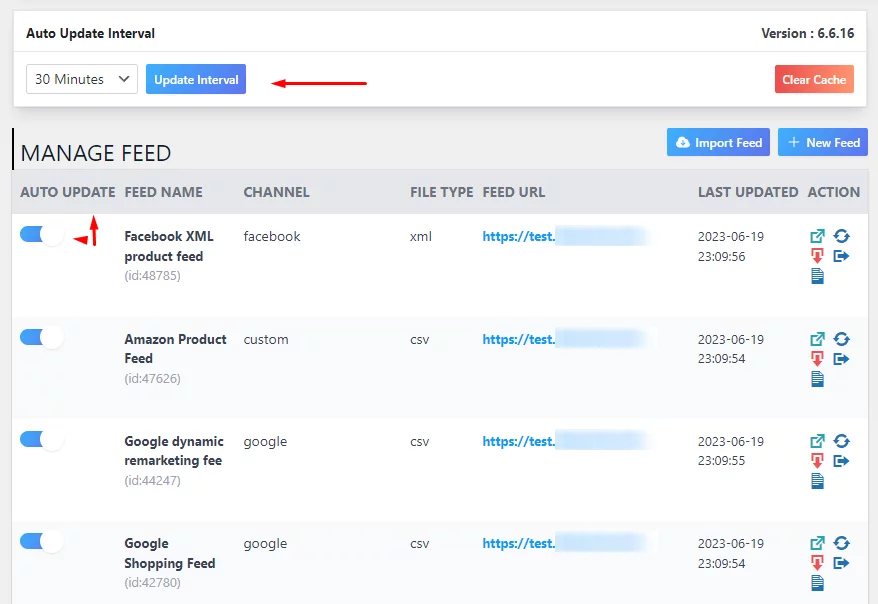
You can set automatic updates from this page along with other feed settings.
Creating and setting up a Google Merchant Center (GMC) account
Imagine a central hub where you manage all your product information for Google Shopping and other Google platforms. That’s essentially what Google Merchant Center is.
It’s a free platform that lets you upload your product data, including details like titles, descriptions, prices, images, and inventory levels.
Once your product information is in the Merchant Center, it becomes eligible to appear on various Google Shopping surfaces, such as Google’s Search Engine Result Page (SERP), Google Shopping platform, Google – Images, Maps, Lens, Popular Products section, YouTube, Gmail Ads, Local Inventory Ads, Dynamic Ads and millions of partner sites.
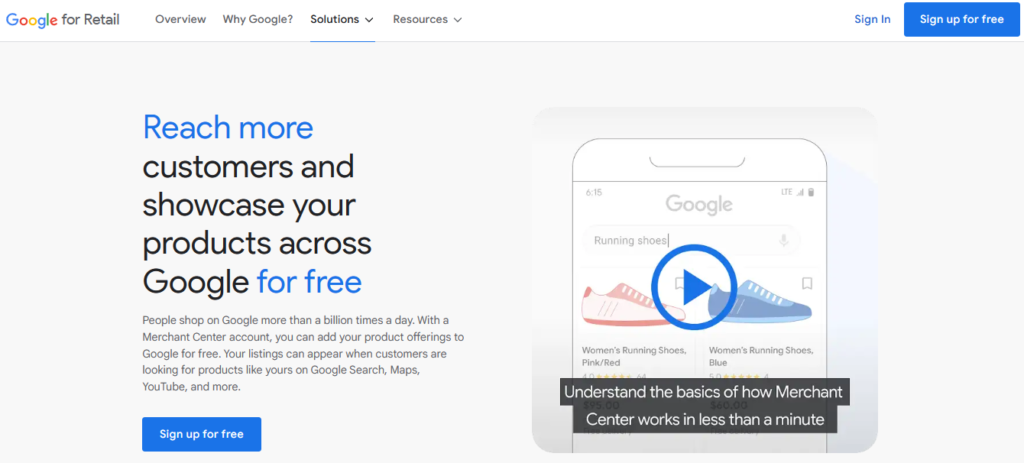
Let’s get down to business. You can create a free GMC account with a Gmail address.
First up, input your email, set a password, and verify it from your email inbox.
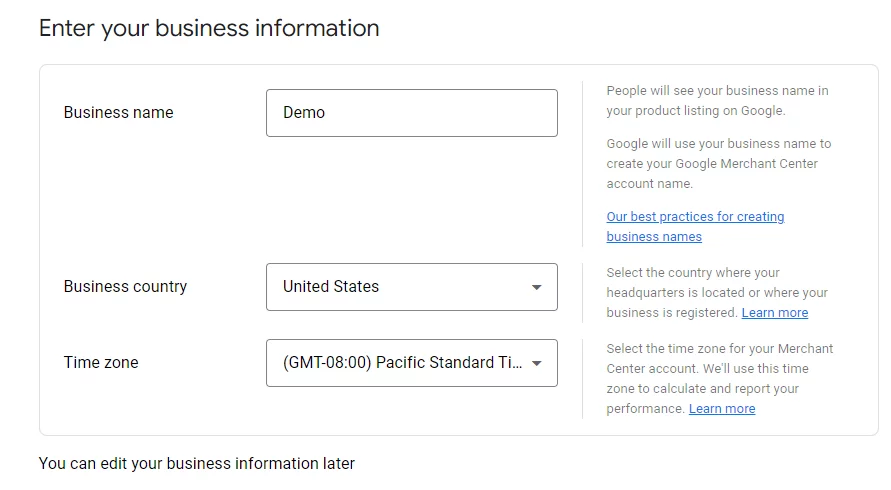
After passing through the initials, GMC will ask you to give your business name and set your country and time zone.
Next, select where you want your customers to checkout. This means what will happen when customers click on your listings (listing titles).

You can redirect them to your WooCommerce product page, which is the most common practice. US-based stores can also accept payments directly on Google Shopping. The platform doesn’t charge any commissions or fees for this service.
The third option is for local inventories or stores that want to display their products on Google. Clicking these listings will redirect users to the store’s location map.
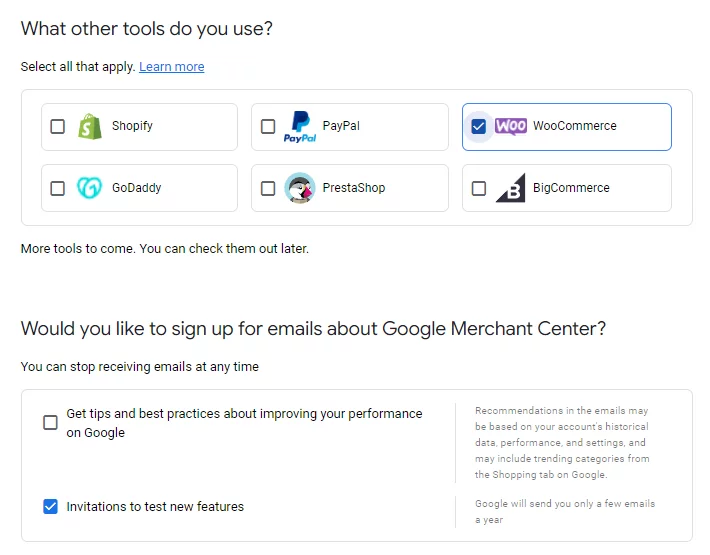
Next, select your platform. In our case, it’s WooCommerce. This will end the initial registration process. After that, you must complete a series of steps to verify your WooCommerce store and upload your Google Merchant product feed.
Necessary steps to set up your WooCommerce store to Google Merchant Center
Here are the steps you need to complete in order to display your products on Google Shopping.
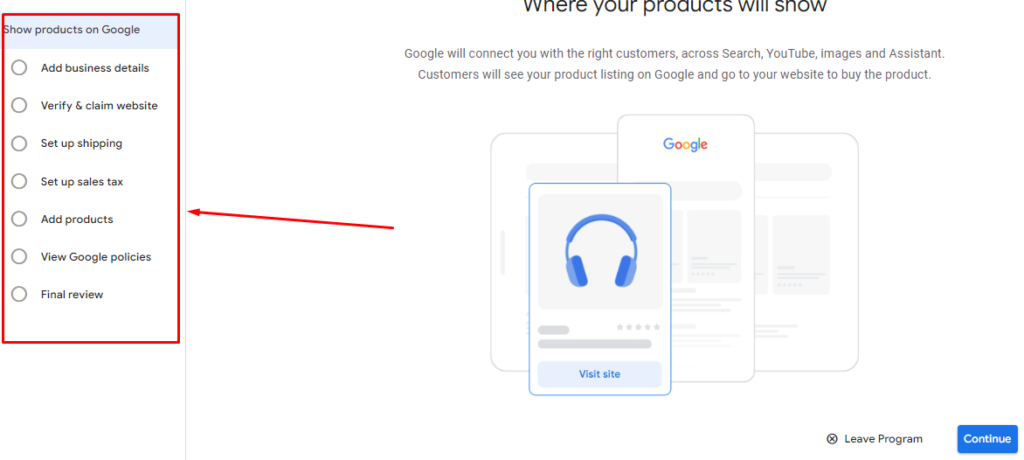
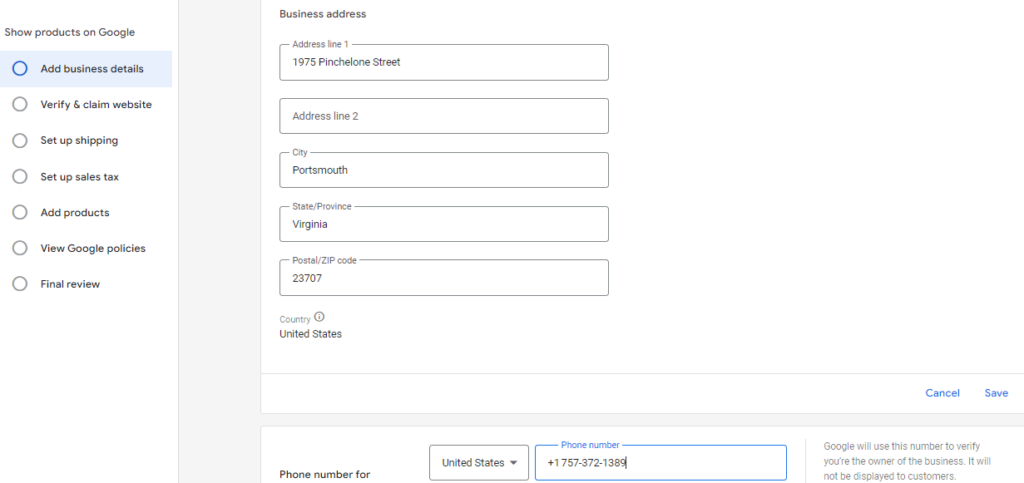
Start with inputting business details.
The next step is crucial for WooCommerce Google Shopping integration. You need to verify your WooCommerce site with GMC. Start by entering your website link.
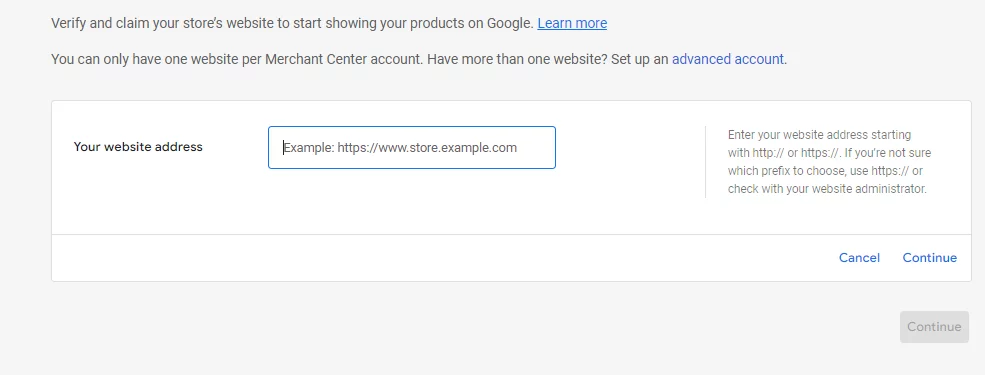
You can verify in two ways.
- Adding an HTML tag in your website header
- Uploading an HTML file to your WordPress file server
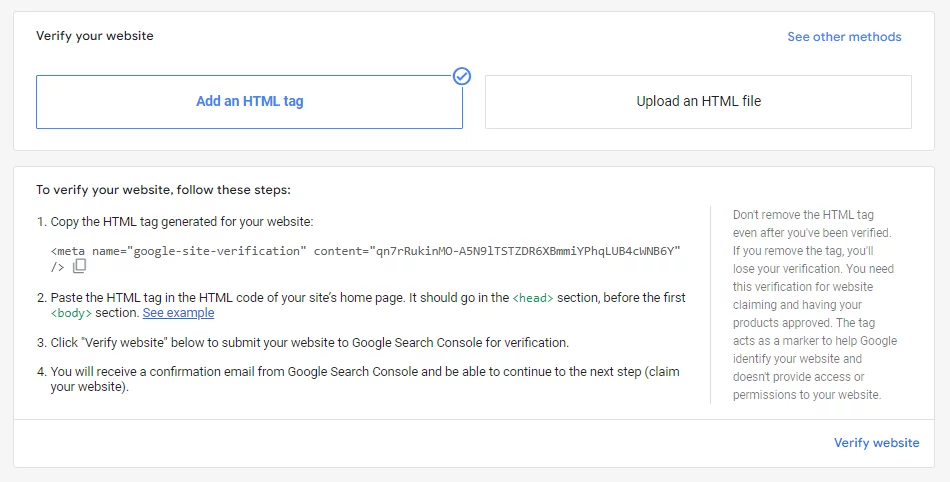
Themes like Divi, Astra, etc., provide options to add codes and tags on the WordPress header. Otherwise, you can manually edit functions.php or add the tag through a plugin.
If you can access your WordPress file server through the control panel or FTP access, you can simply upload the HTML file to complete the verification.
Shipping and Tax information depends on your store location, industry, tax laws, shipping methods, etc. If you have already set these settings on your Woo store, you already know what to input.
Uploading Google Merchant product feed
Next up, uploading the Google Merchant product feed. Select the following option.
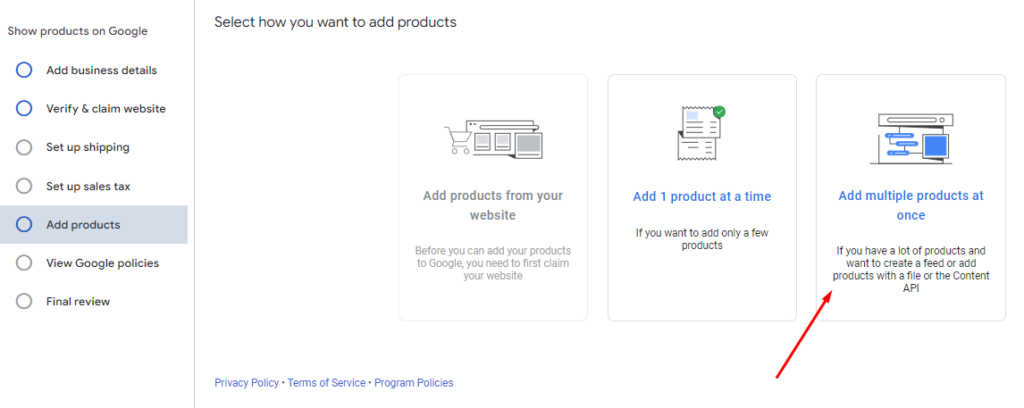
Make sure to checkmark the free listing option if you want to participate in the organic listings program.
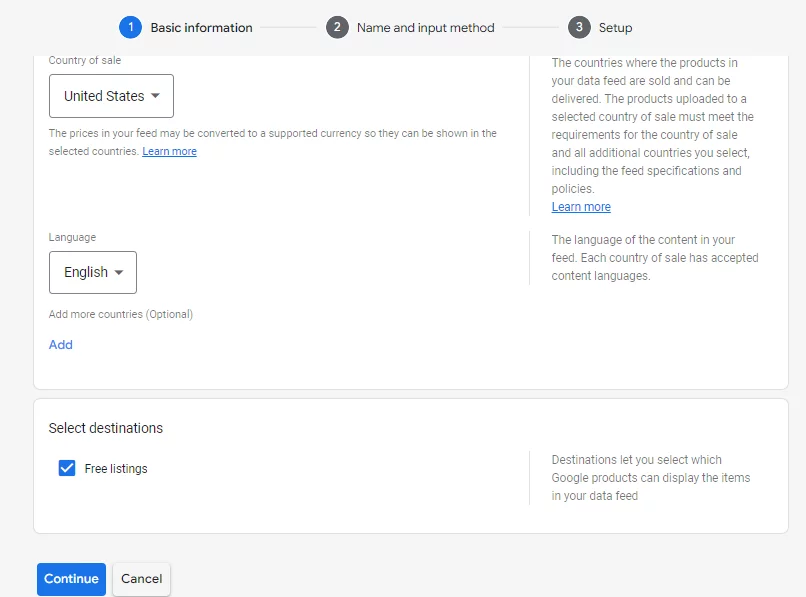
Google Merchant Center allows you to submit a Google Merchant product feed in the following ways.
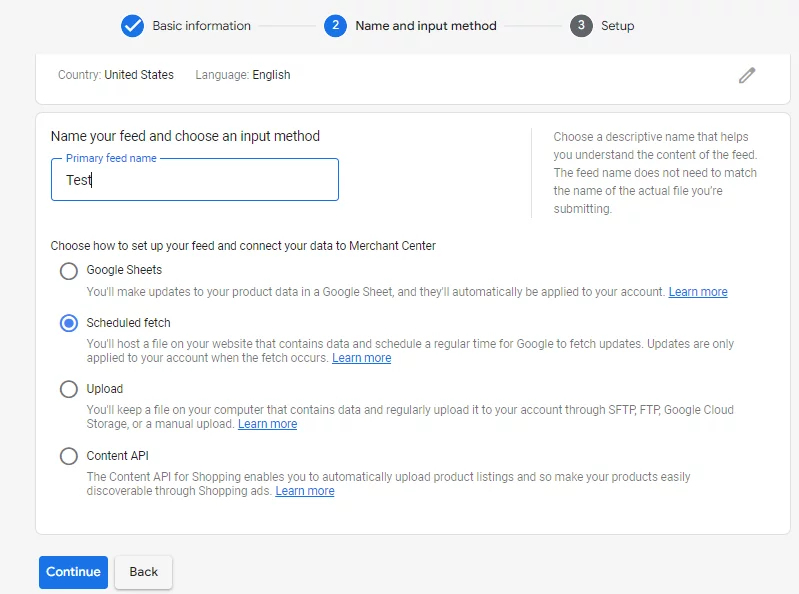
- Google Sheets: If you have a small to medium-sized product catalog and are comfortable using Google Sheets, you can upload your product feed directly from there.
- Scheduled Fetch: For those with extensive product catalogs or a need for frequent updates, Google Merchant Center can fetch your product feed from a publicly accessible URL on your website. This is a great option for extensive inventories.
- Upload: If you have a custom product feed file or a large feed to submit, you can directly upload the file to Google Merchant Center.
- Content API: To automate the process of uploading your product feed or if you’re dealing with a vast feed file, you can utilize the Google Merchant Center Content API for a programmable approach. This option is suitable for those who need a more automated and efficient process.
The best method is the Scheduled Fetch. As we are using CTX Feed, we will pick this option.
Copy your Google Merchant product feed URL from the CTX Feed panel.
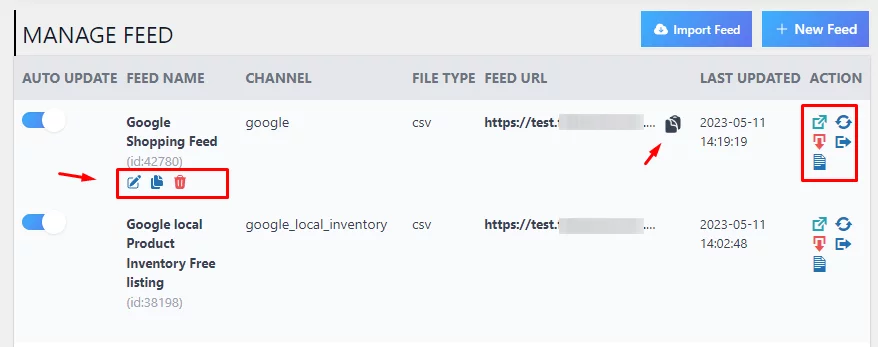
Paste the link and set the fetch frequency.
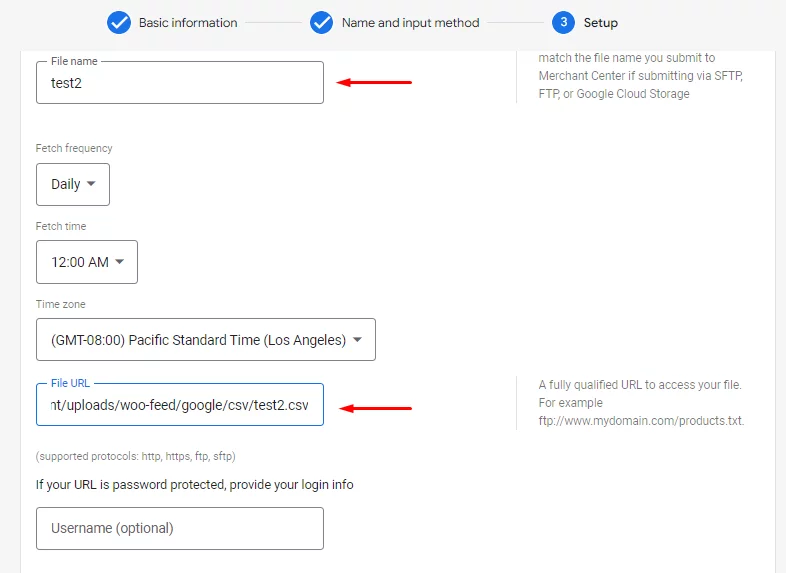
GMC Scheduled Fetch and CTX Feed URL connection explained
Here’s how the integration process between Google Merchant Center (GMC) and CTX Feed works:
- Google Merchant Center fetches your product data directly from the WooCommerce feed URL hosted on your WordPress site.
- Whenever you change your WooCommerce product pages, the CTX Feed plugin automatically updates the feed file.
- GMC regularly checks for these updates from the feed URL based on the frequency you’ve selected.
- Once you’ve set up the connection between WooCommerce and Google Shopping using the plugin and Google’s Scheduled Fetch, your product listings are seamlessly managed.
In essence, combining GMC and the CTX Feed plugin ensures that your product information on Google platforms remains consistently accurate and up-to-date.
CTX Feed – Best Google Merchant product feed plugin
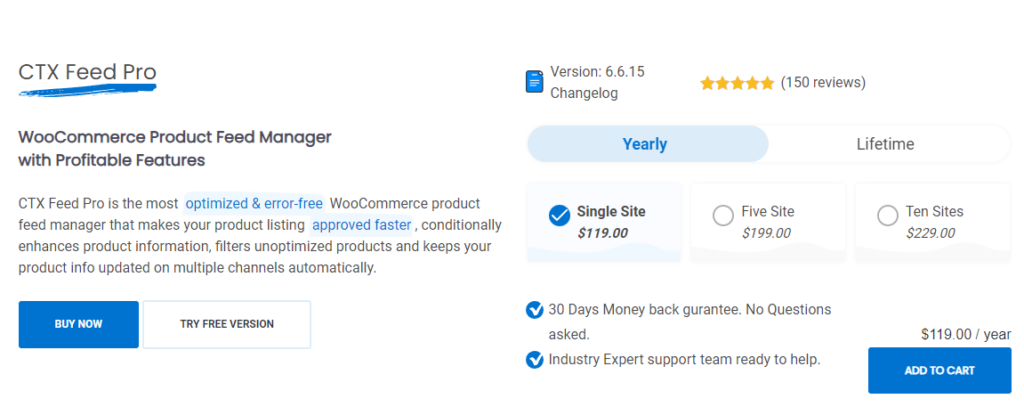
As you know by now, the CTX Feed plugin simplifies the creation of optimized and error-free feeds for various platforms, including Google Shopping, Facebook Catalog, Pinterest Shopping, Instagram Catalog, TikTok Catalog, Snapchat Catalog, eBay Ads, Bing Ads, PriceRunner, Rakuten, PriceSpy, Kelko, and more.
It’s a versatile tool enabling online store owners to effortlessly promote their products on over 130 channels.
Key Features:
- Multi-Channel Support: CTX Feed supports over 130 recognized channels, ensuring a broad reach for your products across marketplaces, search engines, affiliate sites, and price comparison platforms.
- Unlimited Products & Feeds: With CTX Feed, there are no restrictions on the number of products or feeds. You can upload an unlimited number of products and create as many feeds as needed.
- Pre-configured Templates: The plugin comes with 130+ built-in templates, making it easy to create product feeds without extensive research. These templates are crafted to meet the requirements of popular channels.
- Supports Multiple Feed File Types: CTX Feed allows you to create product feeds in five different file formats – XML, CSV, TSV, XLS, TXT, and JSON. This flexibility ensures compatibility with various marketing channels.
- User-Friendly Interface: The plugin offers a user-friendly interface, streamlining the process of creating and customizing product feeds. All attributes and fields are conveniently placed on the same page, eliminating the need for technical expertise.
- Supports WooCommerce Product Types: CTX Feed supports various WooCommerce product types, including Bundle products, Composite products, mix-and-match products, and Subscription products.
- Variable and Variation Features: Handling multiple variable child products is made easy. Users can include or exclude variations based on their preferences, providing flexibility in managing product listings.
- Dynamic Attribute & Smart Filtering: The dynamic attribute feature allows users to set conditions on each attribute, ensuring products meet specific criteria. Smart filtering enables the inclusion or exclusion of products based on various conditions.
Pro Features: Why Upgrade to CTX Feed Pro?
- Product Brand: The Pro version introduces the ability to include product brands, enhancing customer trust and recognition.
- Dynamic Attribute: Set conditions on attributes for a more tailored approach to product information display.
- Smart Filter & Condition: Advanced filtering options to include or exclude products based on specific conditions, ensuring a more refined product feed.
- Attribute Mapping: Enhance titles and attributes for better visibility and differentiation, which is especially useful for Google Shopping and Facebook Shop.
- Multi-Language & Multi-Currency Support: Create product feeds in different languages and currencies, expanding your global reach.
- Multi-Vendor Feed: Support for multi-vendor plugins, allowing multiple vendors to promote products under one website.
- Custom Attribute & Custom Fields: Assign custom attribute values and utilize custom fields from plugins like ACF, Field Factory, etc., providing extensive customization options.
- Product Meta & Taxonomies: Include product meta and taxonomies in feeds, expanding the range of attributes available for marketing channels.
Auto Feed Update & Caching:
CTX Feed automatically updates product feeds based on intervals, saving time and effort. The built-in caching feature reduces server load, enabling smooth feed generation.
Why is CTX Feed the Best Plugin for Google Merchant Center Product Feed?
CTX Feed is the go-to solution for creating Google Merchant Center product feeds due to its unparalleled features. With support for numerous channels, pre-configured templates, a user-friendly interface, and advanced functionalities in the Pro version, it provides a comprehensive solution for online store owners.
The plugin’s dynamic attributes, smart filtering, and support for multiple languages and currencies make it the ideal choice for expanding product visibility and reaching a global audience.
Additionally, its ability to seamlessly integrate with various WooCommerce product types and plugins makes it a versatile and powerful tool for any online business aiming to optimize product feeds for Google and other prominent platforms.
Wrap up
Google Merchant Center allows you to promote your products on Google surfaces and across millions of websites. This provides extensive exposure for your products.
As a result, you can reach many potential customers who browse various online platforms within the Google ecosystem and beyond. However, you must know how to distribute and display your products effectively and efficiently through Google Merchant Center.
Effectively utilizing GMC requires understanding the platform’s features and requirements. You must provide accurate and detailed product data, adhere to Google’s guidelines, and optimize your product listings for visibility.
This includes creating a well-structured Google Merchant product feed, ensuring accurate pricing and availability information, and utilizing relevant attributes to enhance the quality of your listings.
We hope this article will guide you in listing your products on GMC the right way. Let us know if you have any questions or suggestions.
