How To Create Product Groups In Google Shopping in 2026
Product groups in Google Shopping let you organize and bid on products more strategically within a Shopping campaign.
Inside Google Ads, products are automatically placed under an All Products group, which you can subdivide using attributes like product category, brand, item ID, or condition.
This product-group —campaign → ad group → product groups → subgroups—allows you to set different CPC bids, exclude low-performing items, and analyze performance metrics to optimize your Shopping ads in 2026.
In this article, we will talk about Google shopping product groups in detail and walk you through the step-by-step process of creating product groups in the Google Ads account.
Are you ready? Let’s go ahead.
What is Google Shopping?
Google Shopping, formerly known as Google Product Search, is a price comparison shopping engine where consumers can search for eCommerce products and compare prices from different retailers.
Users can now find the Google Shopping tab beside other regular tabs on Google search result pages. However, it will only appear as a tab when they search for a product.

Nevertheless, people can access Google Shopping anytime by typing its dedicated URL.
WooCommerce store owners like you can list as well as promote your products in Google shopping to drive potential buyers to your online store.
Unlike regular search engine results, Google shopping displays product results side by side in a grid view with images and prices.
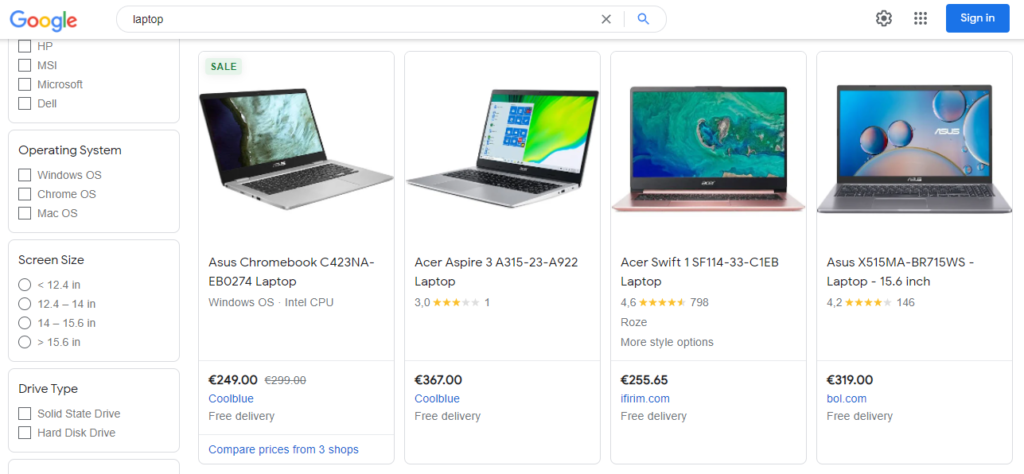
Users can click on a product to view more details and an image gallery provided by shop owners like you. They can also filter their search by different product variants from the left panel.
When they are satisfied and finally select any listing, they can click and directly jump into the product’s page of that online shop from Google Shopping listing.
There are two ways WooCommerce shop owners like you can list your products in Google Shopping.
- Paid listings
- Free listing.
Yes, Google Shopping is now free for merchants. This means WooCommerce shop owners can list their products in Google Shopping for free. However, free listings have limitations and will be displayed below the paid Ads/listings.
As a WooCommerce store owner, you can also run paid ads on these comparison result pages through Google Shopping campaigns. Google Shopping prioritizes paid listings over free listings.
Additionally, you can choose to accept payments directly on Google. If you enable that option, your customers will be able to checkout in Google. Nevertheless, they’ll still be able to visit your website if they want.

How to start a Google Shopping campaign?
Now that we have learned about Google Shopping and how it works for you, it’s time that we learn about the Google Shopping campaign.
What is a Google Shopping campaign?
Running a Google shopping campaign means the paid listing and promotion of your WooCommerce store’s products on Google. In simple words, you can create and run Shopping ads for your products across different Google platforms, including Google Shopping, with a Google Shopping campaign.
Shopping Ads are different from regular ads because these ads are more visual. A shopping ad shows visitors images of your product along with price, store name, and other additional details.
In order to start a Google Shopping campaign, you will need to create two accounts.
- Google Merchant Center account.
- Google Ads account.
However, to get started, first you need a product feed file.
How to create a product feed file?
A product feed file contains all your product’s information such as name, brand, price, stock, category, etc. Instead of creating products one by one in different channels like Google Shopping, you can import product feed files and save an incredible amount of time and effort.
But how do you create one in your WooCommerce store?
The best way for WooCommerce store owners to create a product feed file is by using a free plugin called CTX Feed. With this plugin, you can create a product feed file for almost any channel to list your products.
To create a Google Shopping product feed file, go to CTX Feed>>Make Feed. Select your channel from the Templates dropdown and give your file an appropriate name. Then, select from different file format types such as CSV, TXT, JSON, etc.
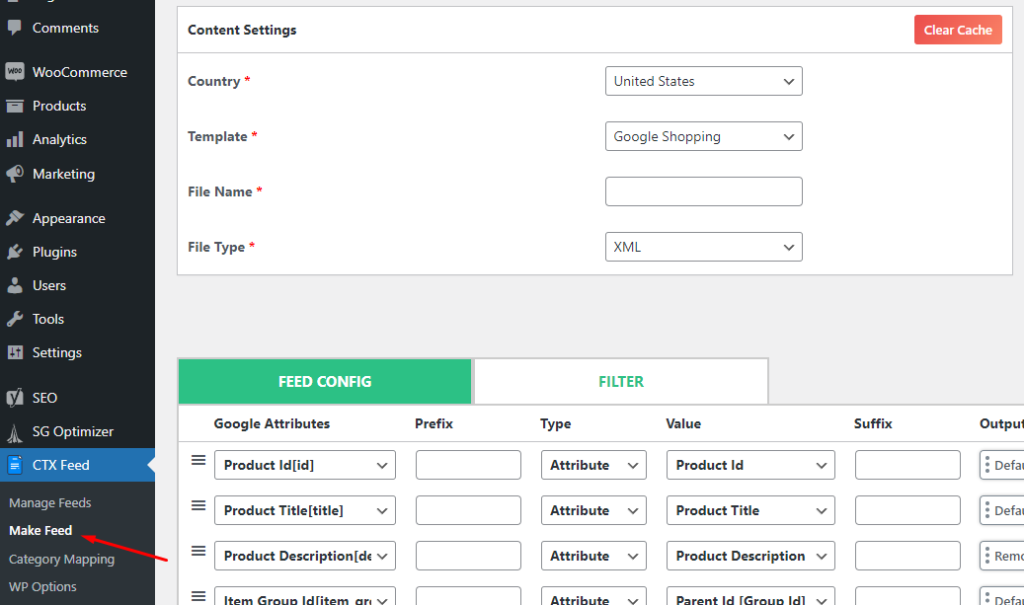
The plugin will populate all your product attributes automatically. However, you can customize them as well. Once you are done, you can generate the file, and your product feed file will be ready to be uploaded to Google Merchant Center.
The next process of starting your Google Shopping campaign is to create a Google Merchant Center account and upload your product feed file to that account.
After that, you need to create a Google Ads account and connect your Google Merchant account to that Ads account. You also need to give your WooCommerce store’s URL, verify the website with Google to claim your ownership, and finally set up a campaign in Google Ads.
Unlike regular Google Ads, you don’t need to create product shopping Ads yourself. Google will create them based on the product data (product feed file) you submitted to your Google Merchant Center account.
What are Google product groups?
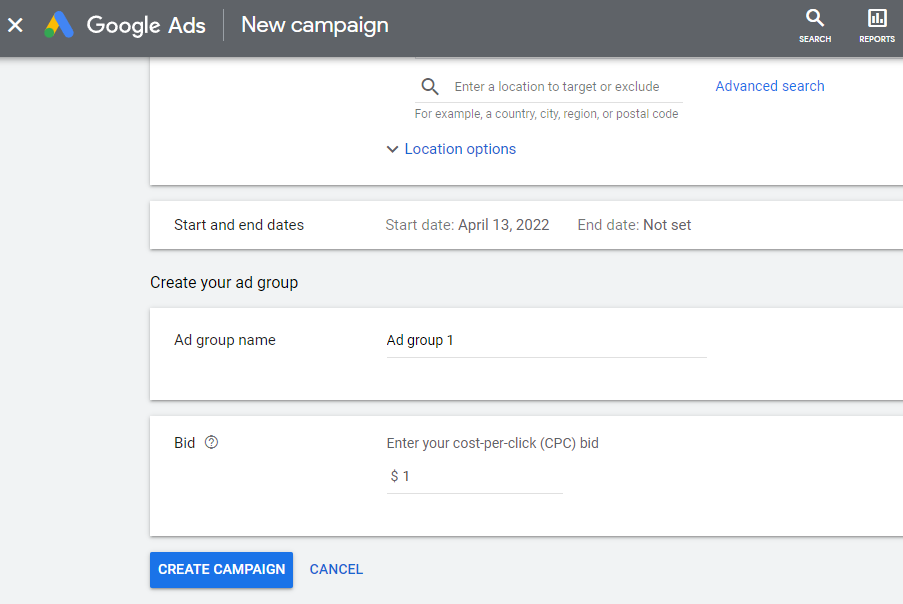
When you create a shopping campaign in your Google Ads account, you will need to create an Ad group and set the cost per click bid for that Ad Group. This will create your shopping campaign, and all your products will be listed under that Ad group as a product group.
This is the structure of a Google shopping campaign – Campaign >> Ad Group >> Product Group.
You can divide and create multiple Google shopping ads product groups to better organize your inventory in shopping campaigns. You can organize your product groups according to brands, categories, ID, etc.
You can also subdivide google shopping campaign product groups based on brands within categories. For example, let’s say you sell sports shoes of different brands and t-shirts or jerseys of different football clubs. If you break the categories into Ad groups and subdivide product groups based on brands, it will be a lot easier for you to manage your shopping ads and place bids on them.
| Ad Group | Product Groups |
| Sports Shoes | Nike, Adidas, Reebok, Fila |
| Jersey | MANU, Chelsey, Liverpool, Juventus |
If you want to subdivide based on categories it may look like this –
| Ad Group | Product Groups |
| Sports shoes | Boots, Sneakers, Court shoes |
| Sports clothing | Jersey, T-shirts, Hoodies |
You can create products groups based on different attributes, which we will cover later in this article.
Why do you need to subdivide product groups?
By default, when you create your Google Shopping campaign and create the ad group, all your products from the product feed file will be listed under this Ad group as a product group.
So if you set, for example, a $1 bid on your Ads group, it will apply to all your products.
Now, what’s the problem with that?
Well, the problem is that not every product is equal. Some have different values; for example, they sell at different pricing. Maybe someone clicks on one product, but they spent a hundred dollars on average with upselling purchases, and for another product, they spent almost nothing. So, one product is doing great, and another is not so well.
That’s why you shouldn’t spend the same amount for every single click. You need to start segmenting just like you would segment for different keywords in regular Google Ads. You shouldn’t bid on every single keyword with the same amount of $1. You should bid based on what’s actually working. The same goes for your product’s shopping ad bids.
You can subdivide product groups to organize your inventory, and it will help you to decide how to bid on your products. You can place lower bids on similar products or place higher bids on the categories or on the exact products which are working well.
Additionally, it helps you determine the search terms that are being used. Overall, you’ll be able to make better advertising decisions.

How do Google ads product groups work?
Product groups in the Google shopping campaign live under the Ad group umbrella. Google will auto-generate a single product group with all your products when you create a shopping campaign.
You can then organize your inventory by subdividing it into different groups and subgroups. You can divide product groups up to seven levels/layers. Dividing your inventory into several groups and subgroups will help your bidding to be more precisely aligned with your advertising and conversion goals.
As mentioned earlier, you can create product groups by different product attributes categories, brands, product types, etc. You can also create a product group for each of your products.
You can create up to 20,000 product groups in your Shopping campaign.
What are the product group attributes?
As a WooCommerce store owner, you are familiar with the product attributes, right? You create product attributes for variable products.
However, in the Google shopping campaign, product attributes are the field/column names you provided in your product feed file in Google Merchant Center.
You can create/subdivide product groups in a Google shopping campaign based on the following attributes –
Items ID
WooCommerce allocates a unique identifier to each product automatically. So when you create a product feed file using the CTX Feed plugin, it will fetch those IDs for you. You can create product groups using the IDs.
Brand
You can subdivide product groups by manufacturers or company names.
Category
You can subdivide by categories only from specific locations such as the USA, UK, Japan, etc. If you don’t assign categories in your Merchant Center product data, Google will assign one for you.
If you are using the WooCommerce CTX Feed plugin, you can easily pick the category from the attributes field. Once you assign that product feed file to Google Merchant Center, your shopping campaign will fetch that data, and you can create product groups based on categories.
Here’s an example of a category – Apparel & Accessories > Clothing > Shirts & Tops
Product type
Here’s an example of a product type – Clothing > Women > Tops > Tees > Plus Size Tees.
Plus size t-shirt is the product type here. Product type is more of a specific category that lives at the end of the category funnel.

Custom labels
Additionally, you can create up to 5 custom label attributes in your feed file. You can use these for creating custom features such as seller rate (bestseller, low seller), seasonal (winter, summer, spring), reviewed (positive, negative), etc.
Condition
If you are selling products under different conditions, such as New, Used, or Refurbished, you can create separate product groups for them.
Channel
Are you selling products only on your WooCommerce store or at your local store? No matter what channel or channels you are using to sell products, you can create individual product groups for them.
Channel exclusivity
Many business owners like you sell both at local stores and online. You can let your customers know that they can buy from both options. Similarly, you can subdivide your product groups based on single-channel or multi-channel. This will help you determine your advertising strategies for different channels.

How to create product groups in google shopping?
Let’s start from the beginning. Let’s create a Google shopping campaign and then divide product groups.
Go to your Google Ads account and click on the New Campaign button to start creating a new Google shopping campaign.

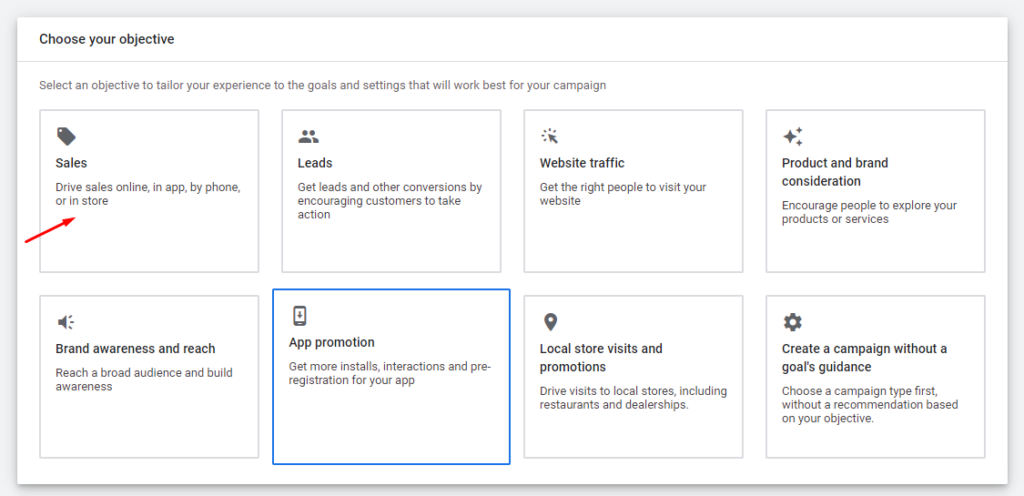
We will select Sales as our objective because we want to sell our products through these ads.
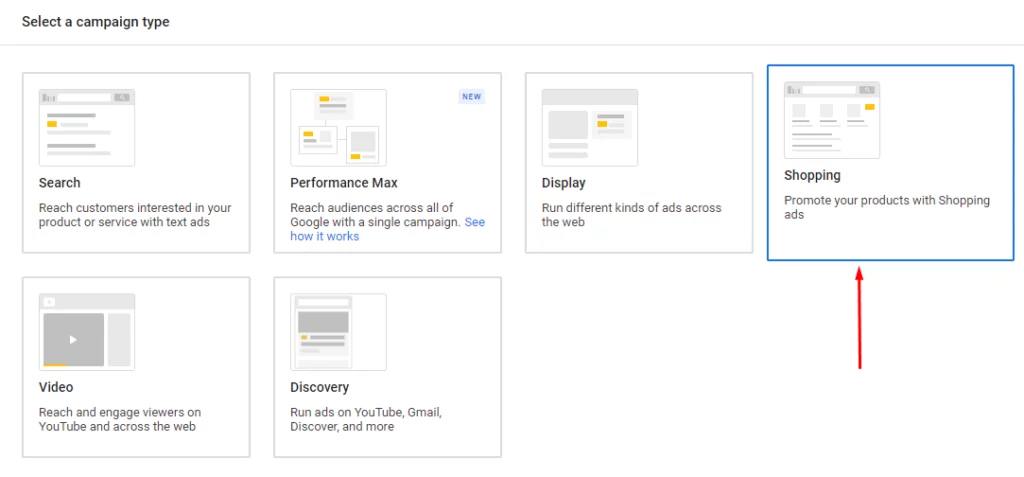
As we are creating a shopping campaign, we will select Shopping as our campaign type from the next window.
Google will fetch your Merchant Account details you linked with this Google Ads account. You need to select the country where you sell your products. Remember to choose the same country you selected while creating the product feed file.
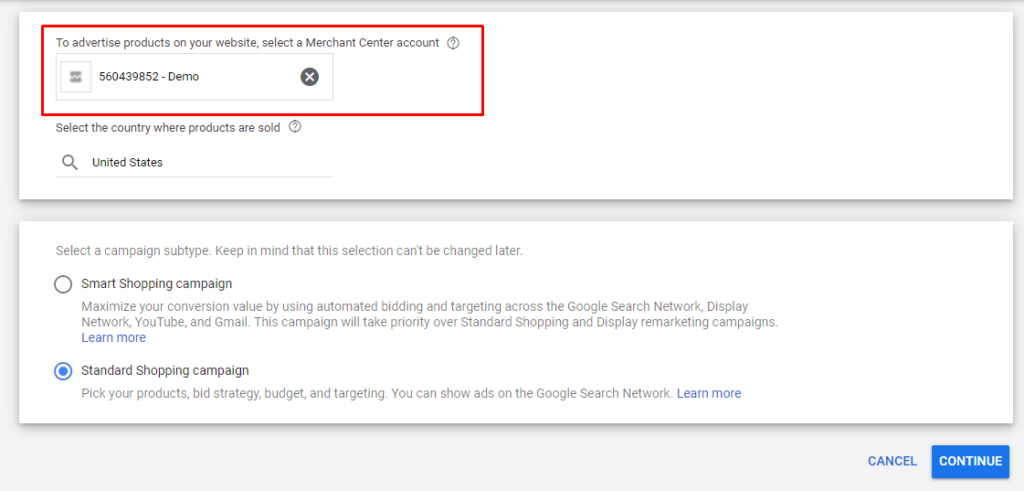
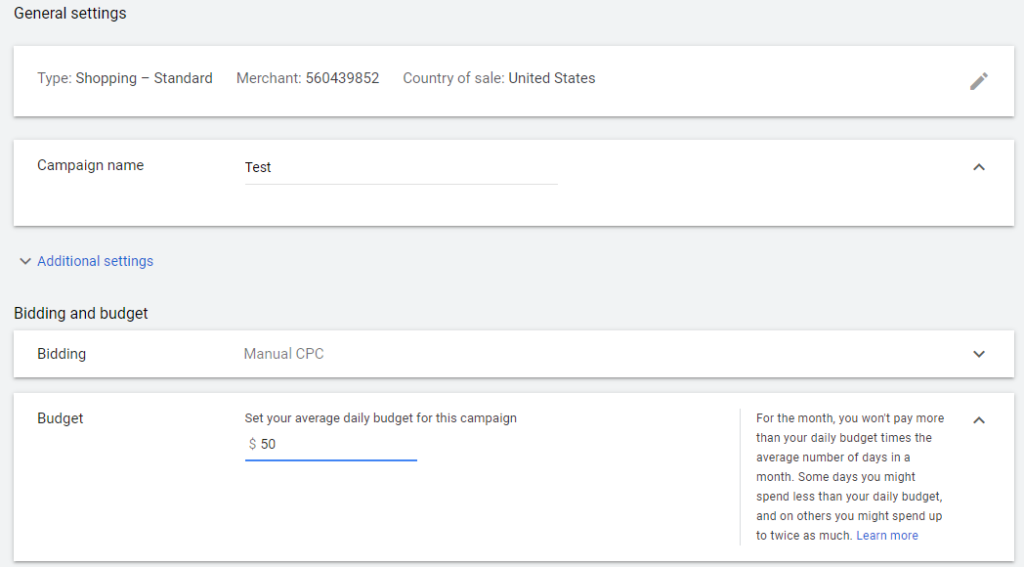
Continue to the next window, where you will need to give your campaign a name. Set your bidding method and daily budget for the campaign.
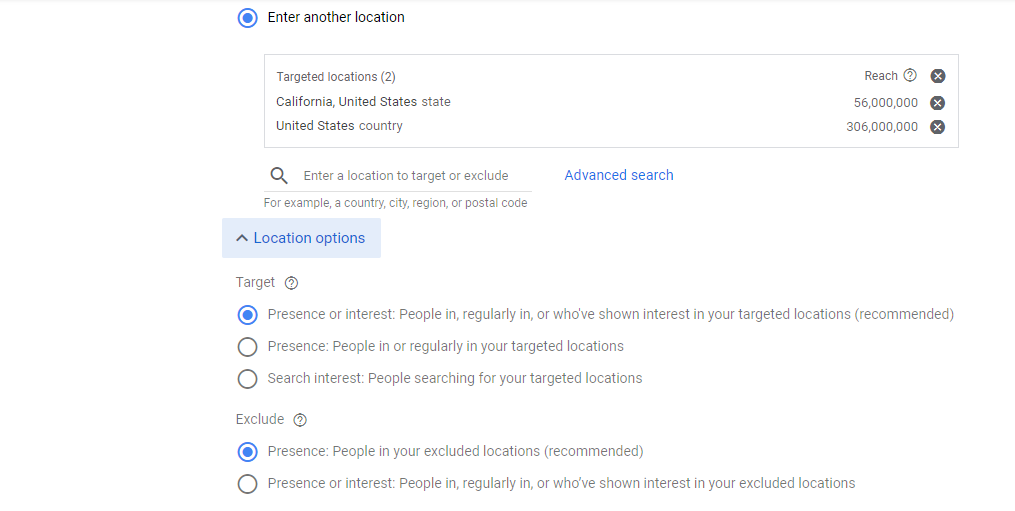
You can enable all Google search networks and partners to display your product ads. Additionally, you can filter down your target location by state and city. You can also specify your target audience in the following windows.
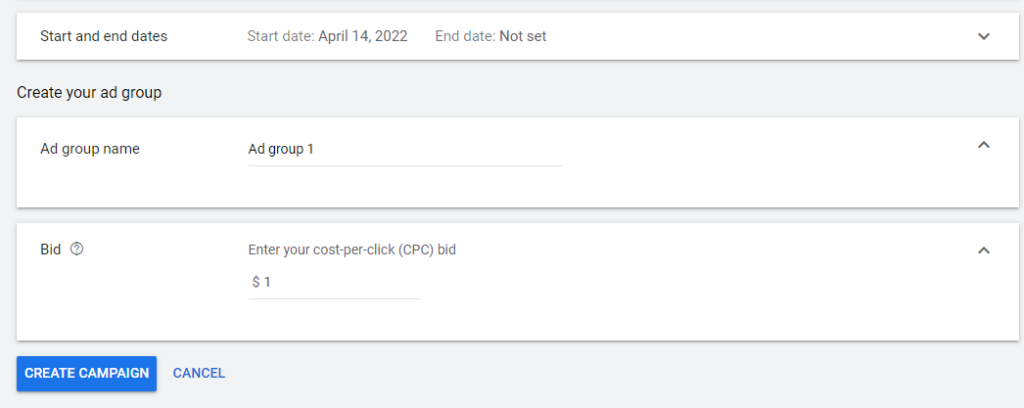
Next, we need to create the ad group by naming it and setting the cost per click budget for the products under it.
When we are done creating our shopping campaign, it will look like this –
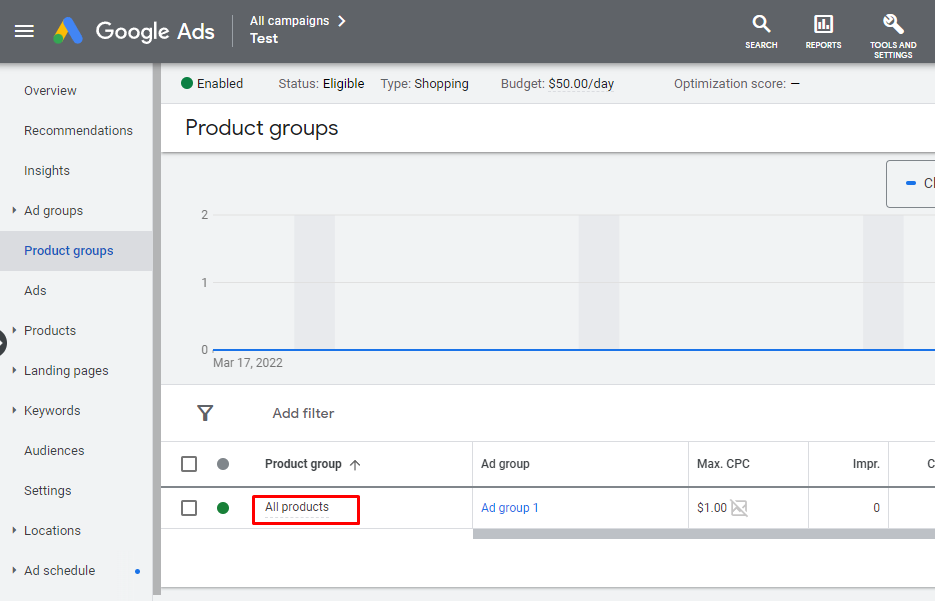
Creating/subdividing Google product groups
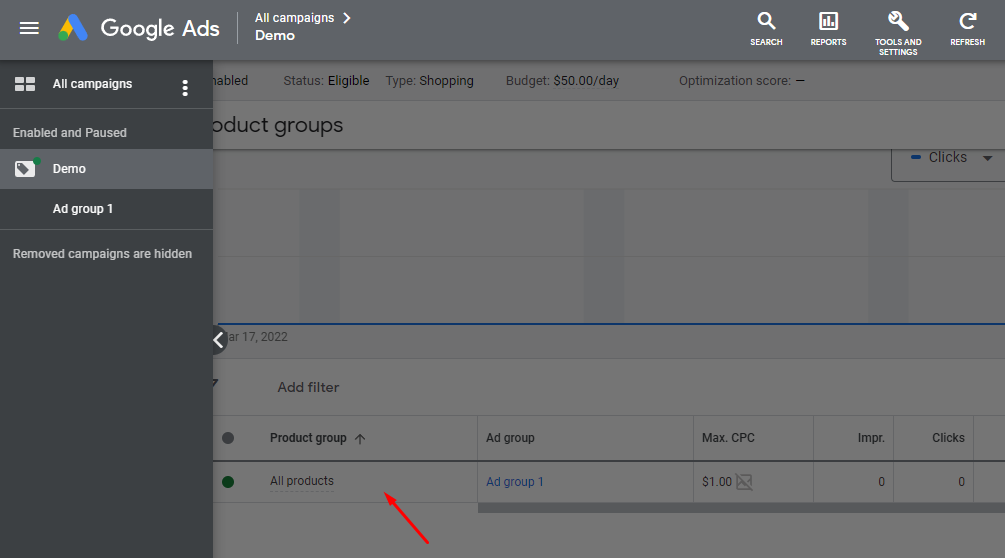
As you can see, there’s only one product group under our ad group we named Ad Group 1, and CPC (Cost per click) is set to $1. This means if someone clicks any of our products on Google shopping or anywhere our ads are displayed, it will cost us $1. We have already explained why that’s not a good practice.
Let’s learn how to break our products into different product groups. Hover your mouse over the product group All Products; you will see a (+) sign.

It will take you to the window where you can subdivide your products based on the attributes we talked about earlier.
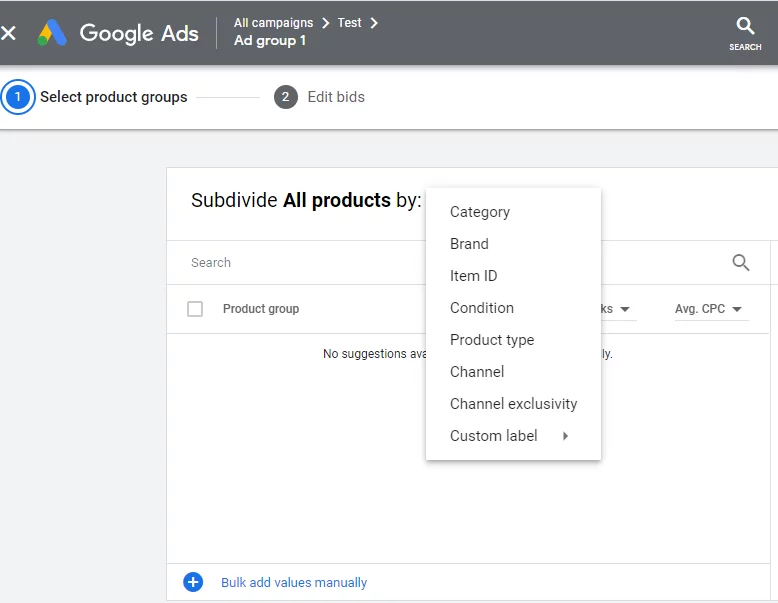
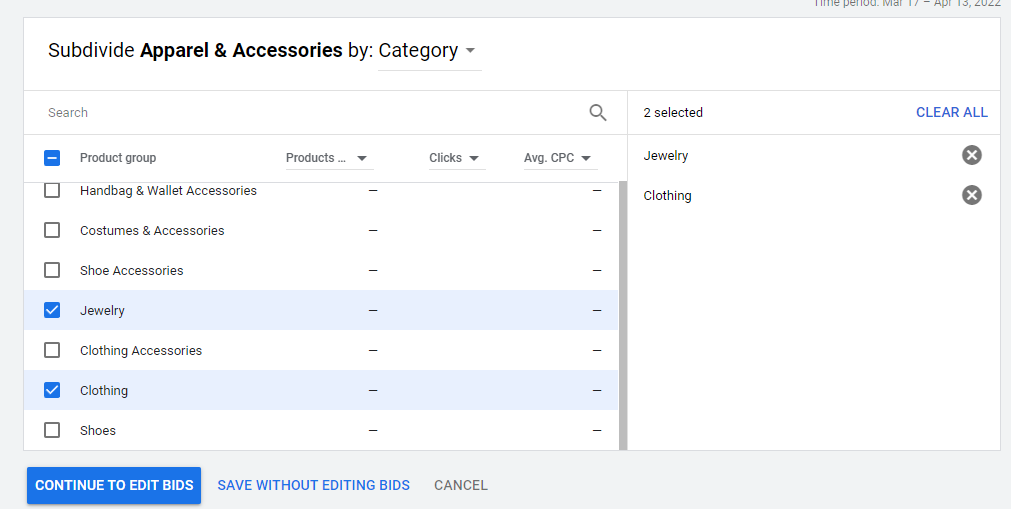
For example, we have picked two categories that we want to subdivide.
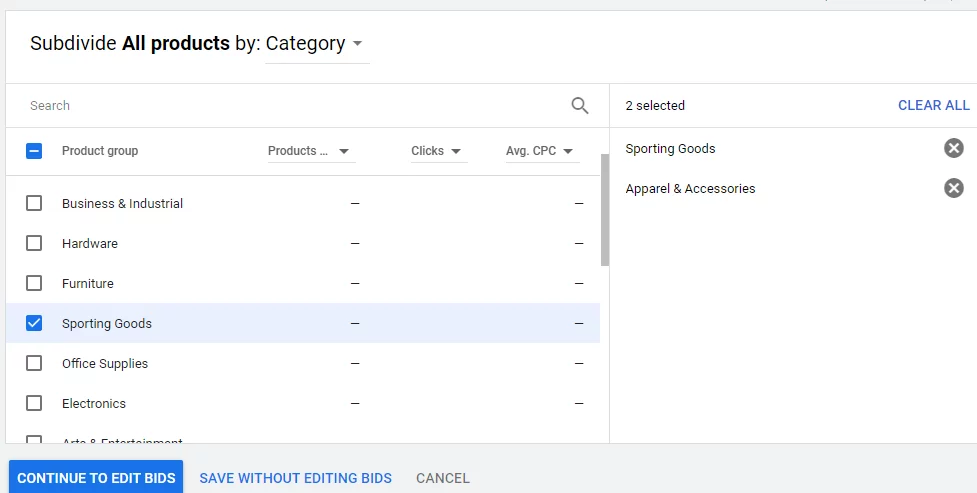
We will continue to edit bids.
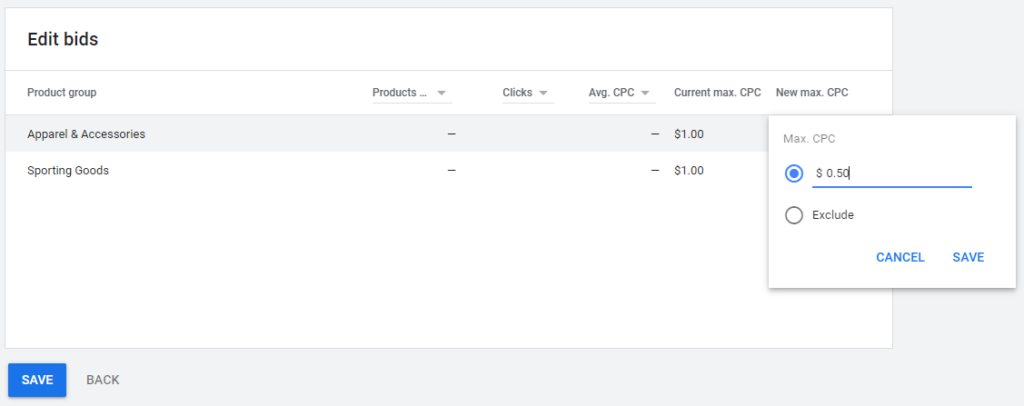
You can set a new cost per click for the products under these categories or exclude them from your campaign.
Here’s how it looks after we finish subdividing our products into new product groups.
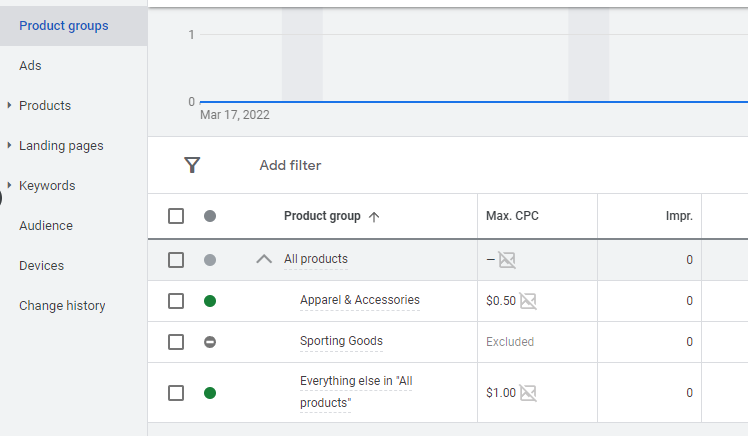
All these new groups are under the main All Products group. So these are all subdivisions of that group.
You can also exclude or set a new CPC from the main window as well.
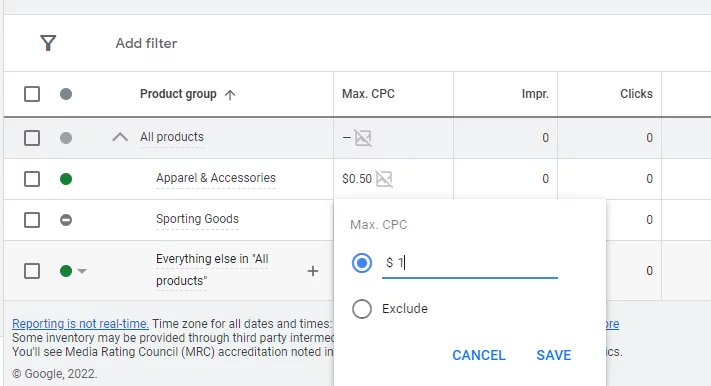
You can subdivide a group into 7 levels, as we have mentioned earlier. For example, let’s break our Apparel & Accessories product group into more subgroups. Click the (+) beside it. You will see more specific categories to filter down your choice and subdivide your products into more specific categories or product groups.
Then you will be able to set different CPC bidding amounts on them. Here’s how it looks after you subdivide your group into several product groups.
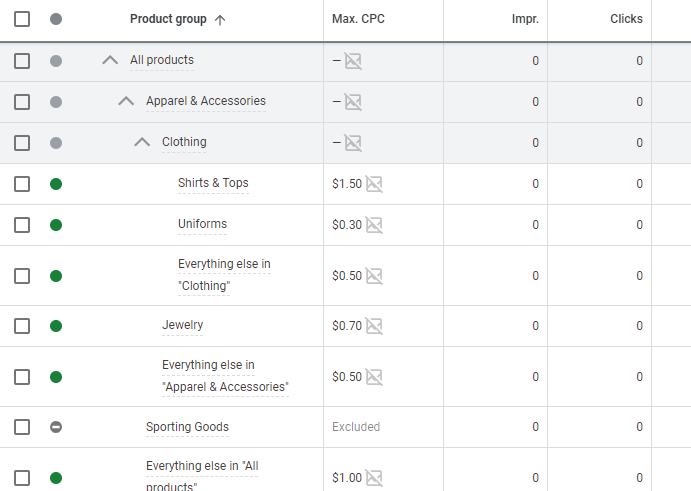
One important information you should remember is that a product can only be added in one group.
Filtering product groups
The product group’s page in Google Ads account provides a filter feature through which you can filter your product groups based on different parameters. It will help you check the exact information you need.

You can filter and view your product groups by clicks, conversions, click share, products approved, etc. Additionally, you can save your filter settings. Therefore, if you need to filter again, you won’t need to start from scratch. This can save you a lot of time and effort.
These filters can play a vital role in your advertising decisions. You can filter and analyze how your campaign is running and what product groups bring home the bacon.
Analyzing the product groups
When you create a shopping campaign in your Google Ads account, you will receive a separate product group’s page. This page contains all the metrics to analyze your product’s performance.

You can customize the columns and display your own set of necessary fields from the Columns section. You can download reports in different formats and also can upload spreadsheets to make changes in your product groups.
You can check valuable information such as total clicks on your products or product groups, impressions, maximum cost per click, conversion metrics, etc. These data will let you know exactly how your campaign is performing and help you determine what areas you need to work on to improve.

Frequently Asked Questions (FAQs)
Creating a shopping ad is different from creating traditional ads on Google. You don’t need to manually input texts and images on a shopping ad. Instead, you need to upload a product feed file that contains all your product details (images, price, brand, etc.) to Google Merchant Center and create a Shopping campaign in the Google Ads account. That campaign will fetch your products data from the connected Merchant Center account and generate ads for your products.
Product groups in the Google shopping campaign houses all the products you listed in your product feed file. By default, an ad group of a shopping campaign contains one product group that lists all the products under it. You can subdivide this group into several product groups to set different bid amounts on different products. You can divide your product groups by categories, brands, IDs, etc.
You can’t bid on keywords in a Google shopping campaign as you do on regular Google ads. Instead, you need to bid on product groups. A product group can contain one single product or can have a set of products based on categories, channels, product type, brands, etc. You can bid different amounts on different product groups. However, all the products under a product group will have the same bid amount.

Wrap up
If you are a WooCommerce store owner, you can use a Google shopping campaign to promote your products to a vast audience, drive incredible traffic to your website and boost your overall sales.
However, Google shopping ads work differently than regular search result ads. Therefore, you need to understand different aspects of running a shopping campaign on Google, particularly product groups. Product groups are used in shopping campaigns to help you manage and organize your inventory more effectively.
Yes, dividing product groups into several levels can feel a bit time-killing, but it will pay off in the long run. It will give you better control over your bidding, improve the quality of your analytic reports, and make your campaign more effective and increase your profits.
You May Also Like
