
How to Configure Stripe for WooCommerce Sites with Infographics
Configuring Stripe for WooCommerce involves connecting a Stripe payment gateway to your store so customers can pay securely by card or digital wallets.
By installing the official WooCommerce Stripe Payment Gateway plugin, creating a Stripe account, and adding API keys, WooCommerce extends its checkout system with Stripe’s payment attributes like tokenized card data, express checkout, refunds, and fraud protection.
This payment —customer checkout → Stripe authorization → secure transaction → order confirmation—ensures fast, reliable, and scalable online payments for WooCommerce sites.
In this blogpost, we will walk you through the reasons for using Stripe alongside with the step-by-step process of integrating Stripe for WooCommerce stores.
Let’s start!
What is Stripe?
Stripe is basically an Irish-American SAAS-based financial service provider technology company. It creates APIs and payment management gateways for online businesses and eCommerce websites.
For enterprises running on older systems, legacy application modernization plays a crucial role in enabling smooth Stripe integration and optimizing payment workflows.
It was founded by the Collison brothers, Patrick Collison & John Collison, in 2011. Just after their initial launching, this new payment method received a massive investment of $2 million from venture capitalists Peter Thiel, Andreessen Horowitz, and Sequoia Capital.

Since then, their growth rate has never fallen back. Their valuation soared to $95 billion after the latest fundraising. The core participants on the latest financing are Fidelity, Allianz, AXA, Baillie Gifford, Sequoia Capital, and Ireland’s National Treasury Management Agency.
Few Top Websites that Use Stripe Payments
Thousands of websites relies on Stripe’s software tools to accept payments from their customers. Here are some of those –
- Spotify
- Ford
- Amazon
- WooCommerce
- British Council
- Shopify
- Atlassian
- Airbnb
- Slack
- Lyft
- Figma
- CNN etc

How to Add Stripe to WooCommerce Websites in 5 Steps
Configuring the Stripe account is probably the easiest method of adding a payment gateway in an eCommerce store. You can use this well-renowned payment processor only if you have an active Stripe account and access to the WordPress dashboard.
In this section, we will go through the step-by-step process of installing and activating the Stripe payment gateway. Before proceeding to the main steps, let’s check the total integration process at a glance.
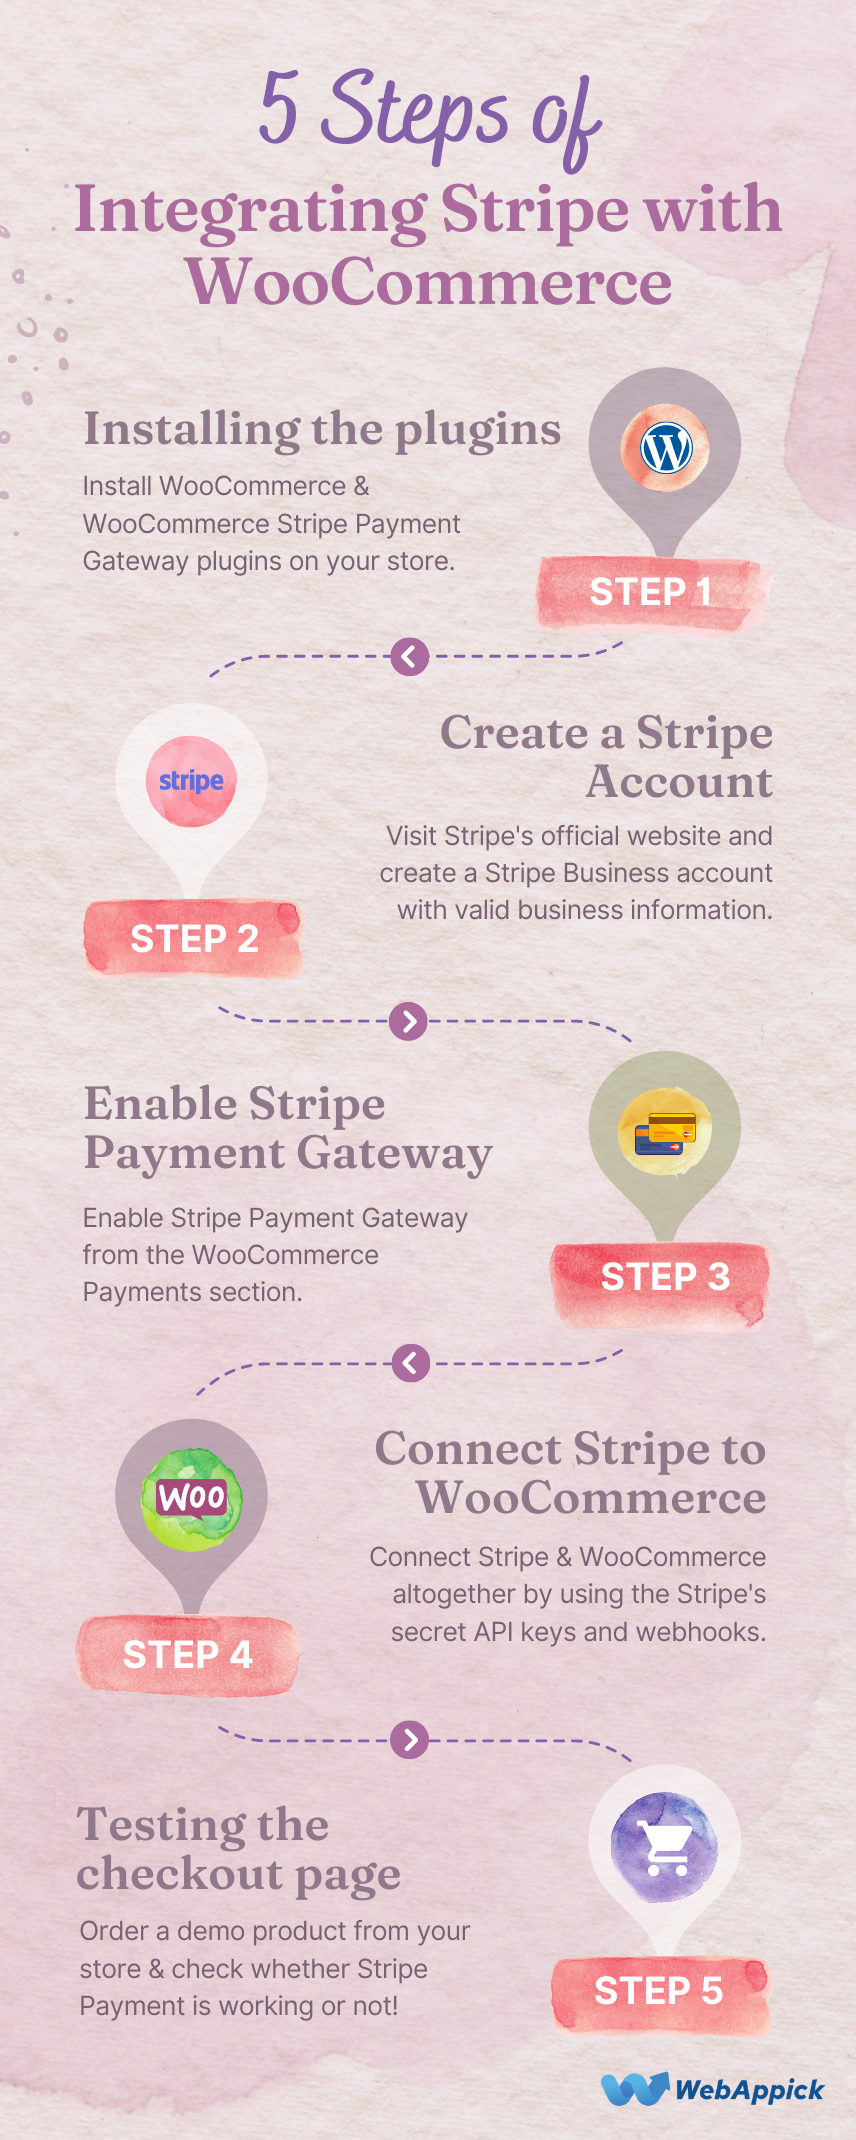
Okay, now let’s go through the thorough description of these integration steps.
Step #1: Installing the plugins
Before initiating the Stripe WooCommerce setup process, we need to install the required plugins first. Here’s the list of required plugins –
- WooCommerce &
- WooCommerce Stripe Payment Gateway
Being an online shop owner, we believe you’ve already installed the WooCommerce plugin on your website. In this section, we will show you the process of installing the WooCommerce Stripe Payment Gateway plugin.
Remember, there are a number of Stripe payment plugins available on the WordPress store. But, we will install the official WooCommerce Stripe plugin in this process. Because this is by far the best stripe plugin for WooCommerce.
Let’s start.
1. Accessing the WordPress dashboard
Just like installing a regular WordPress plugin, you have to log in to the WordPress dashboard to install the Stripe plugin. The default URL of accessing the dashboard panel is “www.yourdomain.com/wp-admin/”.
2. Installing WooCommerce Stripe Payment Gateway plugin
After logging in, proceed to Plugins > Add New and you will be landed on the WordPress plugin store. Then search for the WooCommerce Stripe Payment Gateway plugin and install it.
Here’s the graphical representation of installing this plugin from the dashboard.

Easy peasy, right?
However, you can install any WordPress plugin by using this method. Give it a try!
Step #2: Creating a Stripe account
After installing the Stripe WooCommerce plugin, it’s time to integrate WooCommerce and Stripe together. But, you will need a Stripe business account to proceed with the next steps.
If you already have a business account, you can just proceed to step #3 now. Because, we will show the process of creating a Stripe business account in this section.
Let’s start.
1. New Account Registration
To create a new account, you have to visit the Stripe new account registration page.

You have to enter the following information there –
- A valid Email address
- Legal full name
- Country name &
- A strong password
After entering that information, click on that big purple “Create account” button, and your account will be created!
2. Email Confirmation
Now check your email, and you will notice an account confirmation email from Stripe. Click on that confirmation link, and your account will be activated instantly.
3. Adding Business Details
After signing in to your account, you will get a banner showing the next step of creating your business account.

As the banner suggests, the next step is creating your business details on Stripe. You have to enter the following information in this section –
- Business structure
- Business representative
- Fulfillment details
- Business details
- Support details
- Bank details
- Two-step authentication
- Tax calculation
- Climate contributions &
- Summary
After entering valid information, your account will be activated automatically, and then you will get your Stripe API keys from the dashboard.
Step #3: Enable Stripe Payment Gateway
As we’ve already installed and activated the plugin, so it’s time to enable payments. To do this, proceed to WooCommerce -> Settings -> Payments tab and search for Stripe options.
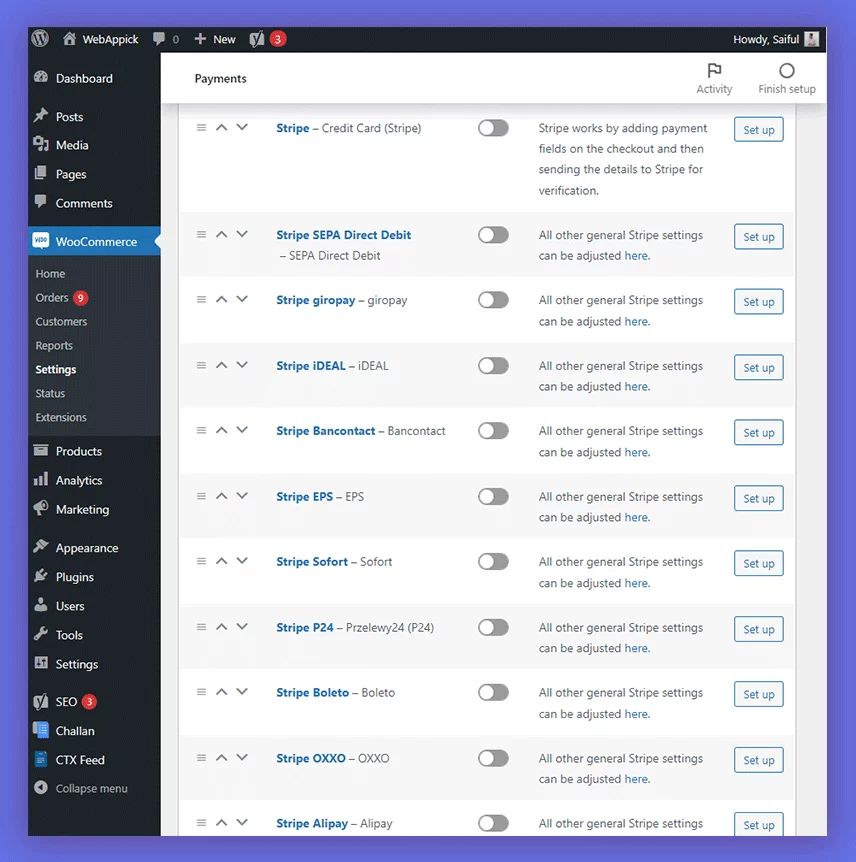
You will get lots of Stripe options there. These are –
- Stripe Credit card
- SEPA direct debit
- Giropay
- iDEAL
- Bancontact
- EPS
- Sofort
- Przelewy24 (P24)
- Boleto
- OXXO
- Alipay
- Multibanco etc.
We will work with the credit card option for now. So, toggle the button beside Stripe – Credit Card (Stripe) option, and the WooCommerce Stripe gateway plugin will be enabled.
By the way, there are some requirements to open a Stripe business account.
The requirements for US residents are –
- Legal entity name
- Legal entity type
- Business address &
- Employer Identification Number (EIN)
By the way, if you live in another country, you will require some extra documents. These are –
- A government-approved tax ID
- A physical location
- Valid phone number
- Government-issued unique ID card (passport or driving license)
- A Valid website with a valid SSL certificate
- A physical bank account etc.
Gather all of these before applying to the Stripe business account.
Step #4: Connect Stripe to WooCommerce
After enabling the Stripe payment, it’s time to enter account keys. You can access this option by navigating to WooCommerce -> Settings -> Payments tab.
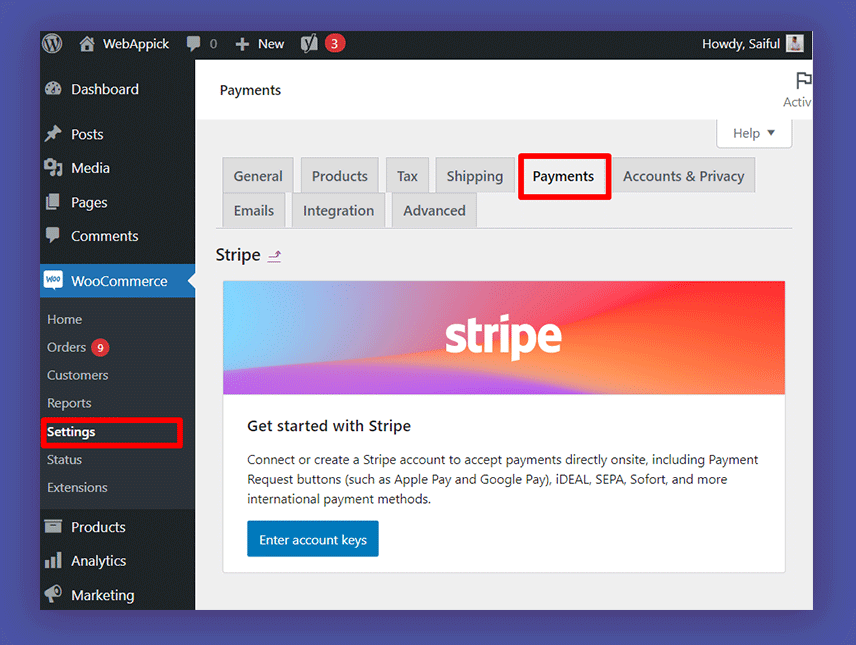
After clicking on that ‘Enter account keys’ blue button, it will show a new window. You have to enter the publishable key, secret key, and webhook secret from here.
By the way, Stripe allows the user to enter both their live and test keys from that page.
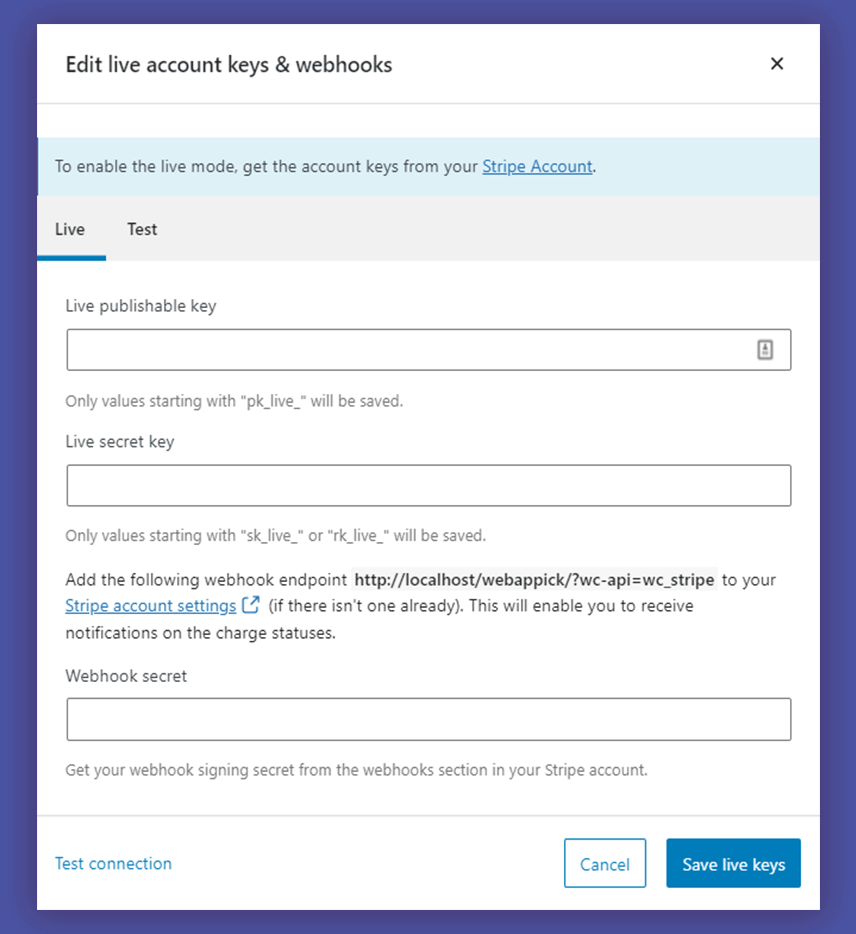
You will get both test and live keys from the Stripe dashboard. Copy and paste it on the keys page, and you are done. However, you will need a Stripe account to get those keys.
However, Stripe supports both production mode for testing your account. So, if you are just exploring the options, just use the test mode here. To get those API keys and webhooks, you have to visit the API keys section from the Stripe dashboard. Just copy those keys and paste those on WooCommerce.
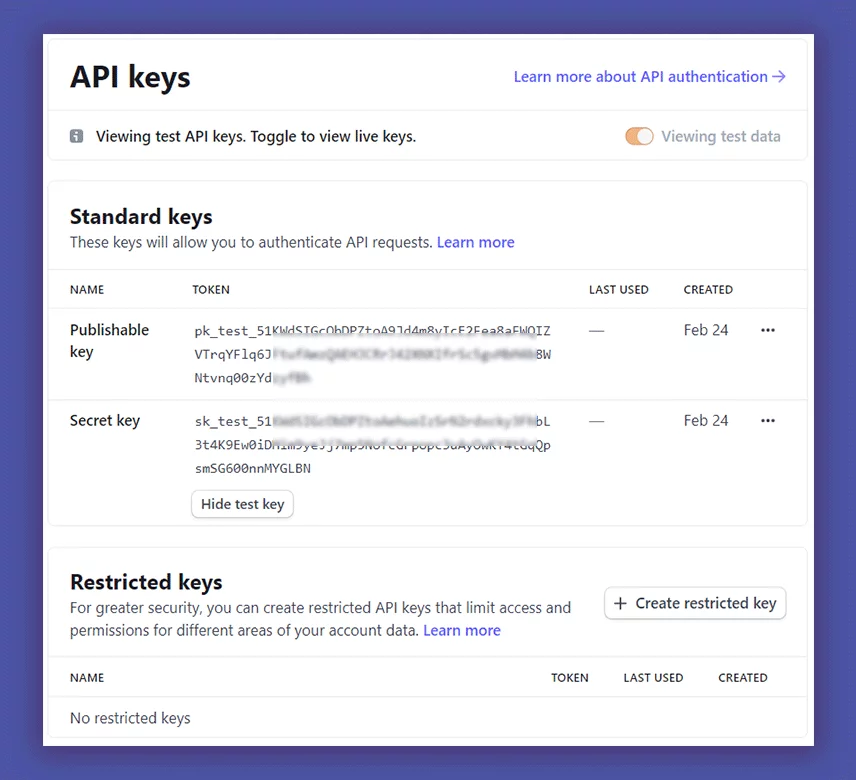
These keys can be copied only by clicking on the codes. If you have completed all of these steps successfully, then that’s the end of our Stripe account integration journey!
Step #5: Testing the Checkout Page
Now, it’s time to test the Stripe checkout from your WooCommerce store. So, order something from your store and check whether Stripe is showing on the express checkout pages or not.
If you configure everything properly, then you will get the following options on the express checkout page. You will get the Stripe option after choosing credit card payments easily from the checkout pages of your store.
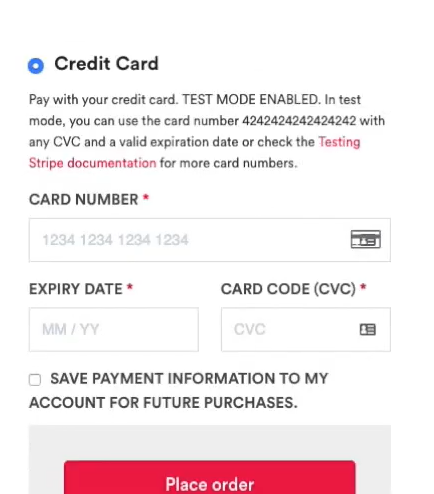
As you can see, the Stripe credit card form is visible on the checkout page. Simply fill out this credit card form with secure card data, and your order will be placed.
By the way, you can also use a saved payment method for checkout purposes. You can save the same card you’ve used for making the payment.
Okay, How does the Stripe Payment Gateway Work?
After all, Stripe is basically a payment gateway. But, it just offers lots of additional facilities along with solving your online payment needs. The main powerhouse of Stripe is its web payments API.
The whole Stripe functionalities are managed by the following process –
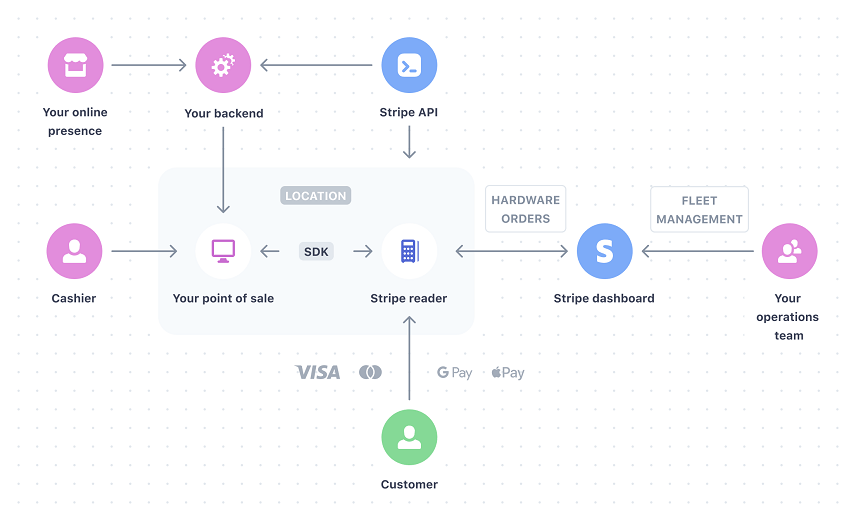
Seems too complex?
Don’t worry! This process is designed for developers and engineers. Here we have designed a simplified view of how a payment system works.
Check the infographics below to understand the working procedure of the general payment gateways.
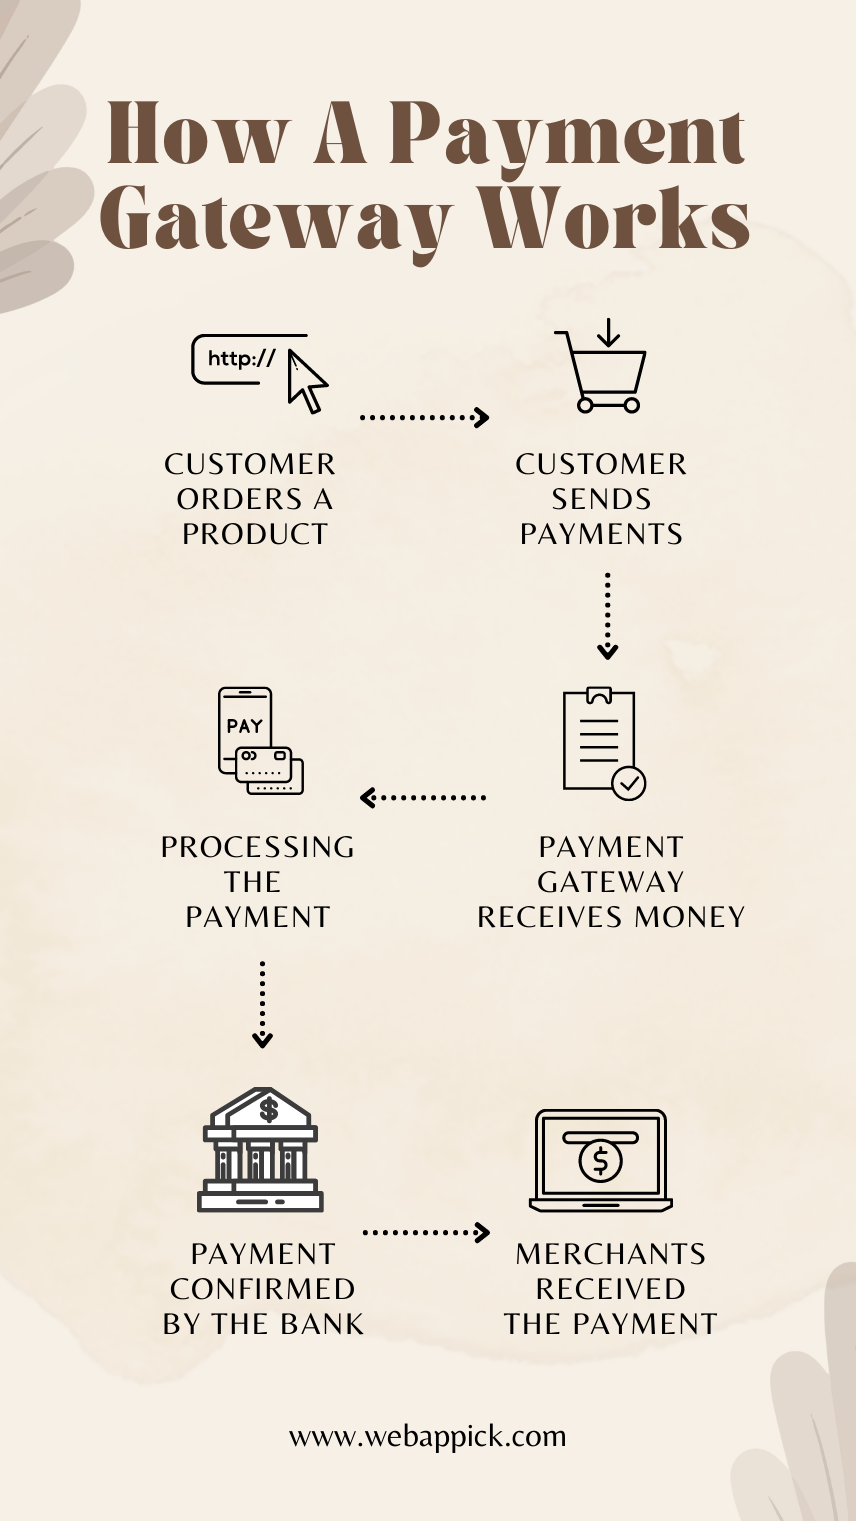
This is the general process of transaction money online. Though Stripe payment methods use a secured transaction process, its root structure is also similar to this.
What is so Special About the Stripe Payment Gateway?

Probably the very first impressive thing about Stripe payment gateways is its slogan!
Yeah, no kidding!
Their slogan is “The New Standard in Online Payments”! Well, they can surely claim that standard because of the combination of service quality and accepting online payment.
Wonder why? Let’s find out those specialties about Stripe payment gateway.
1. No Hidden Charges
It’s ubiquitous to charge for the services you are providing. But, the real horror begins when a service provider charges you without any prior notification.
Unfortunately, this became a common tendency for online service providers during the early 20s. That’s why people tend to spend less on online stores.
The Collison brothers tried to change that situation with their own financial service provider, Stripe payments.

Stripe makes their first move against this problem by offering a full-fledged payment service without any hidden costs. They neither charge the customers nor the merchants while using Stripe.
Besides, there are no setup fees, support recurring payments, express checkout, Google Pay, Apple Pay, accept Visa, Mastercard, and other payment cards.
Once you add Stripe to WooCommerce, consumers can pay you within just a few taps, even from the mobile devices, via the Apple pay button or other payment request buttons by providing their valid payment details.
2. Developer-friendly
Developers and engineers just love Stripe!
Why?
Because of the powerful and flexible web payments API, SDK’s, and custom libraries.
These SDKs are production-ready, and it seamlessly integrates with most of the legacy applications. It is properly optimized with fast payment solutions like Google Pay, Apple Pay, Microsoft Pay, credit card payments, recurring payments, etc.
The custom libraries support most of the popular programming languages. Developers can use the following languages for integrating Stripe –
- Java
- Python
- PHP
- JavaScript
- Node.js
- Ruby etc.
The WooCommerce & Stripe integration process doesn’t require any extra coding. So, the developers can focus more on their product than the payment procedure.
By default, Stripe is capable of processing a massive amount of money transactions within a short time. The President of Stripe, John Collison, said that Stripe has handled about 5,000 requests per second in 2020.
These requests include making payments, refund requests, data checking, and other queries through the application program interface. So, you can surely rely on WooCommerce and Stripe for all of your future transactions.
3. Instant Account Creation
Most of the payment solutions like PayPal payment gateways require some time to approve the new accounts. But, Stripe payment methods are completely opposite to that. Users can pay with their Stripe account just after creating one.
Even the sellers can also receive payment instantly after adding the bank account to their stripe account. If you save that account, you can use that saved payment method for future transactions.
As you don’t need to go through the manual installation method, the whole integration process becomes buttery smooth. Just create your account and connect it with your online store.
4. A Full-fledged Dashboard

Stripe offers a full-fledged dashboard to operate your account. You can monitor your payments, dispute response, refunds, or other third-party integration from the Stripe dashboard.
The user interface of the Stripe dashboard is so rich that you can perform every account management action from here without using Stripe’s API. For example, you can cancel a subscription, monitor monthly fees, refund a payment, check payment details of specific accounts, etc.
Most importantly, you can download all of the payment history reports from the dashboard in a CSV format. Thus you can check the overall money transaction scenario from this dashboard. You can also explore the whole dashboard by using the Stripe test mode. Toggle the Viewing test data option to enable the test mode.
5. Stripe Terminal
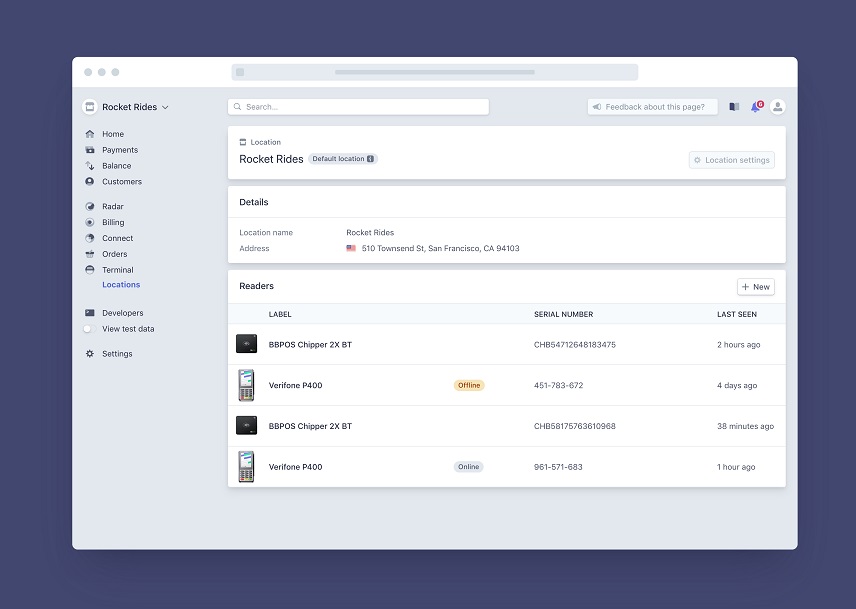
Stripe isn’t just another online payment processing platform. You can accept payments from both online and in-person payments by using Stripe.
Thanks to the Stripe Terminal for making the offline transactions available online. You can accept payments online by using both mobile and web-based applications.
6. Safety & Security
I will not brag about the safety and security of using Stripe. Just take a look at those features of Stripe, and you will understand how secure it is!
- Stripe supports Strong Customer Authentication (SCA), which is mandatory for financial transactions with the European Economic Area (EEA).
- Faster transactions are just an authorization away because of Stripe’s secure integration with touch ID and face ID.
- The Stripe Payment Request API can detect online frauds and scammers using the Stripe Radar and 3D Secure.
Overall, you can say that Stripe is really making a change on the security of online transaction platforms.
7. Accepts Major Payment Systems
Stripe works as a single platform for all of your payment needs. It supports the major credit and debit cards from different countries. Here’s the list –
| Debit & Credit card | Wallet Payment |
|---|---|
| Visa | Apple Pay |
| Mastercard | Google Pay |
| American Express | WeChat Pay |
| Maestro | Microsoft Pay |
| Discover | AliPay |
| UnionPay | Click to Pay |
| Cartes Bancaires (CB) | Bank checks |
| Japan Credit Bureau (JCB) | SEPA |
| Diners Club cards etc. | ACH Credit Transfer etc. |
Right now stripe supports 30+ countries and 135+ currencies for transacting money globally. However, they are working with automatic refunds and reconciliation features which can be enabled by adding bank transfers to the Payment Intents API.
8. Core Functionalities

No doubt that Stripe is making our professional tasks easier than ever with its endless functionalities. But if we consider the core functionalities, then we have to mention the functionalities below –
- Accepting payments
- Financial reporting
- Stripe Connect
- Stripe Atlas &
- Setting up subscriptions
Overall, all of these functionalities serve only one purpose: providing the best financial service to the users. So, we can surely rely on Stripe for financial transactions.
9. Uses Machine Learning
Stripe uses machine learning to provide the most secure money transaction facility for users. It solely works to prevent frauds from accessing the bank account you’ve added on Stripe or making any interference during the transaction.
The Stripe Radar basically handles these situations. It is powered by an adaptive machine learning algorithm. This algorithm learns from years of data and infrastructural functionalities of the previous transactions.
It even evaluates every single transaction and scans the relevant information to measure the fraud risks. If this machine raises any red flag, Stripe Radar takes action immediately.
Here’s a graphical representation of how the Stripe fraud detection works –
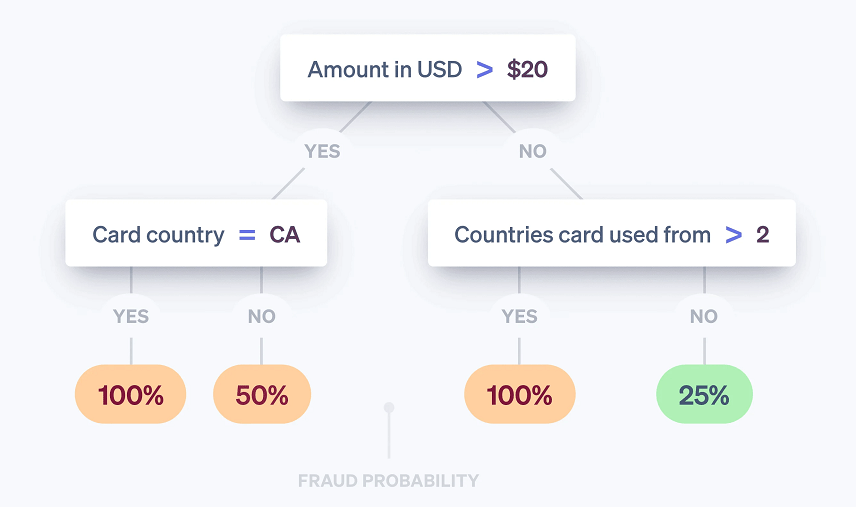
That’s how your payments via Stripe payment gateway become more secure and trustworthy.
10. Universality
As you might have already realized that Stripe isn’t just a random online payment gateway. It is far more mature than that. It is a collection of complex tools and services. Here’s the list of Stripe’s main products –
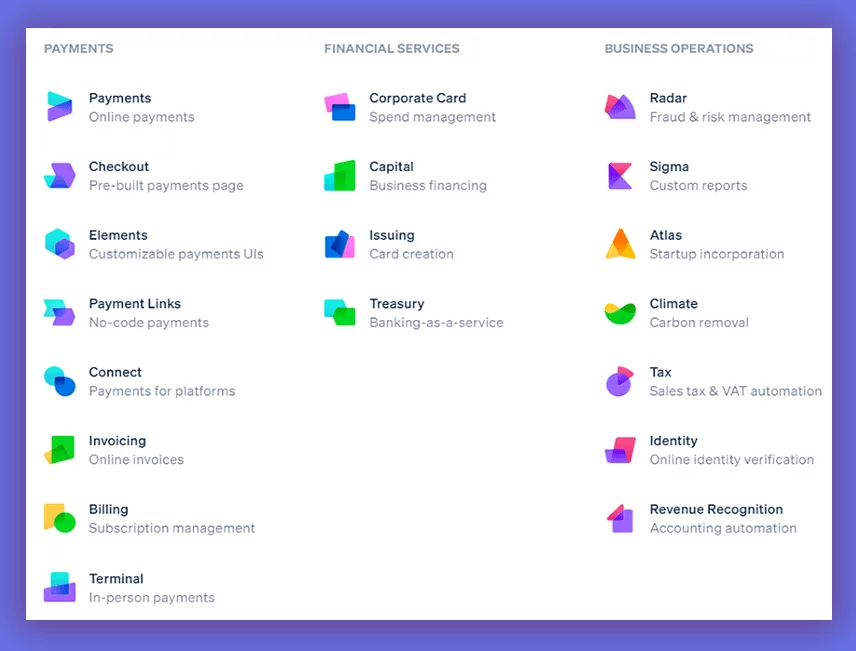
Let’s have a quick overview of the common services at a glance.
- Stripe Radar – It is a machine language-enabled service for fraud prevention.
- Atlas – It is used to handle business creation services.
- Issuing – Users can create, distribute, and manage physical debit and credit cards from this section.
- Terminal – It enables the feature of receiving in-person payments.
- Sigma – It is an SQL-powered analytical tool used for creating custom reports.
- Billing – It enables the users to create complex billing systems with custom pricing models.
- Stripe Elements – Stripe elements offer a customizable payment UI.
- Treasury – It enables the Banking-as-a-service feature against your Stripe account.
- Tax automation – It automates the sales tax calculation for your online store.
- Connect – It enables a payment system for online marketplaces and eCommerce platforms.
- Invoicing -It creates online invoices based on your transactions.
By the way, besides creating invoices for the money transactions, you also have to send order invoices for your WooCommerce customers. And, you can easily do it by a renowned plugin called Challan.
Just give it a try!
However, these are the common products of Stripe. To learn more about these products, you may visit their official sites.
WooCommerce Payments vs Stripe Payments
Stripe and WooCommerce Payments are both used for accepting payments from the customers. As both of these gateway charges almost the same, so the eCommerce owners might get confused while choosing their payment gateway.
That’s why we have created a comparison table to understand the differences between these platforms. Let’s have a look –
| Fees | Stripe | WooCommerce Payments |
|---|---|---|
| Credit card payments | 2.9% + $0.30 (per transaction) | 2.9% + $0.30 (per transaction) |
| In-person transactions | 2.7% + $0.05 (per transaction) | 2.6% + $0.10 (per transaction) |
| ACH Payments | 0.8% per transaction | Not supported |
| Currency switching fees | 1.50% | 1% |
| Cross-border fees | 1.00% | 1.50% |
| Dispute fee | $15 (per lost dispute) | $15 (will be refunded if you win the dispute) |
| Supported currency | 135+ | 135+ |
| Supported countries | 45+ countries | 18 countries |
These are the common differences between Stripe and WooCommerce payment gateways. Based on country coverage and facilities, it seems like Stripe is winning here. But, you can choose whichever you want as your primary payment gateway.
Frequently Asked Questions
Here we have answered the most commonly asked questions about WooCommerce Stripe integration.
1. Is Stripe free to use with WooCommerce?
Stripe is completely free to integrate with the major eCommerce platforms, including WooCommerce. All you need to do is install the official Stripe plugin from the plugin store, and it’s completely free.
But, you have to pay some bucks to receive money by using this payment method. You can also send a payment request to someone in order to receive payments directly on your card.
2. Do WooCommerce payments use Stripe?
Yes!
WooCommerce has a built-in partnership with Stripe. But you have to sign up with WooCommerce and verify your business with Stripe to use Stripe payment request buttons as one of your payment methods.
However, you can also add multiple payment methods to your online store. This you can receive money from the customers by using alternative payment methods as well as adding the other payment request buttons on the pay order page.
You can also create your own gateway by using the combination of Stripe Connect & WooCommerce in your online store.
3. How much does it cost to use Stripe with WooCommerce compared to PayPal?
Stripe doesn’t cost much while integrating it with WooCommerce. If you can compare it with the alternative payment methods, you can easily understand how less it charges!
4. How do I setup Stripe & WooCommerce altogether?
Setting up Stripe checkout & WooCommerce altogether is probably the easiest task of setting up an online store. We have already described the process in the previous section.
So, here’s just an overview of the steps for integrating the WooCommerce stripe gateway as the primary payment method.
1. Install the official WooCommerce Stripe plugin
2. Create a Stripe business account &
3. Connect Your Stripe account with WooCommerce
That’s all! Your integration process is done!
Final Words
E-commerce fraud costs almost $20 billion per year. So, it’s your duty to ensure a secure payment processing gateway when a customer pays for a product.
Integrate the main Stripe gateway & an SSL certificate on your WooCommerce website and enjoy the highest ROI.
Ciao!
