How to Setup WooCommerce PayPal Checkout Gateway in 5 minutes
Offering the best products and special discounts is the core factor to increase sales, right?
Absolutely wrong!
Trust me, people won’t purchase anything via an unsecured payment gateway. It doesn’t matter how good your product is; people won’t buy it!
Just think about it, who will transact their money via something they don’t trust? Leave it, will YOU do it? We don’t think so!
Not only you, but a report by Experian shows that 27% of consumers abandon their cart only because of the lack of visible security.
However, there’s an easy solution to solve such a huge mess. And that solution is integrating PayPal and WooCommerce into your online store.
We’re gonna inform you everything about integrating the WooCommerce PayPal checkout gateway on your online store in this post.
Let’s do it!
Why Should You Use PayPal Payment Gateway for WooCommerce?
PayPal dominates the online payment gateways alongside other giant competitors like MasterCard, Visa, American Express, Discover, etc. There are thousands of reasons behind using PayPal payments on your website. Here are some of those –
1. Consumers trust PayPal
Trust is the primary concern while talking about online shopping. People won’t spend a single penny on a WooCommerce store with suspicious payment gateways.
81% of total consumers say that trust is one of the main concerns while purchasing something online.
– Edelman Trust Barometer
And, people trust PayPal as their everyday transaction handler. According to the 2021 Q2 financial report, PayPal has crossed the 400 Million+ active accounts milestone and surpassed $300 Billion in Total Payment Volume or TPV in 200+ markets.
Their TPV grew 26% in the next quarter and reached $310 Billion, while the active PayPal accounts became 416 Million. That’s 15% more than the previous quarter.
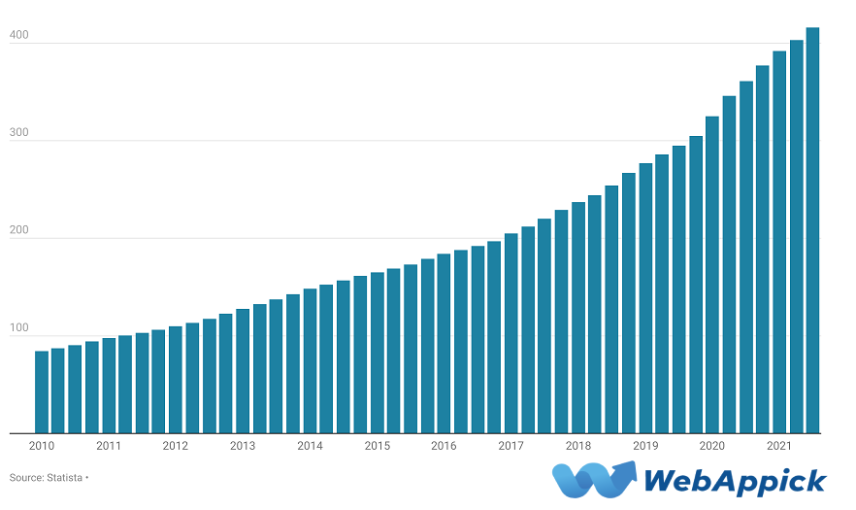
The Chief Financial Officer of PayPal, John Rainey, expects to touch the $50 billion revenue and $2.8 trillion TPV by 2025.
2. Increase conversion rate
On average, PayPal has a whopping 88.7% conversion rate compared to other wallets. It is 60% higher than the third-party digital wallets and 82% higher than all payments types combined.
Moreover, PayPal users are comparatively frequent buyers. About 47% of consumers tend to shop more from those websites that accept PayPal payments.
Read More: A Detailed Guide To WooCommerce Conversion Tracking
3. Good for new businesses
Lack of a secure checkout payment gateway is one of the significant reasons behind shopping cart abandonment. Most importantly, a new business and unsecured payment options are a deadly combination in terms of business growth.
So, how to grow a business as a new WooCommerce store owner?
Easy!
Simply add PayPal to your available payment methods, and you might notice a hike in your eCommerce sale graph.
Because a report of PayPal shows that consumers are 54% more willing to purchase from an unfamiliar website when they accept payments from PayPal.
4. Credit card security
Debit card and credit card payments are the most appropriate payment options for online purchases. But, there’s always a security issue while adding credit card information on a random website. But, you can solve this problem by using the PayPal transaction method.
When you sign up for a new PayPal account, you have to input the credit card information on PayPal directly. After that, you don’t need to type the credit card information anywhere.
You can just tap on PayPal smart buttons on the merchant website and pay via your new or existing PayPal account.
Read More: 15 Advanced WooCommerce Security Tips You Might Don’t Know Yet!
5. The flexible online shopping experience
Online shoppers spend too much time choosing a good product to purchase. After all of those hassles, it’s really heartbreaking to leave from the shopping cart page just because of a failed transaction.
The Federal Reserve Board of the United States of America reports that only the USA citizens have made a total of 45 billion direct and recurring payments in 2019. All of these are totally accounting for a massive virtual $4 trillion.
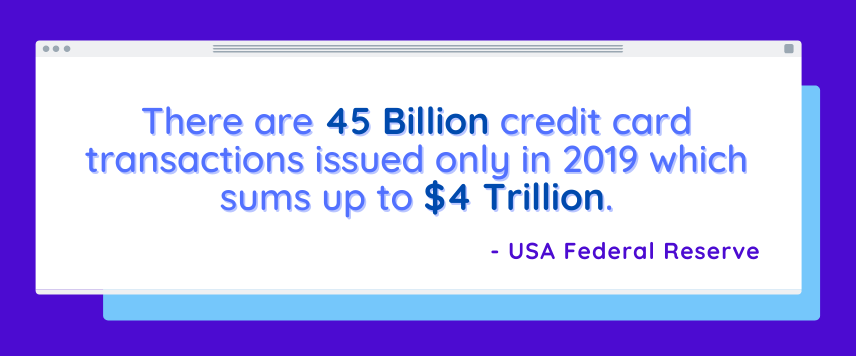
But the other side of the coin is pretty harsh! While making these transactions, about 4.5% to 7.5% of credit cards are declined for various reasons. You know, card declination is one of the most common credit card problems worldwide.
So, if you don’t wanna enlist your name on the credit card declination rate, PayPal will be a wise choice. Because you can add multiple credit and debit cards or bank accounts on PayPal.
If one of your cards gets declined, simply choose another one and complete your payment. You know, PayPal just look for the card funds and approve the transaction if you have enough fund.
Besides PayPal also offers special discounts for the users who shop with their partner retailers. Most importantly, at least a few discounts are always available on the PayPal offers page. Just look at it!
Read More: All You Need to Know About WooCommerce Payment Gateways
Okay, How Can You Setup WooCommerce PayPal Checkout Gateway?
Integrating PayPal with WooCommerce isn’t a hard nut to crack. As PayPal supports seamless integration, you can integrate PayPal and WooCommerce within a few minutes.
We can sum up this total WooCommerce PayPal gateway in two steps. These are –
- Signing up for a PayPal account and
- Integrating PayPal with WooCommerce
Let’s have a look at the step-by-step guide to performing both of these actions.
1. Creating a PayPal Account
To connect PayPal to WooCommerce, you’ll need a PayPal business account. If you already have one, proceed to the integration section directly. Otherwise, let’s create a PayPal business account with us.
Step #1: Check availability
PayPal transactions are available in about 200 countries and regions worldwide. But still, there’s a vast area that is currently out of the PayPal coverage. You can check the coverage area from PayPal Global page.
If your country is listed on that page, you may proceed to the next step.
Step #2: Choosing the Business Account
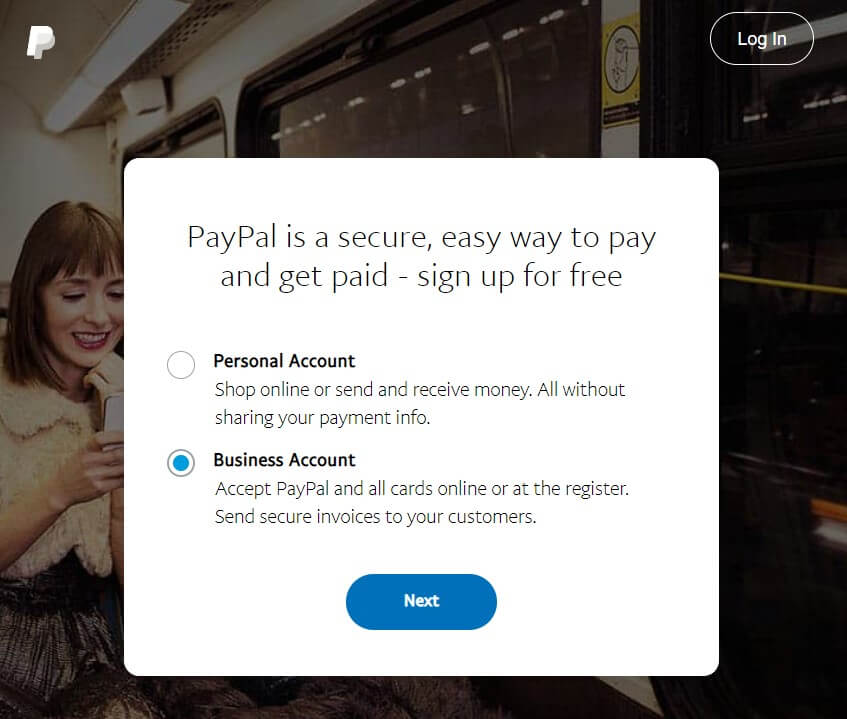
At first, proceed to the PayPal homepage and click on the big “Sign Up for Free” yellow button. But, the homepage could be different based on your location. If you can’t locate this button, use the blue “Sign Up” button from the top navigation bar.
Then you’ll proceed to the account selection page and choose the Business Account radio button.
Step #3: Provide business information
On the next page, you have to input your business email and password. Your chosen password must satisfy three conditions. These are –
- Password must be 8-20 characters long
- At least one uppercase & lowercase letter
- At least one number & a special character
Here’s the visual representation of these steps.
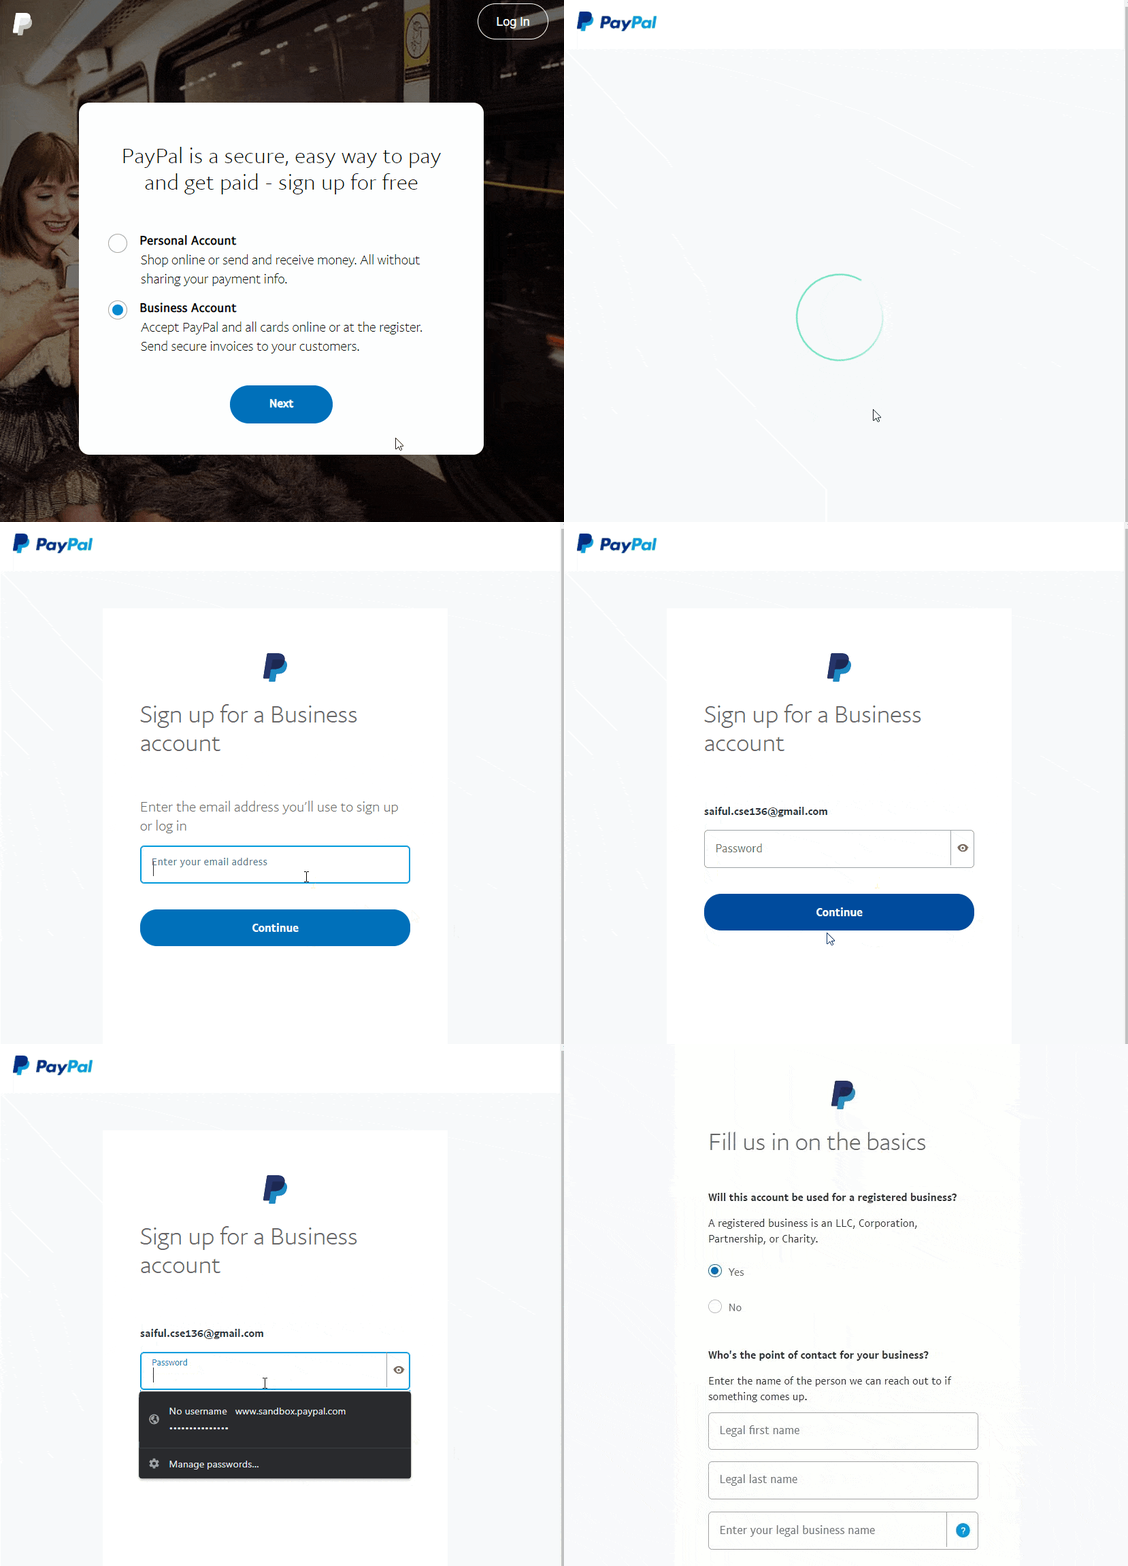
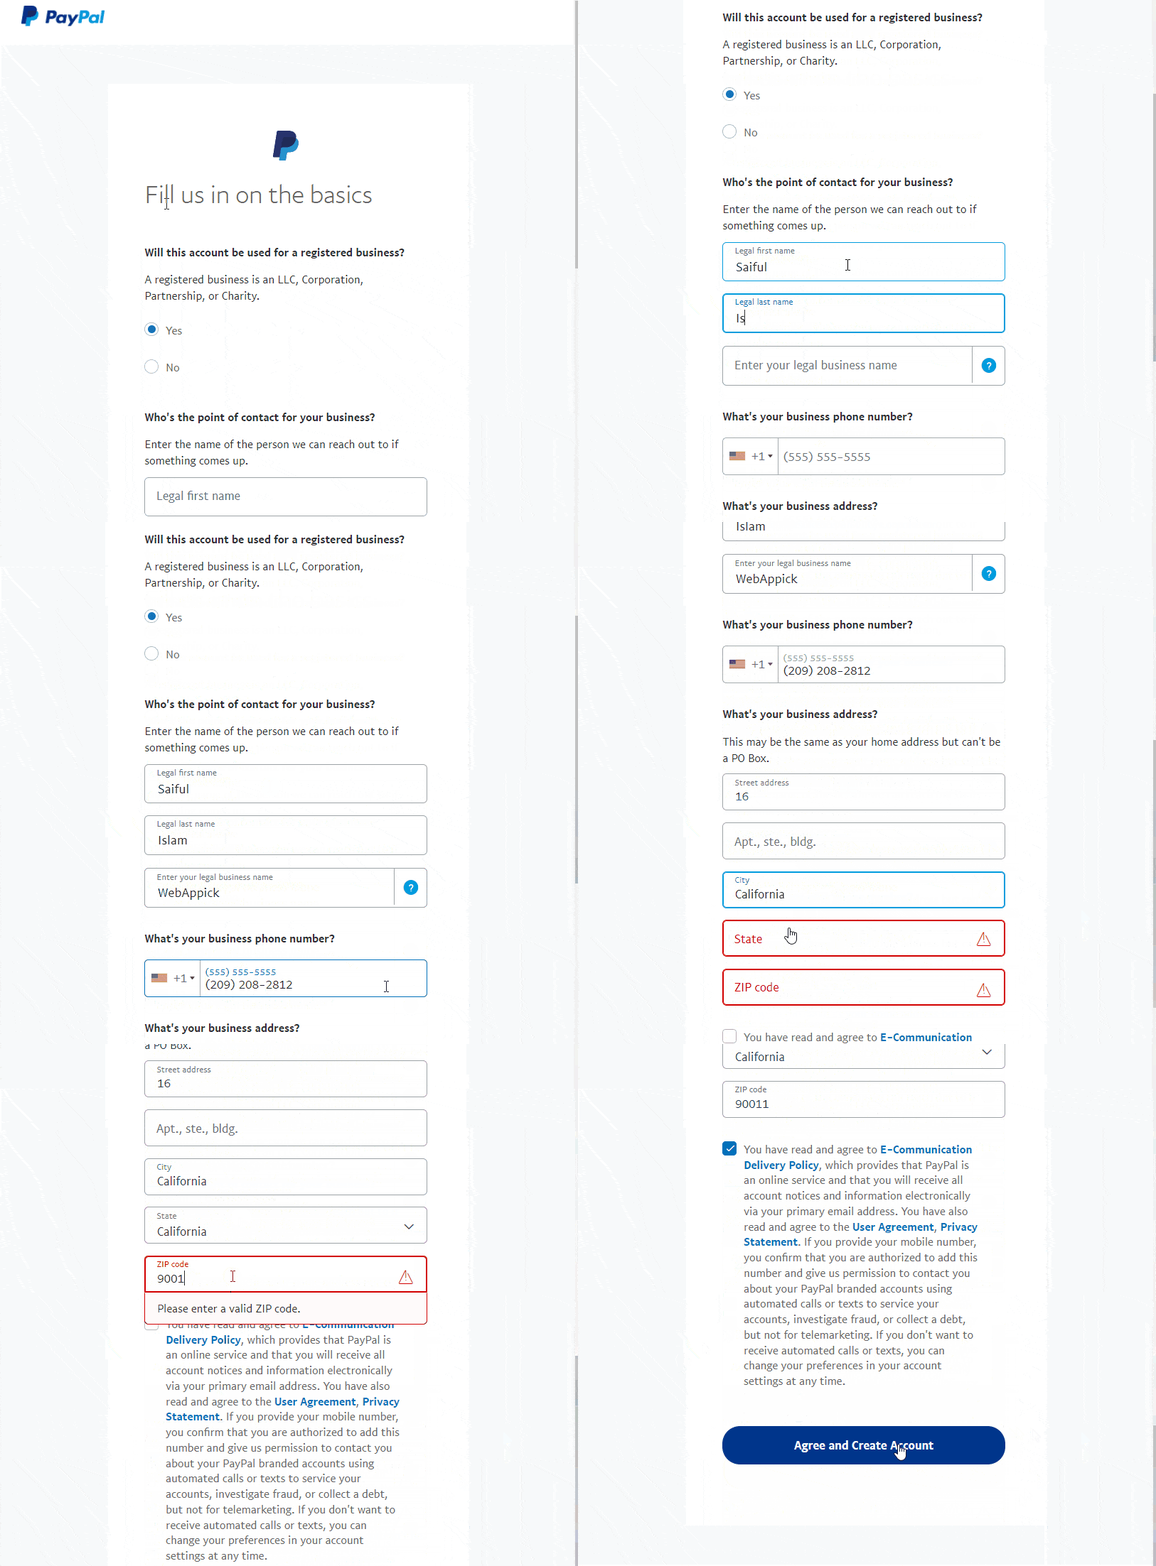
Now it’s time to provide Business information to PayPal. On this page, you will be asked to enter various legal information like –
- Legal first name and last name
- Legal Business name
- Business phone number
- Business location
- City & zip code
Here’s the graphical representation of this information –
Remember, these are the crucial information for PayPal accounts. Try not to make any mistake here!
After filling out all of this information, click on the blue Agree and Create Account button. It will forward you to another page to describe your business.
This page will ask you to enter three key factors about your business such as –
- Business type
- Product or service category
- Monthly sales amount, and
- Website URL (optional)
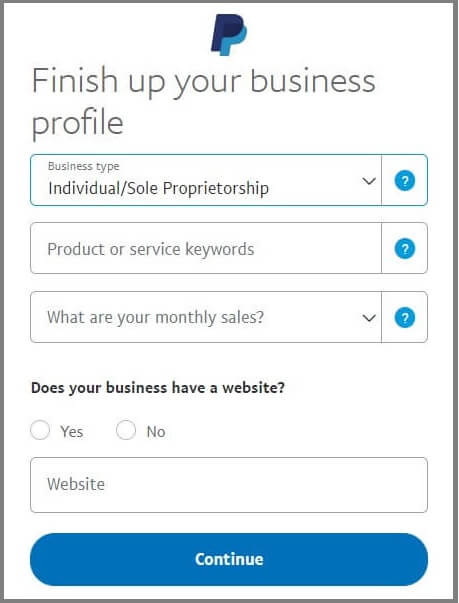
After inputting all of the information, click on the Continue button, and you are done with this step.
Step #4: Provide personal information
In the following section, you have to share sensitive personal information like SSN, date of birth, and home address.
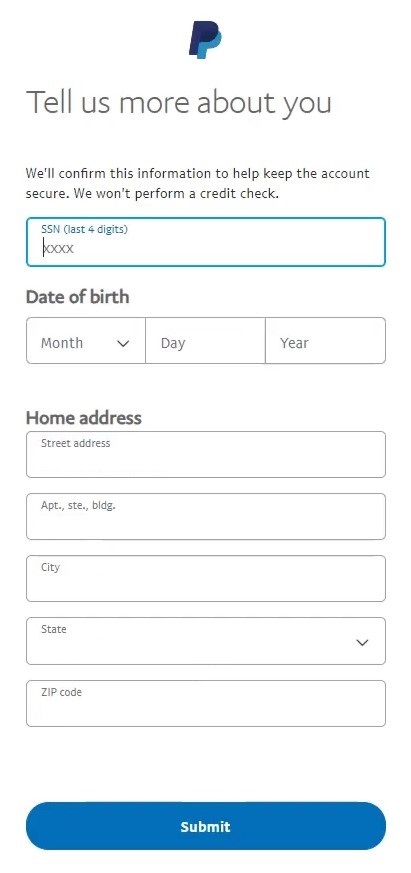
After providing this information, click on the submit button, and your PayPal account creation is done.
Step #5: Email confirmation
Now it’s time to check your email inbox. If you provide all of this information correctly, you’ll get two different mail from PayPal. The first one will instruct you to activate your account by confirming the email.
Here’s the confirmation mail from PayPal.
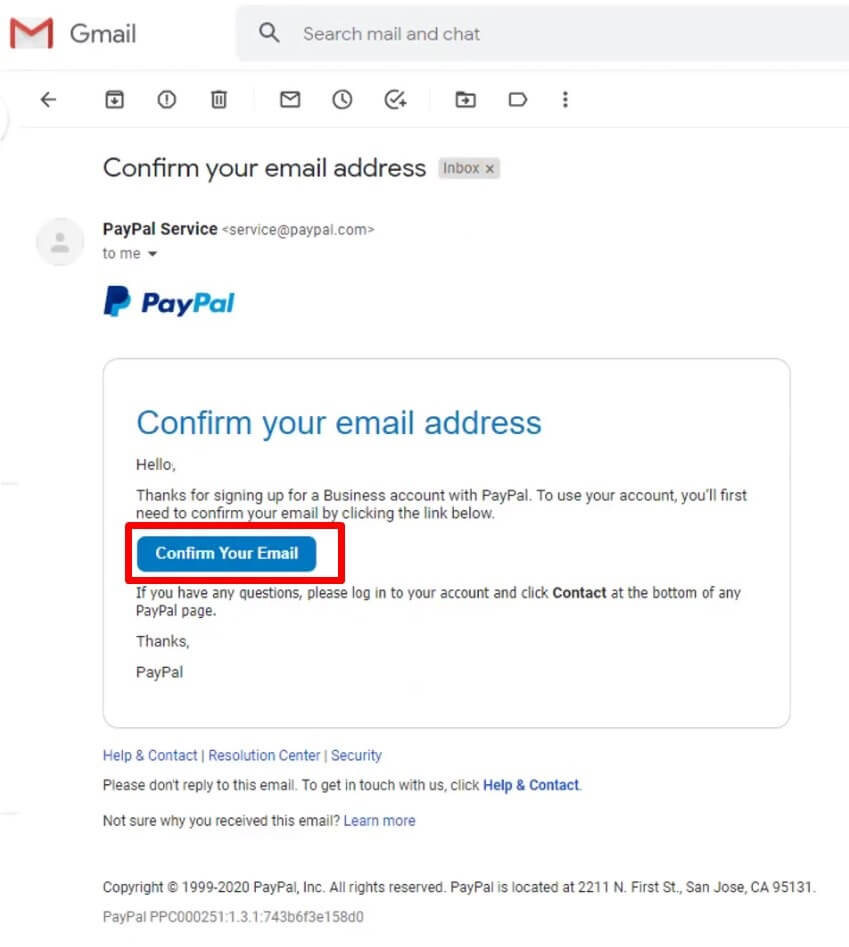
On the other hand, the second email will assist you in setting up your PayPal business account. Open the second mail, and click on the “Get Started Now” button.
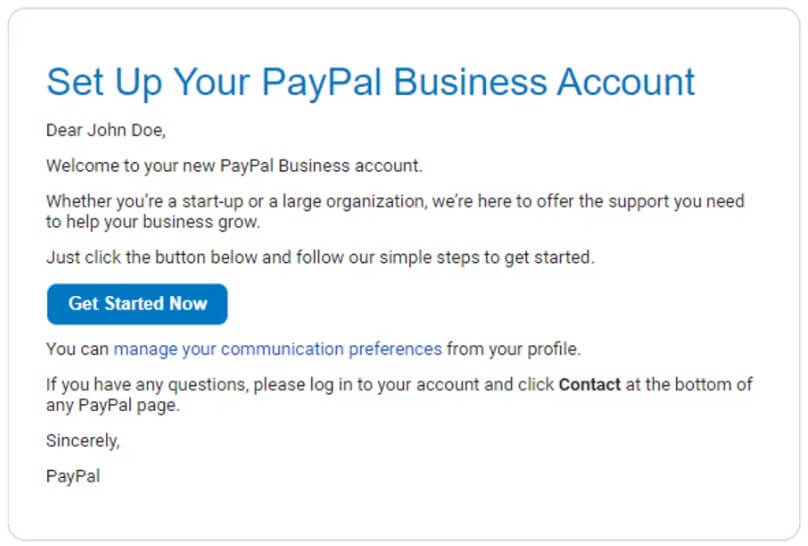
By clicking on the “Get Started Now” button, you will proceed to the business account settings page.
Step #6: Linking Bank Account
You can set up the other settings like identity confirmation, bank account linking, debit card linking, etc from the PayPal Business Account settings page.
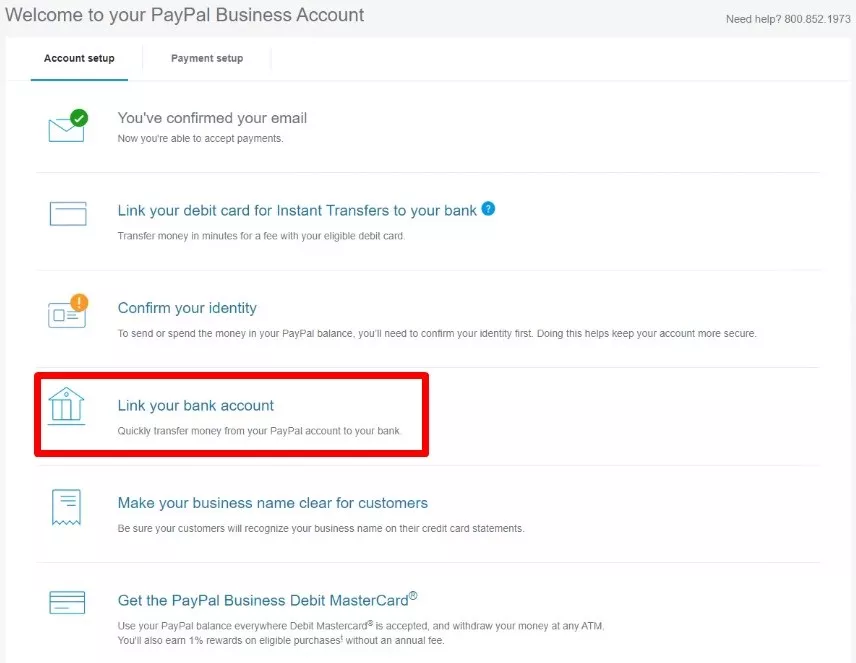
In this section, we will link our bank account with our PayPal account. Click on the “Link your bank account” section, and it will show the PayPal-supported bank accounts from your country.
Then, choose your bank and enter the required information. Here, we will add a Citi bank account to show you the bank adding process. After choosing Citi bank, it will ask you to provide your Citi bank User ID, Password, and PIN number.
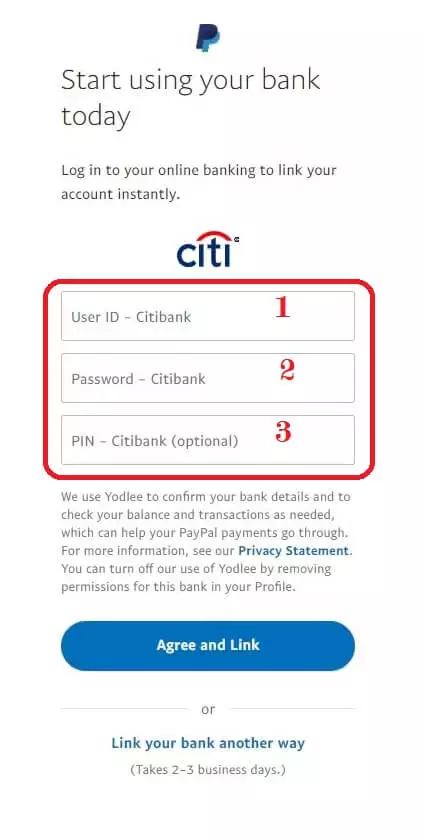
After filling out the form, click on the “Agree and Link” button, and PayPal authority will initiate the linking process.
N.B. It may take 2 to 3 business days to connect your bank account with PayPal. So, be patient on this step!
By the way, this is the end of our PayPal account creation process. Now, it’s time to focus on the WooCommerce checkout page integration.
2. Integrating PayPal with WooCommerce
You have to go through a few additional steps to integrate PayPal checkout on your WooCommerce checkout page. So, let’s start the integration process.
Step #1: Enabling PayPal payment gateway
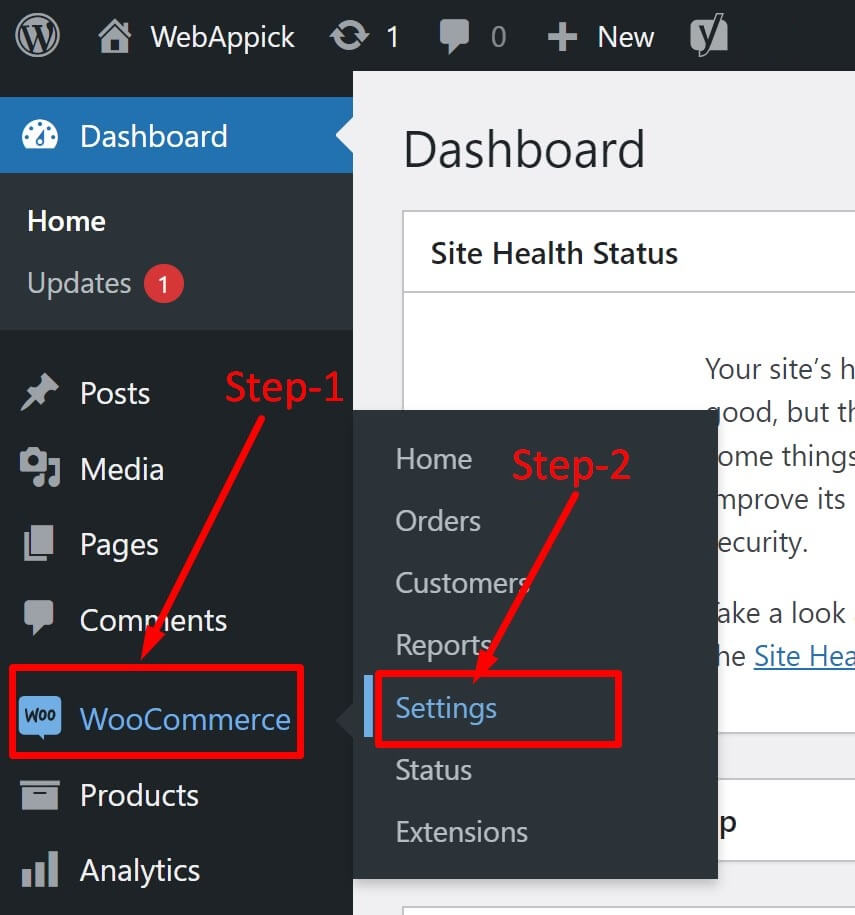
To enable the PayPal payment gateway on your WooCommerce store, you must log in on the WordPress admin panel dashboard first.
Then, hover on the WooCommerce option from the left side panel and choose Settings.
On the settings page, there will be eight tabs with different settings. Choose the Payments tab from there and toggle the button beside PayPal.
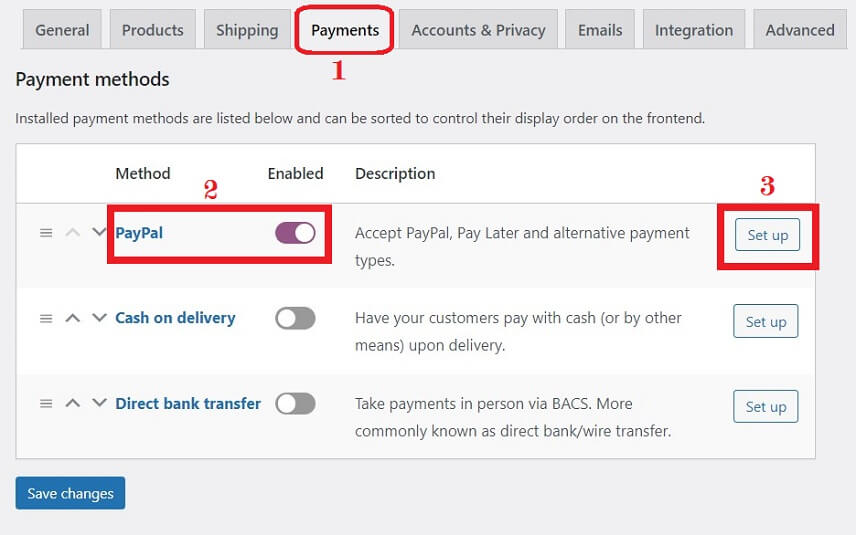
It will enable the PayPal checkout payment gateway on your order page. But, you must set up your account to receive payment via PayPal or accept credit cards online.
Step #2: Setting up PayPal payment method
You will notice two different account categories on the settings page. The first one is the PayPal Standard method, and the second one is called the PayPal sandbox account.
Well, there’s nothing to be confused about!
We will work with the PayPal standard method. The sandbox mode is only for testing your WooCommerce installation.
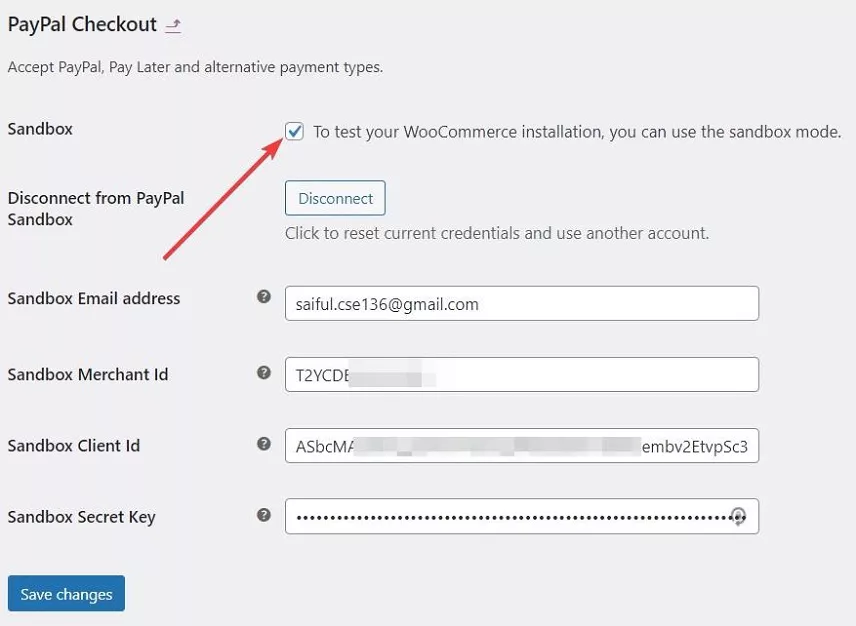
You just have to click on the sandbox tick sign, and the Merchant email, Id, client id, and secret key will be automatically loaded. Then click on the “Save Changes” button, and your sandbox account will be ready for the test PayPal transaction.
N.B. It’s just a test account. So, you don’t need to tense about losing money while using sandbox transactions.
If everything is okay with the test transaction data, you can opt for the standard PayPal Pay. Just like the sandbox account, you can also enable the standard PayPal checkout by ticking the ‘Enable PayPal Standard’ button.
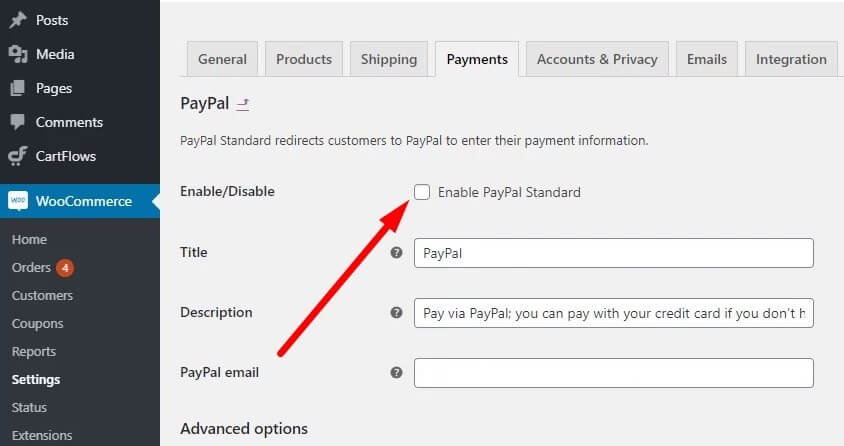
Step #3: Connect PayPal to WooCommerce
However, if you don’t integrate the PayPal payment with the WooCommerce website still now, it’s high time to do that. By clicking on the ‘Connect to PayPal’ button, you will get a pop-up window with payment gateway options. Enter your login credentials, and it will connect your account automatically.
You can also manually integrate it by clicking on the manual mode. Enter your live email, merchant id, client id, and secret key respectively.
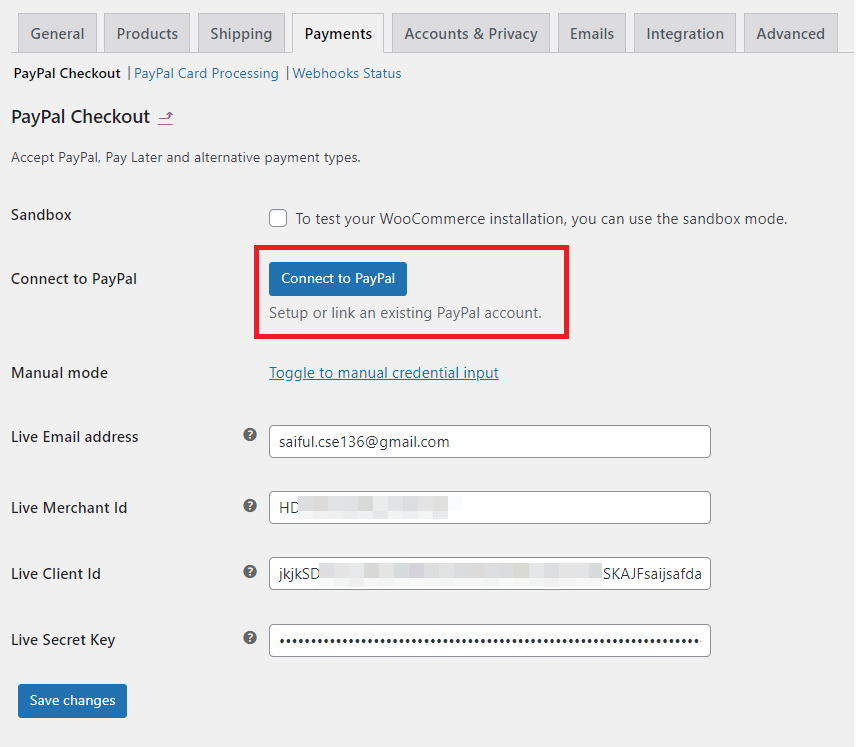
After saving these credentials, you will get the ‘PayPal Checkout Settings’ page with several custom checkout fields.
Step #4: Customizing PayPal payments checkout fields
On the PayPal checkout page, you can customize the PayPal payment option. The available options of this page are –
- Enabling PayPal Gateway
- API Credentials
- PayPal Checkout Settings
- Single Product Page Settings
- Cart Page Settings and
- Mini Cart Settings
Under these categories, there are multiple subcategories with important customization features. You can either modify the default settings or keep those just as it is!
By the way, a few important settings of this page are –
- Title
- Tagline
- Description
- Invoice prefix
- API credentials
- Checkout button layout
- Mini cart button height, etc.
After successfully customizing the settings page, our PayPal checkout integration is done! Now, it’s time to opt for the testing page.
Step #5: Testing PayPal checkout
We’ve already tested the Sandbox mode, so now it’s time to test the actual PayPal transaction. You can either choose debit cards or credit card payments, or PayPal express checkout from there.
By the way, there are several PayPal checkout buttons available for the business websites. You will find a checkout button like below on the cart page.
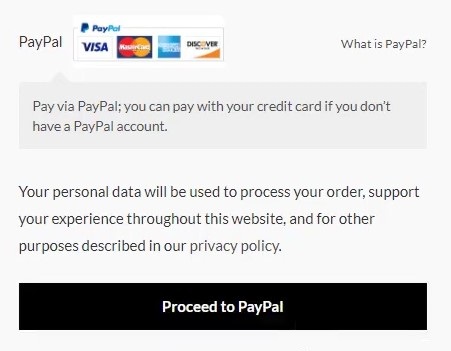
Choose the ‘Proceed to PayPal’ checkout button, and you are ready to pay via the relevant payment options. Besides paying the WooCommerce orders, the consumers can also pay their monthly fees via direct credit cards from here.
If you can make a successful payment via this button, it means we’ve successfully integrated PayPal with the WooCommerce website.
Read More: 10 Must-Try WooCommerce Order Tracking Plugins
3 Best WooCommerce PayPal Checkout Gateway Plugins for Business Websites
Besides integrating WooCommerce and PayPal manually, we can also add PayPal payment methods by using WooCommerce plugins too. In this section, we have listed the top 3 Best WooCommerce PayPal checkout gateway Plugins for seamless PayPal integration with the WooCommerce website.
Let’s check those out.
1. WooCommerce PayPal Here
PayPal Here™ is developed by WooCommerce itself. The sole intention of this WooCommerce plugin is to receive in-person payments against the WooCommerce orders.
This free plugin simplifies the payment receiving procedure for business owners. It can complete a payment process in only three steps.
- Click the PayPal Here button.
- Swipe the card or pay cash via the QR code.
- Payment confirmation on background by PayPal.
Then, the order details and status will be automatically updated on your website. Pretty neat and clean, isn’t it?
Highlighted features
- In-person payment receiving
- Pay via the QR code
- Cash payment
- Automatic status update
- Both android and iOS apps are available
2. PayPal Plus for WooCommerce
Inpsyde is the brand behind the development of PayPal Plus for WooCommerce addon.
This plugin adds all PayPal plus payment methods such as direct debit card, credit card, invoice payment, direct PayPal payment, etc.
The PayPal express checkout page loads an iFrame that shows enables the faster PayPal payment with the Express Checkout button. Most importantly, the consumers can also use the Guest Checkout option while using the PayPal Express Checkout feature.
However, users must provide the correct shipping address and billing address to deliver the product to customers’ doorstep. Furthermore, the business owners require billing address on the billing agreement paper for the virtual products.
Highlighted features
- Offers more payment methods
- Same PayPal fees for all payment
- No hidden or monthly fees
- PayPal Express Checkout
- PCI conformity etc.
N.B. The PayPal Plus is available only in Germany right now. Customers from other countries can use credit cards and make general payments.
3. WooCommerce PayPal Pro Payment Gateway
WP Insider develops the WooCommerce PayPal payments pro. This plugin enables on-site credit approval without any card setup fees.
Configuring this plugin is pretty straightforward. Simply collect your PayPal payments pro API information and add it by navigating on –
WooCommerce Settings > Checkout > PayPal Pro
Now, you will get the Credit Card Payment option. It eases the payment procedure and enhances buyers’ shopping experience.
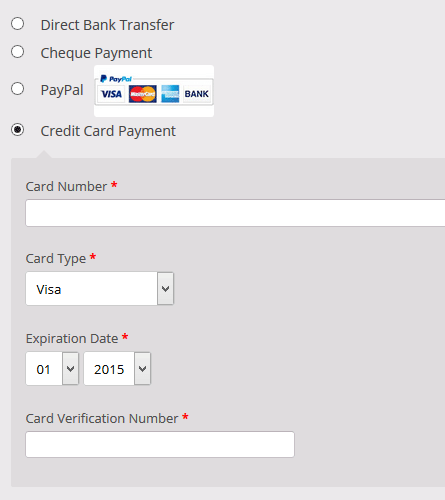
This plugin adds the functionality of both PayPal & credit card payment on the guest checkout page without leaving the page.
Highlighted features
- Easier credit card payments
- Smoother PayPal integration
- Offers secure payment etc
Honorable Mentions
Besides these WooCommerce extensions, there are a few other in-context flow checkout methods worth mentioning. For example –
- 1
- PayPal Express Checkout Payment Gateway for WooCommerce
- 2
- YITH PayPal Express Checkout for WooCommerce
- 3
- Braintree Payments for WooCommerce
- 4
- PayPal for WooCommerce
- 5
- PayPal Payments by WooCommerce
Frequently Asked Questions
We’ve answered the most frequently asked questions about WooCommerce and PayPal integration in this section.
PayPal is very safe in terms of transacting money. Every PayPal transaction is end-to-end encrypted and specially designed to thwart any hacker. Most importantly, they don’t even share your financial information with your payment receivers too!
PayPal is very safe in terms of transacting money. Every PayPal transaction is end-to-end encrypted and specially designed to thwart any hacker. Most importantly, they don’t even share your financial information with your payment receivers too!
The PayPal Express Checkout is a secure payment method from the user’s personal PayPal accounts. While making a payment via the Express checkout method, the customers are redirected to a secure PayPal website with end-to-end encryption and complete the payment easily.
The PayPal Smart Buttons are one of the most sophisticated payment methods for purchasing anything from supported retailers.
These smart payment buttons enable a feature to make the payment via using Braintree payments, Venmo, and major credit and debit cards.
Payments Advanced is the cheaper alternative to Payments pro and it enables both PayPal and card payments on the checkout pages by using an iframe. For processing the transaction, the payments advanced iframe loads a secure website of PayPal.
Note: Payments Advanced doesn’t accept new merchants anymore. But, the existing customers will get support if needed.
PayPal credit messaging is the method of displaying customized information on a WooCommerce website. The website owner can show this message on any website, such as the checkout page, product, cart, or homepage.
This credit messaging aims to show information while the customers intend to pay for a product in several installments.
Conclusion
eCommerce owners have lots of options while talking about receiving payments from consumers. The popular ones are PayPal, Apple Pay, Google pay, Amazon Pay, Stripe, etc.
Among all of these, PayPal is the most popular one with 400M+ active users. As general consumers trust PayPal more than other payment gateways, adding the WooCommerce PayPal checkout gateway to your store will be a better choice for your business growth.
Reading this article thoroughly will help you add a PayPal payment gateway to your WooCommerce store and reduce the shopping cart abandonment rate.
Take the right decision and increase profitability!

Just want to say your article is as astonishing.
The clearness to your publish is simply excellent and i could assume you are knowledgeable in this subject.
Fine along with your permission allow me
to grasp your feed to stay updated with forthcoming post.
Thank you one million and please continue the rewarding work.
I am truly glad to read this website posts which carries tons of helpful facts,
thanks for providing these statistics.
You are so awesome! I don’t believe I’ve read through a single thing like this before.
So nice to discover someone with some original
thoughts on this issue. Really.. many thanks for starting this up.
This website is one thing that is needed on the internet, someone
with a bit of originality!
I have been browsing online more than 3 hours today, yet I never found any
interesting article like yours. It’s pretty worth enough for me.
In my view, if all website owners and bloggers made good content as you did, the web will be much more useful than ever
before.