
Advanced Custom Fields for WooCommerce: A Quick Guide
No doubt, WooCommerce is the best of its kind for those who run eCommerce shops on the WordPress platform. WooCommerce is full of features and functionalities to let business owners build full-fledged eCommerce sites quickly and easily.
However, if you ever felt the need for adding more fields on your WooCommerce product page to highlight your product features more than your competitors, you need the Advanced Custom Fields (ACF) plugin.
In this article, we have discussed how to add advanced custom fields for the WooCommerce product page step-by-step (with images) using the ACF Plugin.
Are you here for that? If yes, just keep reading.
What is Advanced Custom Fields (ACF) in WordPress?
Advanced Custom Fields (also known as ACF) is a WordPress plugin that helps developers and website owners to add extra or additional fields to custom pages, posts, taxonomy terms, comments, and media pages of any WordPress website.
The simple but intuitive in-built field builder feature in it allows the users to easily and quickly add fields to WP edit screens within a few clicks.
Extra fields are usually referred to as custom fields which speed up the website building process and educate the clients way faster.
At present, the Advanced custom fields plugin offers 30 field types with powerful functions and extensive documentation.
With more than 2 million active installations on WordPress, Advanced Custom (ACF) is one of the essential and well-known plugins for the WordPress community of developers.
What Are the Key Features of Advanced Custom Fields?
30 Field Types
Below is a list of 30 field types the advanced custom fields plugin offers for its users. You can use any of these fields anywhere on your WordPress website.
| Range | Radio Button | Image | Date Time Picker | Group |
| Text | Select | oEmbed | Google Map | Repeater |
| Text Area | True/False | Wysiwyg Editor | Time Picker | Table |
| Button Group | File | Color Picker | Accordion | Clone |
| Checkbox | Gallery | Date Picker | Flexible Content | Link |
| Page Link | Post Object | Relationship | Taxonomy | User |

A Wide Range of Functions
Advanced Custom Fields Plugin boasts a simple yet powerful API to power your website. With the hassle-free and developer-friendly functions, you can easily load and display your custom field values in any theme template file.
There are many functions that you can instantly leverage for your website which include:
- Basic Functions
- Loop Functions
- Update Functions
- Other Functions
- Deprecated Functions
Actions and Filters to Customize ACF
There are different actions and filters that you can hook into to enrich your Advanced Custom Fields (ACF) experience.
ACF Blocks
ACF lets the developers create highly customizable and dynamic blocks.
Options Pages
The options page offers a variety of functions to add extra admin pages to edit ACF fields.
All data saved on an options page is global. On top of that, the data is displayable on any page of the website.
How Can Advanced Custom Fields Help WooCommerce Websites?
Easy Content Handling
Advanced Custom Fields (ACF) lets the marketers update the text, images, and content of the page with repeatable blocks and modules. ACF is also helpful in the sense that it allows the marketers to change the existing content without breaking the border layout.
Flexible Front-End Web Design
If you look from the perspective of an admin, you’ll find your desired flexibility with Advanced Custom Fields.
One of the most popular and used ACF is the Flexible content field.
So, what is a Flexible Content Field? Well, it’s a powerful but straightforward block editor that you can leverage to create custom field groups that serve your unique content.
With the help of Flexible Content Fields, an admin can easily build a thoroughly unique page layout.
How? Just by adding, removing, or repeating blocks.
Amazing, isn’t it?
And there’s more.
Admins can easily reorder the blocks using the simple drag-and-drop functionality.
Easy-to-use Repeater Field
Though you can consider Flexible Content Fields as the powerhouse of the Advanced custom fields plugin, the repeater field feature also contributes to enhancing the flexibility of the website design.
This repeatable field type can contain several subfields. You can use any type of advanced custom field within a repeater as a subfield.
This functionality is immensely useful when you create forms for your customers to collect multiple information from them such as their names, phone numbers, email, the best time to contact, the best way to contact, etc.
Relationship Field
The relationship fields give the admin options to choose specific pages, posts, or custom post types to include within the section of the page. You can use it on your website to link relevant information pretty quickly.
This will let your users or customers do things like search for in-stock products by store location or search for any services based on the service provider’s location.
Taxonomy Field
Taxonomy field type lets you choose one/more taxonomies that will return a list of posts within a certain(selected) category or categories.
When it comes to any blogging website, this field is usually used to categorize products by subject matter. However, this works immaculately to sort products through multiple filters for WooCommerce websites.
Custom Web Design
With ACF installed on your WooCommerce website, you don’t need to force the content into a predefined page template. ACF will enable you to let the content drive the page design and not otherwise.
So, if your goal is to craft new and existing pages with some fantastic and unique layouts, you can’t go wrong with ACF.
Extensive Knowledge Base
You might be wondering about how millions of WordPress users (beginners included) work with the different functionalities of the Advanced Custom Fields plugin for their websites, right?
One of the reasons why the ACF plugin is so popular is its extensive documentation.
The documentation page of ACF is full of resources that include tutorials, FAQs, code examples, and guides.
Hence, you don’t have to google for hours to find solutions or information about certain features of ACF. You can get these from the experts who built the plugin and the users who already experienced the functions, actions, and filters of the plugin.
Developer-Friendly Plugin
Technically speaking, You can easily track custom fields and their settings within the code repository with ACF.
Its significance lies in the fact that it saves the developers from worrying about creating fields across all your environments as the fields can be repopulated.
That’s why it saves the time of the developers and your money simultaneously.
Examples of Custom Field Usage for WooCommerce
Let us give you some context regarding when and where you can make use of the advanced custom fields for your WooCommerce store.
- Mention additional product information for products like computers, where you would like to show technical specifications such as CPU and RAM.
- Display easily-alterable promotional messages that you can change time to time to meet your needs.
- Add extra video or other media elements that you can not insert using the standard WooCommerce features.
- Display dates and times for countdowns, auctions, and release dates of your products.
- Add extra options that customers can easily look at and glide through along with the product variants.
- Include paragraphs to post detailed instructions for using an item or product.
- Display add-on offers to the shoppers for upselling products that complement the one they’ve decided to buy. For example, you can show socks for shoes or after-shave lotions for razors.
- Add any other extra data or information on the product page that either you cannot incorporate with default WooCommerce or ACF is a better and faster option.

Advanced Custom Fields (ACF) Pricing: Choose the Right Plan for WooCommerce Websites
Advanced Custom Fields (ACF) has both free and premium versions.
While you can download the free version from the WordPress plugin directory, you can get ACF PRO licenses in different categories from the official ACF website.
When we’re writing this, ACF Pro has three pricing plans for their customers.
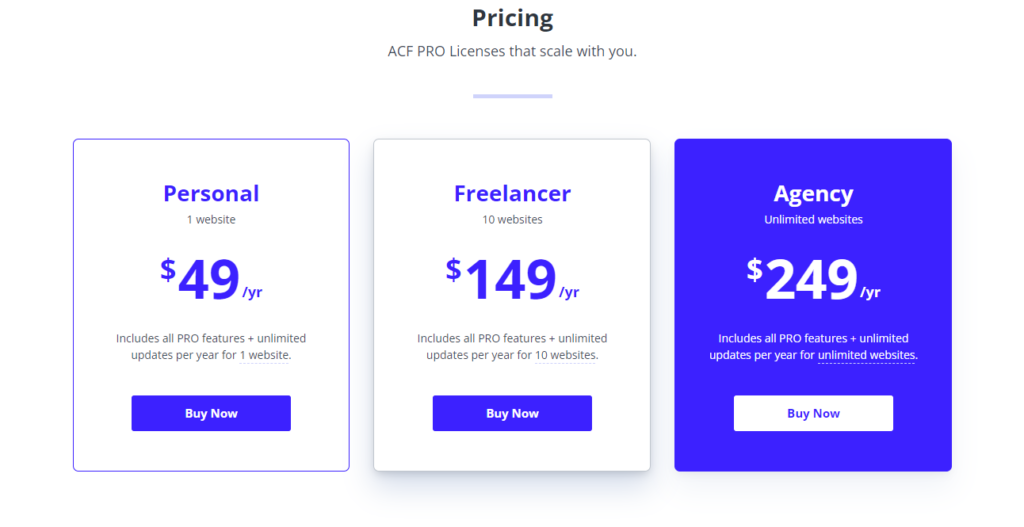
Note that the premium version, I mean ACF Pro, is a stand-alone plugin. So, you can use it without the free version of ACF along with all the free features included in it.
Who Should Buy Personal License: You should choose the personal license for ACF Pro if you own only one website and you don’t have any plans to add more domains to your hosting within a year that might require the use of advanced custom fields.
Who Should Buy Freelancer License: It’s quite clear from the name of the pricing plan that this plan suits freelance developers who work with clients to build their websites. If you’re a freelance developer and you have a constant flow of work from your clients, you can definitely go for the Freelancer plan that you can use for up to 10 websites for a year.
Who Should Buy Agency License: If you maintain dozens of websites that regularly require the use of advanced custom fields, the Agency pricing plan is the best option for you to choose.
How to Add Custom Fields to WooCommerce Product Pages (Step-by-step Guide)
Wondering how do you add custom fields to WooCommerce products?
Let’s see how you can add custom fields to your WooCommerce product pages. Suppose you own an e-commerce store where you sell desktops and laptops. It usually takes a great deal of time to add technical specifications for each computer individually.
You can include custom fields with ACF so that you can easily select from a wide range of specifications for all the computers in your store. It will save you time and sweat.
To get started, the first thing you have to do is to install the free Advanced Custom Fields plugin available on WordPress.
Once you’ve installed the plugin on your WooCommerce website, below are what you’re going to do next for adding custom fields to WooCommerce product pages:
- Create a new field group
- Add your desired custom field(s)
- Configure additional field group settings
- Add required information to products
- Display custom field information on the frontend
Let me walk you through the entire process of adding custom fields to WooCommerce products step-by-step.
Step 1: Create a New Field Group
Go to your WordPress Dashboard. Find and enter the Custom Fields plugin from the left panel of the dashboard.
Click on Add New from the Field Groups tab.
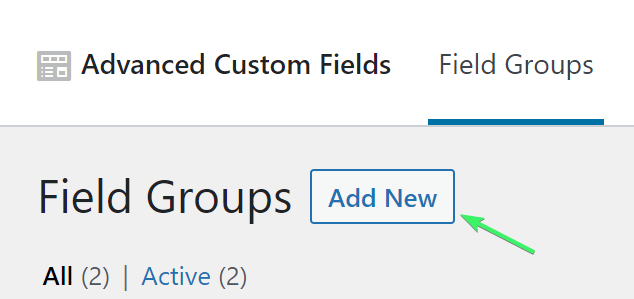
Now, name the field group. Here, let’s name the group “Computer Specifications”.
For your information, a field group is basically a collection of fields that you can use for one product or a certain section of your WooCommerce website. Remember, a field group can be a list of internal and external specifications that you might want to display on the product pages of the computers you sell.
Step 2: Add your desired custom field(s)
Now that you’ve created a new field group, you have to add your desired custom fields to the group. To add a field to the group, click on the Add Field button.
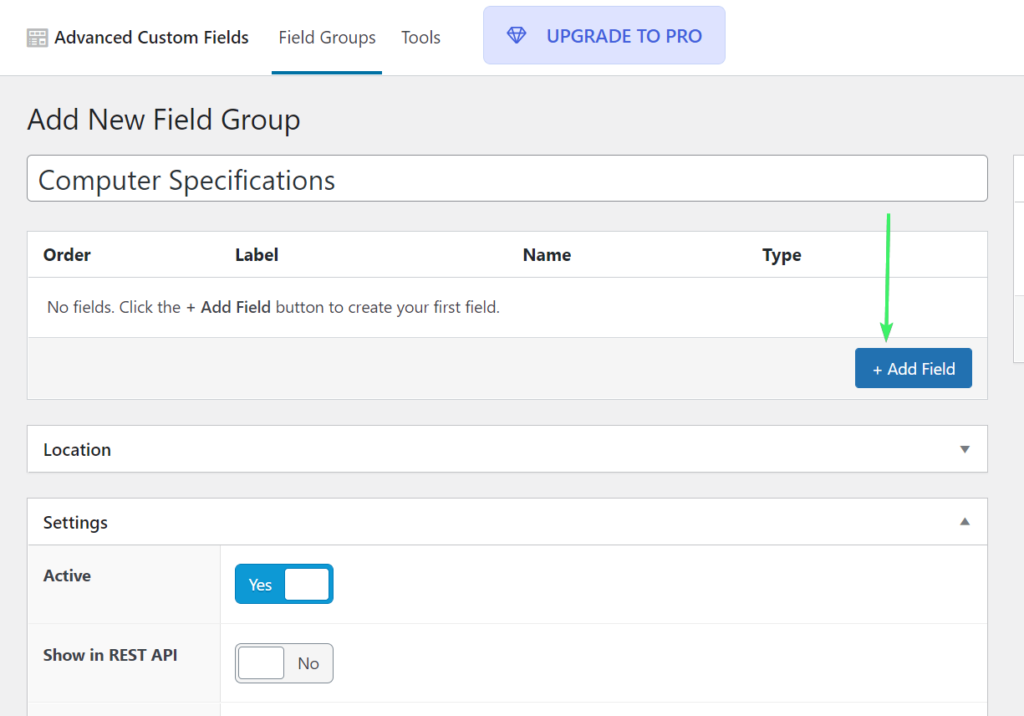
After clicking on the Add Field button, start creating:
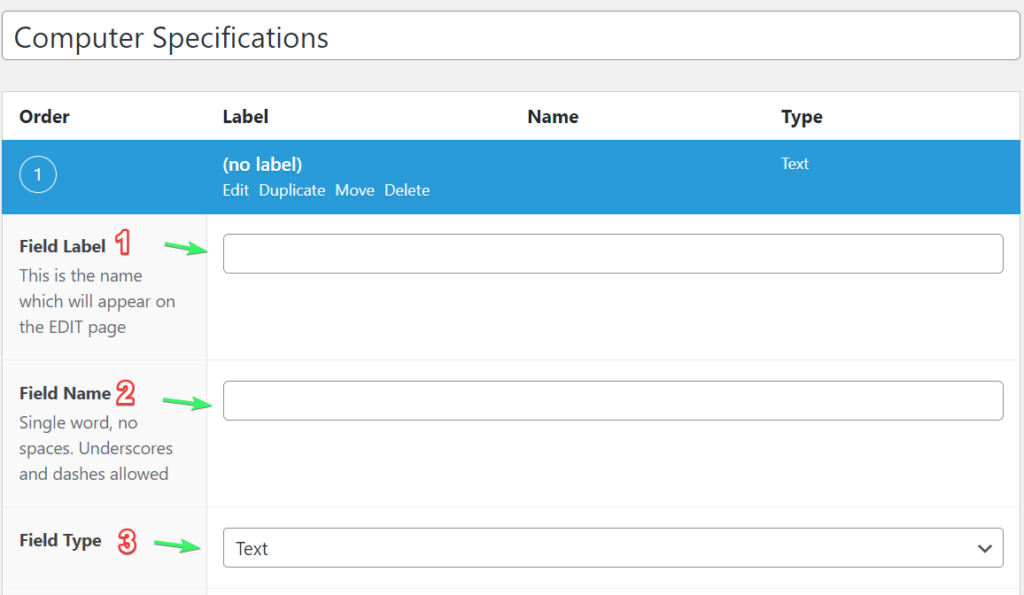
Field Label – Field label will appear on the edit page as the title of the field. Use it for your reference.
Field Name – Field name is usually generated by the plugin itself that you can place in your own custom code or shortcode. You can leave this field empty.
Field Type – Field type is the format that you create for that field. You can choose from texts, checkboxes, radio buttons, dropdowns, and other options as per your requirement of the field.
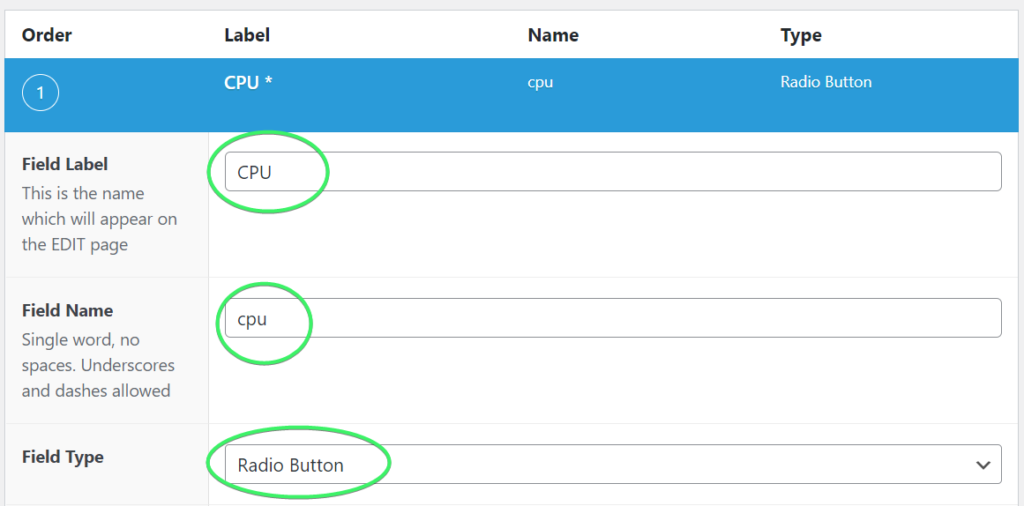
Below, in the Instructions field, you can leave any instructions for yourself or the developer if you want (not mandatory) . Also, specify if the field is required or not with the Yes/No toggle button. We suggest you toggle it as ‘Yes’.

If you create a field that features multiple options (like Select or Radio Button field types), you have to add the field choices for that field one after another in new lines. These selection options will appear on the backend of your product page that you can choose/select to use for specific product (e.g. computer) models.
See how we’ve added choices for CPU:

And also the Hard Drive field choices for a computer:

If you want to keep things simple, the rest of the settings (like default value, layout, etc.) are typically optional.
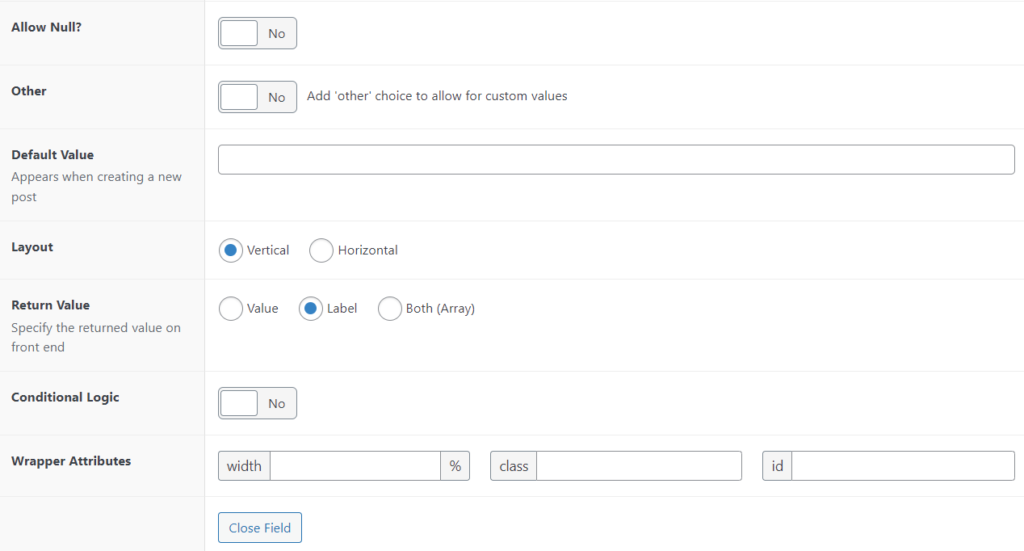
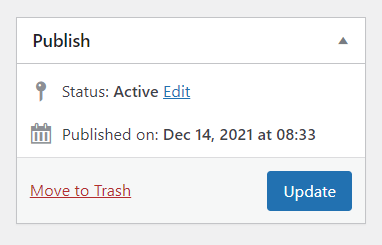
When you’re all done with a field or field group, make sure to click on the Publish or Update button (on the top-right side of the page) to make sure all the changes are saved.
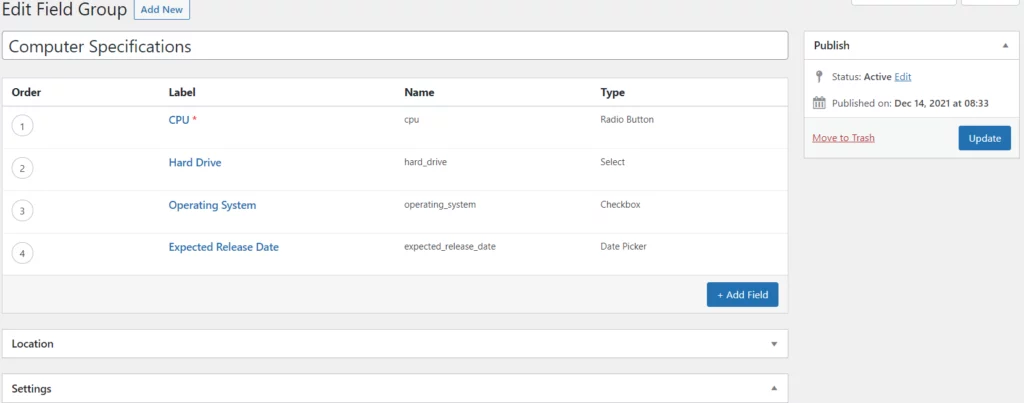
Following the same way, we have created a hard drive, operating system, and expected release date fields to be used on the individual product (computer) page.
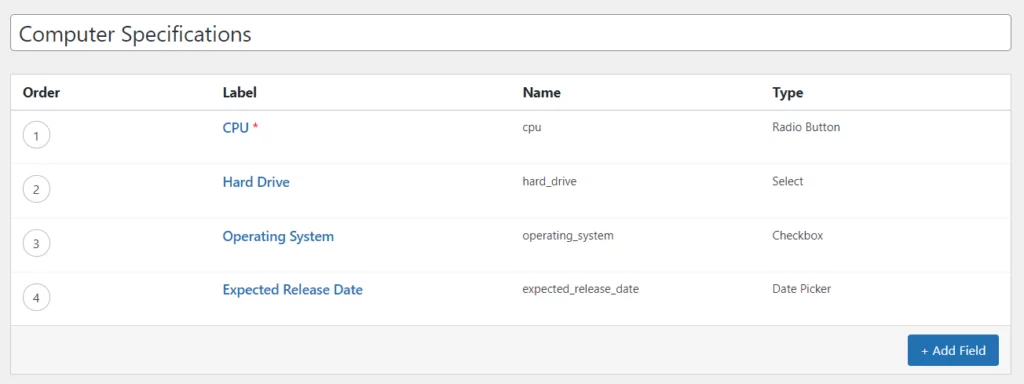
Note that you can always add more fields to your group by clicking on the Add Field button.

Also, you can change the field orders as per your choice simply by dragging and dropping them up and down.
Here’s how it looks like with four fields in this group for:
- CPU
- Hard Drive
- Operating System, and
- Expected Release Date
Step 3: Configure additional field group settings
Once you’re done working with the fields of a field group, scroll down to the Location module to set location rules for displaying the advanced custom fields. You can show the fields for posts, pages, users, and forms.
As you’ll be showing the advanced form fields to the WooCommerce product pages, set the “Post Type” is equal to “Product“.

Alternatively, if you want to be more specific, you can also choose a specific category of products.
Now scroll down to Settings and make sure that the custom field group is set to Active. If it is deactivated, you’ll not see the field group on those product pages. More importantly, the field selections will not be shown to your customers.

When it comes to Style, Position, Label placement, and Instruction placement, it all depends on your own preferences. Set these as per your choice and the way you want to format your backend.
If you’re in doubt about the best option, you can leave them as they are (i.e. keep the default settings).
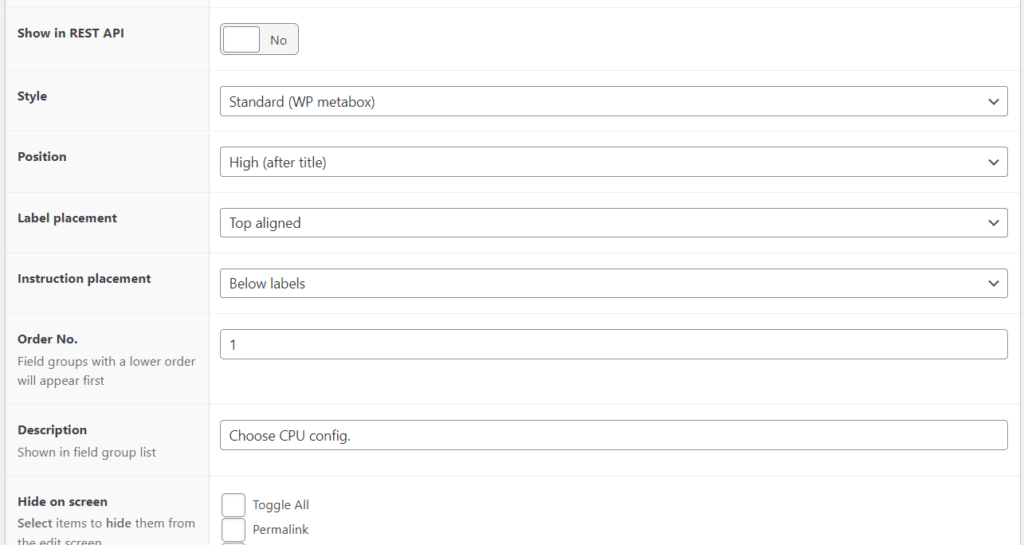
If you have multiple field groups, set the order number to show them consequently on product pages.
If you wish, you can also set a description and hide specific details from your edit screen.
Step 4: Add required information to products
Next, decide the product where you want to use the advanced custom fields.
If you want to use the custom fields on existing products, just go to your products page (Products > All Products) and then click on the product name to open an edit screen. For adding the advanced custom fields to a new product, click on Products > Add New.
In both cases, you’ll see the custom field group you created on the product page in your desired position.
For us, we created a new product page named “Acer 305E” and here is how the field group with individual fields we created in the previous step looks like:
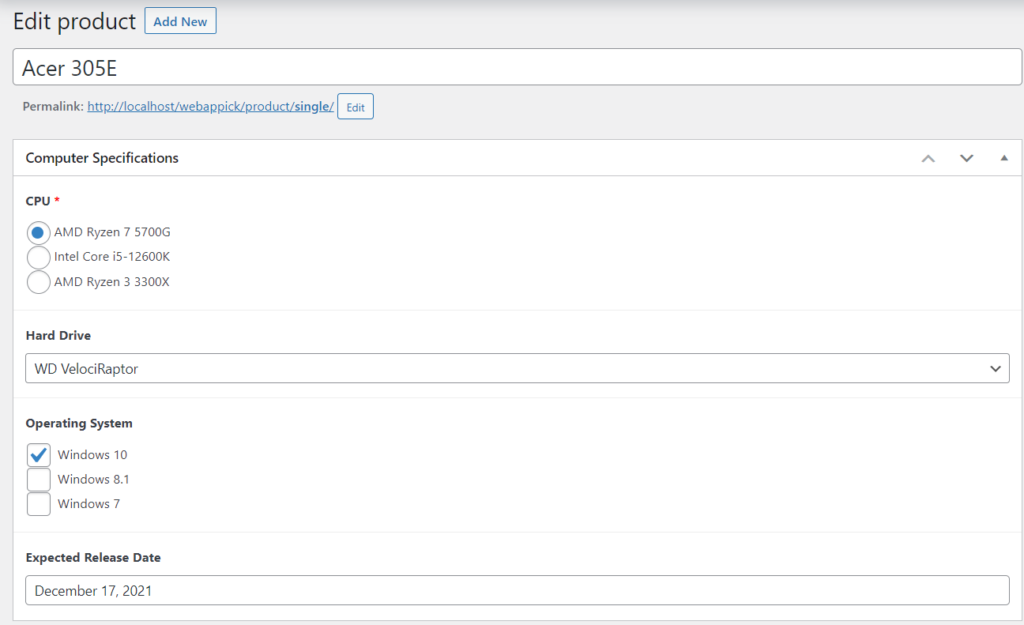
So, that’s what you see on the product page from the backend.
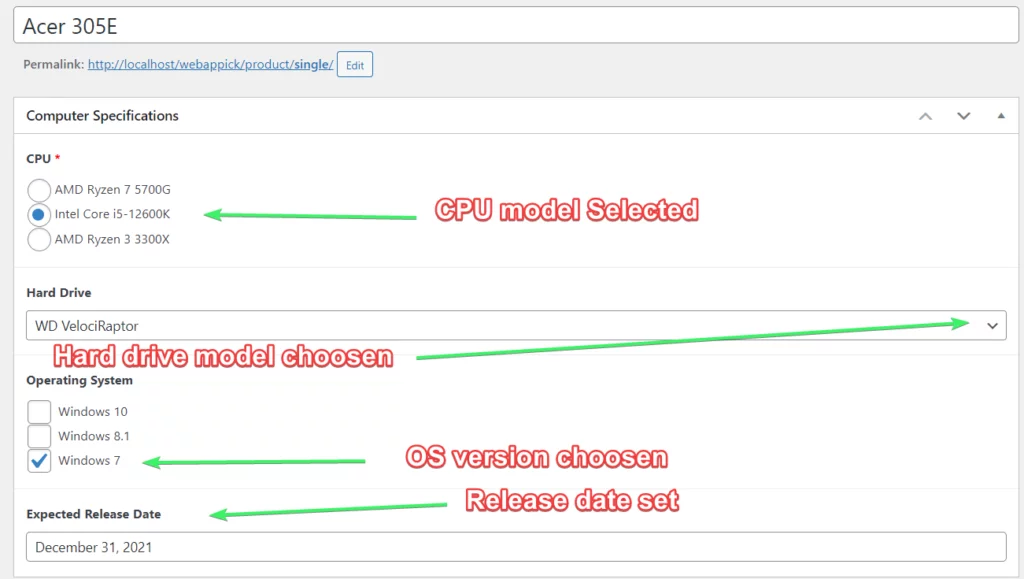
Let’s now make the product page ready by filling up the fields with valid options or information.
Here you go:
Step 5: Display custom field data or information on frontend with shortcode
We have come to the last step of how do you add an advanced custom field in WooCommerce.
To conclude the process, you have to display the information from your custom fields on the frontend of the single product page for the visitors to see. Though you can add this information anywhere you want, we suggest you start by adding them to the long or short product description.
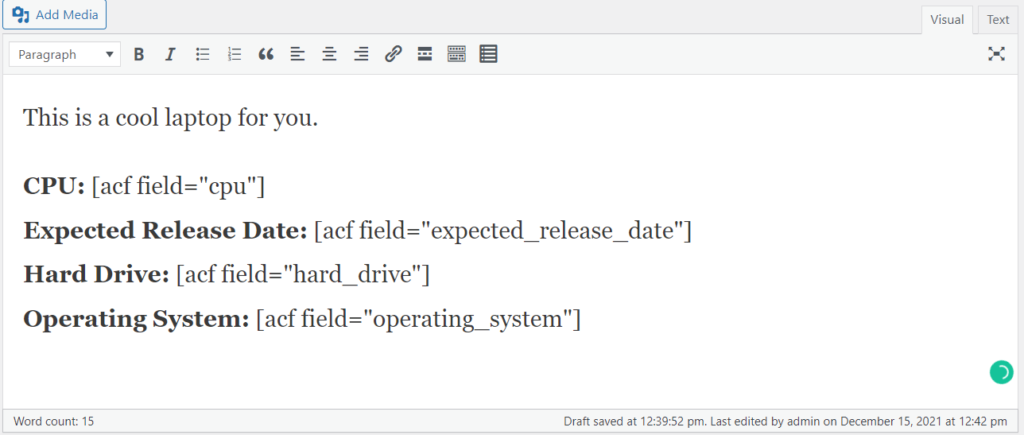
Use the shortcode [acf field=””] to display field information of the advanced custom fields on the frontend. Never forget to add the field name in between the quotation marks. Here is how we did ours:
[acf field=”cpu”]
[acf field=”expected_release_date”]
[acf field=”operating_system”]
Here is how we’ve used it in the product description field: (The title before the shortcode is written and made bold manually)
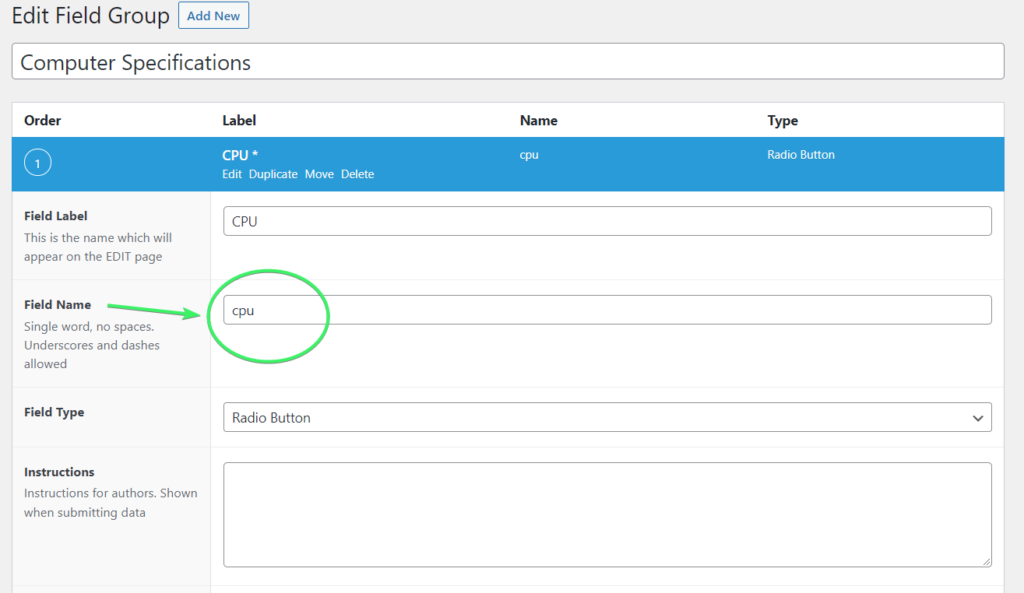
Confused about where does the field names (put inside the inverted comma) come from?
You can always find the Field name for each field in the field group editor interface:
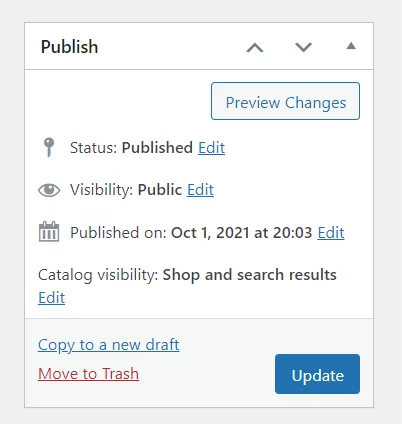
To finish things out, just click on the Update or Publish button.
Voilà! Your WooCommerce product page is ready to display the custom fields on the front end for your visitors to see.
More Resource(s)
Do you want to add advanced custom field value on a WooCommerce product feed?
Here is a guide with a video to help you out.
Frequently Asked Questions (FAQ)
To get to know everything about how to set up advanced custom fields for the maximum output, just explore their resources page. However, if you get stuck somewhere using ACF Pro, you can always seek customer support via ticket or hire an expert to get your tasks done from here.
Unfortunately, no. Advanced Custom Fields (ACF) PRO licenses are valid only for a year. You have to
renew your PRO license every year to keep getting updates and professional support from the plugin developers.
Final Lines
By now you know how to add advanced custom fields for WooCommerce using ACF plugin. If you have questions regarding the process described above or need any kinds of help, feel free to let us know in the comment box. We are always by your side to make your WooCommerce business successful with Challan and CTX Feed plugins for WordPress.
You May Also Read
- 15 Google Analytics WordPress Plugins (Free and Pro)
- 16 WooCommerce Bookings Plugins with Guide
- A Beginners’ Guide to WooCommerce Multilingual Store Creation
- How to Create a WooCommerce Wholesale Store
- How to Print a Packing Slip in WooCommerce
- Creating Improved Variable Product Attributes For WooCommerce
- WooCommerce Product Shortcode – A Comprehensive Guide (2022)

Hi !
This article might be very interesting… if we could see images !
Glad to know that it helped you!