How to Generate Google Shopping Ads Feed (Easy Steps)
A Google Shopping ads feed is a structured product data file—typically in formats like CSV, XML, or JSON—that contains all essential product attributes such as titles, descriptions, prices, images, GTINs, categories, and availability, formatted according to Google Merchant Center feed specifications. In Google’s product data, these attributes define how products are classified, matched, and displayed across Shopping listings and ads. WooCommerce store owners commonly use feed-generation tools like CTX Feed – WooCommerce Product Feed Plugin to automatically assemble, optimize, and sync these channel-specific feeds, ensuring accurate product taxonomy, compliant metadata, and seamless integration with Google Shopping campaigns.
What are Google Shopping Ads and How to Create Them?
Google Shopping Ads are specifically product ads that contain information related to your products. For instance, they may contain a product image, title, price, ratings, brand name, shipping information, etc.
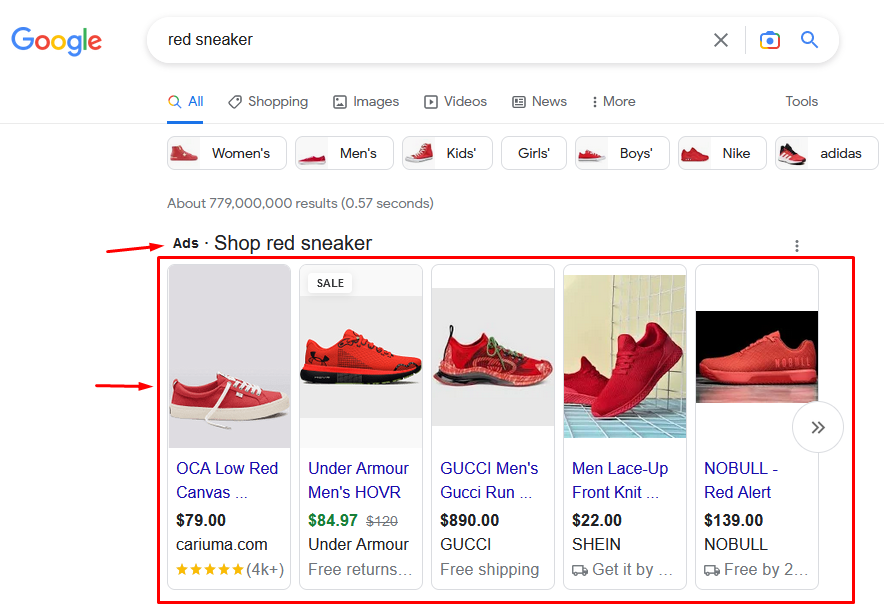
Even though they are called Google Shopping Ads, they are not limited to the Google Shopping platform. Google displays these ads on –
- Google Search Engine Result Pages (SERP)
- Google Popular products on SERP
- Google Rich results on SERP.
- Knowledge panel on SERP
- Google Shopping
- YouTube
- Google Images
- Google Maps
- Google Lens
- Google News
- Google Finance
- Gmail ads
- Blogger
- Mobile apps
- Millions of Google partner sites
Therefore, when you run a Google Shopping ads campaign, you practically promote your products all over the internet. Now, you can understand why they are the king of ads.
How to Create Google Shopping Ads
Unlike traditional ads, where you have to create the ads step by step manually, Google product ads are generated automatically from your Google Shopping ads feed. However, running these ads still involves navigating through several steps and platforms.
Here are the steps in short-
- Create a Google Shopping ads feed for your WooCommerce products
- Create and upload the Google ads shopping feed to a Google Merchant Center (GMC) account.
- Link that Google Merchant Center account to a Google Ads account
- Create a Google Shopping campaign along with the connected GMC that has the Google shopping ads feed
After these steps, Google Ads will automatically generate product ads based on the Google shopping ad feed you provided and distribute them across the web.
Therefore, the most important element in creating these ads is a product feed. Let’s find out what they are and how to create a product data feed for Google Shopping.
What is a Google Shopping ads feed?
We will start with what a product feed is in general. A product feed is a data file that contains your product details.
This data file can be in CSV spreadsheet, XML, JSON, or even in text format. Different channels support different formats.
Now, what information do these feed files include?
Everything about your products, be it their titles, description, prices, categories, etc. They also include visual content in URL format. For example, links to the product page, images, videos, etc.
However, different channel may require different details of your products. You must create a product data feed following a channel’s guidelines.
For example, the Facebook product feed requires some additional elements for the USA Marketplace. Amazon allows you to insert even keywords into your feed.
Let’s come back to the Google Shopping ads feed. The product feed that is specifically made for Google Shopping or shopping ads is called a Google shopping ads feed.
They are also known as Google Merchant Center feeds, as you must upload this feed to the GMC platform.
Understanding Google Shopping Feed Basics
Like other platforms, Google also has some Google Shopping feed specifications. Let’s explore some basics of Google Shopping ads feed.
Product Attributes
These are specific pieces of information about your products that are included in your feed. Examples include product title, description, price, image links, GTIN, brand, MPN, product type, condition, and custom attributes.
Feed Specifications
These are the guidelines and Google Shopping Ads feed requirements set by Google for creating a valid Google Shopping feed. They outline the format, structure, and content that your feed must adhere to.
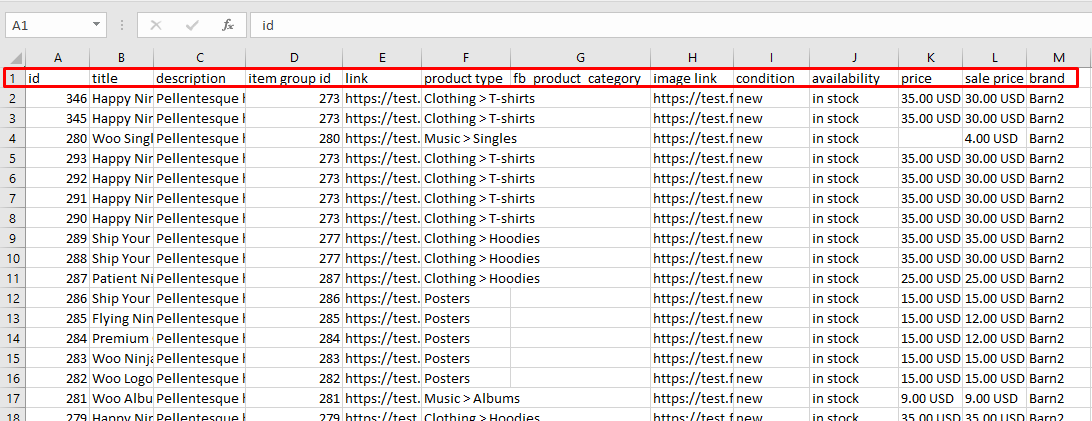
List of Supported Attributes for Google Shopping ads feed
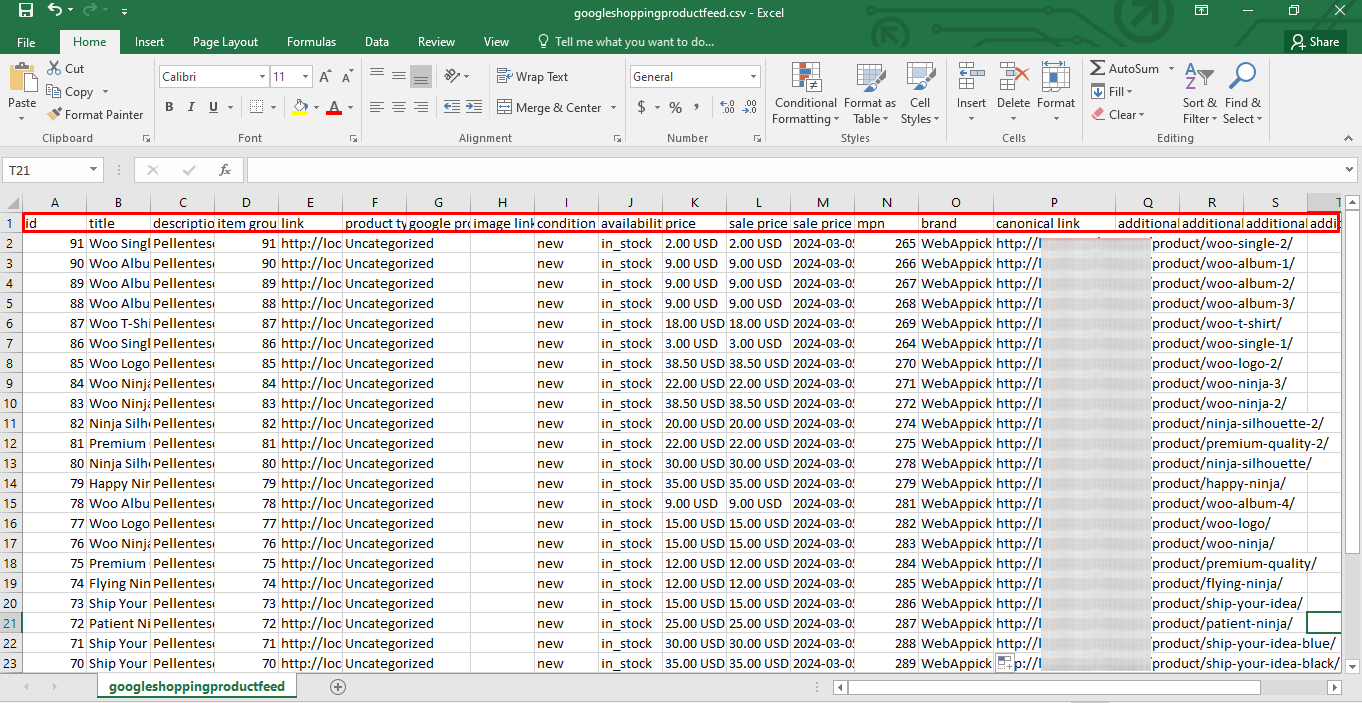
Notice the column headers in the above image? These are attributes of a product feed.
Google has a large library of supported attributes. The platform supports over 50 attributes, some essential and some optional.
- Basic product info (9 attributes): This includes titles, descriptions, prices, and images.
- Comprehensive details (4 attributes): Covers dimensions, weight, and materials.
- Product categorization (11 attributes): Defines where your product fits in Google’s taxonomy.
- Pricing and availability (8 attributes): Details on price, availability, and shipping options.
- Product identification (5 attributes): Unique identifiers like GTIN or MPN.
- Destination specifics (2 attributes): Information on shipping destinations.
- Shipping details (4 attributes): Includes shipping costs.
- Tax information (2 attributes): Covers tax status details.
- Marketplace specifics (3 attributes): Where your product is available to buy.
- Shopping campaign details (7 attributes): How your product is promoted in Google Shopping campaigns.
Types of Google Shopping ads feed
Google supports and allows you to upload several types of feeds to promote your products. It also supports more than one type of Google Shopping ads feed.
1. Google Merchant Center Feed (Google Shopping Primary Feed)
This is the core feed for Google Shopping Ads, containing all the essential product data, such as titles, prices, descriptions, and images. It’s the backbone of your Google Shopping campaigns, which ensures your products appear in shopping-free listings and ads.
Required attributes include Product ID, Title, Price, Description, and more. Creating this feed is easy with tools like the CTX Feed WooCommerce plugin, which automates the process.
2. Google Dynamic Remarketing Feed
The Google Dynamic Remarketing feed allows you to re-target potential customers who have previously visited your site. Google dynamically generates ads based on user behavior, displaying personalized ads that feature products they’ve shown interest in. Attributes typically include Product ID, Title, and URL, among others.
3. Google Local Inventory Feed
For businesses with physical stores, this feed lists products available locally, helping drive foot traffic to your store by showing nearby shoppers what’s in stock. It includes attributes like Store Code, Quantity, and Price. Google Local Inventory feed can be used for free listings or paired with paid ads to enhance visibility.
4. Google Promotions Feed
This feed highlights special offers or discounts in your Google Shopping Ads, making your products stand out. Attributes like Promotion ID, Start Date, and Discount Amount are used to create compelling promotions that can increase click-through rates and conversions.
5. Google Product Review and Ratings Feed
Google Product Ratings are a key feature in Google Shopping ads and listings that showcase aggregated customer feedback on individual products. These ratings are displayed as star ratings (from 1 to 5 stars) alongside product listings in Google Shopping ads and organic listings.
This helps potential customers make informed purchase decisions. The ratings are sourced from various platforms, including merchants, review aggregators, and Google users, and are compiled by Google’s algorithms to ensure consistency and relevance.
6. Google Shopping Actions Feed
This feed is used to manage products across Google’s platforms, like Google Express and Google Assistant. It’s more focused on a seamless shopping experience across devices and helps increase visibility and sales. Attributes include Product ID, Title, Description, and Stock Status.
These feeds ensure your products are accurately listed and promoted in Google Shopping Ads, driving traffic and conversions effectively.
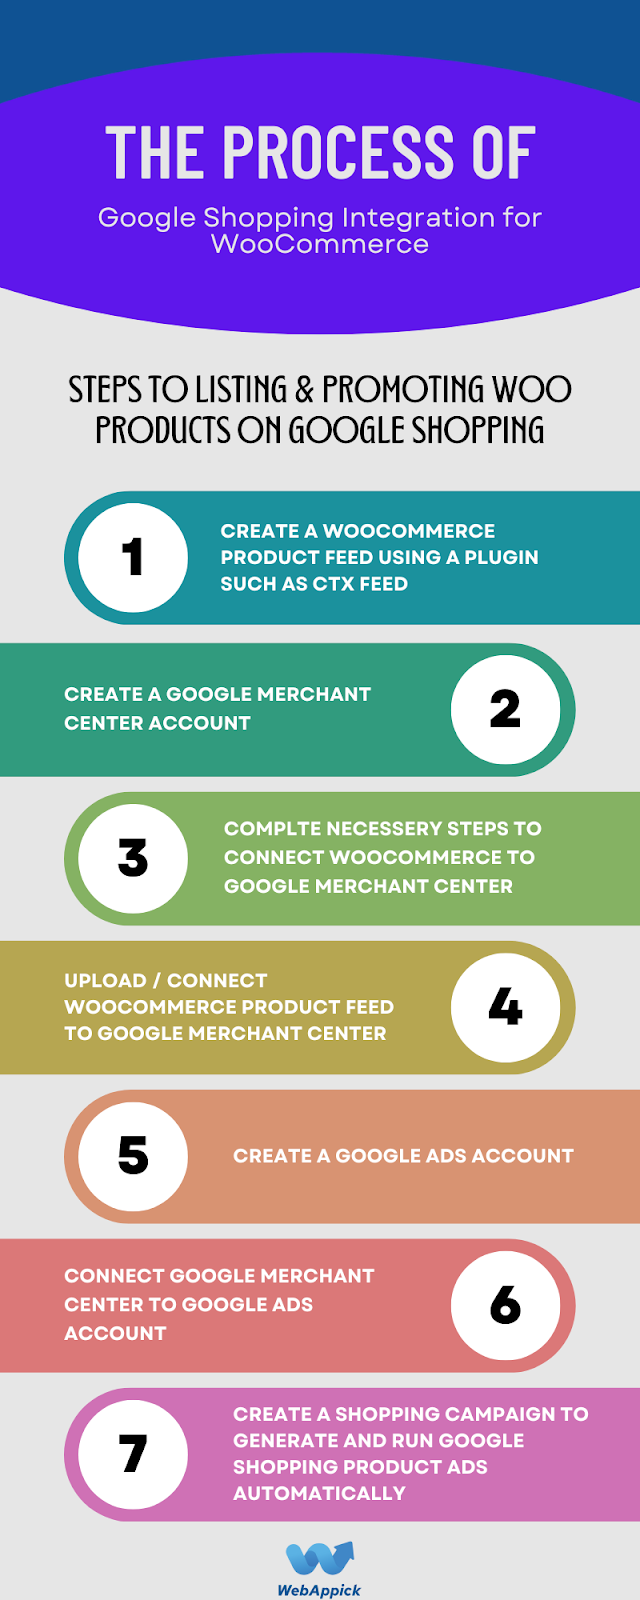
How to Create Google Shopping Ads Feed in WooCommerce
You can create a Google Shopping ads feed manually using a text or spreadsheet editor. However, this process is time-consuming and impractical.
The solution is using Google Shopping feed management tools such as CTX Feed. This WooCommerce plugin helps you generate product feeds for over 130 channels in a split of minutes, if not seconds.
CTX Feed has a dedicated Google shopping ads feed template. The templates come integrated with all attribute requirements and channel guidelines.
You simply select the shopping ad feed template Google AdWords and the plugin will generate the necessary attributes and create the feed for you on your command.
Google Merchant Center has a great feature where it supports uploading and updating feed files through URLs. CTX Feed excels in feeding those features.
Not only it generates feed links, but it also has an automated Google Shopping feed updates feature. The plugin and GMC will handle your feed operation without you worrying about a thing.
CTX Feed is also the best possible tool for Google Shopping ads feed optimization.
Read this article to find out why you need this plugin –
Without further ado, let’s jump to creating a Google Shopping ads feed.
Google Shopping Feed Setup Guide Using CTX Feed
Setting up a Google Shopping feed can be a breeze, especially with the CTX Feed plugin by your side. Whether you’re using the free version or have opted for the pro version (which we highly recommend for the best results), getting your products in front of shoppers has never been easier.
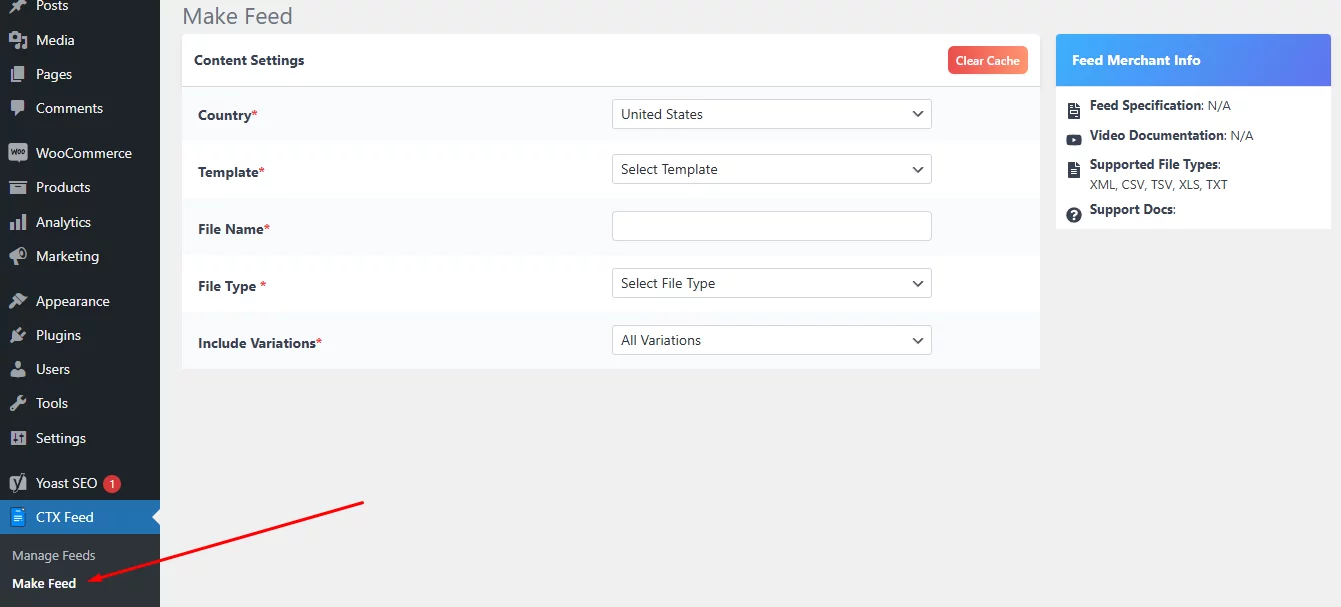
Step 1: Install and Navigate to Feed Creation
After installing the CTX Feed plugin, head over to CTX Feed >> Make Feed. Here’s where the magic begins.
Step 2: Choose the Perfect Template
The Templates dropdown is like a treasure chest filled with over 130 channel-specific templates. For this guide, let’s focus on the core Google Shopping template.

Step 3: Watch the Magic Unfold
As soon as you select the Google Shopping template, the plugin starts doing its thing. In an instant, it populates all the essential attributes you need at the bottom of the screen.
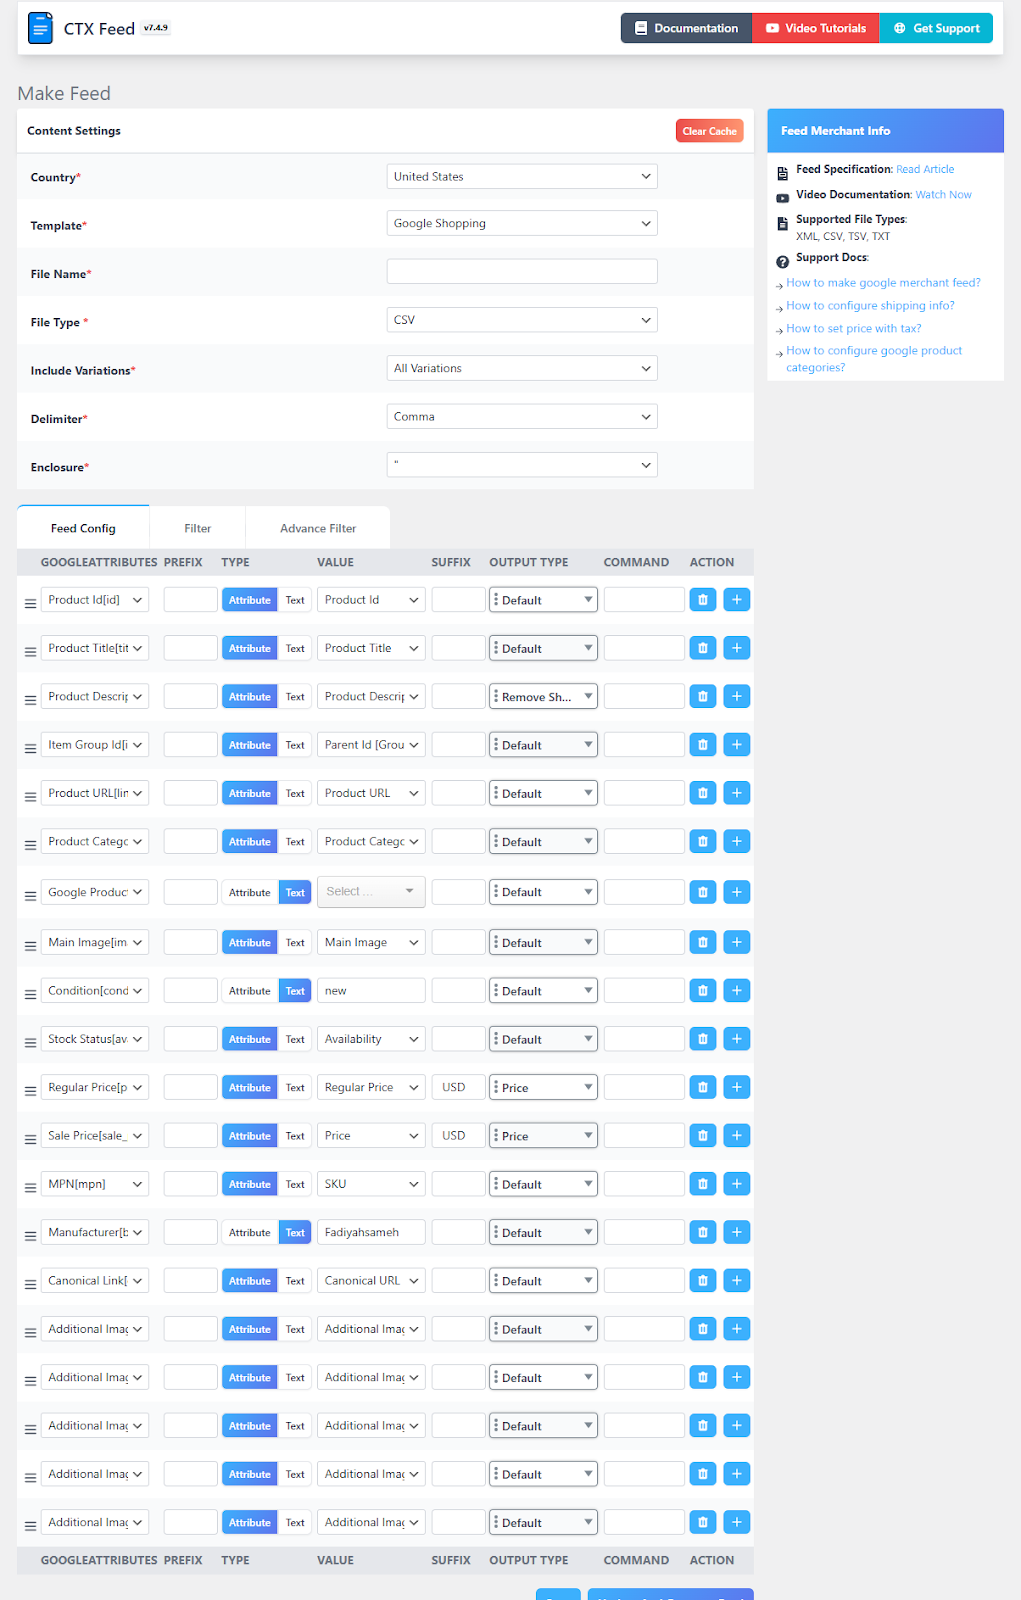
Step 4: Fine-Tune Before You Feed
While it’s tempting to hit the Update and Generate Feed button right away (which would gather all your WooCommerce product data and create the feed), there are some crucial step left.
To ensure your feed aligns perfectly with Google Shopping’s guidelines, some adjustments are needed before generating the feed.
Configuring Additional Fields in the Google Shopping Ads Feed
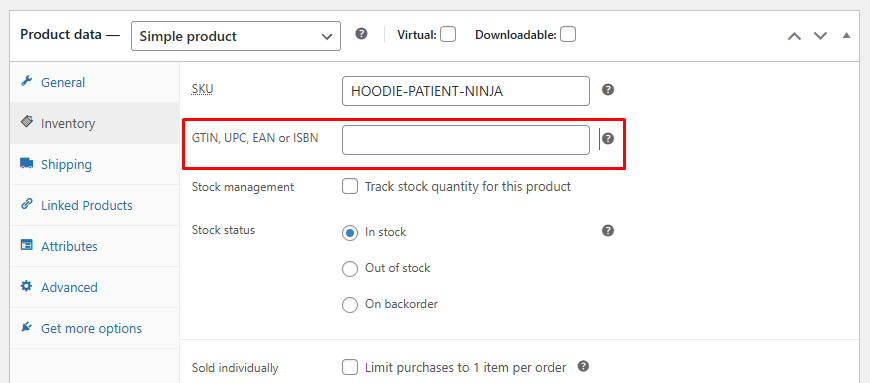
WooCommerce has recently introduced a dedicated field for GTIN, UPC, EAN, or ISBN. However, you cannot input two individual unique identifiers in this field when needed.
Also, there’s no field available to insert data for Brand or MPN. But they are essential for Google Shopping ads feed. What to do?
We all know that WooCommerce allows us to add custom fields to product pages, and that’s our solution for adding the above fields to our feed. If you don’t add custom fields on product pages and choose to insert the values manually in the feed, you will have to keep updating them manually onwards.
Therefore, it is best that you add custom fields for them and let CTX Feed collect them automatically. So how do you add them?
No need for additional plugins; CTX Feed has got your back. It comes packed with all possible custom fields you may need and even more to add within a toggle of a setting.
Go to CTX Feed >> Settings and click on the Custom Fields tab.
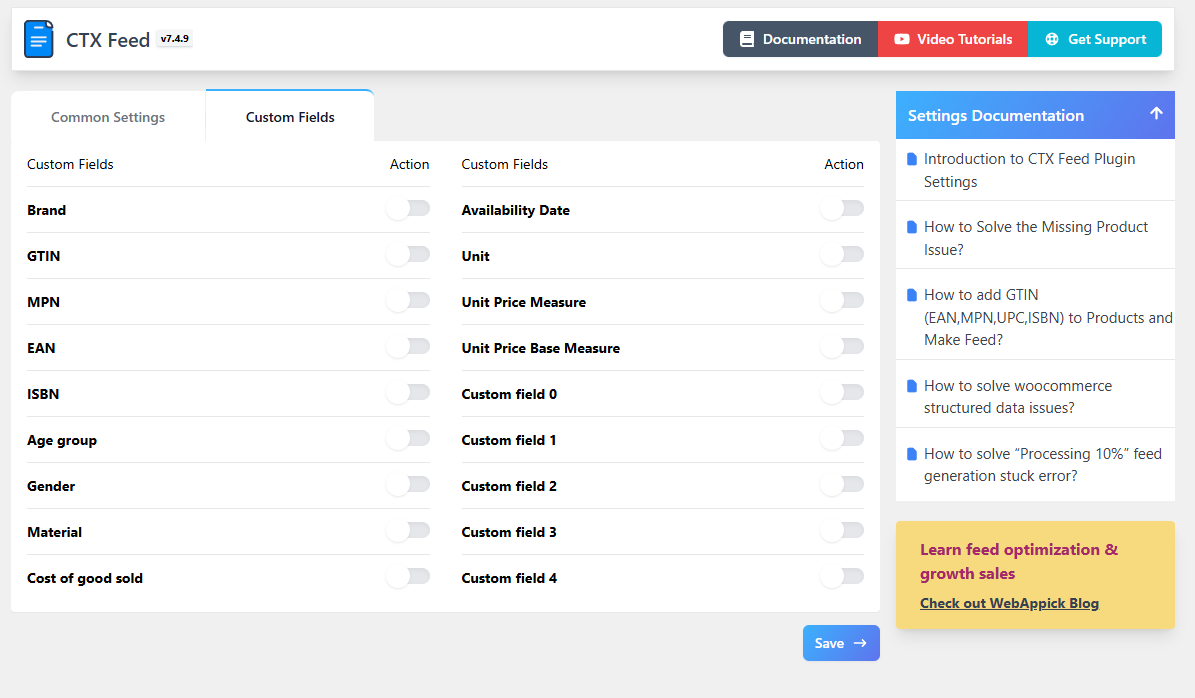
Toggle to enable the ones you need. For the Google Shopping feed, we need to enable GTIN, MPN, and Brand.
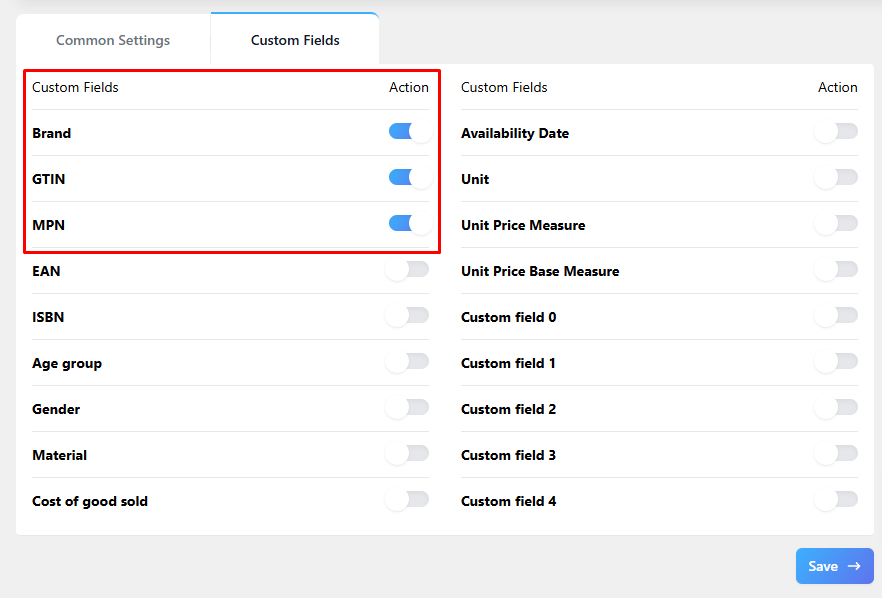
Save your settings. Now, you can go to your product pages and add GTIN and MPN values. For example, go to a product page and jump to the Product Data >> Inventory section.
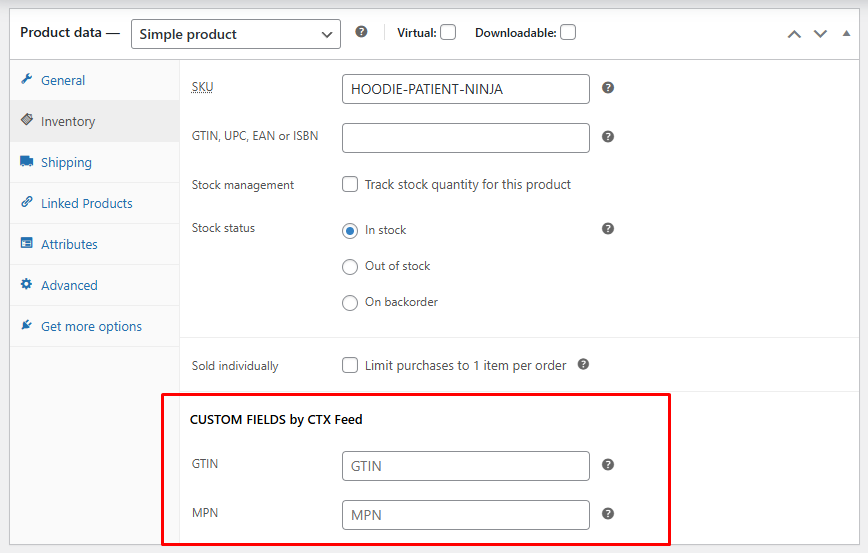
As you can see, the plugin has created individual fields for inserting data values. When you input data here, CTX Feed will automatically add it to the feed.
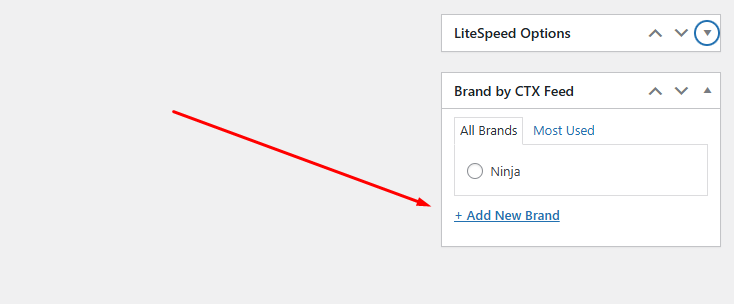
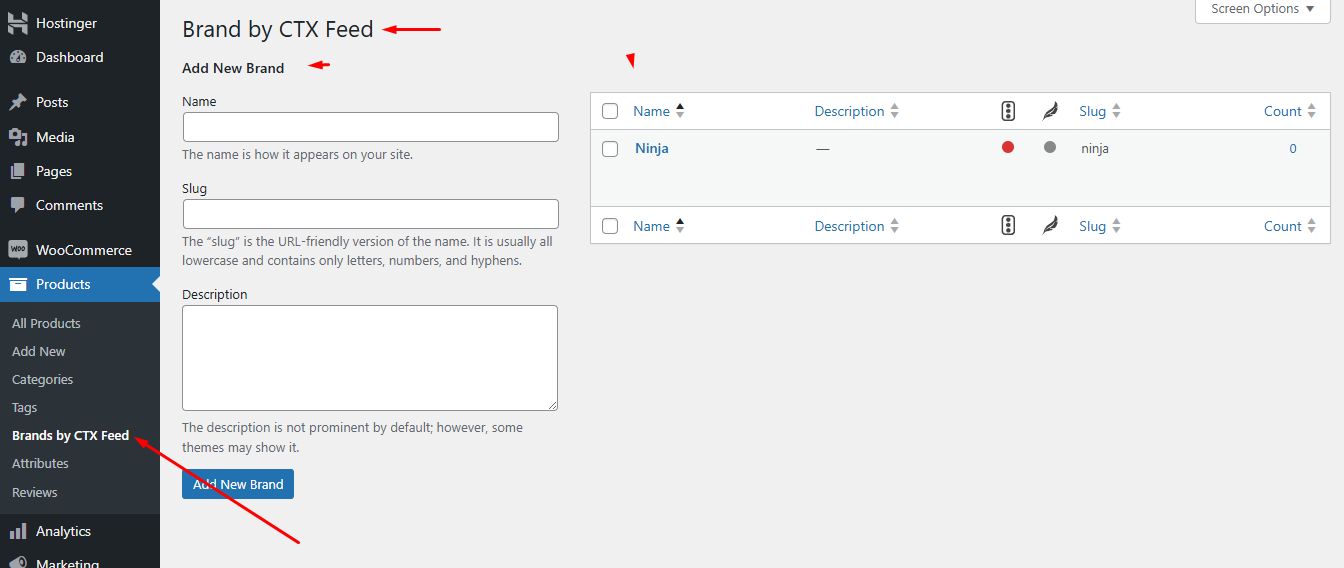
How about Brands?
Scroll down and you will find the Brand By CTX Feed section at the right. You can create or assign brands from here.
To create Brands in bulk, go to the following menu.
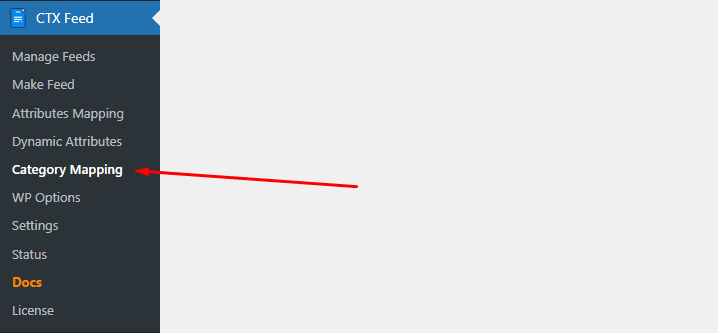
Category Mapping for Google Shopping ads feed
If you generate and upload the feed right now, GMC will return some Google Merchant Center feed errors. It will ask you to map categories according to Google’s recommendations.
Every website has its own site or category structure. If you are trying to upload your products to those websites, your products should also align with their category distribution.
For example, let’s say Google has a clothing category structure like – Apparel & Accessories > Clothing. If your clothing products or product feed doesn’t have or match this category, then Google will show errors and will not display your products.
In simple words, your products should either have the same categories as the host (e.g., GMC), or your product feed should map the categories to match the host.
Sounds complex, right?
Here comes CTX Feed to your rescue again. The plugin makes it incredibly easy for you to map categories according to different channel structures.
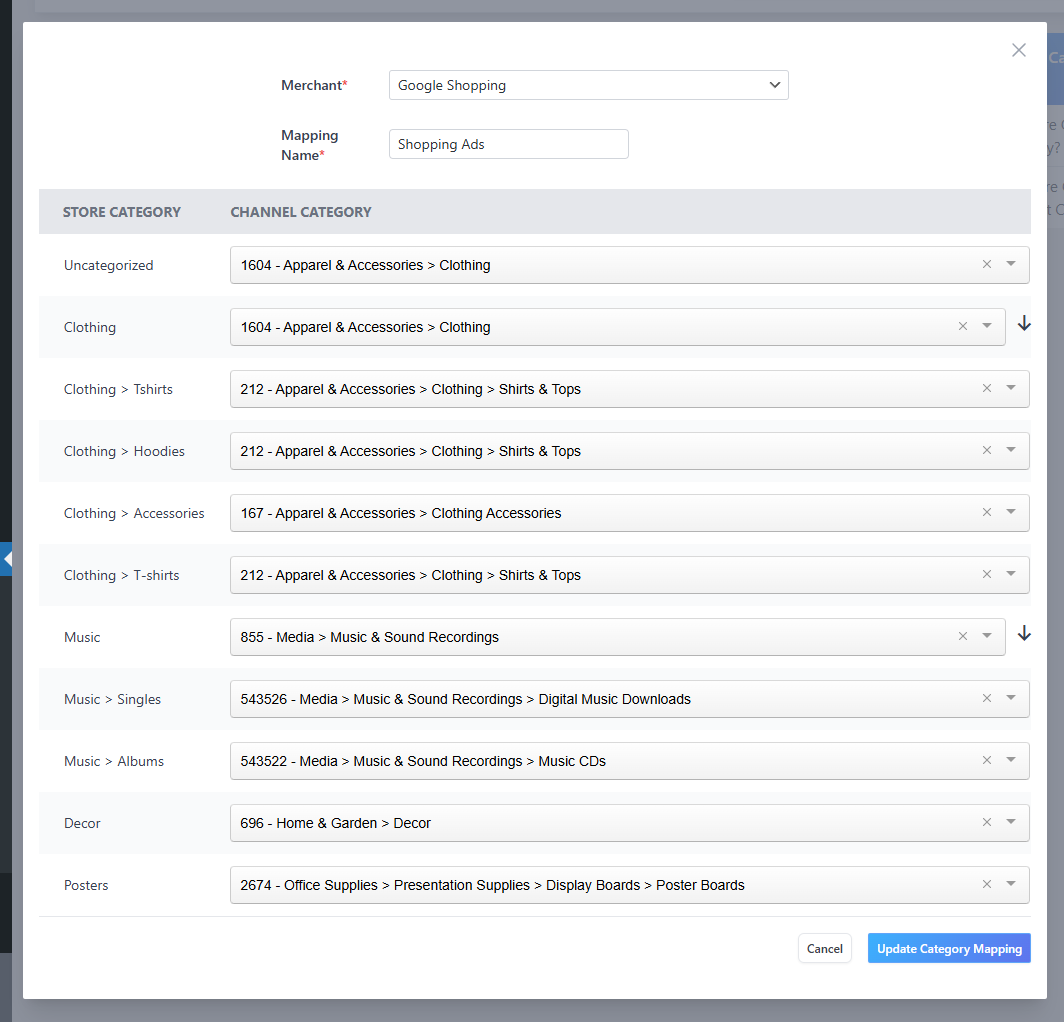
Go to CTX Feed >> Category Mapping.
Hit the New Category Mapping button, and the following window will pop up.

Select your merchant, which in our case is Google Shopping.
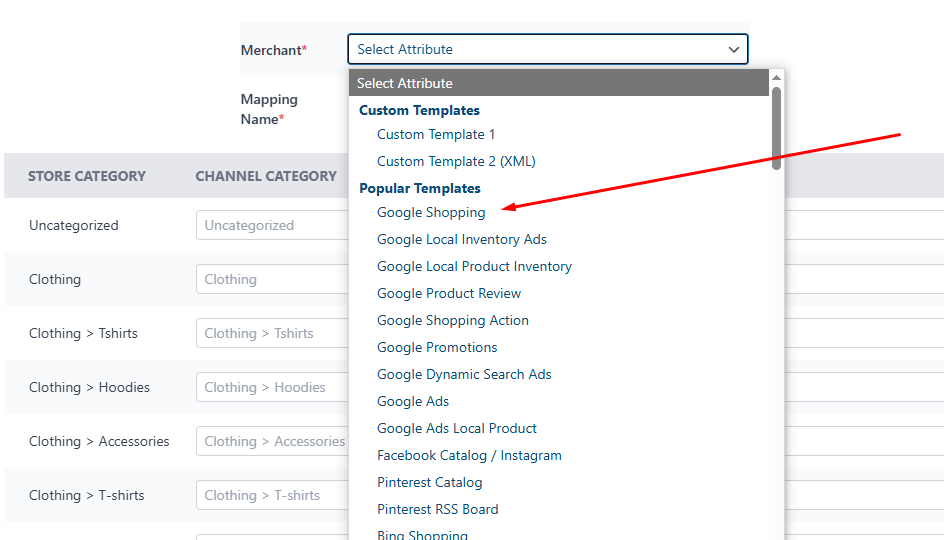
Input a name. The plugin automatically collects your existing categories and displays them on the left; you need to map them with Google’s categories on the right.
For example, let’s map Google’s matching category for your category Clothing.
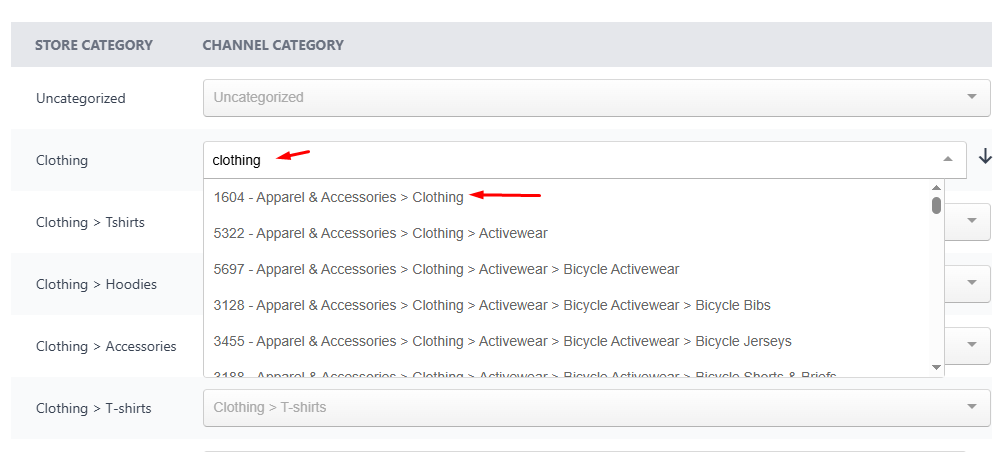
Type ‘clothing’ into the box, and you will find all available Google categories related to it. Select the that best matches your products.
Again, you can see how rich CTX Feed is. It has integrated all channel categories for you to map.
Here’s how it may look after you map all your categories.
Generating and Filtering Google Shopping Feed
Now that we have performed all necessary background tasks, it’s time to create the feed. Let’s go back to the feed window.
You don’t need to edit or add any attributes. However, you should assign the mapped category attribute you created.
Scroll down to the Google Product Category attribute. If you only have one single category, you can assign it directly from the Value window under Text type.
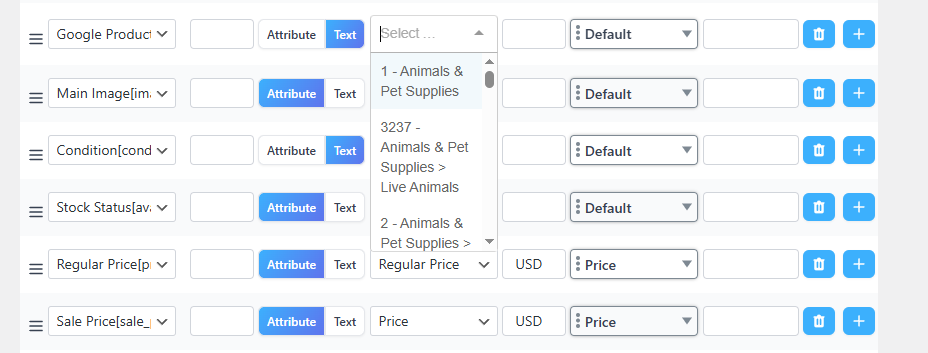
We have multiple categories, and we have mapped them already. So, we will select the Attribute option and select our custom category mapping attribute from the list.

You can go ahead and hit the generate button at the bottom to create the feed now. If you want to apply more filters, you can do so from the Filter options.
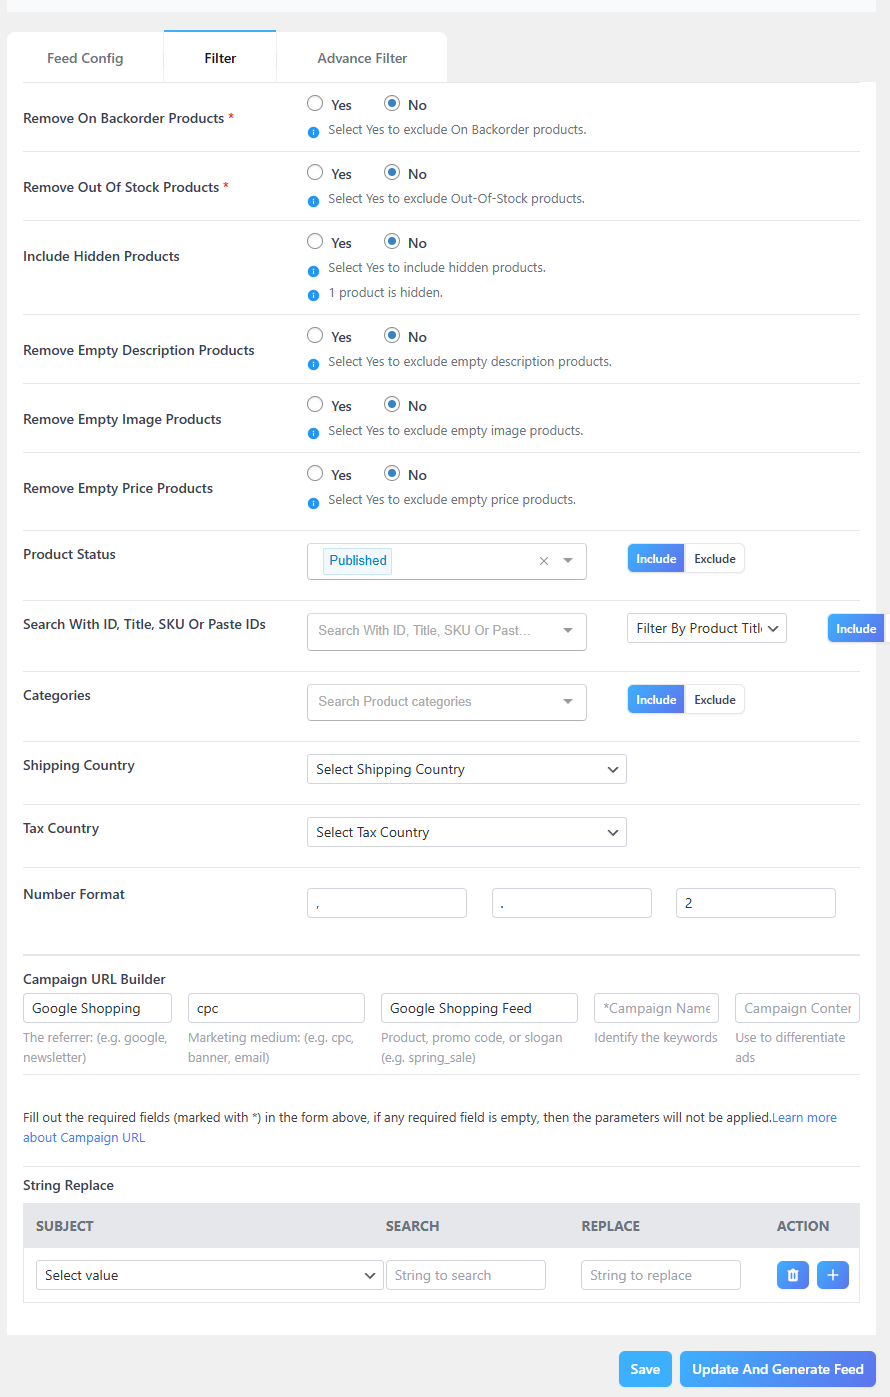
CTX Feed offers a wide range of useful filters. Most important one you will need is – Remove Out Of Stock Products.
With just a click, you can exclude all your stock-out products from your Google Shopping listings and ads. This will prevent you from misleading the audience and wasting money on unnecessary ad spending.
With other filters, you can include exclude specific categories or even specific products by their status, ID, SKU, etc. You can also filter by shipping and tax country and create tracking URLs to monitor your feed and ad performance.
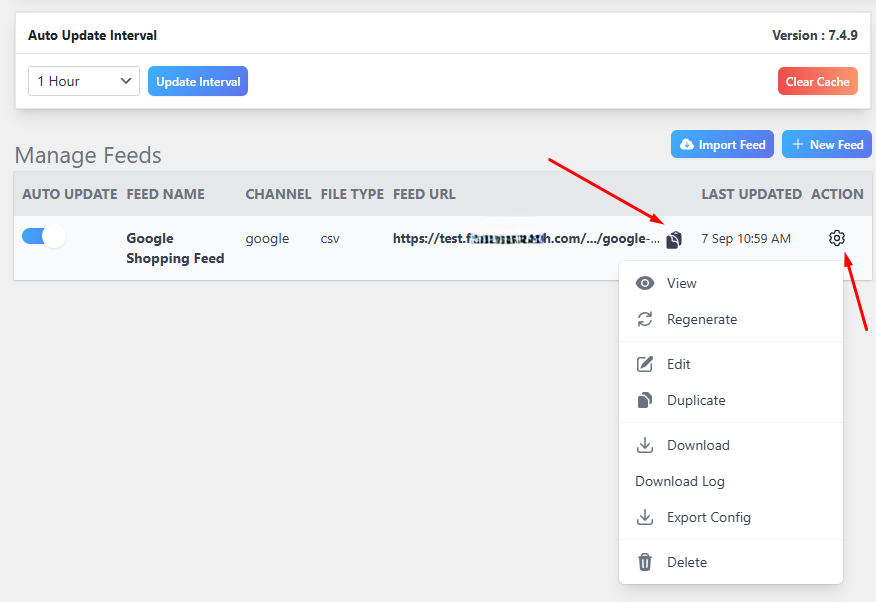
To edit or modify the feed you created, go to CTX Feed >> Manage Feeds.
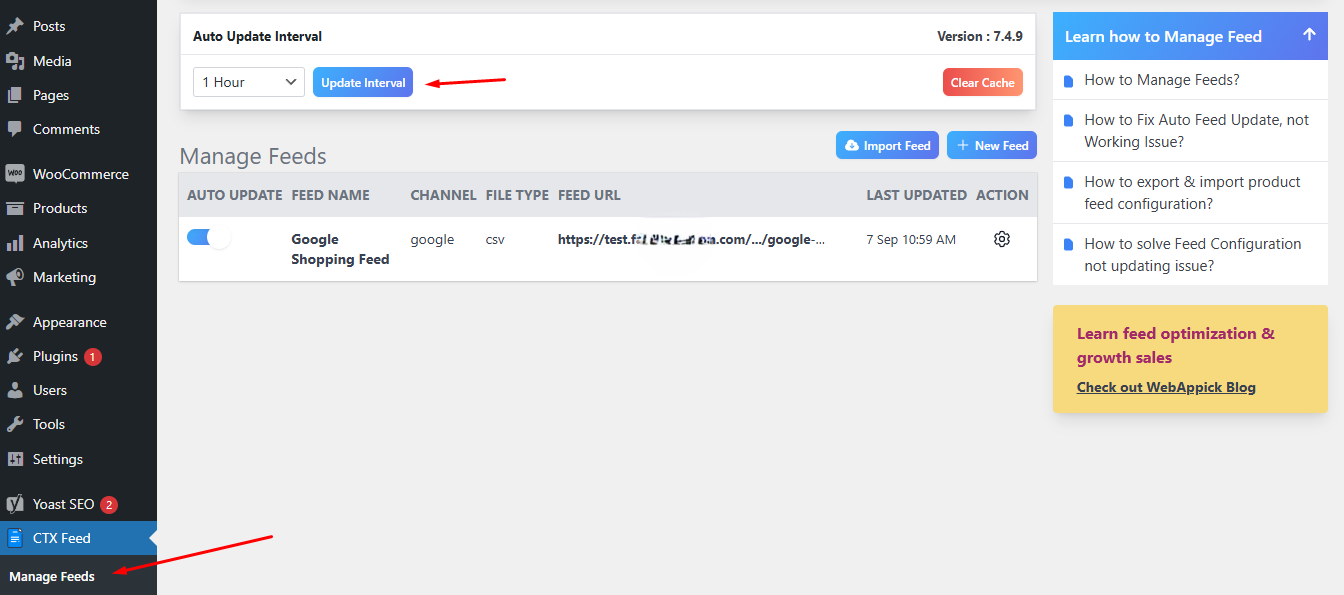
This page allows you to clear the cache (very handy when applying several changes, such as category mapping). One mighty important feature is the Update Interval, which lets you set the interval after which the plugin will automatically surf your WooCommerce site for changes and update the feed.
You can copy the URL from the feed settings. Other options include –
How to Create Google Shopping Ads
We have covered the steps several times in our previous articles. Let’s once again quickly review the necessary steps.
Uploading the Google Shopping ads feed in GMC
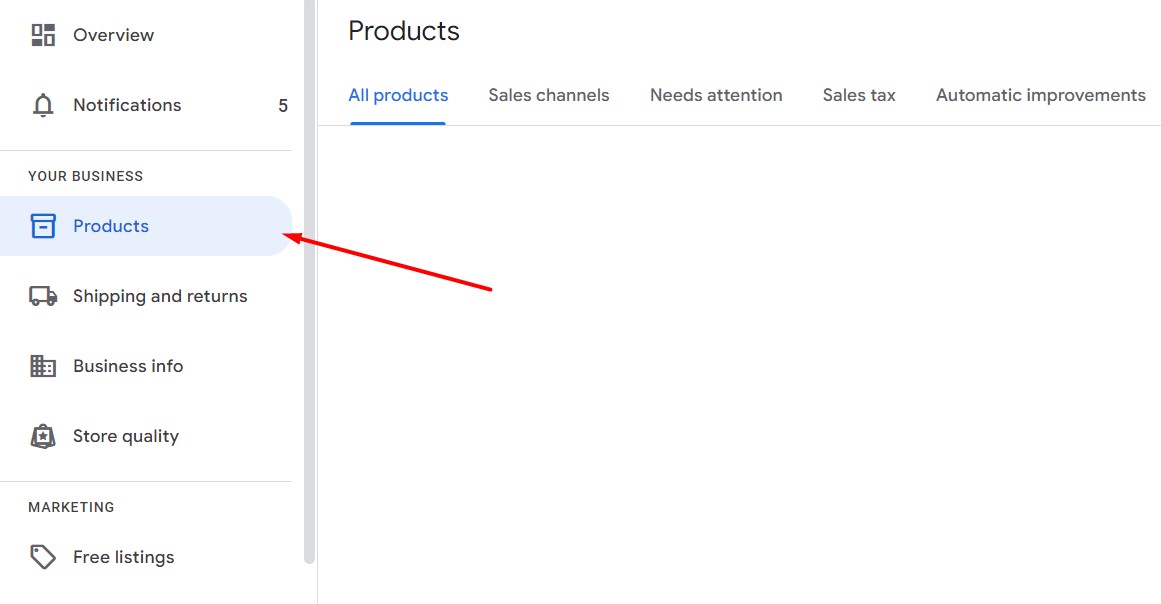
We assume you have set up a Google Merchant Center account already. Go to Products menu in the GMC and click on Add Product Source.
We will select the Add Products from a File option and paste our feed URL in the following box.
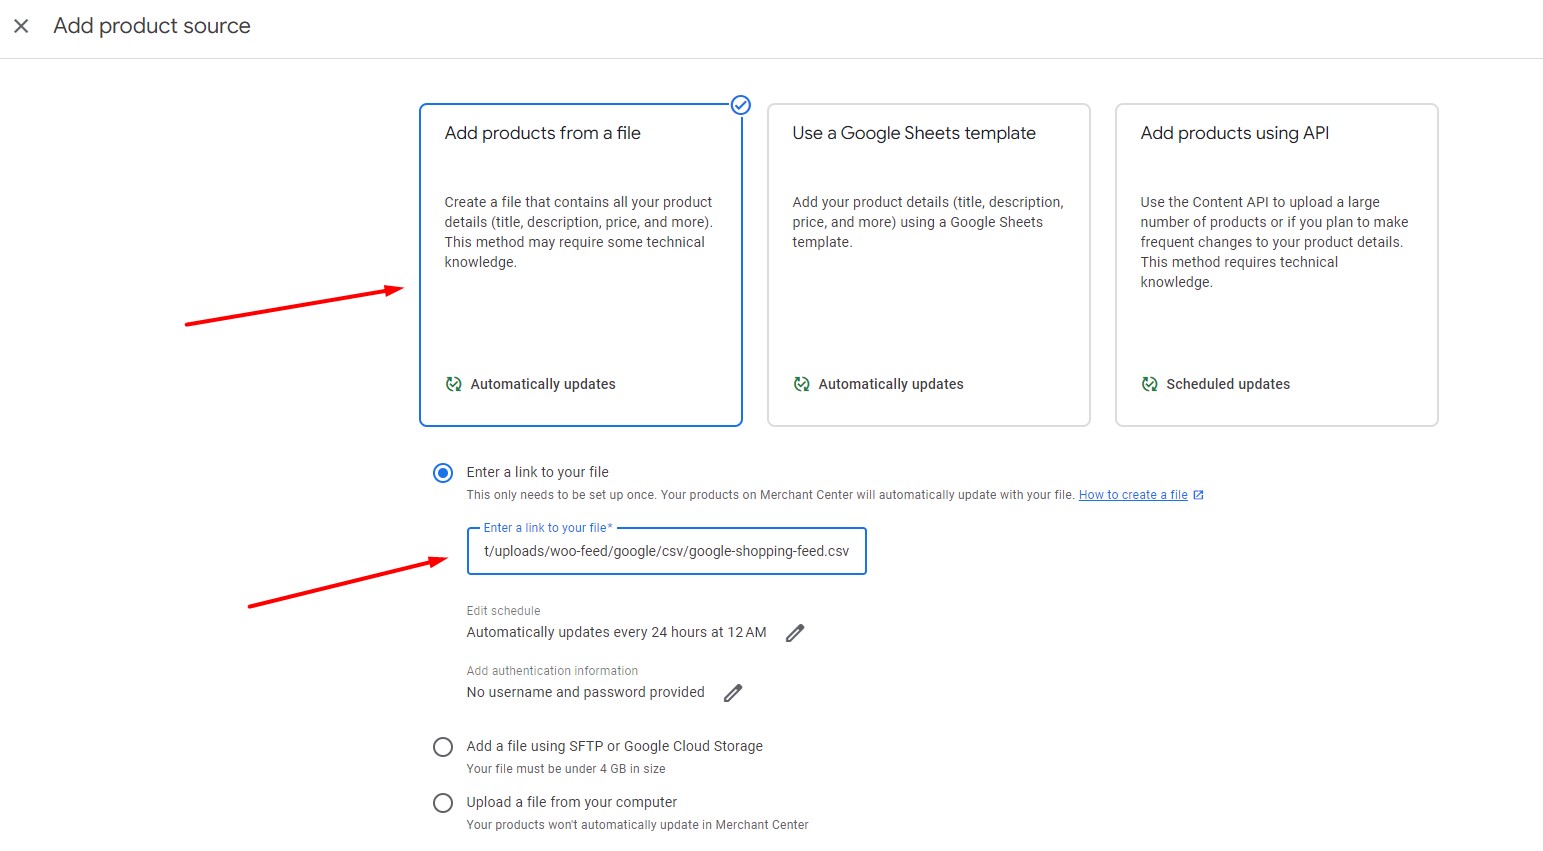
From here, you can also set the automatic update interval and input the feed user name and password if they are protected by any such.
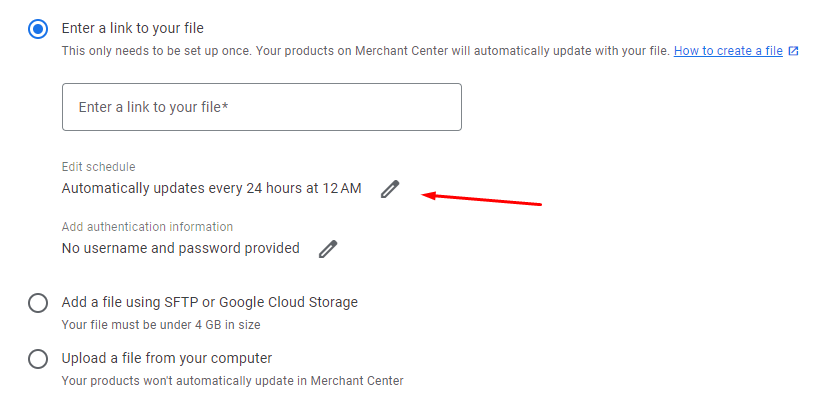
Now, what’s this update schedule in GMC, and how is it different from the one we saw in CTX Feed?
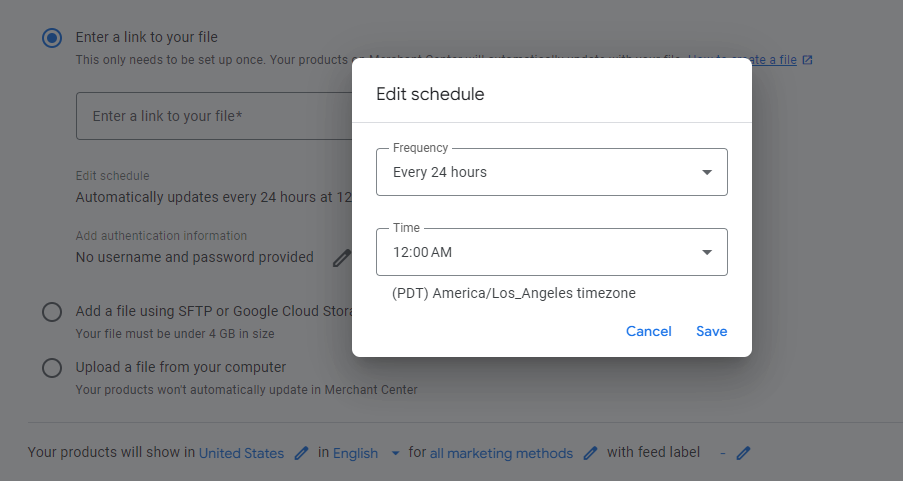
Let’s explain.
- The update interval in the CTX Feed is for checking and updating any product data you may have changed during the interval period. For example, if you have set an update interval of 1 hour and changed the price of a product, CTX Feed will surf your site and find the update automatically. After that, it will automatically update the feed according to the update interval.
- The GMC update schedule is for checking if you have made any changes in the feed. As you have connected the feed through a URL, GMC will fetch the updated feed with the changed price from CTX Feed according to your set time in GMC. After that, it will automatically update the changes in Google Shopping organic listings and your product ads.
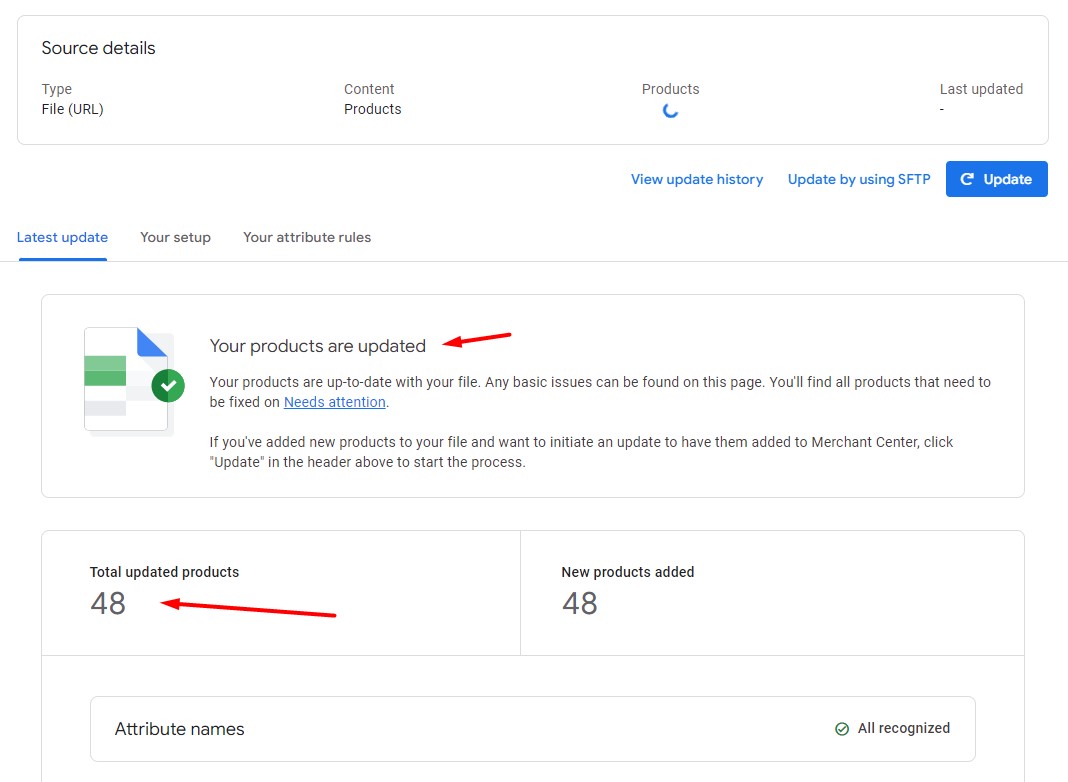
Once GMC fetches your products successfully, it will start distributing them to different platforms, as we mentioned before.
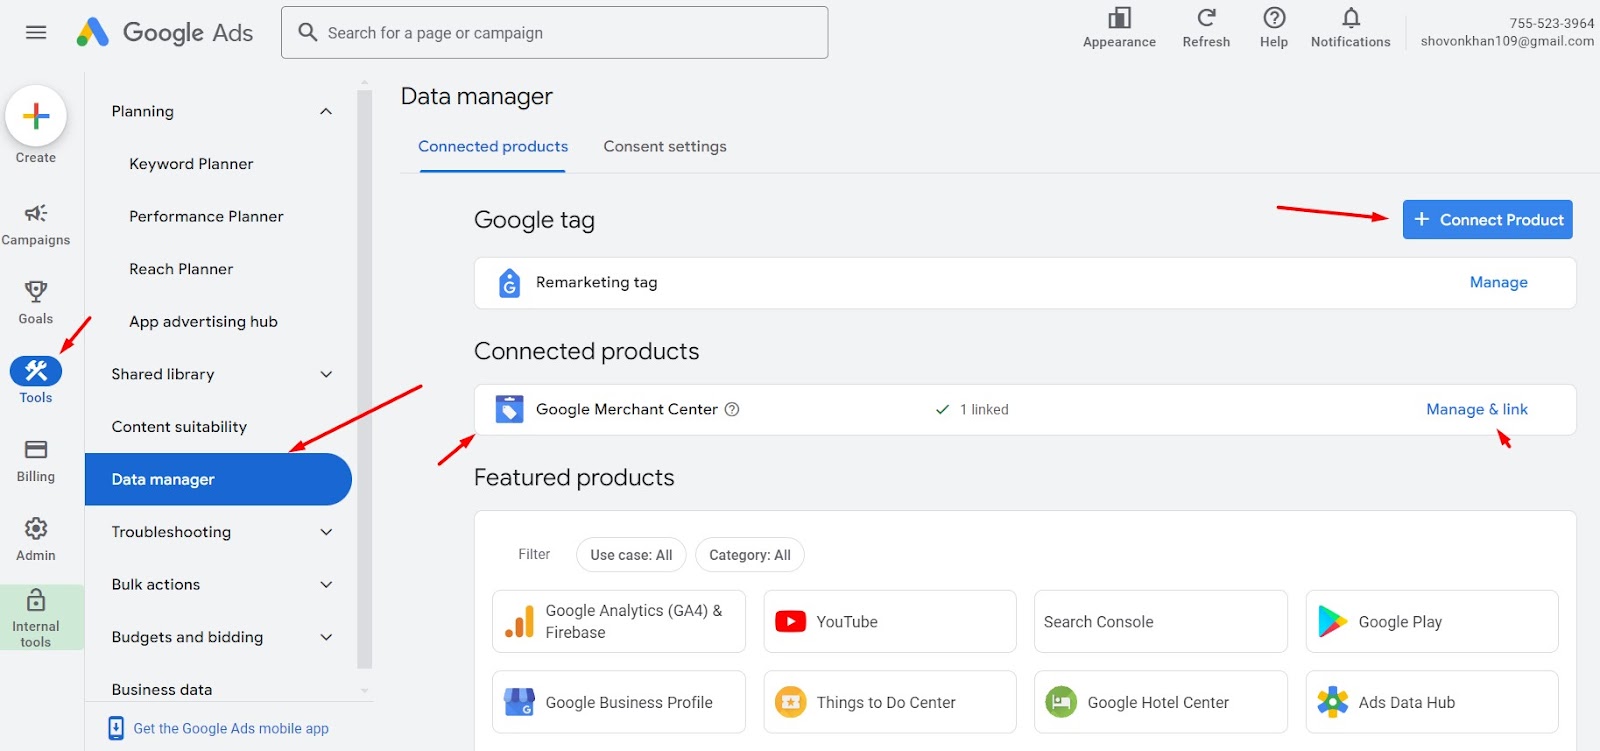
Connecting GMC to Google Ads Account
The next step to creating Google Shopping ads is to connect the GMC account to the Google Ads account. Google Ads has placed this option under a new menu.
Go to Tools >> Data Manager and click on Connect Product. Search, find, select, and link your GMC account.
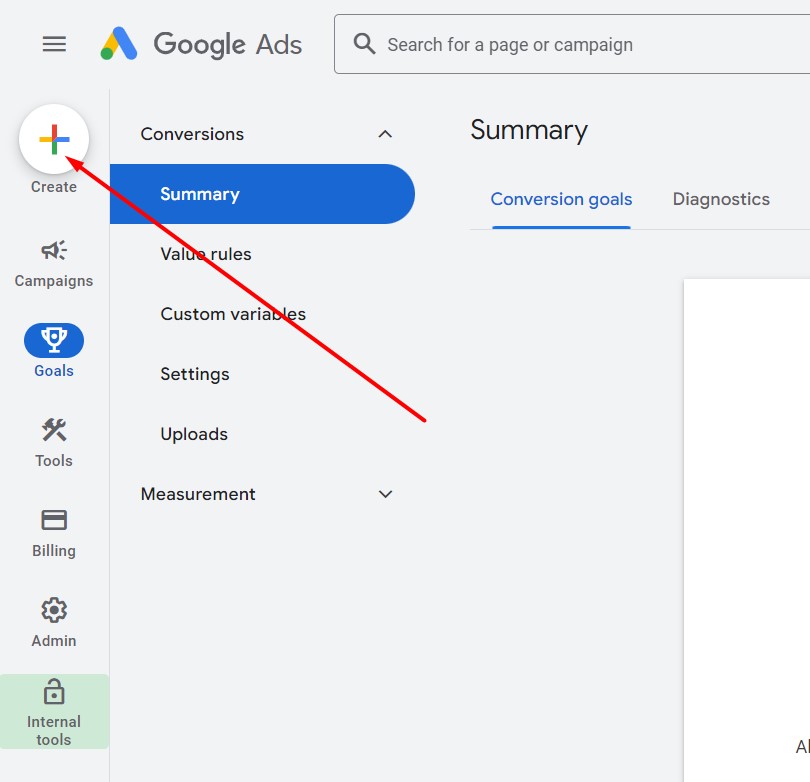
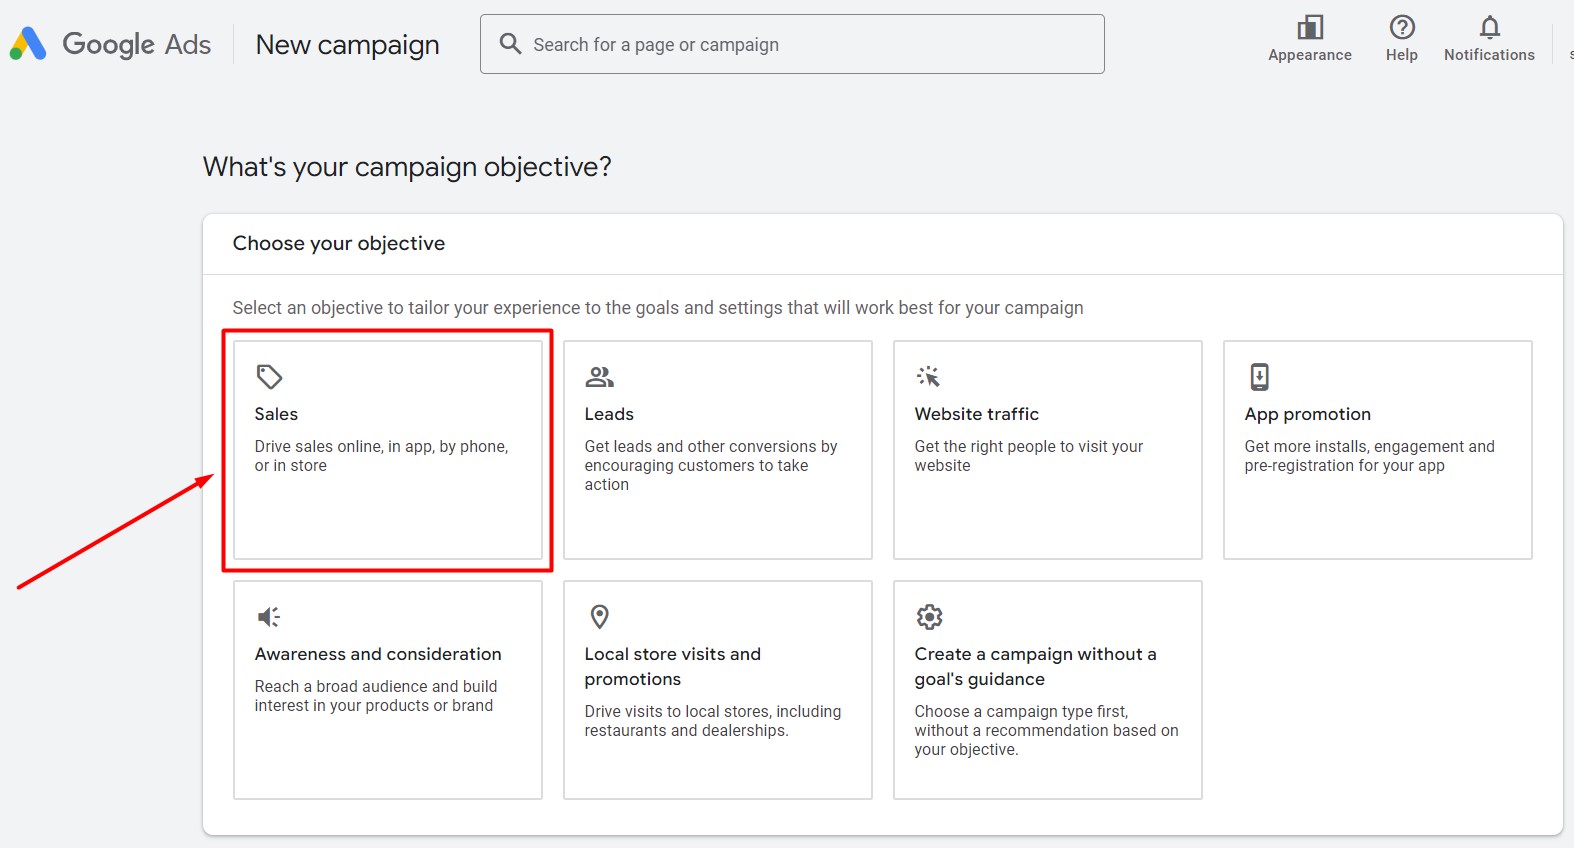
Creating Google Shopping Ads Campaign
Click the following to create a new campaign.
Select campaign objective Sales.
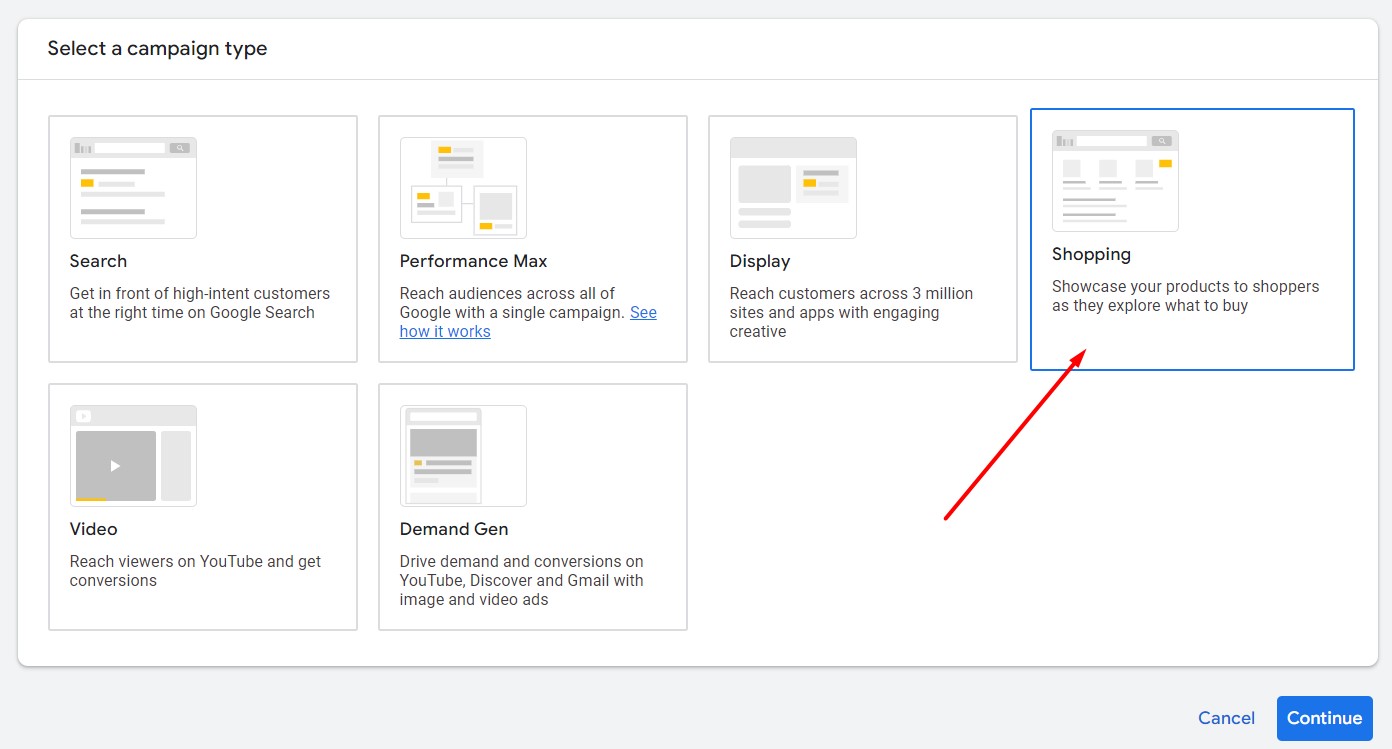
Our campaign type is Shopping.
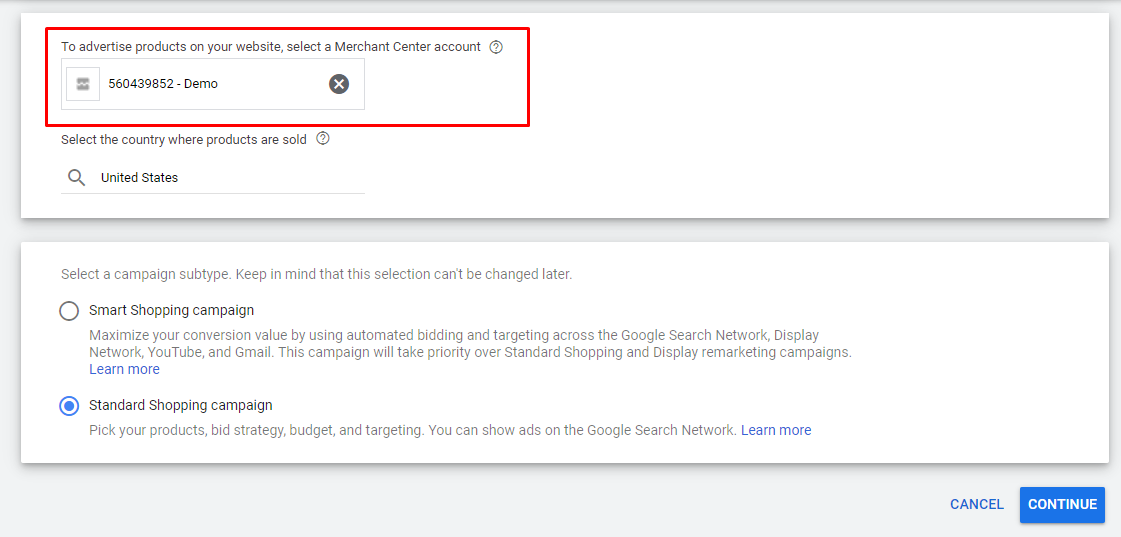
The campaign will automatically fetch the product feed linked to the GMC account you connected.
For Google to decide everything for you, select the Performance Max option.
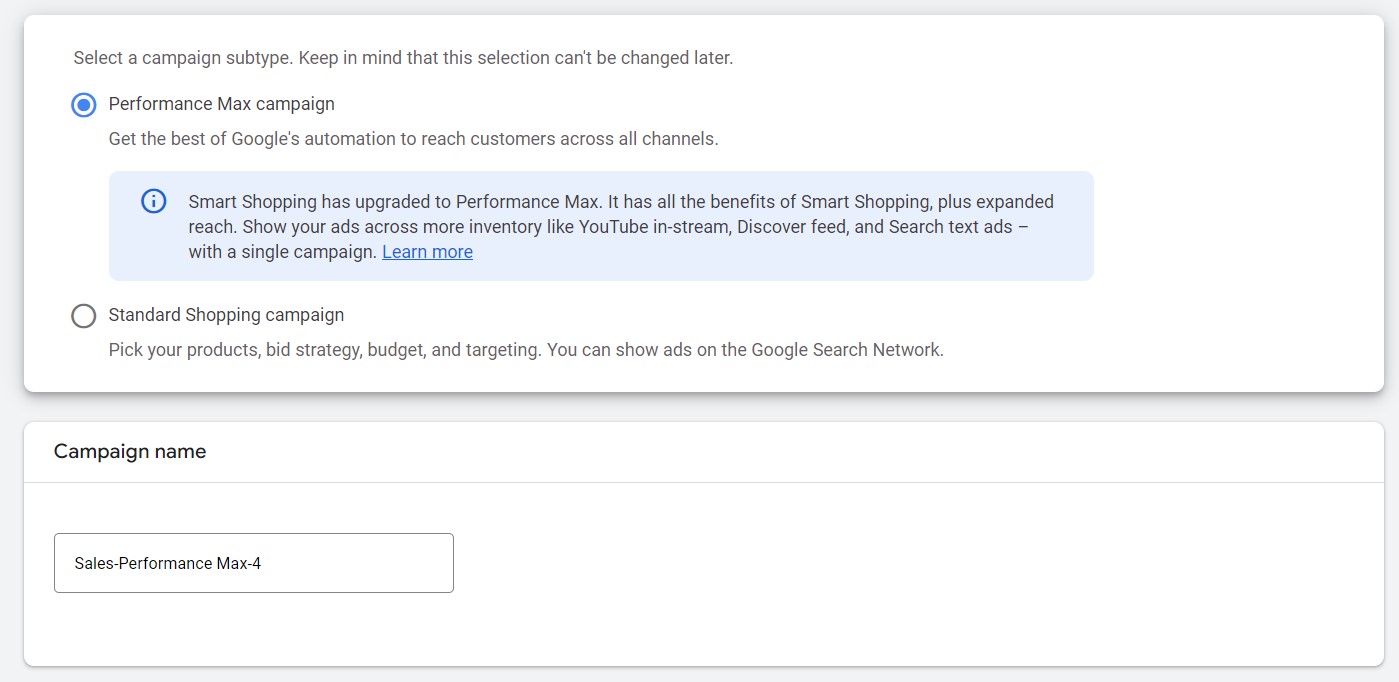
If you want to drive manual, select the standard option and set your budget, location, CPC, etc., and launch your shopping campaign.
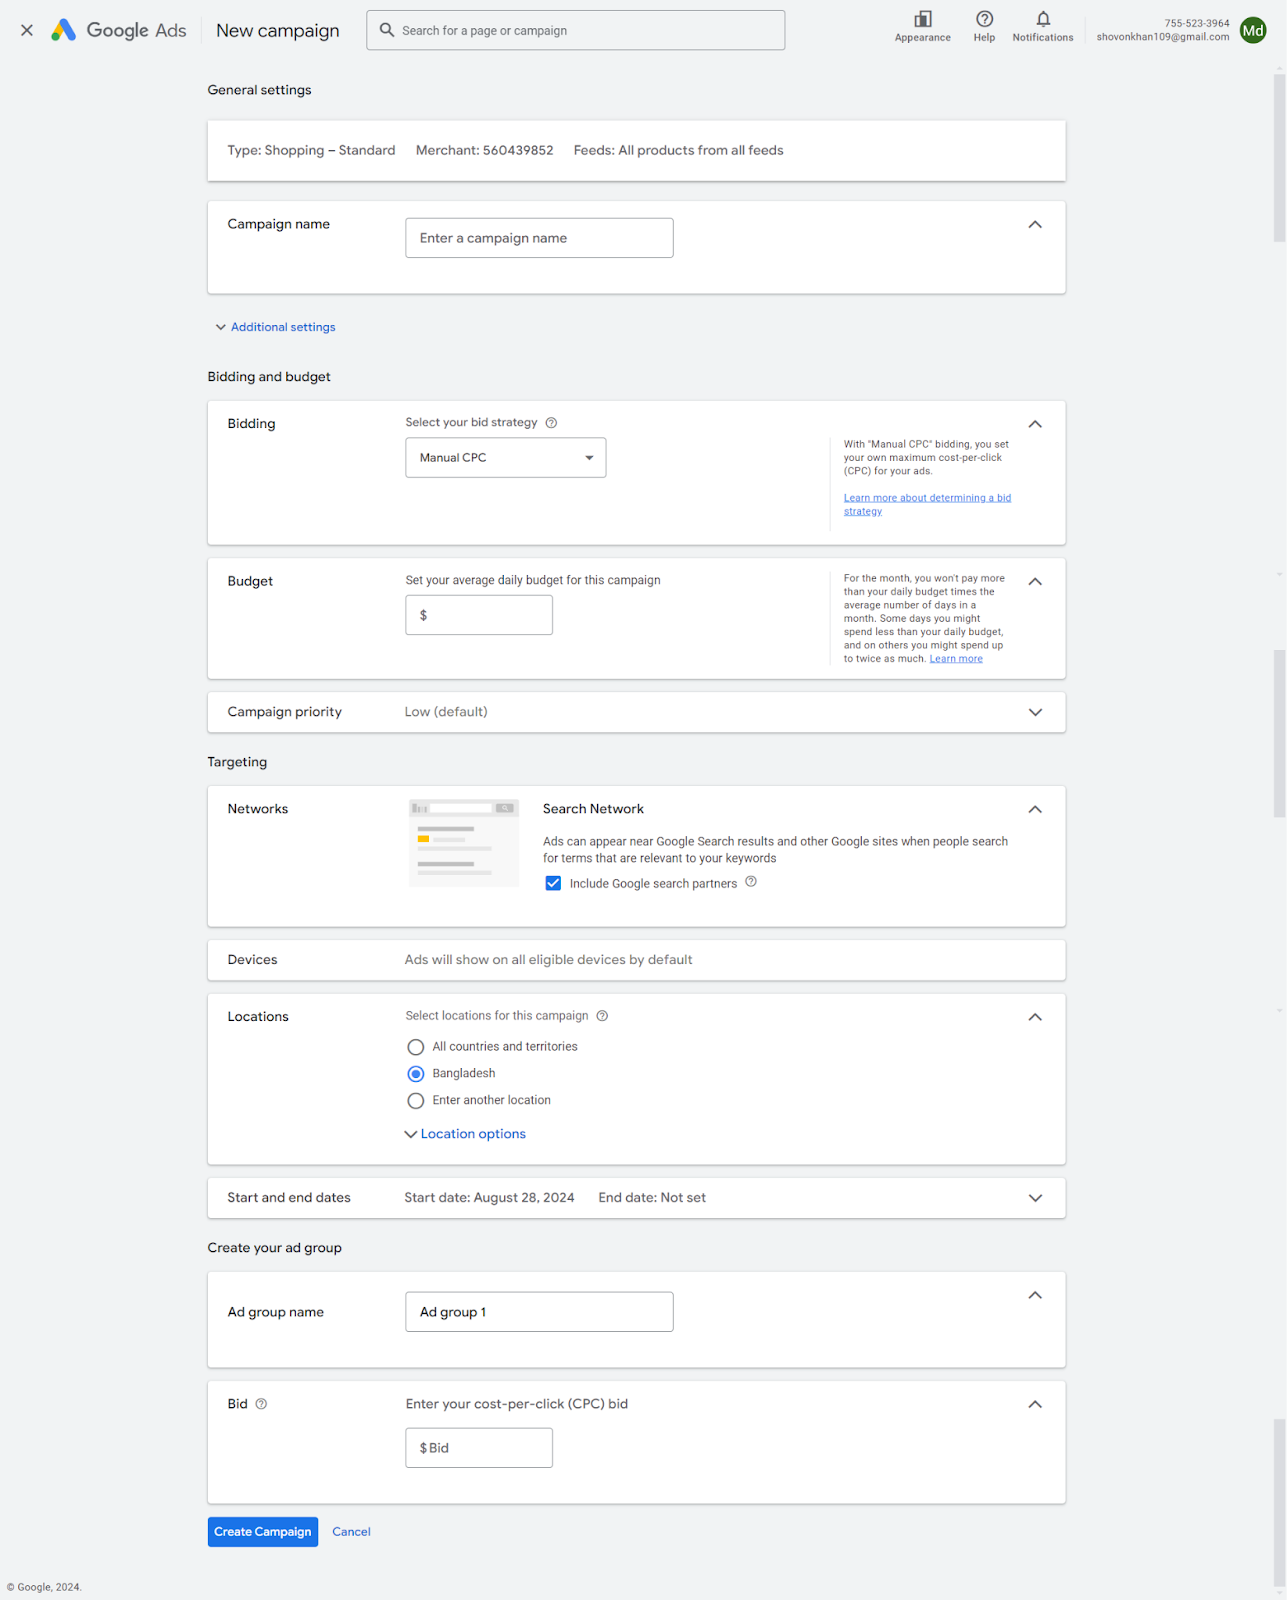
Google will now automatically generate the ads from your Google Shopping ads feed and distribute them across the web.
Best Practices for Google Shopping Feeds
In our previous article, we thoroughly explored Google Shopping Ads optimization. Let’s quickly review some Google shopping feed troubleshooting and best practices.
Data Quality and Consistency:
- Accuracy: Ensure all product information is accurate and up-to-date.
- Consistency: Use consistent formatting for product titles, descriptions, and other attributes.
- Currency: Verify that prices are in the correct currency and format.
- Availability: Keep availability information accurate to avoid wasted ad spend.
Optimize Product Feed For Google Shopping:
- Product Titles: Use clear and concise titles that include relevant keywords.
- Product Descriptions: Provide detailed and informative descriptions that highlight product features and benefits.
- Images: Use high-quality images that accurately represent your products.
- Product Categories: Assign products to the correct Google product categories.
- Custom Attributes: Utilize custom attributes to provide additional product information.
- Feed Frequency: Update your feed regularly to reflect changes in product availability, pricing, or promotions.
Staying Up-to-Date:
- Google Merchant Center Help: Refer to the Merchant Center Help Center for the latest guidelines and best practices.
- Google Ads Blog: Keep an eye on the Google Ads blog for announcements and updates related to Google Shopping.
- Industry News: Stay informed about changes in eCommerce and online advertising trends.
- Monitor Feed Errors: Regularly check for feed errors in the Merchant Center and address them promptly.
By following these Google Shopping feed ad best practices, you can improve the quality and performance of your Google Shopping feeds, leading to increased visibility, clicks, and conversions.
Wrap up
Google Shopping Ads are the number one ad medium for store owners like you to promote your products online and reach a significant amount of potential customers. Google Shopping makes sure your ads reach the very customers who are actively looking to buy products like yours.
Even Google shopping feed ads on mobile search play a pivotal role in growing your reach and conversions.
However, to achieve the optimum results with your listings and ads in Google, you must make sure you have a well-optimized Google Shopping ads feed. Hope this article will guide you in generating the most effective feed files.
