Facebook for WooCommerce: Best Plugin to Sync Product feed
Facebook for WooCommerce intends to serve those who are in dire need of advertising their products through social platforms. It is a misconception that you can only have your WooCommerce Facebook shop if you are a prominent e-commerce owner.
You can have any online businesses from mid-sized to large to set up your WooCommerce Facebook marketplace right now. You just need the best Facebook WooCommerce plugin to intensify your WooCommerce Facebook shop. In addition, having a Facebook Pixel for WooCommerce will reach your products to the right customers at right time.
Yet, the reason is simple – socialize with your clients, offer them the solutions, brief them about your products straight on your business page, and navigate them to your online store.
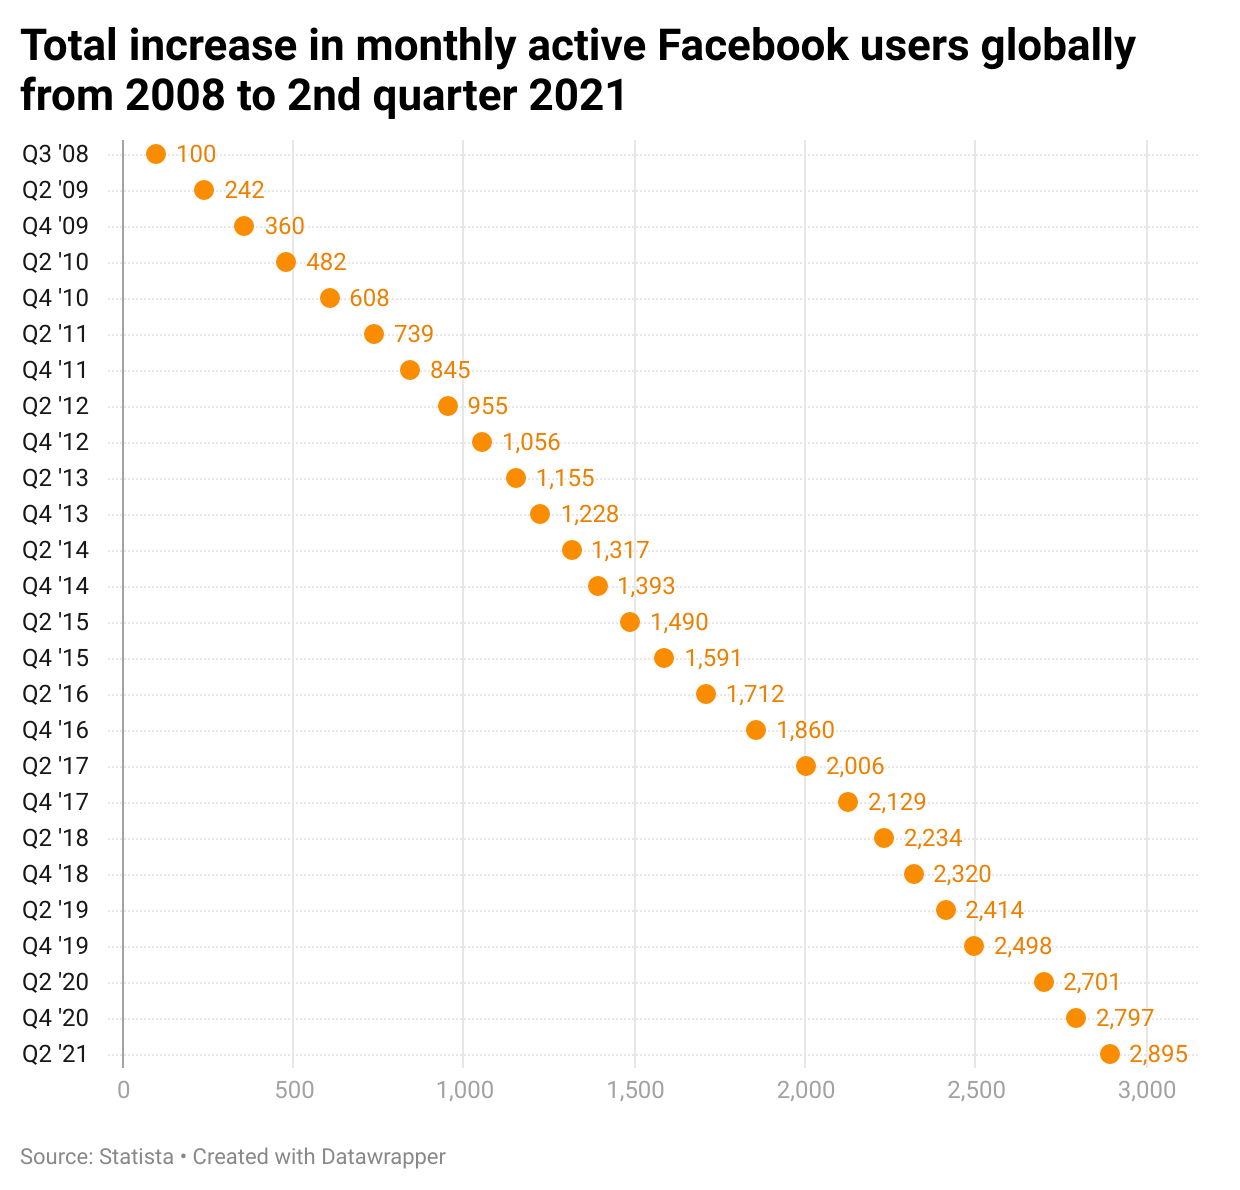
With approximately over 2.85 billion monthly active users with 1.84 billion daily active users, Facebook is the perfect momentum amidst social platforms. This largest social media has globalized almost 94% of businesses, according to The State of Social Media 2019 Report. This number is growing as well. With this growing figure, Facebook indeed proves that it is not only for gossiping or browsing; it is meant to be for other reasons too.
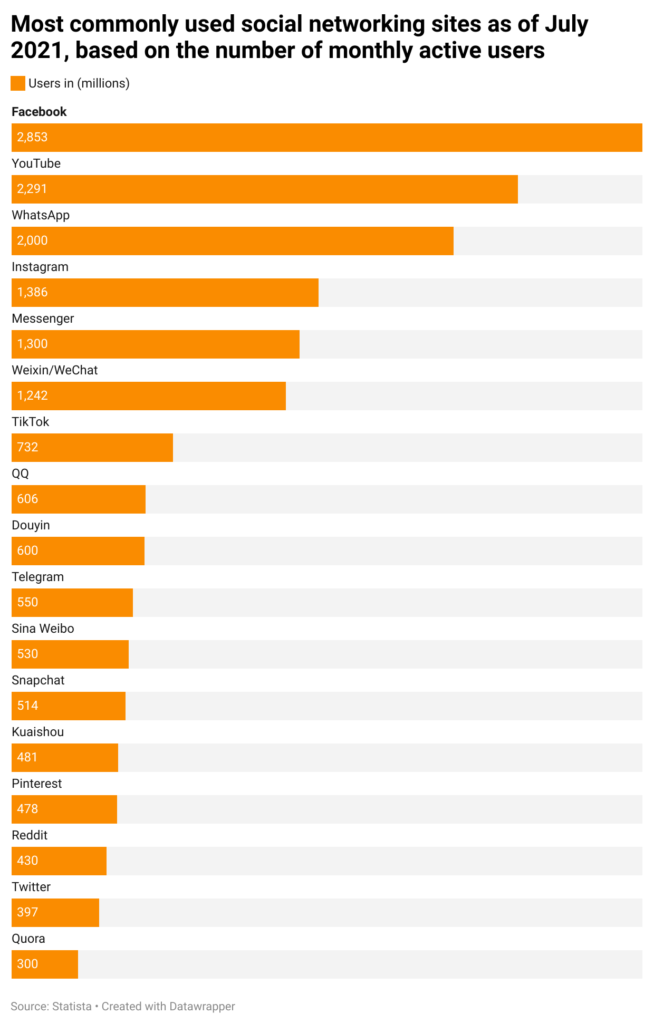
Users spend almost 19.5 hours, particularly on the Facebook app, but it certainly doesn’t apply to only chatting. Out of this sheer time spent on Facebook, people also do a trade-in, and that’s why it is essential for any form of digital business.
Around 86% of American marketers are fond of Facebook as a way of advertising their products or services (Emarketer, 2018). Therefore, creating a WooCommerce Facebook product feed using the best Facebook WooComemrce plugin is a must for a breakout WooCommerce Facebook integration.
We know you are extremely keen to know how on earth Facebook can become your true-sale partner without needing any human being. That’s why we will go through how you can connect your WooCommerce to a Facebook shop and how it will make your business unstoppable. Keep your patience a bit high today, as we will give you the most fruitful way of expanding your Facebook venture using one of the cutting-edge Facebook WooCommerce plugins in a while.
What is Facebook for WooCommerce?
Facebook has become the most popular social platform, gaining almost up to 59% users out of all the social networks. Users use it not only for social entertainment but also for marketing and expansion of the existing businesses. Those who have e-commerce sites can easily generate benefits from Facebook marketing and its accompanying ad promotions.
There are currently over 200 million small businesses that thrive on Facebook resources for their marketing strategy. And one of the vital resources is Facebook Page. Facebook business pages allow your customers to see what product lists you have got for them upfront.
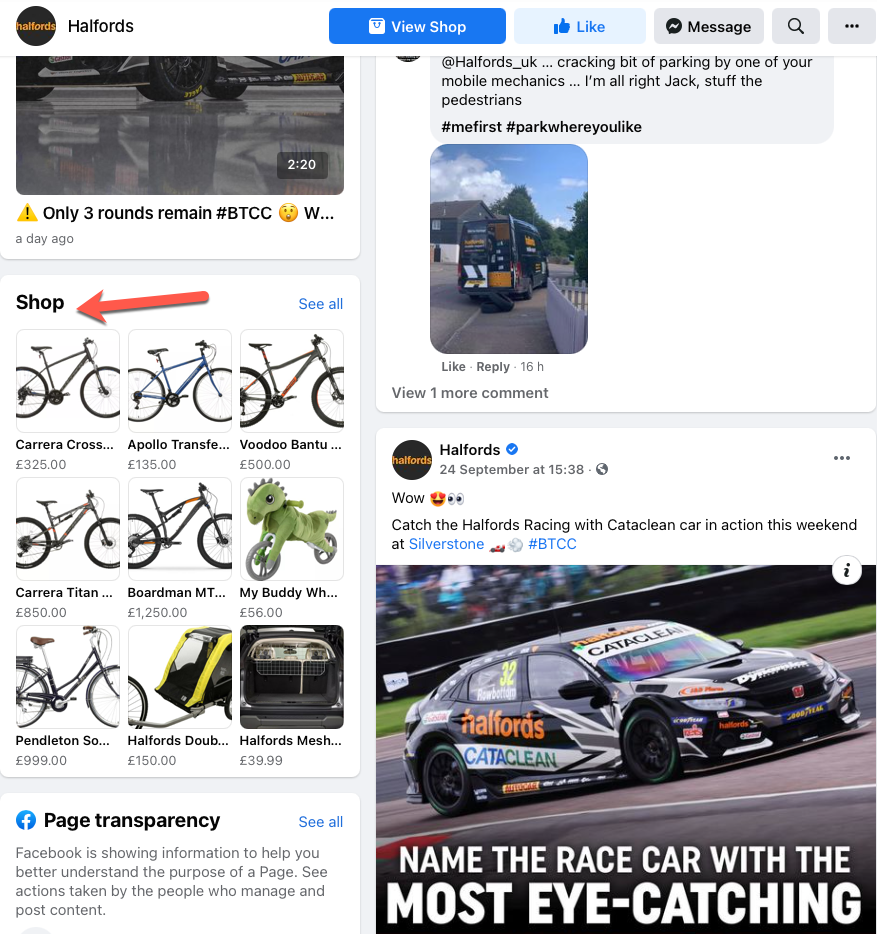
The interesting thing is that the customers can also expand their list by clicking on See all. Here they can see all the products of that particular store; they know what those stores have available or which ones are out of stock.
By clicking on any desired product, it will take the users to that particular product page. Here, they will see the option of entering that product’s website. This is where the beauty lies as the store gets visible to the customers. Now, they can easily explore your websites without staying any further on your page. This is beneficial as your websites get more visitors, hence more conversions.
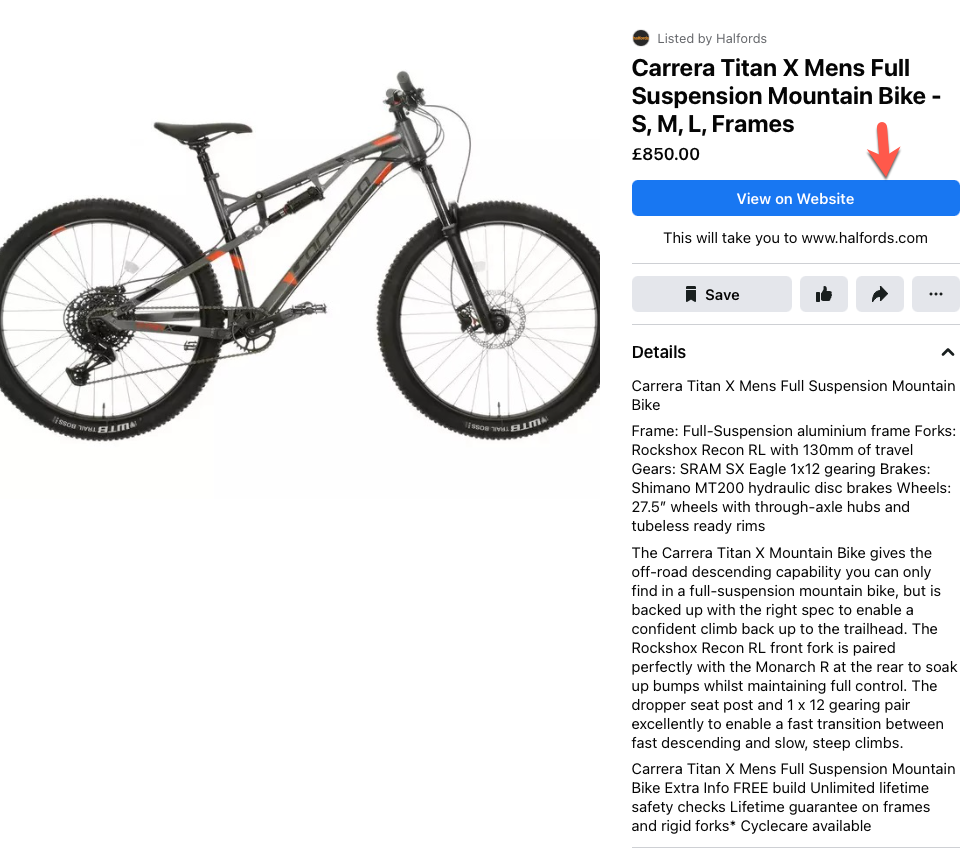
The buyers don’t have any chance to remain petulant since they will get almost everything they need to know before purchasing. A clear yet brighter image of the product will give them a visually appealing insight.
The shoppers will get to see the description next to it to know all pros and cons of the product. It also saves their time as the elaborative description within the store makes it sometimes difficult for the audiences to engage. All of these can happen by dint of Facebook for WooCommerce.
However, the WooCommerce Facebook marketplace doesn’t happen overnight; it requires developing a specific catalog. This catalog contains all the information about your product required by Facebook. Without this information, neither can the product be uploaded ideally, nor will it drive any conversion.
This catalog comprises information, such as authentic images, enticing title, blow-by-blow description, additional images of products’ with multiple variations, and the website URLs. Therefore, you need the help of a sophisticated Facebook WooCommerce plugin.
You have the option to use any plugins, including the Facebook WooCommerce plugin, but we have a special plugin waiting for you. We will tell you why our Facebook WooCommerce plugin is one of the best in the market with an opportunity to expand your market vastly. We are coming to that but let me tell you why you should opt for Facebook for WooCommerce in particular.
Should I Use for Facebook for WooCommerce?
Absolutely. If you know you can get more traffic to your Facebook page, which in turn, converting them to leads, then why not? Facebook helps you achieve more customers from your Facebook page by driving them straight from the page to your website. These visitors become your long-lasting customers. Facebook has generated around $27.2 billion from ad revenue in the fourth quarter of 2020, making it a total of $84.2 billion in that year. In fact, you will be queered to know that 78% of US customers have found their retail products via Facebook search.
Can you just imagine Facebook’s monthly active user has increased by twenty-eightfold from the third quarter of 2008 to the second quarter of 2021? The Facebook marketplace had brought in a lot of these numbers in recent years thanks to the Facebook WooCommerce Facebook marketplace.
However, the question is: Will you be able to compete against these high-end competitors without using any tools? Will you be able to conduct such a large supply chain for your start-up? I don’t think so you can, especially without the help of our customer-shopping-friendly Facebook WooCommerce plugin.

Now let’s come to the advantage of connecting your WooCommerce to Facebook. Let’s assume you are an owner of e-commerce, and you want to sell your products to a large extent to a vast customer base. How is that possible? Will people find your websites since the online is already flooded with loads of these high to mid-range stores?
Here comes Facebook – it uses its algorithm to automatically bring in the search result whenever the products searched by the customers. That’s how you can optimize WooCommerce Facebook product feed.
It means you are trying to reach out beyond your existing customers – derived from your online store – to the customers nationally and internationally. Here you set up a Facebook business page, upload your product catalogs, and publish the contact information and website detail.
Done!
You are now all set for receiving thousands of customers from all parts of the world. You can create your own brand on Facebook alongside the original online store. It streamlines the business presence even better.
Your e-commerce is getting discoverable to large customers or a whole Facebook community. You get a chance to connect to one of the largest communities where you can present your products while representing your brands.
You also get a chance to improve your products by receiving feedback, whether it is good or bad. Do you know you can track your aspiring customers just in a snap? Yes, you heard us right.
The Facebook ad campaign, or Facebook Pixel for WooCommerce, enables you to hunt the customers who wish to buy the desired products. Once they buy them, you can show the relevant products on their display. Besides, you can also show them the same products over and over again if they back down from buying them. We will talk about them later in this blog.
Right now, encapsulating all of these benefits of Facebook for WooCommerce, it turns out that;
- WooCommerce Facebook shop helps you integrate into a large community
- It strengthens your bonding with your customers. Thus, massive customers follow your Facebook shops
- It intensifies your sales strategy, hence more growth revenue
- It showcases your products under various niches. Therefore, your products are more discoverable and approachable
- Customers hardly need to leave your Facebook page as they get everything in one place
- The product catalog will be automatically uploaded and updated, keeping the massive customers up-to-date all the time
- Facebook Pixel WooCommerce helps you connect to those customers who visit your shops regularly or irregularly
- Evaluate and monitor the progress and performance of the Facebook ad campaign
Is Facebook for WooCommerce Free?
It is free when it comes to this special plugin called Facebook for WooCommerce. You can download or install it straight from the Plugins section of WordPress, followed by activating it. You can quickly get it back on an even keel to customize your product catalog easily to your WooCommerce to showcase it on Facebook Shop.
Remember, Facebook Shop is absolutely free to set up and manifest itself to a large-tight-knit Facebook community.
The primary aim of integrating your WooCommerce to Facebook is to connect to a larger audience who can access your business page any time, read the review, product description, see the images and get to decide what they wish to buy.
With the Facebook WooCommerce plugin, you can easily tag your products, upload them in order, update in the proper interval, and reach out to mass customers. Creating ads and analyzing them to measure your growth vs. profit vs. loss is one of the most cardinal factors of this integration.
However, there are other Facebook WooCommerce plugins too, which are available as both free and freemium. One such dynamic plugin that aids your Facebook shopping experience congenial is CTX Feed, a free Facebook WooCommerce plugin for WordPress (CTX Feed Pro, if you look for the paid one).
With the free version, you can customize almost most of the Facebook required attributes. It enables customers to find your page more purchase-friendly yet increases the traffic.
Product information is modifiable. It means you select the correct value for the right attributes, which will be shown on your product page. With the Pro, you can use Attributes Mapping to change or extend your title, description, category as per customers’ preferences.
You don’t need to pay for basic CTX Feed, whereas the CTX Pro demands you a decent charge. We will now head you to WooCommerce Facebook integration by creating the Facebook catalog using the CTX Feed plugin. Check that out.

How Do I Connect Facebook to WooCommerce?
You can’t use WooCommerce for Facebook, but instead, you should use Facebook for WooCommerce. For that, you need to use your pre-made catalog containing the WooCommerce Facebook product feed. It will then be uploaded to your Facebook business suite, aka Commerce Manager, to finally launch them to the Facebook marketplace. Before you undergo all of these processes, your product feed for Facebook needs to be ready to roll.
There you need CTX Feed to create a sustainable feed for your long-term Facebook business page. Let me drive you through creating the feed first, signing up the Facebook business account, and finally uploading the catalog to connect WooCommerce to the Facebook shop.
Remember, only the best Facebook WooCommerce plugin like CTX Feed can instruct you on what you need to add to make your products come on the first ranking of the search result.
1. Firstly, go to Plugins > Add New and type CTX Feed. Install and activate it and click on Make Feed under CTX Feed
2. Choose your preferred country of the store and select your template as Facebook Catalog/Instagram. It’s better to keep your file type as XML for application-to-application transfer

3. After the Facebook catalog is selected, all the necessary attributes will roll out under the FEED CONFIG section. They will exactly show up on the WooCommerce Facebook shop
Choose your category based on your preference, but keeping it static will contain all the products within the same category. The same applies to Manufacturer [brand]. We have selected a specific name for it, but you will choose whichever your brand name is.
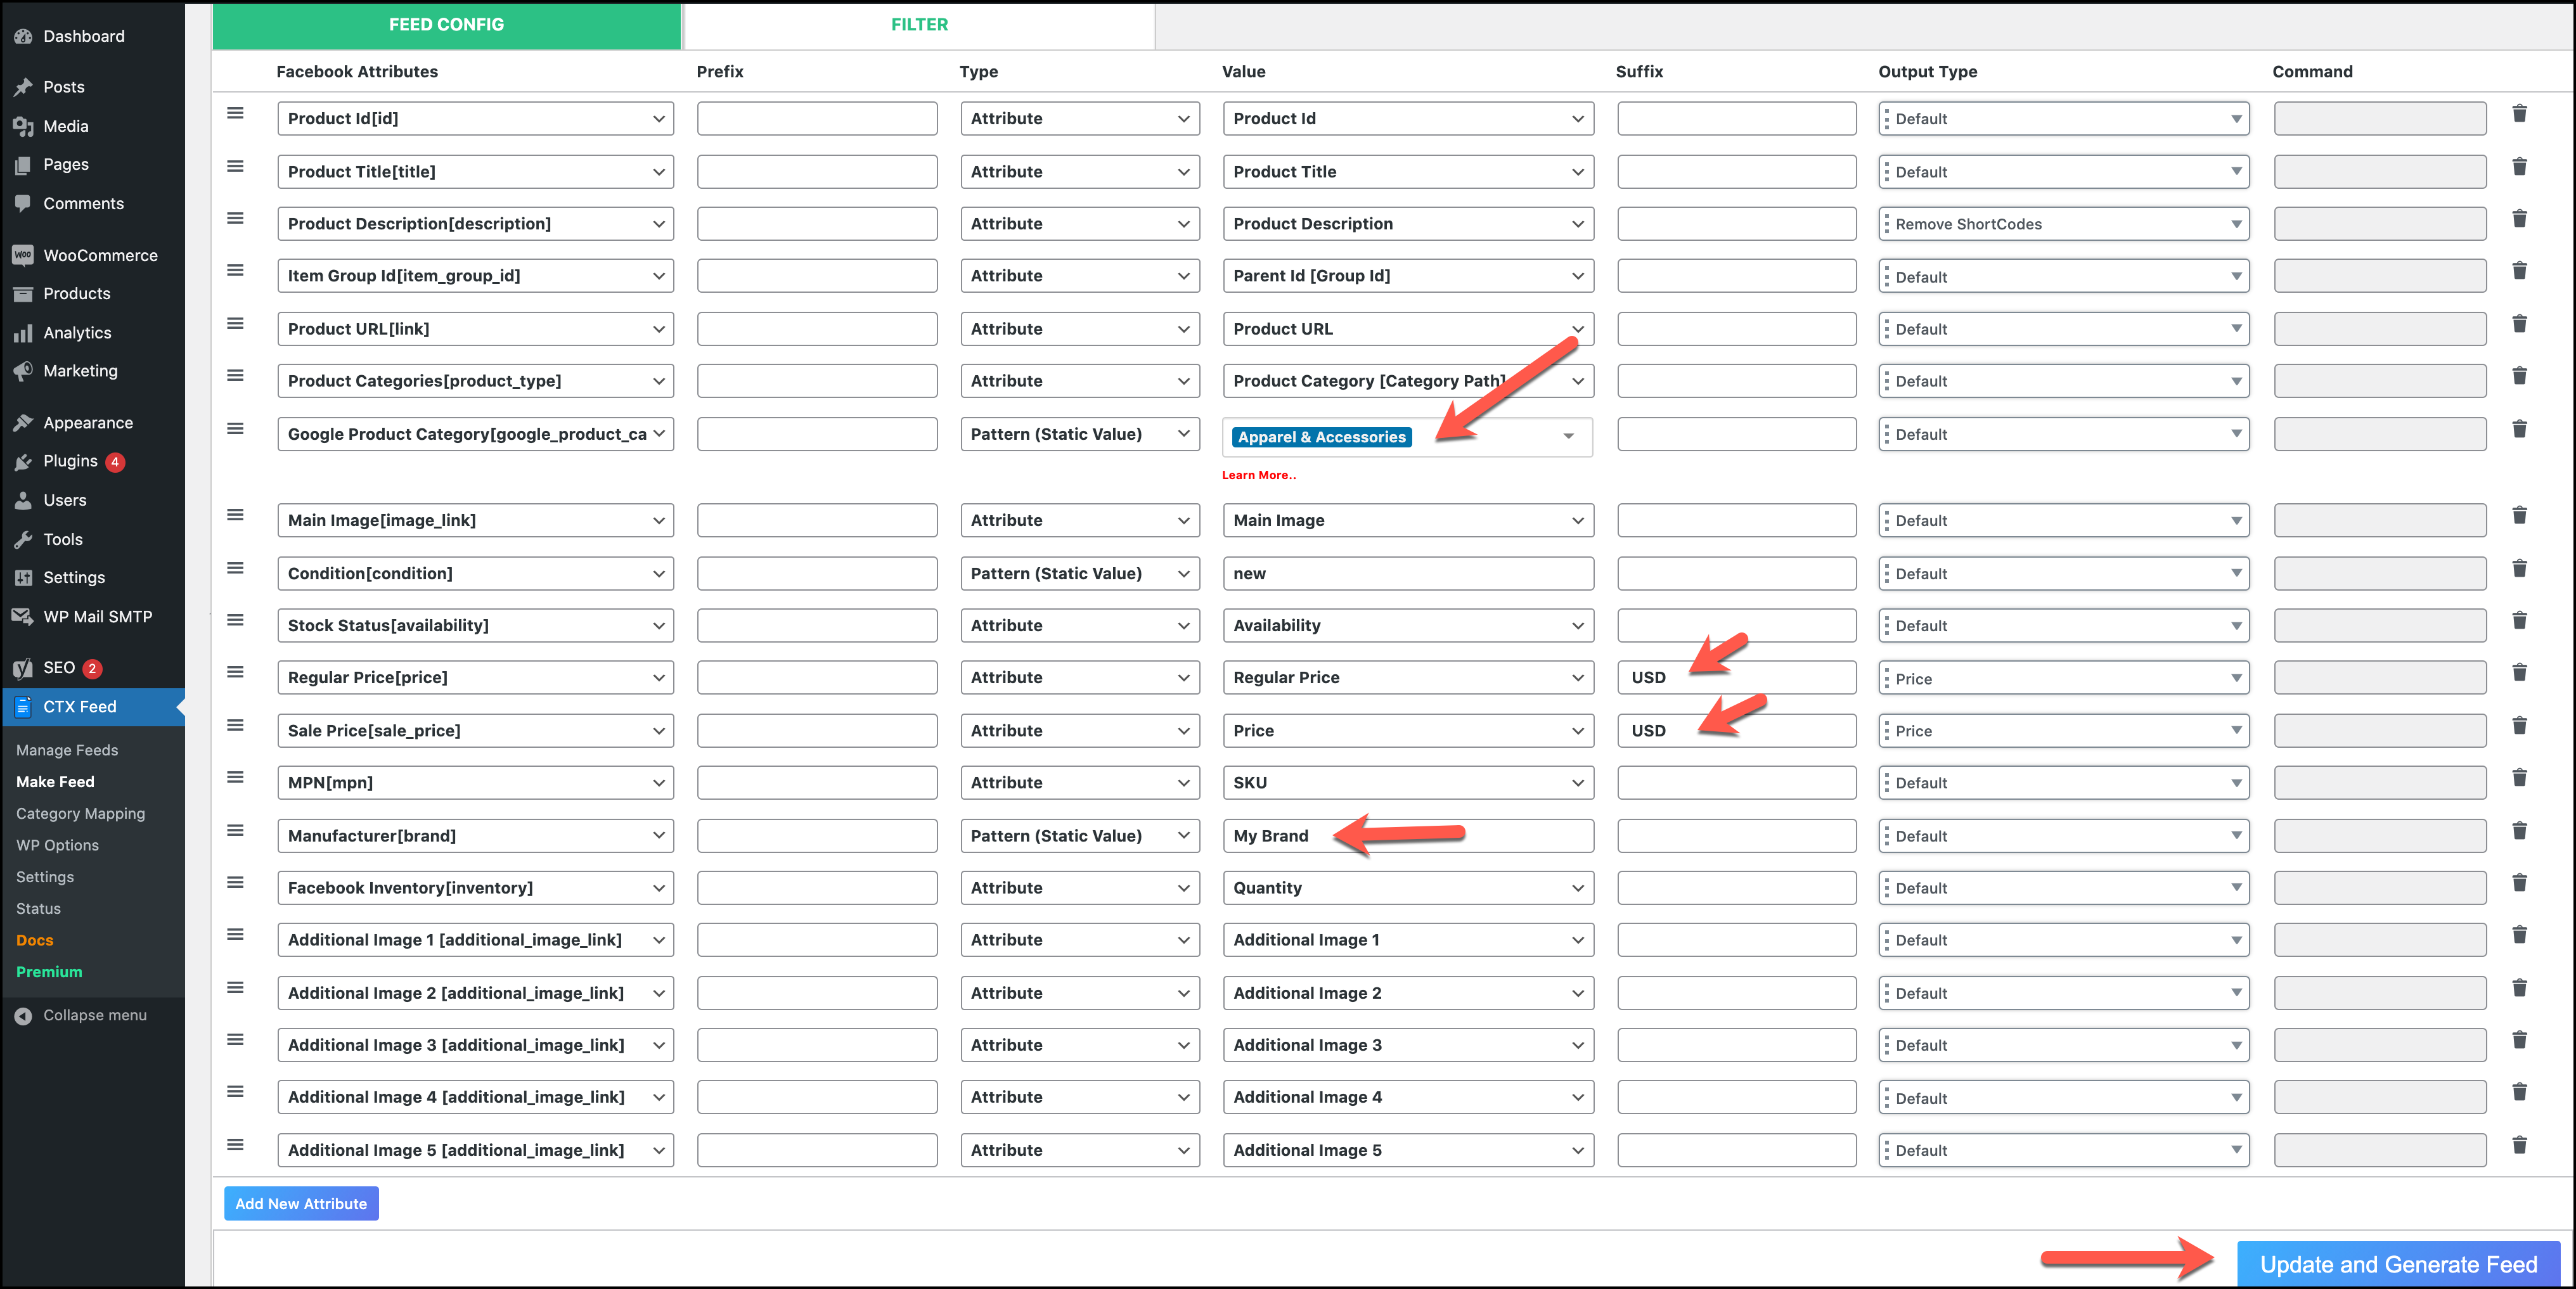
4. Update and generate the feed by clicking on it. Your new feed will be created, which you can see on the Manage Feeds > CTX Feed
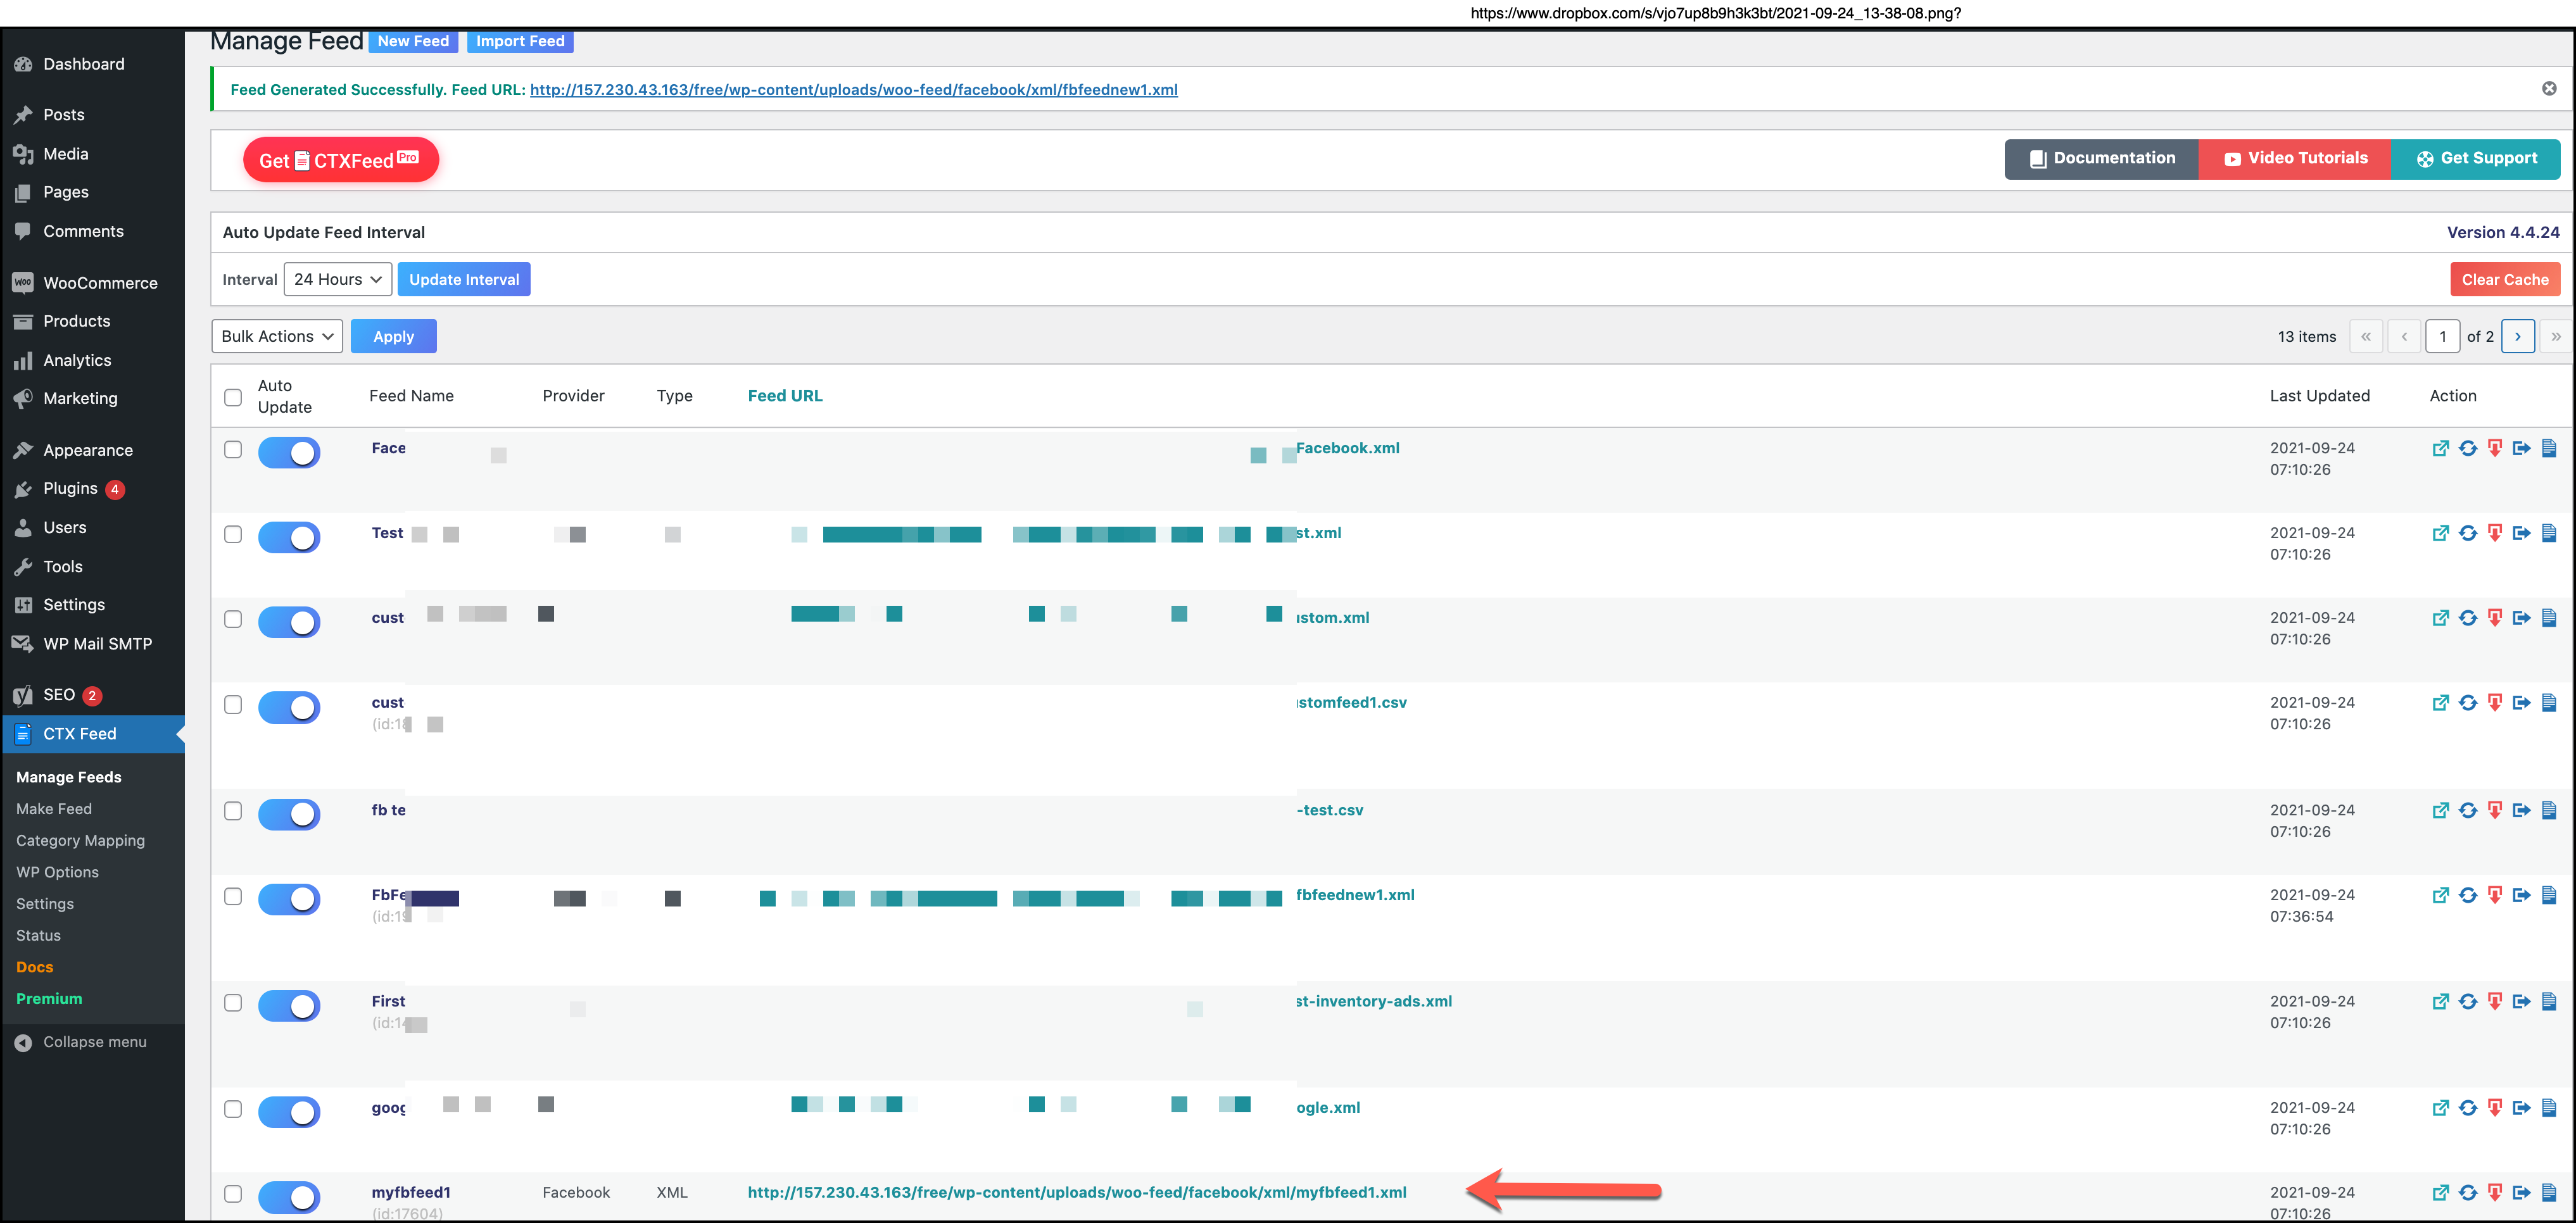
You can see your feed name along with its URL. Click on the URL to copy it. You might need it later when you upload your catalog on Facebook Shop. Here on this page, you have the options to regenerate, download or export the feed.
5. Now, get back to your Google Search engine and type Facebook Business Suite. Access the website, and it will ask for your Facebook login credentials in the LOG IN section
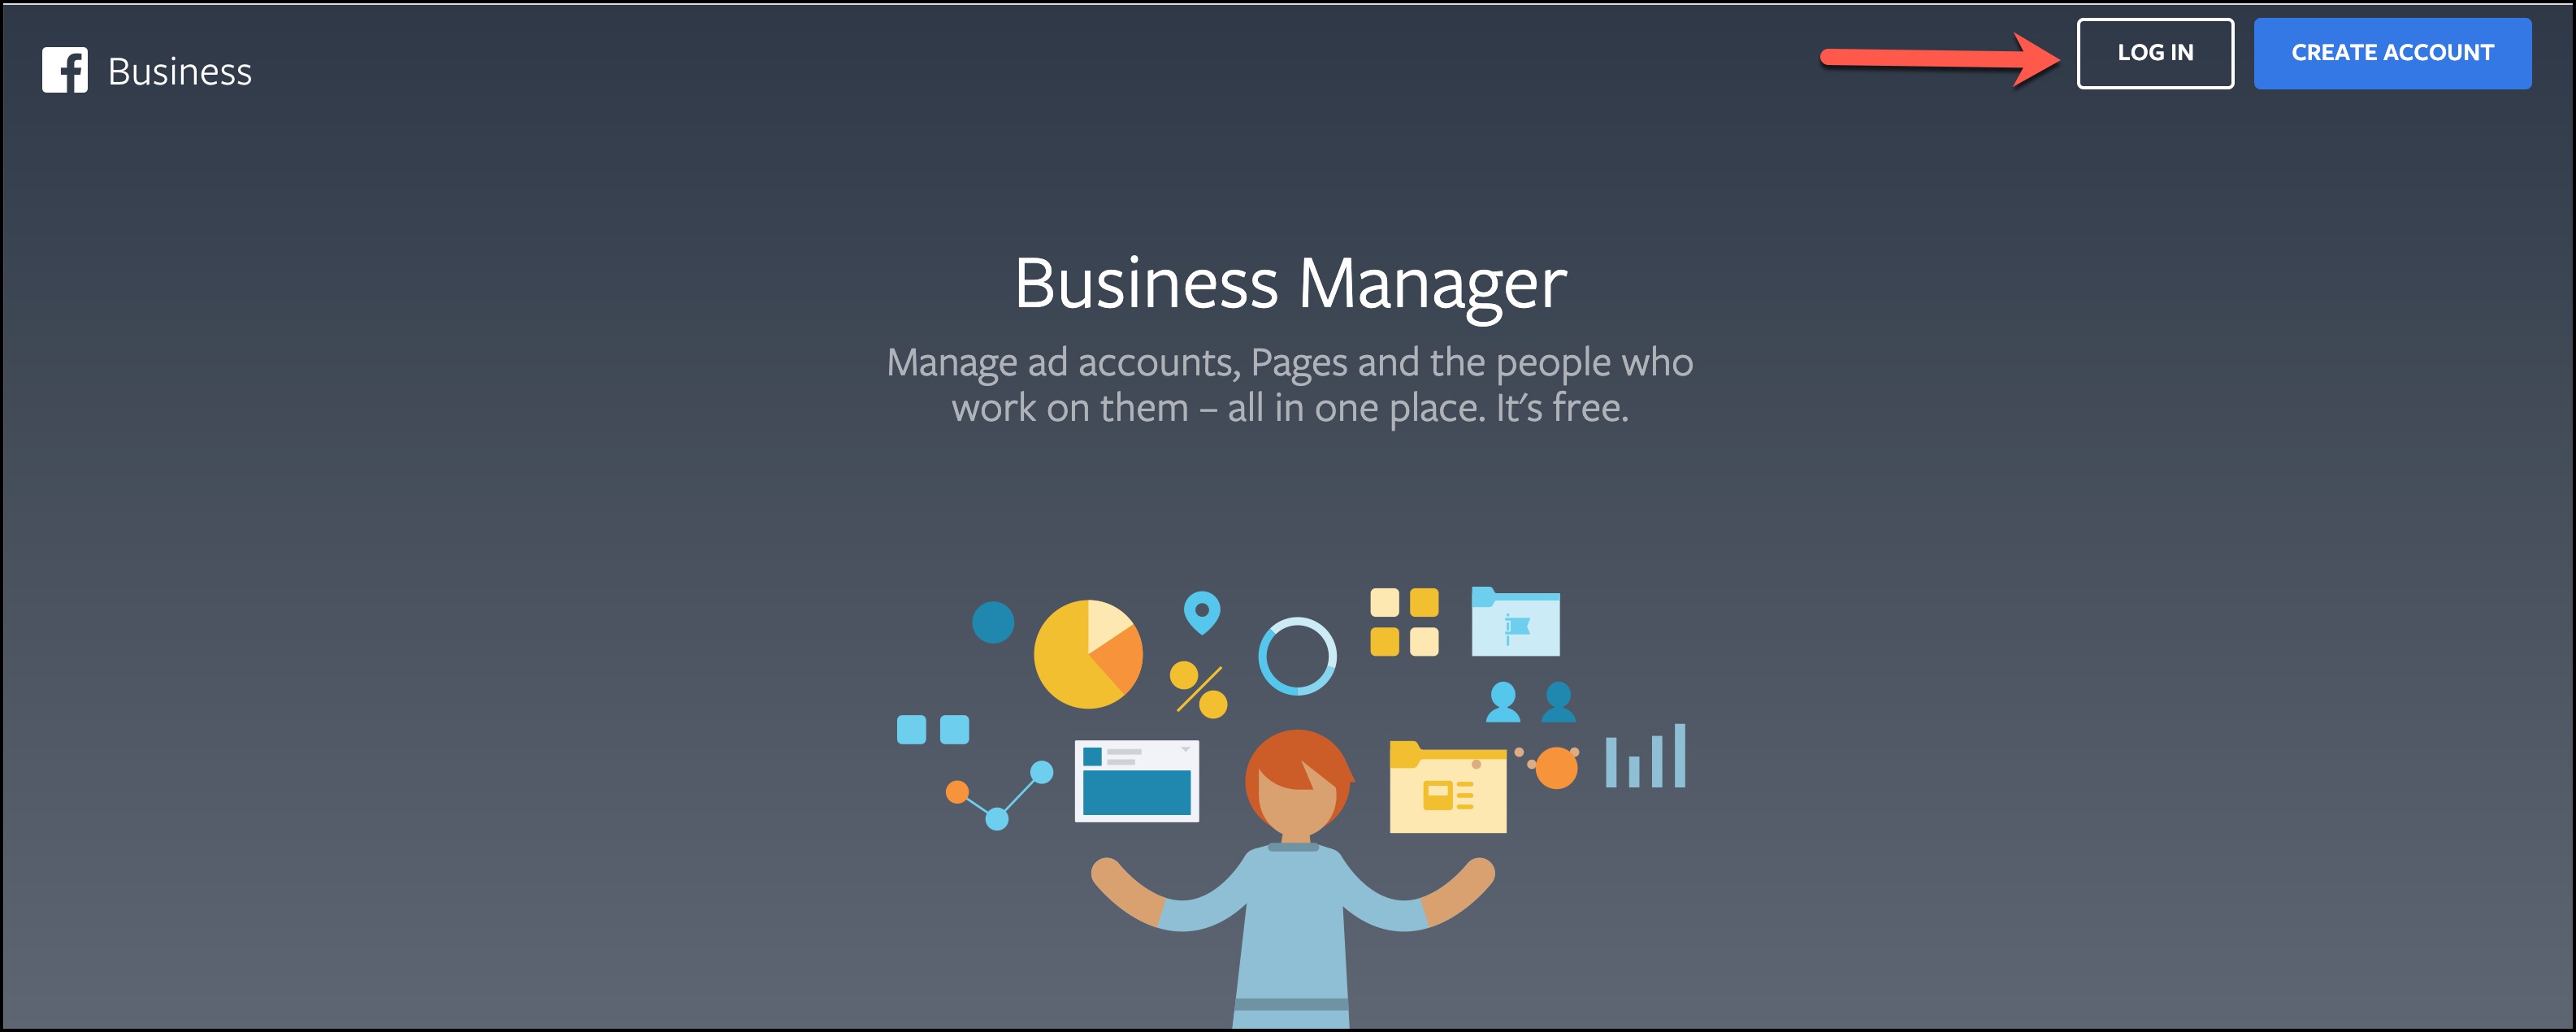
6. After logging in, you will see this Business interface where your company or businesses’ page names will be shown.
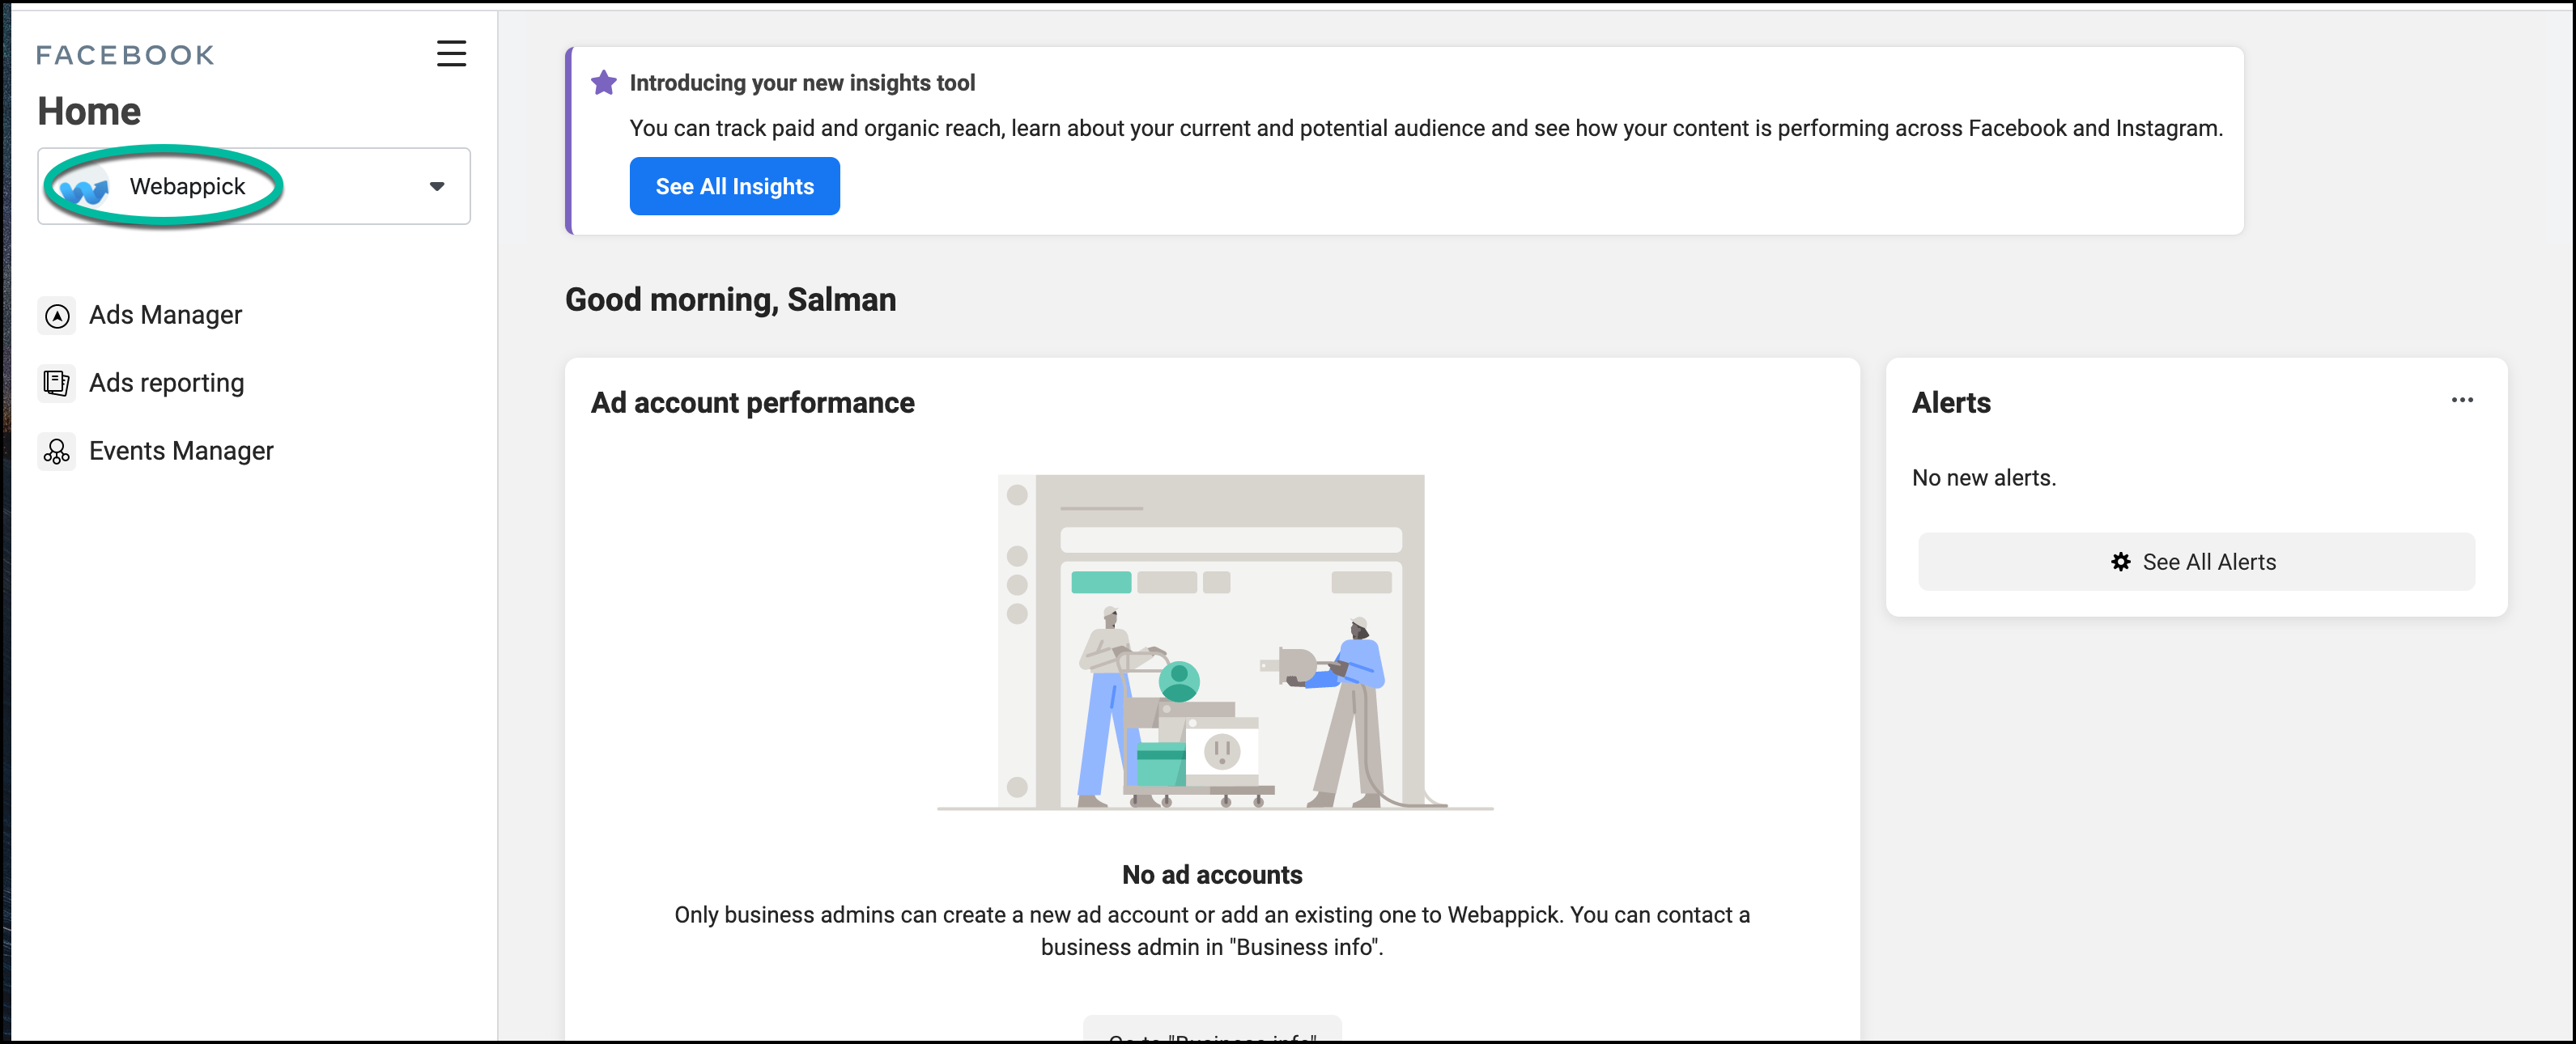
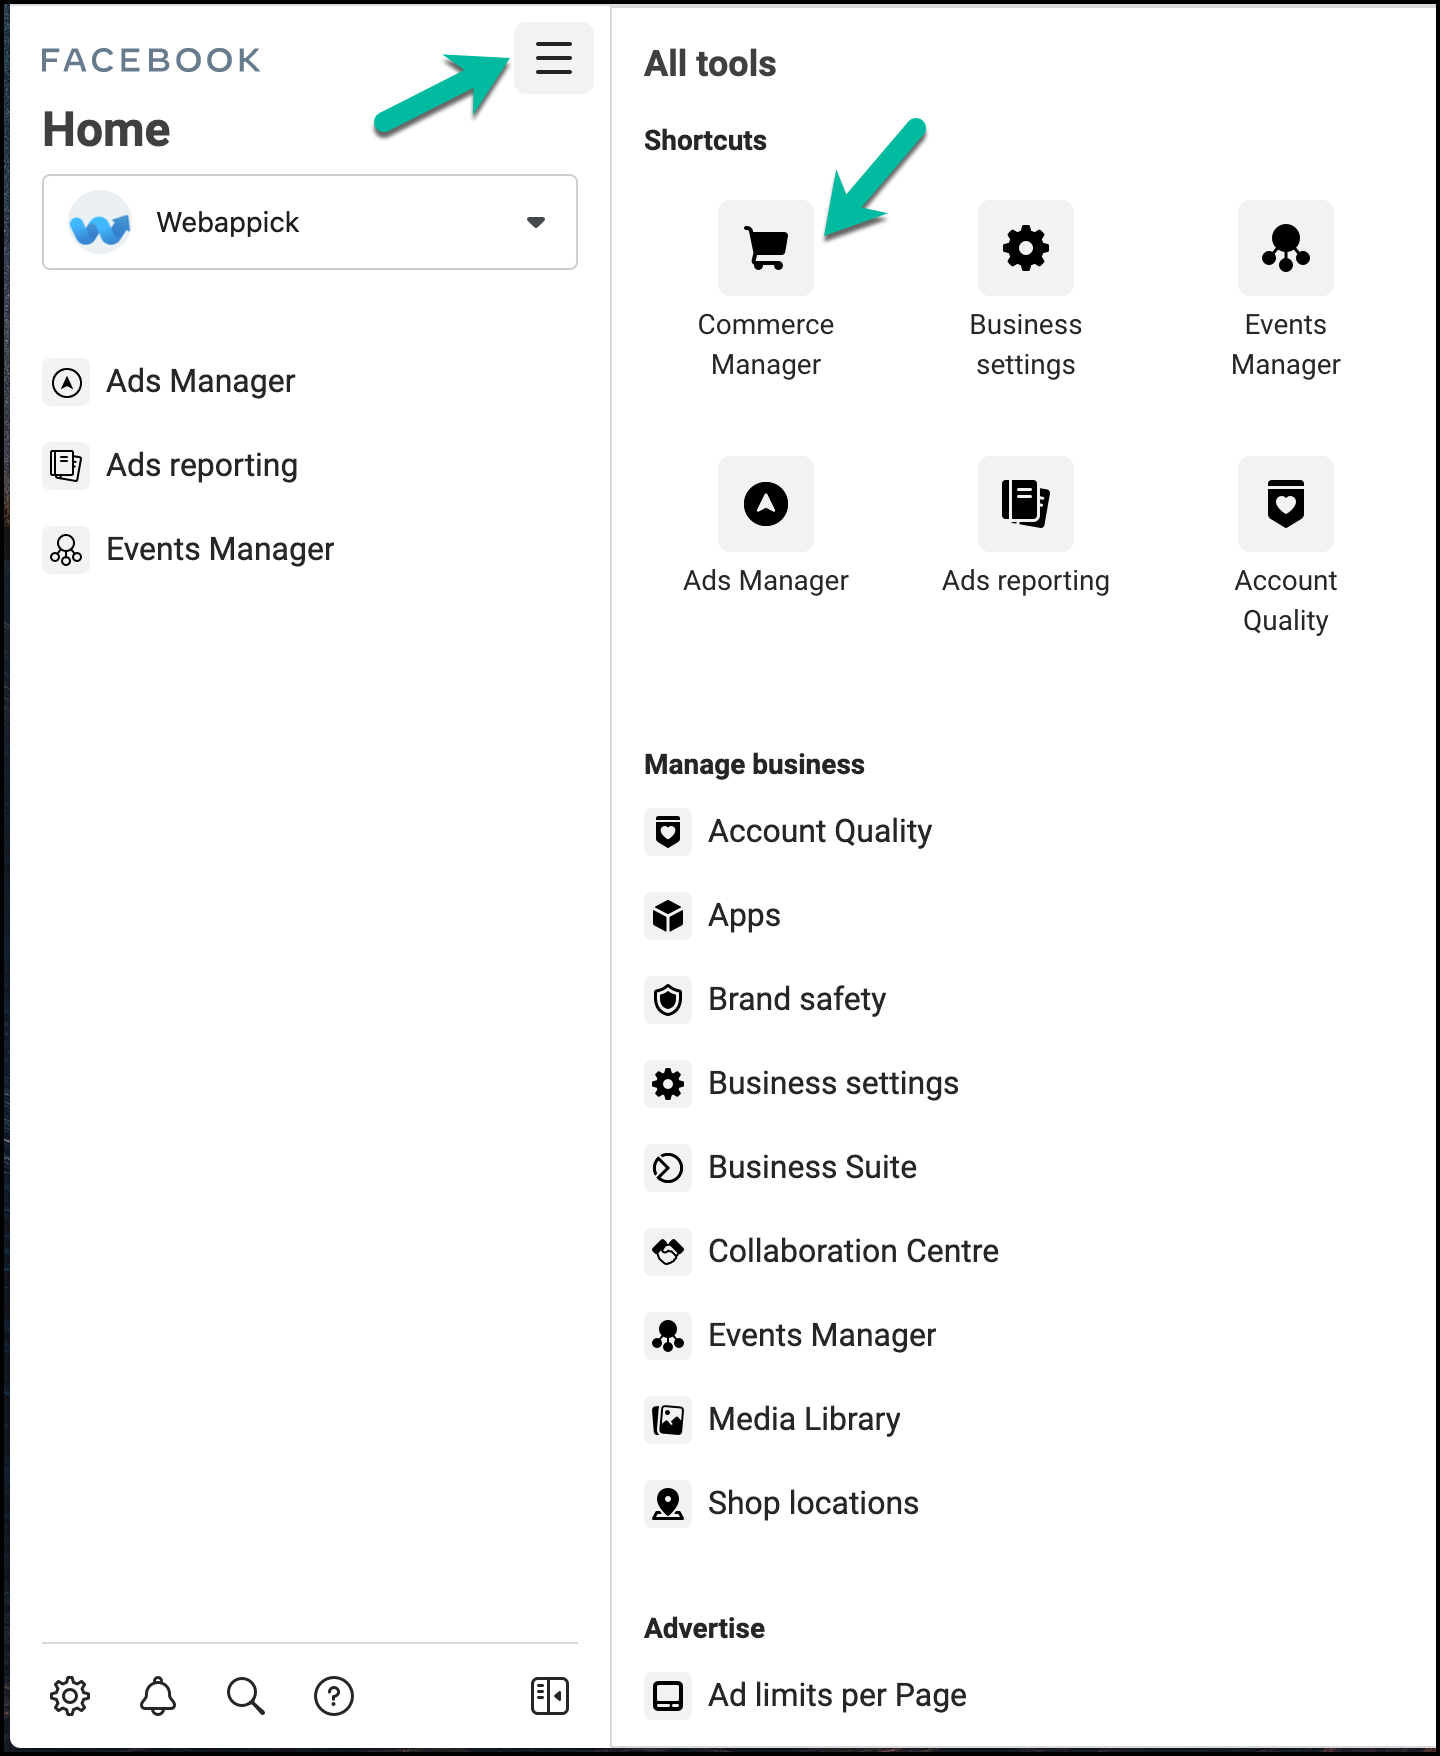
7. Click on the hamburger Unicode icon ☰, and you will see a list of options, including Commerce Manager. Click on the Commerce Manager
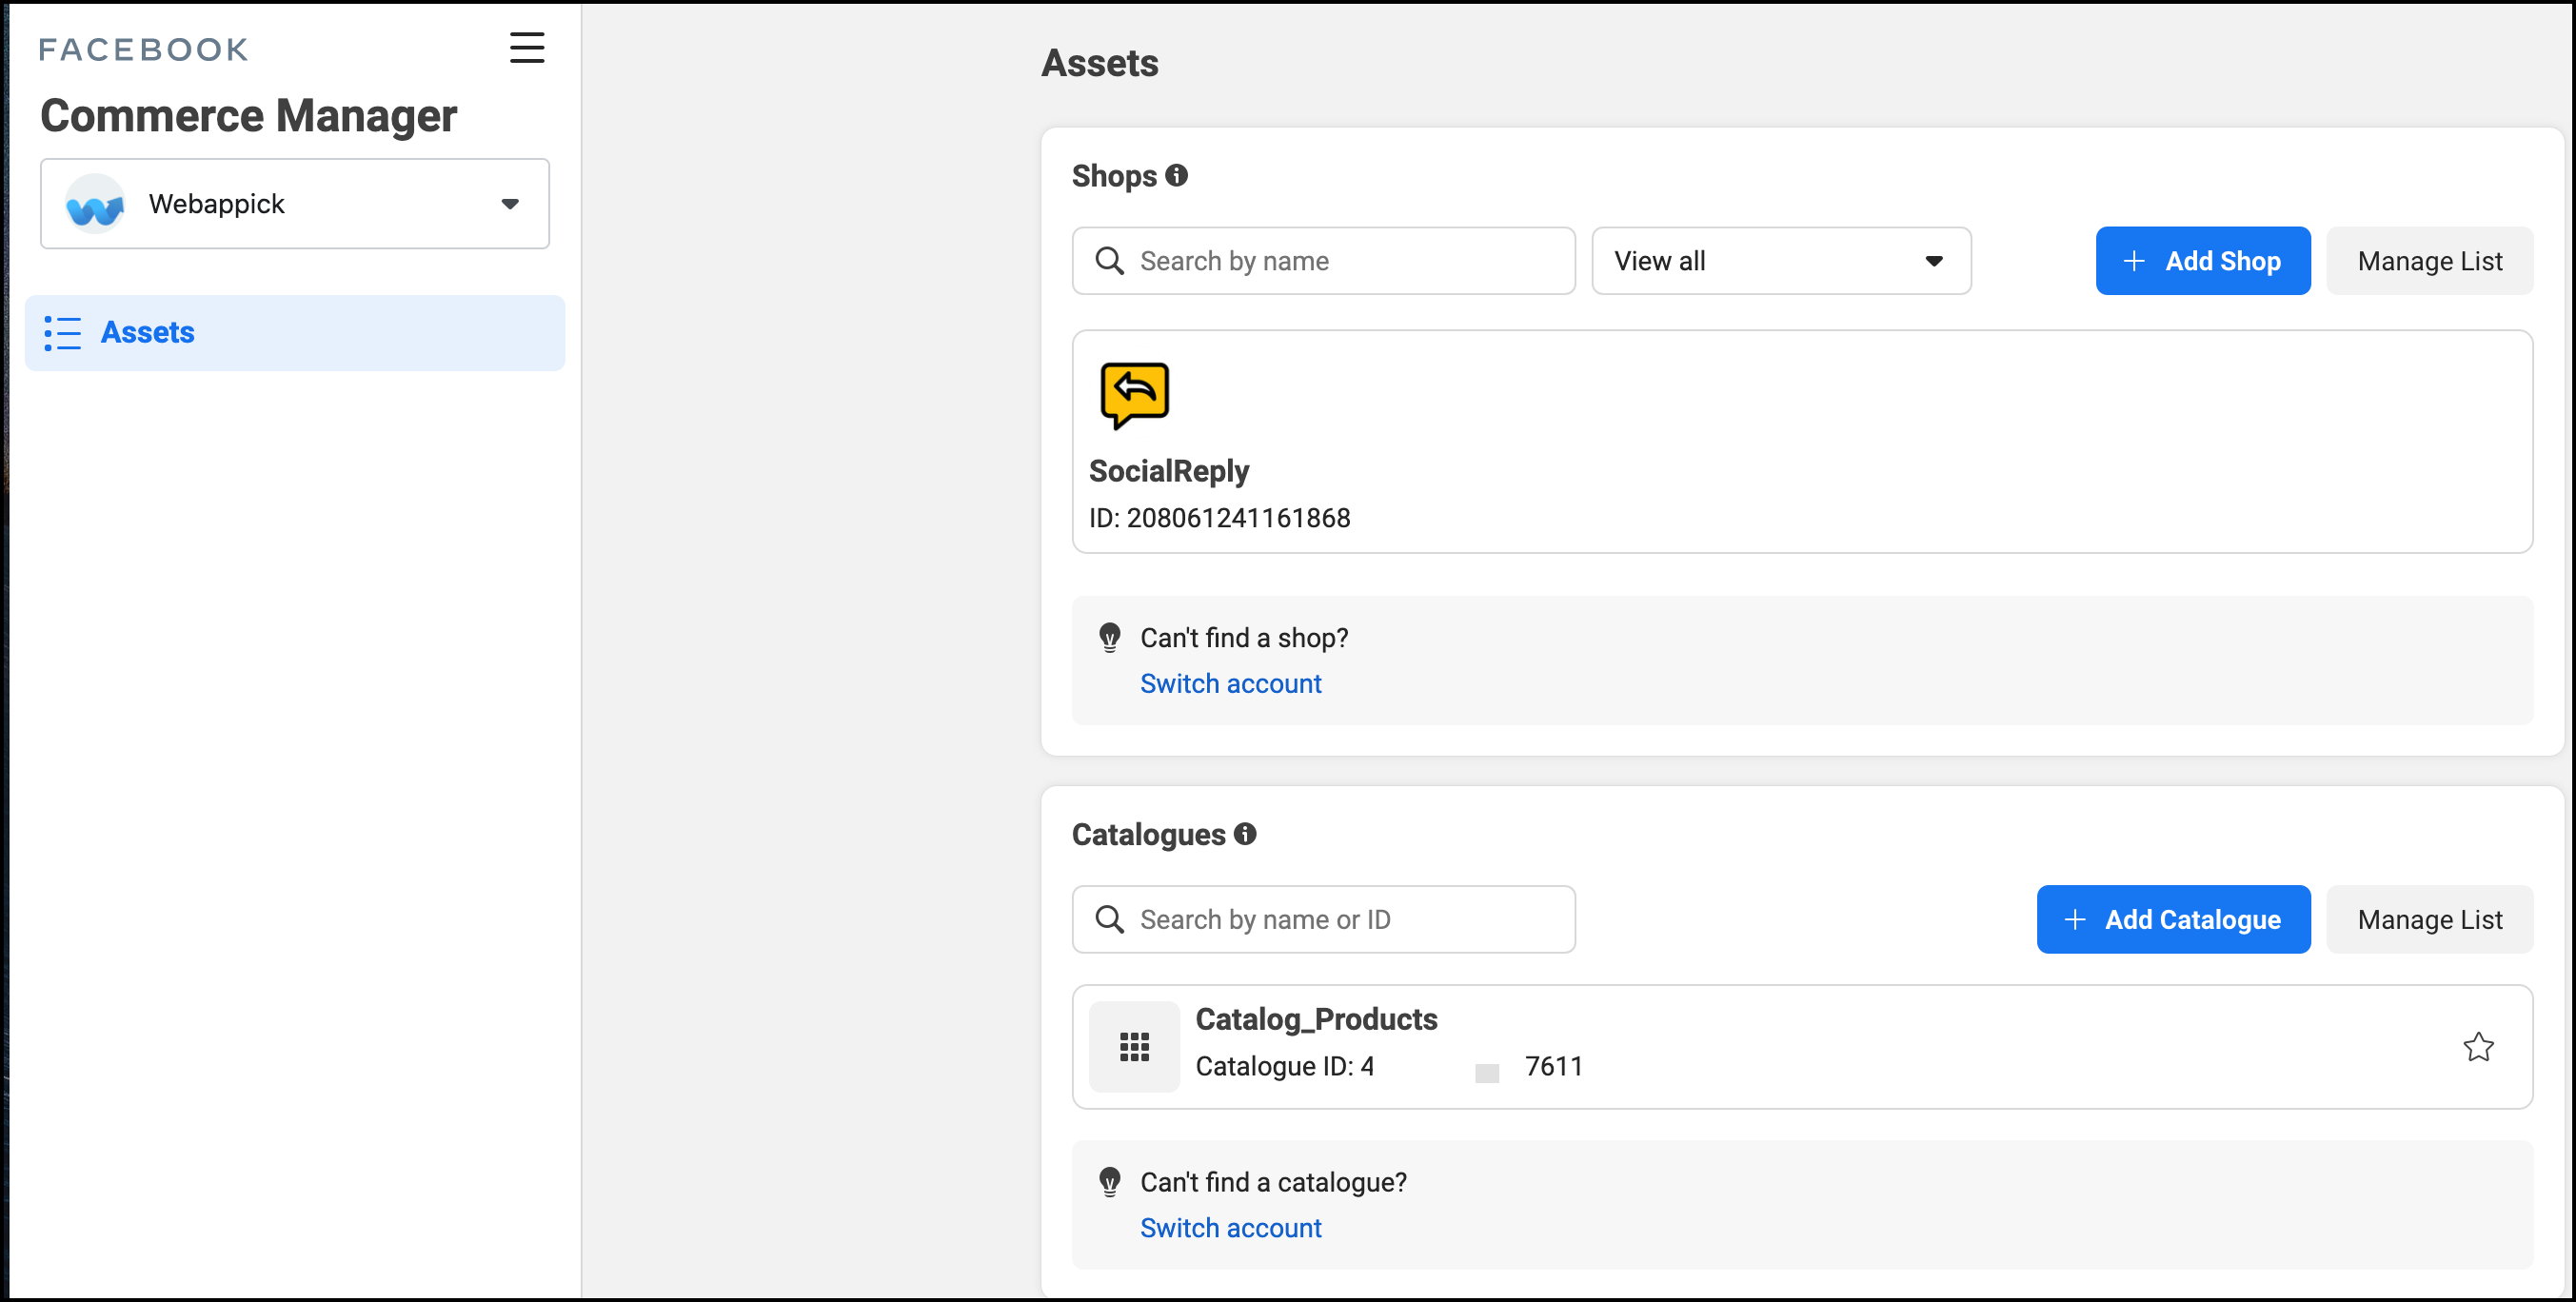
8. Under this section, you either see an existing catalog, which you may have made, or you need to create one by deleting the current one. Select “Add Catalogues.”
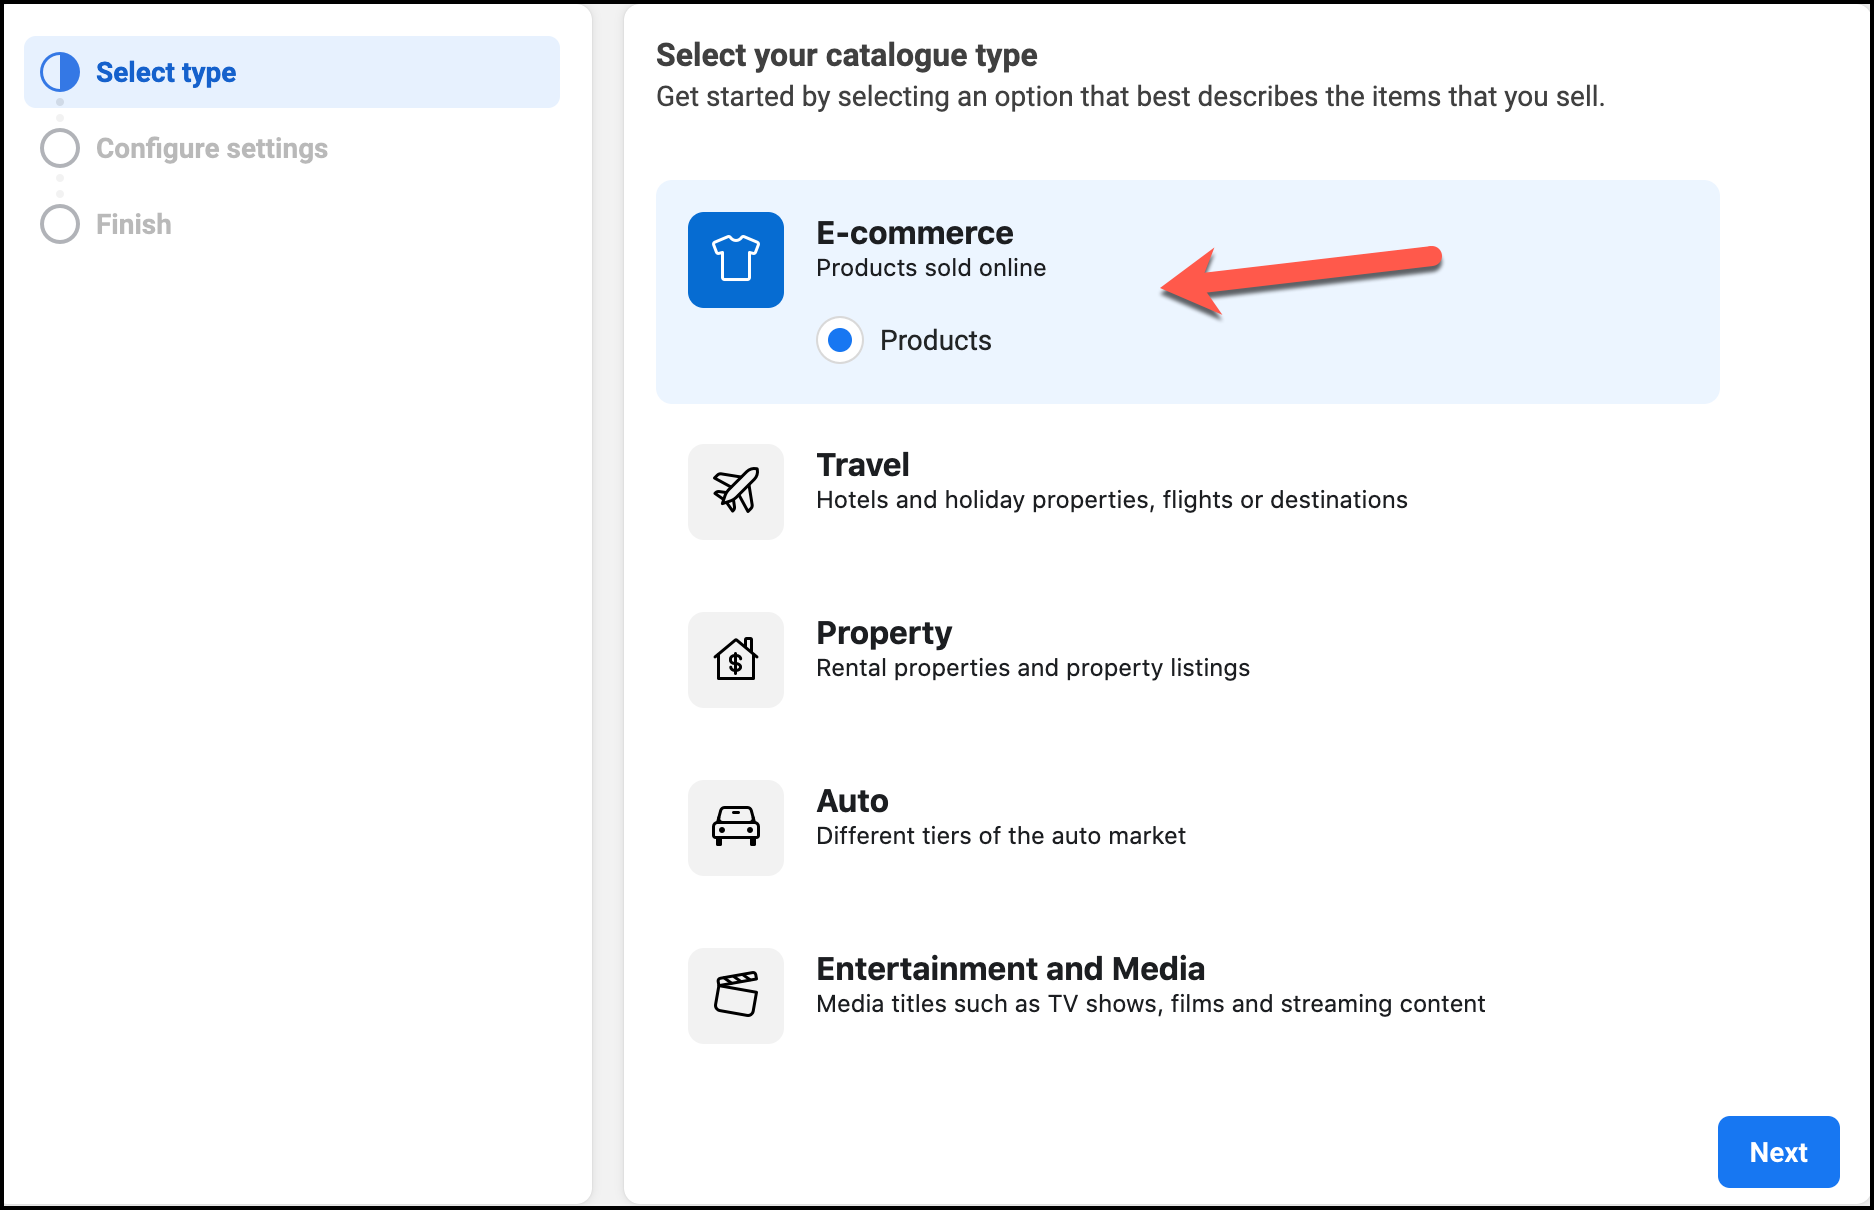
9. Choose your catalogue type suitable for your product selling. In most cases for a Facebook e-commerce shop, choose E-commerce
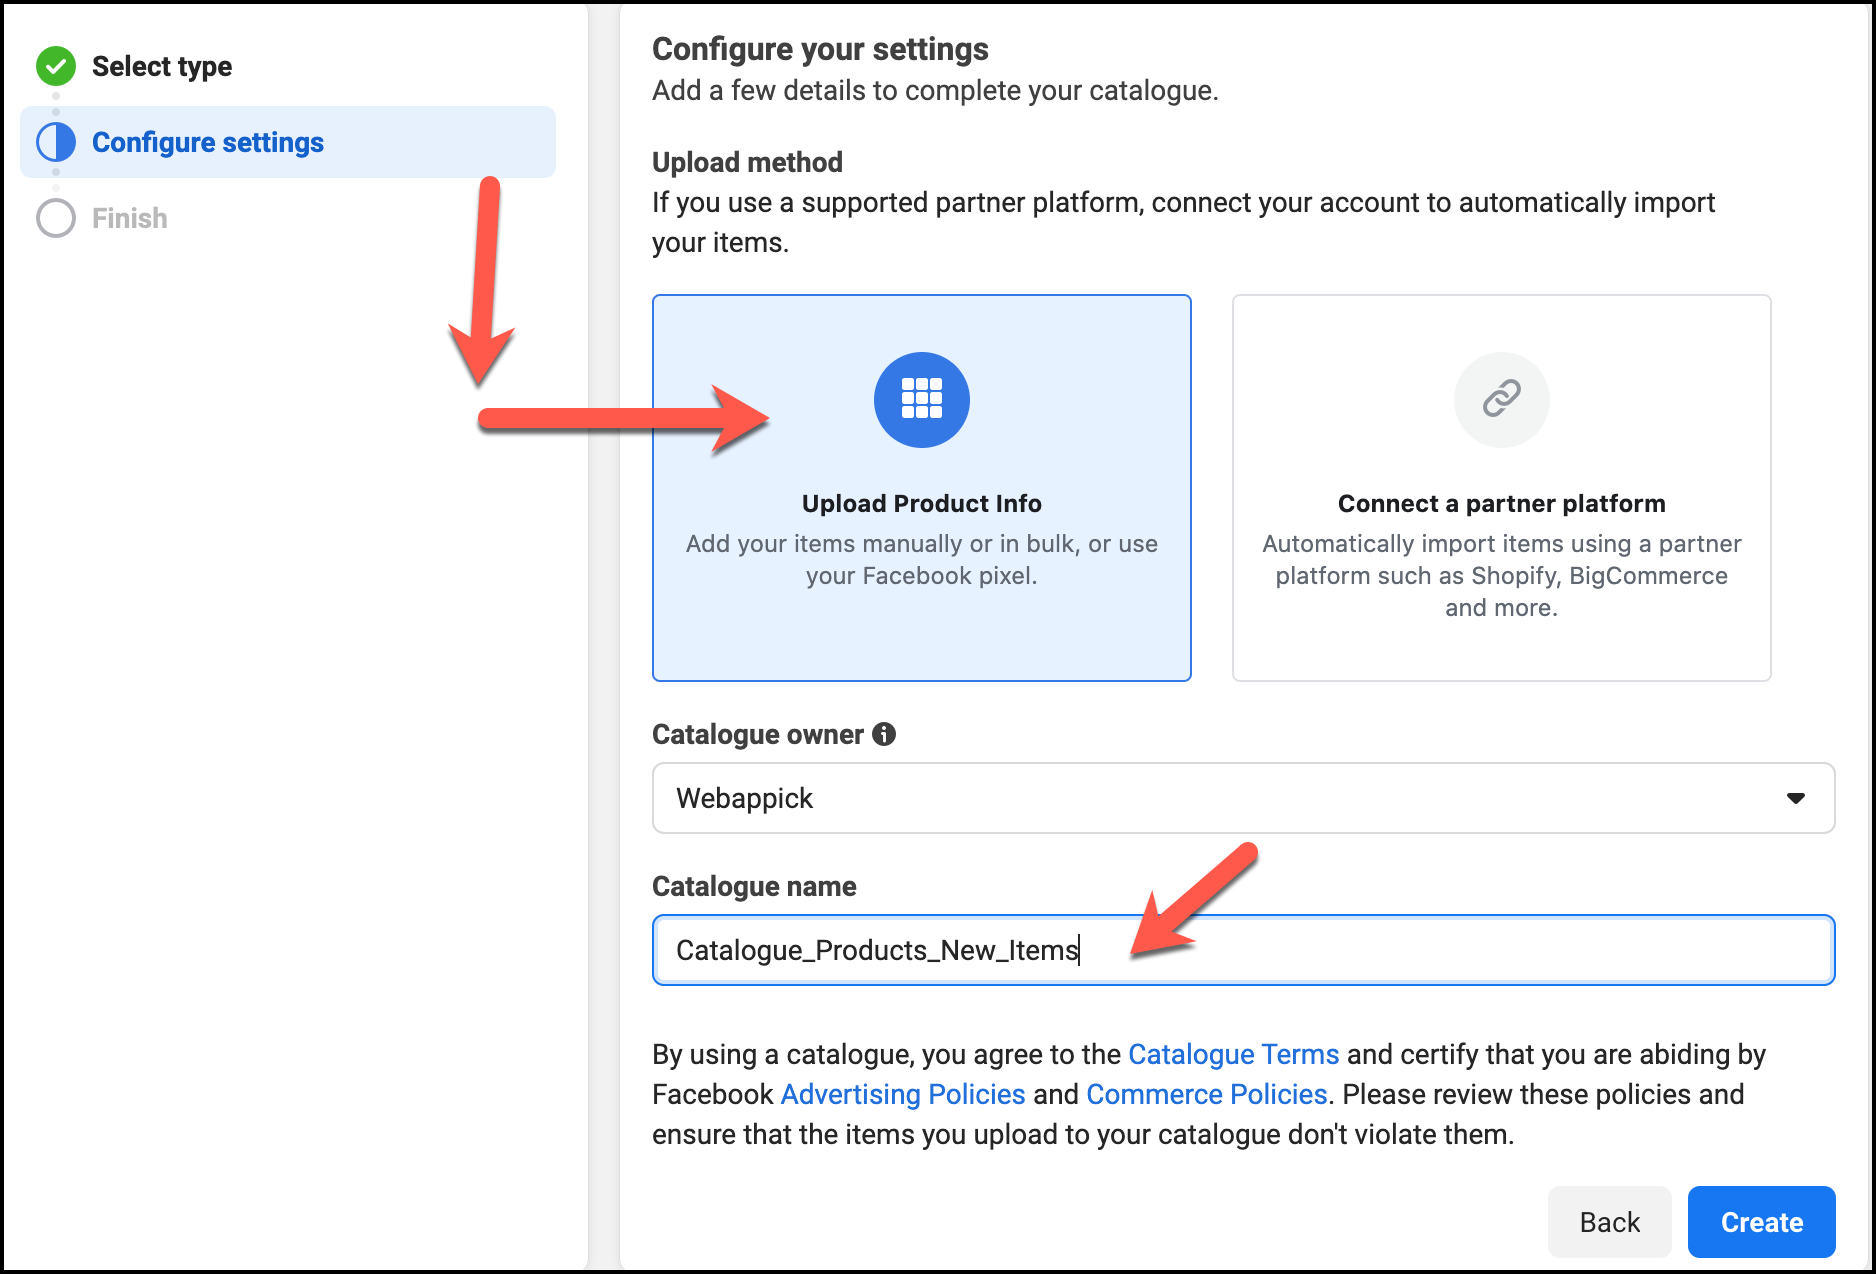
10. In the Configure settings, make sure your ownership is appropriately maintained. Find the perfect name for your catalogue and choose Upload Product Info. You will only choose Upload Product Info if you want to conduct bulk uploading but don’t want to integrate via a third party. Click on Create to make the catalogue
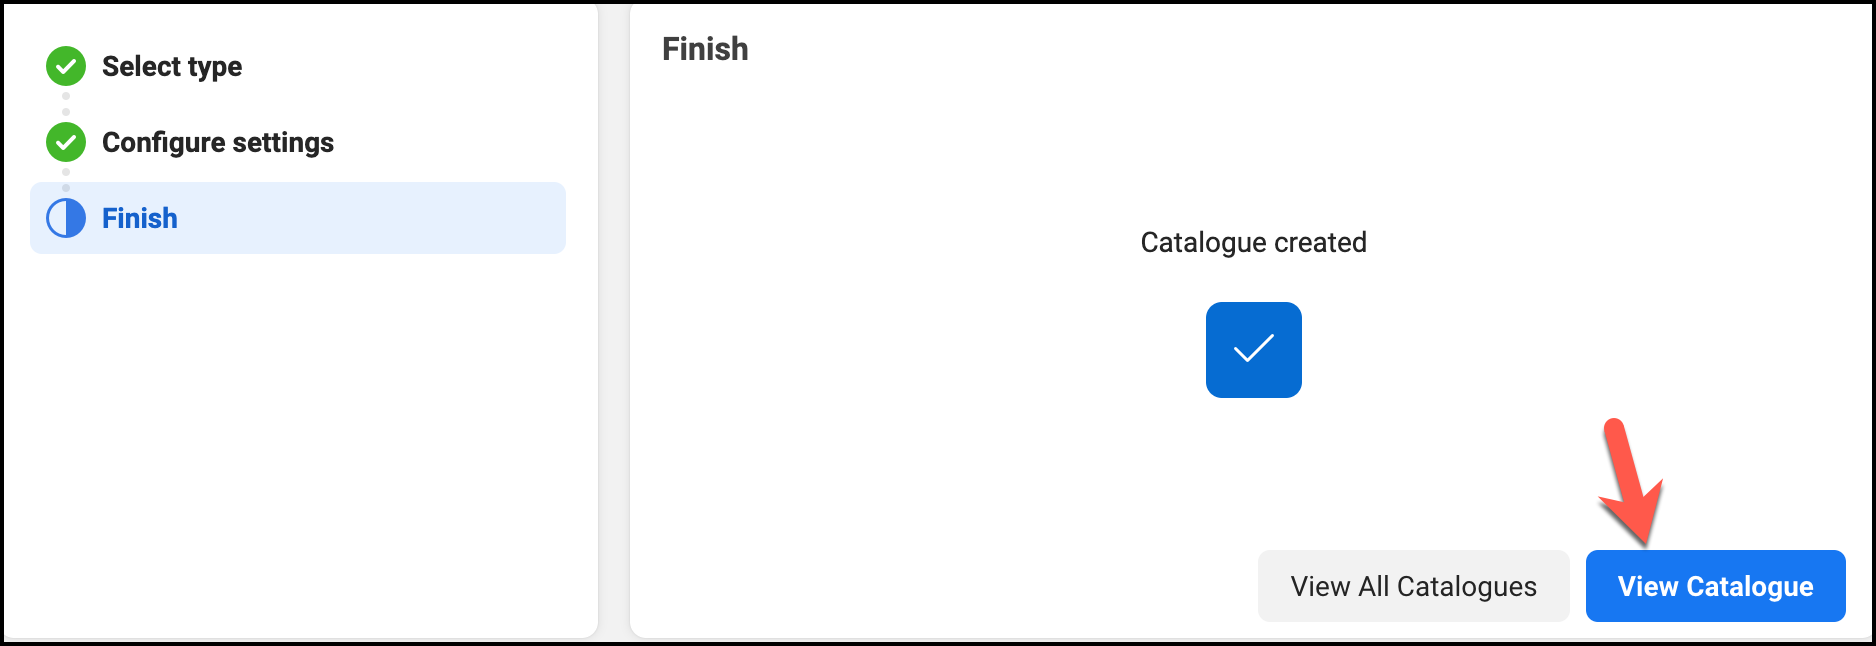
11. Your catalogue is now ready to use for Facebook for WooCommerce. Hit the View Catalogue button
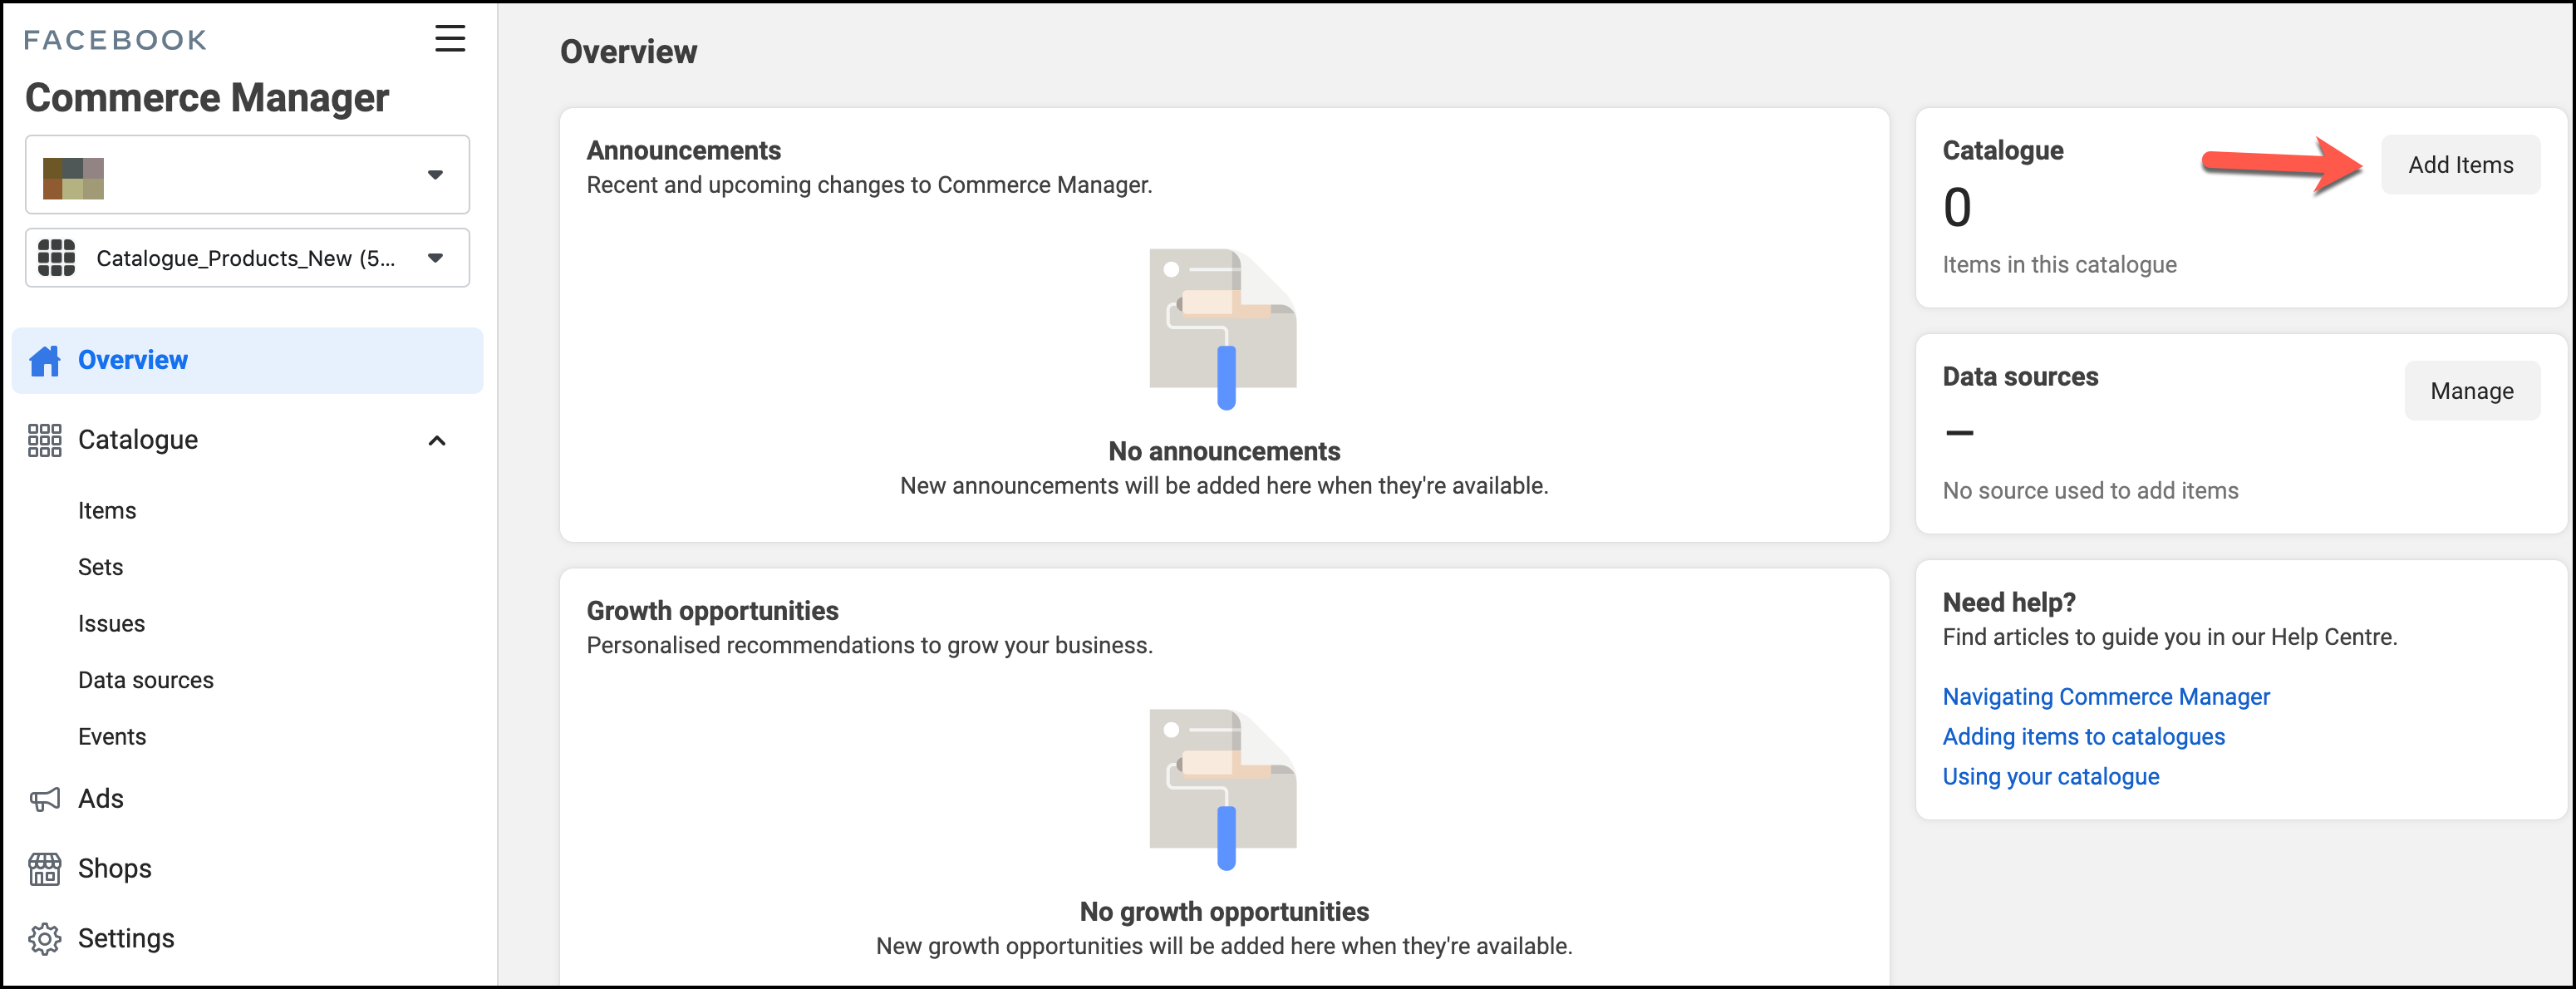
12. You need to add items with the WooCommerce Facebook product feed that you created earlier. Click on Add Items to include your shopping items
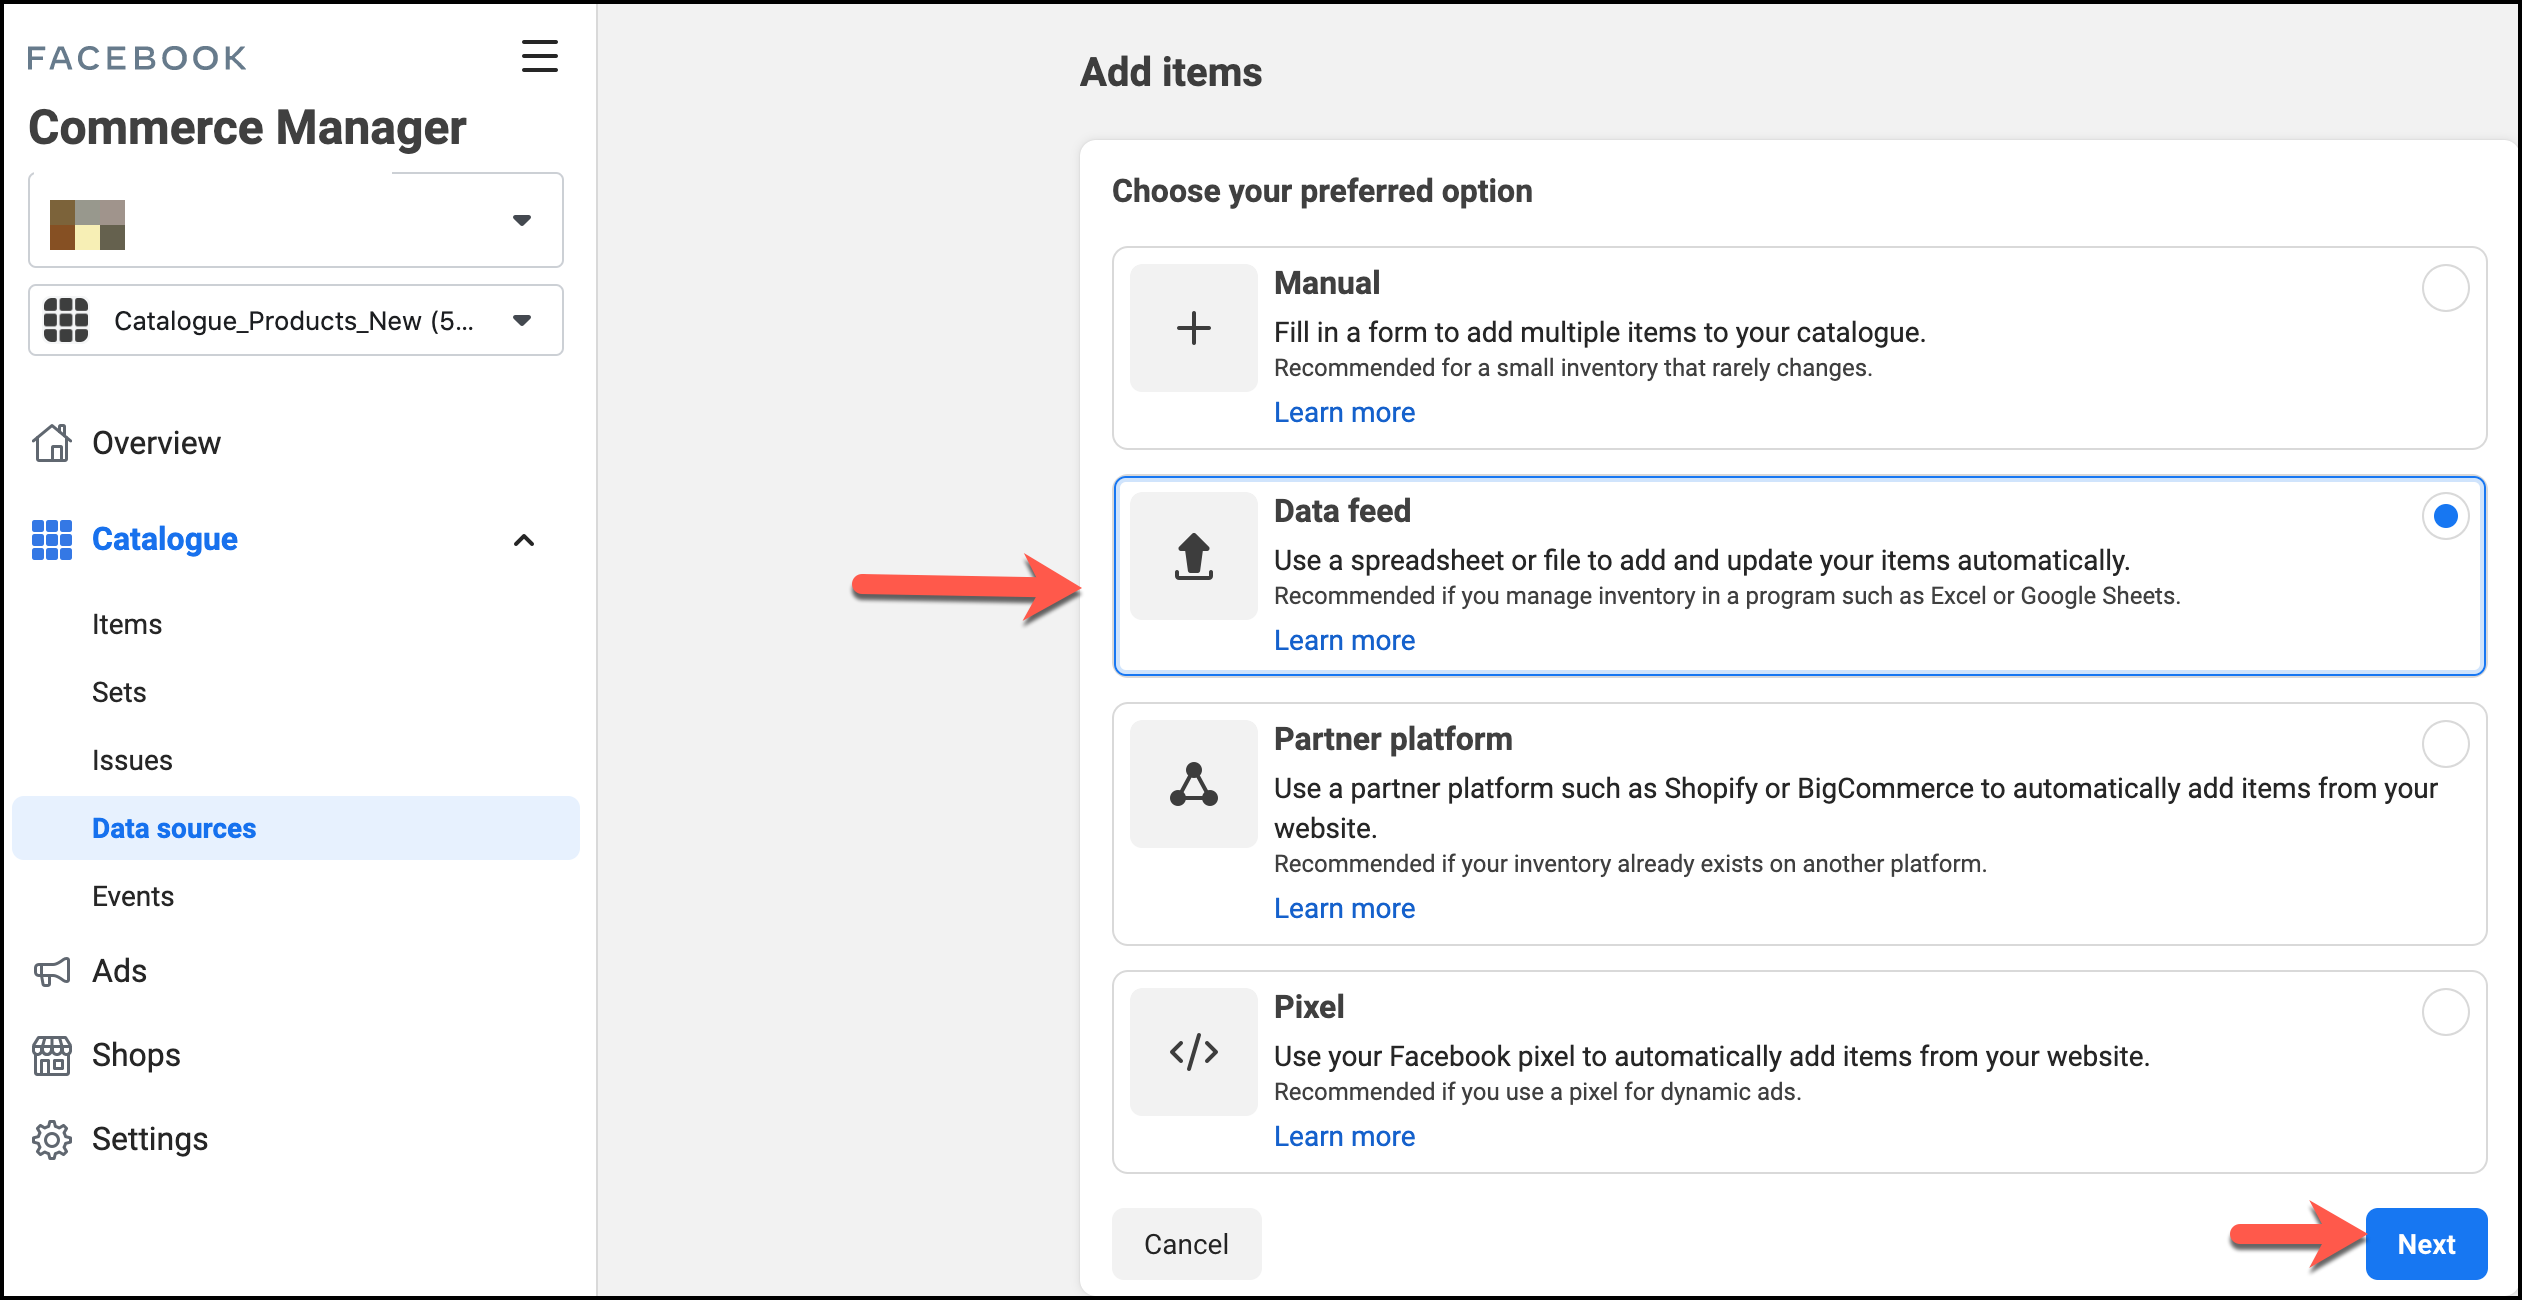
13. Out of four options provided to you, choose the Data feed as it automatically uploads your products. This is quite useful, especially if you have large items to upload in bulk. Click Next to continue
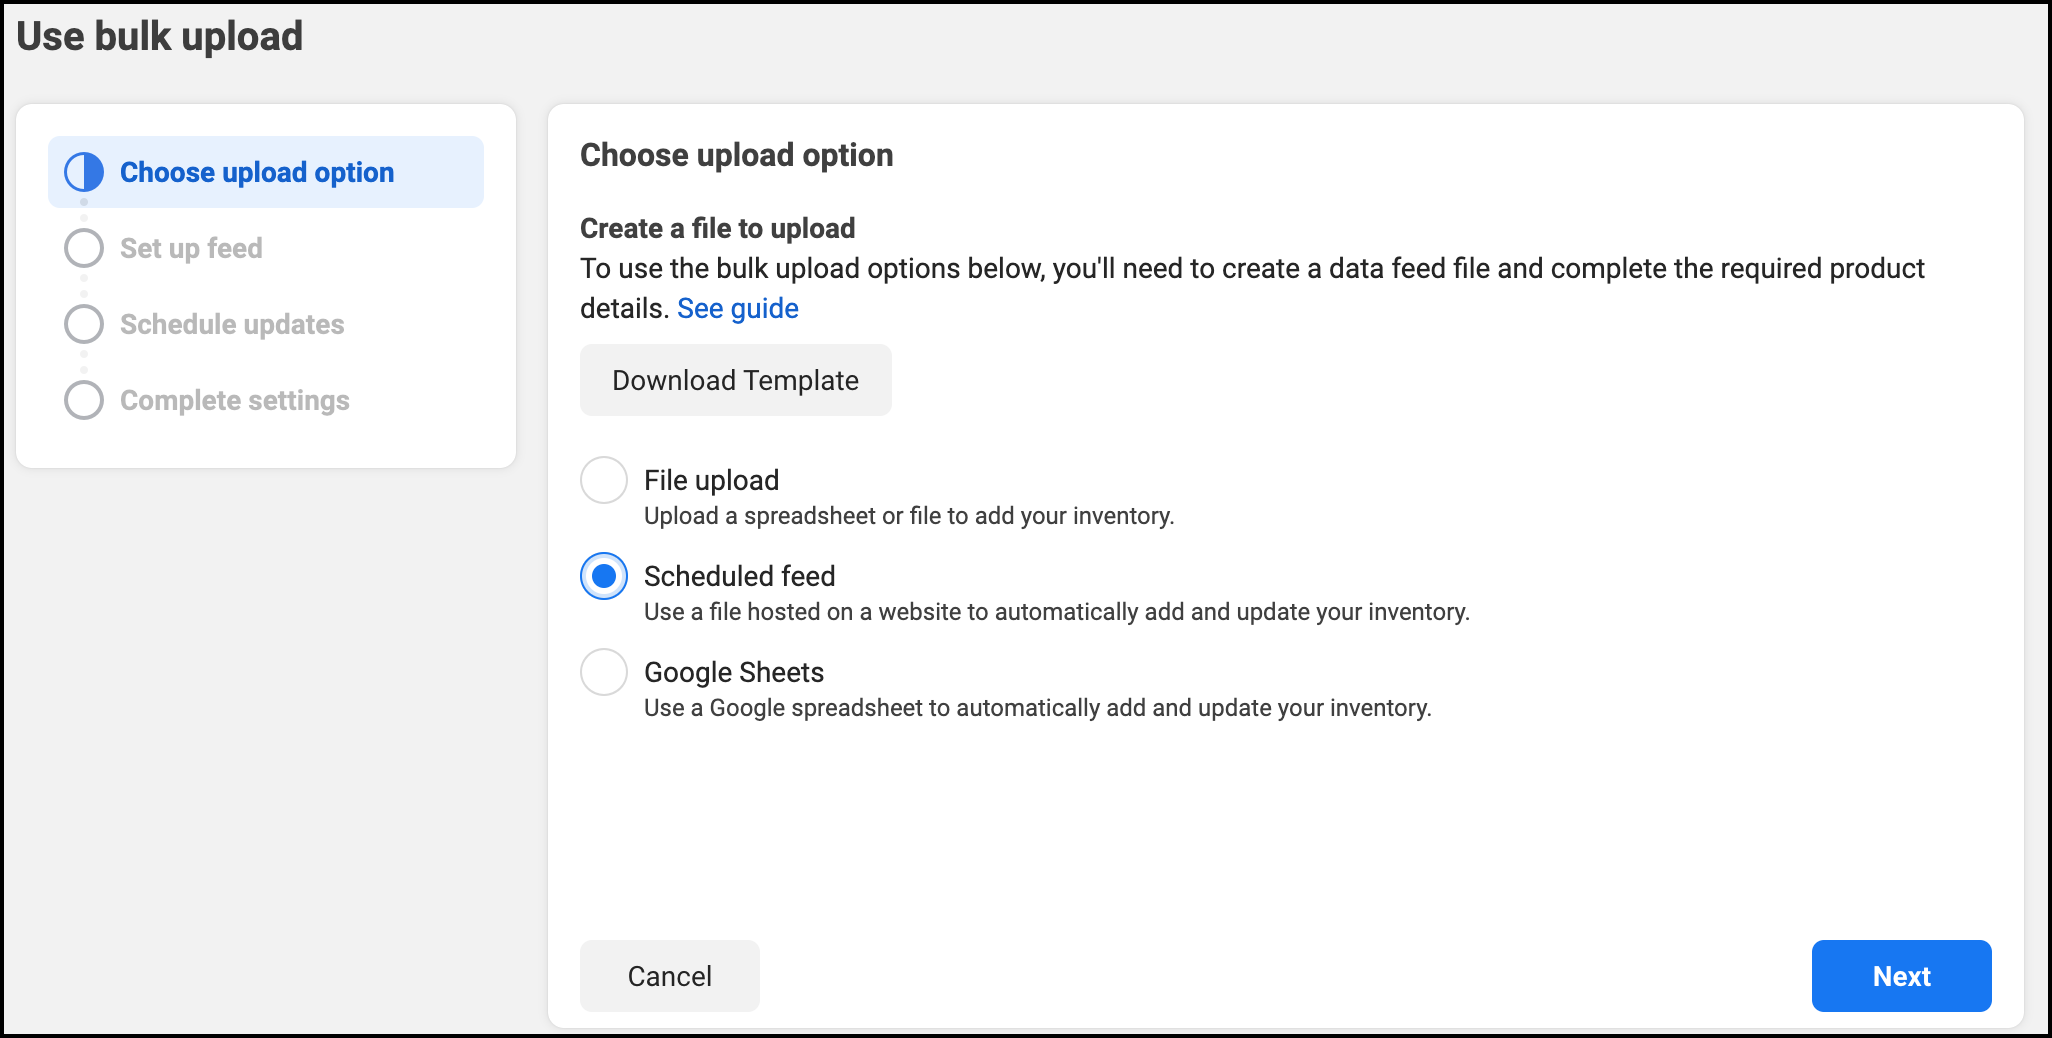
14. You can opt for three options; 1) File Upload, 2) Scheduled feed, and 3) Google Sheets. You may wish to go with Scheduled feed as it will take the URL link of your created feed file. Every time you upload something, or something is changed, this option will help you remain updated. Click Next to carry on with the process
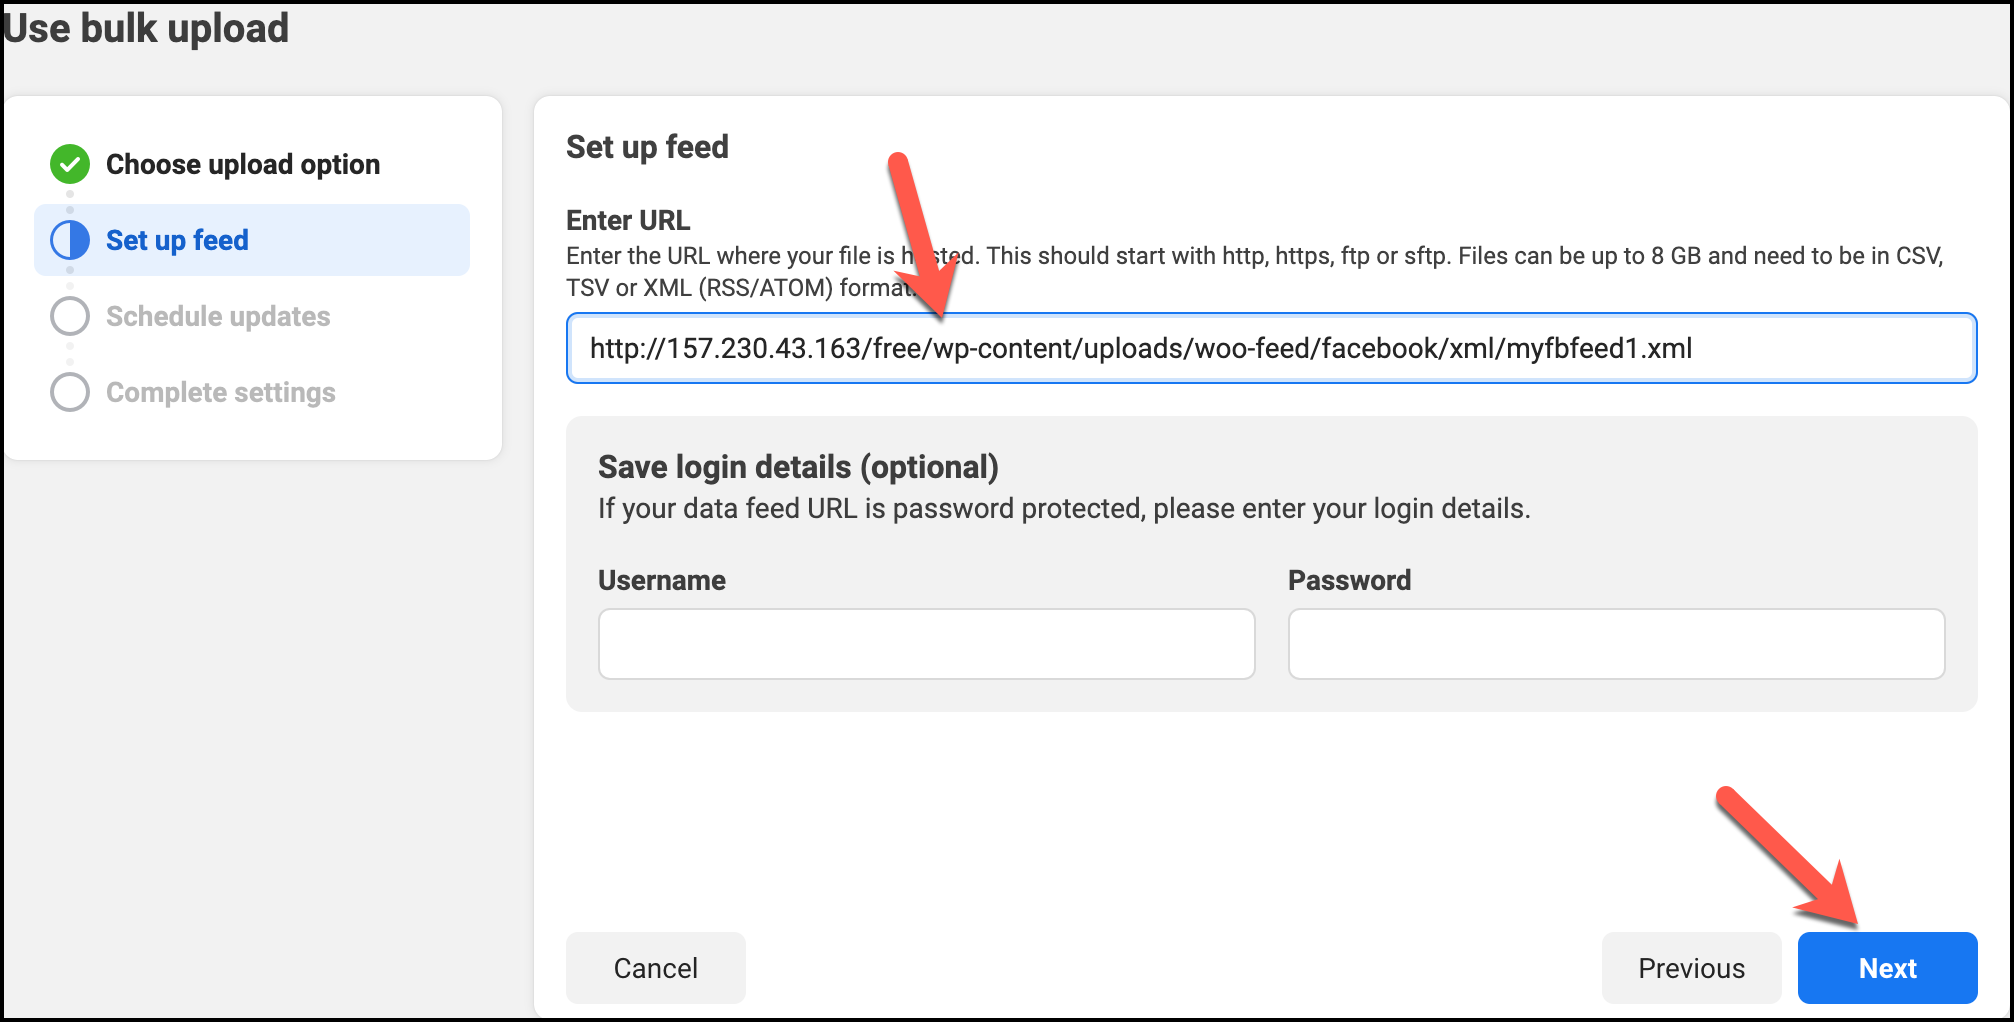
15. Within the Set up feed section, enter the URL of your feed file of Facebook for WooCommerce. For the time being, you can leave the Username and Password vacant. Yet, click Next to move forward
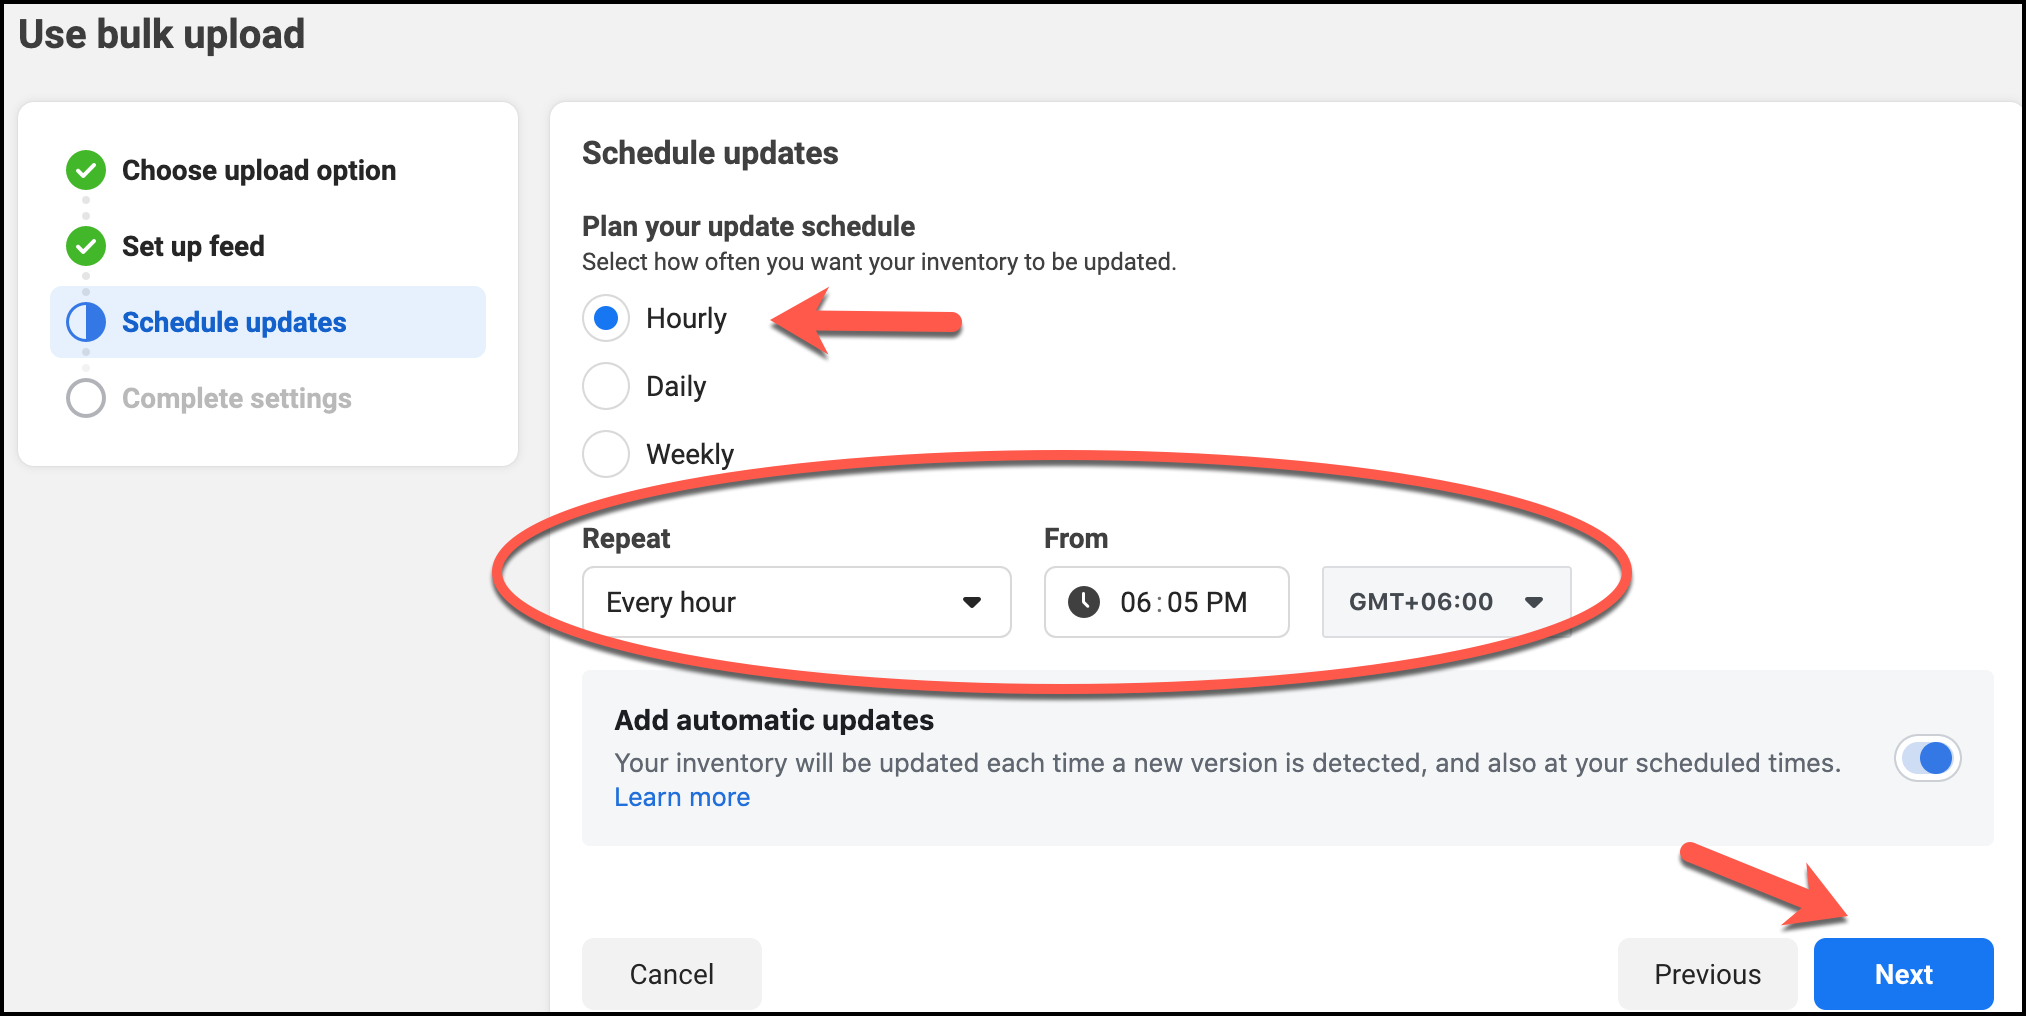
16. You can set your interval time of upload based on your business’s needs. Click on Next to move along with the WooCommerce Facebook integration process
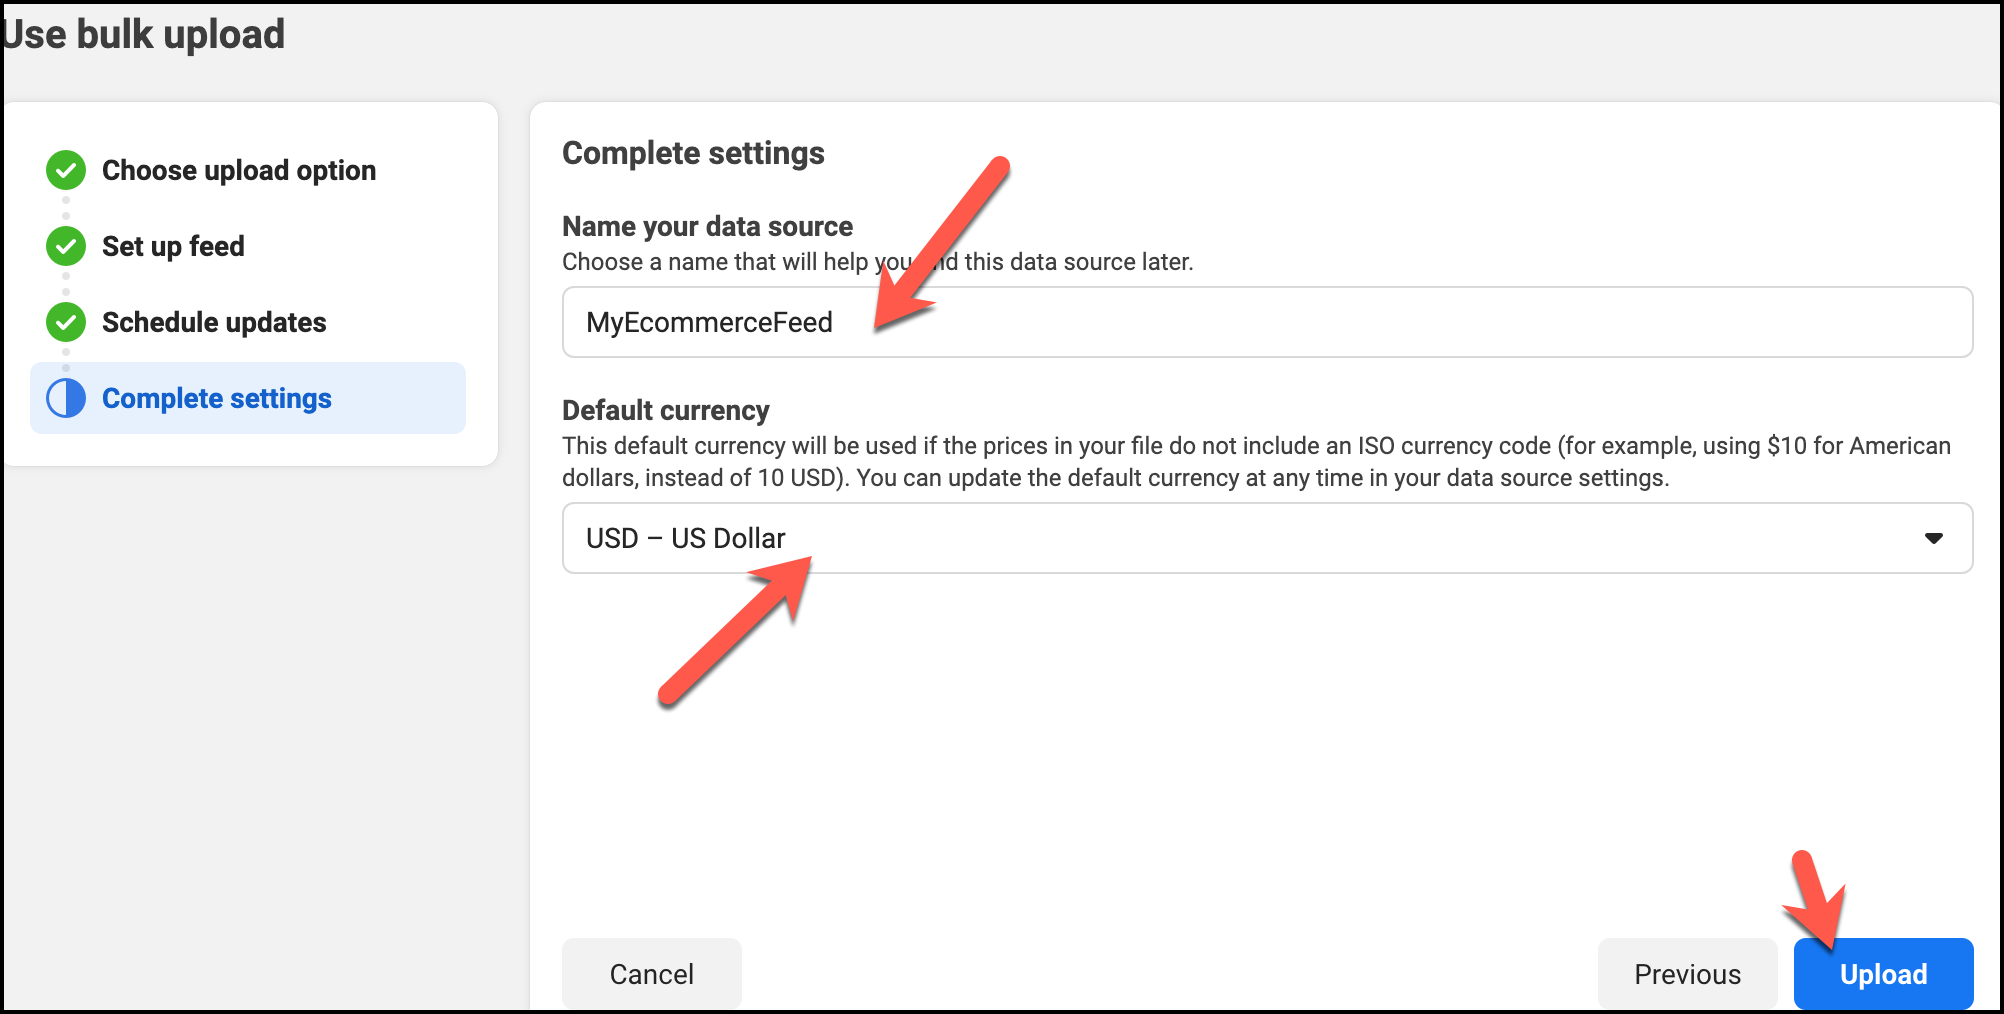
17. This is the last stage of the settings. You either have an IP address in the data source, or you can change it to any name you want. Choose your Default currency based on your store origin. Click on Upload to finally upload the feed file. You can also switch currency if needed.
18. This process will take a while, depending on the size of the feed file
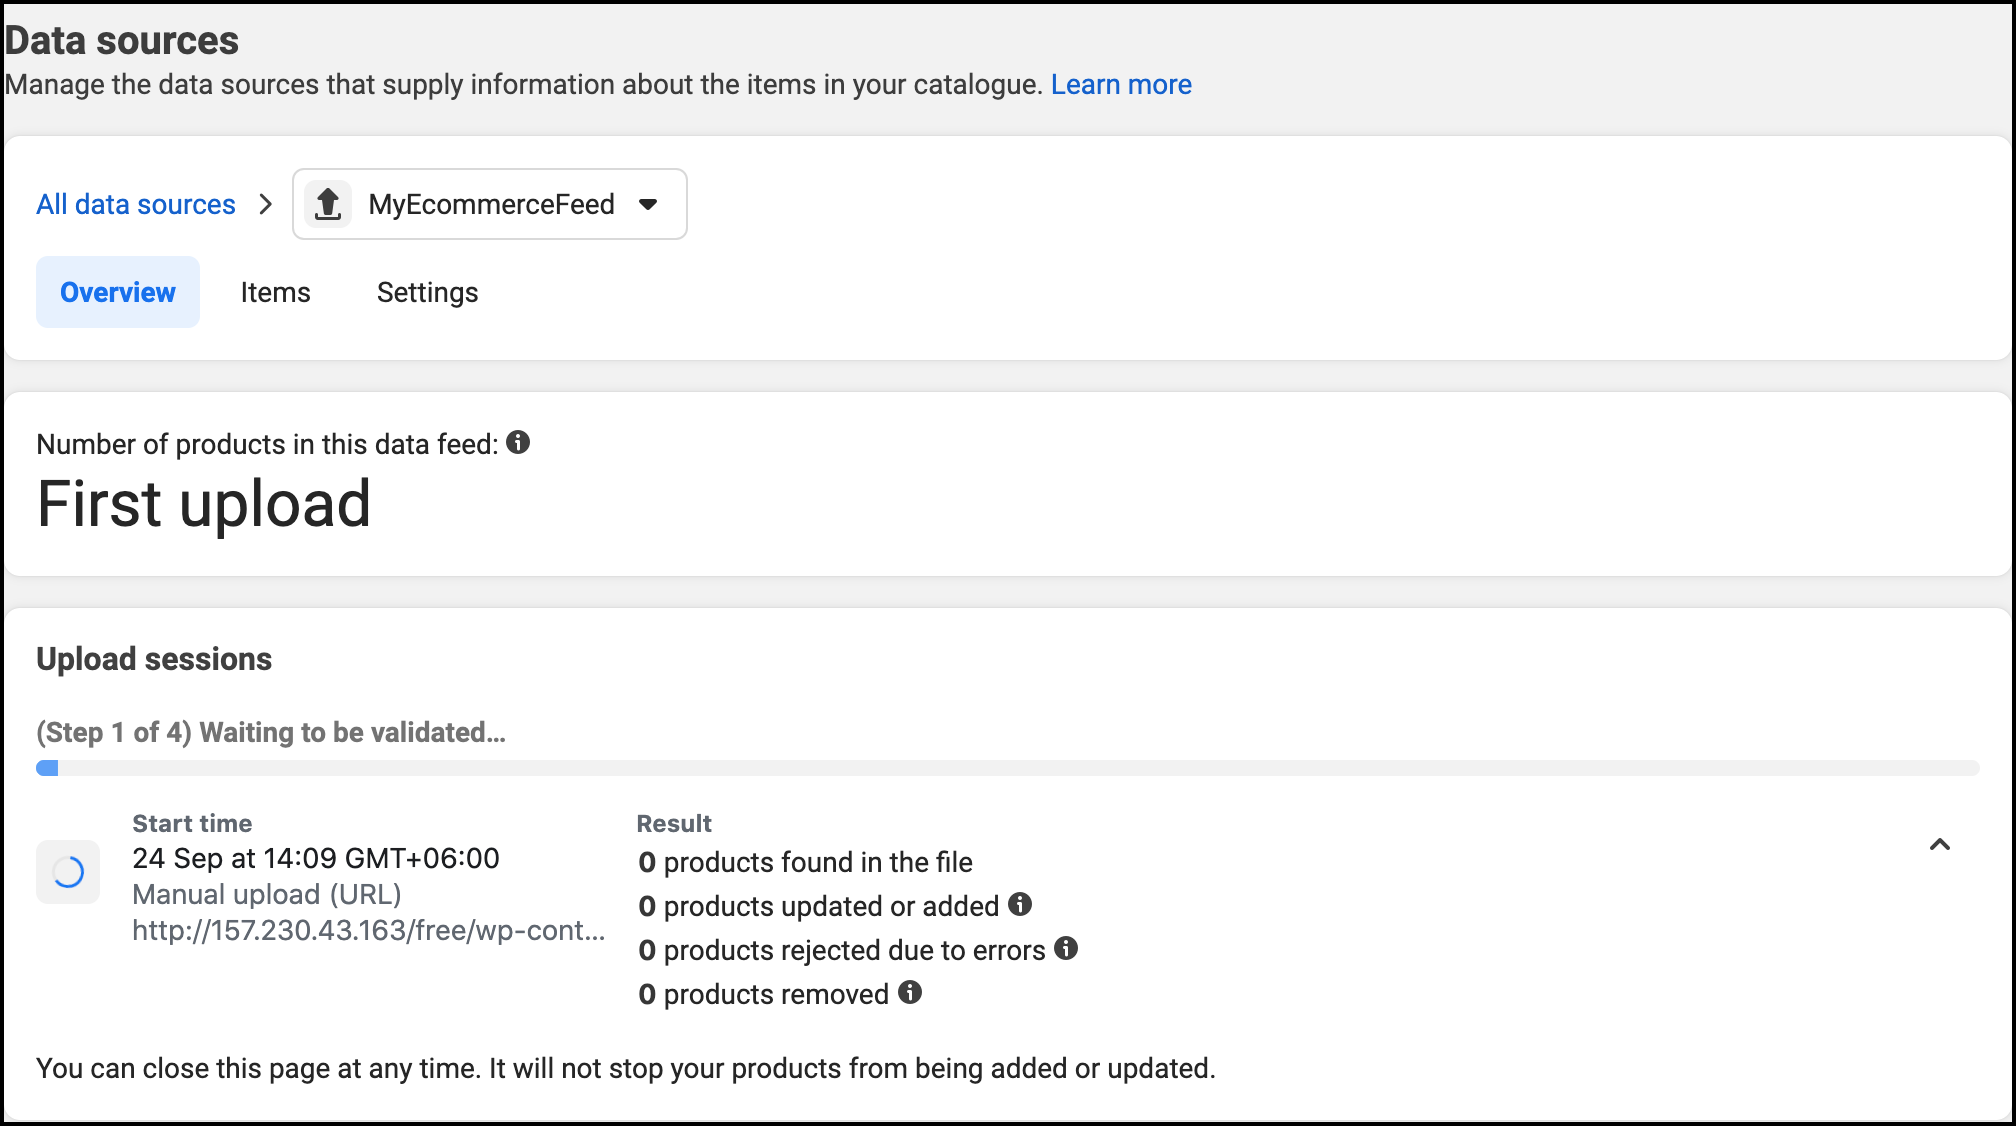
19. Once the upload is completed, you can see how many products are accepted and rejected. Although you can see your next update scheduled time, you can still force the uploading by clicking on Upload Now
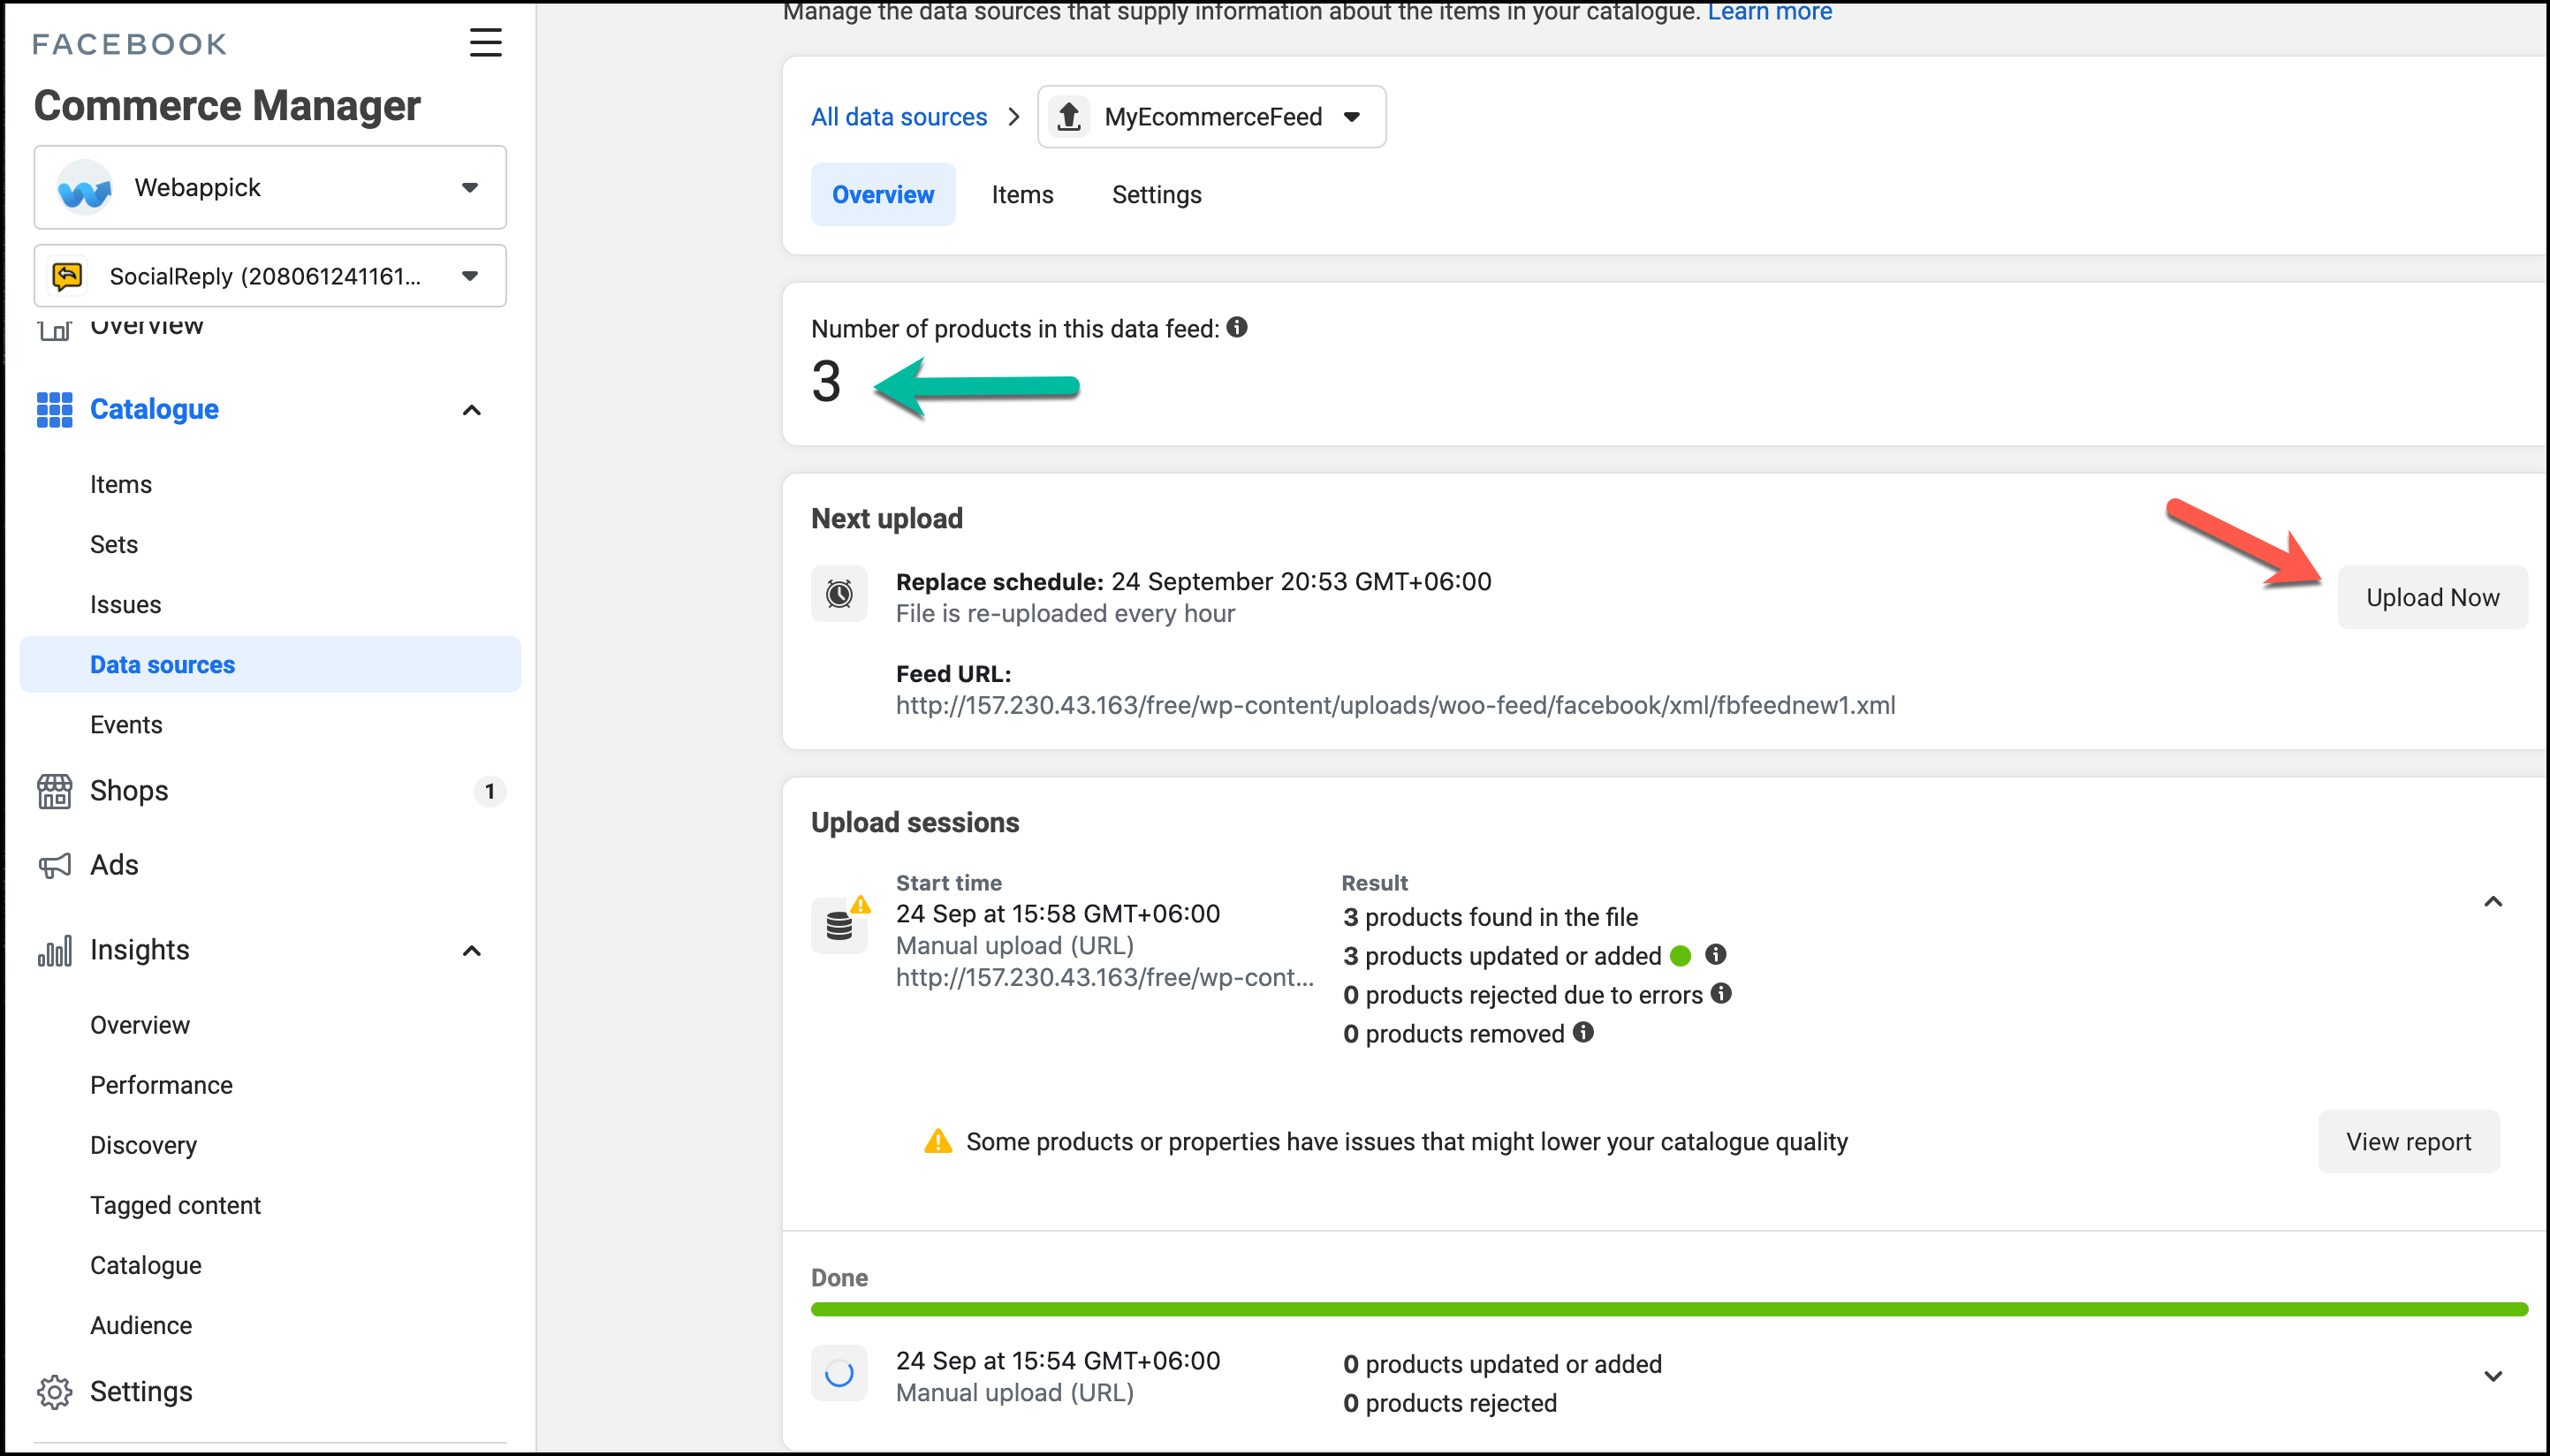
In our case, all three products have been uploaded successfully; it means they don’t have any fault and must have fulfilled the requirement for the WooCommerce Facebook shop. See how easy the process is! You can now see all the products generated in your feed on the WooCommerce Facebook marketplace. This is how you can easily connect your WooCommerce to a Facebook shop.
What if the WooCommerce Facebook product feed remains unsuccessful?
However, not always will your feed uploading turn out successful; sometimes, it may show you where you have your errors. This option is particularly worthwhile as any errors you find at this stage regarding your product information can be sorted. For instance; We have purposefully removed the original and sale price of one of the products.
1. We now want to see how the completed feed file uploading will look. Update your product information on WooCommerce of WordPress. Then, regenerate the file under Manage feeds. Afterward, click on Upload Now to fetch forcefully
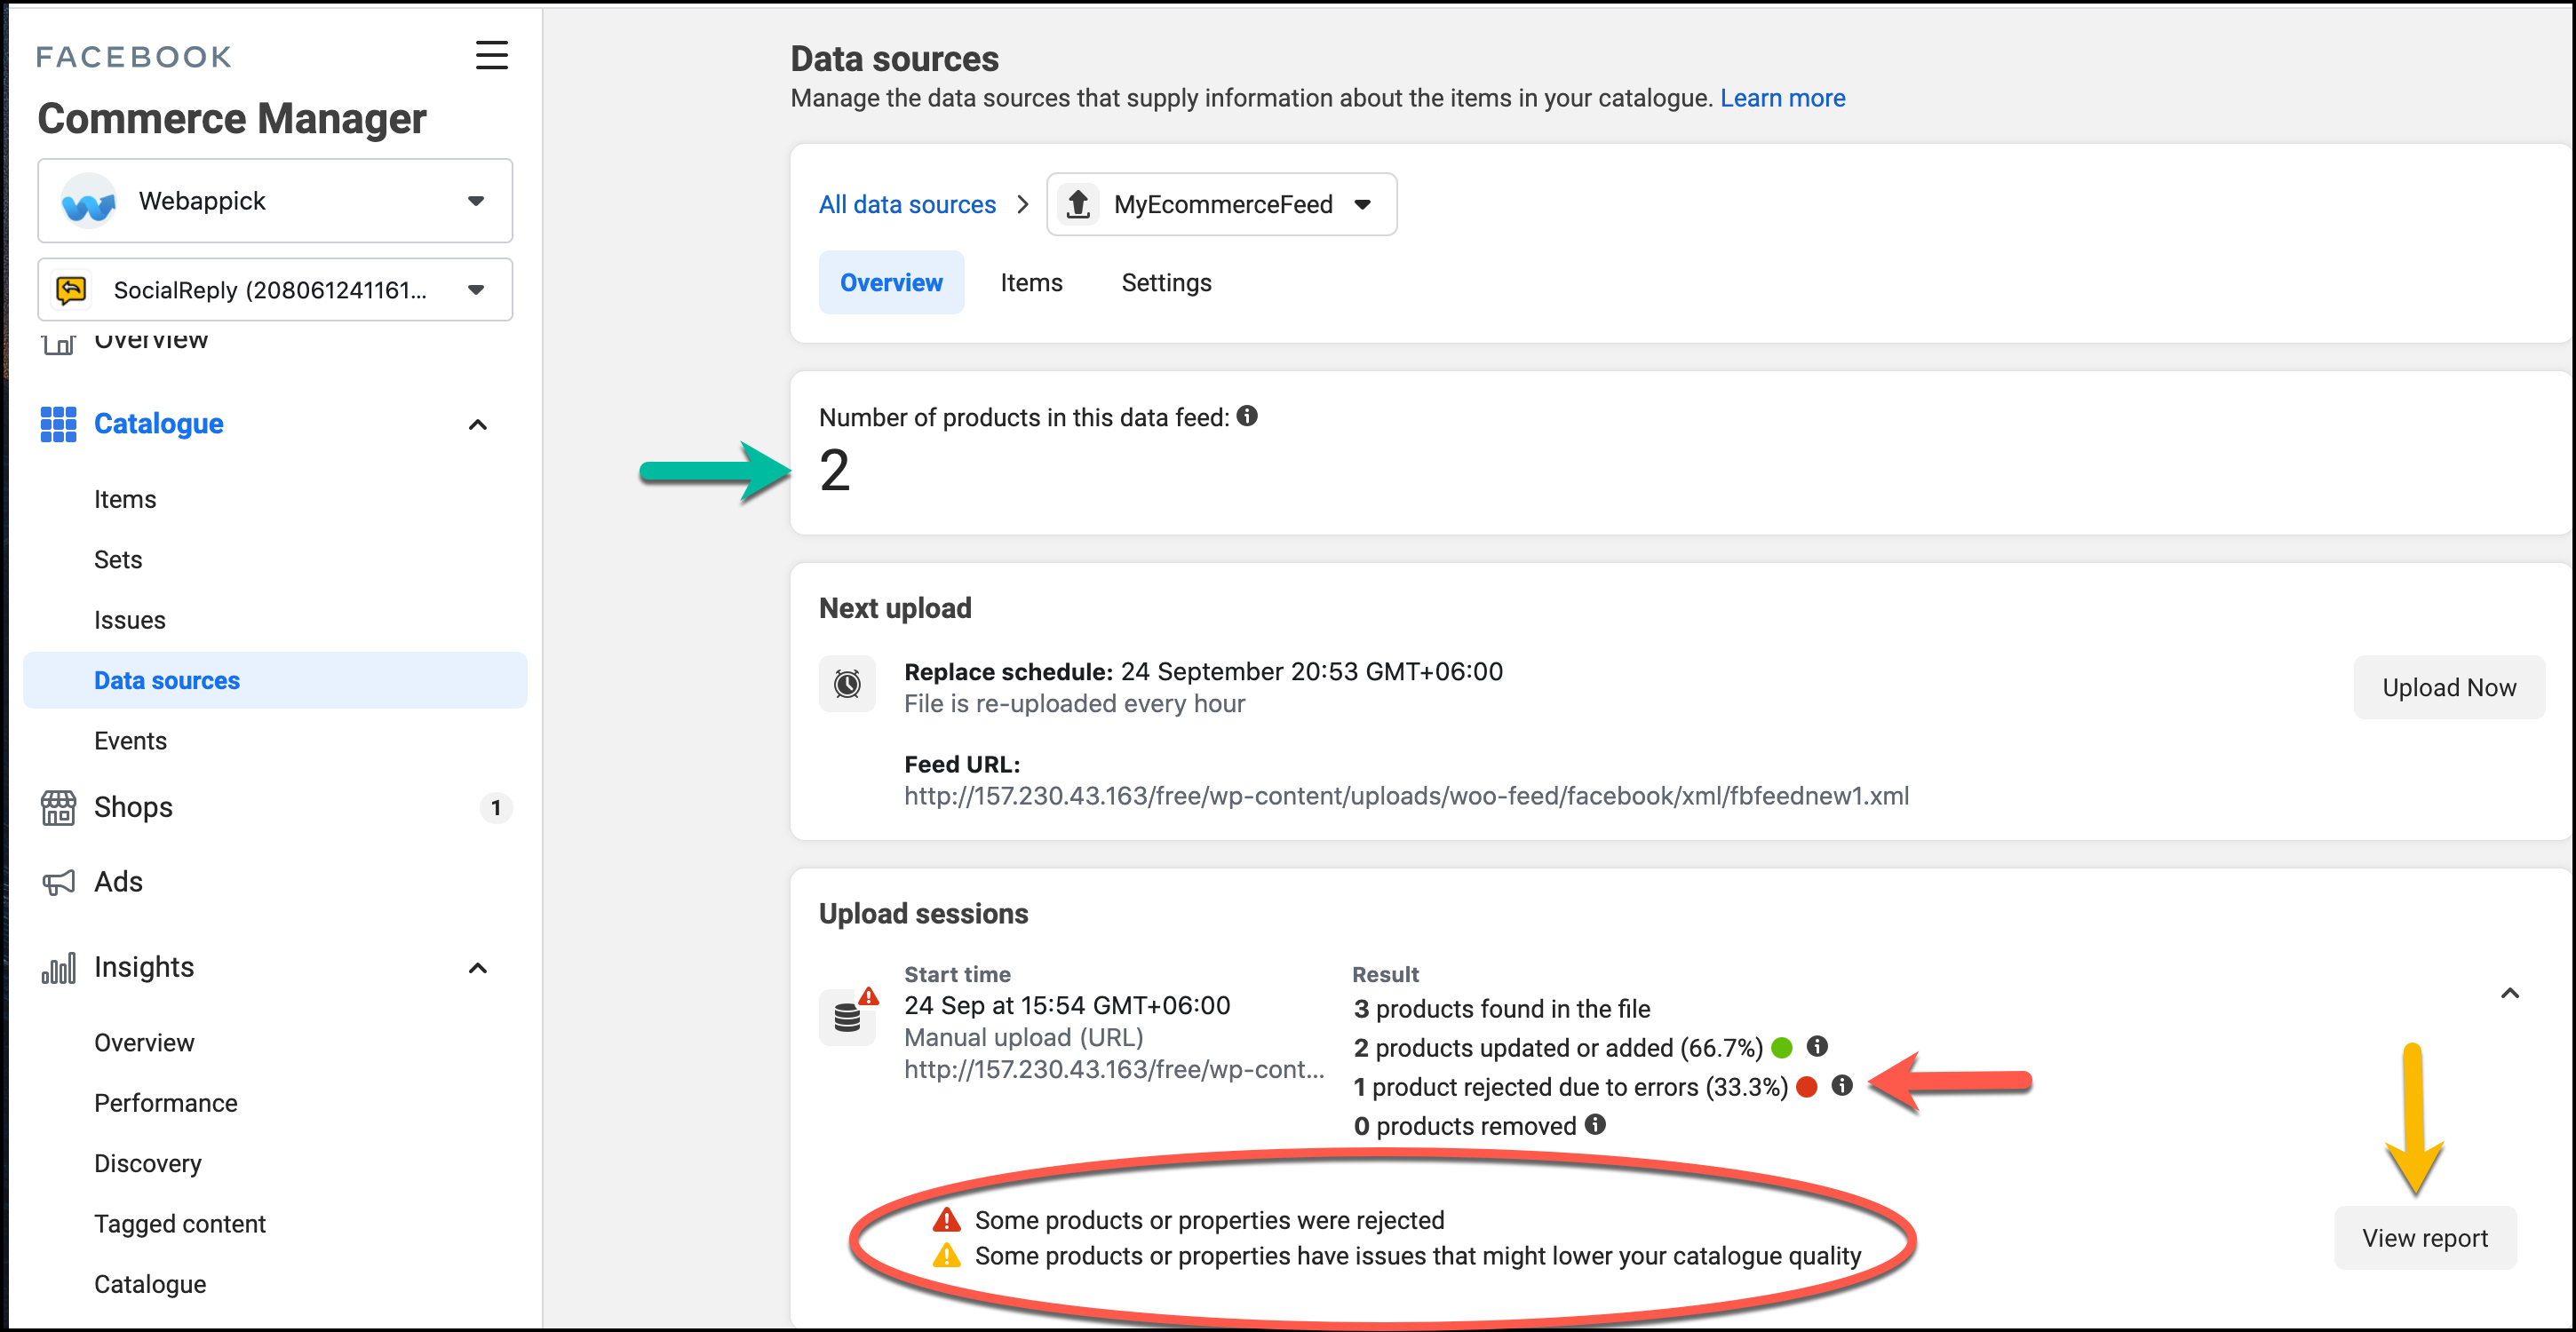
2. Here you go! One of your products turns out to be defective due to its missing information. If you want to be sure, you can click on the View report

As you can see, the price is missing for a specific item, which we removed deliberately. You can also see the id number so that you can search that item and fix the issue. Once the issue is settled down, you can repeat process 1 and then catch up with the feed completion. Here, all your products must have been accepted without undergoing any rejection.
However, you can watch the following video for better visualization of how the Facebook product feed is created as the process flows
Why CTX Feed Pro is better for WooCommerce Facebook Shop?
When you want to give a breathtaking experience to Facebook shoppers, you need to pay a lot of attention to the product status. If someone visits your store from the Facebook page but doesn’t get their products organized, they will be disheartened. This is one kind of traffic loss for your WooCommerce Facebook shop.
However, CTX Feed pays a closer look at those subtle things that you could improve. Few such options are – Dynamic Attributes, Attribute mapping, and Smart & Advanced filters.
Attribute Mapping
Attribute mapping helps you amend or modify your title to description or size or almost anything related to products. Having installed and activated CTX Feed Pro,
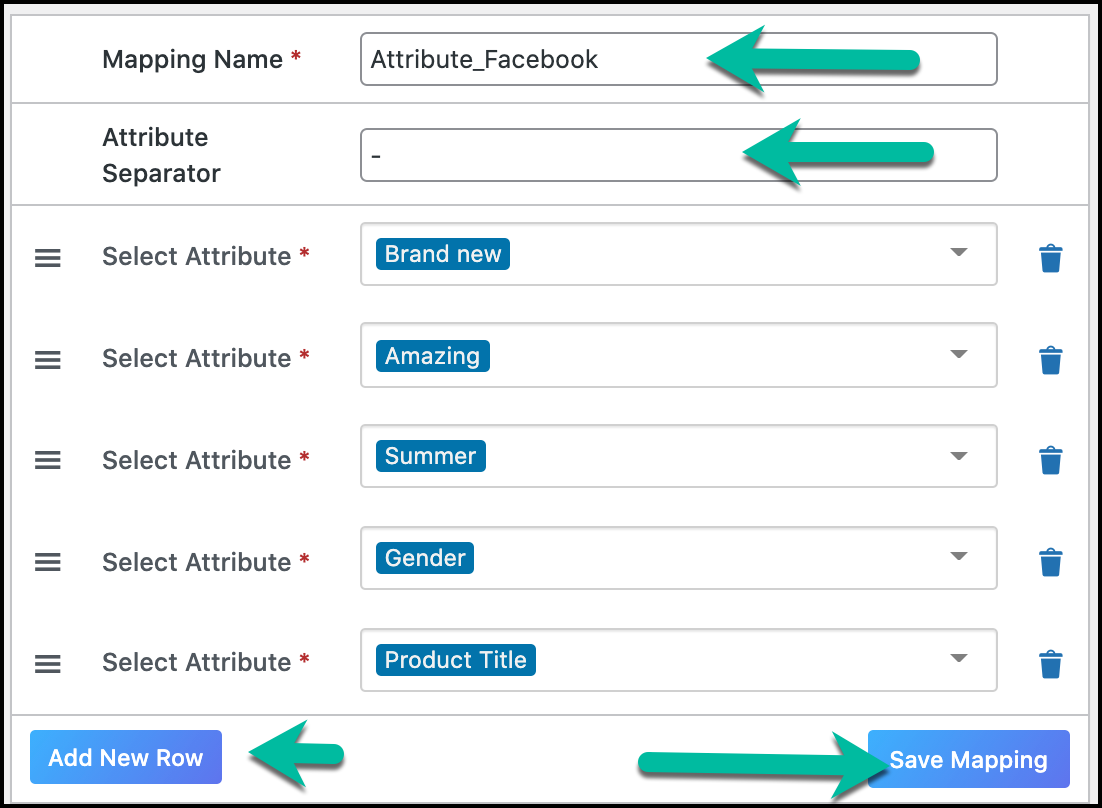
- Go to CTX Feed > Attribute Mapping > Add New Mapping
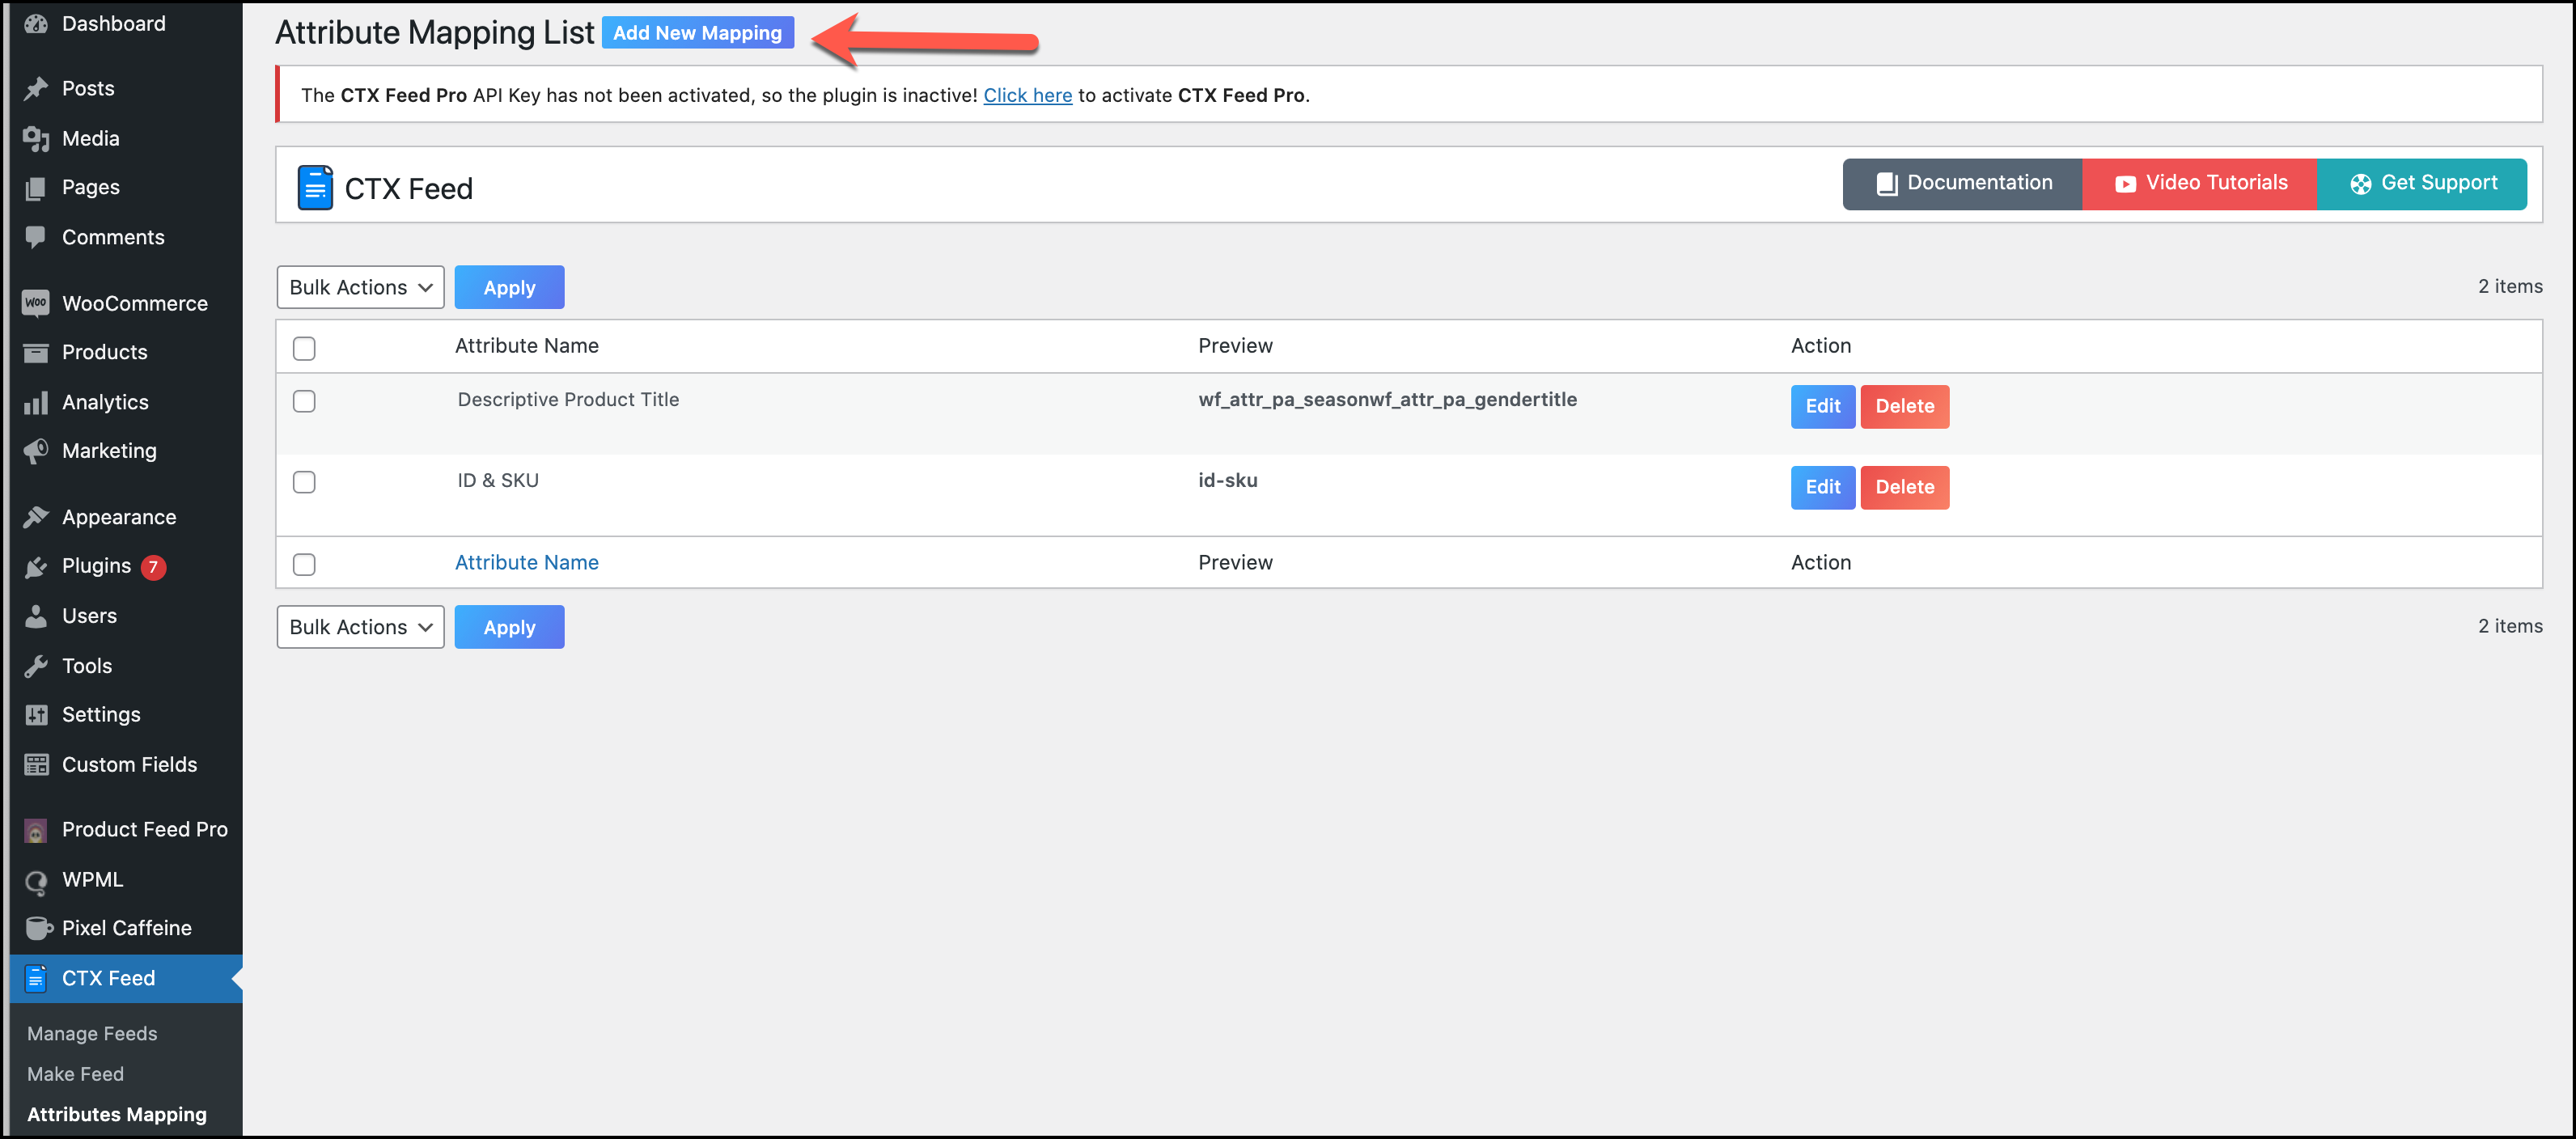
- Select the name of the mapping, choose the separator, such as comma or hyphen, and select the attribute from the drop-down list or add new as per your need. Save it
- Go to Make Feed under CTX Feed and select Facebook/Instagram. Under the FEED CONFIG, select the Value of Product Title as the one you created in the Attribute Mapping section. Generate the feed.
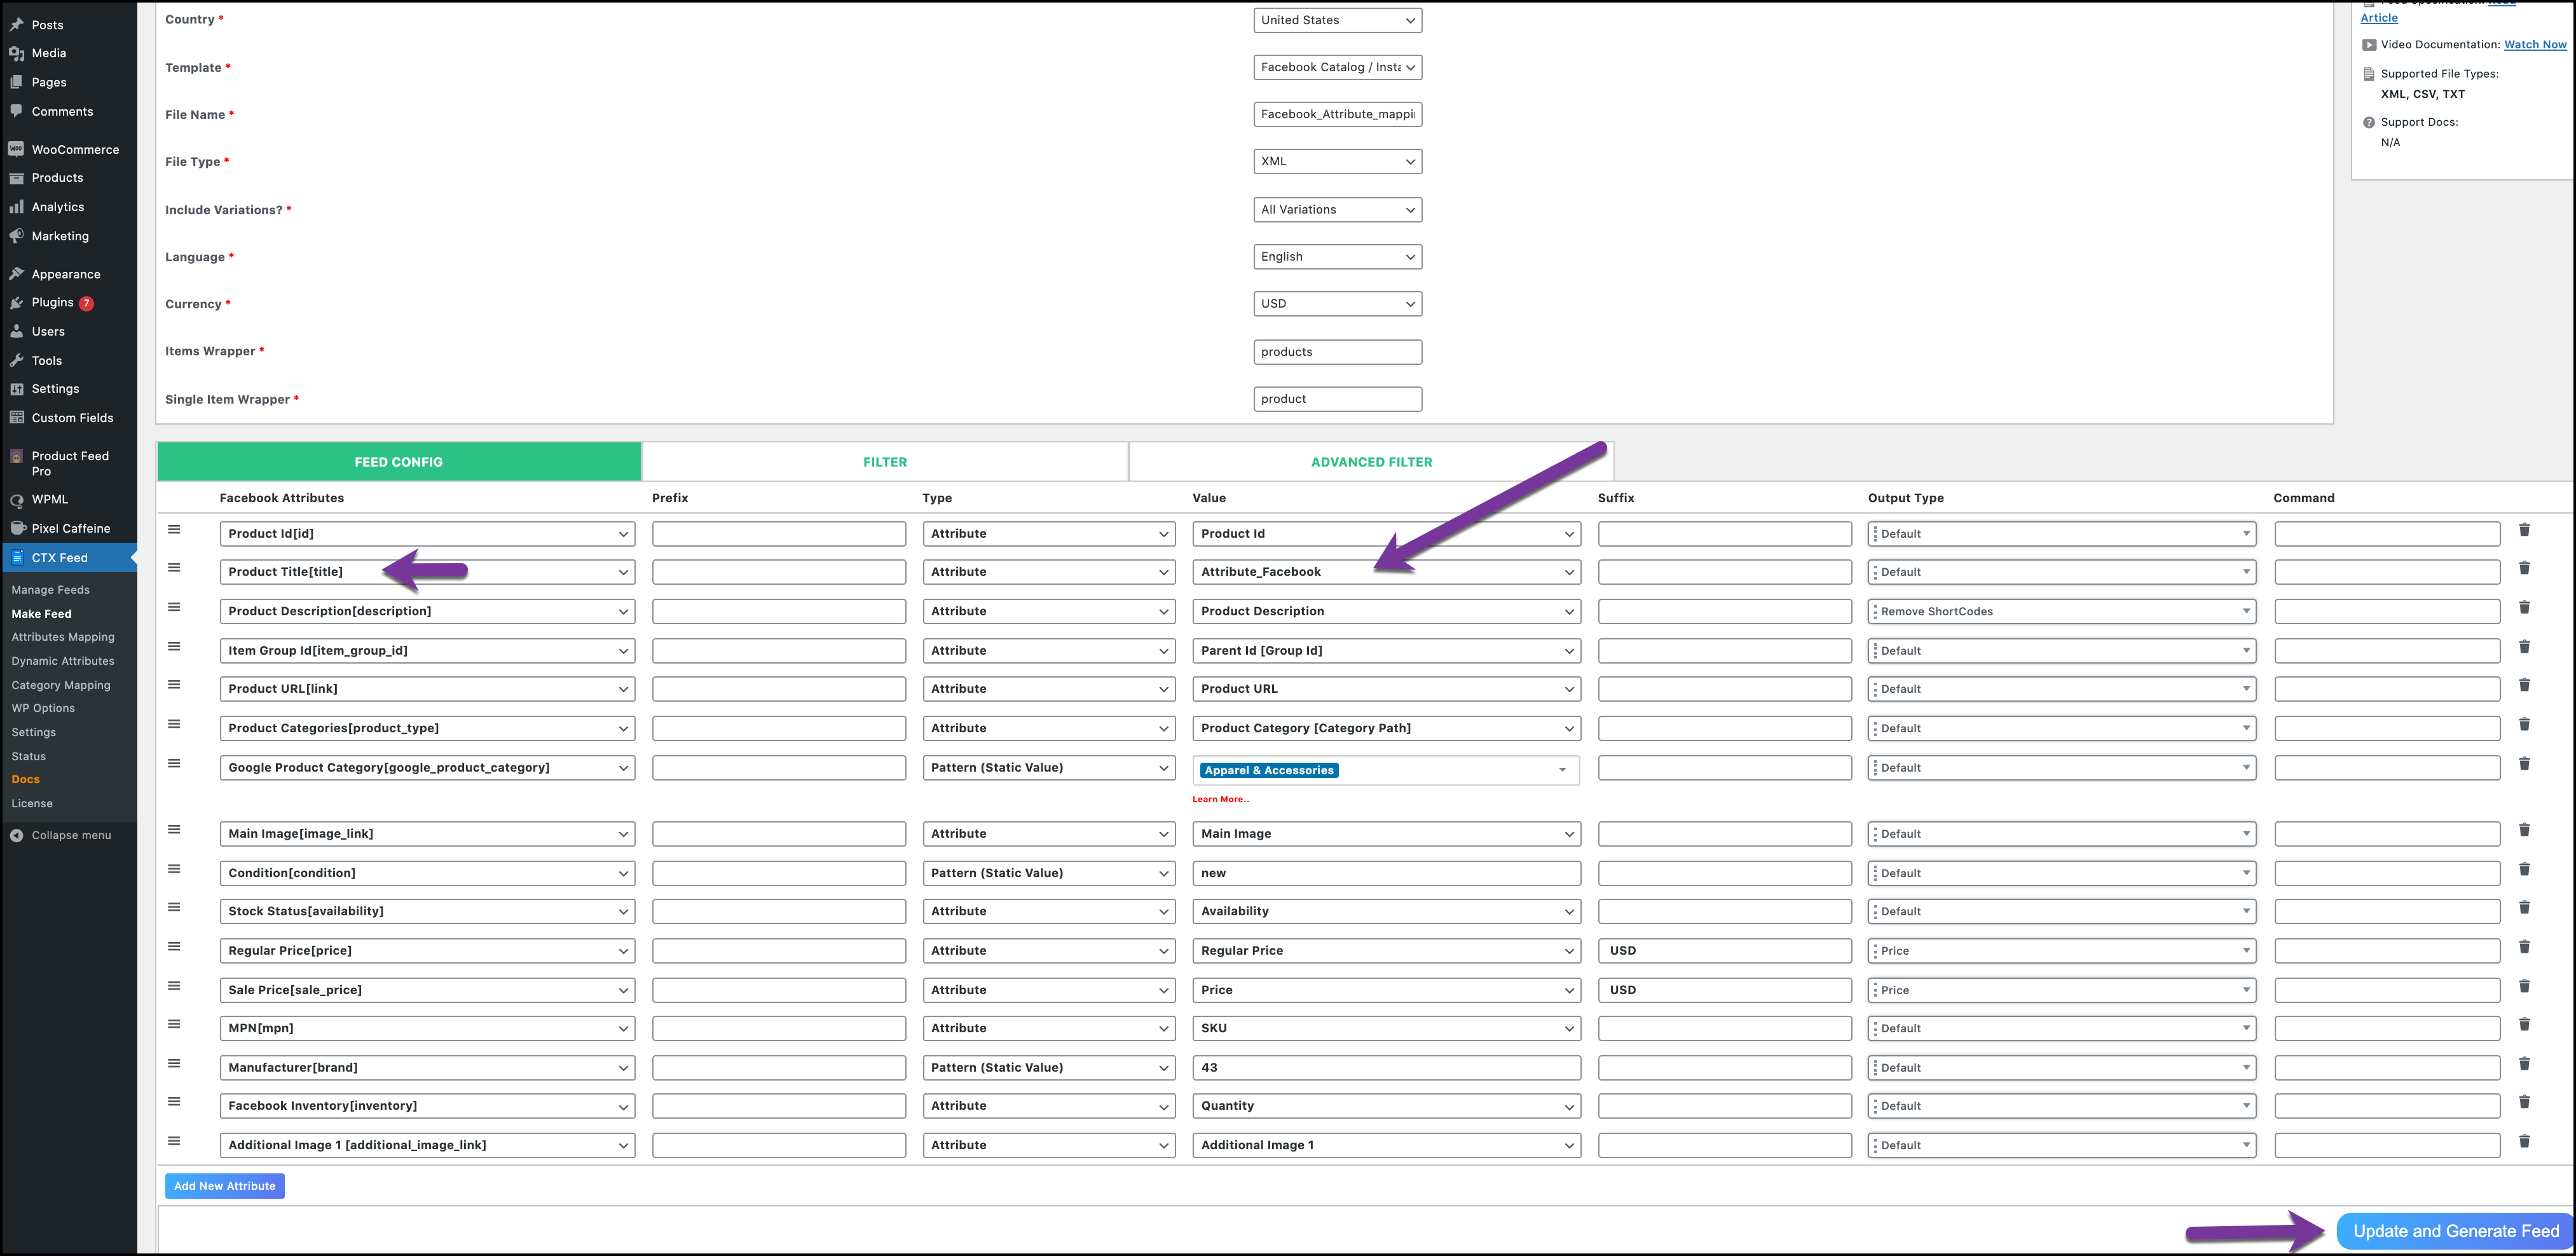
- While viewing the file, you can see that the feed file contains the title you customized with Attribute Mapping. Likewise, you can use this feed file URL to make your product title appear just like the feed file, making your Facebook for WooCommerce journey wonderful.

Dynamic Attribute
Organizing a bulk number of products for the WooCommerce marketplace is a lot more hassle than you think of – needs a prompt organizing skill. Yet, Facebook WooCommerce plugin like CTX Feed Pro is always there to rescue you.
Dynamic attribute helps you sort out your large quantities in just seconds. Whether it is about quantities, price, availability, size, or anything, you can change everything. However, you need to set conditions for that. Let’s take a glimpse at how it works.
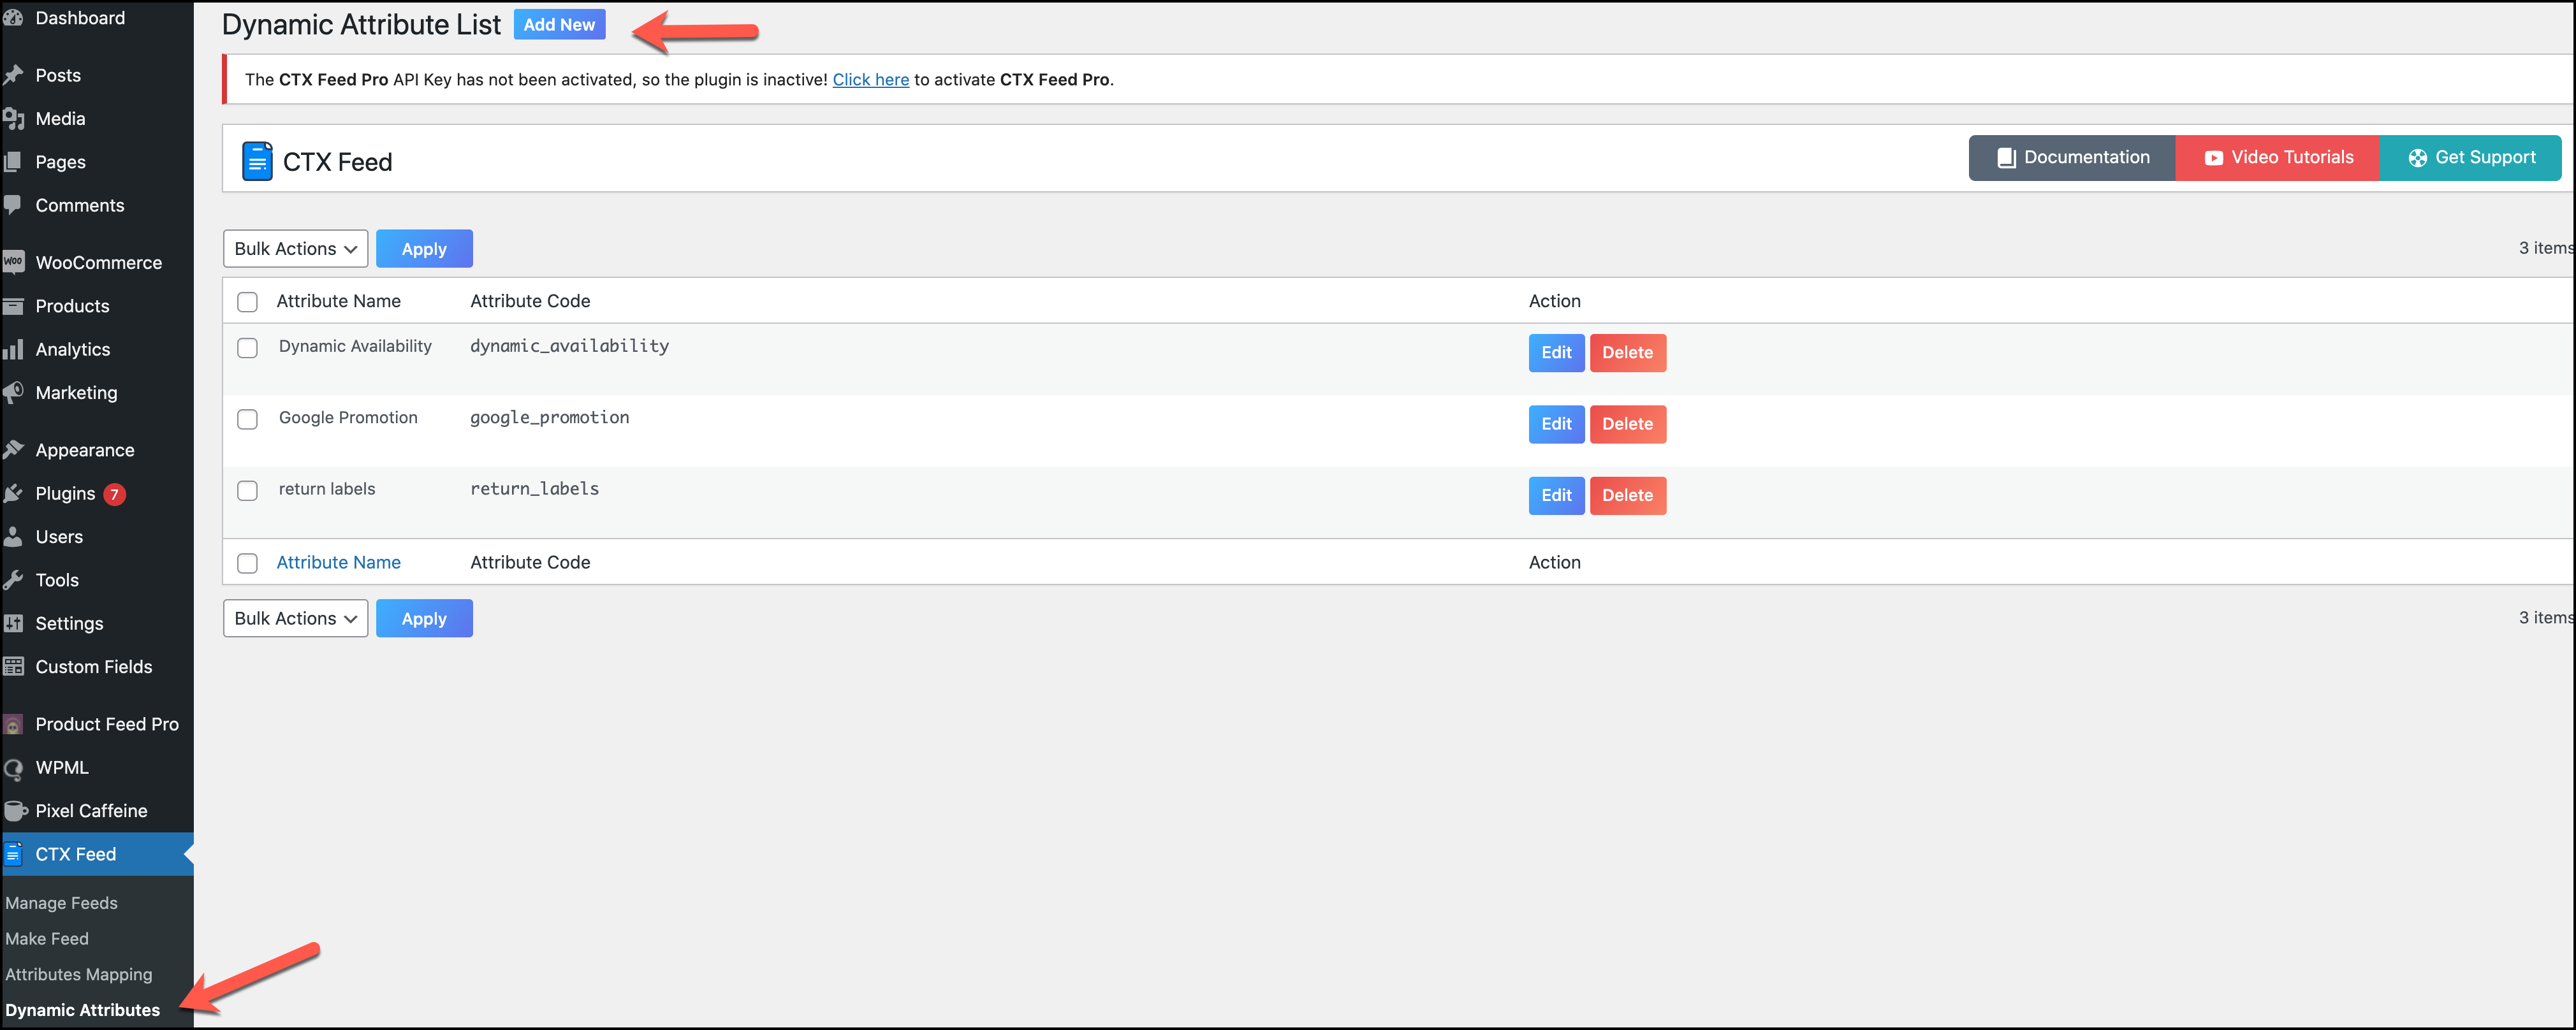
- Go to CTX Feed > Dynamic Attributes > Add New
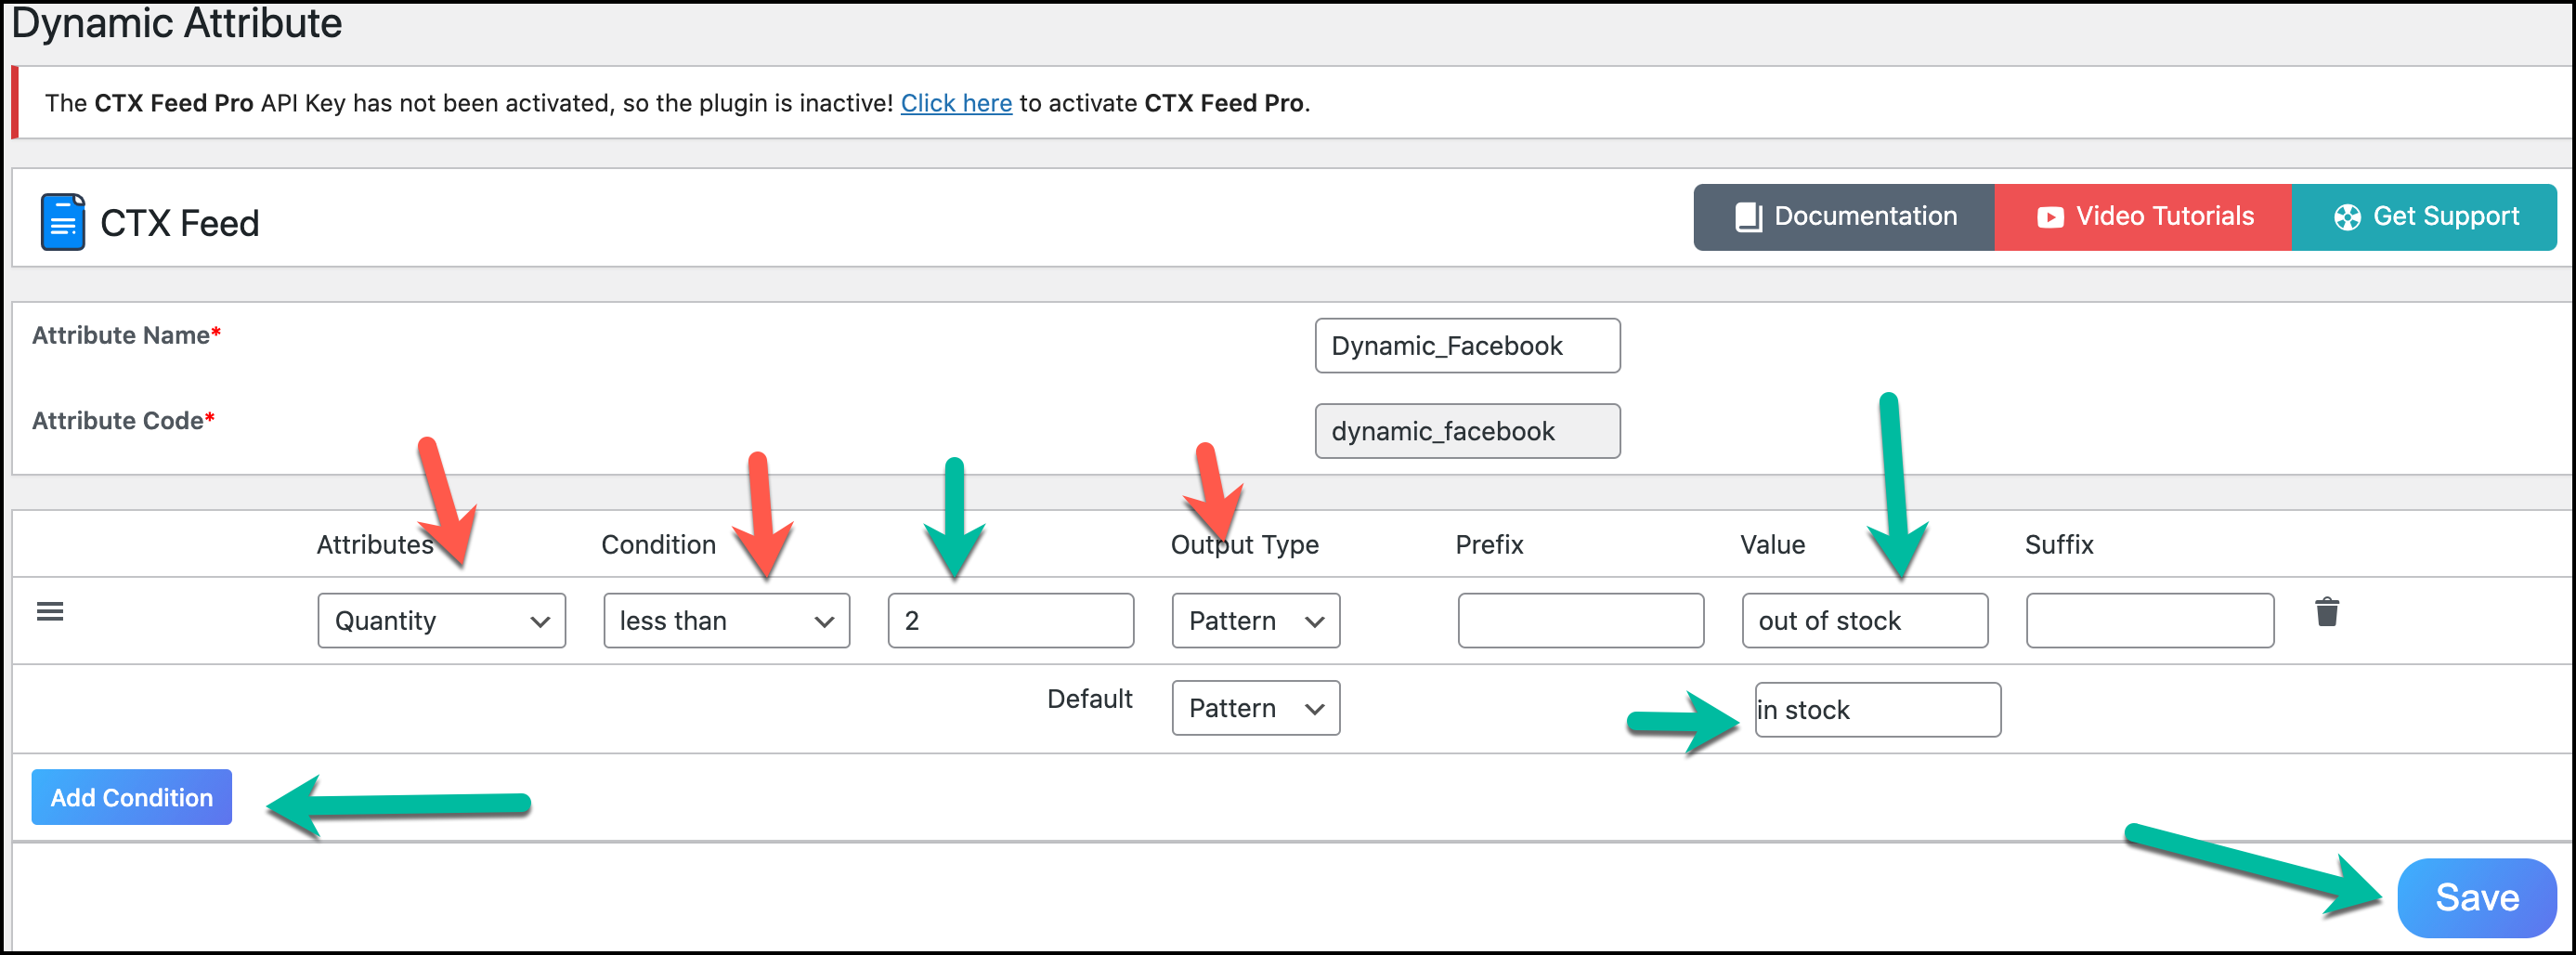
- Choose any quantity and apply the condition by fixing the Output Type. For example, if the quantity is below 2, the product will appear on the Facebook shop as Out of Stock
- Again, in the Make Feed section of CTX Feed, select the Dynamic Attribute name that you created for Stock Status [availability] and generate the file

- Open the feed file and see that magazine shows up as out of stock as it is less than 2 in quantity, whereas the Men’s underwear is shown as in stock.
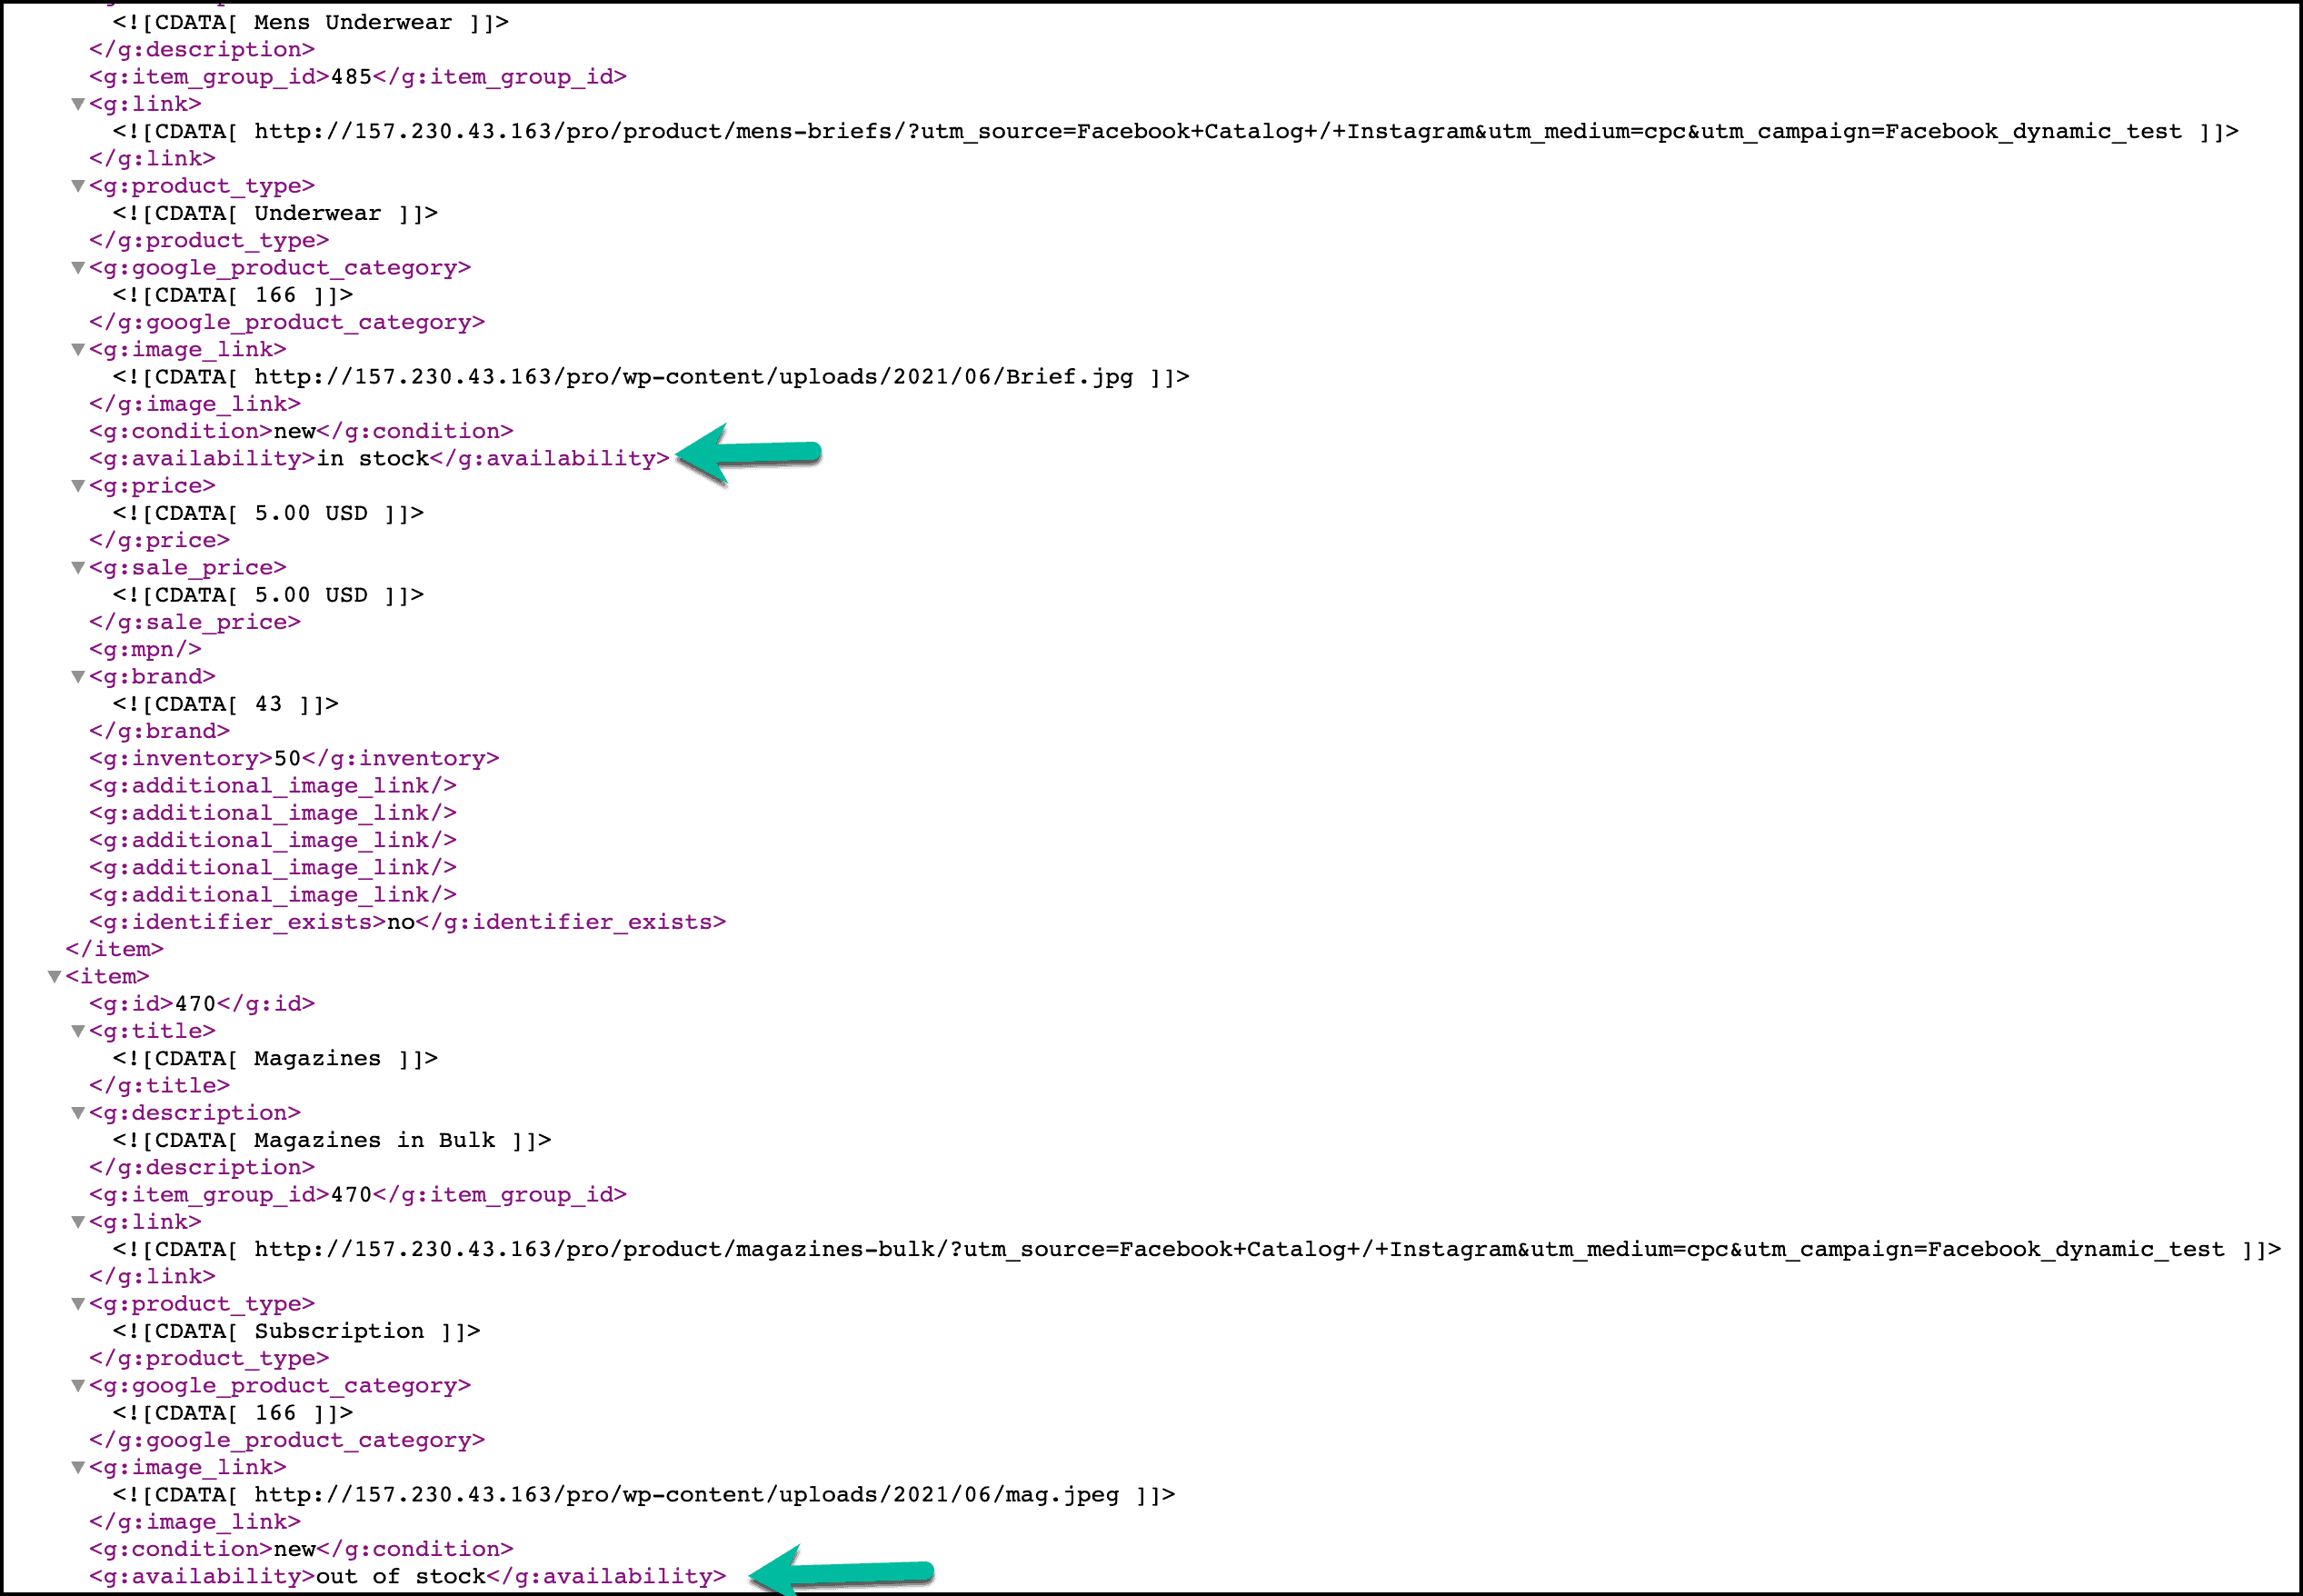
This is how CTX Feed Pro can help you get rid of any hassle of managing the stock. This is particularly important when you have a refund order from a customer, and you need to have at least 2 quantities of that product for backup.
Smart Filter
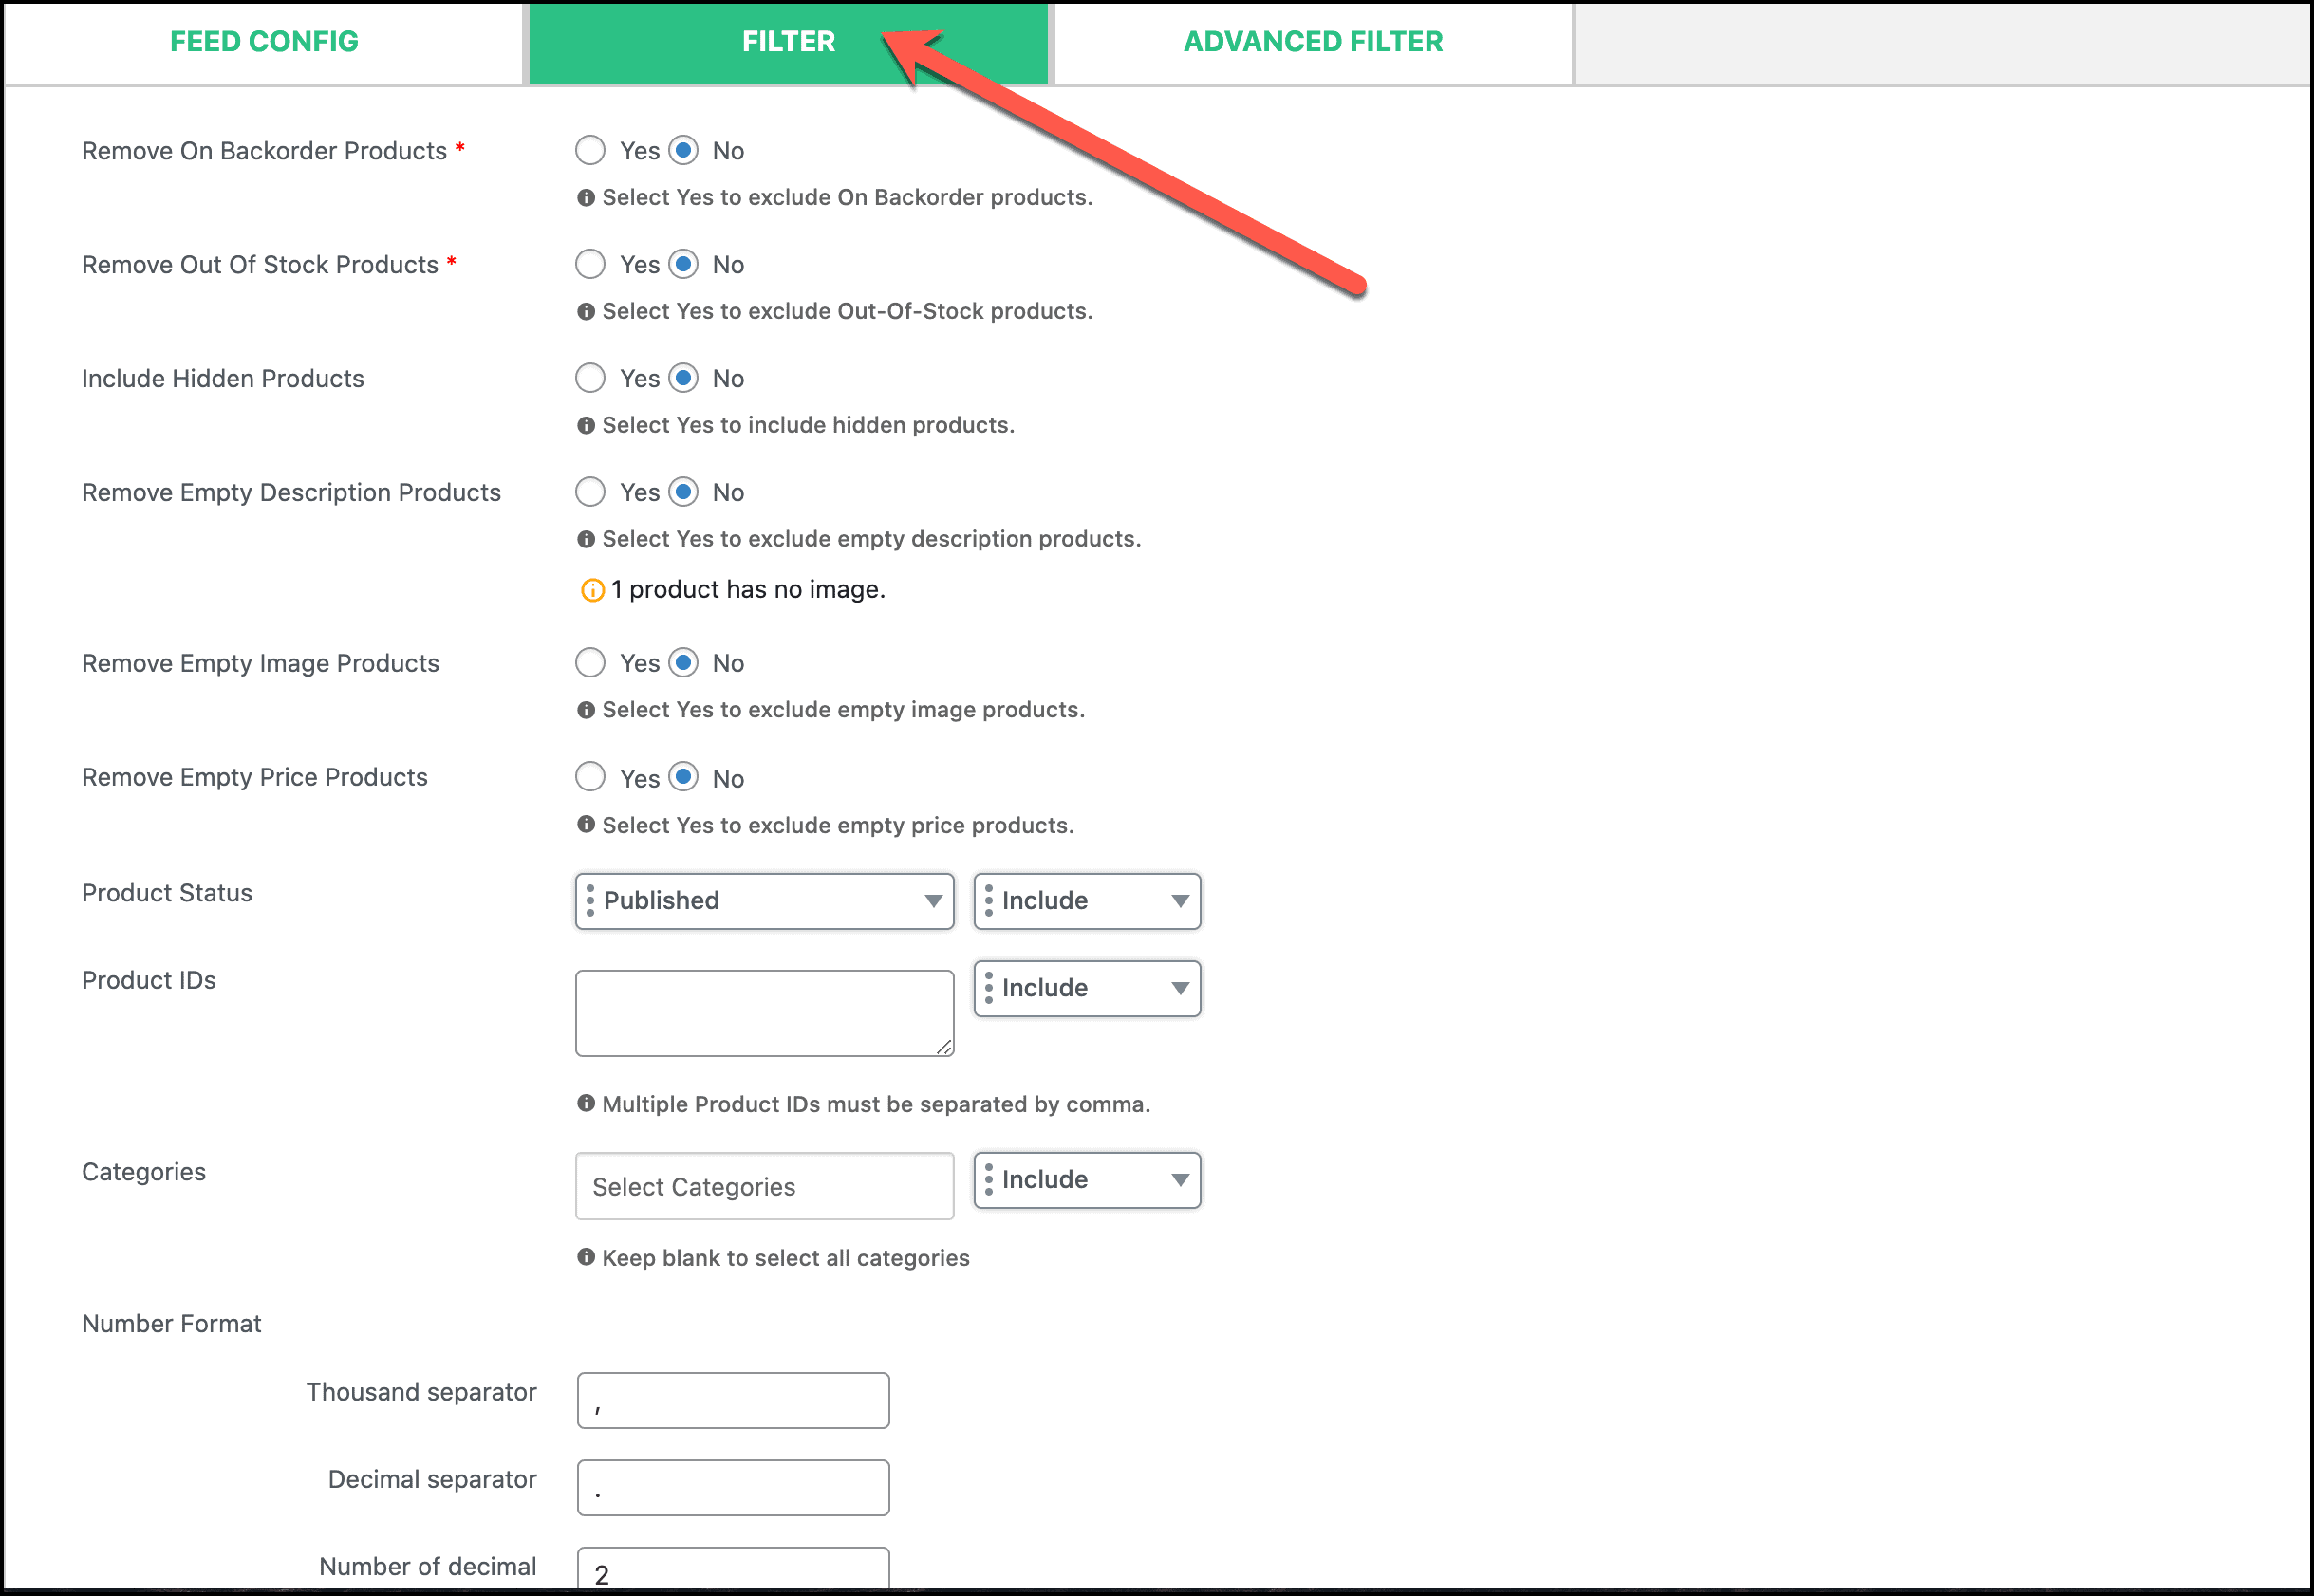
On the one hand, the Filter option allows you to remove the products that have descriptions, prices missing, or are unavailable. You can also type the IDs of the products to either include or exclude them from your feed file.
It leads the product not to turn up in the Facebook shop. You can get to decide how you want your prices to be used, such as the number of decimals, decimal separators, or thousand separators.
Smart file, on the other hand, sets the attribute conditions with AND or OR option. For instance, we have set two conditions, defining a set of products under a certain situation. This situation indicates that only those products will be selected, which will cost more than $25 but less than $50. These types of conditions help you manage a large inventory for your WooCommerce Facebook shop.

We talked a lot about the Facebook catalogue setup. Now, it’s time to reach out to mass audiences and customers to display your products. Remember, our primary aim of selling products through Facebook is not to showcase our items, also to get them buying.
Not all the customers will buy your products or services; some will come, view the items, take the decision, or even add to the cart. However, they will disappear in seconds without buying the items added to the cart. Therefore, knowing the customers’ behavior is a must.
Therefore, you need to track the customers’ behavior, such as how they perceive your product, why they want to buy it, why they rejected it, or revisit it. Based on that, you can decide if you want to run the campaign or not. Or, even if you run the campaign, will it compel them to purchase them, or will they be demotivated again?
At that point, Facebook Pixel will come to your service, laying the groundwork for your best advertising experience for the perfect conversion of Facebook for WooCommerce. Let’s not put you into any delay-hole – It’s time to unveil the inescapable impact of Facebook Pixel on your Facebook Pixel WooCommerce.
What Exactly is Facebook Pixel?
Facebook Pixel is a piece of code intended to be used in your online store website for creating a tracking system. It allows you to track the customer’s activities throughout the visit to your website. This code, while being set within the site, helps you understand how your ad campaign is performing, how to analyze the ad frequency, how to get the immense conversion, where its downsides are, how customers are reacting to it, and how this ad turns the customers into conversion, etc.

Besides, it will help you target those customers who once visited your website to purchase something or didn’t make the purchase or left the site so that they can be retargeted. Honestly, you don’t have to do any rocket science here. You simply insert the pixel code into the site, which works as a loop that sets the trap of cookies.
As soon the customers enter your site or possess a set of actions regarding the product-purchasing-involvement, it triggers the action; hence, you as a site owner get notified of how customers are attracted to your shop.
Is Facebook Pixel Useful for WooCommerce?
Gone are those days when you only relied upon email marketing or paid marketing. In this digital era, thanks to Facebook Pixel where the customers can see a pop-up or dynamic or carousel ads popping up on their display.
They all have one purpose – to engage them with your products to increase your WooCommerce Facebook shop visibility. The interesting fact is that they don’t do it unless they get the customers’ permission. Surprised that they didn’t provide one; how come did you get their permission? No panic!
However, if you aren’t aware of the carousel ads, simple look below;

1. Showing up the relevant products: When someone visits certain websites to buy something, the Pixel code tracks it down and sends it to you as an owner. It could be from buyers’ exploring products to buying them or adding them to the cart, or leaving halfway. Those who bought your products can be marked so that you can show them the relevant products in the future. You can also show them something from the relevant category.
For example, if someone bought a hoodie from your shop, you may want to show them a beanie as both matches perfectly during winter. If your pixel is set, your ad will show up to the right customers who might need the same categories
2. Improving your ad performance: Whenever you find customers ordering the same items, you may know these items are on demand. You either have them full of stock, or you will spend more in your ad campaign to reach out to even more customers. However, if customers are constantly dropping the offer just by coming to the cart, it means something is fishy.
It helps you analyze your ad performance and find out what is wrong with the ad. Based on the speculation, you can either customize your ad again or halt the ad campaign. It saves you from squandering your time, money, and effort on an unproductive ad. There are other reasons too why customers dropped down your products.
For example, they may have trust issues, not find your website interface easier, and the payment method could be suspicious, etc. You can evaluate these factors and, in turn, amend them in your later campaigns. It means Facebook Pixel is a great tool to optimize your ad, as well as monitor its performance.
3. Remarketing and retargeting the customers: The most intriguing factor is its capability to remarket your products to your existing or pre-left shoppers. You don’t want to lose the customers by any means. You will do anything you can to retain those valuable customers even though they left your store.
On top of that, if you have spent hefty advertising your products to bring these customers back, it will be double jeopardy. Thus, having a fully-fledged subtle advertising campaign through Facebook Pixel can save you from this disaster.
Facebook Pixel saves the IP of those visitors so that next time they browse Facebook, they can see those products left inside the cart. You also have a chance to show them similar items of the products they left so that this time they get to like them and buy them. This remarketing will not only bring a lot of customers to your site; it will also give you a chance to reconnect to your new customers and hence rediscover your products.
4. Grossing a Significant Return on Investment: Remember, the Facebook Pixel provides the optimum result when it gets actionable results from enormous conversion rates. It evaluates the results, analyzes the pageview, optimizes the ad campaigns, tracks various customers’ motives, and lastly, pushes them to visit your site to finally purchase the products or services.
You can also check the profit to loss ratio in terms of running the ad campaign. For example, if a product costs $25 but you are spending $30 per click without getting any traffic, it indicates that you must opt-out from promoting this ad any more. You can either think of another ad strategy to catch up with the audiences or create a new ad for another product.
5. Funneling the Search for the Right Audiences: Let’s assume your customers are within the age limit of 30-40 and search for expensive items, such as luxurious smartphones. Facebook Pixel can keep a record of this behavior so that next time whenever these sorts of customers browse Facebook, they get to see these ads showing their desired yet expensive products.
It wouldn’t have happened if you showed this advert to anyone below this age range or to certain customers who would otherwise have taken cheaper phones. Therefore, Facebook Pixel for WooCommerce helps connect your WooCommerce to Facebook shop in such a way that it reaches the target audiences without wasting your resources.
6. Making the ad accessible via Cross-device conversions: You are going down the escalator to the underground while being on the online perfume store on Facebook using your phone. Network gone! Neither can you check the history using apps nor the page. How could you miss such a luring offer? No guarantee that you will find it again, knowing that the cost lower down from $35 to $18 is elusive to find.
Let me give you peace of mind; when you open your desktop or laptop back at home, you will see that ad appearing because the Facebook Pixel functions that way. Whichever device you exchange, that particular ad that you clicked will shadow you like a ghost.
Is Facebook Pixel Free?
As long as installing and setting up Facebook Pixel is concerned, it is absolutely free. It is a misconception that Facebook Pixel is found on a Facebook page, but no. You can get it from the Events Manager of Facebook Business Suite. Therefore, no hassle in searching for it and installing it.
However, don’t match it with the ad campaign. Facebook Pixel has nothing to do with ad campaigns except tracking, analyzing, and monitoring them. You will need to spend money on any ad you will run, and the sum will vary. Yet, no link with the Facebook Pixel in terms of paying the amount. Ads need money but not Pixel.
What is the difference between standard events and custom conversions?
The major difference is in their way of tracking the events for specific customers. By tracking the customers using the Facebook Pixel WooCommerce, you want to hold back the customers to your site. Not necessarily you can do it just by putting trackers, aka Pixel, in every single page or the factors that Facebook gravitates.
Sometimes, you like to see the customers of specific needs, which will turn out to be your desired conversions.
Standard events: These are predefined events that are recognized solely by Facebook. It enlists those events where customers are more likely to generate your traffic followed by conversions. For example, searching the products, viewing them, giving details in the payment options, checkout, cart, etc.
These actions are so definite that the moment the customers finish the action, that will be recorded, and the next ad will customize itself in such a way. It will leave no stone unturned to hound the desired consumer base from any page they visit and commit the actions. Events are;
- Add payment info
- Add to Cart
- Complete registration
- Contact
- Find Location
- Initiate checkout
- Add to Wishlist
- Purchase
- Schedule
- Search
- Subscribe, etc.
You can also check the specification for Facebook Pixel standard events to see how the Pixel base code is embedded into every web page. You need to add this code to every event page so that customers’ behavior information is collected. It helps you track those customers for retargeting, build large audiences and hence create optimized conversions.
Custom conversions: This particular event will account for those outside the standard events list. It brings in those customers who you as an owner want from a specific web page or pages.
Therefore, it refers to a more specific event where the conversion rate becomes specific. There is no scope for adding Pixel code here as the whole conversion rate depends on the set of rules you set for the tracking. You set the rules either via URL or parameter or both.
It is denoted as a custom conversion because you want to reach out to those customers who have made the action up to the purchase. For example, if someone you want to bring to your Thank You page for subscription, and the person has come this far, it will record this and show the ad relevant to the customers since you have added the URL for this action.
At the same time, if you set the parameter, you can also uplift the conversion. But it will be very restricted for a certain product, as well as customers.
For example, if you need to see how many people search baby diapers for aged over 5, here, the URL rule will apply to diapers, whereas the parameter will be age, which is five. It means whenever customers visit your website to purchase the diaper for babies aged over 5 years; it will instigate the tracking.
You will be assured of how good the ad is in driving the conversion. Thus, next time, this ad will display itself to those who are yet to make this particular purchase for any baby aged over 5.
How Do I Add Facebook Pixel to WooCommerce?
To apply all the tactics of tracking, remarketing, or propagating ad campaigns, setting up the Facebook Pixel for WooCommerce is a prerequisite. It is almost symmetrical to what we showed in the “connect Facebook to WooCommerce” section above. But there are a few other things to settle down before you can track your store progress.
Under normal circumstances, you would want to use other third-party plugins, either free or paid ones. Again, they are difficult to find, or even if you find one, you will not be satisfied with how they will incorporate your Facebook Pixel into the WooCommerce store.
But the matter of hope is that we have brought you that opportunity with our all-in-one feed producer – CTX Feed. You can use the free CTX version to manipulate the Facebook Pixel for WooCommerce in whichever way you want. Fortuitously, the CTX Feed has a built-in option for enabling your Pixel tracking feature.
Let me show you the very last stage of this adding Facebook Pixel to your WooCommerce for the better outcome of your Facebook for WooCommerce.

Facebook Pixel Helper
Although Facebook tracking is seen on the Event Manager of a business page, you still want to see it on the top right of your browser, especially if you are a Chrome user. You just need to install an extension for it called Facebook Pixel Helper. It helps you see the users making the transactions or browsing your webpage without staying on the Event Manager page. Remember, Facebook Pixel Helper only extracts the information from any Facebook WooCommerce related plugin, but they are individual entities.
- First, go to Google and type the name. Click on the link, and you will see something like the following image. Click on the Add to Chrome button

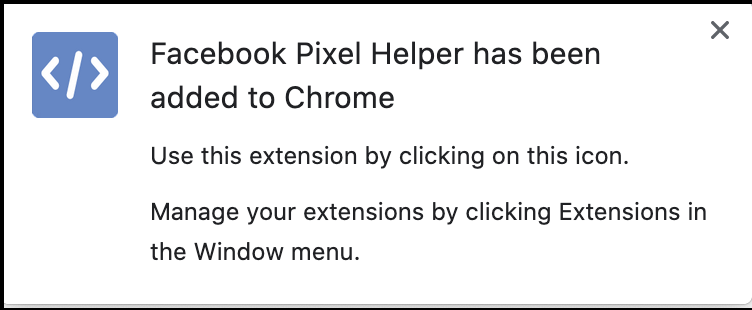
- Now it has been added to your extension setting of Chrome. You will see a confirmation message below
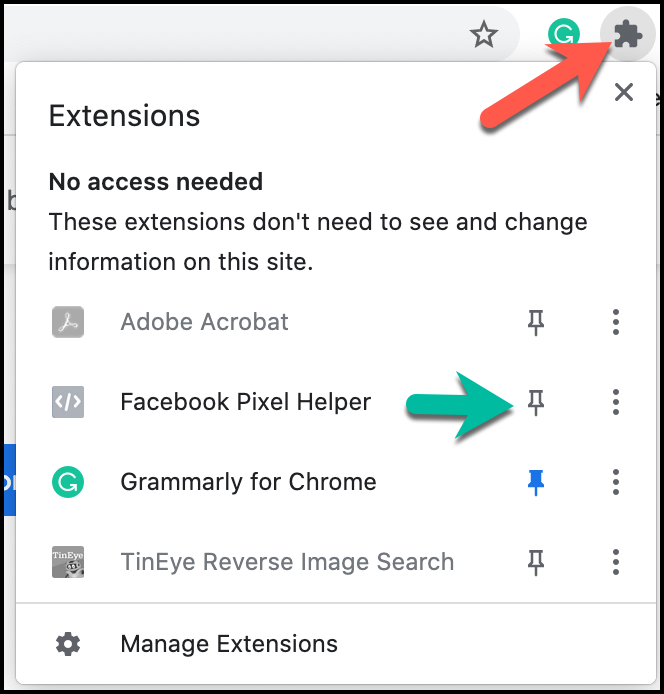
- Now, hover your cursor straight over the Extension sign of Chrome and click to see a list of extensions. Pin the Facebook Pixel Helper to run it. Done.
The following section will cover how to connect your Facebook Pixel to WooCommerce using the CTX Feed Facebook WooCommerce plugin;
Facebook Pixel integration with WooCommerce:
If you have remembered how we did connect the Facebook catalog to WooCommerce, then you are one step ahead. We reckon you have kept your previously created catalogue, which we will integrate under your business page.
- Just log in to Facebook Business Suite with your login information and click on the hamburger sign to click on Events Manager. Now, we need your focus on it
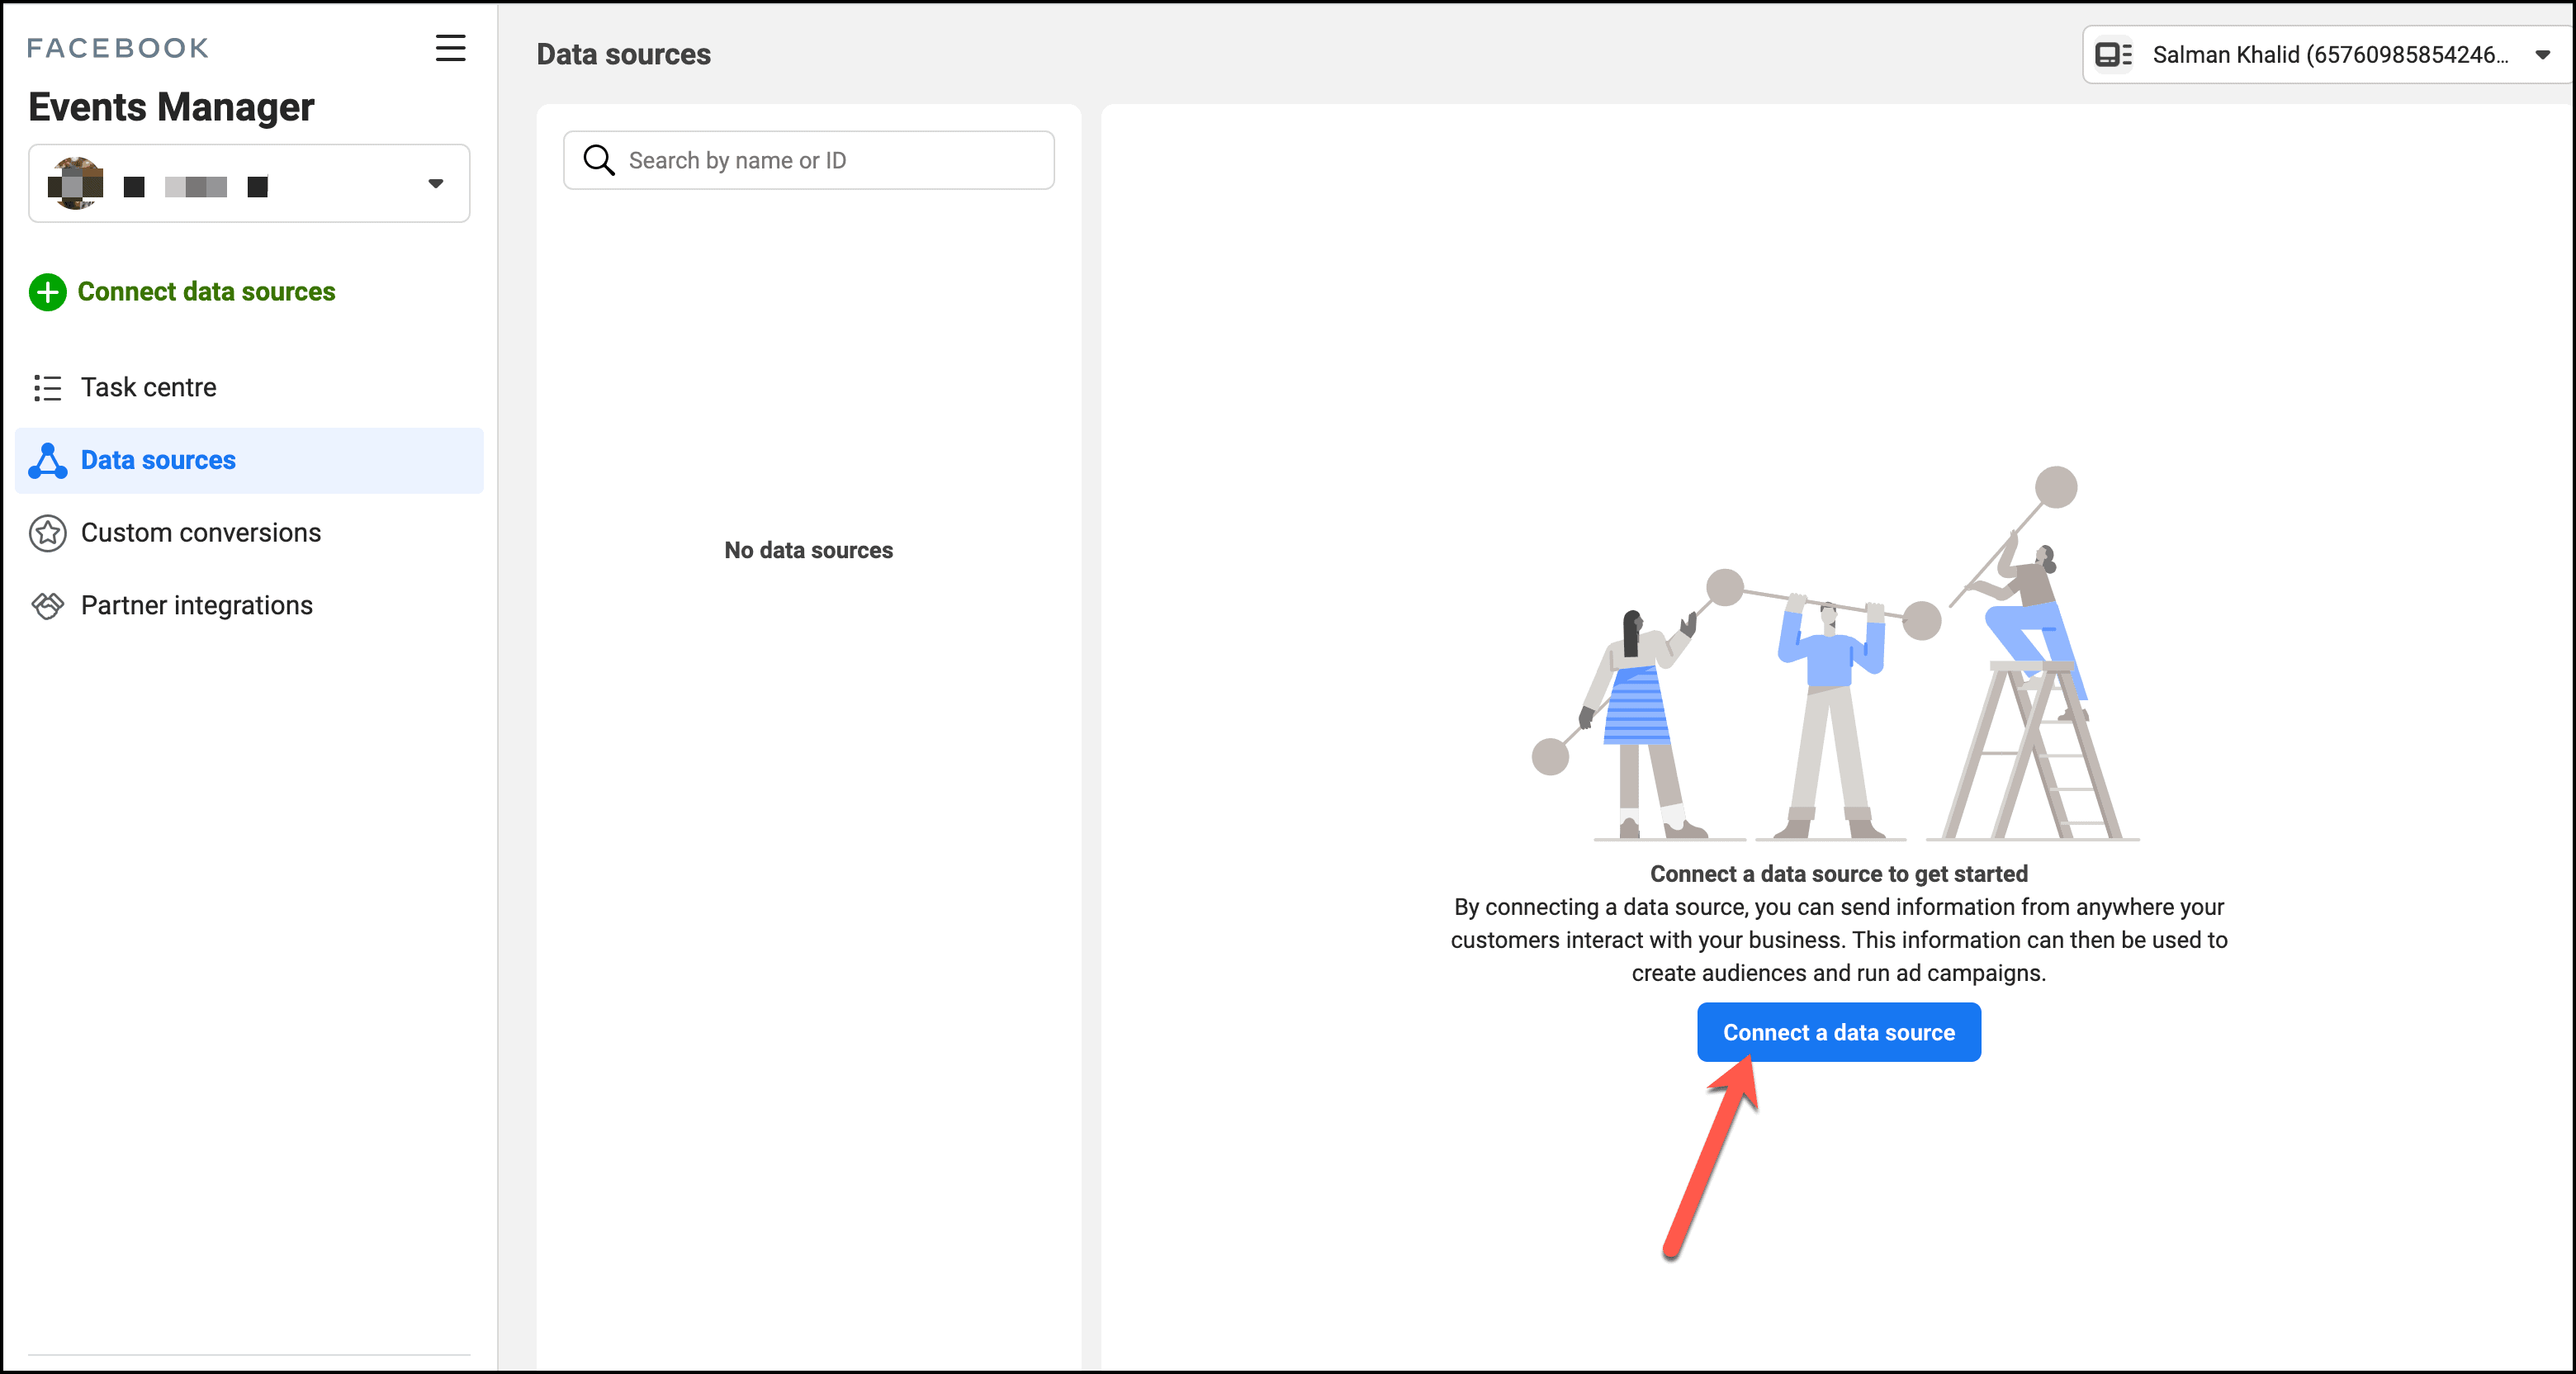
- You need to create a Facebook Pixel for yourself. Therefore, click on Connect a data source under Data sources
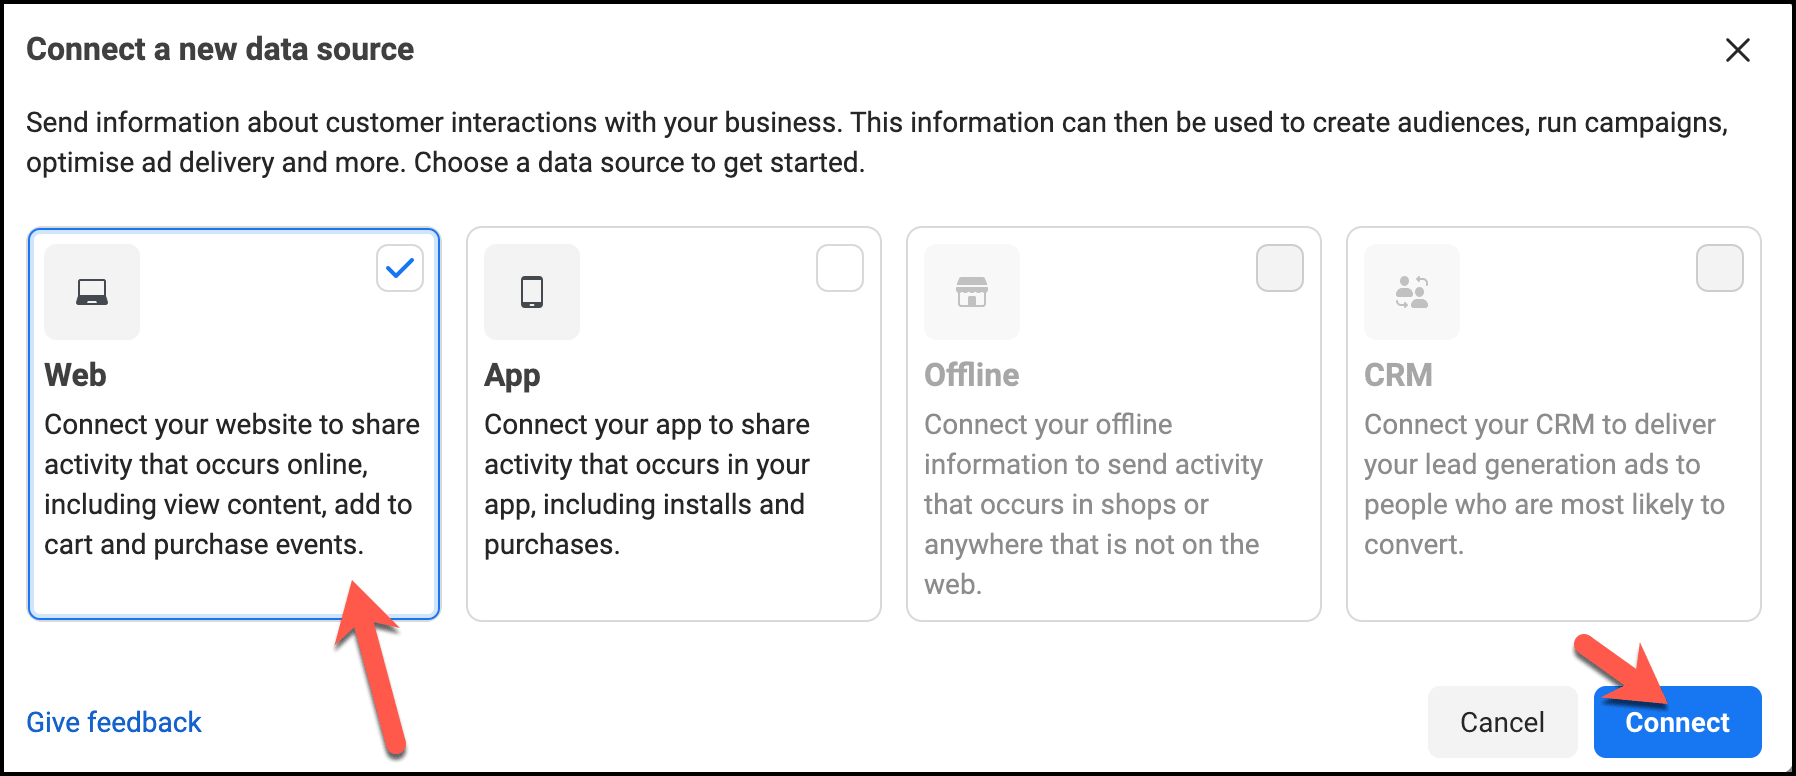
- For the time being, you may select Web, but you can select the other three options depending on your preference. Click on Connect
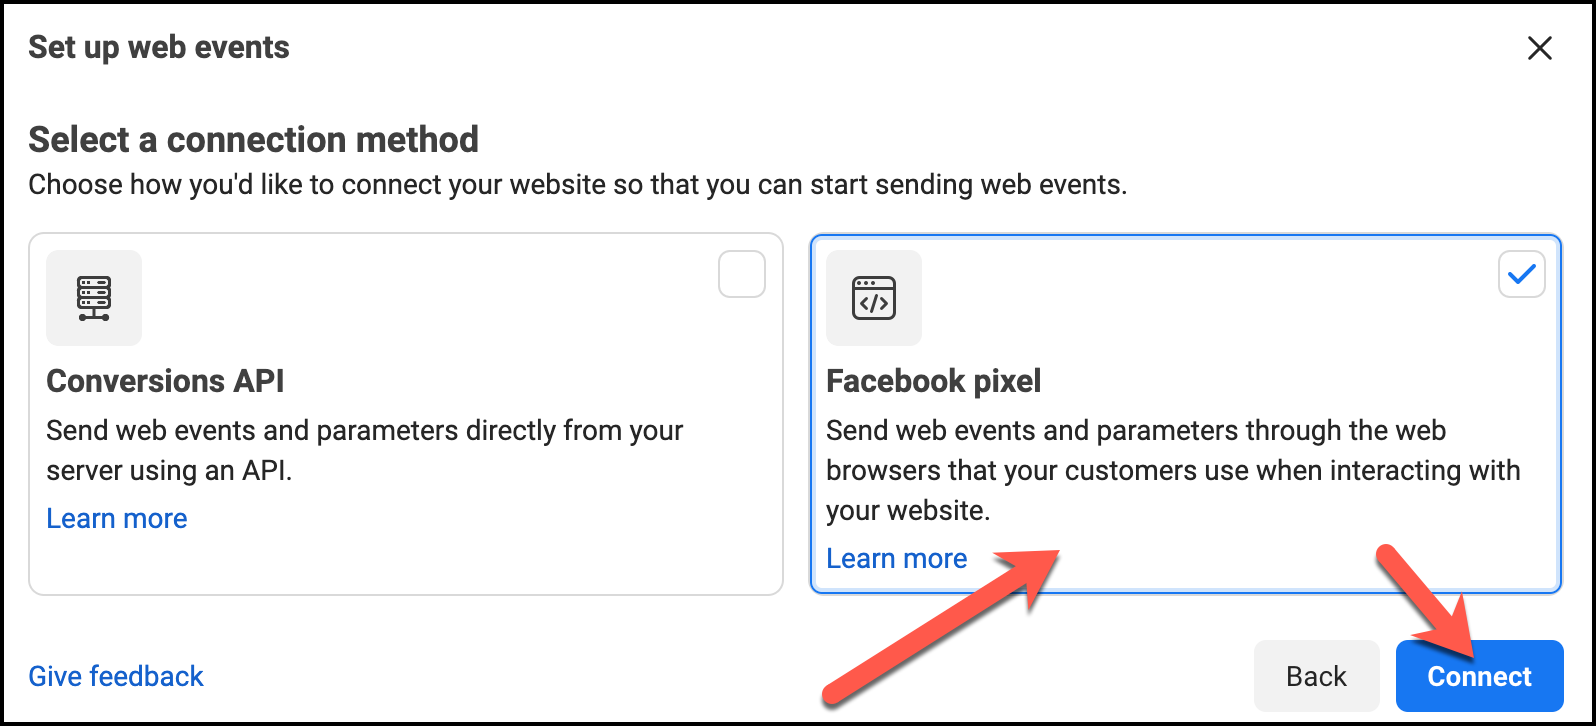
- Tick on Facebook pixel and connect the page
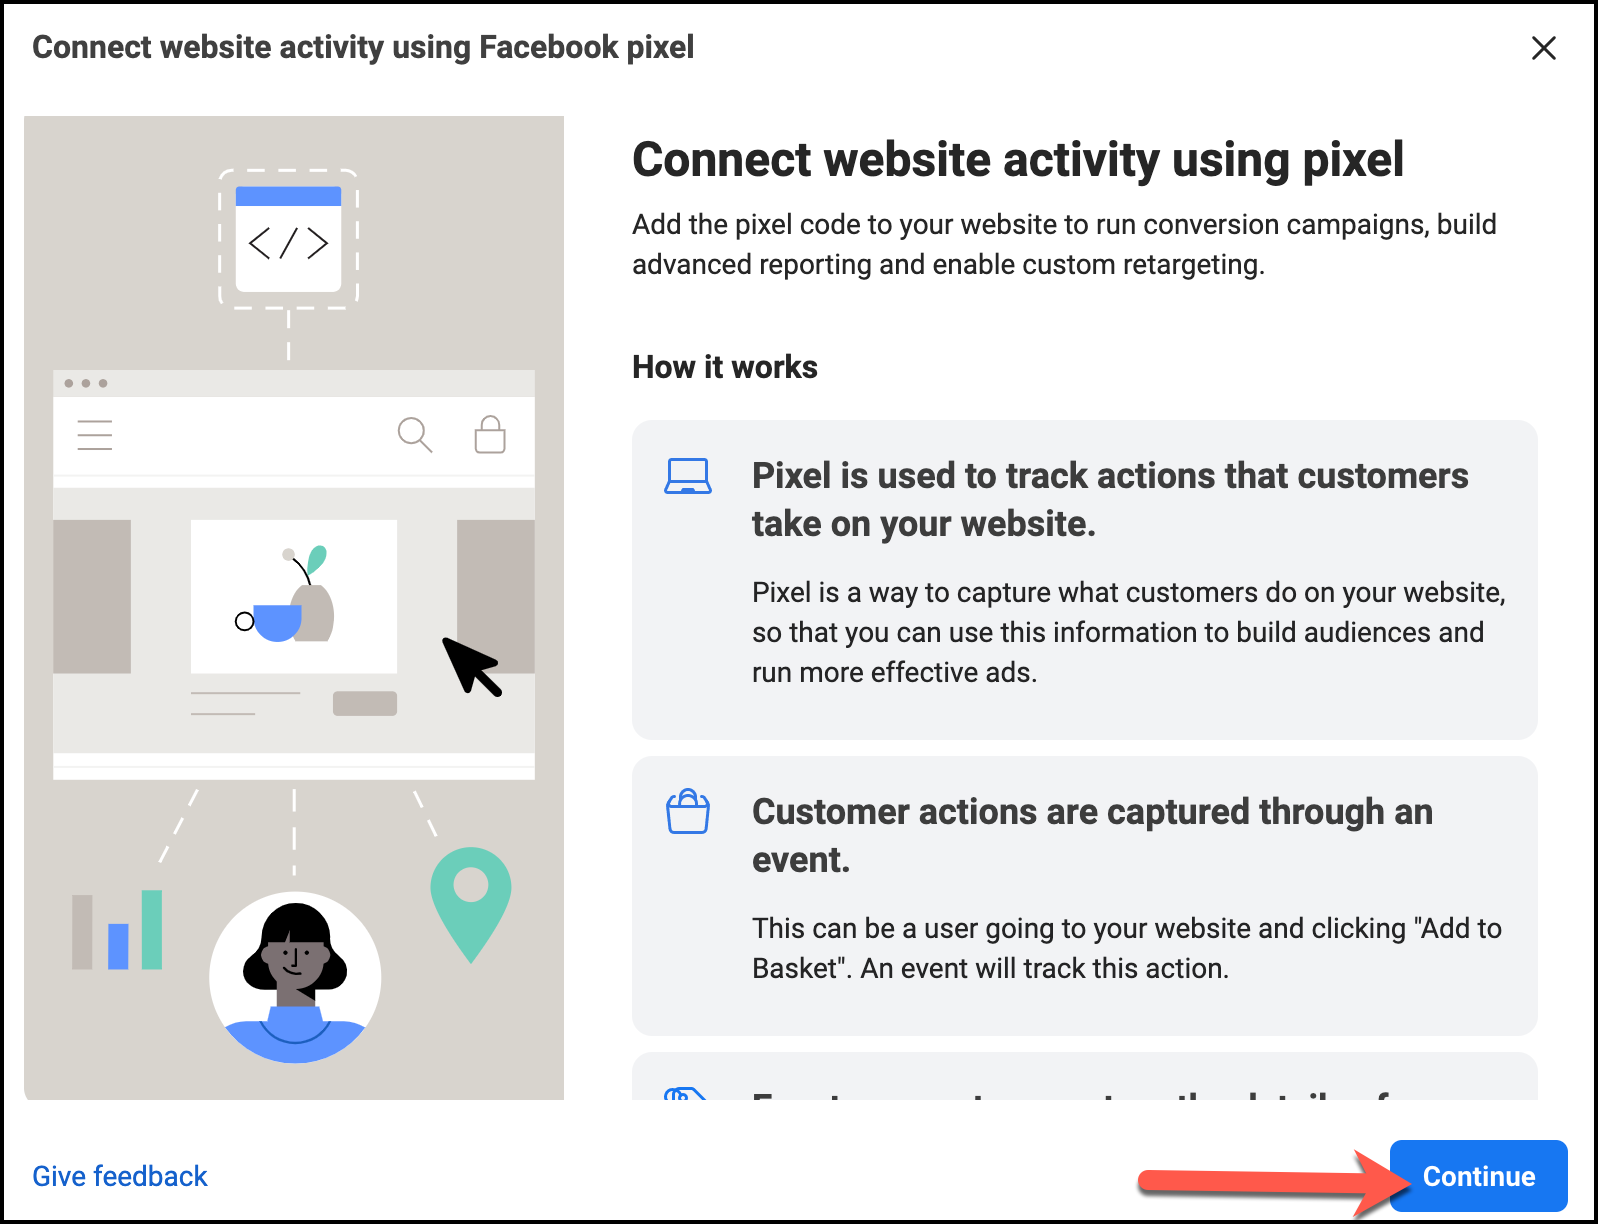
- Click the Continue button to run ahead
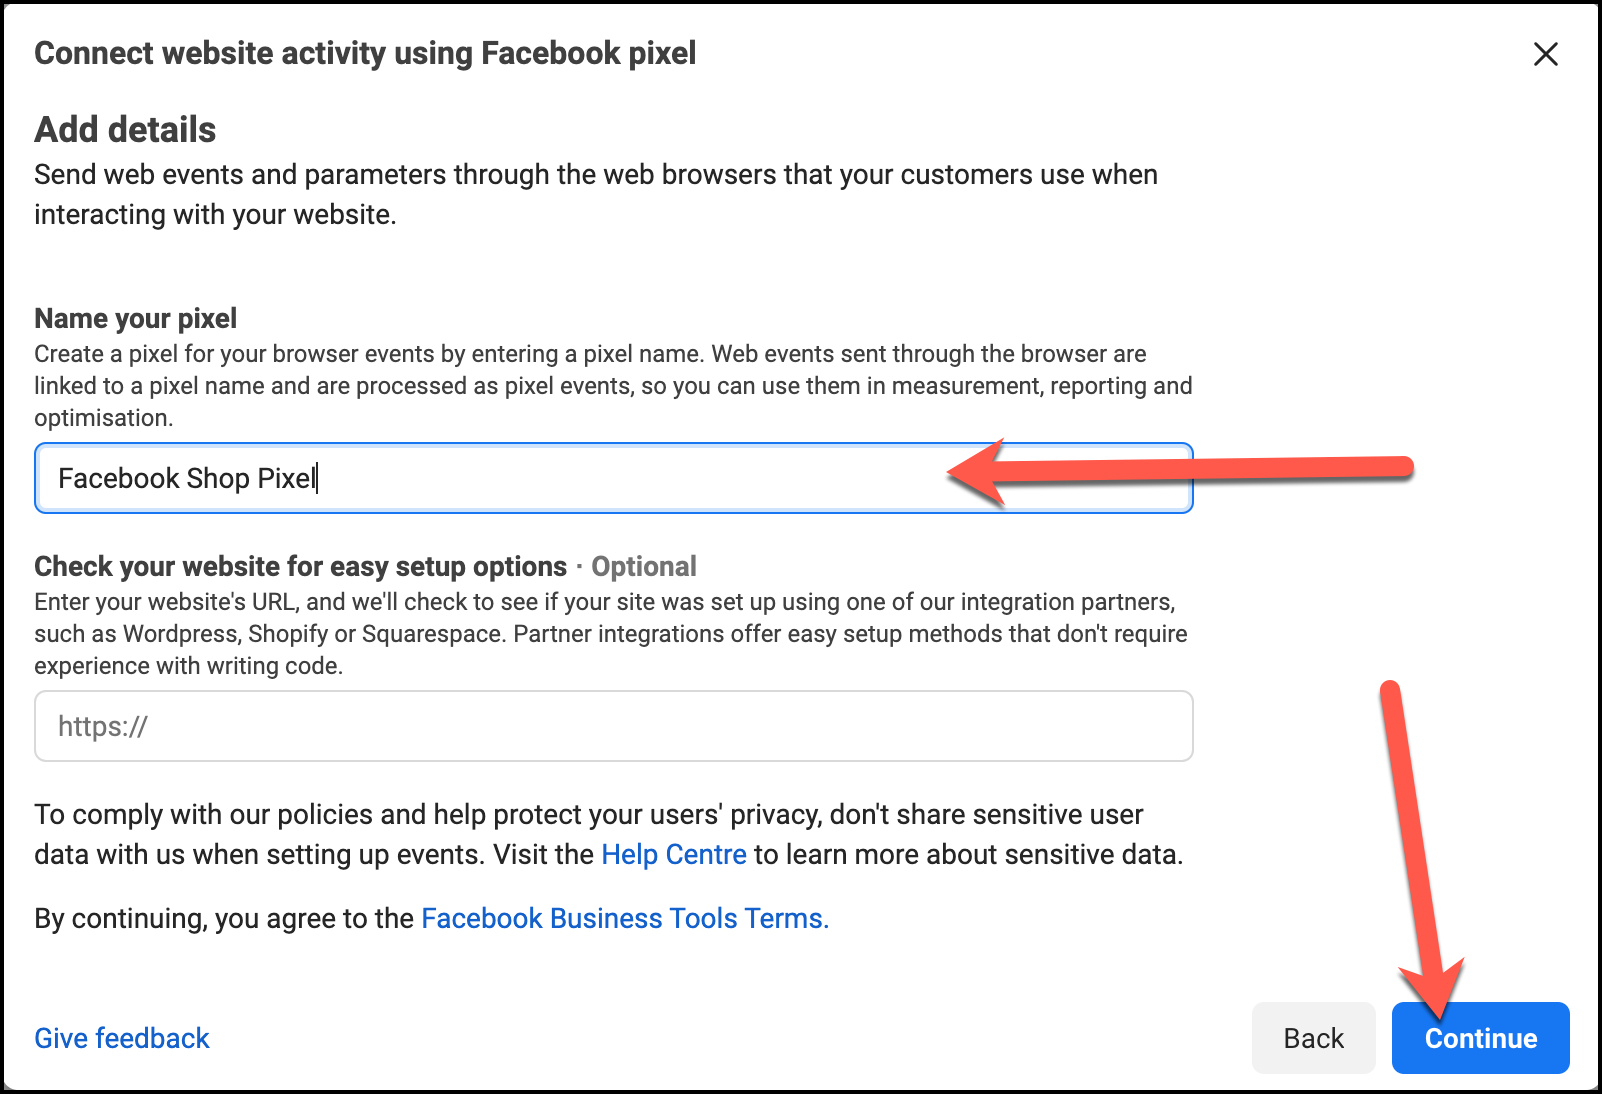
- Give an apt name for your Pixel. Leave the URL section empty as it is not compulsory. Continue the page to get along with the process
- Finally, your Pixel ID is showing up, which you will need to fully track the customers’ behaviors and for the CTX Feed Facebook WooCommerce plugin. This ID will resonate with the WooCommerce Facebook product feed. Copy the ID

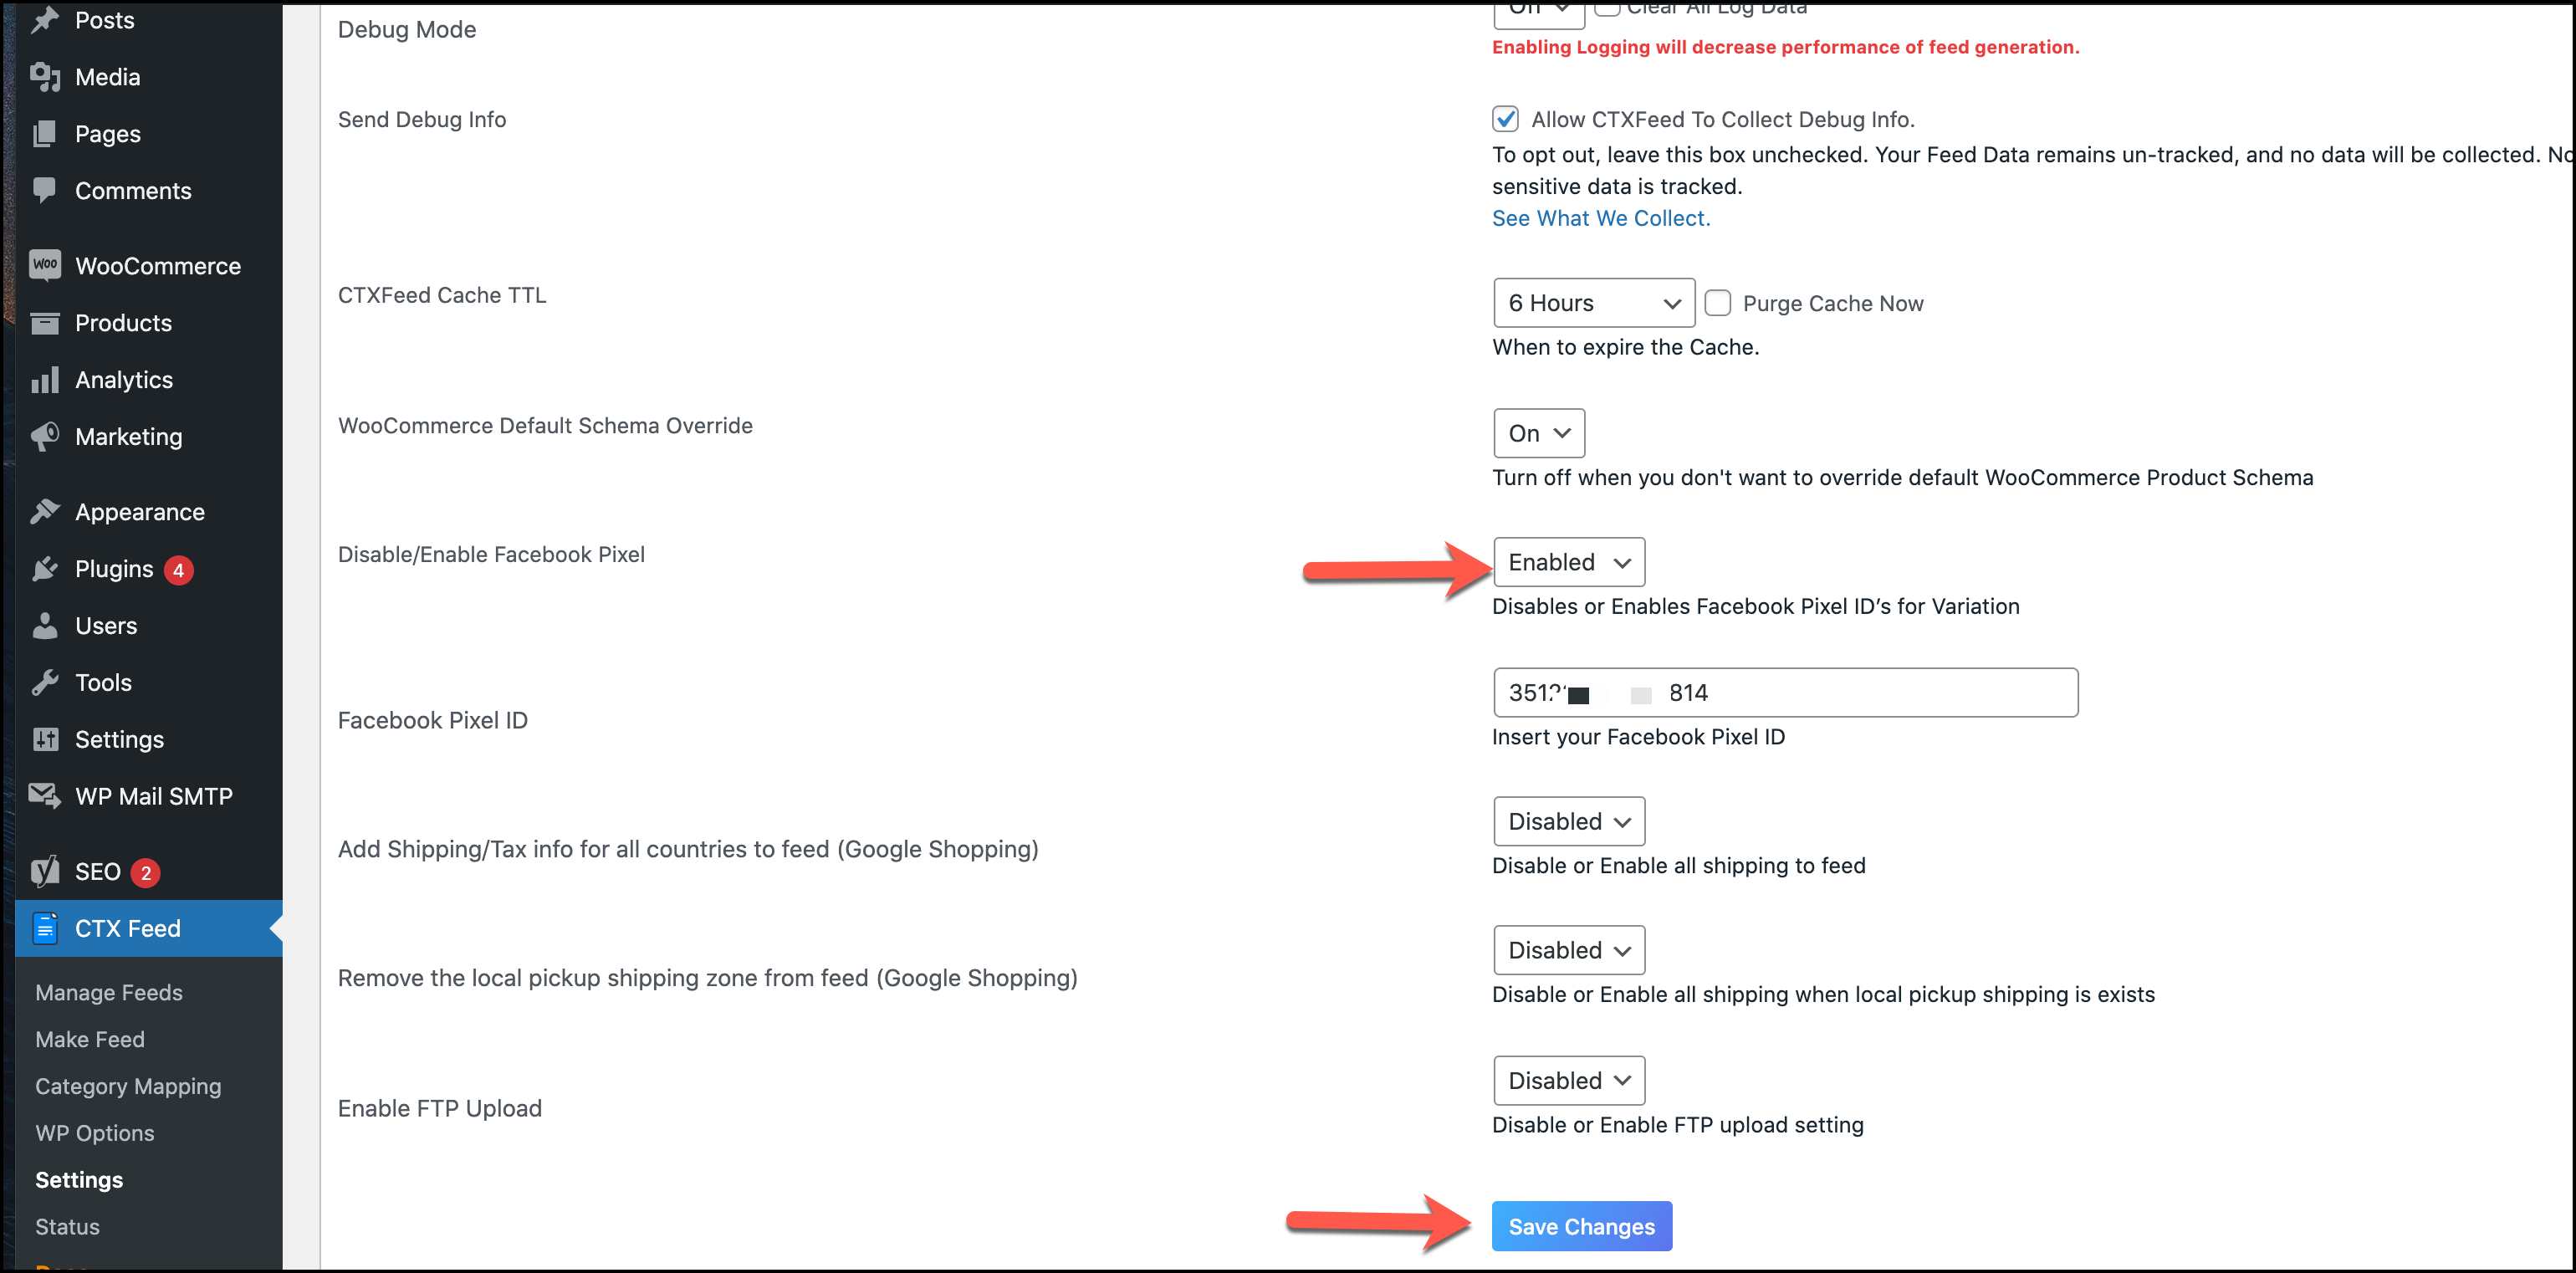
- Return to your CTX Feed > Settings and choose Enabled for the Disable/Enable Facebook Pixel option. Underneath it, paste your unique Pixel ID in the empty box, followed by clicking on the Save Changes button
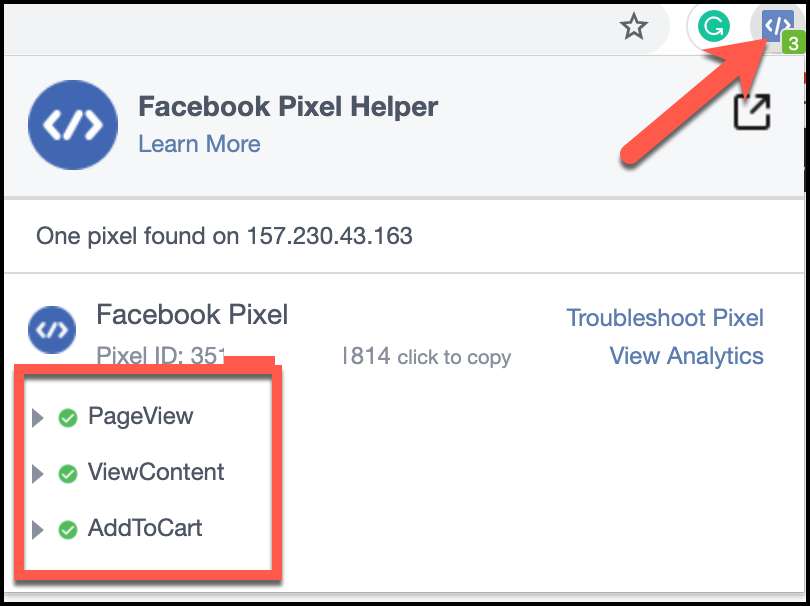
If you carefully look at your Facebook Pixel Helper extension, it will show you numbers. These are the numbers of the activities of the customers. This is happening due to the activation of Facebook Pixel for WooCommerce. For example,
1. PageView: When someone visits your websites
2. ViewContent: refers to when you click on the product to see the images, read the descriptions, and all the relevant details.
3. AddToCart: when you add any product or services to the cart
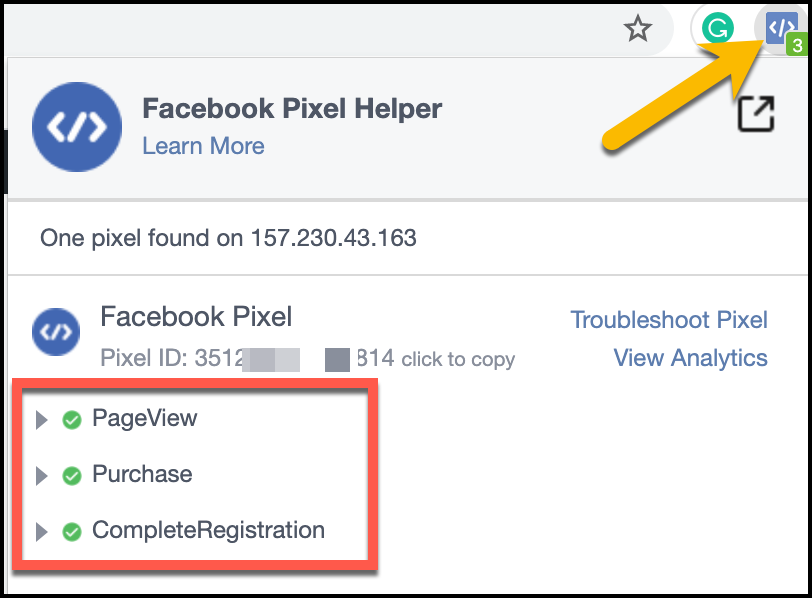
4. Complete Registration: When you place an order and confirm it, it will create a database for that user to your business account.
5. Purchase: When the order is fully confirmed
You should go back to the Events Manager of your business page and refresh the page again. Sometimes, it takes minutes to hours to get the update of the customers’ activities.
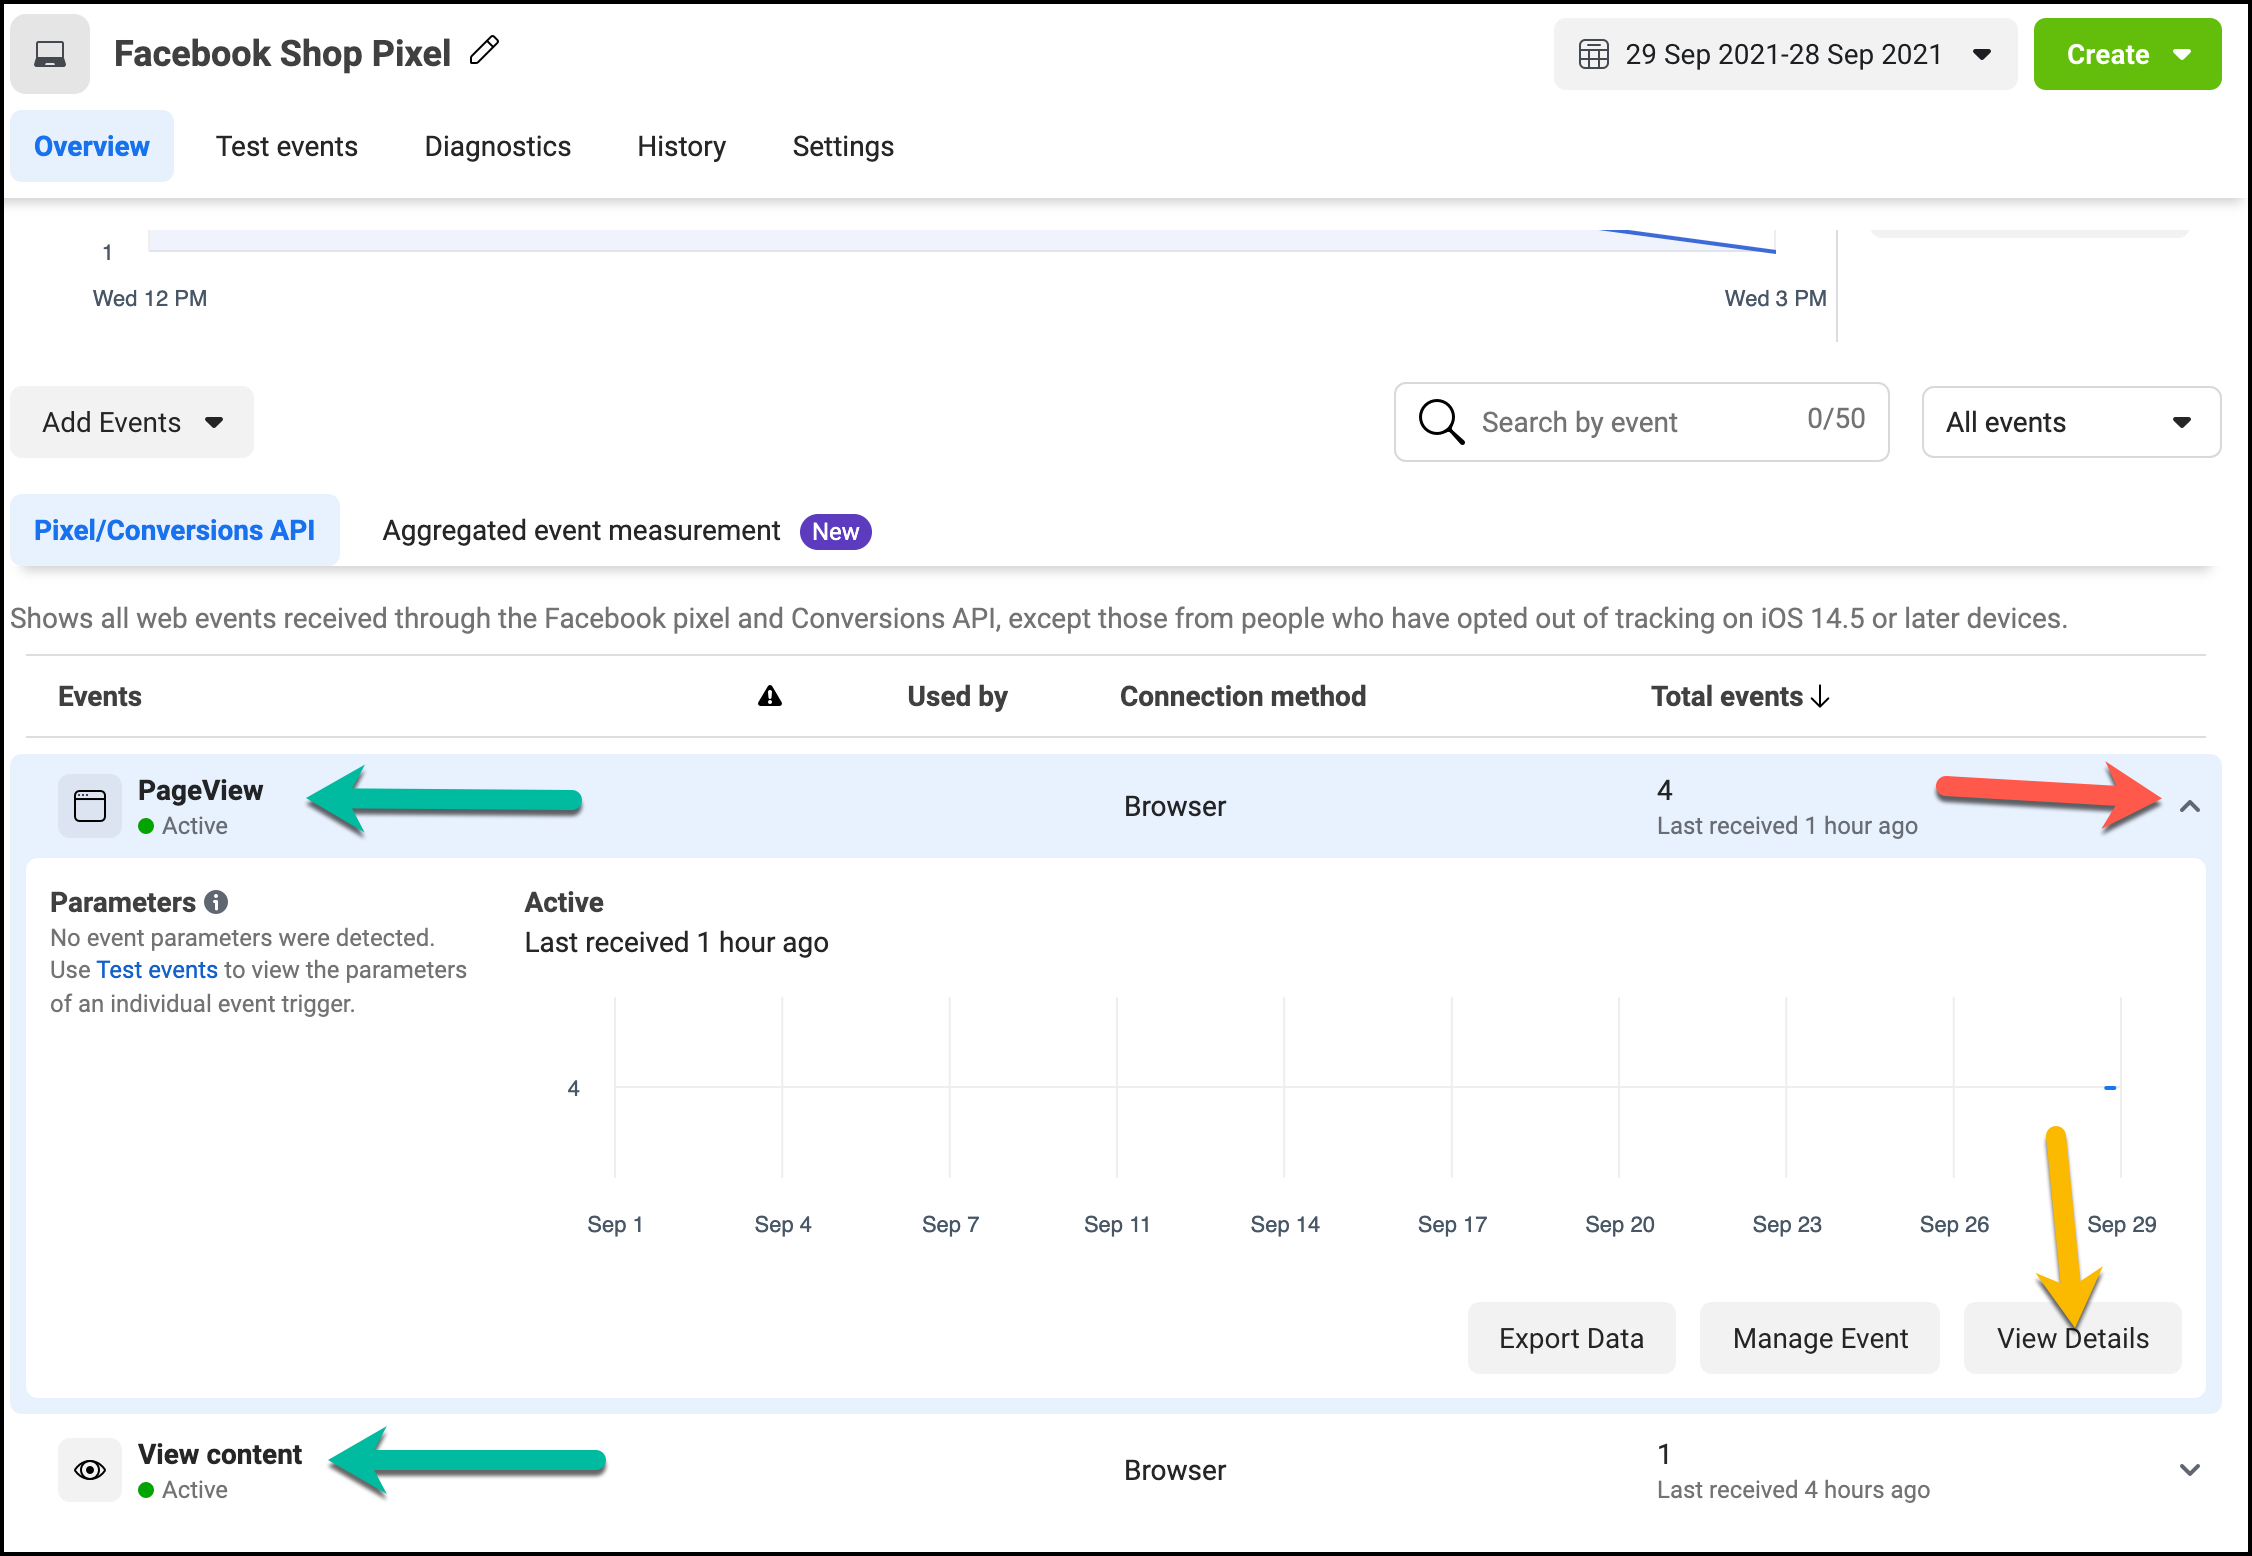
Here, you will see the activities, such as PageView and View content. Click on the View Details button to glance at what activities had taken place at a given time. It helps you as an e-commerce owner get a full picture of your selling products, dynamic ads optimization, and target audiences. Remember, you are getting all of these with a free CTX Feed. And that’s the hack, which the CTX Feed gives you a chance to keep eyes on your customers, making the Facebook Pixel, a perfect choice for WooCommerce.
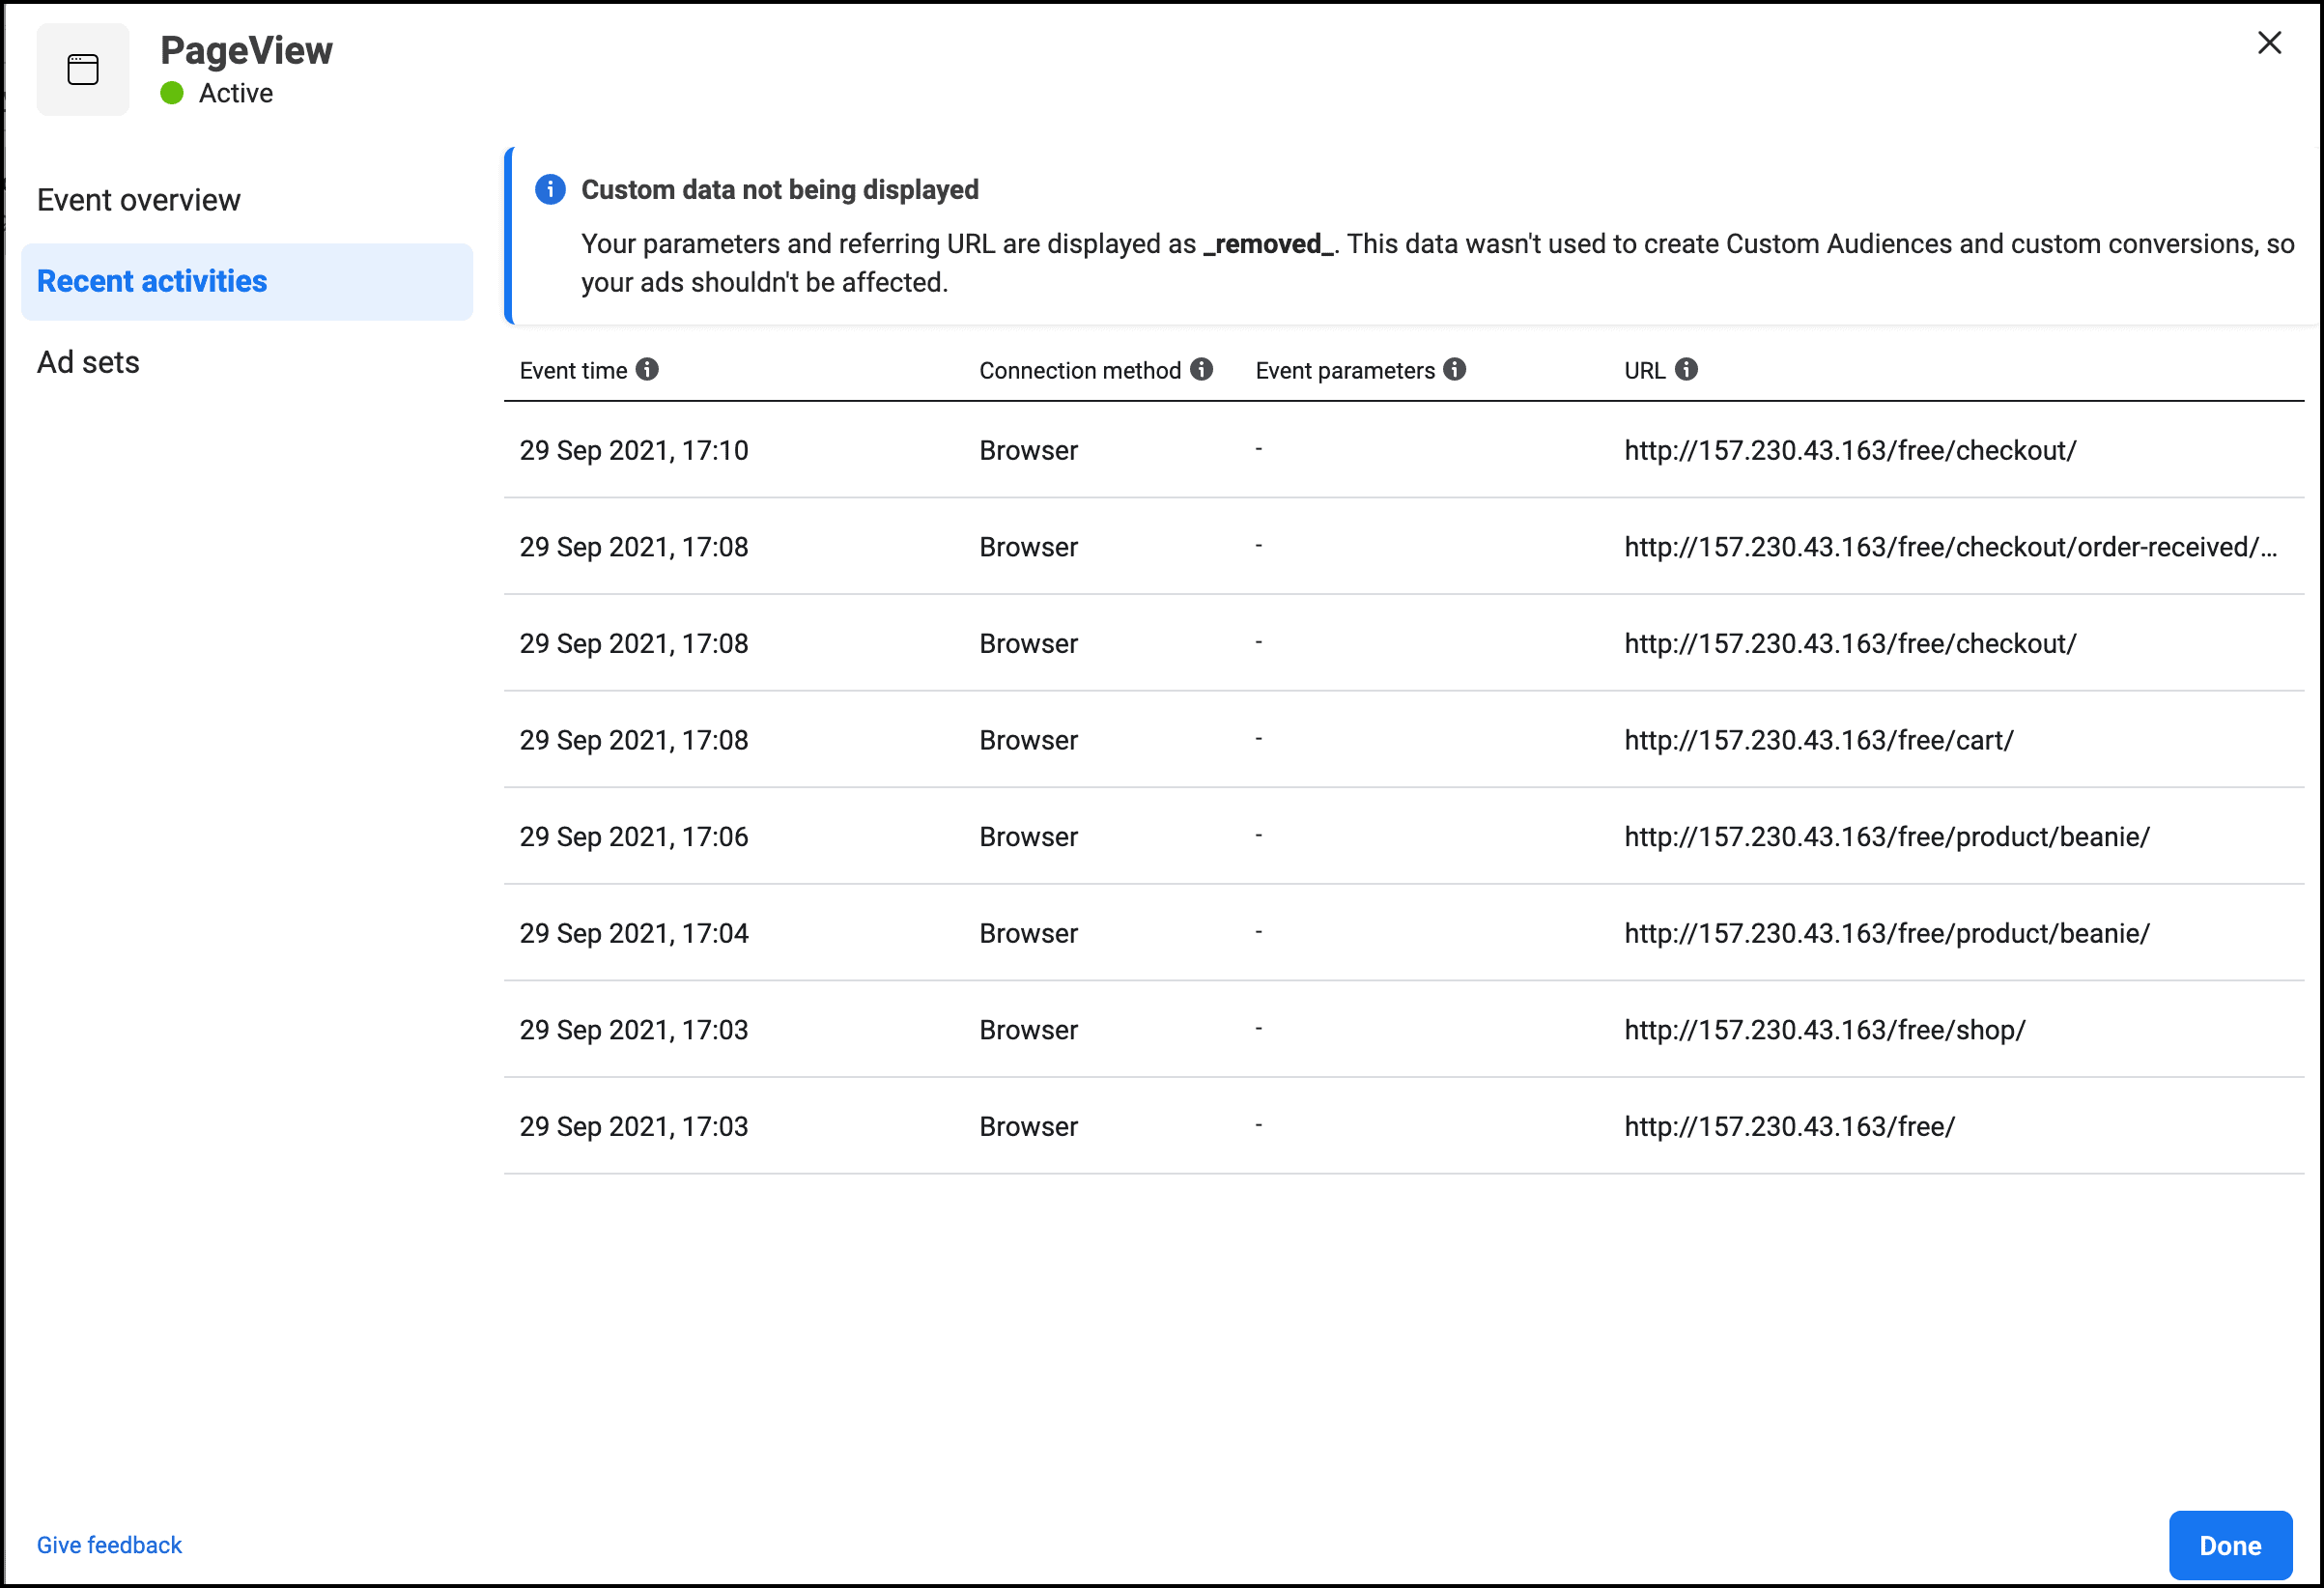
You are all set for your next ad campaign. Do keep tracking the customers and improve your store for the perfect marketing of Facebook for WooCommerce.
How Do I Remove WooCommerce from Facebook?
If you plan to create a new catalogue or remove the existing catalogue to get hold of the business page or the customers, you need to seal off your WooCommerce from Facebook. Facebook for WooCommerce allows you to do that so. All you ought to do is remove your catalogue connected to Facebook for your Facebook business page.
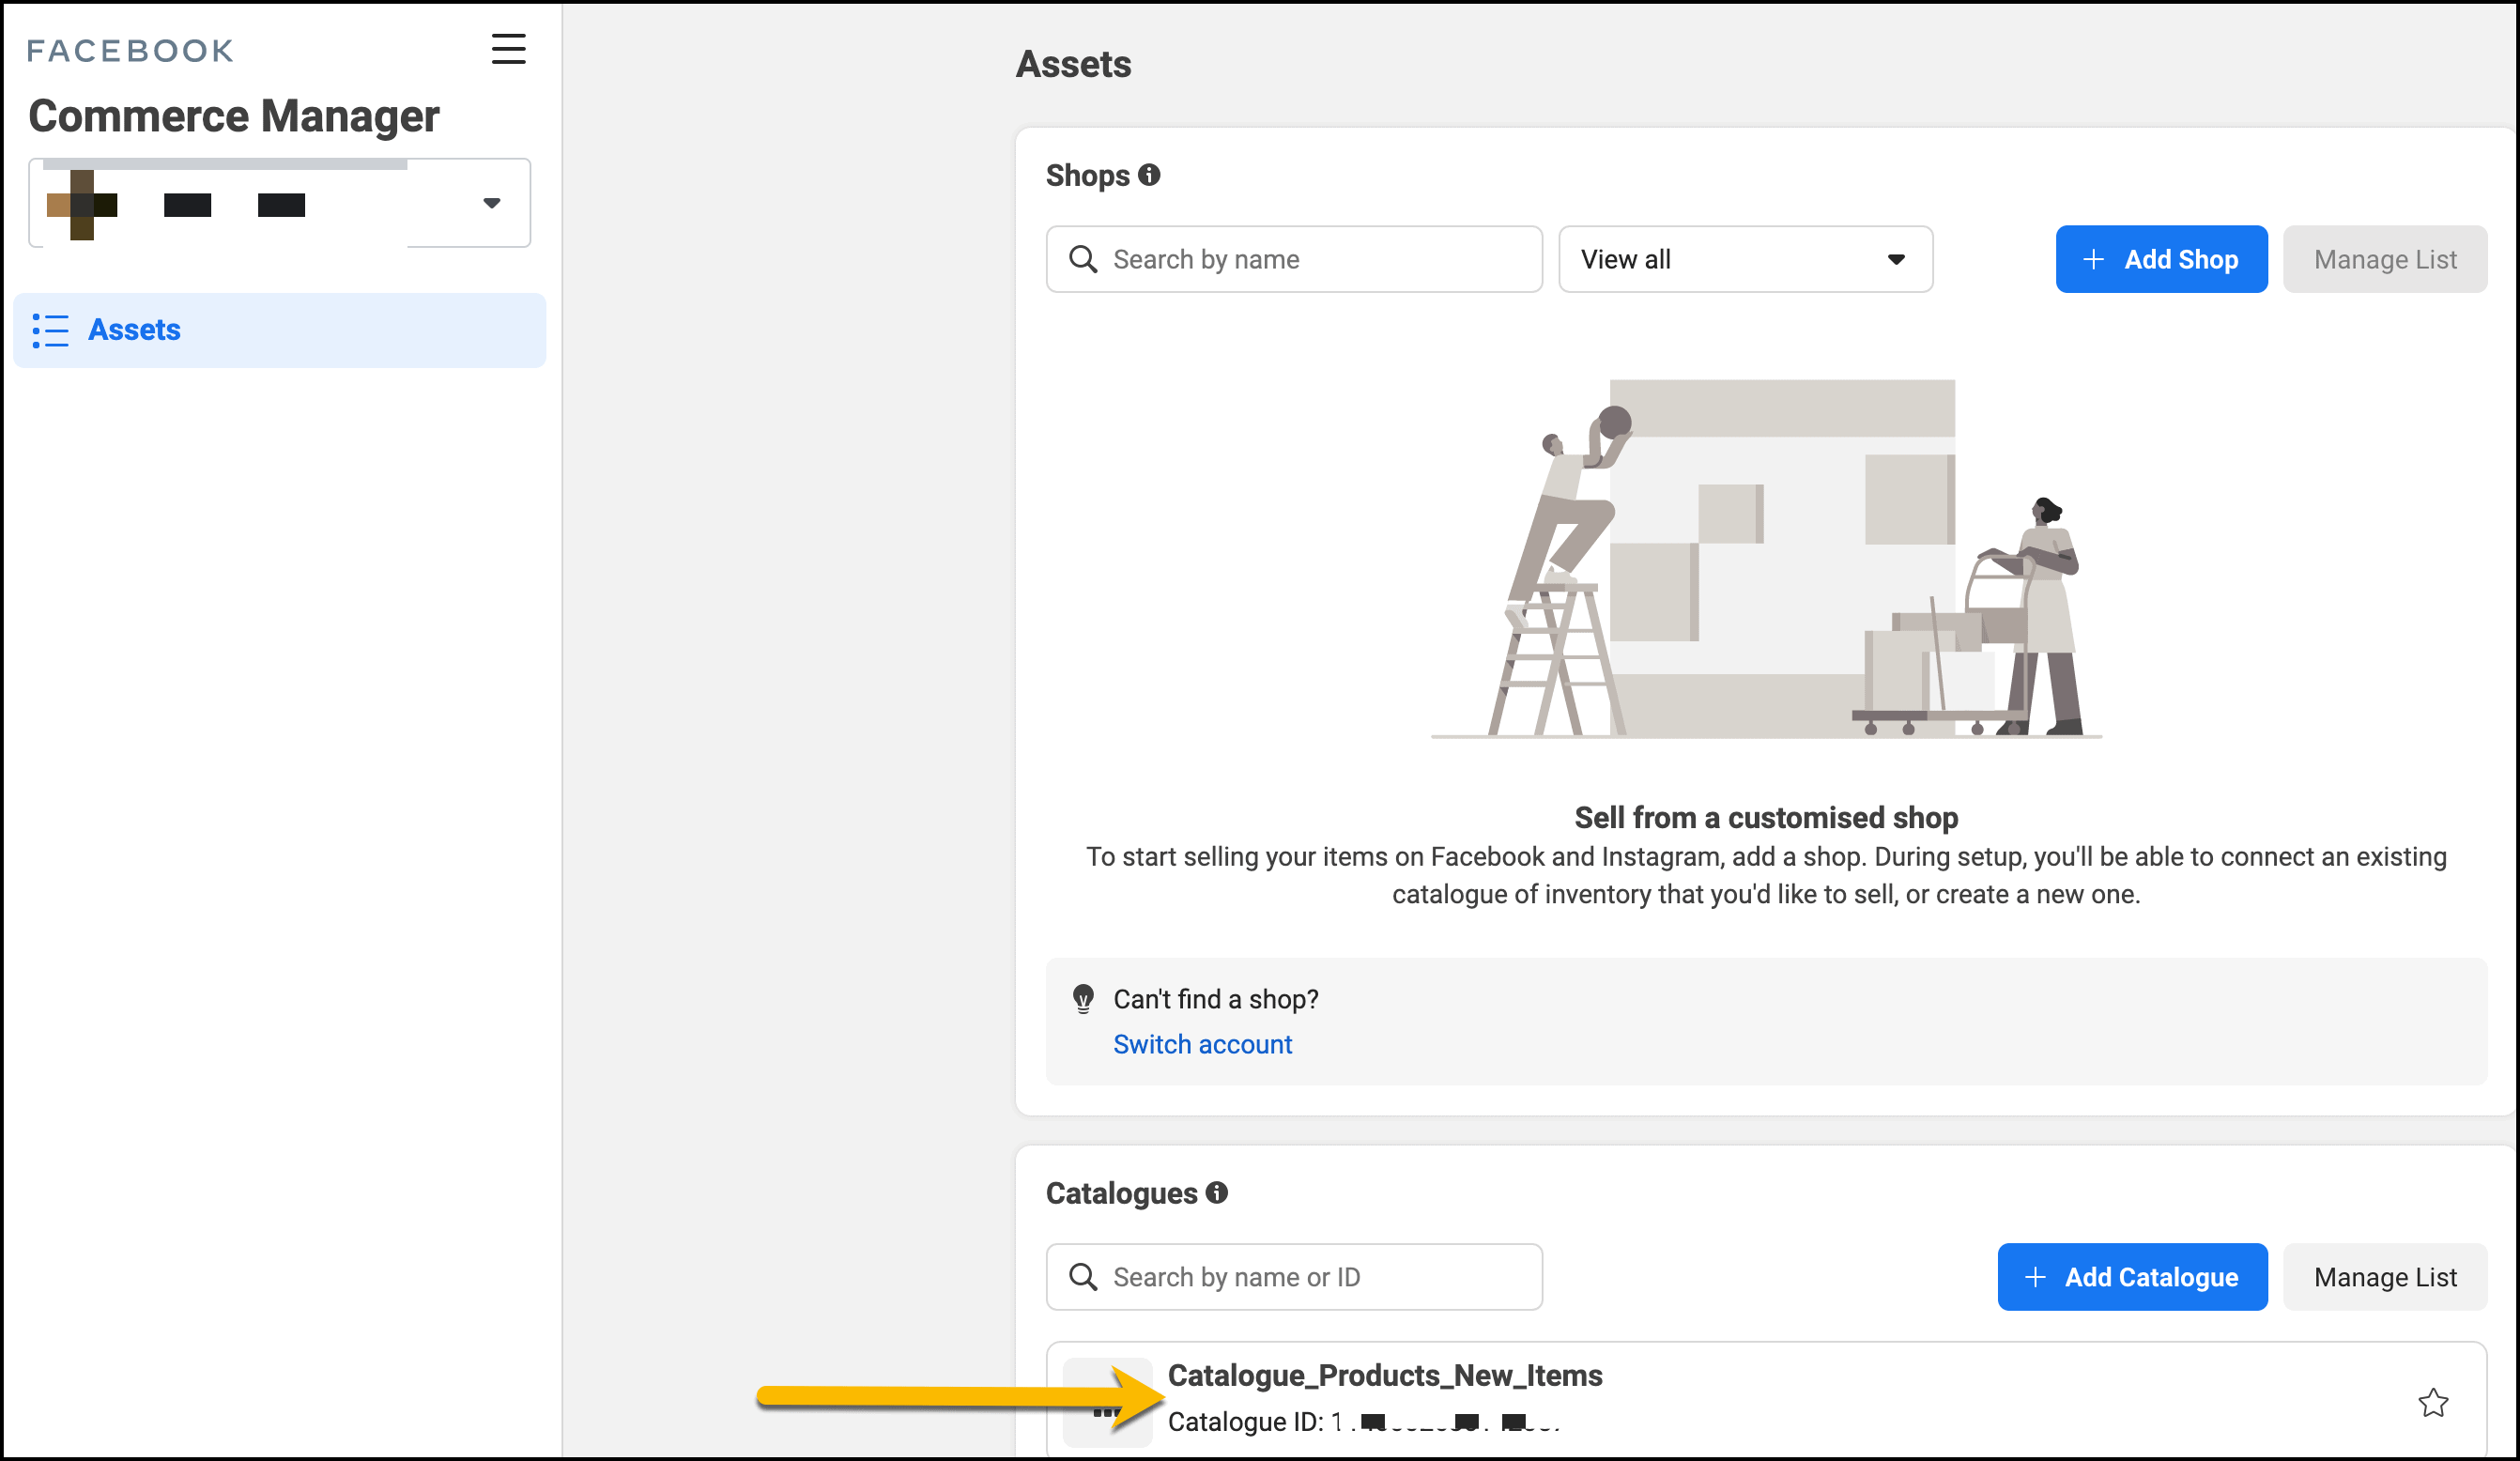
- First, go to Commerce Manager under Facebook Business Suite and click on your catalogue
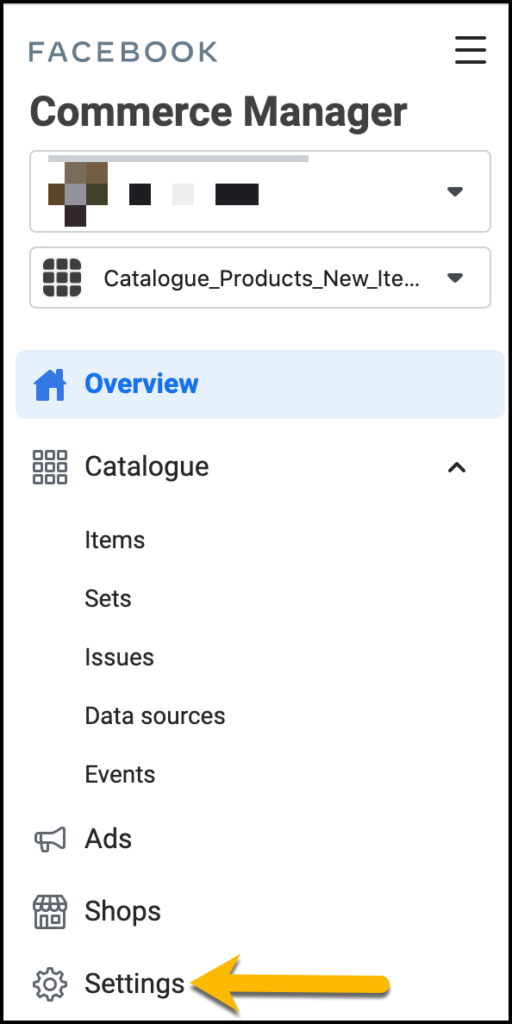
- On the left side, you find the Settings. Click on it to see the removal option
- You will notice the Delete catalogue option, which you must have to click to delete the catalogue permanently
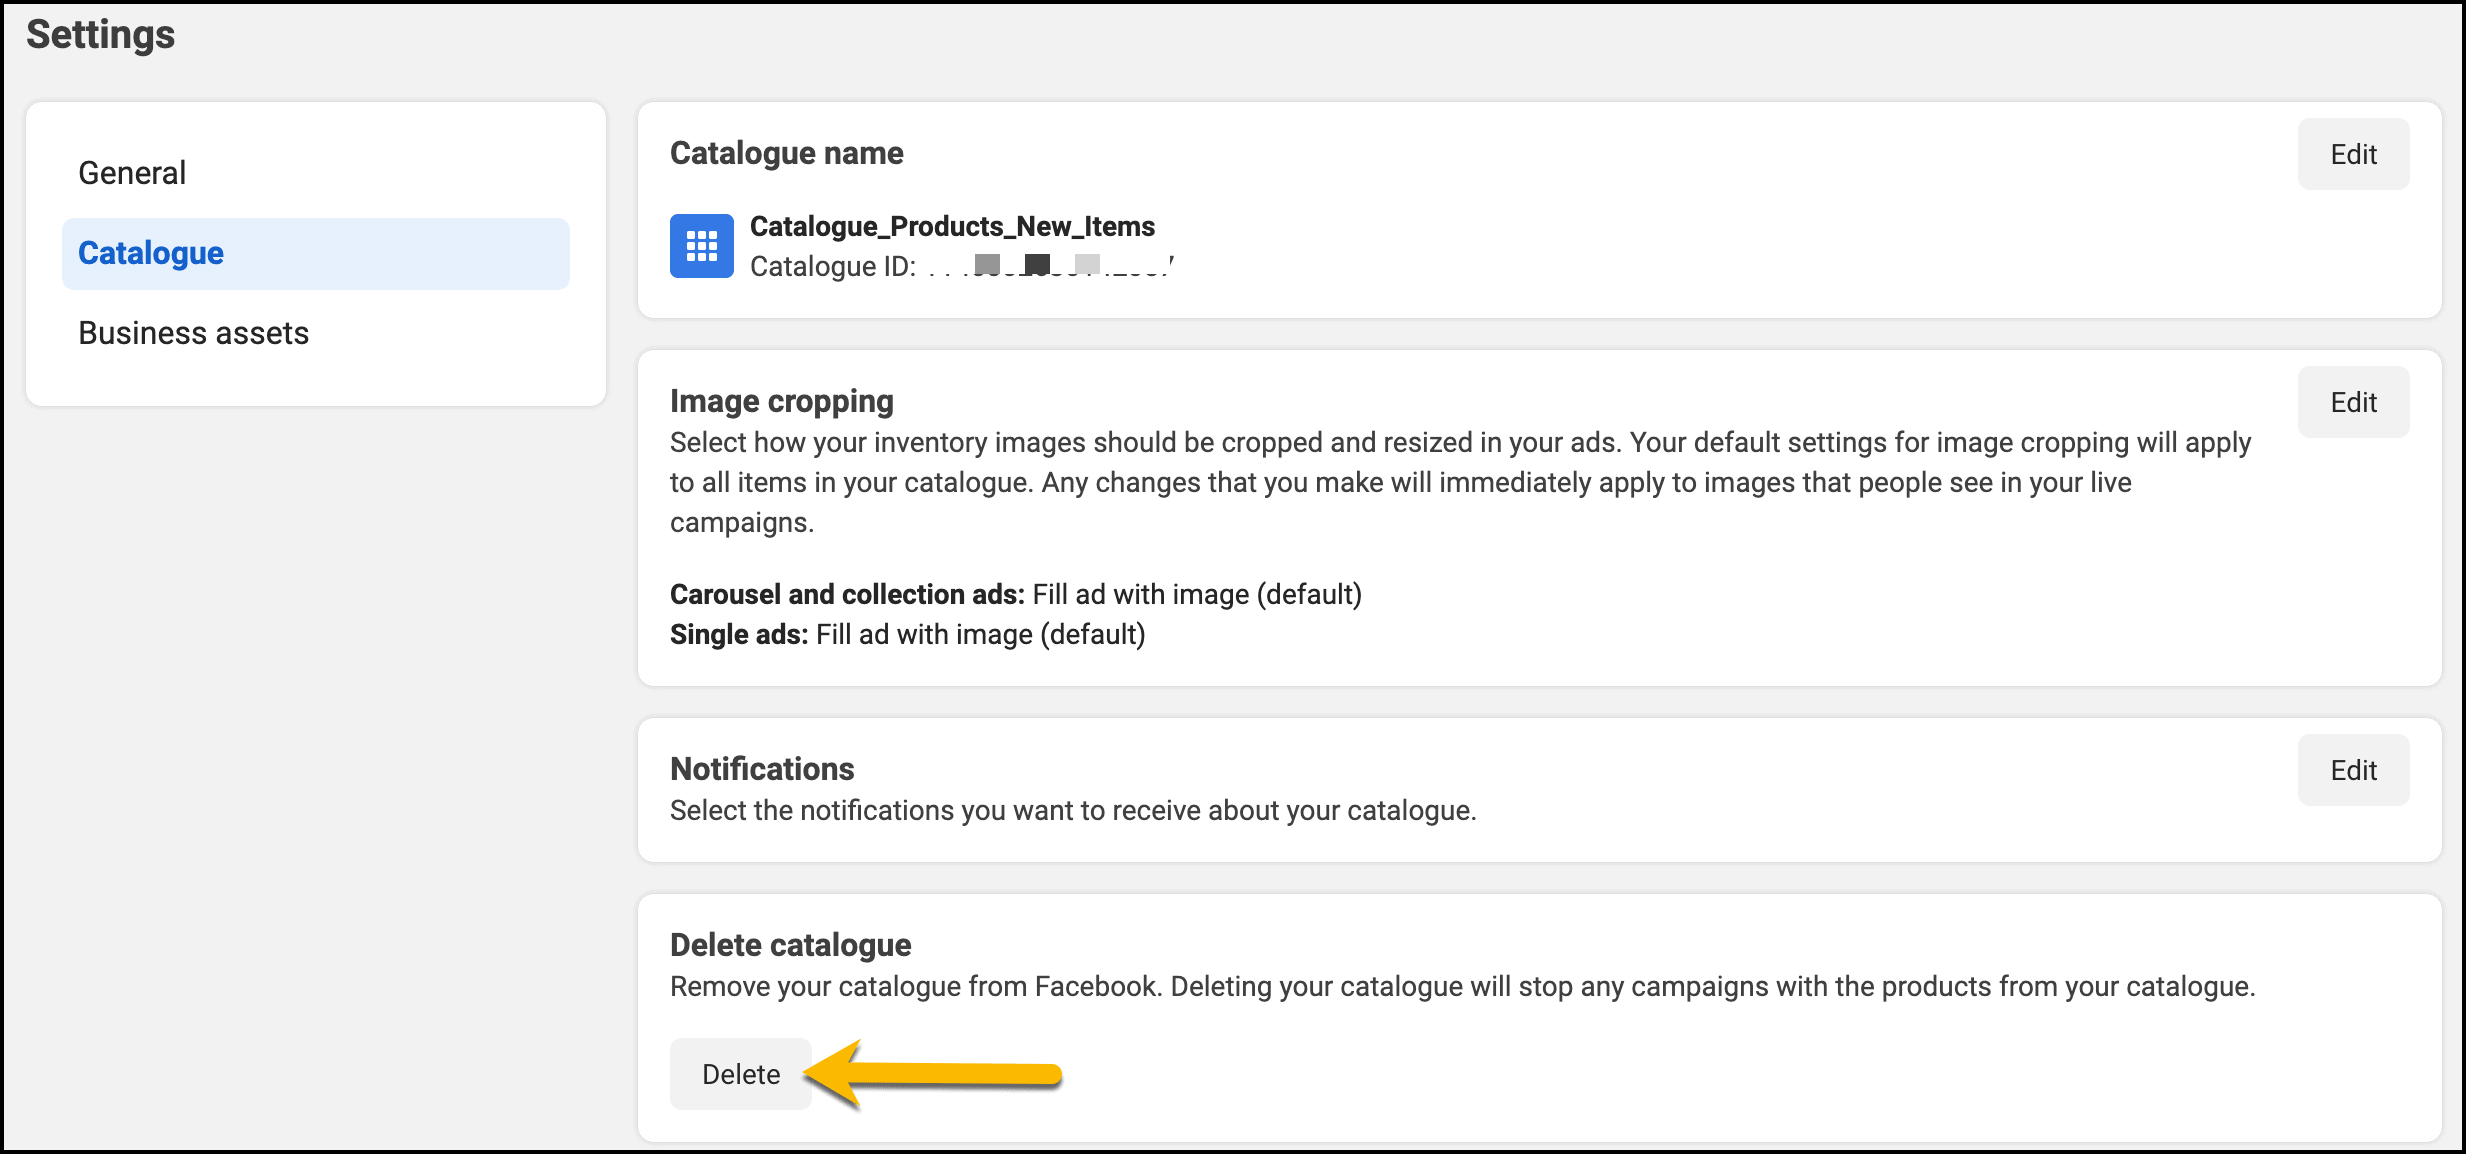
Your WooCommerce Facebook shop will no longer be valid. However, you won’t need to fret if you want to venture into your WooCommerce Facebook shop again. All you have got to do is to follow the technique we showed you to add your catalogue and connect that with the feed you created with CTX Feed Facebook WooCommerce Plugin.
Last Words
Facebook for WooCommerce is all about increasing your eCommerce sales with an organic boosting system. You don’t spend money on that, but surely you make a lot of money out of the WooCommerce Facebook shop. On top of that, connecting WooCommerce to Facebook shop enhances customers’ shopping experience with more ease to find the store, more transparency to search the right product, and more integrity to build larger audiences.
Facebook Pixel catalyzes your business sales by captivating the IDs and other pertinent information of the shoppers to retarget them for bold promotions of your businesses.
You will get all-in-one features just by installing our CTX Feed – a perfect Facebook WooCommerce plugin. We have laid the foundation of every possible query regarding the Facebook to WooCommerce integration and the Facebook Pixel application.
By using the Facebook Pixel for WooCommerce, you can bring back the reluctant customers to increase the ROI. You may have other canvasses to pose us for their solutions. Feel free to get back to us for any inquiry regarding our own CTX Feed or other Facebook WooCommerce plugins, and we will try our level best to come up with their answers. Best wishes.

