
Google Shopping Ads: Everything You Need to Know
In a world dominated by text-based search, Google shopping ads are those visually rich, product-focused ads that empower online brands to showcase their products directly in front of high-intent shoppers, driving conversion and growth.
If you want to enhance your sales and grow your business, Google shopping ads can significantly help you boost your product/brand visibility, especially if you are a WooCommerce owner.
A recent study confirms that these ads account for a whopping 76% of global eCommerce search ad spendings! So, missing out on Google shopping ads can lead to a massive pile of missed opportunities.
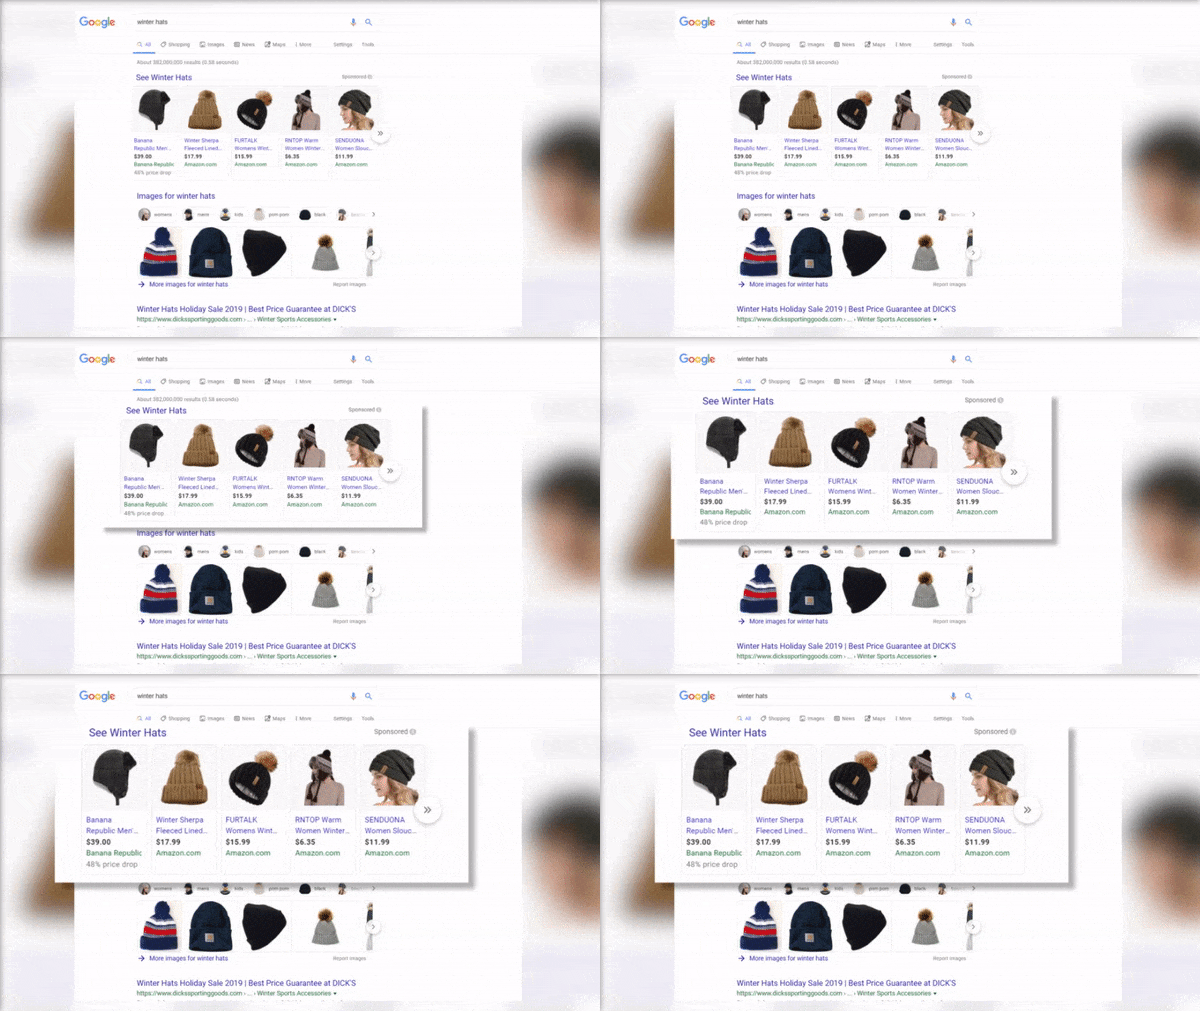
- But how do Google shopping ads work?
- How to set up a Google shopping ad campaign?
- What are some best practices for Google shopping ads?
- What are some common mistakes to avoid with Google shopping ads?
- What are the key benefits of using Google shopping ads?
- And most importantly, why should you invest in them?
In this blog post, we’ll dive deep into the world of Google shopping ads, exploring everything from setup to optimization and answering all the questions you might have.
We’ll also share some advanced google shopping ad tips to help you secure high revenue.
Whether you’re looking to boost traffic, increase sales, or outshine your competitors, understanding and mastering Google shopping ads is crucial to get the most out of your marketing budget.
So, without any further ado, let’s dive right in!
What are Google Shopping Ads?
Now the question is, what is a Google shopping ad exactly?
Google shopping ads are a special type of search engine ads that allows eCommerce businesses to showcase their products directly within Google’s search results (SERP).
Now, what does a google shopping ad look like? When you google something, the first row of answers usually contains shopping ads, followed by traditional text-based ads, before showing you the organic search results.
Below here is a Google shopping ad example if you’ve never seen one:
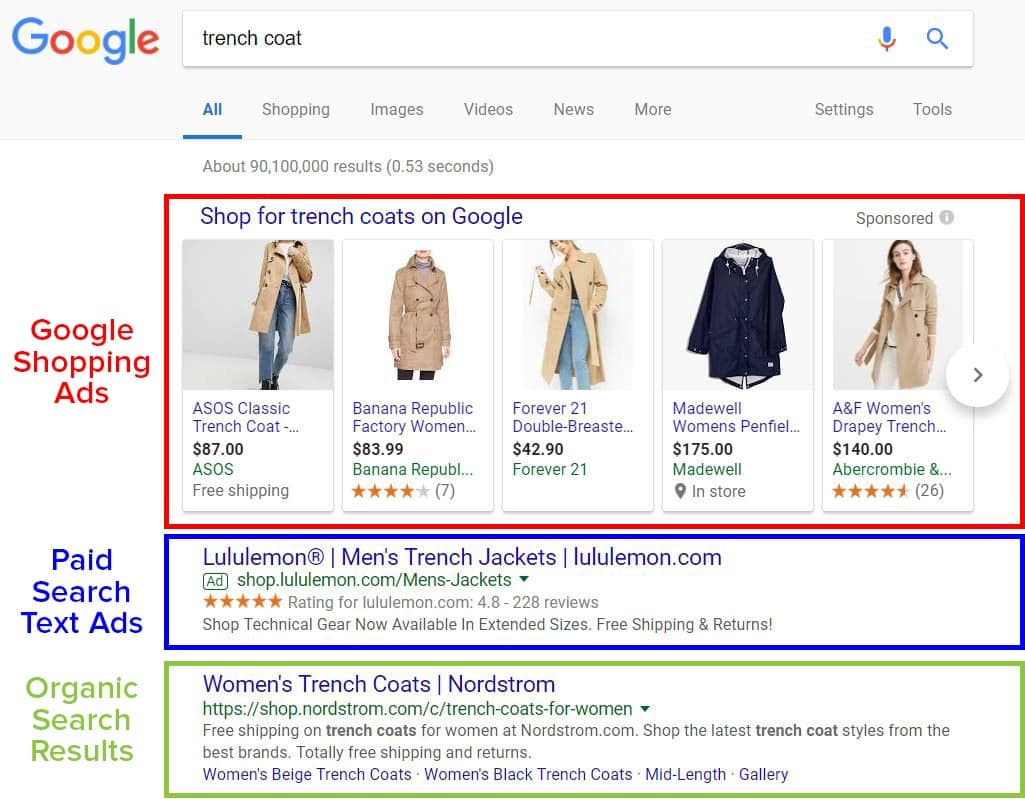
The next question that’ll probably cross your mind is how do Google shopping ads compare to text ads, right?
Well, unlike traditional text (keyword) based search ads, which display a brief headline and URL only, shopping ads are visually rich and product centric.
They feature high-quality image, title, price, store name, and other key information alongside text and URL, offering a more engaging and informative experience for users.
For example, let’s say you run a WooCommerce store selling running shoes. When a customer searches for “running shoes for marathon” on Google, traditional text ads AKA product listing ads (PLAs) might show links to articles or online stores.
On the other hand, a Google shopping ad will display a carousel of running shoes, complete with images, prices, ratings, and your store’s name. This includes both Google sponsored links (paid ads) and free product listings.
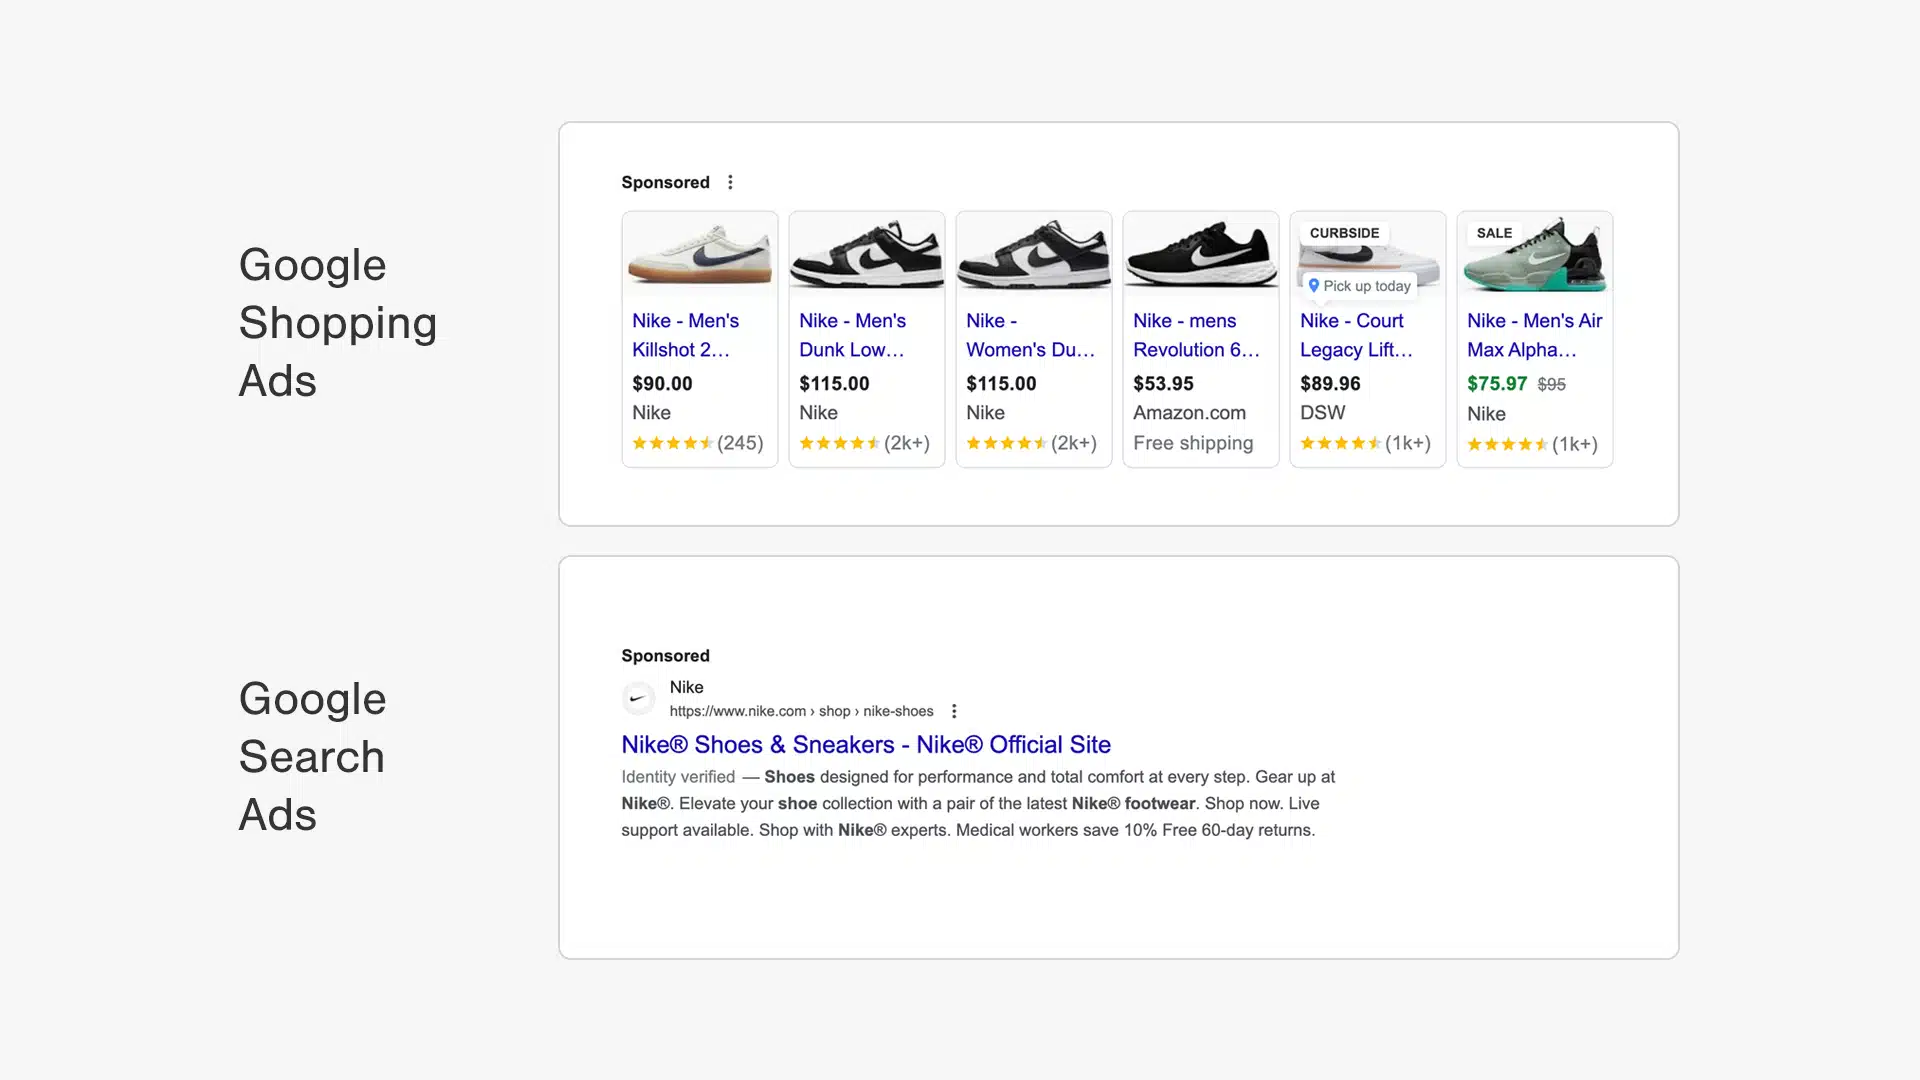
This immediate visual representation allows users to compare products at a glance and directly click on the one that catches their eye. Clicking on a shopping ad will take the user directly to the product page on your website.
This makes Google shopping ads more effective for driving product-specific traffic and conversions. At the present time, these ads have become the dominant force in online marketing, capturing a whopping 85.3% of all clicks on Google ads campaigns.
How Do Google Shopping Ads Work?
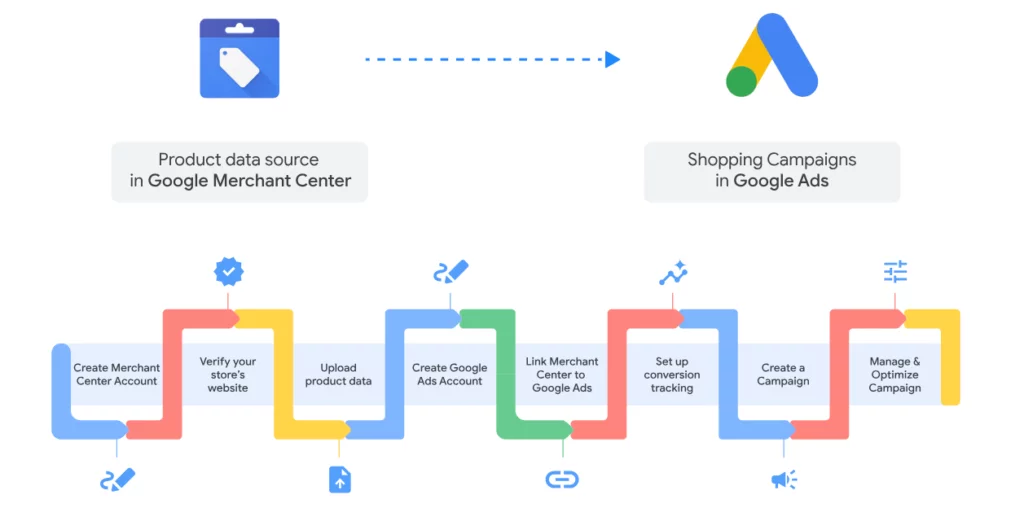
Basically, Google shopping ads operate through a process that starts with submitting a product feed in Google Merchant Center (GMC) and ends with your ads being displayed to potential customers across Google’s ad platforms.
Here’s a step-by-step breakdown of how this process works:
- You create a product feed, an XML or CSV file that contains detailed information about their products, including titles, descriptions, images, prices, and availability.
- You submit the feed to Google Merchant Center for approval. Google reviews the product feed to ensure it meets their quality standards and contains accurate information. Approved products are eligible to appear in Google shopping ads.
- Then, you will need to link your Google Merchant Center account with your Google Ads account. This integration allows you to create and optimize shopping campaigns directly from Google Ads.
- With the accounts linked, you will set up a Google shopping campaign in Google Ads. Once your feed is approved, Google automatically generates shopping ads based on your product feed.
- You’ll choose a bidding strategy that fits your goals. This can be automated, or you can manually set a daily budget, define target audiences, and specify geographic locations.
- When a user searches for a product on Google, the algorithm matches the search query with relevant shopping ads. The most relevant ads are then displayed in the search results.
- Once your ads are live, Google Ads provides detailed performance metrics, allowing you to track key indicators like impressions, clicks, conversions, and ROAS. Based on this data, you can continually refine your campaigns by adjusting bids, updating product data, or segmenting products to improve performance.
At this point, you might have questions like how Google’s algorithm decides where to show your ads, right?
Well, Google’s algorithm uses various factors to determine which shopping ads are most relevant to a user’s search query, including:
- Product quality: The quality and accuracy of the product information in the feed.
- KW relevance: How closely the product title, description, and keywords match the user’s search terms.
- Bid amount: The amount you are willing to pay per click, or how competitive your pricing is.
- Ad quality score: The overall quality of the ad, including its relevance and visual appeal.
- Competition: How your products compare to others in the same category.
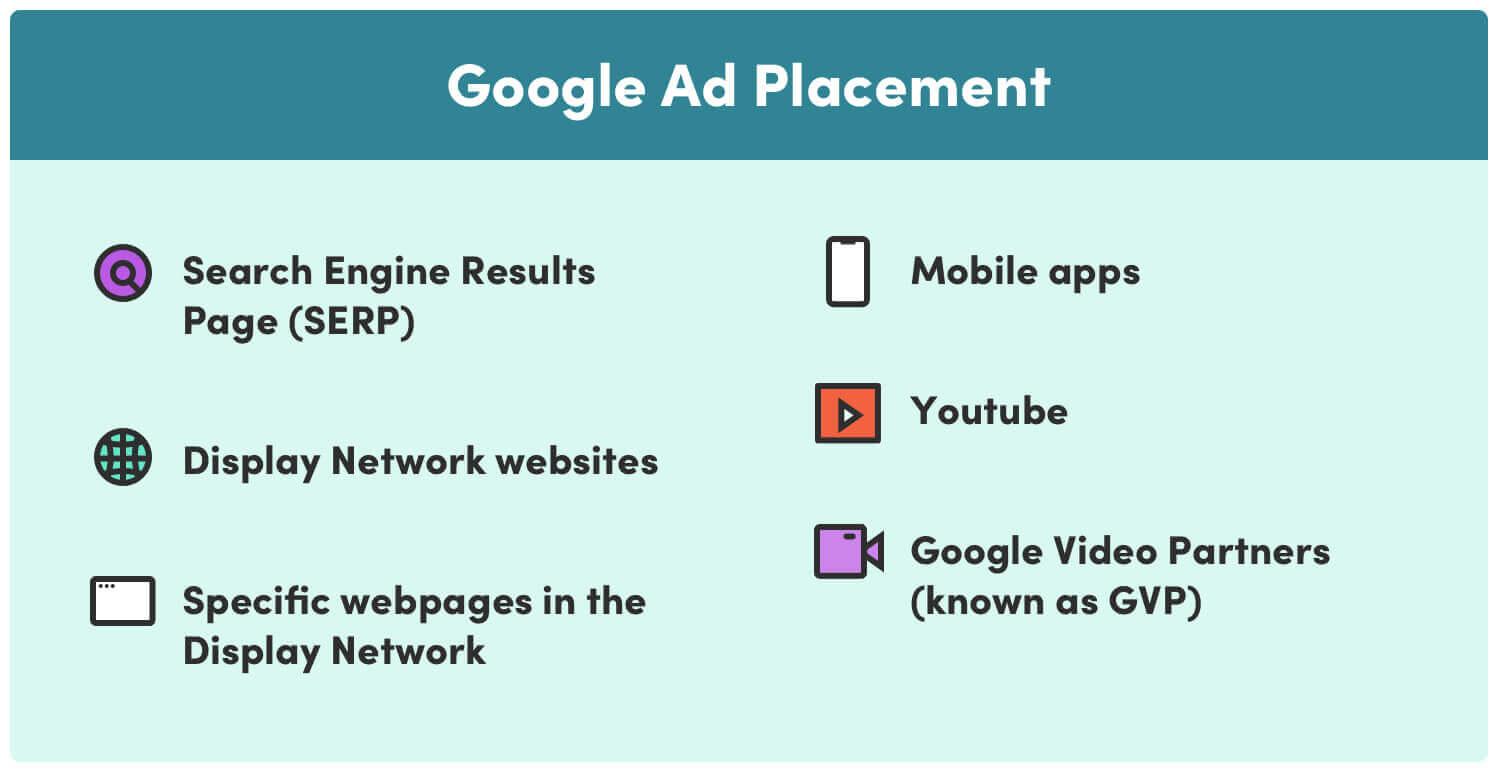
Also, Google has some predefined sport for shopping ads to appear, such as:
- Search Results: Ads are shown at the top of search results or alongside text ads in a visually rich format.
- Shopping Tab: A dedicated section where users can browse products across various sellers.
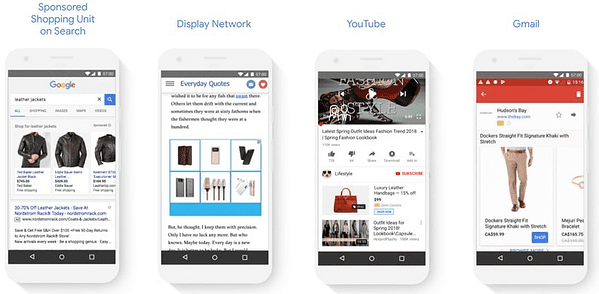
- Google’s Display Network (GDN): Your ads may also appear on partner sites, including YouTube, Play Store, Gmail, and many more, expanding your reach beyond SERP.
To sum up, Google shopping ads work by leveraging detailed product data and advanced algorithms to place your products directly in front of high-intent shoppers.
It’s like having a virtual storefront window that attracts shoppers with eye-catching images and detailed descriptions.
In essence, this automated process ensures that your ads are shown to the right people at the right time, maximizing the chances of driving traffic and increasing sales.
What are the Benefits of Using Google Shopping Ads?
Next, it’s time to explore if Google shopping ads are really worth the hype!
In the ever-evolving eCommerce sector, visibility is everything. Google shopping ads offer a powerful way to showcase your products to the right audience at the right time.
With visually engaging formats and highly targeted placements, these ads not only boost your visibility but also drive more qualified traffic to your store.
Whether you’re looking to improve conversions, increase ROAS/ROI, or outshine your competitors, the benefits of Google shopping ads are too significant to ignore.
Now, let’s explore the key reasons online brands, especially WooCommerce owners like you, need shopping ads on Google. Here are some of the key Google shopping ads benefits:
1. Increase Product/Brand Visibility
Google shopping ads prominently display your products at the top of search results, increasing the chances of attracting potential customers. Google’s advanced targeting options ensure that your ads are shown to users who are actively searching for similar products.
Additionally, these ads usually include multiple high-quality product images, clear titles, prices, and store names, making them more visually engaging. With this highly visual approach, users are more likely to click on your listing.
Automated feed updates ensure that your product information is always current, reducing the risk of showing outdated prices or stock levels.
Lastly, Google Displays your ads through a wide variety of marketing platforms under Google’s Delivery Network and partner websites; across multiple devices. This Repeated exposure helps build brand recognition and trust among potential customers.
2. Get Highly Targeted Traffic
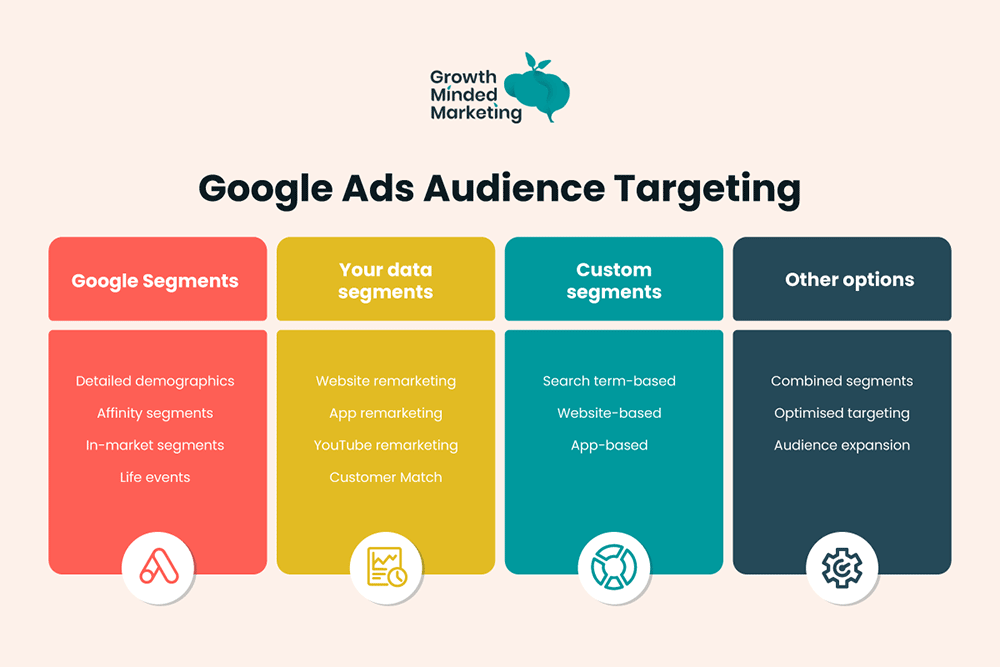
Google shopping ads use real time data to trigger intent-based targeting, meaning Google can target users who have shown intent to purchase products. As a result, you’re reaching a highly qualified audience.
Additionally, you can display multiple related products in a single search result, increasing the likelihood of attracting shoppers with varied preferences.
Appearing alongside competitors’ products gives you the opportunity to stand out with attractive pricing or unique offerings.
Remember, shoppers who click on Google shopping ads have already seen the product details, which means they are more likely to convert once they enter your site.
You can also target specific products or product categories within your WooCommerce store, ensuring your ads are relevant to the user’s search query.
3. Secure Higher Conversion Rates
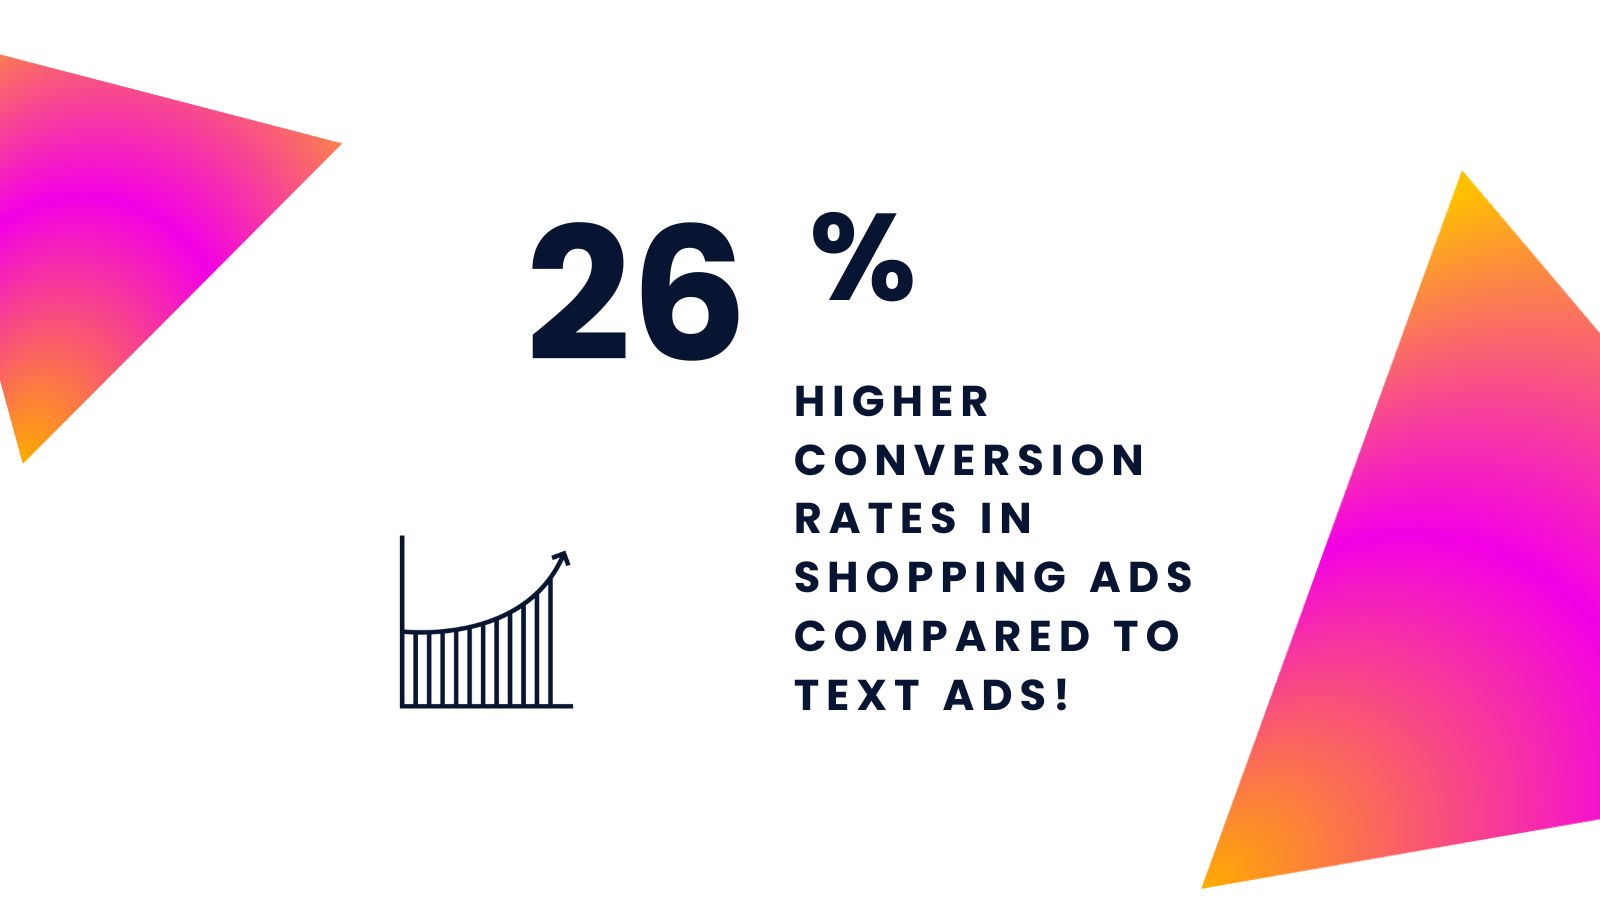
The visual-centric approach of Google shopping ads works better to captivate end-users than regular ads. Unlike traditional text-based ads, shopping ads feature eye-catching images alongside essential details like price and brand.
Together with a highly targeted approach, this visual representation helps users quickly identify and choose products that meet their needs, making the decision process faster and more intuitive.
This leads to higher click-through rates and conversions. At this point, you might be thinking, but what about physical stores? Can I use Google shopping ads for local inventory too?
Absolutely! For WooCommerce stores with physical locations, Google shopping ads can showcase local inventory, driving foot traffic to your stores. This also helps boost your conversion rates.
Besides, Google Ads provides robust tools for optimizing your shopping campaigns, such as bid adjustments, audience targeting, and performance analytics. This helps to continually refine your campaigns based on data-driven insights.
4. Enhance The User Experience
Next, let’s talk about the user experience.
Shopping ads provide all the necessary details users need to make informed purchasing decisions without having to click through multiple links.
Each ad displays key product details—such as title, price, store name, and ratings—right in the search results!
Also, by linking directly to the product page, Google shopping ads provide a seamless transition from search to purchase. Users are taken straight to the relevant product, minimizing the steps needed to complete a transaction.

Google’s algorithms ensure that users are shown products that match their search queries and preferences, making the shopping experience more relevant and tailored to their needs.
Lastly, Shopping ads are fully optimized for mobile devices, offering a smooth and responsive experience across all screen sizes. This is crucial as more users shop on their smartphones and tablets.
But why is this important?
A recent study shows mobile devices account for 65% of clicks on paid Google search results, and with 70% of smartphone users researching online before in-store purchases, they present a prime opportunity to capture high-intent shoppers at critical decision-making moments.
5. Get Access to Measurable Results
Google shopping ads provide comprehensive analytics, allowing you to track performance, measure ROI, and make data-driven decisions. With measurable results at your fingertips, you can continuously refine your campaigns.
Adjusting bids, modifying product feeds, or tweaking ad placements based on data-driven insights can significantly enhance your campaign’s effectiveness.

This allows you to experiment with different ad variations to optimize your campaigns and achieve better results.
Google shopping ads also make it easy to track the return on investment (ROI) by comparing your ad spend with the revenue generated from your campaigns.
This ensures that you’re always aware of how much value you’re getting from your advertising efforts.
How Do I Set Up Google Shopping Ads for My WooCommerce Store?
Ready to unleash the power of Google shopping ads for your WooCommerce store?
So far, you probably have a solid idea about why your WooCommerce business needs to utilize Google shopping ads. Now the question is, how to set up a google shopping ad campaign from scratch?
Many of you asked us, “How can I use Google shopping ads for e-commerce?” The section below will walk you through the entire process, from setting up everything to launching your first campaign.
Follow these steps to get your products seen by potential customers right when they’re ready to buy. Use these instructions as your Google shopping checklist for running future online ad campaigns.
Let’s jump right into it!
Step 1: Create a Google Merchant Center Account
The first step in setting up Google shopping ads for your WooCommerce store is to create a Google Merchant Center account.
Now, what exactly is Google Merchant Center, right?
GMC (Google Merchant Center) is an essential marketing platform where you’ll manage and submit your product data. Google will the use this data to create and display your shopping ads.
Here’s how to do this:
- Visit the Google Merchant Center homepage. Currently, it is named as Google Merchant Center Next. It is a streamlined version of the previously known Google Merchant Center (GMC) that features a more straightforward interface and advanced functionalities.
- Click on the ‘Get Started’ button if you’re new, or sign in if you’re an existing user.
- In the next page, enter your business name, country, and time zone. Ensure that the details you provided are accurate, as they will be used in your account settings and billing.
- Next, you’ll need to verify and claim the ownership of your business. This process confirms that you own the domain and allows you to manage product listings associated with it. Google provides several methods to verify your website ownership, such as —
- Business Code: Use your business email to get a verification code from google. Use that code in the designated placeholder to verify your business.
- HTML File/Tag Upload: Download/copy a HTML file/Tag provided by Google, and upload it to the root directory or the <head> section of your website’s homepage.
- Use your eCommerce Platform: You can also get a verification code through the eCommerce platform you use, just like a business code.
- Google Analytics: If you’re using Google Analytics, you can verify your site through your existing tracking code.
- Google Tag Manager: Similarly, if you use Google Tag Manager, you can verify through your GTM setup.
- After implementing one of these methods, click “Verify” in Google Merchant Center to confirm your ownership.
- Once your website is verified, you need to claim it in GMC Next. This step ensures that no other Merchant Center account can use your domain to upload product data.
- To do this, simply click on “Claim URL” after verification is successful. Your website is now linked to your Google Merchant Center account, and you can start uploading product feeds.
- After that, take a moment to configure your Google Merchant Center account settings to ensure everything runs smoothly. The Key information includes:
- Business Information: Ensure your business information (name, address, contact details) is correct and up to date.
- Shipping Settings: Configure your shipping settings in the Merchant Center to reflect how products will be delivered. This information will appear alongside your products in Google shopping ads.
- Tax Settings: Set up tax settings according to the regions you sell in, ensuring compliance with local regulations.
- Lastly, agree to Google Merchant Center’s Terms of Service. The “Create account” button will light up. Click it, and your account is ready to roll!
Bonus Tip: Enable Important Merchant Center Features Like, Automatic Item Updates or Multi-Client Accounts to help you manage your WooCommerce Operation Smoothly.
See? It was not that hard now, was it? Now that your GMC Next account is up and running, it’s time to move onto the next step, generating your WooCommerce Product Feed.
Step 2: Generate and Upload Your Product Feed
The next step is to generate a WooCommerce product feed and submit it for Google’s Approval.
A Product feed is basically a structured file that contains detailed information about each product you want to advertise, including titles, descriptions, images, and other key attributes. This data is used by Google to create and display Shopping Ads to potential customers.
When used in Ecommerce, this gets called as an ECommerce Product Data Feed AKA ECommerce Product Feed. This is how a standard product feed for google ads AKA google ads shopping feed (XML) looks like:

A standard product feed contains key product information, including
- ID
- Title
- Description
- Link/URL
- Image link
- Availability
- Category
- Price
- GTIN [Global Trade Item Number] or MPN [Manufacturer Part Number]
And many more.
But how do I create a product feed for Google shopping ads?
Well, there are multiple options. You can easily generate a product feed manually from WooCommerce’s built in settings. However, it can quickly become tedious, time-consuming, and error-prone, especially if you work with a large inventory.
That’s why we are talking about the easiest way to generate unlimited product feeds in seconds — using a dedicated product feed plugin.
For the purpose of our today’s discussion, we will be talking about a product feed manager plugin named CTX Feed Pro as it automatically generates, optimizes, and uploads hundreds of product feeds in seconds!
This is how you can create unlimited product feeds using CTX Feed:
- Go to your WooCommerce dashboard and navigate to Plugins > Add New. Search for “CTX Feed Pro” and install the plugin. Once installed, activate the plugin to start using it.
- After that, you’ll need to find the CTX Feed settings under the WooCommerce menu. Click on CTX feed and select “Make a feed”.

- In the next page, give your product feed a name. Also, select your preferred country for the feed, the template, and the feed type. For our purpose, today, let’s select the “Google Shopping” template.

- The plugin will automatically generate all the necessary fields for Google Shopping. It’ll look something like this:
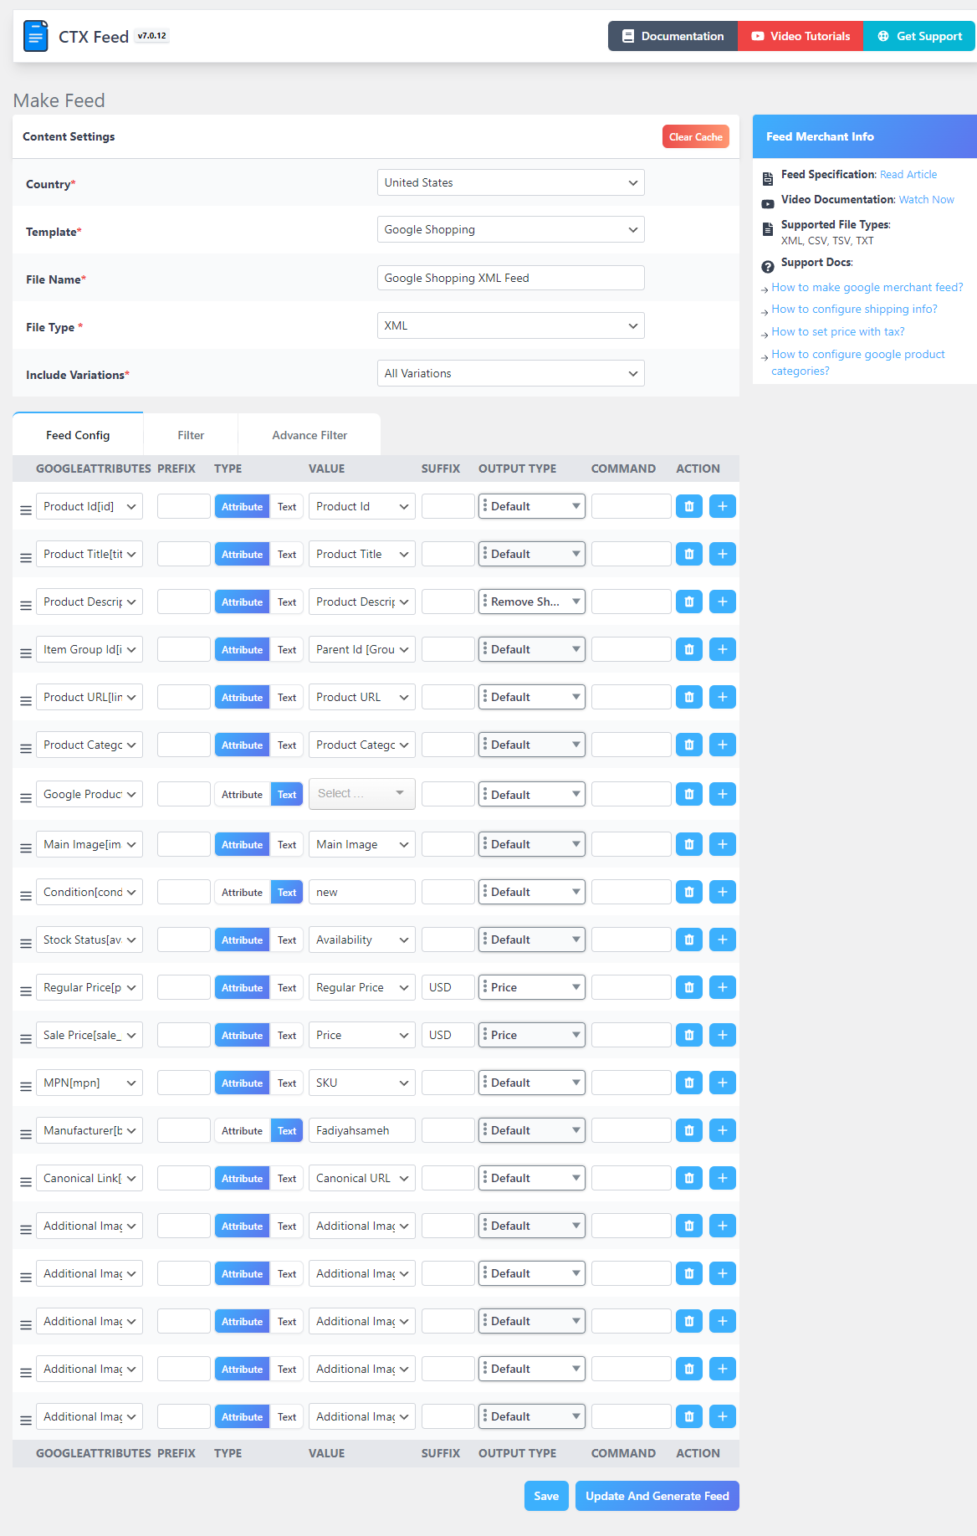
- Double check all the attributes. Make sure to use clear and descriptive titles that include relevant keywords without overstuffing. Use images that meet Google’s image specifications. Optimize the pricing, availability, identifiers (Ex: GTINs, MPNs), and other attributes following GMC’s guideline.
Bonus Tip: Use multiple images with 800x800p or higher resolution that showcase your product from the best angles. Avoid Images that have watermarks or promotional text on them.
Once you’re satisfied with the result, click the “Update and Generate Feed” button in the bottom-right corner.
This’ll instantly generate a product feed URL that you can use to distribute your product information over 130+ major marketing channels. If you want to know more, we have the ultimate WooCommerce Product Feed guide waiting for you.
Step 3: Link Google Merchant Center with Google Ads
Once your product feed is uploaded and verified in Google Merchant Center, the next step is to connect your Google Merchant Center account to your Google Ads account.
This allows Google Ads to access your product data and use it to create Google shopping ad campaigns, ensuring seamless data flow between the two platforms.
Here’s how to complete this linkage and ensure everything runs smoothly:
- Before linking the accounts, make sure you’re logged into both your Google Merchant Center and Google Ads accounts. If you don’t have a Google Ads account yet, you can create one this way:
- Just go to the Google Ads Homepage and click “Start Now. Then, follow the on-screen instructions to set up your advertising account, inputting details like billing information, time zone, and business name.
- To link the two platforms, you’ll need to start from your Google Merchant Center account. From the Merchant Center dashboard, click on Ad campaigns.
- Within the settings menu, click on Campaign Management. This will bring up a list of all the platforms that can be connected to your Google Merchant Center account, including Google Ads.
- Locate the Google Ads option and click Link Account.
- You’ll be asked to input your Google Ads Customer ID. This is the unique identifier for your Google Ads account, which you can find in the top-right corner of your Google Ads dashboard.
- After entering the Google Ads Customer ID, click “Link Account”. This sends a request from your Google Merchant Center to your Google Ads account.
- Now, you’ll need to approve the request in your Google Ads account. Open your Google Ads account and navigate to the Tools & Settings menu.
- Under the “Setup” section, click on Linked Accounts. Locate the request from Google Merchant Center and click Approve to complete the linkage.
And that’s it. Your GMC Next and Google Ads Account are linked now. To check the status, Go back to your Merchant Center account and revisit the Linked Accounts section. You should now see your Google Ads account listed as “Approved” or “Linked.”
Bonus Tip: Ensure that your country of sale, shipping settings, and product availability are consistent across both platforms to avoid product disapproval issues.
As a result, you can now create and manage Shopping campaigns within Google Ads. When you create a Shopping campaign (which we’ll cover in the next step), Google Ads will automatically pull product data from your Merchant Center account to create your ads.
Step 4: Create Your First Google Shopping Campaign
Now that your product feed is uploaded to Google Merchant Center and linked with Google Ads, it’s time to create your first Google Shopping campaign.
All in all, this campaign will allow you to showcase your products to potential customers across Google’s vast network, including search results, Google Shopping, Play Store, and even YouTube or Gmail.
Let’s explore the steps involved in creating a Google Shopping Ad Campaign from scratch:
1. To get started, log into your Google Ads account and navigate to the Campaigns tab on the left-hand side of your dashboard.
2. Click on the blue “+” button to create a new campaign.
3. Google will prompt you to select a specific goal. Since the purpose of Shopping Ads is typically to drive product sales, choose the Sales goal. Other goals like “Leads” or “Website Traffic” each serve their unique purposes.
4. Next, you’ll need to select the type of campaign you want to run. Under the list of campaign types, select Shopping.

5. Choose Your Merchant Center Account. If you have multiple accounts, you’ll need to select the one that contains your WooCommerce product feed.

6. Google will ask you to choose a target country—the geographic region where your products will be shown.
7. Next, Choose Your Shopping Campaign Type. Google Shopping Ad Campaigns primarily come in two different types – Including:
- Standard Shopping Campaign: This gives you more, granular control over the campaign, allowing you to manually adjust bids, segment product groups, and apply detailed google shopping ads targeting options.
- Performance Max Campaign: This automated option uses Google’s machine learning to optimize your bids, ad placements, and targeting. It combines traditional Shopping ads with different types of Google display ads and is ideal for advertisers looking for a more hands-off approach.

Here are the key differences that sets Google’s standard shopping and performance max campaigns apart:
| Topic | Standard Shopping | Performance Max |
| Ad Placement | Primarily Google’s Search Network (Search Partners) | Google’s Search and DIsplay Network (Maps, YouTube, Gmail & Discovery) |
| Outreach | Limited | Very Widespread |
| Primary Bidding Strategy | Target ROAS, Maximize Clicks, Manual CPC | Maximize Conversions or Maximize Conversion Value |
| Level of control | Very High (Granular) | Comparatively Low (Mostly Automated) |
| Conversion volume requirements | None | Impact on Search Campaigns |
| Optimization potential | Very High | Moderate |
| Dynamic Remarketing Capability | No | Yes |
| Impact on Search campaigns | None | High |
8. The next step involves setting your daily budget and selecting a bidding strategy. You can choose from a few different bidding strategies. We’ll talk more about them later.

Awesome! Now you have covered all the basic steps to create your very first Google Shopping Ad Campaign.
However, this online paid advertising campaign needs to be fine-tuned to your specific business needs to provide the optimum result.
Bonus Tip: For first-time users, start with a Standard Shopping Campaign to have more control and understand how the platform works. Once you gain experience, move onto the Performance Max campaigns.
But how can you configure your Shopping ad campaigns on Google?
Let’s talk about configuring the settings that will bring your ads to life and set you on the path to consistent growth. All the essential configuration settings are described in the section below.
Step 5: Configure Campaign Settings and Launch
Once your product feed is in place and your campaign is set up, the final step is configuring the specific settings that will fine-tune how and where your ads appear.
At this point, you’ll need to define critical parameters like targeting options, bidding strategies, and google shopping ads tracking, ensuring your ads reach the right audience and perform optimally.
Here’s the key configuration settings you should focus at:
- First, you’ll need to configure your Product Groups. By default, Google places all products into one group, but segmenting your products based on ID, categories, or brand can help you fine-tune the performance of your ad campaigns.
- Moving on, now you’ll need to set your preferred targeting option. While Google shopping ads don’t use keywords like traditional search ads, you can still adjust targeting parameters to ensure your ads reach the right audience. You’ll have the option to target your ads based on geographic locations, specific device/time, and many other options.
- You’ll also need to set up conversion tracking as this will help you measure the success of your Shopping campaign. Enable Google Ads conversion tracking from the settings menu. You can also use dedicated third-party plugins for more in-depth tracking reports.

- Lastly, before launching your campaign, review all the settings you’ve configured to ensure they align with your goals. Double-check your daily budget, bidding strategy, product groups, and other targeting options.
And That’s about it. Your very first Google shopping ads are ready to amaze your potential clients. Once everything is ready, click Launch Campaign to set your Shopping ads live and start driving traffic to your WooCommerce store!
Bonus Tip: Start with a smaller budget and increase gradually through testing different products or groups. This’ll help you minimize risk and empower you to make more informed decisions.
Meanwhile, Google will start pulling products from your feed and displaying ads to users based on relevant search queries. Keep an eye on your campaign’s performance through Google Ads reporting and be prepared to make adjustments as you gather data.
Step 6: Monitor and Optimize Your Campaign
Congratulations! Your Google Shopping Ad Campaign is now live. Now, you’ll start to notice new traffic visiting your website and making purchases. However, our work isn’t completed just yet!
After your campaign goes live, it’s important to monitor its performance closely. Continuous monitoring and optimization are key to ensuring your ads perform at their best and deliver the desired results.
But you might be thinkin, how do I measure the success of my Google shopping ads campaigns?
Well, here’s the key optimization factors you should focus on:
- Use Google Ads reporting tools to track essential metrics like impressions, clicks, conversions, and ROAS (Return on Ad Spend). These insights give you a clear picture of how well your campaign is performing. Here is a rundown of the key performance metrics:
- Impressions: How often your ads are shown across GDN.
- Clicks: How many people click on your ad to visit your product page.
- Conversions: How many people end up making a purchase.
- ROAS: How much you are earning in comparison to how much you’ve spent.
- Abandoned Cart: How many people leave without completing a purchase.
- Based on performance metrics, adjust your bids to focus more on high-performing products or product groups. If certain products are converting well, increase their bids to capture more traffic. For underperforming products, consider lowering the bids.
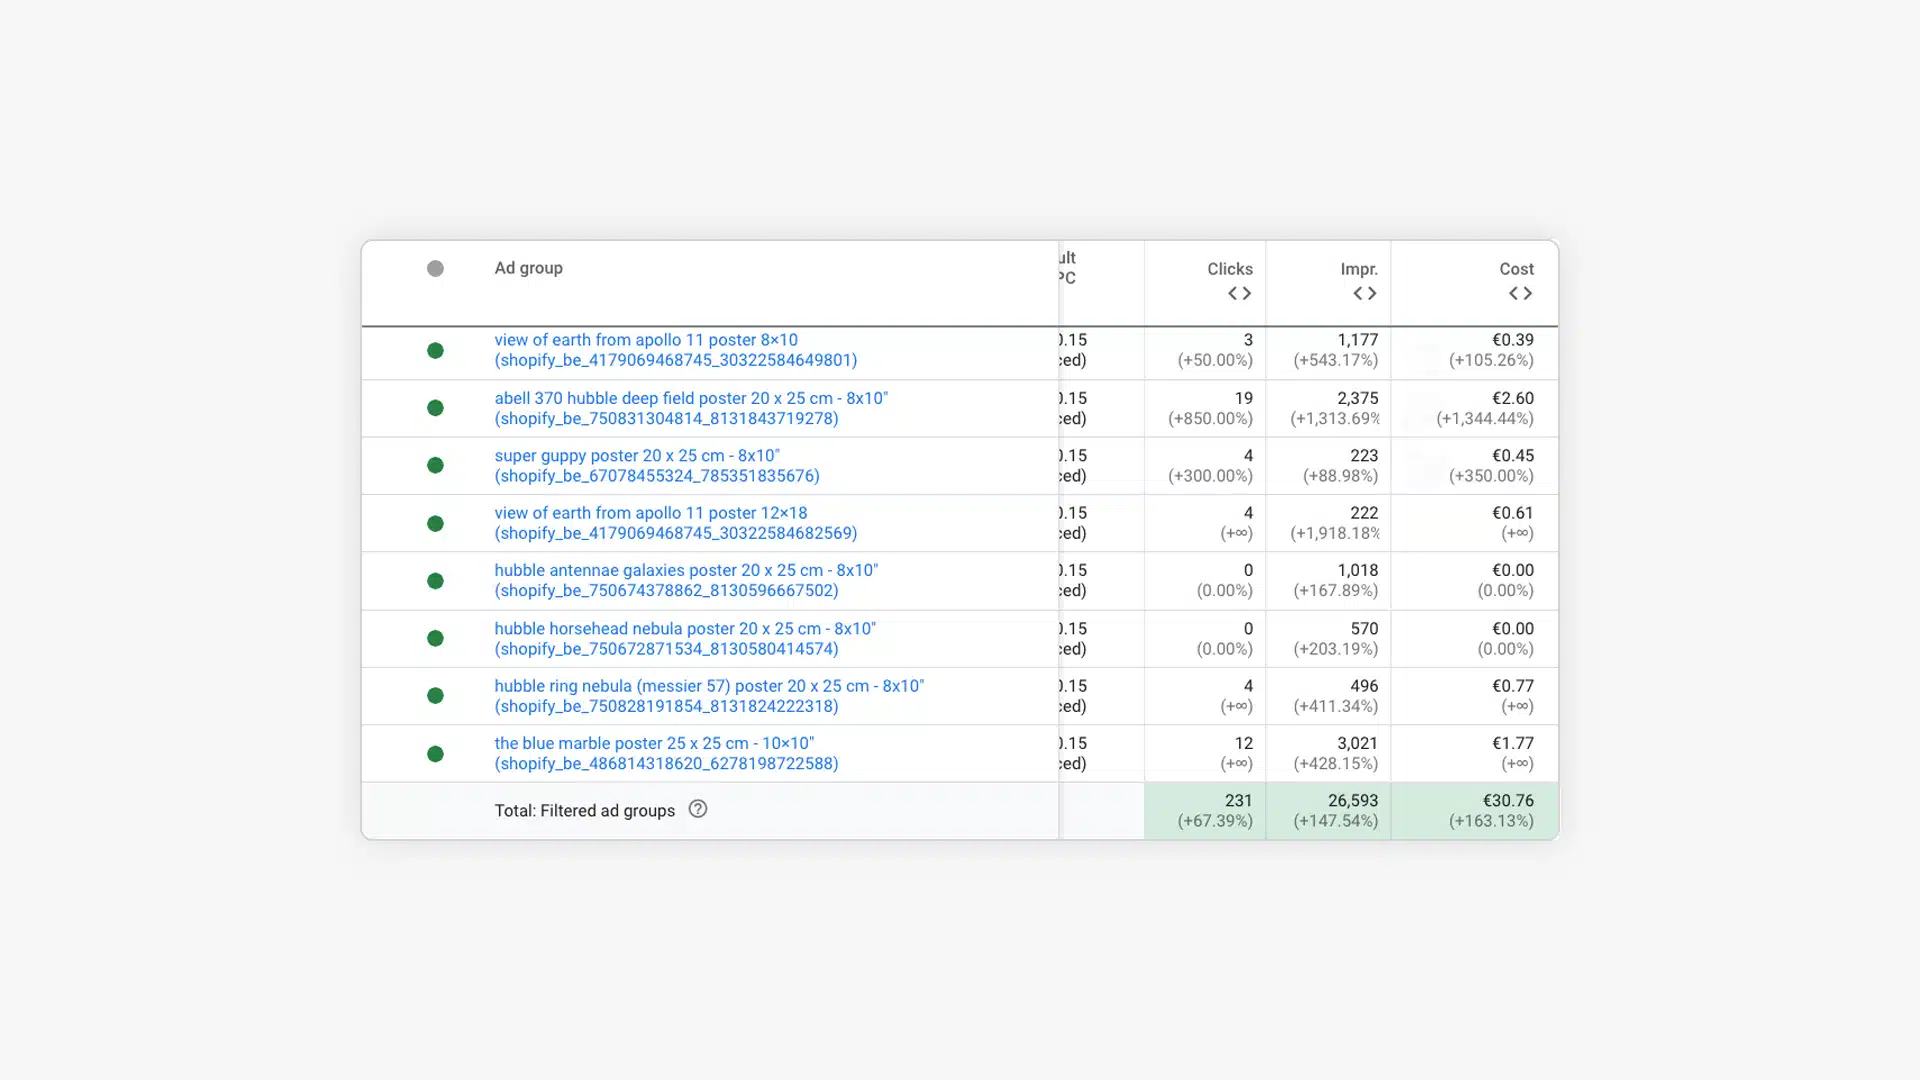
- Regularly update and optimize your product feed. Improving product titles, descriptions, and images can boost ad relevance and attract more clicks. Keep your feed clean and up-to-date to ensure product accuracy.
- Run A/B tests on different campaign settings, such as bids, product groups, or even the use of Standard vs. Performance Max campaigns. Learning from these tests will help you optimize and scale your campaign over time.
Google Ads provides detailed insights into impressions, clicks, and conversions, which allow you to make adjustments as needed. You can tweak your product groups, modify bids, and refine your targeting over time to optimize for better results.
Bonus Tip: Leverage negative keywords to prevent your ads from showing up for irrelevant search queries. This helps ensure your ads are shown only to high-intent shoppers.
Remember, optimization is an ongoing process, and small tweaks can lead to significant improvements in sales and ROI. Stay proactive, and your campaign will continue to deliver strong outcomes for your WooCommerce store.
If you want a hands-on guide, you can follow this video tutorial:
Pro Tips on Google Shopping Ads Optimization
Running Google shopping ads is a powerful way to drive traffic and boost sales, but just like I mentioned earlier, simply setting up a campaign isn’t enough. To truly unlock the full potential of these ads, it’s essential to continuously optimize and fine-tune your approach.
Just like Google product listing ads optimization is necessary for text-based ads, the same goes for shopping ads. Without optimization, even the best shopping campaign can underperform.
As the digital landscape changes and customer behaviors shift, it’s vital to stay ahead of the curve!
But you’re probably thinking how do I optimize my Google shopping ads, right?
You’ll need to actively refine your campaigns regularly to ensure that your products are seen by the right people at the right time. This’ll help you keep your ad spend efficient and your returns high.
Think of it as tuning a car—regular maintenance keeps it running smoothly, and with the right tweaks, you can enhance speed and performance.
Let’s dive into some actionable pro tips that will help you optimize your WooCommerce Google shopping campaigns for the maximum output:
1. Optimize Your Product Feeds Regularly
Google uses the information from your product feed—such as titles, descriptions, and categories—to match your products with relevant search queries. So, ensure your product feed is accurate, regularly updated, and adheres to Google’s guidelines to avoid errors and delays.
Title Optimization also plays a vital role. So, structure your titles in a clear order: Brand > Product Type > Key Features. Keep the most important information upfront, as it impacts how your products appear in search results.
For example: Adidas Ultra Boost Men’s Running Shoes – Black/White.
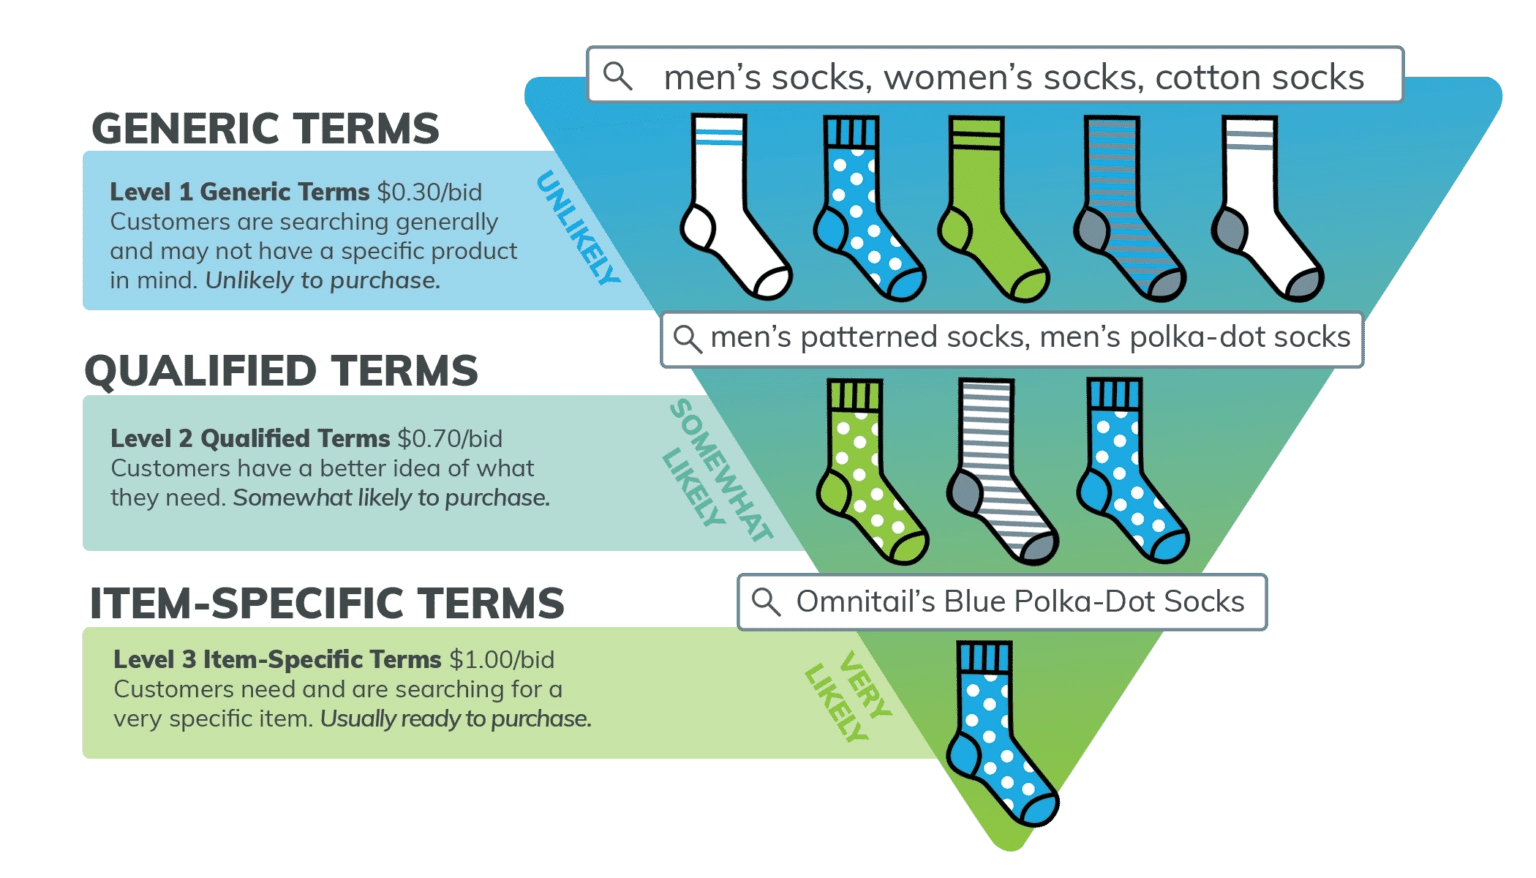
Include all essential product attributes such as color, size, material, and price, as well as high-quality images. Remember, well-optimized product info increases the chances of your products appearing in relevant searches.
Don’t forget to implement important keywords at the beginning of your product titles. Also, your product descriptions should be informative and compelling. Make sure to put the most important information in the first 150-500 words.
2. Leverage High-Quality Product Images
Your product image is the first thing shoppers see. A poor-quality image can lead to lower click-through rates, regardless of how well-optimized your title and price are.
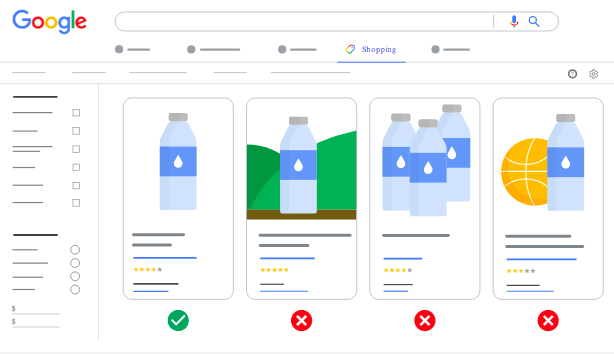
Make sure your images are high-resolution (at least 800x800p) and have a plain white background to keep the focus on the product itself. Your clear, professional images should showcase your products in the best possible light.
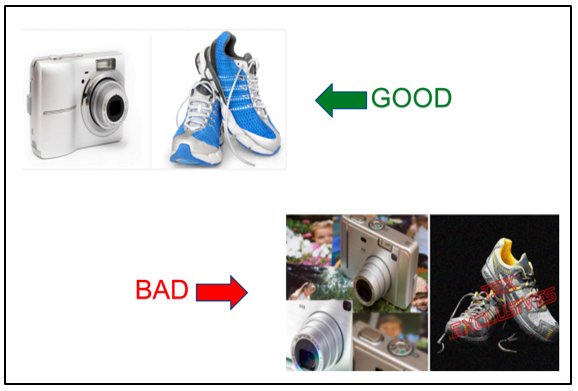
In fact, it will be best to use multiple images that show the product from different angles. Avoid watermarks or text on the images, as these may lead to disapproved ads. Follow Google’s guideline on image optimization for shopping ads.
Also, make sure that all images across your product catalog maintain a consistent style and quality. This creates a professional and cohesive look for your brand.
3. Segment Your Product into Multiple Groups
When all products are in one group, it’s difficult to allocate your budget effectively and optimize performance across categories.
Instead of treating all products the same, segmentation helps you focus your budget on top-performing products and fine-tune your campaign for optimal results.
So, break down your products into smaller, more manageable groups based on criteria like product category, brand, price range, or even individual product performance.
For example, you might create one group for your best-sellers and another for seasonal items.
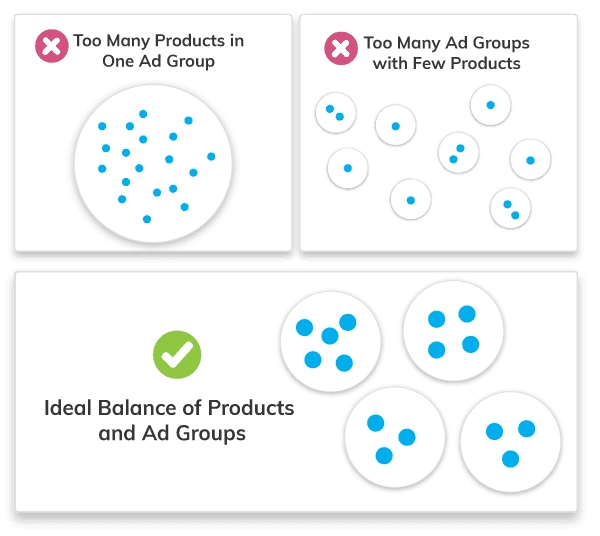
Break down your inventory into smaller product groups based on categories, brand, or price range. This way, you can set different bids for each group.
Allocate higher bids to products that have a higher conversion rate or a greater return on ad spend (ROAS), while setting lower bids for less popular or experimental products.
Don’t forget to continuously track the performance of each product group. This allows you to adjust bids and focus more on the products that are driving the most sales, improving overall campaign efficiency.
4. Utilize Google’s Smart Bidding Strategies
In essence, Google’s Smart bidding strategies leverage machine learning to automatically optimize your bids in real-time, ensuring your ads are shown to the right customers at the right moments. Dynamic bidding helps you stay competitive without overspending and maximize your ROI/ROAS.
So, let Google do all the heavy lifting for you. Smart Bidding analyzes user behavior, search intent, and contextual signals (like device, location, and time) to automatically adjust your bids.
At this point, you might be thinking, how do I choose the right bidding strategy for Google shopping ads, right? Well, to choose the perfect bidding strategy for your WooCommerce store, here’s what you need to keep in mind:
- Maximize Clicks: Best for driving traffic to your site. Google automatically adjusts bids to get the most clicks within your budget.
- Target ROAS (Return on Ad Spend): Ideal if you want to focus on profitability. Google adjusts bids to achieve a specific return based on ad spend, making it great for maximizing ROAS.
- Maximize Conversions: This strategy works well if you’re looking to increase the number of conversions, regardless of the cost per click (CPC). Google will automatically adjust bids to get the most conversions within your set budget.
- Manual CPC: Gives you full control over individual bids. This strategy is effective for experienced users who want to fine-tune their bidding for specific products.
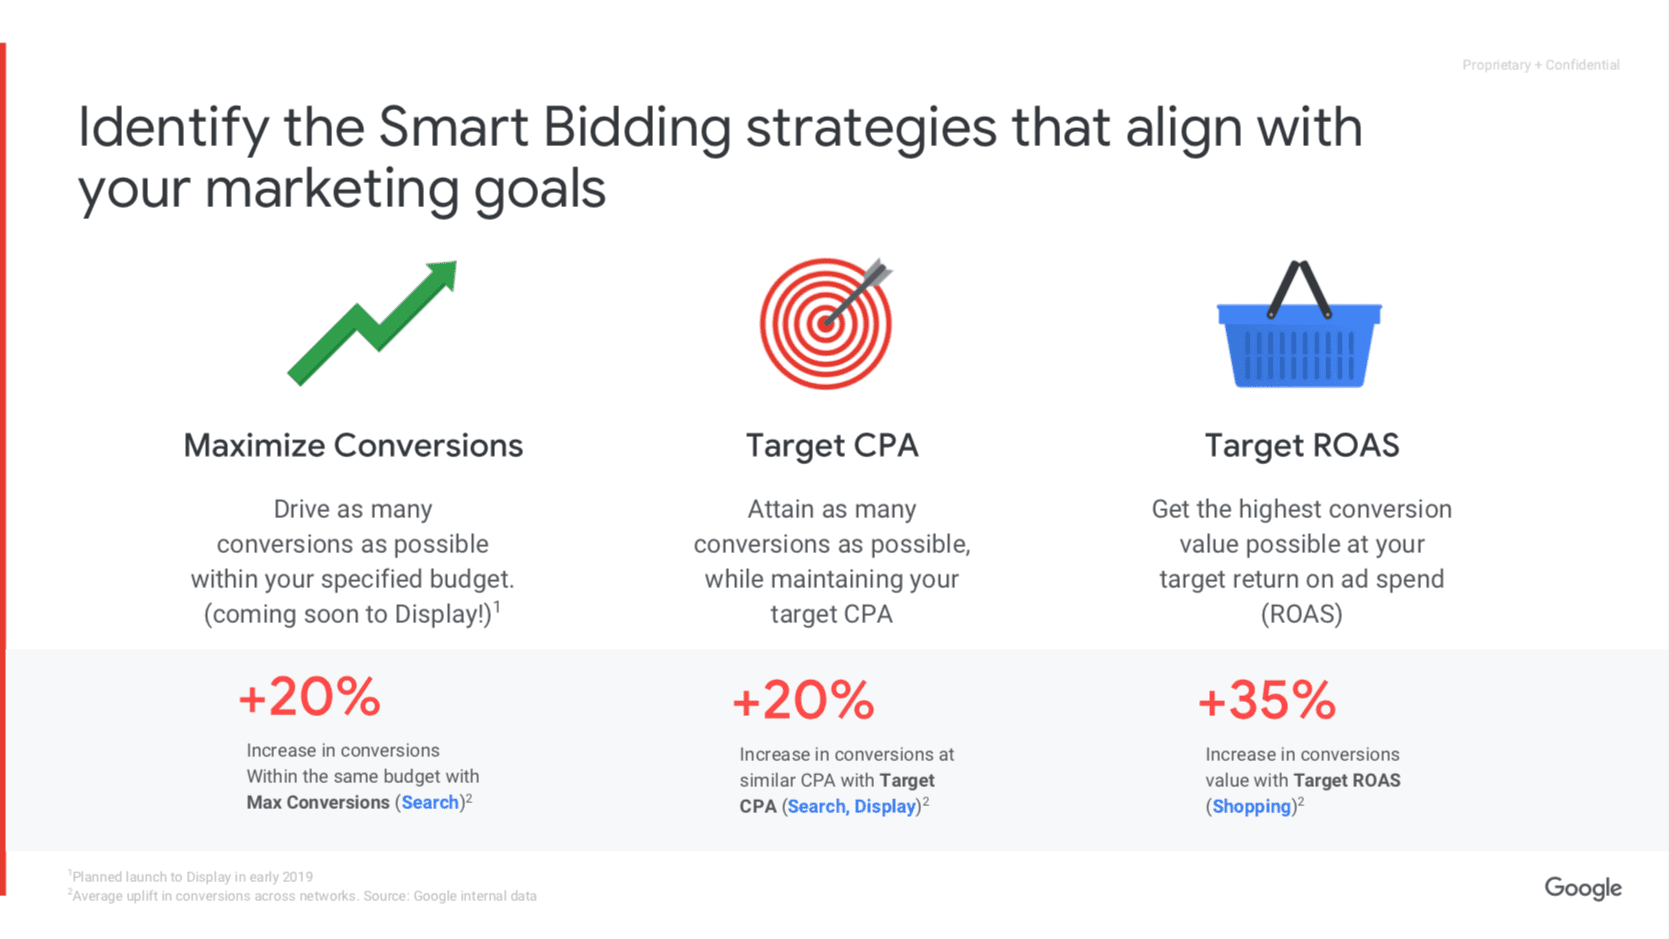
Start with lower bids and gradually increase them for products that show strong performance (higher conversions, clicks). Conversely, lower your bids or pause products that aren’t delivering results.
Leverage smart shopping campaigns that use automated bidding and ad placements. These campaigns combine Shopping and Display ads, using Google’s algorithms to optimize for the best results across the internet.
5. Capitalize on Seasonal Trends and Promotions
Shopping behavior varies throughout the year, and capitalizing on seasonal demand or promotions can significantly increase your sales.
Whether it’s Black Friday, Christmas, New Year, or even back-to-school season, knowing when your products are in high demand is essential.
So, plan ahead by increasing your bids and budgets in the weeks leading up to these events. Utilize promotions like discounts, limited time offers, BOGO offers or free shipping to capture early shoppers.
You can highlight these in your product feed using custom labels to tag sale items or promotional products. Customize your product titles and descriptions to reflect seasonal trends.
If you work with a large inventory, consider using a dedicated discount plugin to streamline your special offerings.
Also, use ad scheduling to ensure your ads are most visible during high-traffic times, like the weeks leading up to major holidays.
Remember, peak seasons make shoppers more likely to convert, so it’s smart to temporarily increase your ad budget to capture as much traffic as possible.
6. Implement Remarketing with Google Shopping Ads
Remarketing with Google shopping ads allows you to re-engage potential clients who have already shown interest in your products but haven’t completed a purchase, increasing the likelihood of conversion.
Not every shopper converts on their first visit. In fact, 97% of website users never return to a website. Remarketing helps you stay top of mind with high-intent customers, increasing the likelihood of a future sale.
Use Remarketing Lists for Search Ads (RLSA) or combine your shopping campaign with dynamic remarketing feeds. Enhance your ads with WooCommerce extensions like sitelinks, callouts, and price extensions to provide additional information and increase click-through rates.
If you have a customer email list, you can also use Customer Match to target previous buyers with Shopping Ads, promoting complementary products or offering exclusive deals to encourage repeat purchases.
Don’t forget, the digital marketplace is always evolving, and staying proactive in your optimization efforts is the key to boost conversion rates and drive long-term success in your WooCommerce Store through Google shopping ads.
What is The Cost of Google Shopping Ads? Tips to Minimize Ad Spending
So, how much are google ads, and how can you make sure you are getting the most out of your buck?
Google shopping ads operate on a cost-per-click (CPC) model, which means The listings themselves are free. You only pay each time someone clicks on your ad.
The actual cost per click varies based on factors like product category, competition, and bid amount. Unlike traditional text ads, you don’t bid on keywords; instead, you bid on product groups.
The average CPC for Google shopping ads is $0.66. However, it can range anywhere from $0.01 to $54.00 or even more, depending on the competitiveness of your industry.
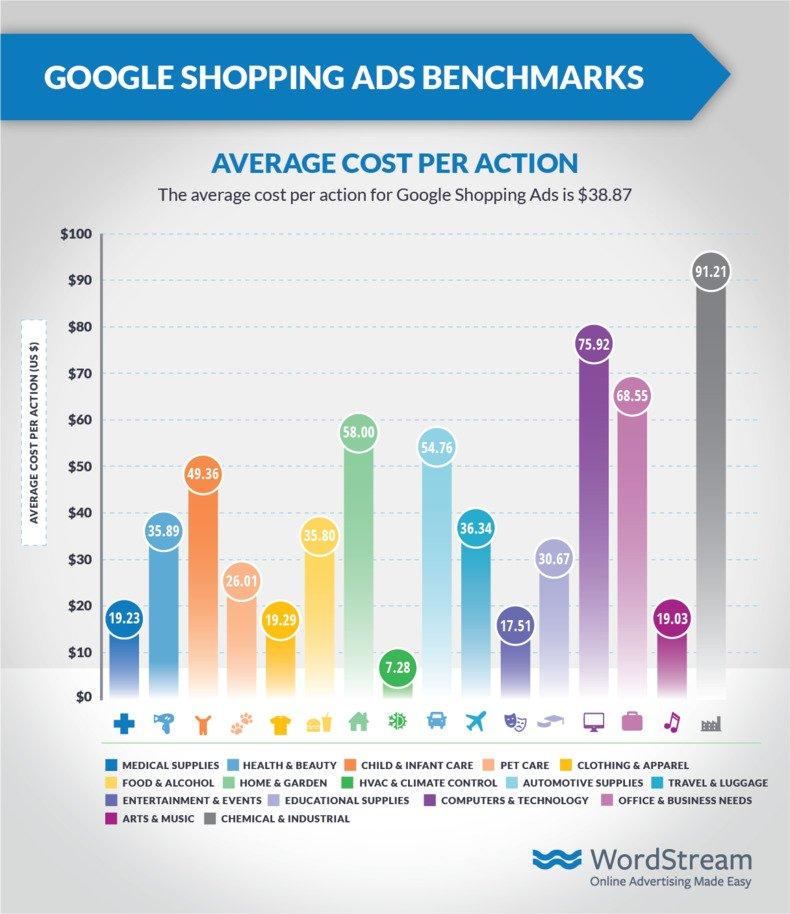
Here’s a few Pro tips on how you can reduce Google shopping ads cost without hampering the outreach:
- Start with a daily budget that you’re comfortable with and monitor your spending regularly.
- Optimize your product feed with accurate titles, descriptions, and images. This can improve ad relevance and quality score, leading to lower CPCs.
- Reduce wasted clicks through implementing negative KW to prevent your ads from showing up for irrelevant searches.
- Segment your products into various groups and try setting different bids for each group.
- Regularly analyze your campaign performance and adjust bids accordingly.
- Experiment with different bidding strategies, product titles, and images to find the most cost-effective approach.
- Utilize Google Shopping Automation options (Smart Bidding) like Maximize Clicks or Target ROAS to automate and optimize bids based on performance data.
While Google shopping ads can be an investment, understanding the cost structure and implementing cost-saving strategies can help you make the most of your budget.
So, it’s important to minimize costs and maximize the return on your advertising spend through closely monitoring your campaigns and making necessary adjustments.
Common Google Shipping Ad Challenges & Their Solutions
Google shopping ads can drive incredible results for WooCommerce store owners, but like any advertising platform, it comes with its own set of challenges. These issues can hamper your campaign’s effectiveness.
For example, a common issue may be getting no impressions on your google shopping ads for product feed or targeting issues. Other key issues include disapproved ads, low conversion rates, high CPC ratio, and many more.
However, understanding these common hurdles and knowing how to resolve them can help you run smoother, more profitable campaigns.
In the sections below, we’ll discuss a few advanced Google shopping ads strategies that’ll help you get the most out of your campaigns.
So, let’s explore the most frequent Google shopping ad challenges and actionable fixes to ensure your ads perform at their best:
Challenge 1: Product Feed Errors
Google may reject product listings due to issues like missing product data, non-compliant images, invalid product identifiers, or violations of Google’s policies.
It mostly happens in Google Merchant Center, and your product ends up being labelled as “disapproved product”.
Solution
Ensure your product feed is complete and follows Google’s guidelines. Use a plugin like CTX Feed to generate a compliant and optimized feed.

Additionally, check the Diagnostics tab in Google Merchant Center on a regular basis for errors and update the feed as necessary. We have an in-depth guide on common GMC errors for those who want to know more.
Challenge 2: Disapproved Ads
Your ads can get flagged as “Disapproved” if they fail to comply with google shopping ads requirements. The key reasons for that include incorrect product categories, misleading pricing, or wrong image formats.
Solution
Review Google’s shopping ad policies thoroughly and ensure that all information (titles, images, pricing) is accurate. Address any issues flagged in the Merchant Center, whether it is in your product feed or ad content.
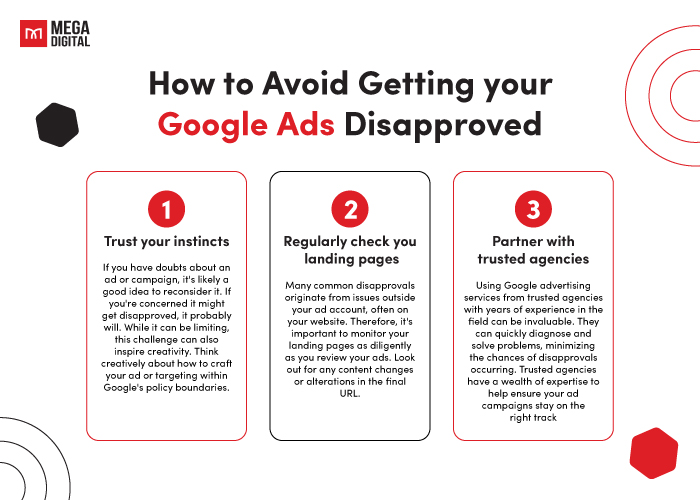
To run a Google shopping ad campaign, you’ll need to meet three requirements. Here are the key Google shopping requirements you need to fulfil:
- Link a Google Merchant Center (GMC) account with Google Ads (GA) account.
- Submit up-to-date product data regularly (at least once a month).
- Comply with Google’s Shopping ads policies for content, business, and website.
Once optimized, you’ll need to resubmit your product feed for Google’s approval. Don’t forget to regularly check your Merchant Center account for error messages.
Challenge 3: Low Ad Visibility
High competition can lead to low ad visibility, especially for products in saturated markets, or with larger profit margins.
In competitive markets, many advertisers bid for the same or similar products, which can make it challenging for your ads to stand out.
This competition drives up the cost-per-click and makes it harder for your ads to be displayed. As a result, your ads will receive fewer impressions, and your CTR will drop significantly.
Solution
Optimize your product titles and descriptions by including high-performing keywords. Regularly conduct Google ads competitor analysis to identify room for improvement. Implement relevant keywords naturally and avoid stuffing.
But how do I optimize my product titles and descriptions for Google shopping ads, right?
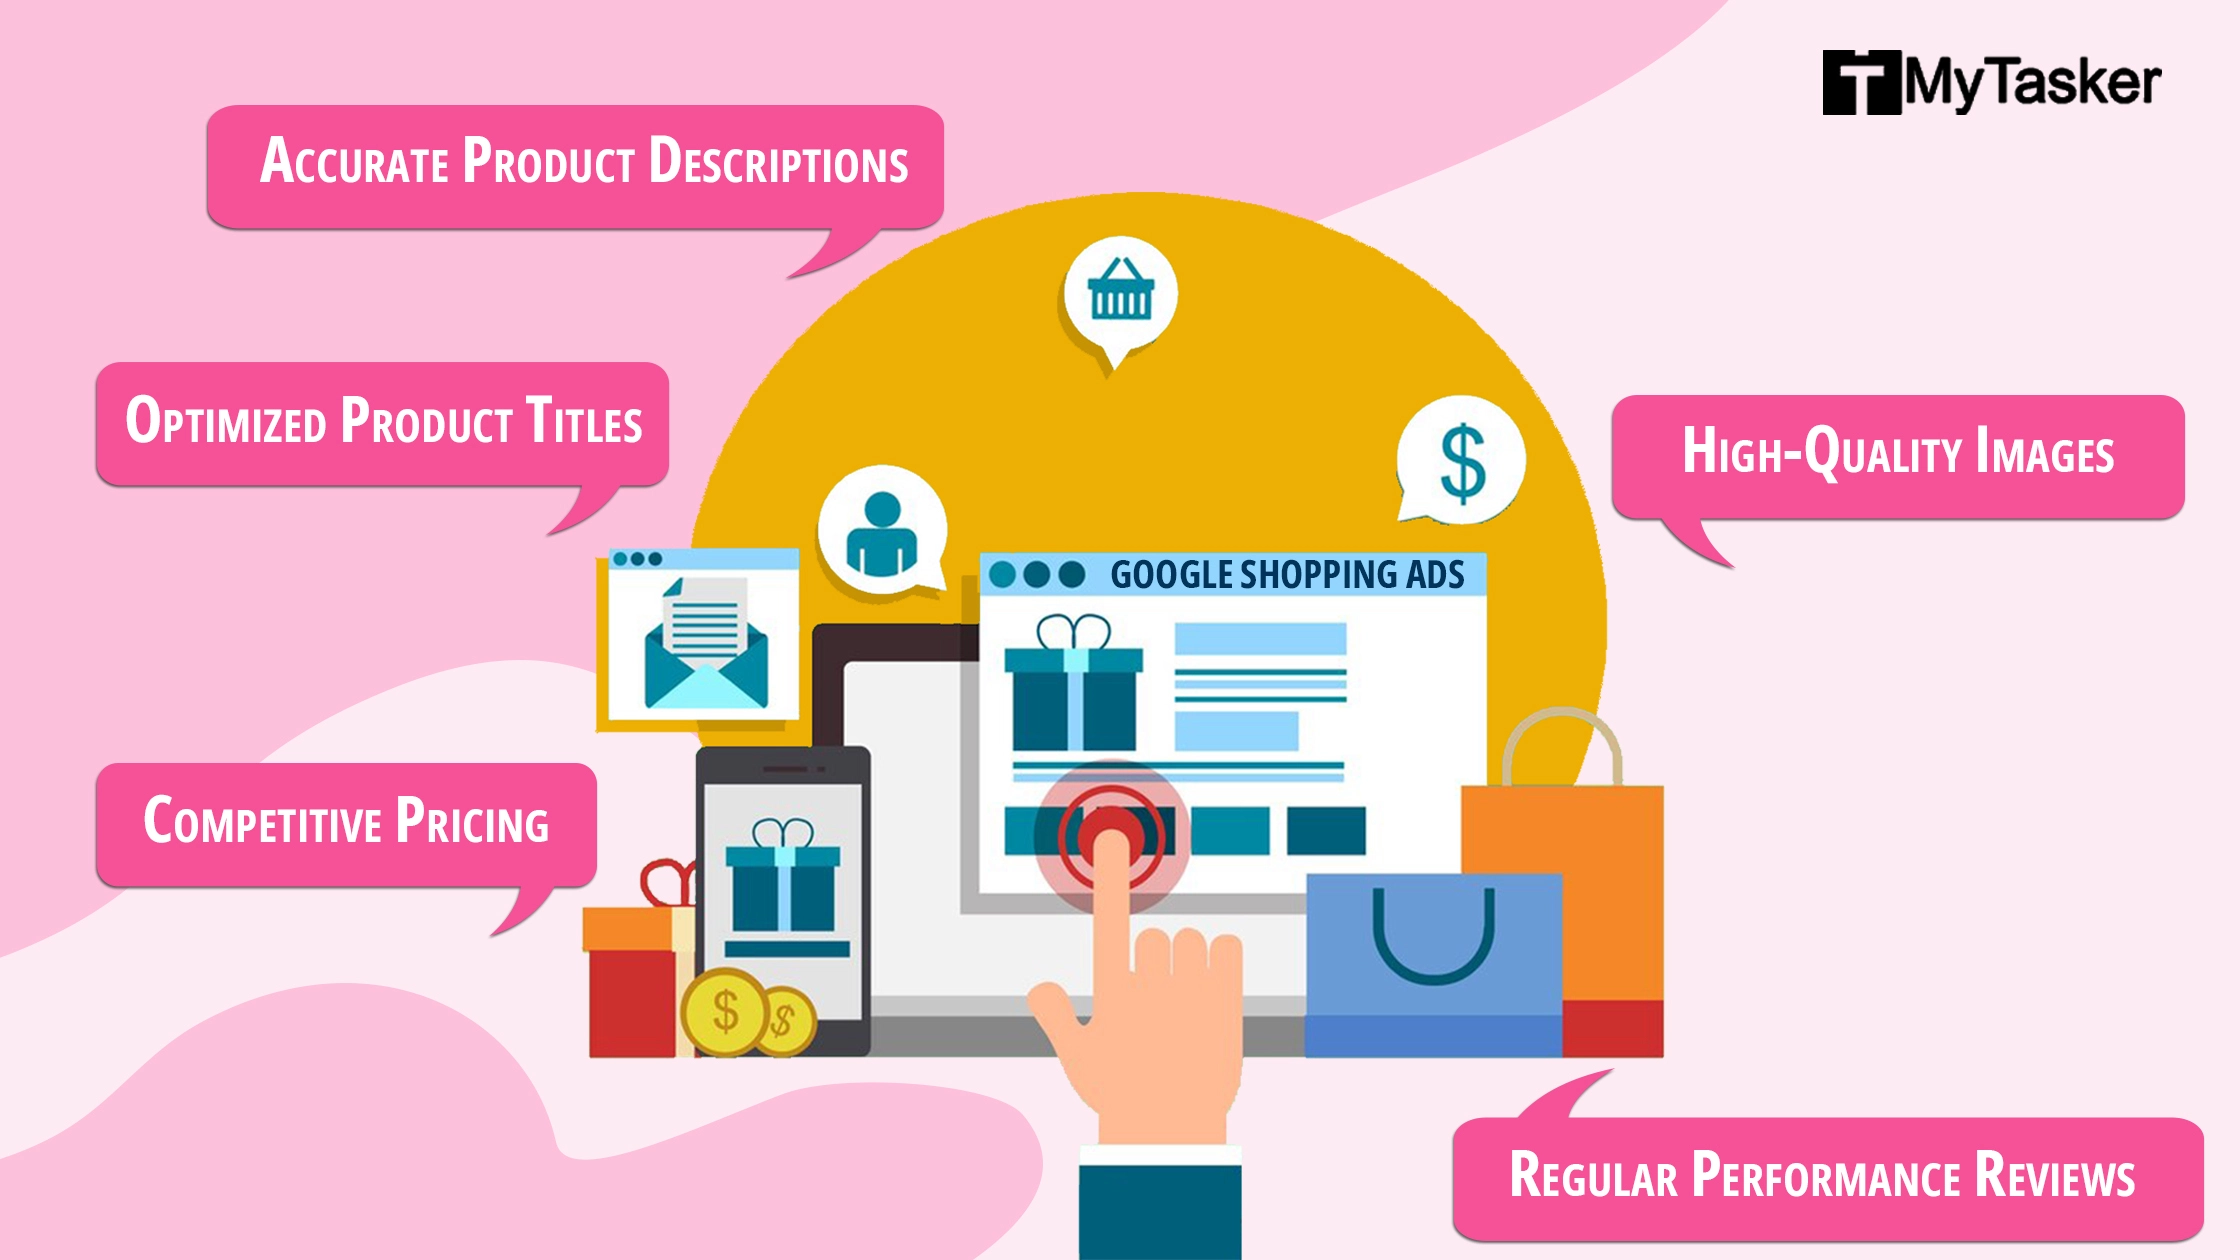
Well, we have an information-rich blog section filled with in-depth articles to help you level up your WooCommerce business. Feel free to check them out.
If you’re interested, here is also a video guide for you:
Additionally, consider increasing bids for high-priority products or using Smart Bidding strategies to improve performance. You can also try to highlight special discounts, ratings, or unique selling points in your product feed to make your ads more appealing in a competitive landscape.
Challenge 4: High Cost-per-Click (CPC) Ratio
High CPC can quickly drain your budget, especially if ads aren’t converting into sales. This can increase your Google shopping ads cost without providing actual results, lowering your ROI.
Solution
Segment your products into groups based on performance and set appropriate bids for each group. Focus on your best-selling or high-margin products.
You can use Smart Bidding options like Target ROAS or Maximize Clicks to automate bid adjustments based on performance.
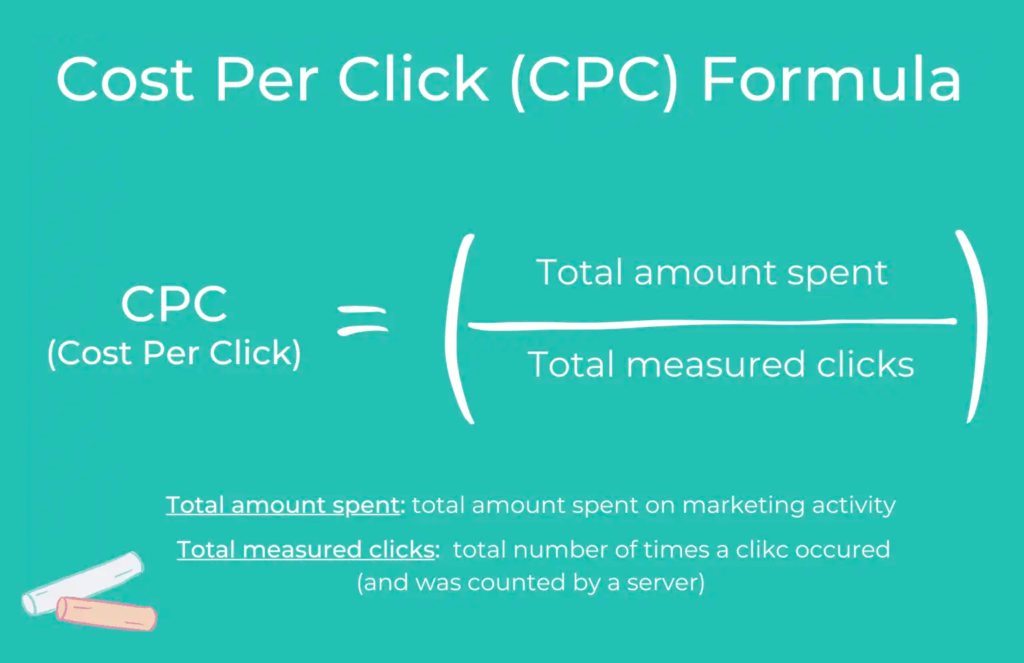
Also, don’t forget to regularly review campaign performance and adjust bids as needed to ensure you’re not overpaying for clicks that don’t lead to conversions.
Challenge 5: Poor Conversion Rates
Despite high clicks, low conversions can be a major issue. This means your ads are getting attention but failing to convert them into sales.
Consistently low conversion rates can affect your campaign’s performance metrics, potentially impacting ad placement and CPC over time.
This can happen for a variety of reasons, including a gap between ad content and landing page experience, high product prices, or a complex checkout process.
Solution
Optimize your product pages for better user experience, ensuring fast load times, clear product information/return policy, and easy checkout. You can also offer guest checkout options and multiple payment methods to streamline the process.
Additionally, try implementing remarketing strategies to target users who abandoned the site before purchasing. Make sure your pricing is competitive, and your product data is accurate across all of your sales channels.
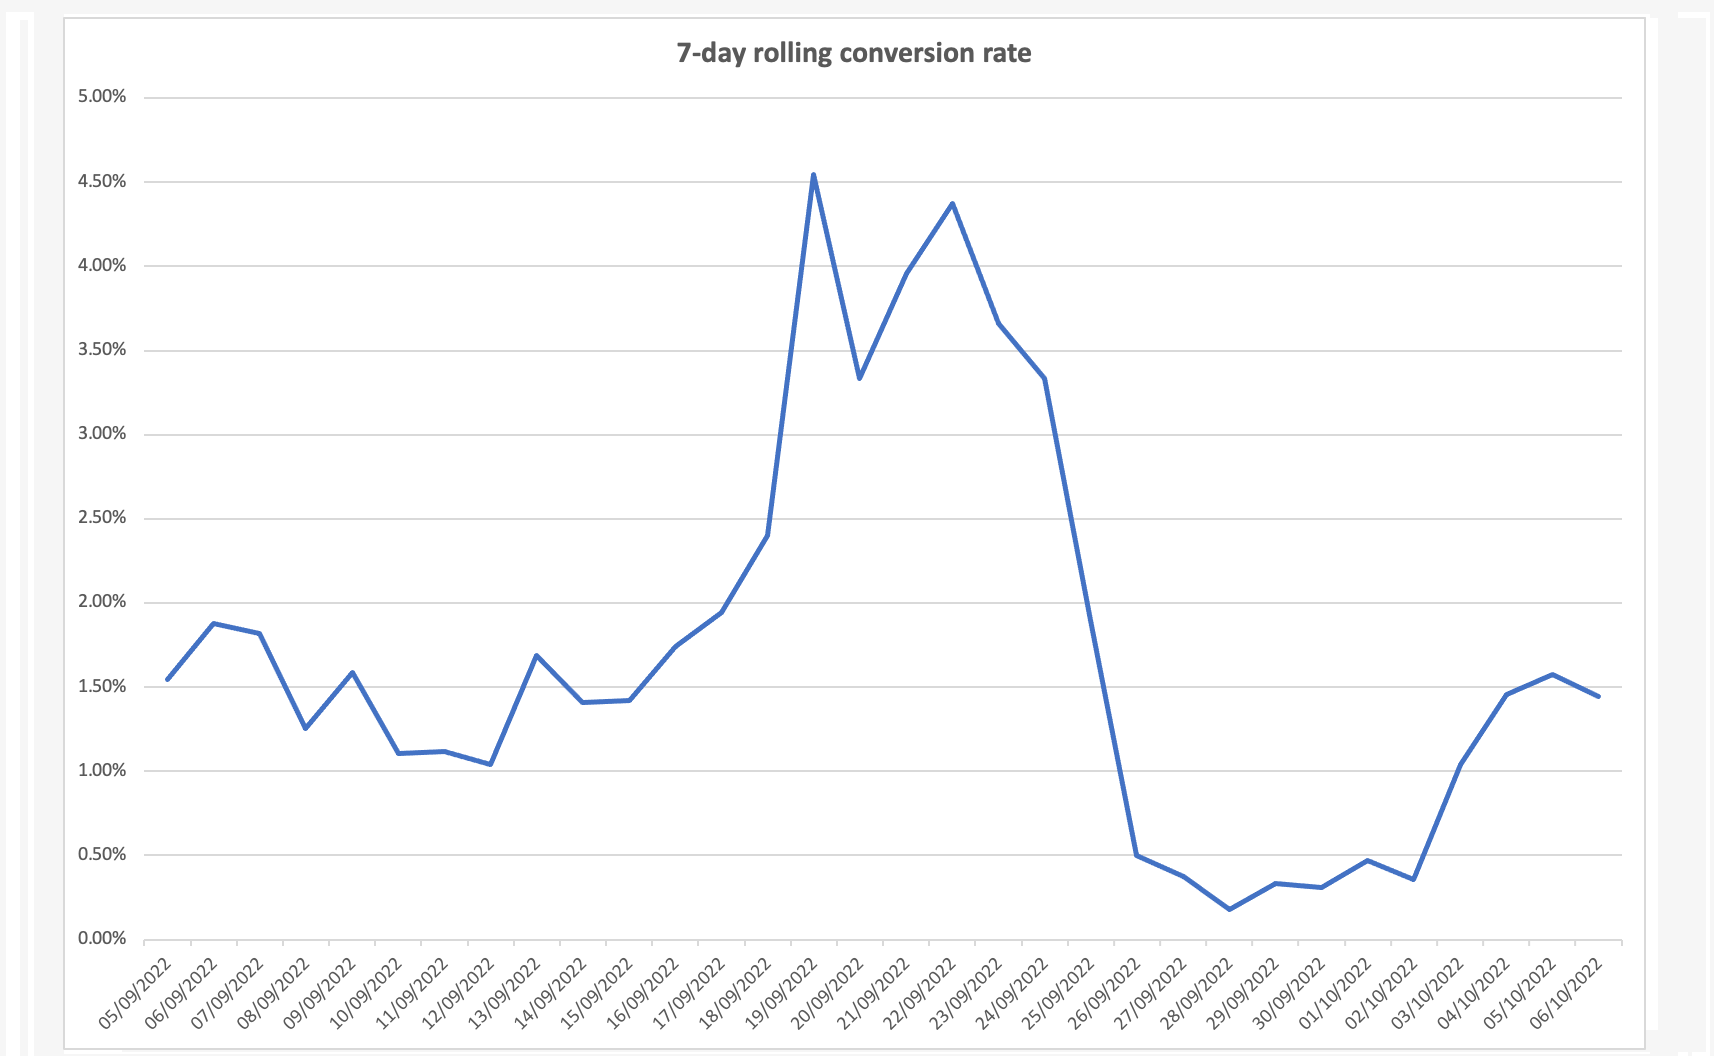
To sum up, facing challenges in your Google shopping ads is part of the process, but with the right strategies and proactive solutions, you’ll be able to overcome these issues and secure maximum visibility for your products.
The key is consistent monitoring, learning from data, and adjusting your approach to ensure ongoing success in your WooCommerce store’s Shopping ads campaigns.
Over to You: Boost Product Visibility with Google Shopping Ads
And with that, we’ve reached the end.
Congratulations on reading this far! Compared to traditional text based boring ads, Google shopping ads break the mold by showcasing your products visually.
As a matter of fact, shopping Ads account for a staggering 85.3% of all clicks in Google Ads and Google Shopping campaigns combined!
So, it’s not only wise, but also crucial to leverage Google shopping ads and advertise your website on google, significantly increasing your brand visibility.
Today, we’ve tried to provide a bird’s eye view of all the essential aspects of Google shopping ads, from setting up and optimizing campaigns to tackling common challenges like low visibility, high CPC, and product feed errors.
For WooCommerce store owners, maximizing the performance of your Google shopping ads means making smart decisions based on data and applying proven strategies that increase visibility, reduce costs, and drive higher conversions.

Don’t forget, success with Google shopping ads is an ongoing process. Regularly monitor your performance, stay informed about the latest best practices, and be prepared for any sudden market changes.
If you’re eager to dive deeper into advanced strategies or need further guidance, explore our in-depth blog section, Google’s official documentation, and policies for more insights and resources.
Embark on this journey with confidence, and watch your online business reach new heights through the power of Google shopping ads!
FAQ
1. What is the difference between a product feed and a data feed?
Ans:
A product feed is a specific type of data feed that contains detailed information about products, such as titles, descriptions, prices, images, and availability.
On the other hand, a data feed is a broader term that refers to any structured file that provides regularly updated information, which could include various types of data, not just product details.
In essence, all product feeds are data feeds, but not all data feeds are product feeds.
2. Can I use Google shopping ads for retargeting?
Ans:
Yes, you can use Google shopping ads for retargeting through dynamic remarketing. To set this up, you’ll need to enable remarketing lists in Google Ads, link them to your campaigns, and ensure your GMC feed is connected for dynamic ad creation.
3. Can I control where my Google Shopping Ads appear?
Ans:
Yes, you can control where your Shopping Ads are shown by adjusting settings like geographic targeting, device targeting (mobile or desktop), and ad scheduling to determine when and where your ads appear
4. What types of businesses benefit the most from Google Shopping Ads?
Ans:
E-Commerce businesses, particularly those in industries like fashion, electronics, and home goods, benefit the most from Google Shopping Ads.
5. How can I utilize Google shopping ads for electronics?
Ans:
You can utilize Google shopping ads to create a visual appeal, target high-intent users, enable captivating product comparisons, and optimize bids for high-value products. These strategies will help you drive targeted traffic and maximize sales in a competitive market.

Google shopping ads is awesome and all but how do you track it? There’s old tutorial saying there is a “Conversion” tab at the campaign settings. But, I don’t find any.
To Monitor and optimize your Shopping campaigns check this link.
To track conversions of your Ads check this link. If you are looking for something else please let me know.