%22%2F%3E%0A%3Cpath%20d%3D%22M59.8894%2016.6974C60.1689%2016.9331%2060.5416%2017.1216%2060.9142%2017.0745C61.5664%2017.0273%2061.8925%2016.6031%2061.6596%2015.7547C61.5198%2014.4349%2061.4267%2013.1623%2061.2869%2011.8425C61.1006%209.72149%2060.8211%207.55331%2060.5881%205.38512L60.1689%201.70863C60.0757%200.81307%2059.6099%200.294591%2058.7713%200.106053C58.4918%20-0.0353509%2058.2123%20-0.0353509%2057.9328%200.106053C57.7931%200.106053%2057.6999%200.106053%2057.6067%200.153187C56.5353%200.483129%2055.4172%200.81307%2054.3458%201.19015C53.5073%201.47295%2052.6222%201.75576%2051.7371%202.03857C50.2929%202.50991%2048.8488%203.02839%2047.4047%203.49974C46.4264%203.82967%2045.4016%204.1596%2044.3768%204.48952L44.3767%204.48956C43.6313%204.72523%2043.3518%205.24371%2043.6313%205.85646C43.7711%206.13927%2044.004%206.32781%2044.2369%206.46921C44.7028%206.79915%2045.2152%207.08196%2045.6811%207.4119C45.8674%207.55331%2046.0537%207.69471%2045.8208%208.02465C45.7276%208.21319%2045.5879%208.35459%2045.4481%208.54313L45.355%208.73167L44.5164%2010.0986L43.9108%2010.9941L43.3052%2011.8897L43.2121%2011.9839L42.1406%2013.5865L44.5867%2019.8706C45.5713%2022.1447%2048.6357%2026.5713%2052.552%2023.6277L53.9265%2022.2593L54.3458%2021.5523C54.3924%2021.458%2054.4856%2021.3637%2054.5321%2021.2694L54.5787%2021.2223C55.2309%2020.1854%2055.883%2019.1956%2056.5352%2018.2059L56.5353%2018.2057C57.0477%2017.4044%2057.5601%2016.6503%2058.0726%2015.849C58.2123%2015.6604%2058.3055%2015.6133%2058.4918%2015.7076C58.9577%2016.0375%2059.4235%2016.4146%2059.8894%2016.6974Z%22%20fill%3D%22%233D89D0%22%2F%3E%0A%3Cpath%20d%3D%22M28.0259%2022.0232C27.9793%2022.0703%2027.9793%2022.1175%2027.9327%2022.1646C27.9793%2022.1175%2028.0259%2022.0703%2028.0259%2022.0232Z%22%20fill%3D%22url(%23paint1_linear)%22%2F%3E%0A%3Cpath%20d%3D%22M53.9265%2022.3064C53.7402%2022.5892%2053.5538%2022.872%2053.3675%2023.202C53.0414%2023.7204%2052.7153%2024.1918%2052.3892%2024.7103C51.3178%2026.4071%2050.1531%2027.9625%2048.4295%2029.0938C46.9388%2030.0365%2045.4015%2030.6021%2043.6779%2030.8849C42.1872%2031.1206%2040.7896%2030.9791%2039.3921%2030.5549C37.6219%2030.0365%2036.038%2029.1409%2034.687%2027.8211C33.7088%2026.8784%2032.9634%2025.7944%2032.3578%2024.616C32.0317%2023.9561%2031.7988%2023.2491%2031.4727%2022.5421C31.0534%2021.5522%2030.1683%2019.2427%2030.1218%2019.1012C30.0752%2019.0541%2030.0752%2018.9598%2030.0286%2018.9127C29.9354%2018.7242%2029.8422%2018.5828%2029.7957%2018.3942C29.6559%2018.0172%2029.4696%2017.6401%2029.3298%2017.2159C29.2366%2017.0273%2029.1901%2016.8388%2029.0969%2016.6503C28.9571%2016.3674%2028.864%2016.0846%2028.7242%2015.7547C28.5845%2015.3776%2028.4447%2015.0005%2028.2584%2014.6235C28.1652%2014.3407%2028.0254%2014.0579%2027.9323%2013.775C27.9323%2013.7279%2027.9323%2013.7279%2027.8857%2013.6808C27.7925%2013.4922%2027.7459%2013.3037%2027.6528%2013.1152C27.4664%2012.5967%2027.2335%2012.1253%2027.0006%2011.6069C27.0006%2011.5597%2026.954%2011.5126%2026.9074%2011.4655C26.8142%2011.2769%2026.7211%2011.1355%2026.5813%2010.947C26.5347%2010.8998%2026.4882%2010.8527%2026.4882%2010.8056C26.4416%2010.7584%2026.395%2010.7113%2026.395%2010.6642C26.3484%2010.617%2026.3018%2010.5699%2026.2552%2010.5228C26.2086%2010.4756%2026.2086%2010.4285%2026.1621%2010.4285L26.1155%2010.3814C26.0689%2010.3342%2026.0223%2010.2871%2026.0223%2010.2871C25.9291%2010.1928%2025.8826%2010.1457%2025.7894%2010.0514C25.7428%2010.0043%2025.6962%209.95715%2025.6496%209.95715C25.603%209.91002%2025.5565%209.91002%2025.5099%209.86288C25.4167%209.81575%2025.3701%209.76861%2025.277%209.67435C25.2304%209.62721%2025.1838%209.62721%2025.1372%209.58008C25.0906%209.53294%2025.044%209.53294%2024.9974%209.48581C24.9509%209.48581%2024.9043%209.43867%2024.9043%209.43867C24.8577%209.39154%2024.8111%209.39154%2024.7645%209.3444C24.7179%209.3444%2024.7179%209.29727%2024.6714%209.29727C24.5782%209.25014%2024.485%209.203%2024.3918%209.15587C22.9943%208.59025%2021.1775%208.77879%2020.1992%209.10873C19.2675%209.43867%2018.2893%2010.3342%2018.2427%2010.4285C18.6619%209.72148%2019.0812%208.96733%2019.547%208.26031C20.1526%207.36475%2020.7117%206.4692%2021.3638%205.62078C22.3887%204.63095%2023.4602%203.78253%2024.6714%203.07551C27.0006%201.75575%2029.4696%201.52007%2032.0317%201.89715C33.3361%202.08569%2034.5939%202.60417%2035.7585%203.35832C36.9231%204.06534%2037.9014%204.96089%2038.7399%206.04499C39.2989%206.79914%2039.8114%207.60043%2040.1374%208.49598C40.6033%209.67435%2041.1623%2010.8056%2041.5816%2011.9839C41.7679%2012.5496%2042.0008%2013.068%2042.2338%2013.6336C42.2338%2013.6336%2042.2338%2013.6336%2042.2338%2013.6808V13.7279L45.0288%2019.8554C45.4015%2020.8452%2045.9139%2021.6465%2046.7059%2022.3535C47.2183%2022.872%2047.8705%2023.1548%2048.5227%2023.3905C48.5693%2023.3905%2048.6158%2023.4376%2048.6624%2023.4376C49.7805%2023.7676%2051.2246%2023.3905%2052.3426%2023.0134C53.088%2022.6835%2053.6936%2022.4007%2053.9265%2022.3064Z%22%20fill%3D%22url(%23paint2_linear)%22%2F%3E%0A%3Cpath%20d%3D%22M28.0255%2022.0238C27.9789%2022.0709%2027.9789%2022.118%2027.9324%2022.1652C27.9324%2022.1652%2027.9324%2022.1652%2027.9324%2022.2123C27.7926%2022.448%2027.6063%2022.6836%2027.4665%2022.9664C25.8826%2025.8416%2024.4385%2028.1512%2021.6434%2029.6595C19.3142%2030.9793%2016.8452%2031.215%2014.2831%2030.8379C14.1433%2030.8379%2014.0501%2030.7908%2013.9104%2030.7908C12.7458%2030.6022%2011.5812%2030.0838%2010.4165%2029.2825C8.78607%2028.1512%207.52829%2026.5958%206.64318%2024.8047L6.17733%2023.9091L5.01272%2021.5524L0.726927%2012.6911C0.447419%2012.0784%200.214496%2011.4656%200.121327%2010.8529C-0.437689%207.8834%200.95985%204.77252%203.80151%203.35849C5.43198%202.51007%207.24878%202.4158%208.87924%202.93428C10.6029%203.45276%2012.1402%204.67825%2013.0253%206.46937L13.1184%206.6579L14.7489%209.95732C14.7955%2010.0516%2014.7955%2010.1459%2014.8421%2010.2401C15.075%2010.8529%2015.8204%2012.4083%2016.426%2013.5867C16.4725%2013.6809%2016.5191%2013.7752%2016.5657%2013.8223C16.6123%2013.9638%2016.7055%2014.1052%2016.752%2014.1994C16.7986%2014.2937%2016.8452%2014.3408%2016.8452%2014.4351C16.8452%2014.4822%2016.8918%2014.4822%2016.8918%2014.5294C16.9384%2014.5765%2016.9384%2014.6708%2016.985%2014.7179C16.985%2014.765%2017.0316%2014.765%2017.0316%2014.8122C17.0316%2014.8593%2017.0781%2014.8593%2017.0781%2014.9064C17.0781%2014.9536%2017.1247%2015.0007%2017.1247%2015.0478C17.1247%2015.095%2017.1713%2015.095%2017.1713%2015.1421C17.3111%2015.4249%2017.4042%2015.7549%2017.544%2016.0377C17.6372%2016.2262%2017.6837%2016.4147%2017.7769%2016.6504C17.9632%2017.1689%2018.1962%2017.6402%2018.3825%2018.1587C18.5223%2018.4415%2018.6154%2018.7715%2018.7552%2019.0543C18.8018%2019.1485%2018.8484%2019.29%2018.8949%2019.3842C18.9881%2019.5728%2019.0347%2019.7613%2019.1279%2019.9498C19.3608%2020.5154%2019.5937%2021.0811%2019.9664%2021.5995C20.1993%2021.8823%2020.3857%2022.1652%2020.6652%2022.4008C22.3888%2023.9563%2024.9975%2023.862%2028.0255%2022.0238Z%22%20fill%3D%22url(%23paint3_linear)%22%2F%3E%0A%3Cpath%20d%3D%22M68.0888%2024.8694L68%207.88696H71.9963L71.8187%2018.4448L76.8806%207.88696H80.6548L81.3209%2018.3999L85.5392%207.88696H89.713L82.4754%2024.8694H78.1683L77.5466%2013.9072L72.3959%2024.8694H68.0888Z%22%20fill%3D%22%230D5293%22%2F%3E%0A%3Cpath%20d%3D%22M92.7771%2025.1385C89.2693%2025.1385%2086.7383%2022.6675%2086.7383%2019.2081C86.7383%2015.3893%2089.8021%2012.1545%2093.4431%2012.1545C96.6402%2012.1545%2098.8603%2014.4458%2098.8603%2017.7704C98.8603%2018.5342%2098.8159%2019.1182%2098.7271%2019.6124H90.4237C90.6457%2021.0501%2091.7114%2022.0385%2093.2211%2022.0385C94.1536%2022.0385%2094.9528%2021.724%2095.5301%2021.095L97.617%2023.4762C96.0185%2024.6443%2094.5976%2025.1385%2092.7771%2025.1385ZM90.6457%2017.411H95.4857C95.3081%2016.0632%2094.4644%2015.2545%2093.2211%2015.2545C92.0666%2015.2096%2091.0898%2016.0632%2090.6457%2017.411Z%22%20fill%3D%22%230D5293%22%2F%3E%0A%3Cpath%20d%3D%22M105.965%2024.9589C104.411%2024.9589%20103.167%2024.24%20102.368%2022.8473L101.924%2024.869H98.1499L101.791%207.52717L105.698%206.89819L104.322%2013.5923C105.166%2012.7836%20106.32%2012.2894%20107.519%2012.2894C110.139%2012.2894%20112.181%2014.8054%20112.181%2018.0401C112.226%2021.814%20109.428%2024.9589%20105.965%2024.9589ZM103.789%2016.3778L102.945%2020.4212C103.478%2021.185%20104.366%2021.6792%20105.388%2021.6792C107.208%2021.6792%20108.54%2020.2415%20108.54%2018.3097C108.54%2016.6474%20107.43%2015.4793%20105.92%2015.4793C105.077%2015.4793%20104.411%2015.7937%20103.789%2016.3778Z%22%20fill%3D%22%230D5293%22%2F%3E%0A%3Cpath%20d%3D%22M120.44%207.88696H125.058L127.899%2024.8694H123.725L123.193%2020.8259H117.154L114.978%2024.8694H110.582L120.44%207.88696ZM122.704%2017.5912L121.949%2011.9304L118.886%2017.5463H122.704V17.5912Z%22%20fill%3D%22%230D5293%22%2F%3E%0A%3Cpath%20d%3D%22M131.23%2012.3347H135.004L134.782%2013.5927C135.626%2012.7391%20136.736%2012.2449%20137.935%2012.2449C140.555%2012.2449%20142.597%2014.7608%20142.597%2017.9955C142.597%2021.8143%20139.8%2024.9592%20136.336%2024.9592C134.782%2024.9592%20133.539%2024.2853%20132.828%2022.9824L131.274%2030.0809H127.456L131.23%2012.3347ZM134.205%2016.3332L133.317%2020.5114C133.85%2021.2303%20134.738%2021.6796%20135.715%2021.6796C137.535%2021.6796%20138.867%2020.2419%20138.867%2018.31C138.867%2016.6477%20137.757%2015.4796%20136.247%2015.4796C135.493%2015.4796%20134.827%2015.7492%20134.205%2016.3332Z%22%20fill%3D%22%230D5293%22%2F%3E%0A%3Cpath%20d%3D%22M144.595%2012.3347H148.369L148.147%2013.5927C148.99%2012.7391%20150.101%2012.2449%20151.299%2012.2449C153.919%2012.2449%20155.962%2014.7608%20155.962%2017.9955C155.962%2021.8143%20153.164%2024.9592%20149.701%2024.9592C148.147%2024.9592%20146.904%2024.2853%20146.193%2022.9824L144.683%2030.0809H140.865L144.595%2012.3347ZM147.57%2016.3332L146.682%2020.5114C147.214%2021.2303%20148.102%2021.6796%20149.079%2021.6796C150.9%2021.6796%20152.232%2020.2419%20152.232%2018.31C152.232%2016.6477%20151.122%2015.4796%20149.612%2015.4796C148.857%2015.4796%20148.191%2015.7492%20147.57%2016.3332Z%22%20fill%3D%22%230D5293%22%2F%3E%0A%3Cpath%20d%3D%22M159.115%2024.8694H155.296L158.005%2012.3347H161.824L159.115%2024.8694ZM158.449%208.47099C158.449%207.1681%20159.559%206%20160.847%206C161.912%206%20162.8%206.85361%20162.8%207.93186C162.8%209.27967%20161.69%2010.4029%20160.358%2010.4029C159.248%2010.4029%20158.449%209.54924%20158.449%208.47099Z%22%20fill%3D%22%230D5293%22%2F%3E%0A%3Cpath%20d%3D%22M169.727%2020.6909L171.592%2023.1619C170.304%2024.4648%20168.572%2025.1387%20166.752%2025.1387C163.466%2025.1387%20161.068%2022.7126%20161.068%2019.388C161.068%2015.3446%20164.088%2012.1099%20167.862%2012.1099C170.082%2012.1099%20171.947%2013.0983%20173.013%2014.7606L170.304%2017.0069C169.727%2015.9736%20168.927%2015.4794%20167.773%2015.4794C166.13%2015.4794%20164.842%2017.0518%20164.842%2019.0286C164.842%2020.6909%20165.819%2021.6793%20167.329%2021.6793C168.261%2021.7243%20169.016%2021.4098%20169.727%2020.6909Z%22%20fill%3D%22%230D5293%22%2F%3E%0A%3Cpath%20d%3D%22M175.722%207.52717L179.629%206.89819L177.365%2017.6807L182.426%2012.3344H187L180.517%2018.6691L184.691%2024.869H180.162L177.009%2019.5676L175.899%2024.869H172.081L175.722%207.52717Z%22%20fill%3D%22%230D5293%22%2F%3E%0A%3Cdefs%3E%0A%3ClinearGradient%20id%3D%22paint0_linear%22%20x1%3D%2223.1831%22%20y1%3D%2224.7007%22%20x2%3D%2223.3049%22%20y2%3D%228.44851%22%20gradientUnits%3D%22userSpaceOnUse%22%3E%0A%3Cstop%20stop-color%3D%22%23327ACD%22%2F%3E%0A%3Cstop%20offset%3D%221%22%20stop-color%3D%22%234696D2%22%2F%3E%0A%3C%2FlinearGradient%3E%0A%3ClinearGradient%20id%3D%22paint1_linear%22%20x1%3D%2227.9436%22%20y1%3D%2222.0876%22%20x2%3D%2228.0428%22%20y2%3D%2222.0876%22%20gradientUnits%3D%22userSpaceOnUse%22%3E%0A%3Cstop%20offset%3D%220.2029%22%20stop-color%3D%22%234C51BF%22%20stop-opacity%3D%220.9%22%2F%3E%0A%3Cstop%20offset%3D%221%22%20stop-color%3D%22%235A67D8%22%20stop-opacity%3D%220.9%22%2F%3E%0A%3C%2FlinearGradient%3E%0A%3ClinearGradient%20id%3D%22paint2_linear%22%20x1%3D%2232.4583%22%20y1%3D%222.22148%22%20x2%3D%2239.8371%22%20y2%3D%2230.0298%22%20gradientUnits%3D%22userSpaceOnUse%22%3E%0A%3Cstop%20offset%3D%220.3367%22%20stop-color%3D%22%2342B9FF%22%2F%3E%0A%3Cstop%20offset%3D%220.7818%22%20stop-color%3D%22%233B97E1%22%2F%3E%0A%3Cstop%20offset%3D%221%22%20stop-color%3D%22%233784D1%22%2F%3E%0A%3C%2FlinearGradient%3E%0A%3ClinearGradient%20id%3D%22paint3_linear%22%20x1%3D%2211.252%22%20y1%3D%220.972585%22%20x2%3D%2215.8771%22%20y2%3D%2225.7529%22%20gradientUnits%3D%22userSpaceOnUse%22%3E%0A%3Cstop%20offset%3D%220.3367%22%20stop-color%3D%22%2342B9FF%22%2F%3E%0A%3Cstop%20offset%3D%220.7818%22%20stop-color%3D%22%233B97E1%22%2F%3E%0A%3Cstop%20offset%3D%221%22%20stop-color%3D%22%233784D1%22%2F%3E%0A%3C%2FlinearGradient%3E%0A%3C%2Fdefs%3E%0A%3C%2Fsvg%3E%0A)

Product Listing Ads: The Complete Guide for eCommerce Advertisers
 Mohammad Miraj
 Product Listing Ads (PLAs) are paid shopping ads that display a product image, title, price, and store name directly within Google search results. Unlike text ads, PLAs pull data from your product feed and are triggered automatically when a user searches for a relevant product, making them one of the most intent-driven ad formats available.
This guide covers everything you need to know about PLAs: what they are, how they work, how to set them up on Google, and how to optimize them for better visibility, clicks, and conversions.
What Are Product Listing Ads?
Product Listing Ads are a visual ad format used on search engines and shopping platforms. Each ad displays a product image, title, price, store name, and sometimes a rating giving shoppers enough information to make a decision before they click.
What does PLA stand for? PLA stands for Product Listing Ad. In digital marketing, PLAs are also commonly called Shopping Ads, Google Shopping Ads, or simply shopping listings.
A standard PLA includes:
- Product image: Catches the shopper’s eye and provides a visual reference.
- Product title: A clear, keyword-relevant product name.
- Price: Transparent pricing that helps consumers compare quickly.
- Store or brand name: Builds awareness by showing the retailer’s name.
- Product rating: Social proof that helps shoppers assess trustworthiness.

PLAs appear most prominently on Google Search, in the Google Shopping tab, on Bing, on Amazon (as Sponsored Products), and on social platforms like Facebook, Instagram, and Pinterest.
What Are PLA Keywords?
PLA keywords work differently from standard search keywords. In a traditional search campaign, you bid on specific keywords. With PLAs, Google automatically matches your ads to search queries based on the product data in your feed the titles, descriptions, categories, and attributes you provide.
This means your “PLA keywords” are not keywords you enter manually. They are the search terms that trigger your ads based on how well your product feed is optimized. A well-structured product title like “Men’s Lightweight Running Shoes with Arch Support” will trigger more relevant and specific queries than a vague title like “Running Shoes.”
To control which queries trigger your PLAs, you can use negative keywords to exclude irrelevant searches, and you can segment products into separate ad groups to adjust bids by query type.
How Do Product Listing Ads Work
PLAs operate on a data-driven system. The information displayed in each ad is pulled directly from your product feed, a structured file containing your product titles, descriptions, prices, images, availability, and other attributes.
Here is how the process works from start to finish:
- You create a Google Merchant Center account and upload your product feed.
- Google reviews and approves your product data.
- You create a Shopping campaign in Google Ads and link it to your Merchant Center account.
- When a user searches for a product related to yours, Google automatically generates an ad using your feed data and enters it into an auction.
- If your ad wins the auction, it appears in the search results or Google Shopping tab.
- The user clicks your ad and lands on your product page.
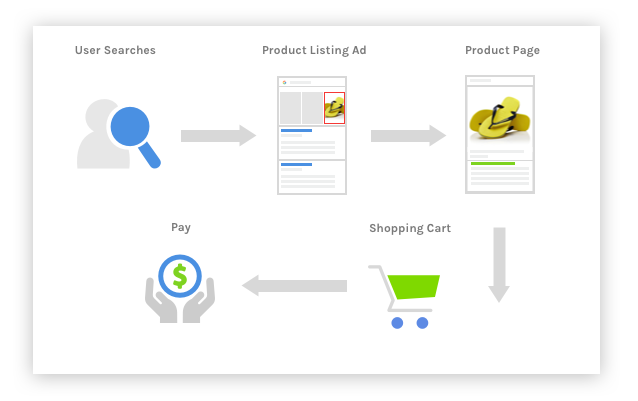
The ad content image, title, price is generated automatically from your feed. You do not write ad copy for PLAs the way you do for text ads. This makes feed quality the single most important factor in PLA performance.
Where Do Product Listing Ads Appear?
PLAs are not limited to Google Search. Here is a breakdown of the main platforms:
Google Shopping Ads are the most widely used PLAs. They appear at the top of Google search results and within the Google Shopping tab. A search for “running shoes” triggers a carousel of product images from various retailers, each showing a price, rating, and store name.
Bing Product Ads appear on the Bing search engine and partner sites. While Bing’s market share is smaller than Google’s, it can reach a distinct segment of shoppers with less competition and lower CPCs.
Amazon Sponsored Products display within Amazon search results. Unlike Google PLAs, which drive traffic to external websites, Amazon ads aim to increase sales within the Amazon platform itself.
Social media PLAs appear on Facebook, Instagram, and Pinterest through their shopping ad formats. These ads show up in feeds and stories, integrating product discovery into the social browsing experience.
Benefits of Product Listing Ads for eCommerce Stores
Higher Visibility in Search Results
PLAs typically appear above organic results and standard text ads. This prime positioning means your products are among the first things a shopper sees when searching for something you sell.
Higher Click-Through Rates
The visual format of PLAs, with product images, prices, and ratings visible before a click, tends to outperform text ads on CTR. Shoppers feel more confident about a product before visiting the site.
More Qualified Traffic
PLAs are triggered by product-specific search queries, meaning the users who see them are already in buying mode. This intent-driven targeting reduces click waste and improves the quality of visits to your store.
Better Conversion Rates
By displaying key product details upfront — price, image, availability — PLAs remove common friction points in the purchase decision. Shoppers who click through have already compared options and are further along in their buying journey.
Improved Return on Ad Spend (ROAS)
PLAs use a cost-per-click (CPC) model, so you only pay when someone clicks. Because the traffic they drive is more qualified, conversion rates tend to be higher, which directly improves ROAS compared to broader ad formats.
Cross-Platform Reach
PLAs are not limited to a single channel. They can appear across Google Search, Google Shopping, YouTube, the Google Display Network, and social platforms, giving your products consistent visibility wherever your customers browse.
Disadvantages of Product Listing Ads
High Competition and Rising CPCs
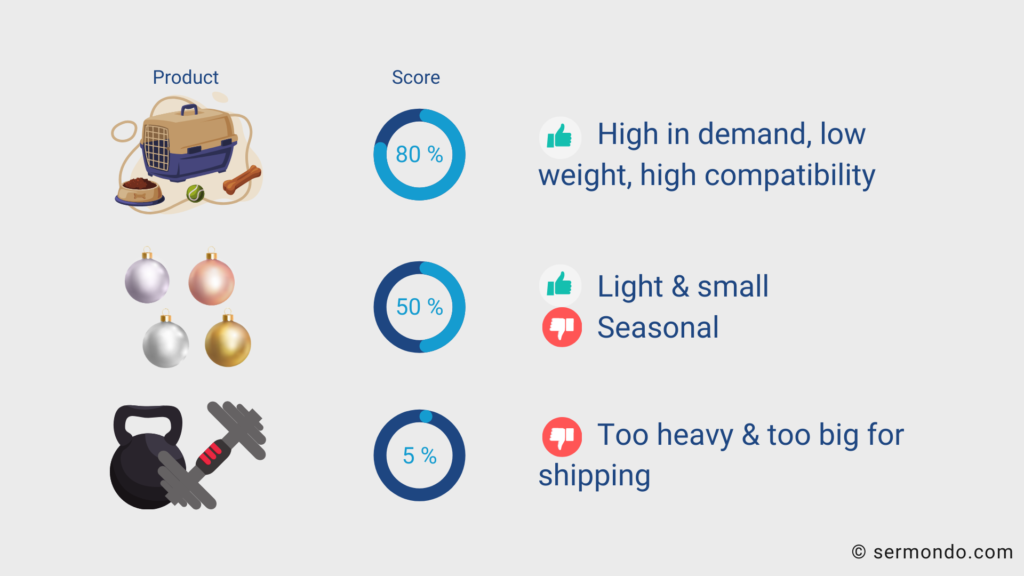
As PLAs have grown more popular, competition for placements has intensified, particularly in high-volume categories like electronics, apparel, and home goods. For smaller stores with limited budgets, this can make it difficult to compete with larger retailers.
Feed Management Complexity
PLAs require a well-maintained product feed. The feed must be accurate, regularly updated, and formatted to meet platform requirements. For stores with large inventories, this demands either dedicated time or a reliable feed management tool.
Unpredictable Ad Spend
Because PLA costs are tied to competitive bidding, costs can spike during peak shopping periods. Without careful budget controls and bid strategies, it is easy to overspend without proportional returns.
Click Fraud Risk
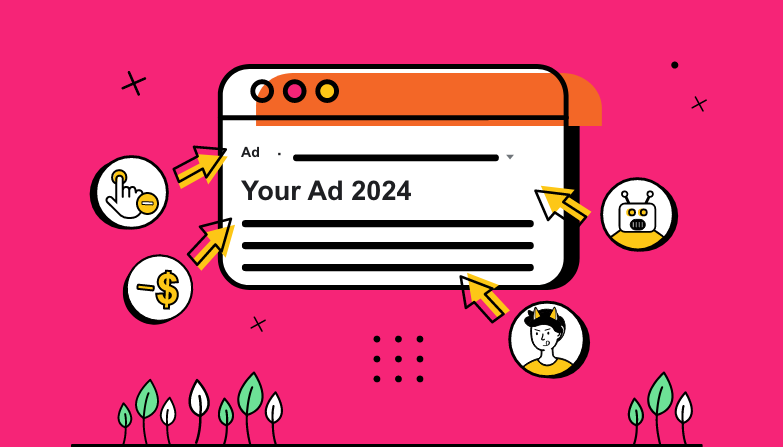
Fraudulent clicks from bots or competitors can inflate your costs without producing sales. Most platforms have detection measures in place, but click fraud remains a real concern, especially in competitive markets.
How to Set Up Google Product Listing Ads
Setting up a PLA campaign on Google involves five key steps: creating a Merchant Center account, uploading your product feed, linking Merchant Center to Google Ads, building your campaign, and monitoring performance.
Step 1: Set Up a Google Merchant Center Account
The first step to create a Product Listing Ad (PLA) Campaign is to set up a Google Merchant Center (GMC) Account, if you don’t already have one. This is the platform where you’ll manage your product data feed.
Here is how you can do it:
- Visit GMC’s Homepage and sign up for an account using your Google credentials. If you don’t have a GMC account, click on the ‘Sign up for Free’ button.
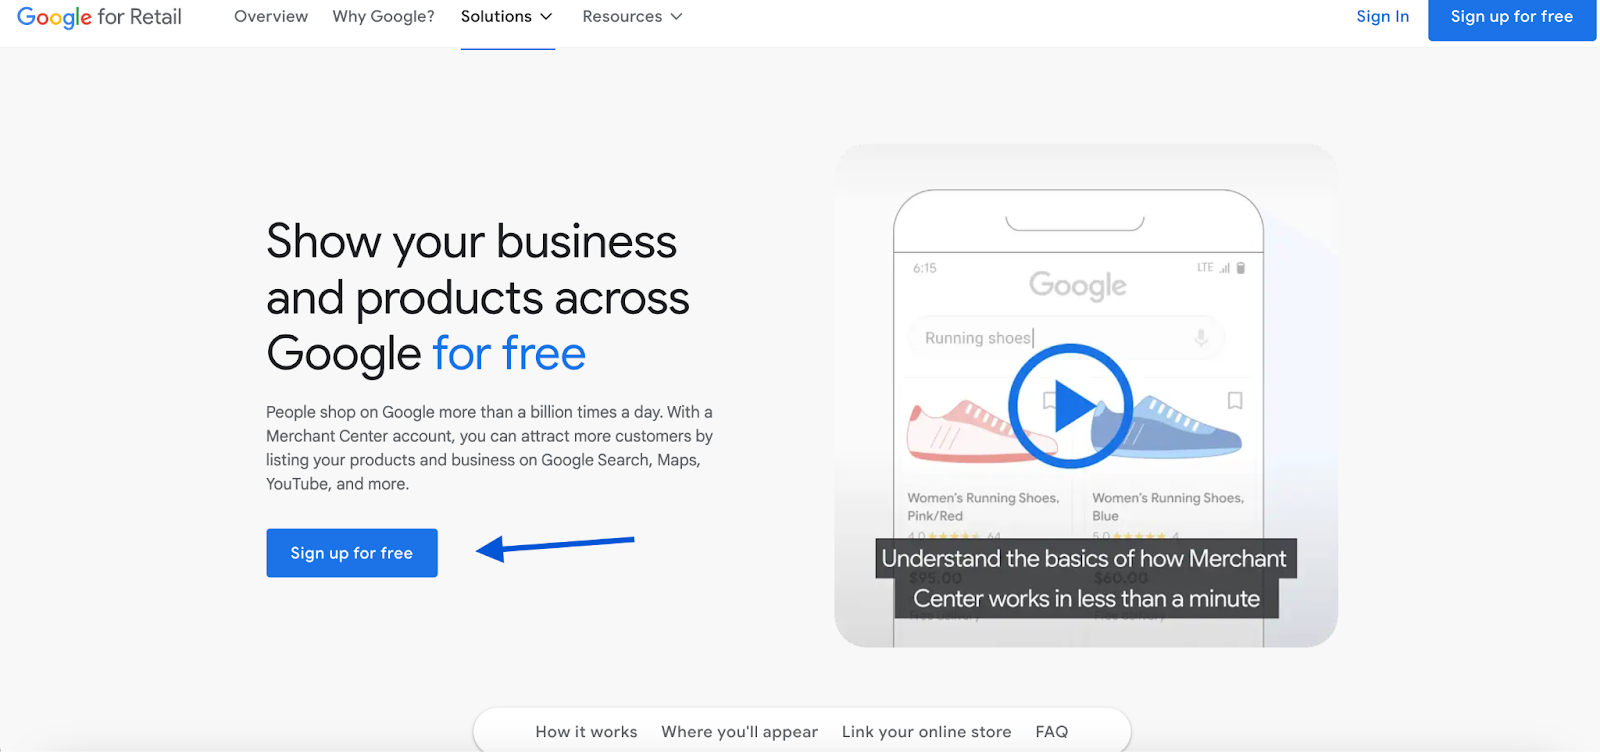
2. In the next step, Google will ask you to provide some vital business information. Including things like:
- Business name and address
- Your business country (Where your business is located)
- Contact Details
- Your local time zone
3. Now you need to verify and claim your WooCommerce store’s website. Google provides several methods for verification. Pick one that suites you the most.
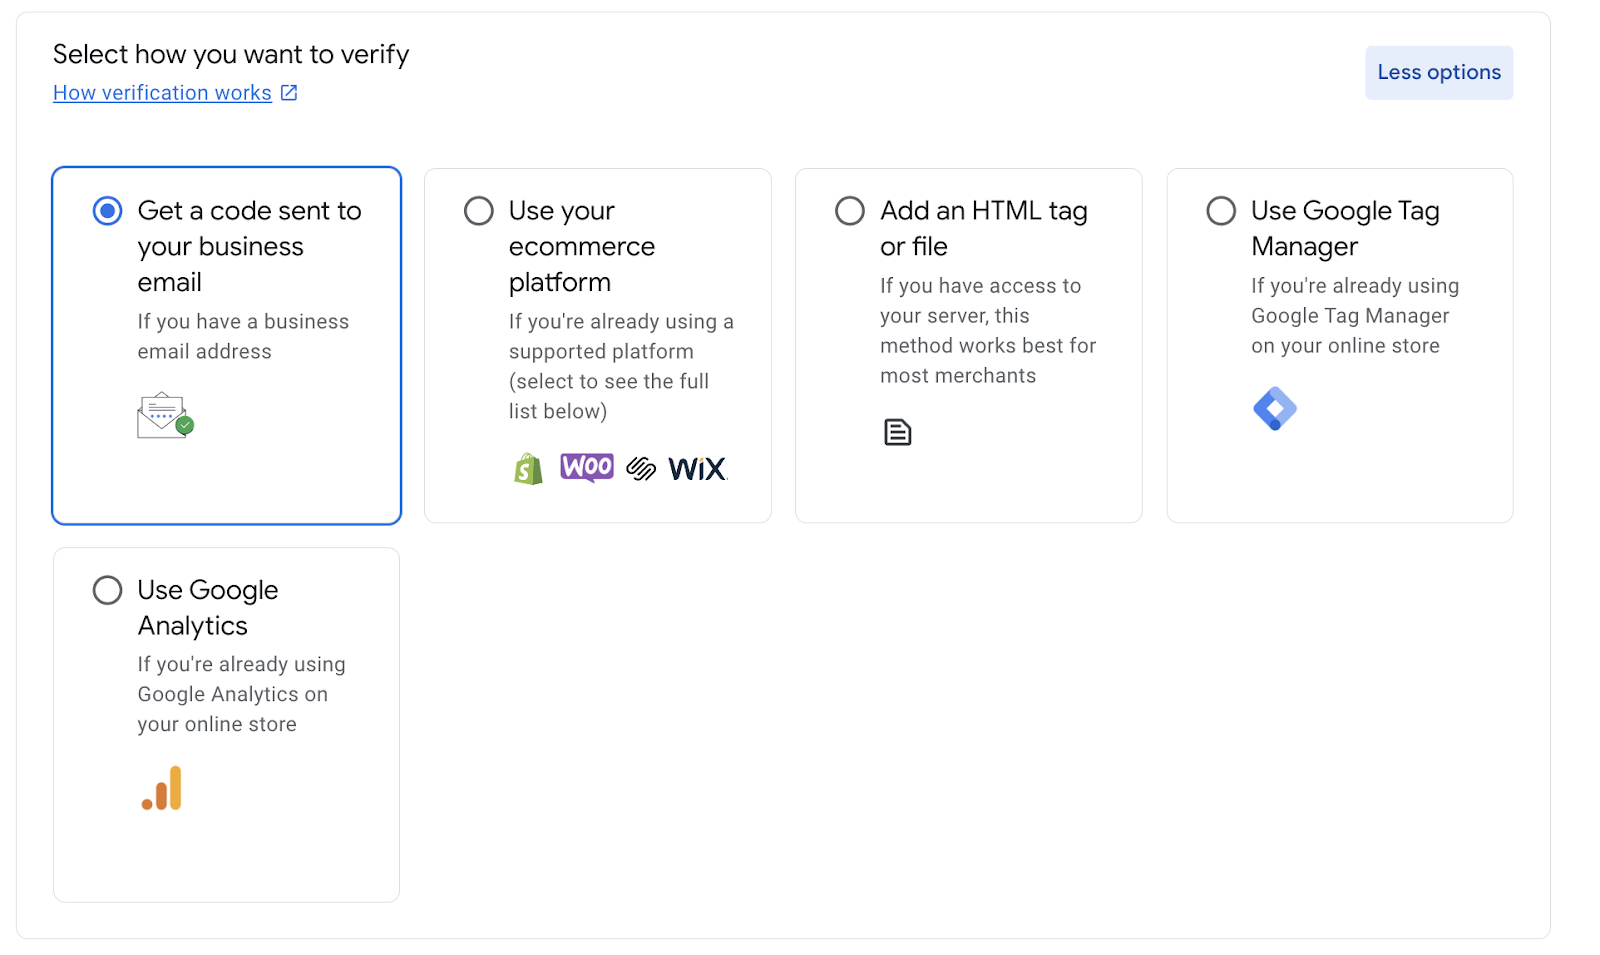
4. Next, you’ll need to set up the shipping information for your business. This includes the country you want to ship to, your product list, delivery time and associated costs.
5. After that comes the sales Tax. Google offers a tax setup suggestion based on your business location. You can also set your tax information up manually.
And that’s about it. Now, your Google Merchant Center account is up and running. The next step is to submit your product information to your GMC account.
You can do that manually one by one or use a dedicated product feed plugin to generate a product feed for you automatically.
Pro Tip: Use Google Tag Manager for website verification. It’s a quick and efficient method that also allows you to manage all your tags in one place.
Let’s explore the easiest way to create and upload your product feed using CTX Feed, the most widely used WooCommerce product feed management plugin across the globe.
Step 2: Create and Upload Your Product Feed
Your product feed is a file that contains all the necessary product information, such as titles, descriptions, prices, and images.
Product data feeds are really helpful and they can be used to upload, show, and sell your products on various marketing platforms. This is what a standard product feed looks like:
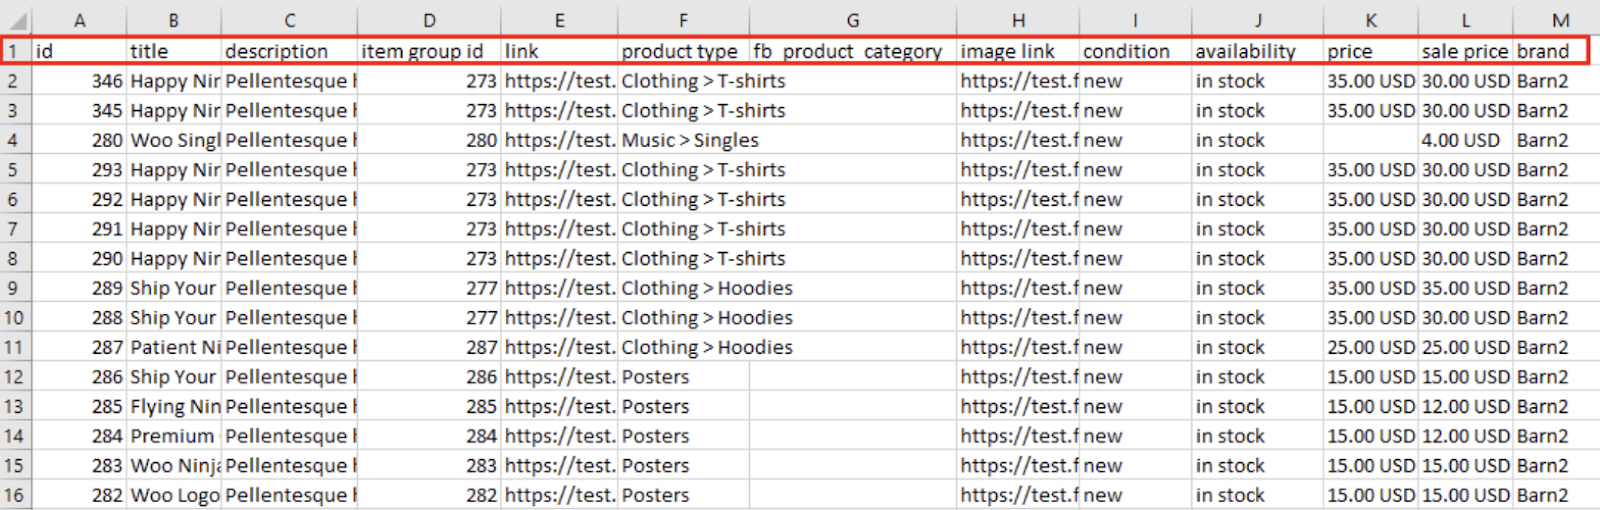
Here’s the easiest way to generate unlimited product feed for your WooCommerce store using CTX Feed:
1. The first thing you need to do is to install and activate the plugin. To do that, from your WordPress Dashboard go to “Plugins > Add New Plugin”.
2. In the search bar, search for ‘CTX Feed’.
3. When the plugin comes at the top, click on the upper right-side button to install and then activate the plugin.

4. To create your first product feed, access the plugin settings by navigating to “CTX Feed” on the left-hand menu from your WordPress admin dashboard. And then click on “Make Feed”.
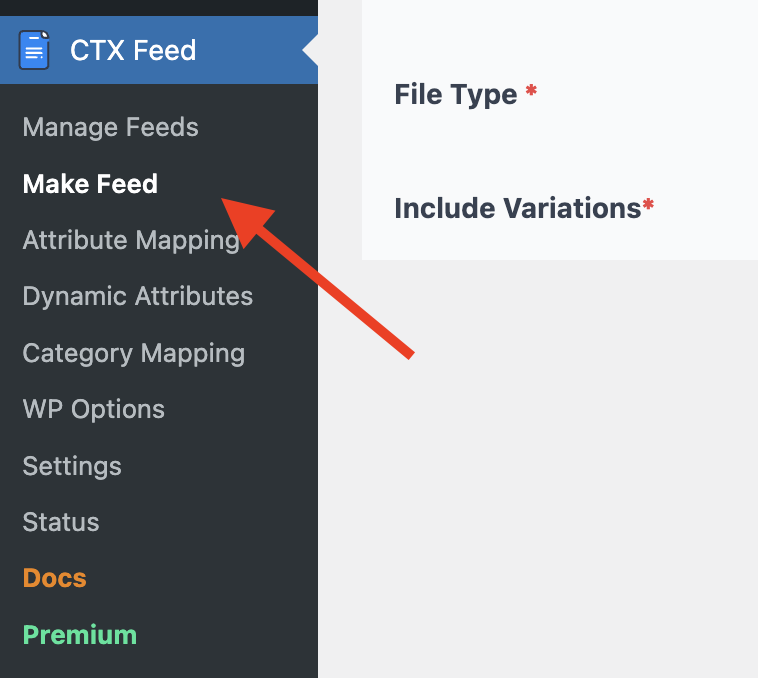
5. In the next window, name your product feed. Also, select your target country, template, and feed type.
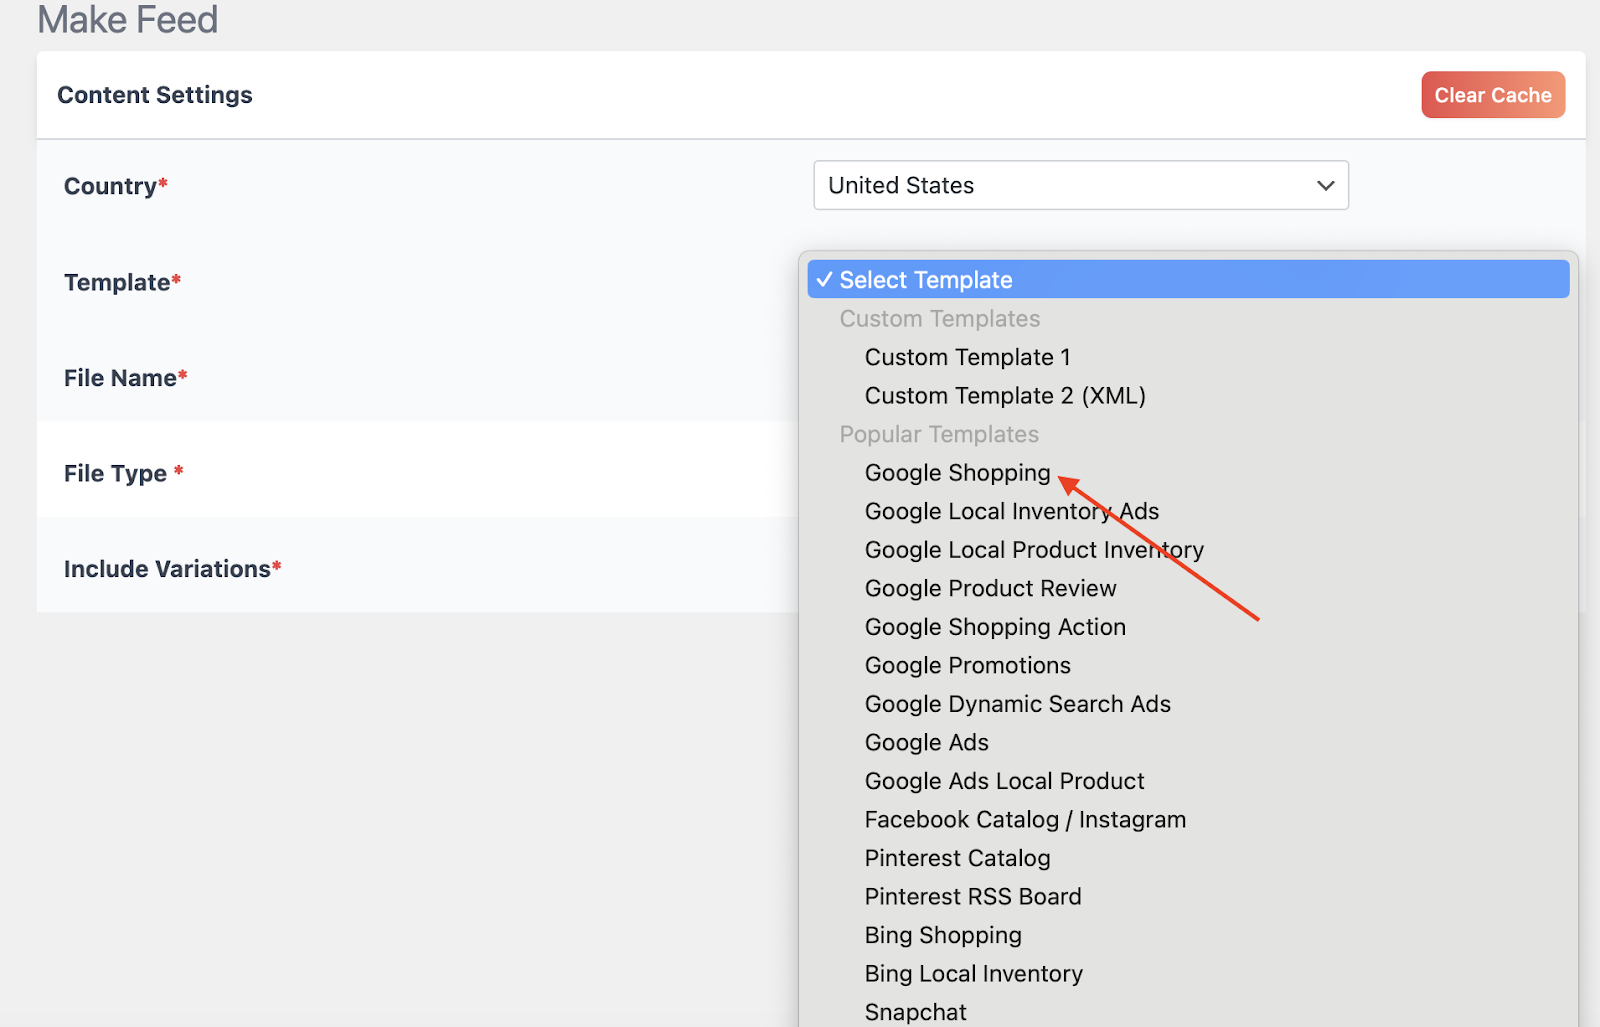
6. Once you select your template, it will automatically generate the required attributes for you below. Double check all the necessary attributes.
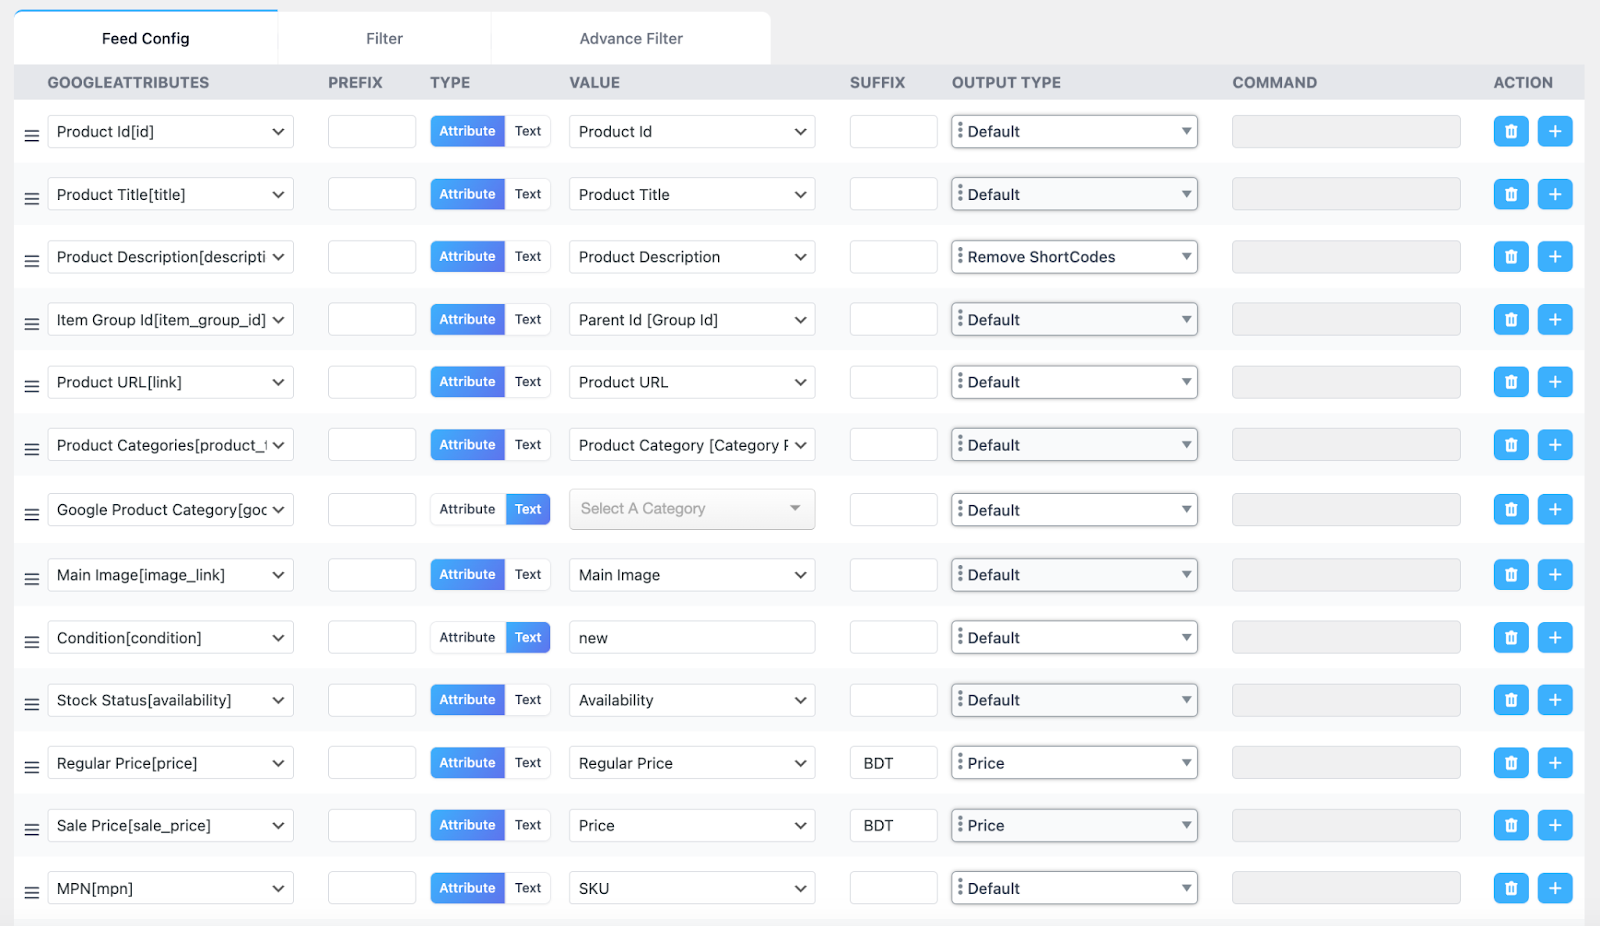
7. Once you’re satisfied, scroll down and select ‘Update and Generate Feed’. This will finalize and generate your feed.

Don’t forget to include essential product attributes like title, description, images, price, availability, GTIN (if applicable), and product category. Also, optimize your product titles and descriptions with relevant keywords to improve visibility.
Once your feed is ready, simply upload it to Google Merchant Center. You can choose to upload manually, schedule regular uploads, or use a URL to fetch the feed automatically.
Google will take a little time to verify all the information and approve your feed.
Pro Tip: Keep your product titles clear, optimized, and descriptive. Also, regularly update your product feed to reflect changes in inventory, pricing, or product information.
Once approved, you’ll be able to create product listing ad campaigns using those optimized and approved product feeds.
Step 3: Link Google Merchant Center with Google Ads
The next step is to connect your Google Merchant Center account with your Google Ads account. If you already have one, you can connect it with your GMC account in just a few clicks. If you don’t have any, here’s how to create one and link it with your Merchant Center account:
- Visit Google Ads homepage and create a free account by clicking “Start Now.”
- Google will verify that you’re using the correct account to create ads. Select, “New Google Ads Account” and move forward.
- After that, enter your business name, and click “Next”. On the next page, enter your website URL, and move forward.
- Next, you’ll be asked to check the preview of your website in both mobile and desktop versions. Once you are satisfied, move onto the next page.
- From your Google Merchant Center dashboard, click on ‘Ad Campaigns’ on the left-hand side.
- Next, look for the ‘Link to Google Ads’ option on the right side and click ‘Link’.
- Next, you’ll see a page where you can add your Google Ads account. Select your desired Ads account and click on the ‘Link Account’ button below.
Pro Tip: Use the same Google account for both Merchant Center and Google Ads to simplify the linking process and avoid potential issues with data syncing.
See? That wasn’t so hard. Now your GMC and GA accounts are linked together, and you can create as many ad campaigns as you want.
If you want to know more, please visit our blog section where you’ll find in-depth tutorials on how to optimize your WooCommerce business. Here’s a video guide for those who prefer a more hands on approach:
Step 4: Create a PLA Campaign in Google Ads
All done with the prerequisites. Now, it’s time for the real deal: to create your very first PLA campaign. Here’s the easiest way to create a Product Listing Ad campaign from scratch:
- Log in to your Google Ads account and select “New Campaign” from the main dashboard. Also, you can click on the “+” button.
- It will take you to a page. Choose “Sales” as your goal, and then select “Shopping” as the campaign type.
- Next, Choose the Merchant Center account you linked earlier, and then choose between two subtypes of shopping or product listing ads:
- Standard Shopping: provides more control over targeting, bidding, and ad creation.
- Performance Max Campaign: lets you create automated ads that use smart bidding to help you drive better conversions across Search, YouTube, Gmail, and more.
- For our purpose, let’s go with the standard shopping experience. In the next page, Name your campaign and move onto the configuration page.
- Here, you’ll need to set your bidding strategy. You can start with “Manual CPC” for more control, or use “Maximize Clicks” to let Google optimize bids for the most clicks.
- You’ll also need to set a daily budget, and the priority of your PLA campaign. As we’re creating just one campaign, keep the priority value as the default “low” option. Use the Priority Settings to manage multiple campaigns targeting the same products.
- Next comes the targeting section. Here, you’ll decide where you want your PLAs to be displayed. This includes Google’s platform, your preferred device, location, and the duration of your campaign.
- Lastly, you’ll also need to organize your products into different ad groups. Ad groups in Shopping campaigns are based on product groups rather than keywords.
By default, all products are included in one group. However, you can create separate groups based on categories, brands, or other attributes. Create product groups within each ad group to further refine your targeting.
Also, start with a broad campaign to gather data and refine your targeting later.
Pro Tip: Start with a smaller budget and gradually increase it as you analyze performance. This helps you avoid overspending.
Remember, it’s important to assign different bids to each product group based on their importance and profitability. Higher bids can be set for products with better profit margins or higher conversion rates.
The last thing to do here is to publish your first PLA campaign. Double-check every configuration, review the ad, and once you are satisfied with everything, click on the “Create Campaign” button.
Step 5: Monitor and Optimize Your Campaign
However, our work isn’t over yet. We’ll also need to track the performance of our PLA campaign on a regular basis so we can optimize it for the optimum result.
You can use both Google Merchant Center and Google Ads’ reporting tools to monitor the performance of your PLA campaign. Key metrics to watch include clicks, impressions, CTR, ROAS, CPC, and conversion rates.
Also, regularly update your product feed with accurate and detailed information. Optimize titles, descriptions, and images to improve ad relevance and performance.
Use negative keywords to exclude irrelevant search terms and improve ad relevance.
Based on performance data, adjust your bids and budgets to focus on high-performing products. You can also experiment with different bidding strategies as you gather more data. Use A/B testing to experiment with different product titles, images, and bidding strategies.
Additionally, you can create remarketing feeds/lists to target users who have previously interacted with your store. This helps re-engage potential customers who didn’t convert on their first visit.
Pro Tip: Set up custom labels in your product feed to group products by profitability, seasonal trends, or inventory levels. This allows for more granular bid adjustments and campaign optimization.
Lastly, Google Ads’ audience targeting features can also help reach specific customer segments based on demographics, interests, or shopping behavior. Don’t forget to regularly test different ad variations and bidding strategies to optimize your campaign’s effectiveness.
If you want to learn more about how to properly use Google Ads, here’s an in-depth video tutorial for you:
Product Listing Ads Optimization Tips
1. Write Strong Product Titles
Your product title is your most important PLA keyword signal. Structure it with the most searchable attributes first: brand, product type, key features, size or color.
Example: Instead of “Running Shoes,” use “Nike Men’s Air Zoom Running Shoes Lightweight, Size 10, Black.”
Include specific attributes such as material, model, color, and size. Long-tail specificity helps your ads match more targeted, higher-intent queries.
2. Use High-Quality Product Images
PLAs are a visual format. Use sharp, well-lit images against a clean background. Ensure consistency across your catalog uniform style and dimensions build brand recognition. Check that all images meet Google’s size and quality guidelines before uploading.
3. Keep Your Feed Accurate and Up to Date
An outdated feed leads to disapproved products, wasted ad spend, and poor shopper experience. If a product goes out of stock, update the feed immediately. Use a plugin like CTX Feed to automate feed syncing between your WooCommerce store and Google Merchant Center.
Include GTINs and MPNs where available. These attributes improve product matching accuracy and can give your listings an advantage in competitive categories.
4. Implement Competitive Pricing
Price is visible before the click. If your price is significantly higher than that of competitors showing in the same carousel, your CTR will suffer. Monitor competitor pricing regularly and consider promotional extensions sale prices, free shipping callouts, or limited-time discounts, to improve your position.
For discounts, use percentage-based language for products under $1,000 (e.g., “20% off”) and show the dollar amount for higher-priced items (e.g., “$200 off”), as the absolute number tends to feel more substantial.
5. Use Custom Labels for Smarter Bidding
Custom labels let you tag products in your feed by criteria that matter to your business: high margin, seasonal, bestseller, clearance. Once labeled, you can apply different bidding strategies to each group. Bid more aggressively on high-margin products; reduce bids or limit exposure for low-margin items.
Custom labels also make it easier to run isolated tests and analyze performance at a more granular level.
Amazon Product Listing Ads vs Google PLAs
Amazon Sponsored Products and Google PLAs share the same core format image, title, price but serve different purposes.
Google PLAs drive traffic from Google Search to your own website. You control the landing page, the checkout process, and the customer relationship. Amazon PLAs keep the entire experience within Amazon, which means you benefit from Amazon’s built-in trust but give up direct ownership of the customer.
For WooCommerce stores, Google PLAs are the primary channel. Amazon ads are most useful for sellers who also list products on the Amazon marketplace.
Google Shopping vs Product Listing Ads
These terms are often used interchangeably, but they are not the same thing.
Google Shopping is a comparison shopping engine (CSE) where users can browse, compare, and buy products directly from search results. It includes both free organic product listings and paid placements.
Product Listing Ads (PLAs) are the paid advertising units that appear within Google Shopping results and on the main Google SERP. Running a PLA campaign is how you get your products to appear in Google Shopping with consistent, controlled visibility.
| Content | Google Shopping | Product Listing Ads |
|---|---|---|
| Cost | Free (organic) | Paid (CPC model) |
| Visibility type | Organic | Paid |
| Advertiser control | Limited | Full |
| Targeting | Broad | Highly targeted |
Free product listings can appear in Google Shopping without a paid campaign, but there is no guarantee of placement, position, or consistency. PLAs give you the ability to bid for placement, control which products show, and track performance in detail.
Best WooCommerce Product Feed Plugin for PLA Campaigns: CTX Feed
Running effective PLA campaigns requires a clean, well-structured product feed. For WooCommerce stores, CTX Feed is one of the most widely used plugins for generating and managing product feeds across multiple platforms.
CTX Feed pulls product data from your WooCommerce catalog, formats it to meet each platform’s requirements, and keeps feeds updated automatically. It supports Google Shopping, Bing, Facebook, Amazon, Pinterest, and dozens of other channels from a single plugin.
Key Features
- Pre-built templates for 220+ marketing channels
- Automatic feed updates when product data changes
- Support for custom labels, product variants, and conditional rules
- GTIN, MPN, and brand field mapping
- Scheduled feed refresh to keep listings current
Free version available; paid plans with advanced features are listed on the official CTX Feed website.
Frequently Asked Questions
What are Product Listing Ads?
Product Listing Ads are paid shopping ads that show a product image, title, price, and store name directly in search results. They are used on Google, Bing, Amazon, and social platforms to promote individual products to shoppers who are actively searching for them.
What does PLA stand for in digital marketing?
PLA stands for Product Listing Ad. The term is used interchangeably with “Shopping Ad” or “Google Shopping Ad,” though technically PLAs refer specifically to the paid ad units, while Google Shopping also includes free organic product listings.
What are PLA keywords?
PLA keywords are the search queries that trigger your shopping ads. Unlike search campaigns, you do not manually bid on keywords in a PLA campaign. Google matches your ads to relevant queries based on your product feed data titles, descriptions, categories, and attributes. Optimizing your feed is how you control which queries your ads appear for.
How do Product Listing Ads work?
PLAs are automatically generated from your product feed. When a user’s search matches your product data, Google enters your listing into an ad auction. If you win, your ad appears with the product image, title, price, and store name. You pay only when the user clicks.
What is the difference between Google Shopping and Product Listing Ads?
Google Shopping is the platform the comparison shopping engine where users browse and compare products. PLAs are the paid ads that appear within it. Free listings can also appear in Google Shopping, but PLAs give advertisers control over placement, targeting, and bidding.
How do I monitor Product Listing Ad performance?
Use Google Ads reports to track impressions, clicks, CTR, CPC, conversion rate, and ROAS. Use Google Merchant Center to monitor feed health, disapproved products, and item-level performance. Set up automated rules or use third-party tools for ongoing monitoring at scale.
Can I run Product Listing Ads for Amazon products on Google?
Not directly. Google PLAs require a Google Merchant Center account and drive traffic to your own website. Amazon Sponsored Products run within Amazon’s platform. If you sell the same products on both, you would run separate campaigns on each platform.
Key Takeaways
- Product Listing Ads (PLAs) are visual shopping ads that show product images, prices, and store names in search results triggered automatically from your product feed, not manual keyword bids.
- PLA keywords are search queries matched to your ads based on your feed data. Optimizing product titles, descriptions, and attributes is the primary way to control which queries trigger your ads.
- Google Shopping and PLAs are related but different: Google Shopping is the platform; PLAs are the paid ad units within it. Free listings also exist, but PLAs give you full control over placement and targeting.
- A high-quality, regularly updated product feed is the foundation of any PLA campaign. Use a feed management plugin to keep data accurate across channels.
- Key optimization levers include product title structure, competitive pricing, high-quality images, negative keywords, custom labels, and bid segmentation by product group.
- Amazon PLAs (Sponsored Products) and Google PLAs serve different goals: Amazon keeps sales within its platform, while Google PLAs drive traffic to your own store.
- Monitor campaign performance using CTR, CPC, conversion rate, and ROAS and adjust bids, feed data, and targeting regularly to maintain efficiency.