Google Merchant Center Data Feed Template: The Ultimate Guide
The first step to promoting your eCommerce store’s product to Google Shopping is to create and upload a data feed to Google Merchant Center.
There are different ways to create a data feed for Google Shopping.
You can use a product data feed generator plugin that automatically generates data feed for Google Merchant Center in a few clicks.
Alternatively, you can choose to populate a template on Google Sheets for each product data field manually.
? In this blog, we will discuss the second process, i.e., how to create and upload a Google Merchant Center data feed template manually (without any product feed generator plugin).
Let’s go ahead.
What is Google Merchant Center?
Google Merchant Center (GMC) is a Google service that lets you upload, manage, and optimize your ecommerce store’s products for all the shoppers across Google.
When you upload your products to Google Merchant Center, you can effectively show and promote your products in Google Shopping ads, Google Shopping free listing, local inventory ads, etc.
If you use PPC search campaigns you must know about the Google Ads platform, right? The ads you make on Google Ads are shown on Google for web searches as per your targeted keywords.
What’s different for Google Merchant Center (GMC) is that you use this platform to manage your Google Shopping product ad campaigns.
The products you upload on the GMC are shown on the Google Shopping network. And the best thing is, Google Shopping ads are created automatically as per the product data you upload on the GMC.
You do not need to go through any kind of keyword research to get your products on Google Shopping.
However, the key to success in Google shopping is to upload the most accurate and related product information on GMC so that your products shine on Google Shopping Feed.
How much does Google Merchant Center Cost?
Well, it’s free. You don’t need to pay anything to register on Google Merchant Center.

Is Google Merchant Center Worth Your Time?
Definitely. Using Google Merchant Center is key to advertising and promoting your products across a wide range of Google platforms such as Google Shopping.
By dint of Google Merchant Center, you can show your ecommerce store’s products to millions of shoppers at the top of Google search engine result pages. And interestingly, Google shows your products above paid ads and organic listings.
Another reason why you should invest your time in Google Merchant Center is that getting on board with it is free of cost.
Last but not least, once you complete uploading your products on Google Merchant Center, things will get pretty straightforward and automatic and won’t require much time.
What is a Google Merchant Center Data Feed?
A Google Merchant Center data feed is a file that contains a list of products. This feed file is what you upload on Google Merchant center to promote your products on different Google platforms.
At the time of adding your products to a feed, you need to assign attributes to each product. The job of the product feed is to make use of these attributes to group your uploaded products. After creating a feed, you can use it multiple times for different Merchant center features.
Types of Data Google Merchant Center Data Feeds
A Google merchant center product feed can be either primary or supplemental. Which you need to use depends a lot on your necessity.
A primary feed lets you upload your product data to Merchant Center using text (.txt) files, XML Feed files(.xml) , Google Sheets, or the Google Content API for Shopping.
While the primary feeds work as the main data sources for your Merchant Center inventory, supplemental feeds add data that are missing from the primary feed.
Note that, if your product data in the primary feed meet all the eligibility requirements of the Google Merchant Center, you don’t need to create any other feeds for your products.
No matter what types of feeds you use, the product attributes are supposed to be the same.
Google Merchant Center Product Feed Requirements and Data Specification
Once you’ve successfully signed up for Google Merchant Center and are ready to upload your products on it, you should have clear knowledge about exactly what attributes or product data you need to use for your product feed.
You can format all your product information for GMC, Shopping ads, and Shopping Actions following a product data specification.
If you want to promote your ecommerce products on ads or free listings, it’s crucial to submit your product data to Google using the right format.
Based on the product data you insert in your feed, your products will be shown to the visitors who search for similar products on Google to buy the kinds of products you sell in your store.
Let’s have a look at the product attributes you need to include in your product feed to get your products approved on Google Merchant Center and to be shown on platforms like Google Shopping.
Basic Product Information
You must include some basic information regarding your products that will help Google Merchant Center determine the nature of your products. The information you provide here will be working as the key elements to creating product ads and free listings.
Some of the basic but important product information includes Product ID, Title, Image Link, Description, Mobile Link, etc.
Product Availability
Google shows the product availability to the visitors who search for the type of products you sell. It is super important to let Google know the exact information about your product availability. If your product goes out of stock, you must update your feed accordingly in the Merchant Center. You can also choose to include the availability date and expiration date if you want.
Product Price
Product price is one of the most essential elements in a product data feed. All the products you upload on the Google Merchant Center should have a price tag. If the price drops or changes, you have to make the required changes in the feed to make sure your customers see the latest price.
Product Category
Assigning an appropriate product category for your product is important to help Google group the same types of products and show them accordingly to the targeted customers.
If you don’t assign any product category to your products, Google will try to categorize your products automatically based on other information it gets from your data feed.
However, this method is prone to errors and Google may categorize your products wrongly.
That’s why it’s super important to assign a product category to your products.
Product Description
The product description lets Google and customers get a clearer view of your product. A detailed product description will help take your products to the targeted customers. Usually, a product description includes age group, pattern, material, size, color, product condition, etc.
Product Identifiers
There are certain product identifiers that you need to use to make your specific product stand out. These identifiers help Google find out the specialty of your products and what you’re exactly selling.
Google uses these identifiers to place your products rightly in the ads and free listing. Product identifiers help customers as well to choose the right product for them.
Steps to Create and Upload Your Product Data Feed on Google Merchant Center with Template
To start uploading your product data feed with Google sheets, you have to manually input all the information in the fields individually. If you want a modern and simple feed creation method, you can use a product feed generator plugin like CTX Feed to make your product feed creation task easier and quicker.

You can get a full-fledged product data feed with a feed generator plugin within a few clicks.
However, for now, let’s go ahead with the traditional way of uploading your product data feed on Google Merchant Center with a template.
Below are the steps you should follow to proceed.
Step 1: Go to the Feed Section of the Google Merchant Center
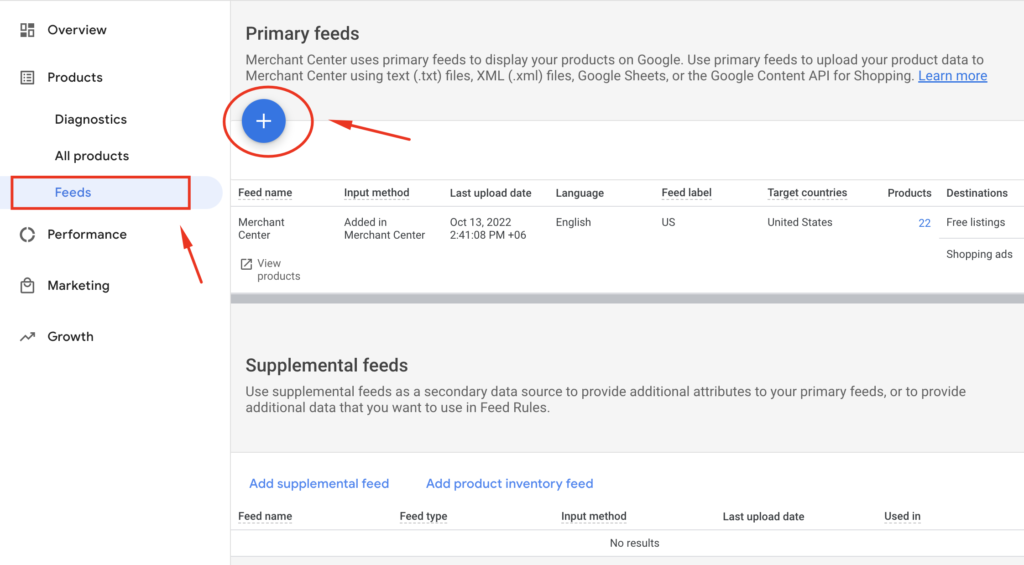
Visit the dashboard of Google Merchant Center. Go to Products >> Feeds. Click on the “+” sign under the heading of Primary feeds.
Step 2: Fill up the Basic information
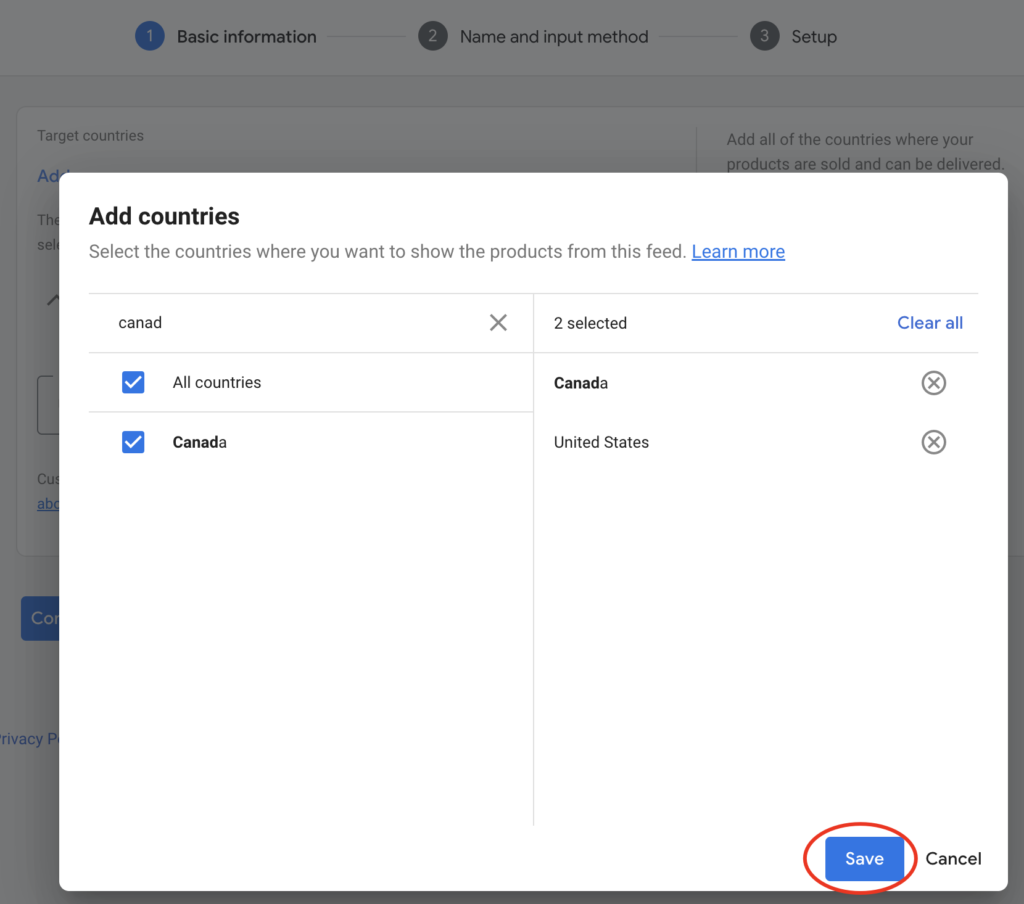
The first option in the Basic information step is to add the targeted countries. You should add all the countries where your products are sold or delivered.
Click on “Add” and choose your desired countries. Once you’re done, click on the “Save” button.
Then, select the language of the content in your feed.
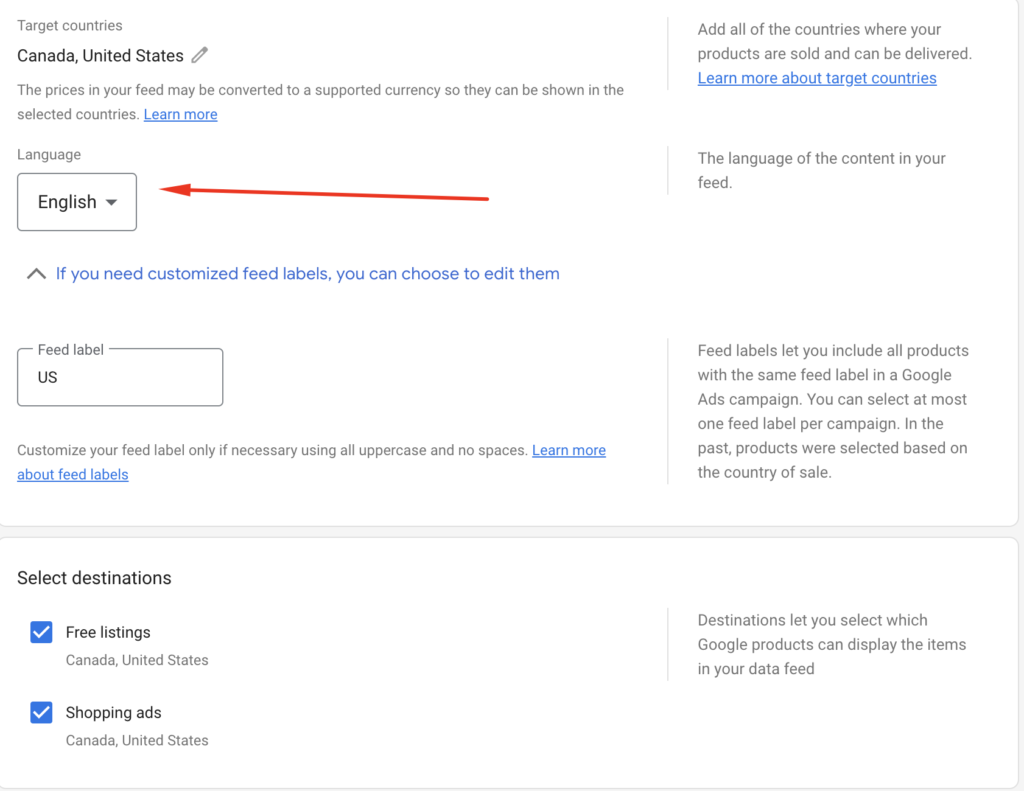
Now, you’ll be able to see the targeted country’s Feed label by default. You should only customize the feed labels if necessary. Note that the Feed label should contain only uppercase and no spaces.
Below, there will be an option to select the destinations at the bottom of the page. You can choose Free Listings and Shopping Ads based on your objective.
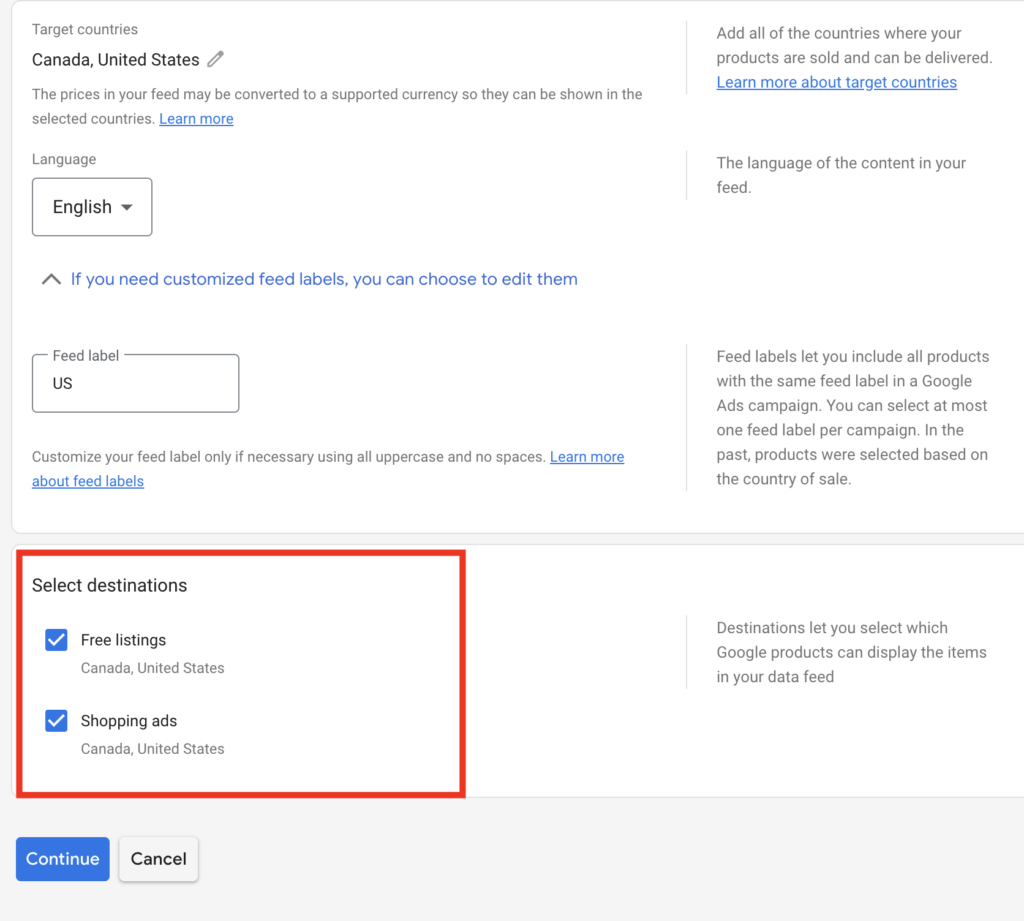
Once you’re all done, click on “Continue”.
Step 3: Fill up the Name and input method
Start with giving your primary feed a name. Go down and choose “Google Sheets” as your method to set up your product feed and connect data to the Merchant Center. Once you’re done, click on “Continue”.
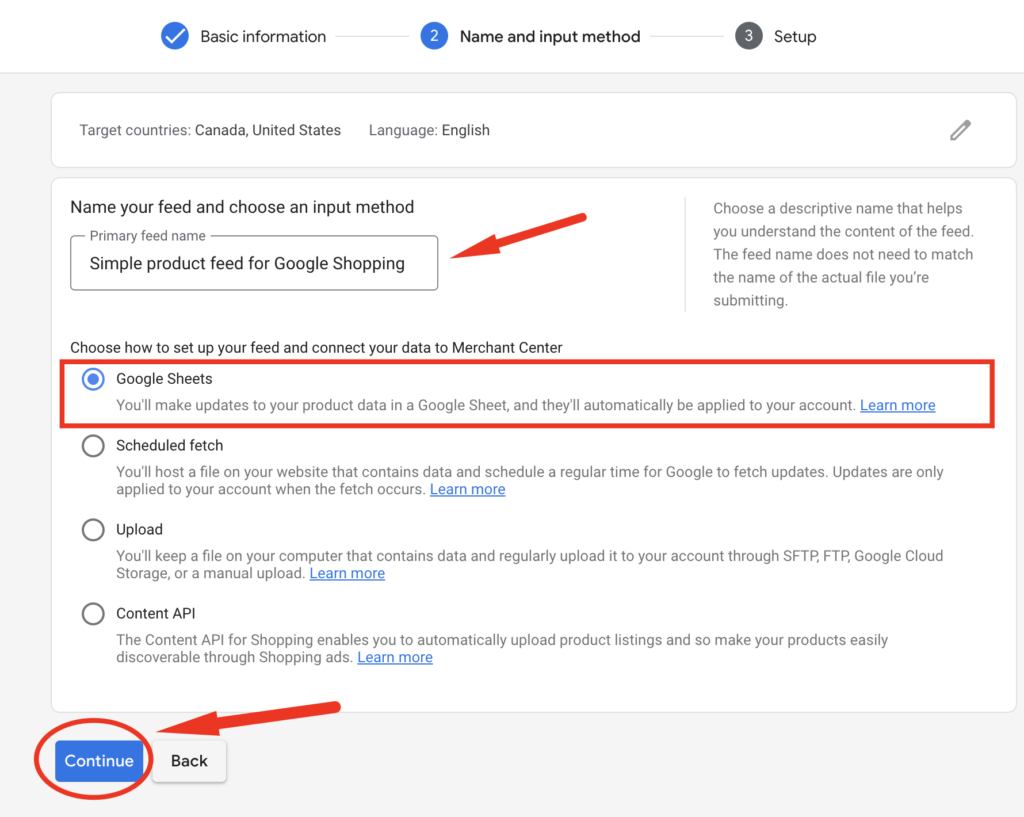
Once you click on continue, a new window will appear to let you choose a Google account that will be used to make updates to your product data in a Google Sheet.
Any updates you make on the Google Sheets will be automatically updated to your account.
Also, allow the Google Merchant Center to access your Google account.
Step 4: Register a Google Spreadsheet from the Setup tab
Here you can either generate a new Google spreadsheet from a template or select an existing Google spreadsheet.
For this tutorial, we’re generating a new Google spreadsheet from a template.
Below, you can also choose to create an upload schedule (optional)
Once done, click on the “Create feed” button.
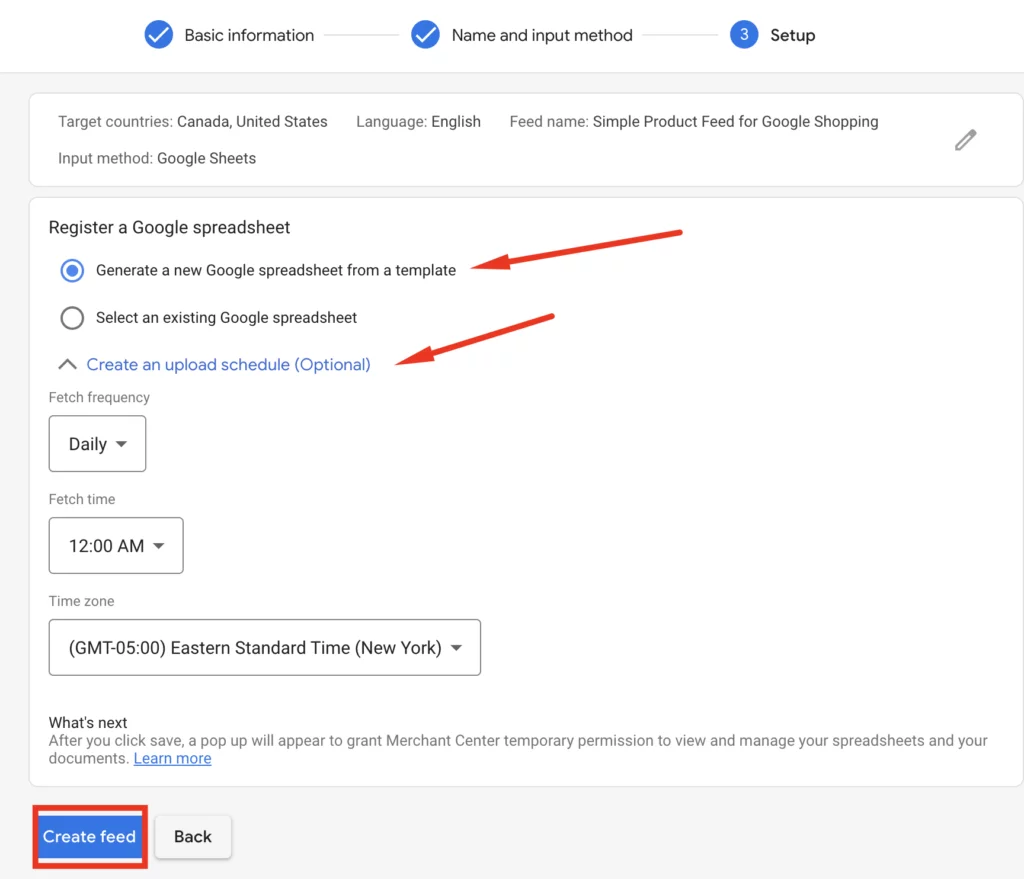
Step 5: Access the Google Sheet and Fetch
Now, it’s time to open the Google Sheet product data feed template by clicking on the “Access Google Sheet” button.
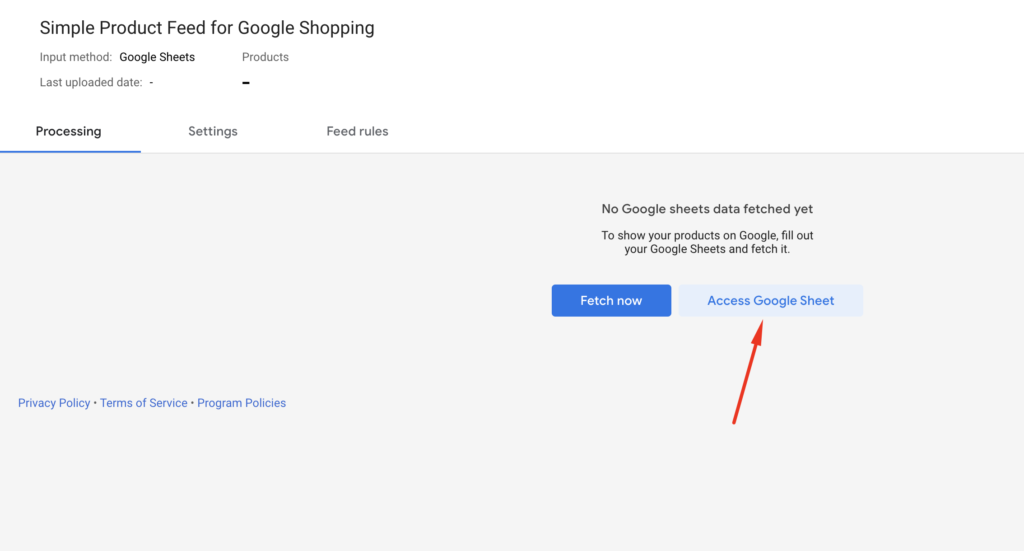
After opening, fill it up according to Google Merchant Center requirements. You have to insert the product id, title, description, link, condition, price, availability, image link, GTIN, mpn, brand, and google product category for each product.
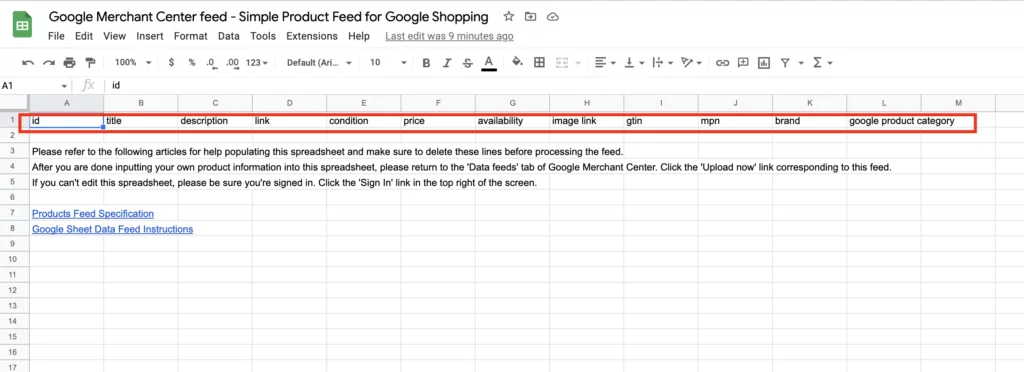
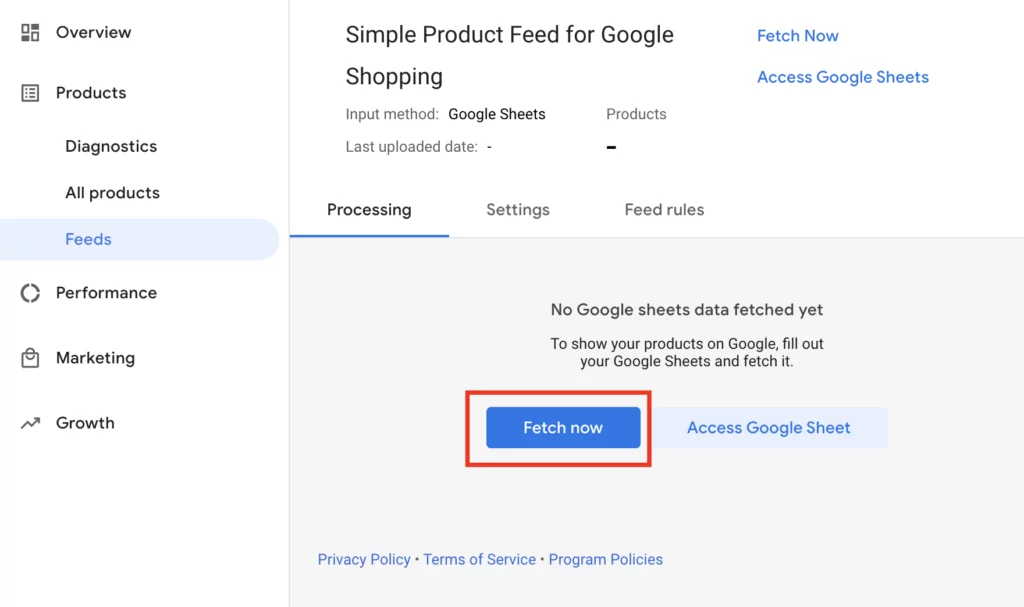
Once you’re done filling up the data feed with your product information, go to the Feeds page’s Processing tab and click on the “Fetch now” button. Now, your product data will get uploaded to Google Merchant Center.
That’s all.

How to Generate a Google Shopping Product Data Feed with a Product Feed Manager Plugin (Step by Step)
By the way, if you want a better and quicker alternative to the manual Google Merchant Center data feed template, you can use the CTX Feed plugin for your WooCommerce store. It has 130+ pre-built templates to let you create unlimited product feeds for hundreds of marketing and shopping platforms such as Google Shopping, Facebook, Bing, Kelkoo, Rakuten, Instagram, TikTok, Snapchat, and more just in a few simple clicks.
The best thing: CTX Feed comes with a free version while the pro version offers a 14-day money-back guarantee.
Below we’re going to show you how you can use the CTX Feed plugin to build your Google Shopping product feed from scratch and just within a few clicks.
Are you ready? Let’s get started.
Step 1: Install the CTX Feed Plugin
It all starts with installing and then activating the CTX feed plugin on your WordPress website.
Though you can install the free version of the plugin, the pro version offers a wide range of features such as dynamic pricing, filters, advanced filters, attribute mapping, multilingual, and multicurrency feature that the free version is missing.
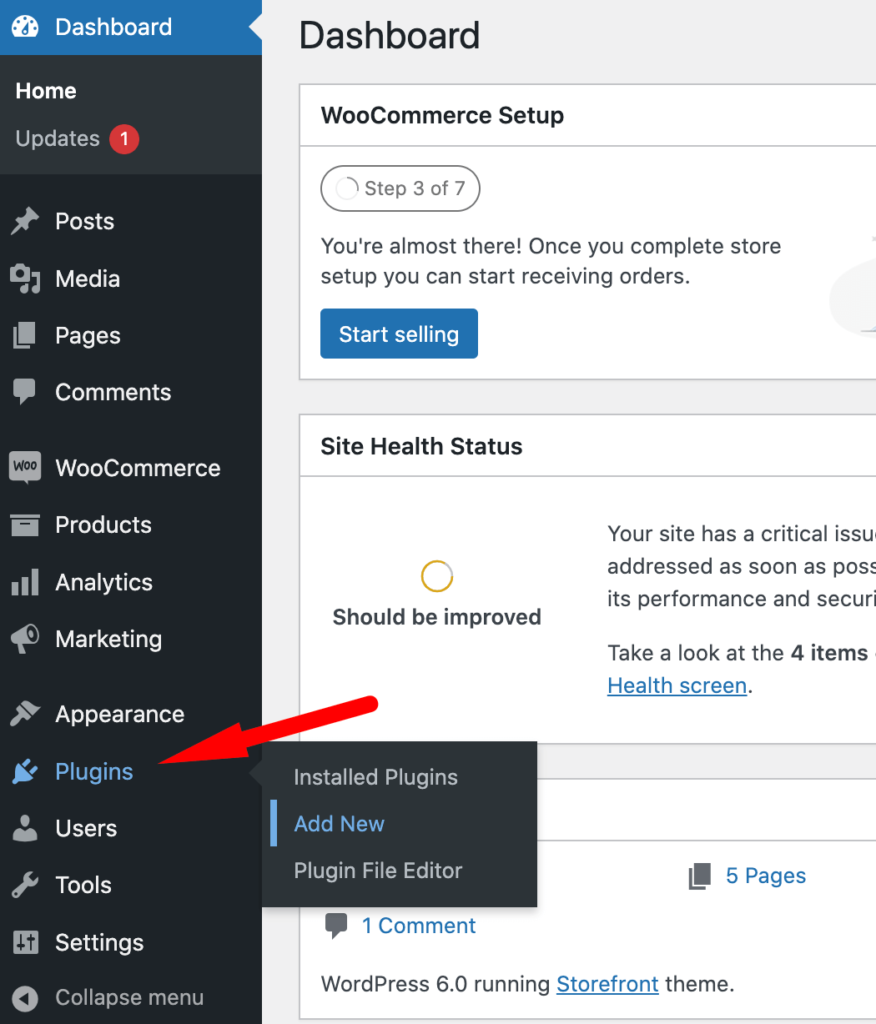
By the way, for installing the free version of CTX feed, go to Plugins> Add New from your admin panel.
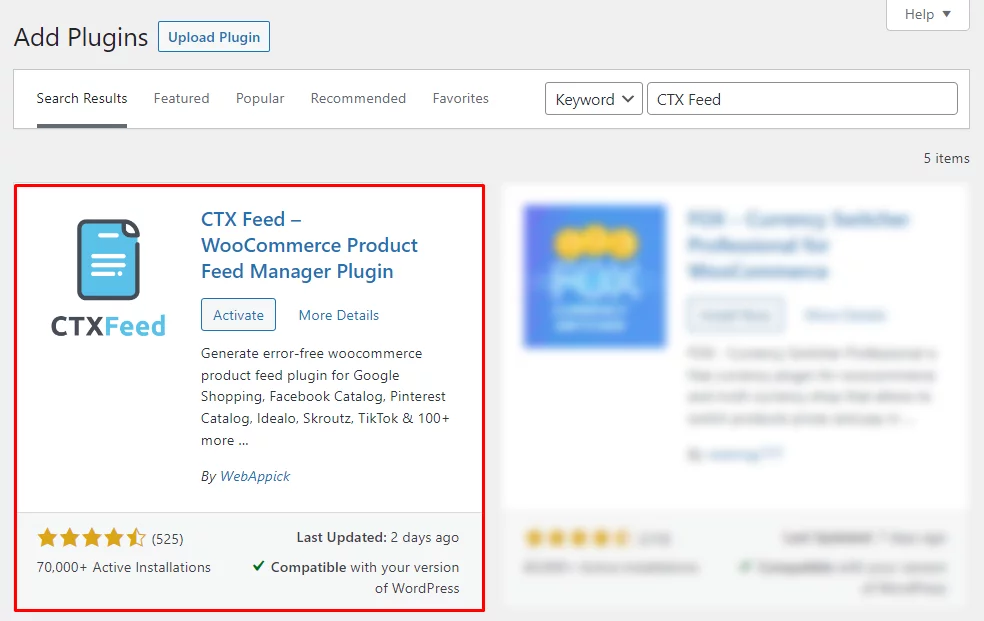
Type “CTX Feed” in the search box. From the search result, install and activate the plugin.
However, if you want to install the CTX Feed Pro, you have to download the plugin first from the official website and then upload the plugin from your add new plugin page.
Learn more on how to install CTX Feed Pro here.
Note: If you need to know how CTX Feed Pro differs from CTX Feed Free based on features, you should read this.
Step 2: Initiate the Google Shopping Product Feed Creation
Now that you have installed the CTX Feed Free/Pro version, it’s time to go ahead and start creating your Google Shopping product Feed.
Stay relaxed, it’s easier than you think.
Just hover on the CTX Feed Menu on the left of your WordPress Dashboard, and then click on the “Make Feed” option.
Content Settings
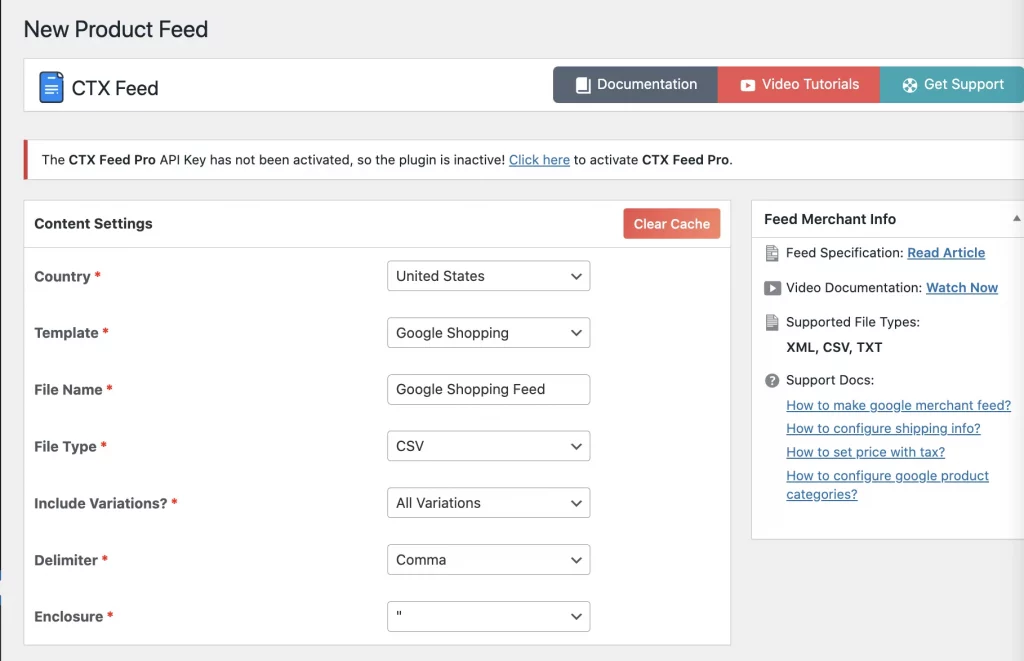
Now you’ll see a page that comes with the content settings. Here you have to complete the following to initiate the feed creation:
- Country
- Template
- File Name
- File Type
- Include Variations
- Delimiter
- Enclosure
Let us discuss how to use them on your feed.
Country: Choose the country for which you want to create your Google Shopping product feed for.
Template: As you’re generating a product feed for Google Shopping, choose the Google Shopping template from the dropdown.
File Name: Give your product feed a unique name.
File Type: Choose the file format in which you would like to generate a product feed for Google Shopping.
Include Variations: Here you have to decide whether you want to include product variations in your feed to show up in Google Shopping.
Delimiter: It’s a determiner of how you want to separate each item in your Google Shopping Feed. The default is the comma.
Enclosure: Choose a type of enclosure option for your Google Shopping Product Feed creation. Interestingly, you can even choose None from the option.
Step 3: Configure the Google Shopping Product Feed
Now that you’re done with the basic content settings of your Google Shopping product feed, it’s time to go ahead to configure the feed.
FEED CONFIG
This is your canvas! As per the template you chose on the content settings (i.e. Google Shopping), you’ll see that all the mandatory attributes or field of your product feed is here by default.
You can add any attribute you want here just by clicking on the Add New Attribute.
On top of that, you can delete any attribute from the feed just by clicking on the delete button available at the end of each line of an attribute. It means that it’s completely customizable and easy for you to add any required or optional attribute to your feed. It’s amazing, right?
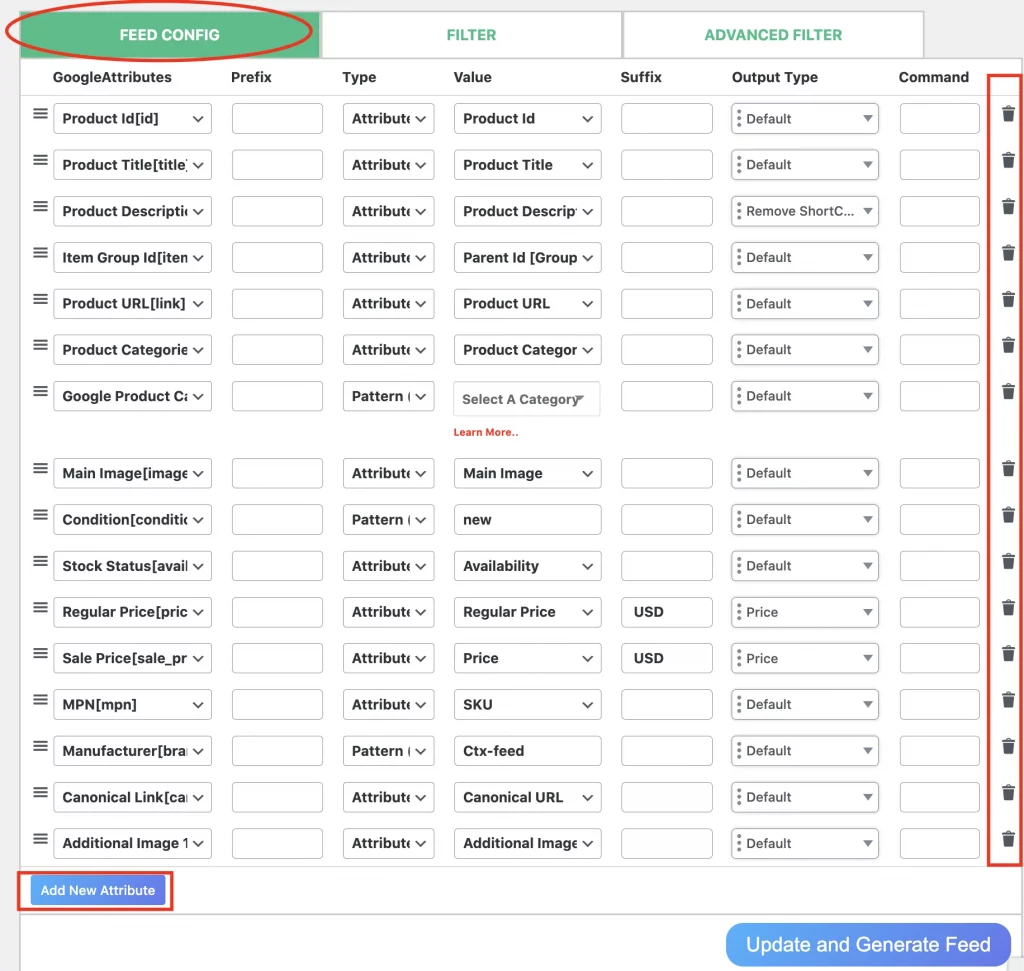
Other things that you can customize on the FEED CONFIG tabs are changing the attribute type, attribute value, output time, adding suffixes and prefixes, and more.
FILTER
The next big thing is FILTER, which is unique to the CTX Feed Pro version.
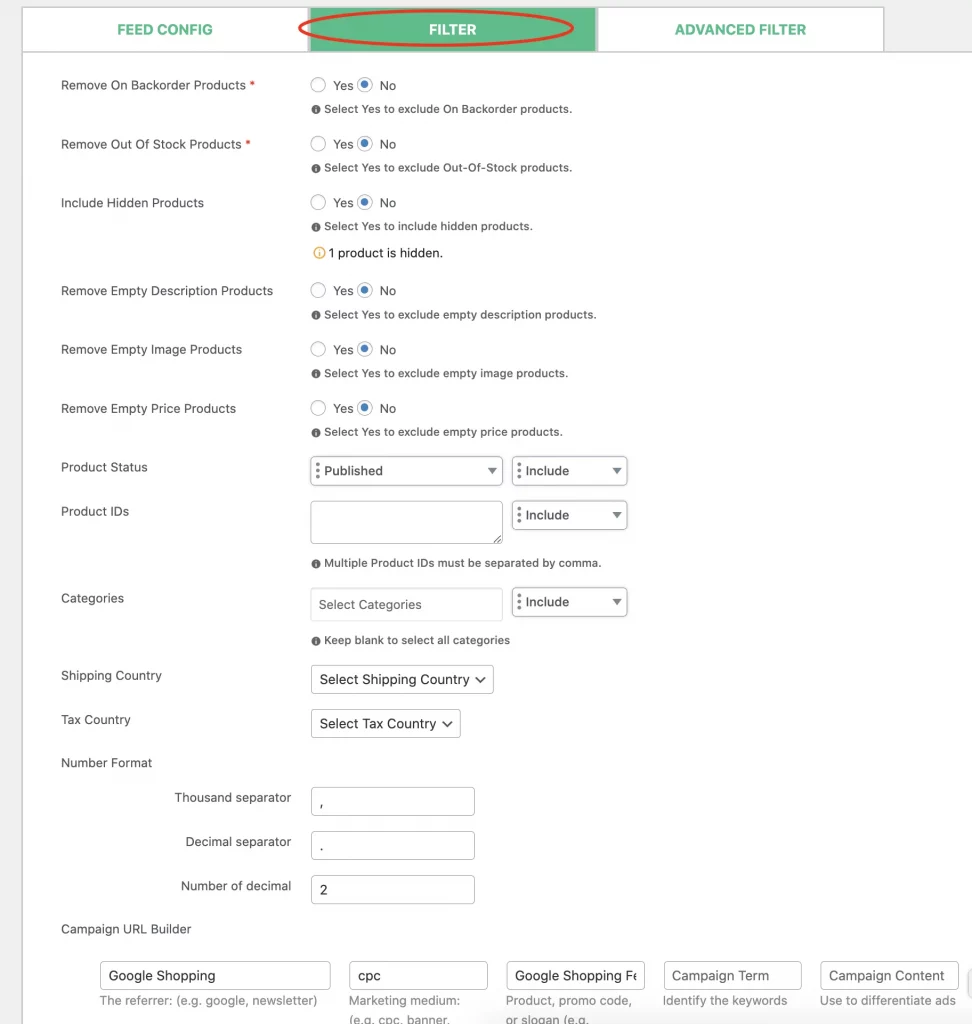
FILTER feature lets you customize your Google Shopping product feed further with the following settings:
- Remove the backorder products from the feed
- Remove out-of-stock products from the feed
- Include/exclude the hidden products
- Remove empty description products from the feed
- Remove empty image products from the feed
- Include/exclude any product from the feed
- Remove empty price products from the feed
- Include/exclude products based on product status
- Include/exclude products by product IDs
- Include or exclude certain product categories
- Select the shipping country
- Replace the string
- Create the campaign URL and more.
That’s a long list of filter opportunities on CTX Feed Pro to choose only those products that you want to see in your Google Shopping product feed.
ADVANCED FILTER
This is another fantastic CTX Feed Pro feature to let you use multiple conditions for the Google Shopping product feed creation. This feature will let you unlock the unlimited doors of opportunities.
Here’s how to use the advanced filters
Other Pro Features
Filters and Advanced Filters are just like the tip of the iceberg when it comes to CTX Feed Pro features.

CTX Feed Pro lets you use dynamic attributes, category mapping, multichannel selling options, multicurrency features, and more.
So, we suggest you try CTX feed pro for product feed creations for any marketing channel you can imagine including Google Shopping.
Now, going back to the feed, as you’re done with the filter, advanced filters, and other pro feature implementation, it’s time to end the process.
To start generating the product feed for Google Shopping, just click on the “Update and Generate Feed” button.
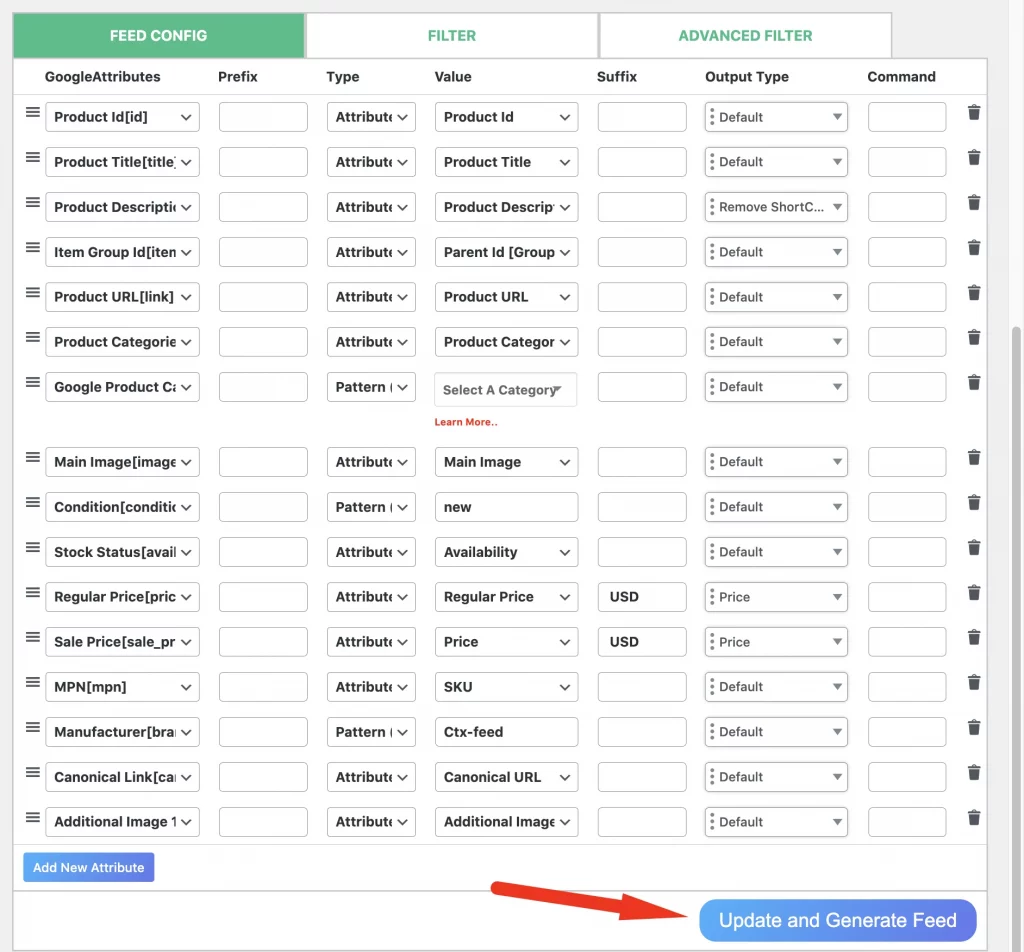
And that’s it.
You will see your product feed getting generated. Once it’s done, you’ll see a success message along with the Google Shopping Feed URL you’ve just created.
Your product feed for Google Shopping is ready.
Step 4: Manage the Feed
Once you’re done with creating the feed for Google Shopping, it’s time to know from where you can manage it. It’s the feed management page where you’ll be redirected once you finish creating the feed.
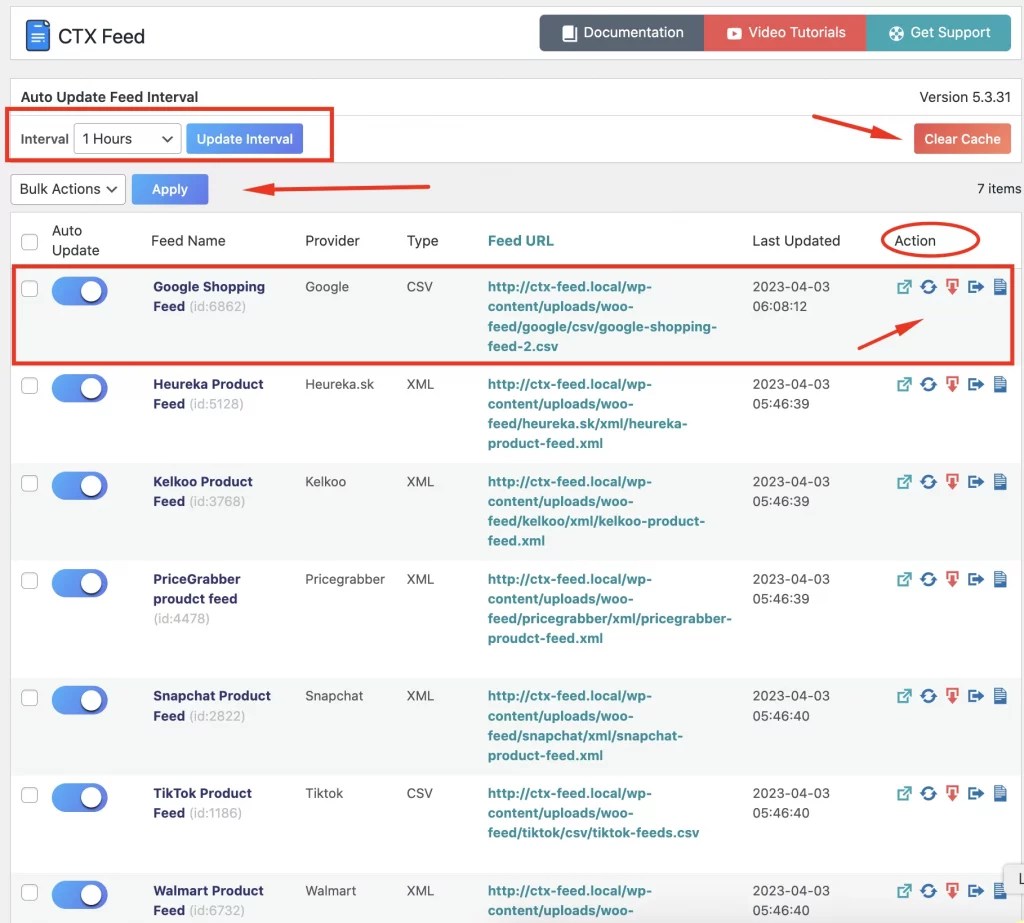
From the Mnaage feed page, you can easily manage all the feeds you create with CTX Feed for all the shopping platforms.
There are options to download, regenerate, interval setup, and more for each product feed.
Apart from that, you can also view the feed types, Feed URLs, feed updated time, and download the feed log and feed.
Check this documentation on how to manage your feed
Congratulations, you’re now done with the product feed creation and feed management options for your Google Shopping feed.
Step 5: Upload the Feed on Google Merchant Center
As you’re already created the feed for Google Shopping, it’s time to upload your final Google Shopping product feed on the Google merchant center and start generating traffic from google shopping ads, free listing, and more.
Here’s the documentation on how to upload your Google product feed to Google Merchant Center
How to Create WooCommerce Product Feed for Google Shopping (Video Tutorial)
Want a detailed video on how you can create a WooCommerce product feed for Google Shopping?
If yes, you should watch this video:
Final Words
By now you know all the important information about Google Merchant Center Data Feed and how to create and upload Your Product Data Feed on Google Merchant Center with the template (Google sheets).
This process is known as the manual process of uploading your products to Google Merchant Center and it requires your time and extra care to meticulously populate all the data fields of the Google sheets to create a feed.
However, if you use the CTX Feed plugin to make a product data feed as shown above, you will be able to save a lot of your time, money, effort, and resources.
You May Also Read
- 15 Google Analytics WordPress Plugins (Free and Pro)
- 16 WooCommerce Bookings Plugins with Guide
- A Beginners’ Guide to WooCommerce Multilingual Store Creation
- How to Create a WooCommerce Wholesale Store
- 27 Successful Snapchat Ad Examples for Your Business
- How to Create a Snapchat Product Feed
- Google Shopping Ads Image Requirements: The Ultimate Guide
