CTX Feed Pro adds the advanced capabilities on top of the free CTX Feed plugin — advanced filters, attribute mapping, dynamic attributes, output commands, Custom Template 2, FTP/SFTP upload, minute-level update intervals, multilingual and multi-currency compatibility, and AI-assistant (MCP) access. This guide walks you through downloading the Pro plugin, uploading it to WordPress, activating it, and entering your license key, so everything is unlocked and ready to build feeds.
Before you start
These need to be in place:
- WooCommerce, installed and active. CTX Feed builds its feeds from your WooCommerce products.
- The free CTX Feed plugin, installed and active. CTX Feed Pro runs on top of the free plugin: every screen lives in the free plugin’s CTX Feed menu, and Pro adds its features to it. Pro can install the free plugin for you (see below), so you do not have to do it manually, but the free plugin must be present for Pro to work. Keep it up to date — current Pro releases need a recent free version (8.0.27 or newer), and tell you if yours is older.
- PHP 7.4 or newer.
You also need your CTX Feed Pro purchase. The plugin ZIP and your license key both come from your WebAppick account.
Step 1: Download the Pro plugin
- Go to webappick.com and log in to your account.
- Open My Account → Downloads.
- Click Download next to CTX Feed Pro to get the plugin as a
.zipfile. Keep the file — you will upload it in the next step. (Your license key is under My Account → License keys; you will need it in Step 4.)
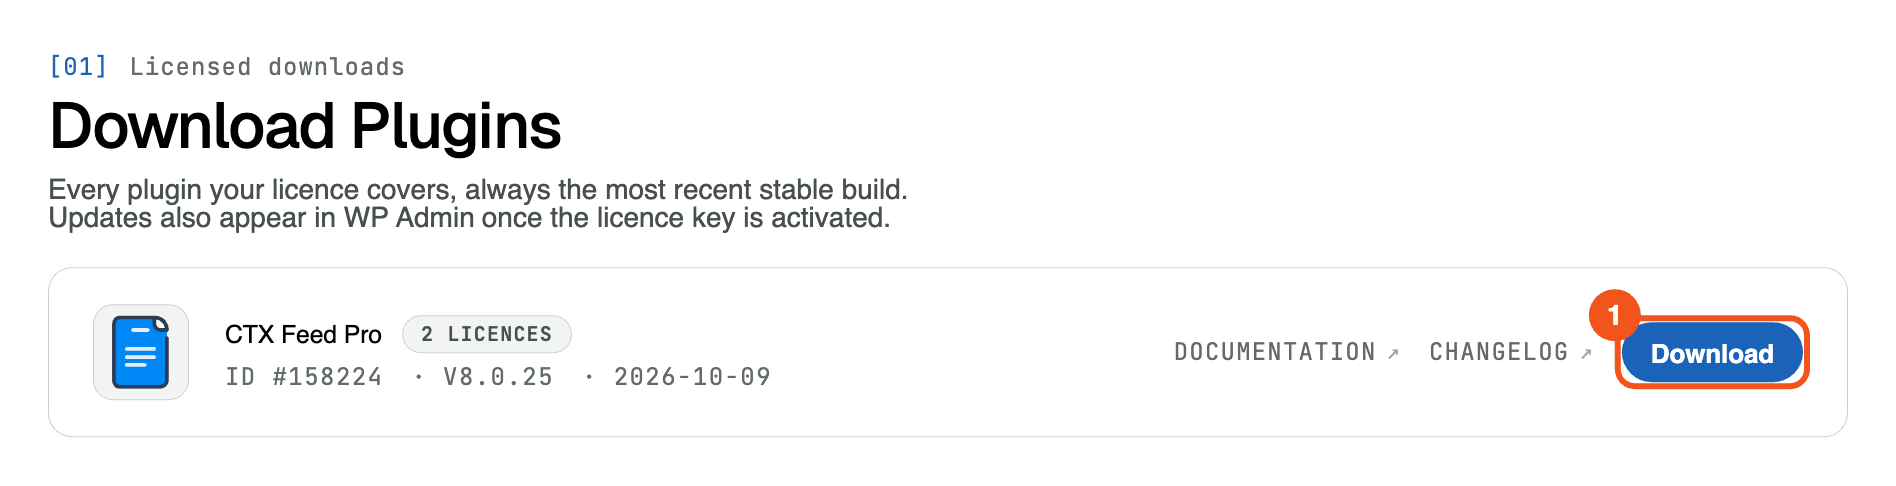
Already in your WordPress dashboard? CTX Feed → System → License lists these steps too, with a Download CTX Feed Pro button that opens the right account page and a Go to Upload Plugin button for Step 2 (see Activate license).
Do not unzip the file. WordPress installs the .zip as-is.
Step 2: Upload and install it in WordPress
- In your WordPress dashboard, go to Plugins → Add New.
- Click Upload Plugin at the top of the page.
- Click Choose File, select the CTX Feed Pro
.zipyou downloaded, and click Install Now. - When the upload finishes, click Activate Plugin.
Step 3: Let Pro pair with the free CTX Feed engine
CTX Feed Pro needs the free CTX Feed engine to function:
- If the free plugin is already installed and active, Pro pairs with it immediately. You stay on the Plugins screen; go straight to Step 4.
- If the free plugin is missing, Pro does not fail with a dead-end error. Instead it opens a short Setting up CTX Feed screen and installs the free plugin from WordPress.org automatically, then activates it. You do not need to click anything; if your host prompts for filesystem credentials, provide them so WordPress can download the plugin. If the automatic install fails, click Install CTX Feed manually.
- If the free plugin is installed but switched off, the same screen simply activates it (“Activating CTX Feed…”).
- If you can’t install plugins (for example, you aren’t an administrator), the screen says the free CTX Feed plugin is required and asks you to contact a site administrator.
- If an older free plugin (before 8.0) is installed, Pro shows Update CTX Feed to continue with an Update CTX Feed button. Update the free plugin, then Pro pairs automatically.
Until setup is finished, other admin screens show a reminder — “CTX Feed Pro: one more step — the free CTX Feed plugin is required to run.” — with a Finish setup link.
Once paired, everything lives under a single “CTX Feed” menu in your WordPress admin — there is no separate menu for Pro.
Step 4: Activate your license key
Installing Pro does not unlock its features by itself — you must activate your license:
- Open CTX Feed → System → License.
- Paste your license key into the License key field on the Activate CTX Feed Pro card. You find the key on webappick.com under My Account → License keys (the Master key, or the per-product key next to your CTX Feed Pro order).
- Click Activate. The page reloads and the Pro features turn on.
For the full activation walkthrough and error help, see Activate license.
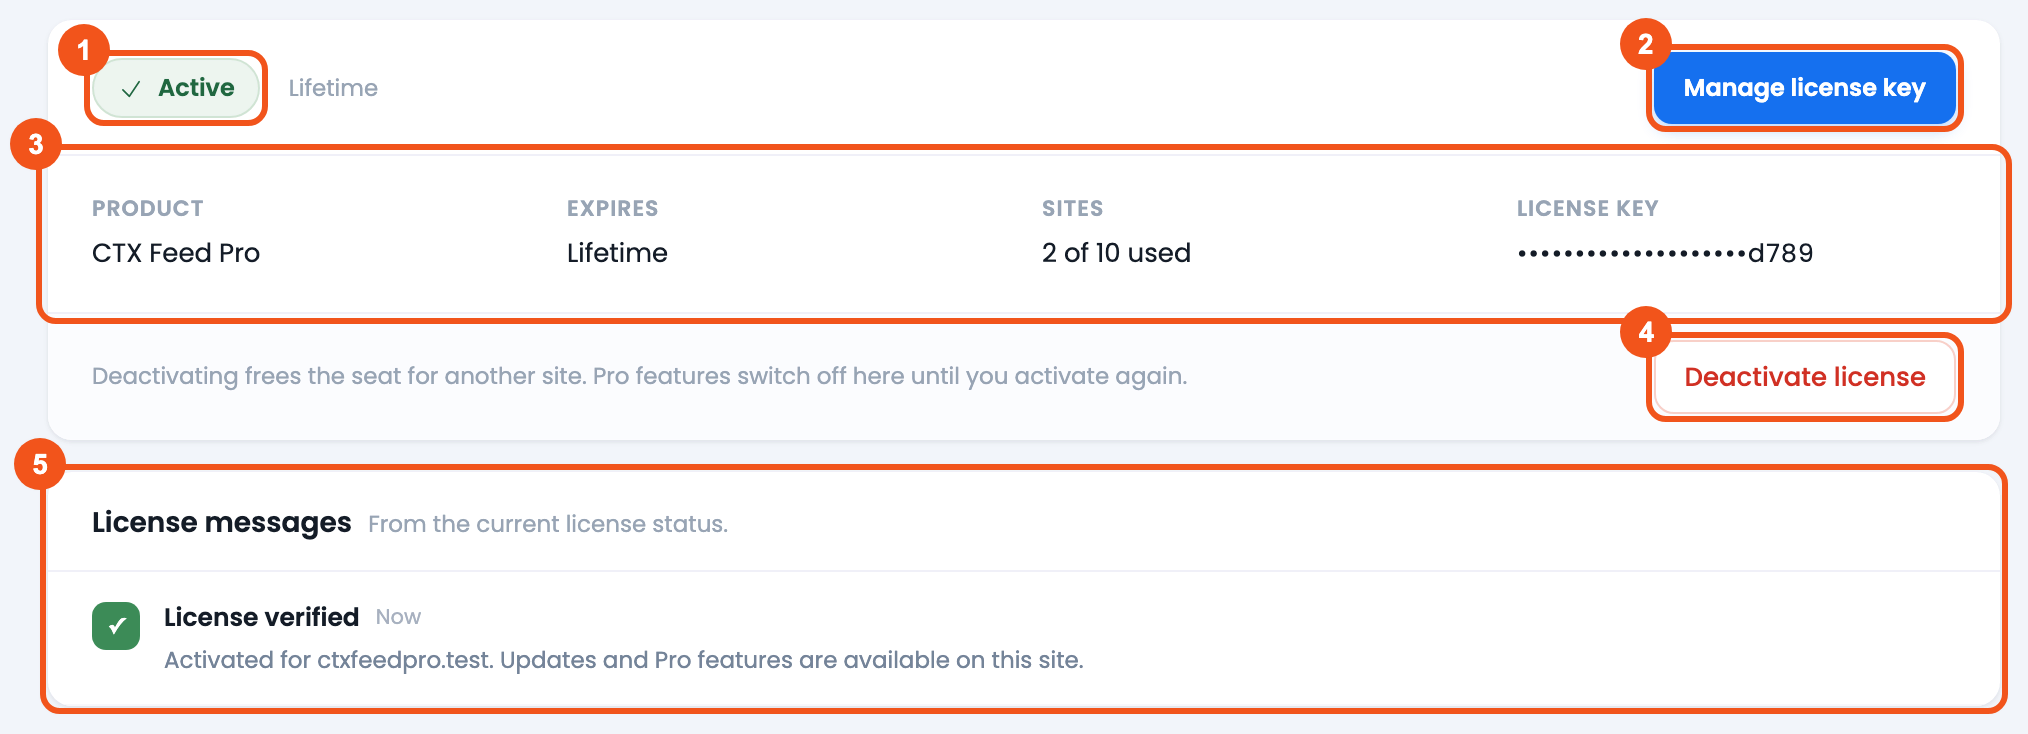
- Active pill — Pro is unlocked on this site; next to it, the renewal date or Lifetime.
- Manage license key — opens My Account → License keys on webappick.com.
- The details grid — PRODUCT, EXPIRES, SITES and the masked LICENSE KEY.
- Deactivate license — frees this site’s seat.
- License messages — the current status, such as “License verified”.
Verify the installation
- Under Plugins → Installed Plugins, both CTX Feed and CTX Feed Pro are listed and active.
- On CTX Feed → System → License, you see the green Active pill and your plan details.
- Pro-only screens such as Attribute mapping and Dynamic attributes are available (no longer showing an upgrade prompt).
Updating CTX Feed Pro later
When a new Pro version is released, WordPress offers the update on the Plugins and Dashboard → Updates screens like any other plugin — click Update now. If it doesn’t show up yet, open CTX Feed → System → Version control and click Check for updates. The update is listed even when the license isn’t active, but it can only be downloaded with an active license — renew or re-activate it to install Pro updates.
Always update the free CTX Feed plugin first, then Pro. Pro runs on top of the free plugin, and new Pro releases are made to work with the matching free release. From CTX Feed Pro 8.0.19 this is handled for you: when you start a Pro update (on Plugins, Dashboard → Updates or Version control) and a newer free CTX Feed exists on WordPress.org, an Update CTX Feed too window opens. Click Update CTX Feed X, then Pro Y to update both in the right order, or Not now to leave everything as it is. If the free update fails, Pro is not touched. It works the other way round too (CTX Feed 8.0.30 and newer): updating the free CTX Feed from Version control while a newer Pro is available opens Update CTX Feed Pro too, so both plugins always end up on the latest version.
While CTX Feed is going through its major update (versions before 8.1.0), updating from Version control first shows a short notice: after the update, regenerate your feeds and check titles, prices, brand and shipping. Click Continue and update to go ahead, or Not now to cancel.
If the two plugins are ever out of step, CTX Feed tells you which one to update instead of failing: CTX Feed Pro needs an update (the free plugin is newer) or CTX Feed needs an update. (Pro needs a newer free plugin — Pro features stay inactive until you update it). Update the plugin named in the notice.
Troubleshooting
- “CTX Feed Pro requires PHP 7.4 or higher and has been paused…” Your server runs an older PHP. Ask your host to update PHP, then Pro resumes automatically.
- WordPress won’t activate Pro because WooCommerce is missing. Install and activate WooCommerce first.
- “Update CTX Feed to continue.” The installed free plugin is too old for this Pro release. Click Update CTX Feed, then Pro pairs with it.
- “CTX Feed needs an update.” / “CTX Feed Pro needs an update”. One plugin is newer than the other. Update the one named in the notice (free first when both are behind); the notice disappears once both match.
- The upload is rejected as too large. Some hosts cap upload size. Increase the upload limit, or install the
.zipvia SFTP intowp-content/plugins/and activate it from the Plugins screen. - Features are still locked after installing. Installation alone does not unlock Pro — activate your license key (Step 4).
Related guides
- Activate license
- Connect CTX Feed to your AI assistant
- Manage license key
- Cannot activate API key — No API resources available
- Upgrade or downgrade subscription
