Google Shopping Product Feed Specifications: A Comprehensive Guide (2025)
Google Shopping Product Feed specifications define how product data should be structured and submitted to Google Merchant Center to ensure accurate listing in Google Shopping ads.
Key entities include product titles, descriptions, images, prices, availability, GTINs, MPNs, and categories. Properly following these specifications improves ad visibility, relevance, and conversion potential.
To promote your products on Google via the Google Merchant Center, you need to know properly about google product feed specifications.
It’s because only when you know about the Google product feed specifications can you equip your product feed properly for better ads and product listing on the Google platform.
To help you understand Google product specifications the best, we’re going to talk about the required and optional product feed specifications in this blog.
On top of that, we’ll also show you how you can easily create a product feed for Google using a readymade template without worrying about the product specifications.
Let’s get started.
What is a Product Feed?
Simply put, a product data feed, also known as a product feed is a file that contains all the relevant information related to your products. The information may include product title, product price, product ID, product SKU, product description, product image, etc.
As a WooCommerce store owner, you can use a product feed to list your store’s products and advertise them on various eCommerce platforms and marketing channels such as Rakuten, Walmart, TikTok, Google Shopping, Facebook, Amazon, and more.
When it comes to the feed format and attributes of a feed file, it is entirely dependent on the requirement of the individual platform you make the feed file for.
So, feed file format and attributes differ widely from platform to platform.
The required attributes and feed file format for TikTok might be different from Google Shopping and vice versa.
However, if you are going to advertise on Google Shopping, your product feed should contain the product title, ID, price, description, image, and website URL along with other optional product data.
By the way, if you’re selling your WooCommerce products on multiple platforms, you will need to make individual product feed from scratch for all of them as per their attribute requirement and feed format if you want to do it manually. And no doubt that it’s a terribly tiresome job to do.
But, the good thing is there’s a better alternative that makes the product feed creation for any platform a piece of cake.
If you don’t have the time, energy, or resources to create a product feed for a platform spending hours after hours, you can use CTX Feed – Product Feed Manager plugin for WordPress that has specific readymade templates for 100+ platforms including Google Shopping, Facebook, TikTok, eBay, Walmart, Rakuten, and whatnots.
This plugin works fantastically with WooCommerce and comes with both free and pro versions for WordPress users.
What is Google Product Feed Specification?
Every marketing channels are unique with different requirements for product specification in the feed.
When you use the appropriate attributes or specifications of your products in your feed, you let the buyers see how the product looks along with the price, description, size, weight, and more.
If you do not mention these specifications in the product feed, your buyers will have no idea about your product and thus you’ll end up selling to none.
Product specification or attributes in the feed also has importance for the shopping channels. A shopping platform or channel uses the attributes or specifications of your products that you include in your feed to display the buyers’ appropriate products.
If you do not share the mandatory product information or specification in your product feed, a shopping platform will fail to fetch the information it requires to present in front of the buyers.
As a result, the platforms may disapprove your product feed and your products might not be shown in the search result or you may not be able to create display ads.
A product specification feed file can come up with multiple formats such as XML Product Feed, CSV Product Feed, and TXT Product Feed.
When it comes to the Google Product Feed specifications, it signifies the required or optional information about your products that Google Shopping requires to promote your products to potential buyers.
Google Shopping has made certain attributes or product specifications for the sellers mandatory to insert into the product feed.
These attributes include Product ID, Title, Description, Link, Price, Availability, and more.
Apart from the mandatory product attributes or specifications, Google also prefers you to include certain optional attributes in the product feed such as MPN, GTIN, Sale Price, Product Type, etc.
In the middle of both the mandatory and optional ones, there are certain attributes that may be either optional or required based on certain products or circumstances. Some of these attributes are shipping weight, gender, age group color, size, condition, brand, etc.
Types of Product Feeds on Google Shopping
There are different types of feed you can create for Google Shopping based on your product types and advertising types.
Let us talk about some common product feed types for Google Shopping one by one:
Primary Google Merchant Center Feed
This is the main or primary Google Merchant Center Data Feed which contains all the product information of a store and helps to run the ads on the Google platform.
Google Promotions Feed
This Google Promotions Feed will let you add promotional texts to your ads on Google Shopping.
Google Local Inventory Ads Feed
With Google Local Inventory Ads Feed, you can attract customers to visit your physical brick-and-mortar store.
Product Rating Feed
Product Rating Feed will help you add product ratings and reviews to your shopping ads to build trust and inspire future customers to buy from you.
Dynamic Remarketing Feed
Dynamic Remarketing Feed lets you retarget those shoppers who have visited your product page and added products to their cart, but abandoned without completing the purchase.
Google Manufacturer Center Feed
With this product feed, you can decide the way you want to present your products to the shoppers across the Google Ads platform.
Ways to Create a Google Product Data Feed
There are multiple ways to create a Google Product Data feed. Let’s explore them one by one.
Product Feed Manager Tool – Easy and Quick
If you want to create, optimize, and manage your product feed from your WooCommerce website, there are multiple product feed management plugins that’d be handy for you.
Using a plugin like CTX Feed Pro, you can create, optimize, and manage your product feed for Google Shopping, Walmart, TikTok, Facebook, and 100s more.
CTX Feed plugin offers both free and pro versions for users. It’s noteworthy that the pro version offers a 30-day money-back guarantee.
Manual – product by product
The second way of creating your product feed for Google is to upload your product information manually (one by one) on this platform.
If you use this method, you have to include the product data of each item individually. On top of that, you will also need to update your product feed manually.
So, if any product gets stocked out, you have to update the information personally by spending your time and effort.
Note that while it is okay for merchants who sell just a few products, it’s not a scalable solution if you sell dozens to hundreds of products on your eCommerce store.
Following this method, you can add your product data from the Products tab of your Google Merchant account.
Spreadsheets – manually but in bulk
Though this process is also a manual one, it lets you upload your product information on Google Merchant center in bulk. This method also requires you to update the spreadsheet to keep the ads relevant.
To use this method, you need to create a spreadsheet document and then fill the columns with product data as per the attributes you insert at the top row of the sheet.
API connection – automatically
Some eCommerce platforms offer online store owners the chance to send product data to Google Merchant Center automatically.
Using this method, you can pass your website’s exact product data configurations to the channel. However, the problem with this method is that it won’t allow you to control the feed as you want it.
Google Merchant Center’s Required Attributes for All Categories or Product Types
| Attribute and Format | Definition, Syntax, and Example | Attribute and Format |
| ID [id] | It’s the unique identifier of the product – Maximum 50 characters Example: B4C3 | – Insert unique value for a product – Use the product SKU if possible – Make sure to keep the ID unaltered when you update the product data – Maintain the same ID for the same product for all languages and countries |
| Title [title] | It’s the name of your product – Maximum 150 characters Example: Mens Blue Jeans | – Describe your product precisely in a way that matches the product of your landing page. – Avoid promotional texts, all capital letters, or any foreign characters. -For variants, you may include color and size. For mobile devices, you may include the phrase “with contract” if applicable. -If your mobile device is sold in installments, mention “with payment plan” in the USA. -For Russia, mention the age range at the start of the title for books and other information products. |
| Description [description] | It’s the description of your product -Maximum 5000 characters Example: Made from pure denim, XXL, ocean blue. imported. Fresh and brand-new | – Describe your product in such a way so that it matches the description of your product landing page. – Avoid using any promotional texts, all capital letters, and foreign characters. – Only include product-related information. – Avoid links to your store, any sale information, competitor details, or description of other products or accessories. – Use required forming such as lists, italics, and line breaks to format your product description accurately. |
| Link [link] | It’s the URL of your product’s landing page Example: http://www.yourdomain.com/mensbluejeans | – Use the verified domain link of your website. – The link should start either with http or https. – Use RFC 2396 or RFC 1738 complied encoded URL. – Avoid linking to an interstitial page without any legal requirement. |
| Image link [image_link] | It is the URL of your product’s primary or main image Example: https://www.yourdomain.com/image1.jpg | For the Image Link: – The link should represent the main product image – Start the URL either with https or HTTP. – Use RFC 2396 or RFC 1738 complied encoded URL – Keep the URL crawlable by Google For the Image: – Display your product vividlyUse accepted formats like JPEG, WebP, PNG, GIF, BMP, and TIFF. – Avoid submitting an image thumbnail or scaling up an image – Avoid borders, watermarks, and promotional texts – Avoid using placeholders or generic image |
| Availability [availability]Supported Values: In stock [in_stock] Out of stock [out_of_stock] Preorder [preorder] Backorder [backorder] | It’s the status of a product to indicate whether a product is available or not. -Numeric-ISO 4217 Example: in_stock | – Submit the product availability as per the product availability on your landing page and checkout pages – If you set the availability to preorder or backorder, make sure to provide the availability data with the availability_date attribute. |
| Price [price] | It’s the price of your product Example: 60.00 USD | Submit the product price that matches the product price on your product landing page and checkout page. – Show the currency of the targeted territory prominently on the landing page and checkout page. – Ensure that the product is available to be bought online as per the submitted price – Make sure that customers can buy the product at the submitted price without any membership payment required. – Avoid submitting 0 price. However, it’s allowed for selling mobile devices with a contract. – When you buy a product in bulk, bundles, or in multipacks, submit the total price of the minimum purchasable quantity, bundle, or multipack. – Avoid including tax in the price for the USA and Canada – Include VAT or GST in the price for all other countries except USA and Canada. – There are additional options to submit price-related information such as: Unit pricing measure [unit_pricing_measure] Unit pricing base measure [unit_pricing_base_measure] Sale price [sale_price] Subscription cost [subscription_cost] Installment [installment] |
| GTIN or MPN | GTIN is your product’s Global Trade Item Number and MPN is your product’s Manufacturer Part Number. GTIN is required for all products that have a valid GTIN. MPN is required when your product does not have a manufacturer-assigned GTIN. Example: 3234567890126 Or GO12345OOGLE | – Do not use dashes and spaces – Submit only valid GTIN and MPN – Provide the correct GTIN and MPN – Use the most specific GTIN and MPN possible – Your product will be disapproved with the incorrect GTIN or MPN value |
| Shipping [shipping] | It’s your product’s shipping cost, shipping location, and shipping speed Shipping costs are required for Shopping ads and free listings for the following countries: Australia, Austria, Belgium, Canada, Czechia, France, Germany, Ireland, Israel, Italy, the Netherlands, Poland, South Korea, Spain, Switzerland, the UK, and the US Example: US:CA:Overnight:16.00 USD:1:1:2:3 | – You have to use this setting when your merchant center account does not define the shipping costs of your product. Also, you have to use this if you need to override the shipping costs or speeds defined in your merchant center account. |
Optional attributes and required or optional depending on circumstances or categories on Google Merchant Center
Tax [tax]
It is used to describe your product’s sales tax rate in percent
It’s a required attribute (Available for the US only)
| Example: | Syntax: | Example: |
|---|---|---|
| US:CA:10.00:y | This attribute uses 4 sub-attributes: Rate [rate] (required) Country [country] (optional) Region [region] or postal code [postal_code] or location ID [location_id] (optional) Shipping tax [tax_ship] (optional) * Specify if you charge tax on shipping. | yes or no |
Here’s how you can add the Tax [tax] attribute to your feed using CTX Feed plugin
![tax [tax] attribute](https://webappick.com/wp-content/uploads/2023/04/Tax-Attribute-1024x670.png)
Minimum Requirements:
- Use this setting only to override the account tax settings for an individual product. It’s best to submit tax information for all your products using the account settings in Merchant Center.
- Don’t include tax in the price [price] attribute for the US and Canada.
- Submit the tax in the tax [tax] attribute if you need to override your account settings for the US only.
- Submit value-added tax (VAT) or Goods and Services Tax (GST) in the price attribute, and do not use the tax attribute for all other countries.
Shipping length [shipping_length]
It’s the length of the product used to calculate the shipping cost by dimensional weight
This attribute is optional (Required for carrier-calculated rates in your account shipping settings)
| Example: | Syntax: | Supported units: |
|---|---|---|
| 20 in | Number + Unit | in cm |
Here’s how you can add the Shipping Length [shipping_length] attribute to your feed using CTX Feed plugin
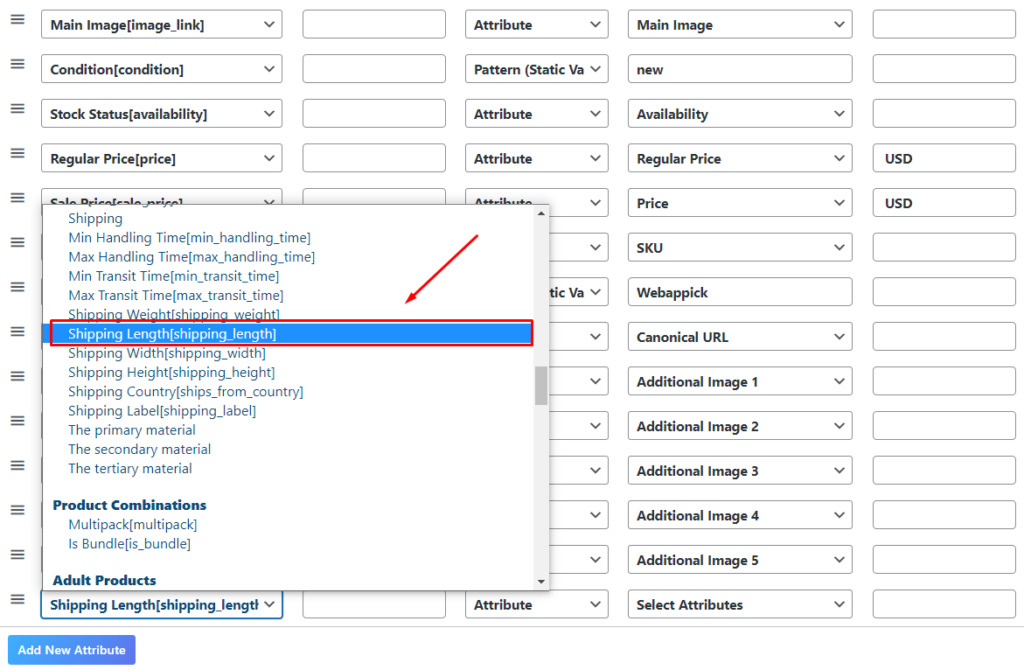
Minimum Requirements:
- Submit this value if you set up account shipping settings for carrier-calculated rates.
- If you don’t provide shipping dimension attributes while using carrier-calculated rates, Google won’t be able to calculate rates based on the dimensional weight of the product. If that’s the case, we’ll just calculate the rates based on the value you provided in the shipping weight [shipping_weight] attribute.
- If you submit this attribute, submit all shipping dimension attributes:
- Shipping length [shipping_length]
- Shipping width [shipping_width]
- Shipping height [shipping_height]
- Use the same unit for all shipping dimension attributes that apply to a single product.
- Google doesn’t automatically calculate the additional shipping costs for oversized products. If your package would be considered large or oversized by your carrier, you should use the shipping [shipping] attribute to set the shipping cost for an individual product.
Product highlight [product_highlight]
It’s the most relevant highlights of your products to make the product more attractive to the buyers.
It’s optional for all products and categories.
| Example: | Syntax: |
|---|---|
| Supports thousands of apps, including HBO, YouTube, and Netflix. | Maximum 150 characters |
CTX Feed plugin lets you add product highlight attributes for your Google Shopping product feed
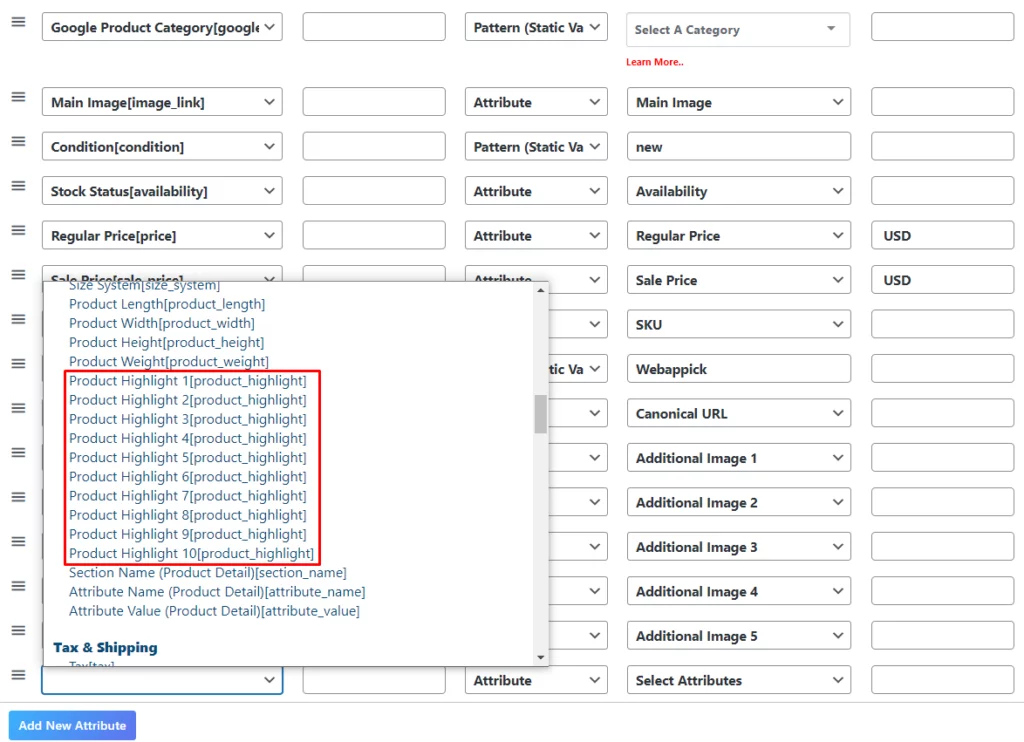
Minimum Requirements:
- Use between 2 and 100 product highlights.
- Illustrate only the product itself.
- Avoid listing keywords or search terms.
- Avoid using promotional text, all capital letters, or gimmicky foreign characters.
Product detail [product_detail]
This attribute denotes the technical specifications or additional details of your product
It is optional for all products and categories.
| Example: | Syntax: |
|---|---|
| General:Product Type:Audio player | This attribute uses 3 sub-attributes: 1. Section name [section_name]: Max 140 characters 2. Attribute name [attribute_name]: Max 140 characters 3. Attribute value [attribute_value]: Max 1000 characters |
Here’s how you can add the product detail attribute to your feed using CTX Feed plugin
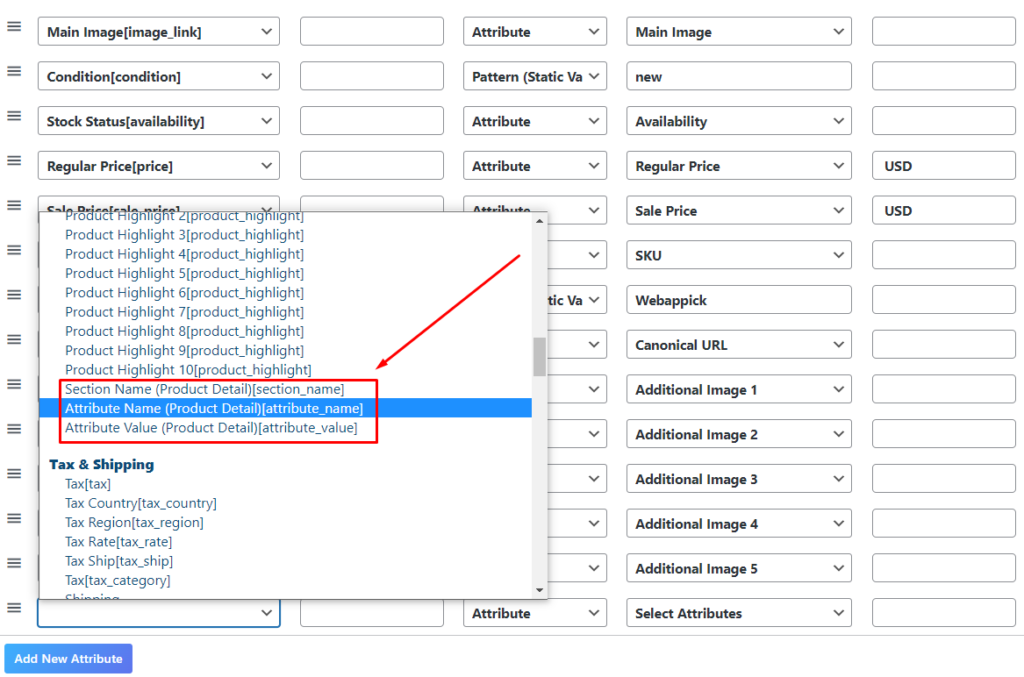
Minimum Requirements:
- Avoid adding information covered in other attributes, all capital letters, gimmicky foreign characters, promotion text, or list keywords or search terms.
- Avoid adding information such as price, sale price, sale dates, shipping, delivery date, other time-related information, or your company’s name.
- Only provide an attribute name and value when the value is confirmed. For example, provide “Vegetarian=False” if a food product is not vegetarian.
Custom label 0-4 [custom_label_0-4]
You assign a custom label to a product to help organize bidding and reporting in Shopping campaigns
This attribute is optional for all products and categories.
| Example: | Syntax: |
|---|---|
| Seasonal Clearance Holiday Sale Price range | Maximum 100 characters |
Here’s how you can add the Custom Label 0-4 [custom_label_0-4]attribute to your feed using CTX Feed plugin
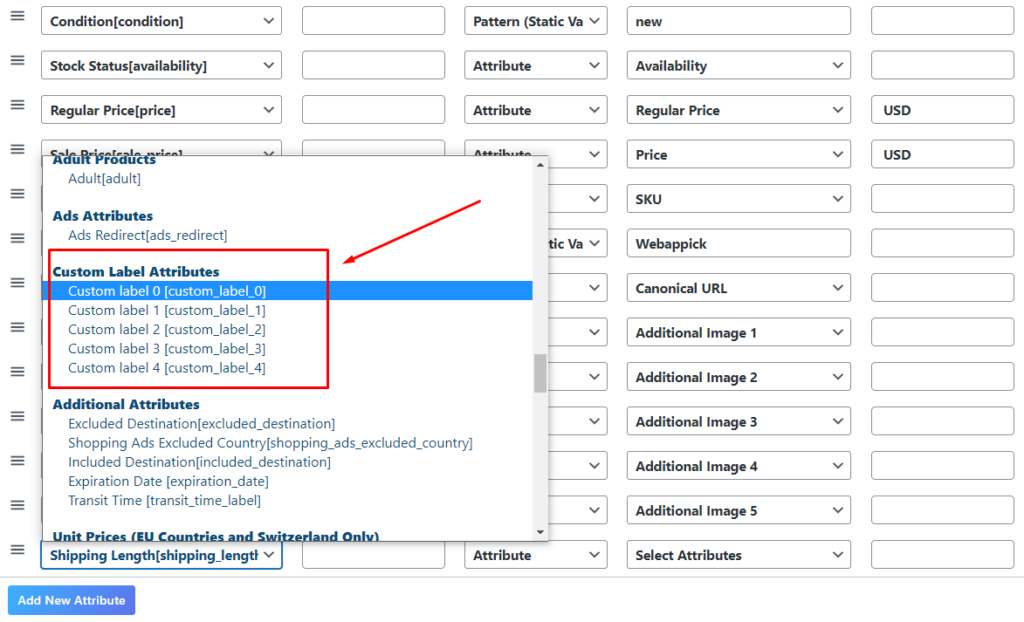
Minimum Requirements:
- Use a value that you’ll recognize in your Shopping campaign. The value won’t be shown to customers who see your ads and free listings.
- Submit up to 5 custom labels per product by including this attribute multiple times:
- custom_label_0
- custom_label_1
- custom_label_2
- custom_label_3
- custom_label_4
- Use only 1,000 unique values for each custom label across your Merchant Center account.
Additional image link [additional_image_link]
It’s the URL of an additional or extra image of your product. This attribute is optional for all products and categories.
| Example: | Syntax: |
|---|---|
| http://www.yourdomain.com/image2.jpg | Maximum 2000 characters |
Here’s how you can add the Additional image link [additional_image_link] attribute to your feed using CTX Feed plugin
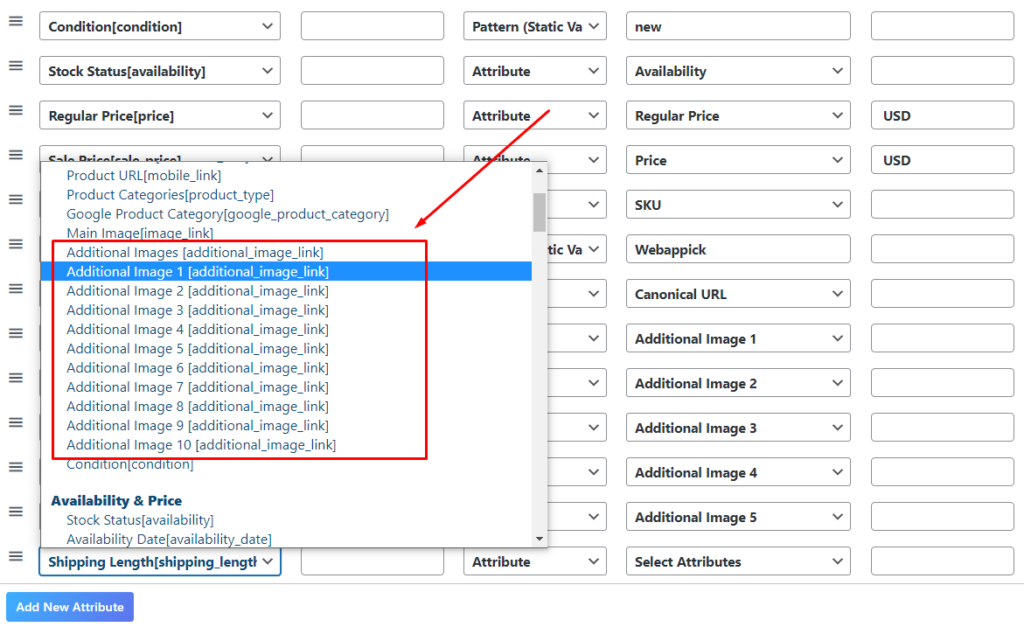
Minimum Requirements:
- You are supposed to meet all the requirements for the image link [image_link] attribute except for two things: product staging and using the graphics and illustrations. For the additional images, you can include the product staging and show the product in use. Also, you are free to use the graphics or illustrations here.
- You can submit up to 10 images using this attribute
Mobile link [mobile_link]
It’s the link to your product’s mobile-optimized landing page when you use a different URL for mobile and desktop users. It’s optional for all categories and products.
| Example: | Syntax: |
|---|---|
| http://www.m.yourdomain.com/mensbluejeans | Maximum 2000 alphanumeric characters |
Here’s how you can add the Mobile link [mobile_link] attribute to your feed using CTX Feed plugin
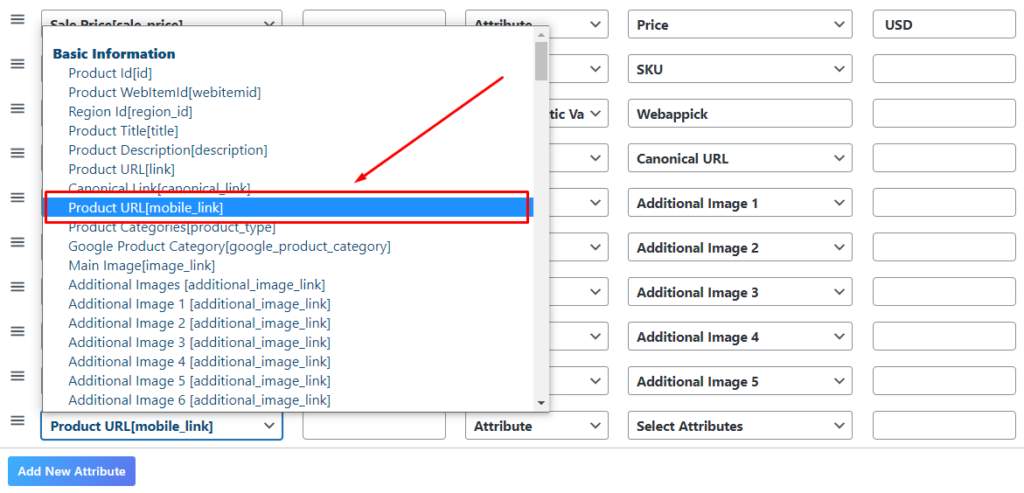
Minimum Requirements:
- Make sure to meet the requirements for the link [link] attribute.
Availability date [availability_date]
It’s the date a preordered or back ordered product becomes available for delivery
This product attribute is required for Google Merchant Center if the product availability is set to preorder or backorder
| Example: | Syntax: |
|---|---|
| (For UTC+3) 2024-03-23T10:08+0300 | Maximum 25 alphanumeric characters ISO 8601 |
Here’s how you can add the Availability date [availability_date] attribute to your feed using CTX Feed plugin
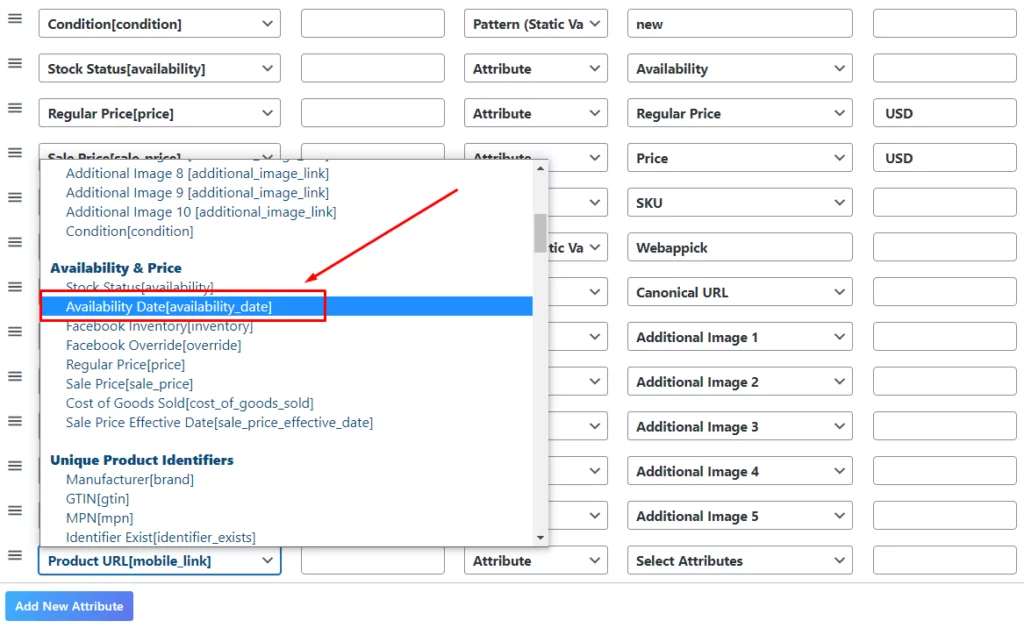
Minimum Requirements:
- You should use this attribute if you’ve set your product’s availability to preorder or backorder. Make sure to add value up to 1 year in the future.
- Remember that the availability date should also be added to the product’s landing page in a way that it’s clearly visible to the customers.
- If you can’t provide an exact date, it’s okay to use an estimated date.
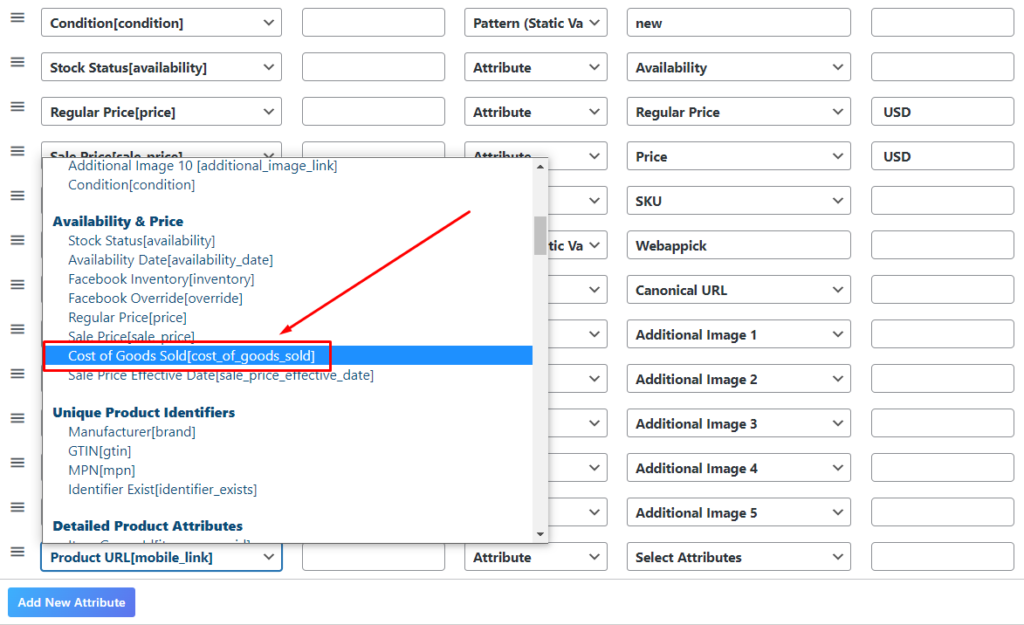
Cost of goods sold [cost_of_goods_sold]
It’s the costs related to the sale of a particular product as per your defined accounting convention. These costs may include material, labor, freight, or other overhead expenses.
By submitting the cost of goods sold (also known as COGS) for your products, you get valuable information about other metrics, such as the gross margin and the amount of revenue you generate from ads and free listings.
This attribute is optional for all products and categories.
| Example: | Syntax: |
|---|---|
| 23.00 USD | ISO 4217 codes Use ‘.’ rather than ‘,’ to indicate a decimal point Numeric |
Here’s how you can add the Cost of goods sold [cost_of_goods_sold] attribute to your feed using CTX Feed plugin
Expiration date [expiration_date]
This is the date when your product will stop showing
This is optional for all products and categories.
| Example: | Syntax: |
|---|---|
| (For UTC+3) 2024-03-23T10:08+0300 | Maximum 25 alphanumeric characters ISO 8601 |
Here’s how you can add the Expiration date [expiration_date] attribute to your feed using CTX Feed plugin
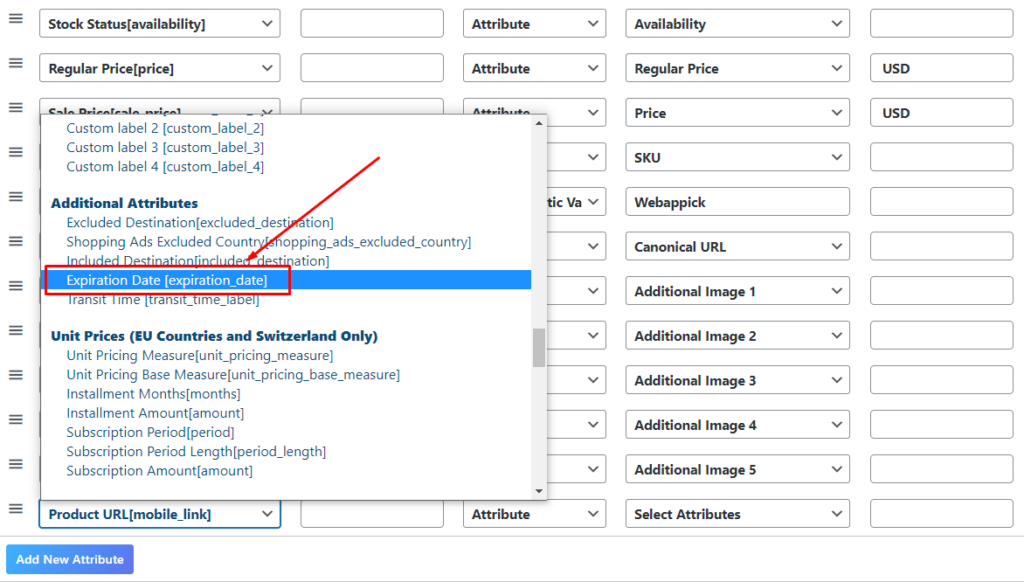
Minimum Requirements:
- Make sure that the date you use is less than 30 days in the future from now.
- By the way, a latency of several hours is acceptable.
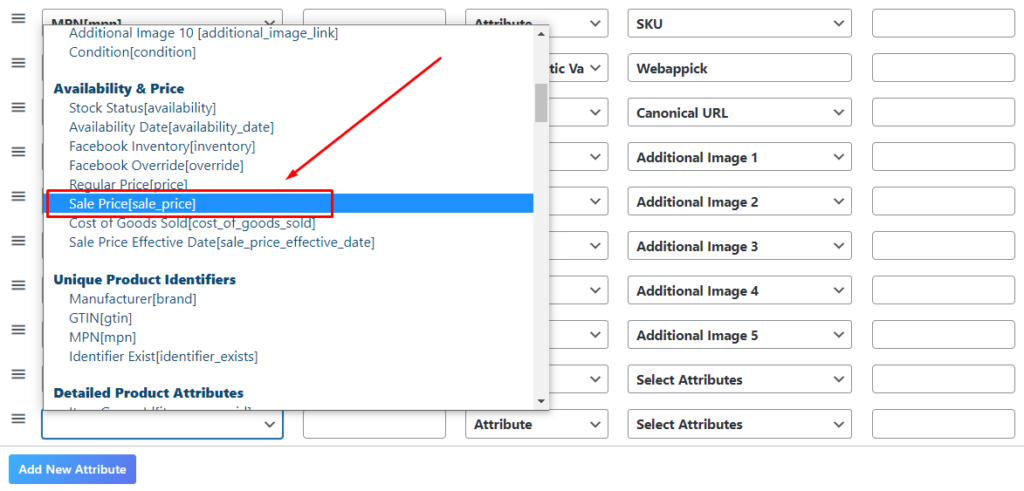
Sale price [sale_price]
It’s your product’s sale price. It’s optional for all products and categories.
| Example: | Syntax: |
|---|---|
| 43.00 USD | Numeric ISO 4217 |
Here’s how you can add the Sale price [sale_price] attribute to your feed using CTX Feed plugin
Minimum Requirements:
- Make sure to meet the requirements for the price [price] attribute.
- Use this attribute (sale price) apart from the price [price] attribute set to the non-sale price.
- Properly submit the product’s sale price in a way that matches the sale price as given on your landing page as well as the checkout page.
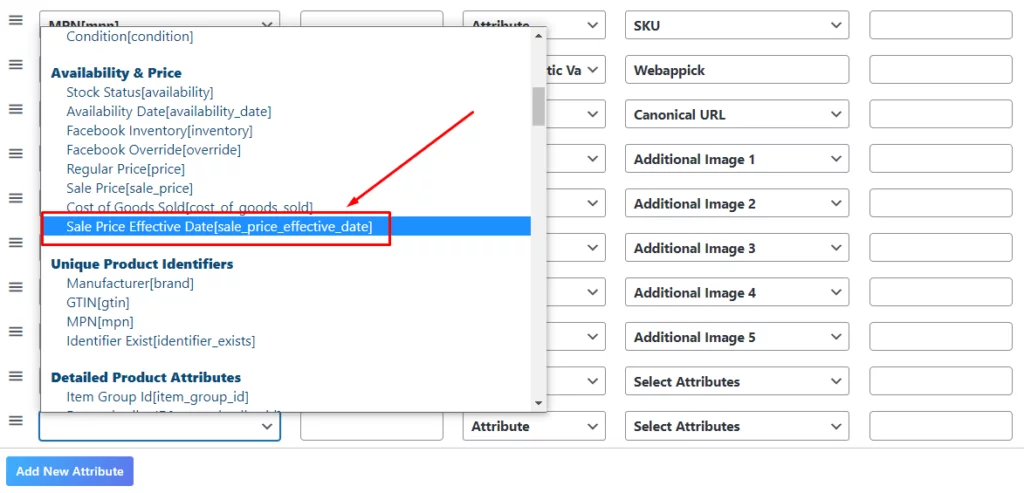
Sale price effective date [sale_price_effective_date]
This is the date range when the sale price applies
It’s optional for all products and categories
| Example: | Syntax: |
|---|---|
| (For UTC+3) 2024-03-23T10:08+0300 / 2024-03-26T22:03+0300 | Maximum 51 alphanumeric characters ISO 8601 Separate start date and end date with |
Here’s how you can add the Sale price effective date attribute to your feed using CTX Feed plugin
Minimum Requirements:
- You can use this additionally with the sale price [sale_price] attribute.
- In case you don’t use this attribute (sale price effective date), the sale price always applies.
- Always insert a start date before the end date.
Unit pricing measure [unit_pricing_measure]
It’s the measurement as well as the dimension of your product when it’s sold.
It’s optional for all products and categories except when required by local laws or regulations.
| Example: | Syntax: | Supported units: |
|---|---|---|
| 3.8kg | Numerical value + unit | Weight: oz, lb, mg, g, kg Volume US imperial: fl oz, pt, qt, gal Volume metric: ml, cl, l, cbm Length: in, ft, yd, cm, m Area: sqft, sqm Per unit: ct |
Here’s how you can add the Unit pricing measure [unit_pricing_measure] attribute to your feed using CTX Feed plugin
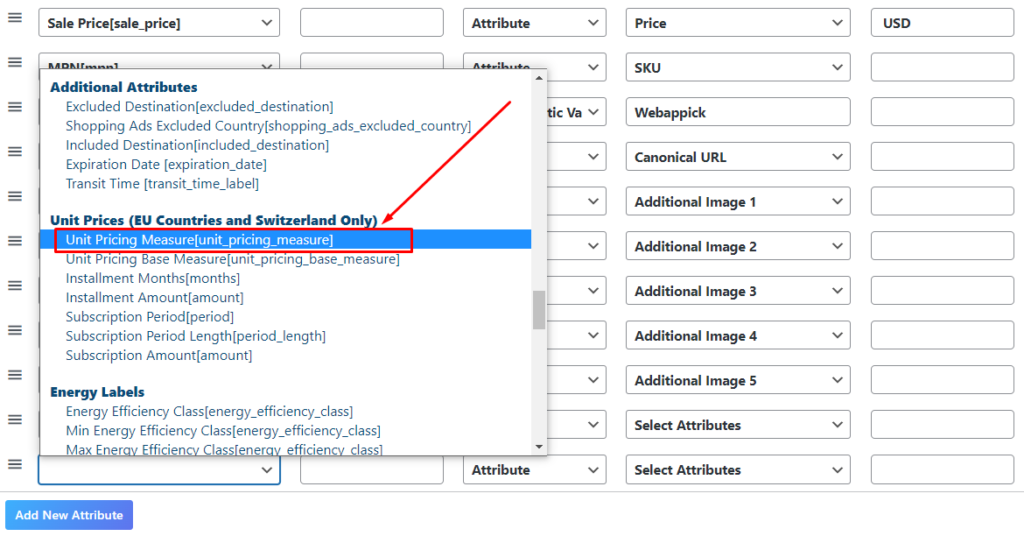
Minimum Requirements:
- The measurement and dimension of the product should be calculated without packaging.
- You must use a positive number
- For variants: you should include the same value for item group ID [item_group_id] and different values for unit pricing measures.
Unit pricing base measure [unit_pricing_base_measure]
It’s a product’s base measure for pricing (for example, 100ml means the price is calculated based on 100ml units)
It’s optional for all products and categories except when required by local laws or regulations.
| Example: | Syntax: | Supported integers: | Supported units: |
|---|---|---|---|
| 100g | Integer + unit | 1, 10, 100, 2, 4, 8 | Weight: oz, lb, mg, g, kg Volume US imperial: floz, pt, qt, gal Volume metric: ml, cl, l, cbm Length: in, ft, yd, cm, m Area: sqft, sqm Per unit: ct |
Additional supported metric integer + unit combinations:
75cl, 750ml, 50kg, 1000kg
Here’s how you can add the Unit pricing base measure attribute to your feed using CTX Feed plugin
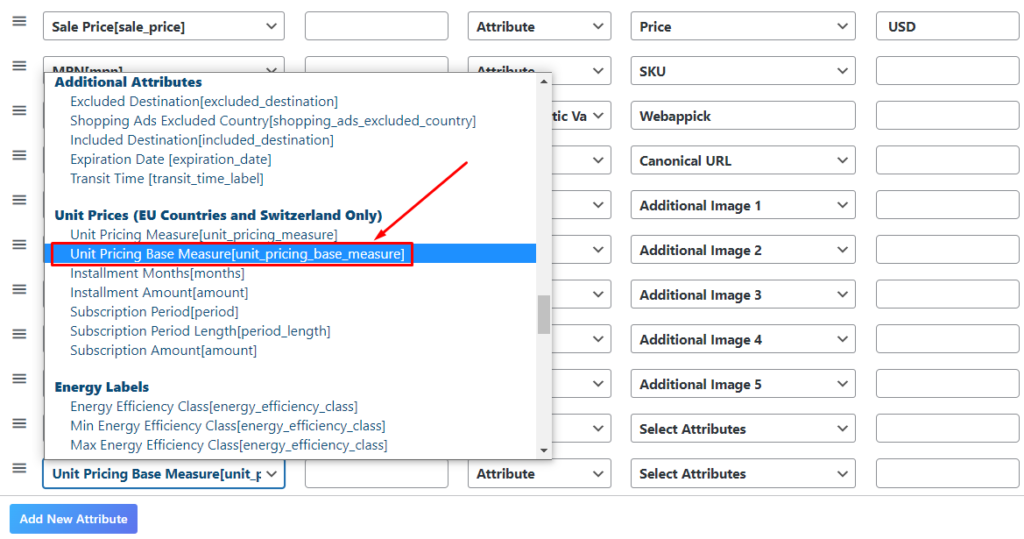
Minimum Requirements:
- This attribute is optional if you submit the unit pricing measure [unit_pricing_measure] attribute.
- Make sure to use the same unit of measure for this attribute (unit pricing measure) and unit pricing base measure.
- Remember that the price (or sale price, if active) is used to calculate the unit price of the product. For example, if the price [price] attribute is set to 3 USD, unit pricing measure is 150ml, and unit pricing base measure is set to 100ml, then the unit price is 2 USD / 100ml.
Installment [installment]
This attribute is used to describe the details of an installment payment plan
This attribute is optional. However, it is available in Latin America for all product categories and in certain other countries for showing wireless products and services only.
| Example: | Syntax: |
|---|---|
| 7,40 BRL | This attribute uses 2 sub-attributes: Months [months] (Required) Amount [amount] (Required) |
Here’s how you can add the Installment attribute to your feed using CTX Feed plugin
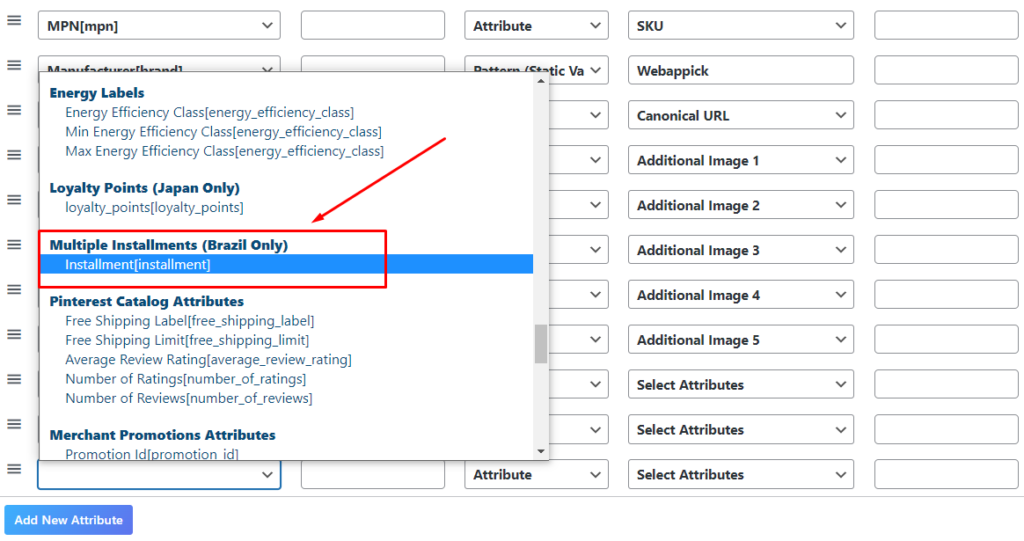
Minimum Requirements:
- Match the installment option that’s visible on your landing page.
- Don’t require a loyalty card.
- For Latin America, make sure the price [price] attribute is the total price when paid in full up-front and use the installment [installment] attribute to indicate an alternative payment option using installments.
- For other countries, use the price [price] attribute (as low as 0) as the up-front payment (including any device down payment and activation fees), and the installment [installment] attribute for additional monthly installment payments.
Subscription cost [subscription_cost]
It includes the details of a monthly or annual payment plan that bundles a communications service contract with a wireless product
This attribute is optional (available in certain countries for showing wireless products and services only)
| Example: | Syntax: |
|---|---|
| month:12:40.00USD | Period [period] is required to use. It is the duration of a single subscription period. This sub-attribute uses the following supported values: Month [month] Year [year] Period length [period_length] is also required to use. Integer, the number of subscription periods (months or years) that the buyer must pay. Amount [amount] (Required) ISO 4217, the amount the buyer must pay per month. When displaying this amount, Google may round up to the nearest whole unit of local currency to save space. The provided value must still exactly match the amount shown on your site. |
Here’s how you can add the Subscription cost attribute to your feed using CTX Feed plugin
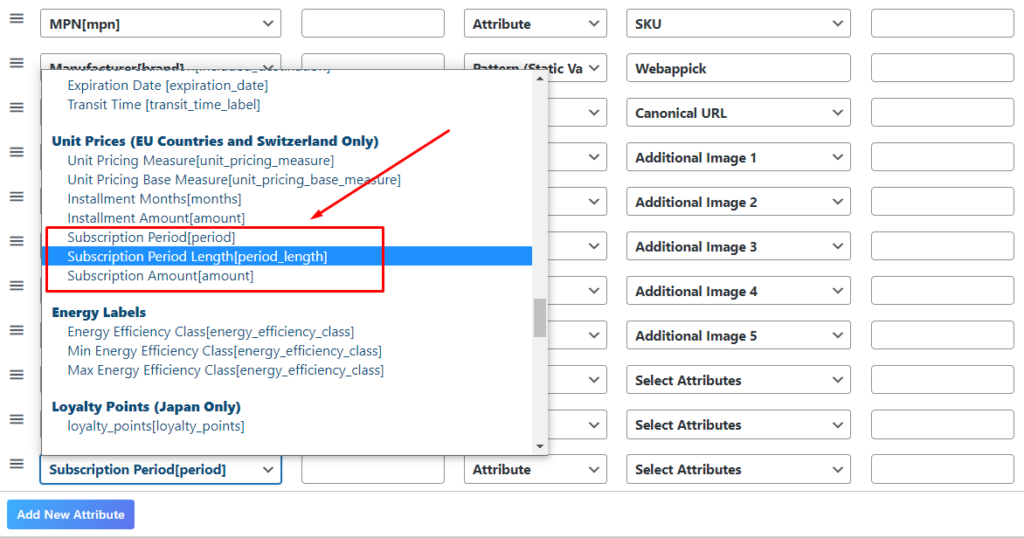
Minimum Requirements:
- Submit the price [price] attribute with the total amount due at checkout (including the down payment and activation fee).
- Match the communications payment plan that you display on your landing page. The plan must be easy to find on the landing page.
Apart from the ones mentioned above, there are other attributes that are optional or product-dependent requirements. You can find all the required, dependent, and optional product feed attribute requirements here.
Also, you can view the following image to learn about all the product specifications and requirements at a glance:

How to Generate a Product Data Feed for Google? (Step-by-step)
You can create a product data feed for Google in a variety of ways. However, most of those are time-consuming as well hard quite hard.
By the way, we believe that using a product feed plugin like CTX Feed – WooCommerce Product Feed Manager Plugin can help you create a product feed easily within a very short period.
The CTX Feed plugin will allow you to create a product feed seamlessly for Google along with 150+ other marketing channels such as Bing, TikTok Facebook, Rakuten, Wish, Kelkoo, and whatnot.
The good news is that this plugin comes in both free and pro versions. While the free version of the CTX Feed plugin is available on WordPress, you will get the pro version available on the official website.
In the following part of this blog, we’re going to show you how you can create a product feed for Google Merchant center that you can use for Google shopping and other platforms of google.
Let’s get started.
Step 1: Install CTX Feed Plugin
The first step to generate a product feed for Google with product feed specifications inbuilt is to install the CTX Feed Plugin on your WordPress website.
Note that you can download either the free version of CTX Feed or the Pro version of it for making a Google product feed. For better optimization and functionalities, we recommend you install the pro version of CTX Feed.
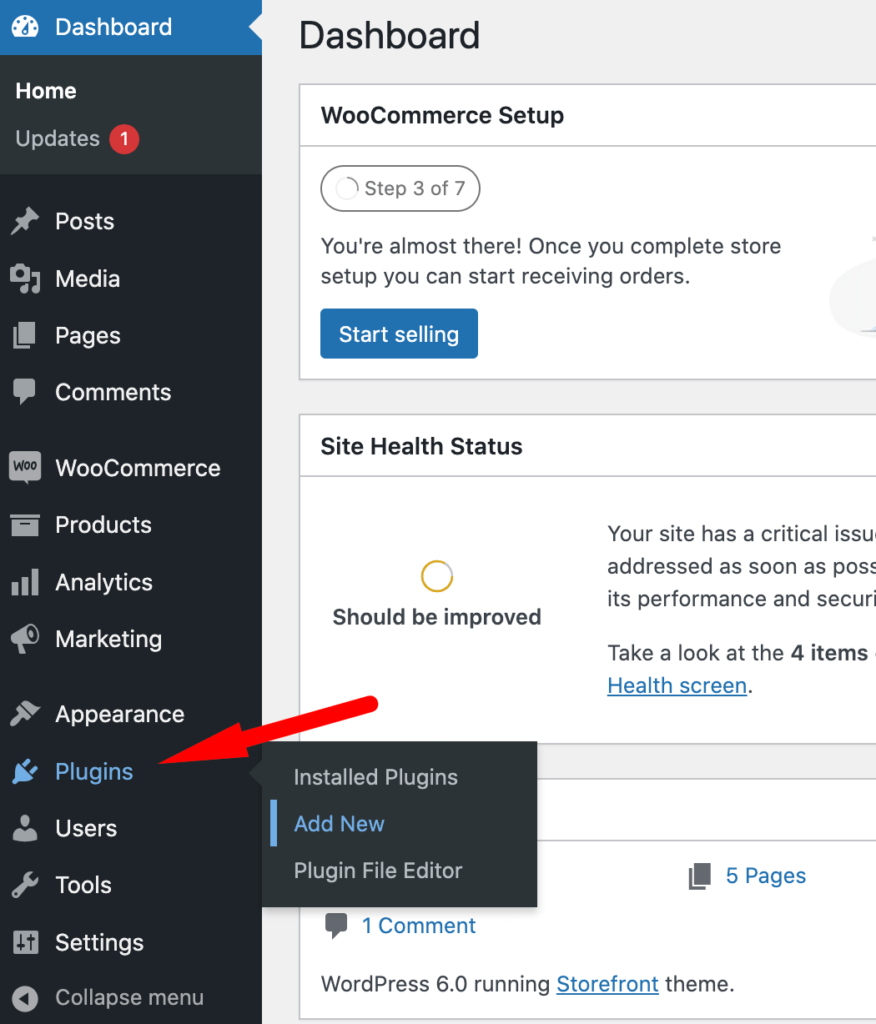
For installing the free version of CTX Feed, just go to the WordPress Dashboard and then click on Plugins > Add New.
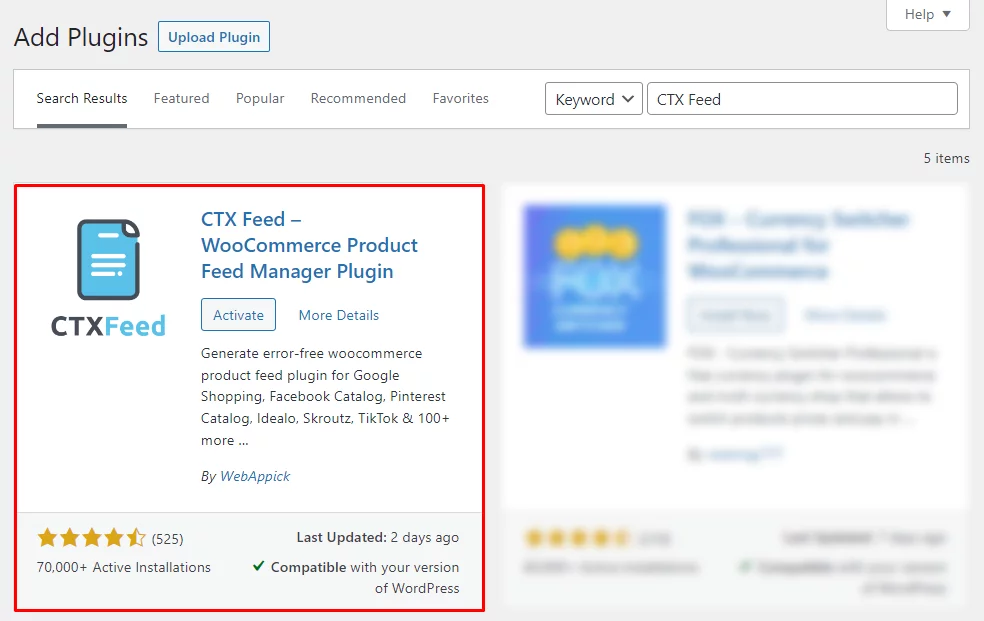
And then, type CTX Feed on the top-right of the Add plugins page.
From the search result, you can easily install and activate the plugin by clicking on the respective buttons.
In case you want to install the Pro version of CTX Feed, you can use the “Upload Plugin” button to upload and activate the plugin you’ve bought and downloaded from the official product page of CTX Feed.
We encourage you to try the CTX Feed Pro version because it will enable you to enjoy the best features of CTX Feed such as advanced filters, dynamic attributes, attribute mapping, and multilingual plus multi-currency feeds.
To learn more about how CTX Feed Pro can keep you ahead compared to the CTX Feed free version, you can view this page.
Step 2: Make a Google Product Feed with Specifications
Now that you have the CTX Feed plugin installed on your WooCommerce website, it’s time to start creating a Google product feed with specifications.
Stay assured, the product feed creation process with the CTX Feed for Google is a really simple and easy task to do.
To go ahead with the product feed creation, Find the CTX Feed menu in your WordPress dashboard and then go to the “Make Feed” option.
Content Settings
Once you click on the make feed option, you’ll be redirected to a new page where you’ll find the Content Settings page to help you configure your product feed.
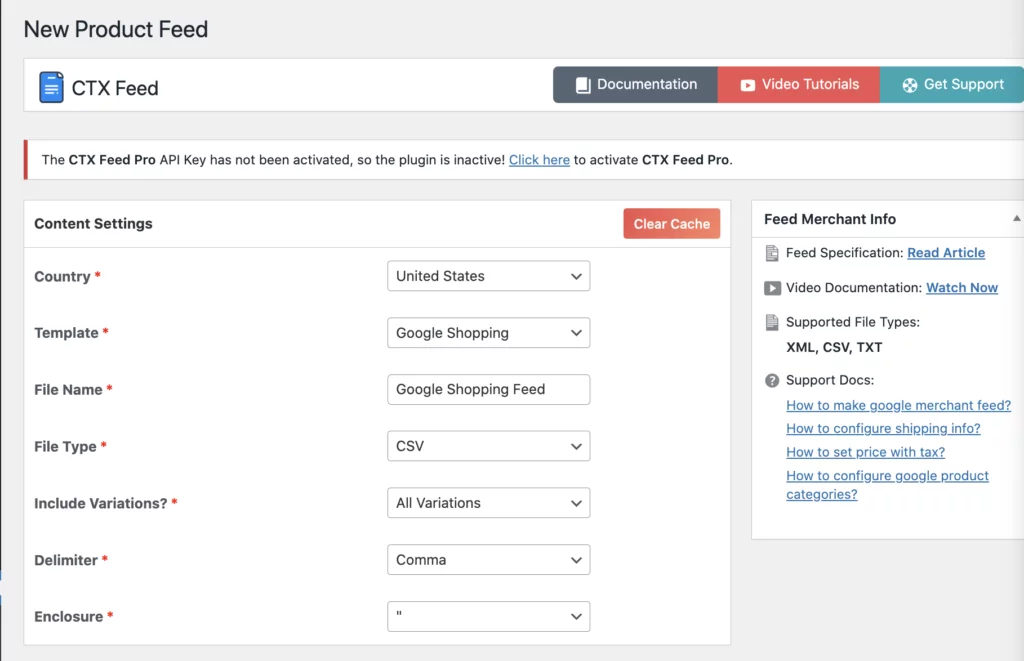
Let’s discuss the configuration options one by one:
Country: Though CTX Feed manually populates this based on your WooCommerce store’s location, you can change or optimize it manually as per your requirement.
Template: There are more than 130 templates to choose from while making a product feed from CTX Feed. Choose Google Shopping or any other Google feed template (Google product review, Google dynamic ads, Google promotions) from the list of templates as we’re going to create a Google product feed with default google product feed specifications. From our side, we’re choosing Google Shopping.
File Name: Give your Google Shopping product feed a name. You can give it any name you want that you can easily identify from other product feeds you create using CTX Feed. Ensure you do not repeat one file name to another product feed word by word.
File Type: It’s time to choose the type of product feed format you want to create with the CTX Feed Plugin. You have to select any from the following options available:
- XML
- CSV
- TXT
It’s okay for you to choose the appropriate one for your Google product feed creation.
Include Variations: Do you want to include product variations in your product? If yes, make use of this option properly and you’ll be amazed to see the result of it. Choose the type of variation you want to include in your Google product feed.
Delimiter: It’s the place where you can set the way you want to separate the item in the feed from one another. The default delimiter is a comma which you can change if you want.
Enclosure: There are multiple enclosure options for you to choose from such as:
- Single-inverted comma
- Double-inverted commas, and
- None.
You have complete freedom to choose the one you want.
Step 3: Configure the Feed
Here comes the next step of creating your product feed where you need to configure your feed. To start with feed configuration, go to the FEED CONFIG tab first.
FEED CONFIG
You’ll be amazed to see that all the required or mandatory attributes for the Google product feed are by default here based on the google product feed specifications.
You can add or delete any attribute from here as per your preference.
However, make sure to include all the required fields and as much as needed from the optional attributes.
Note that you can add suffixes and prefixes to your attributes, change the attribute type, attribute value, output time, and lots more.
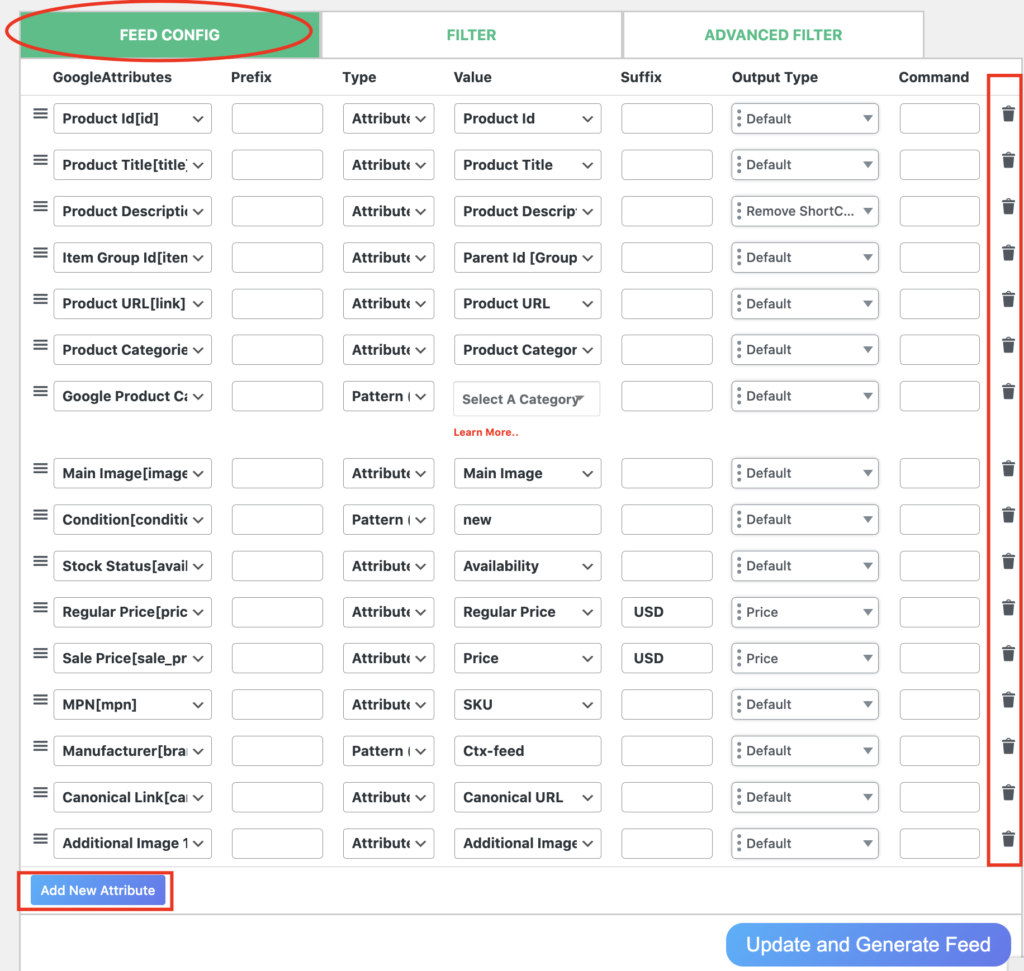
You’ll find the “Add New Attribute” button at the bottom of the attribute list. On top of that, there is a delete button at the right corner of all the attributes to let you delete any attribute smoothly without any hassle.
FILTER
Next to the Feed Configuration tab, there comes a tab named FILTER.
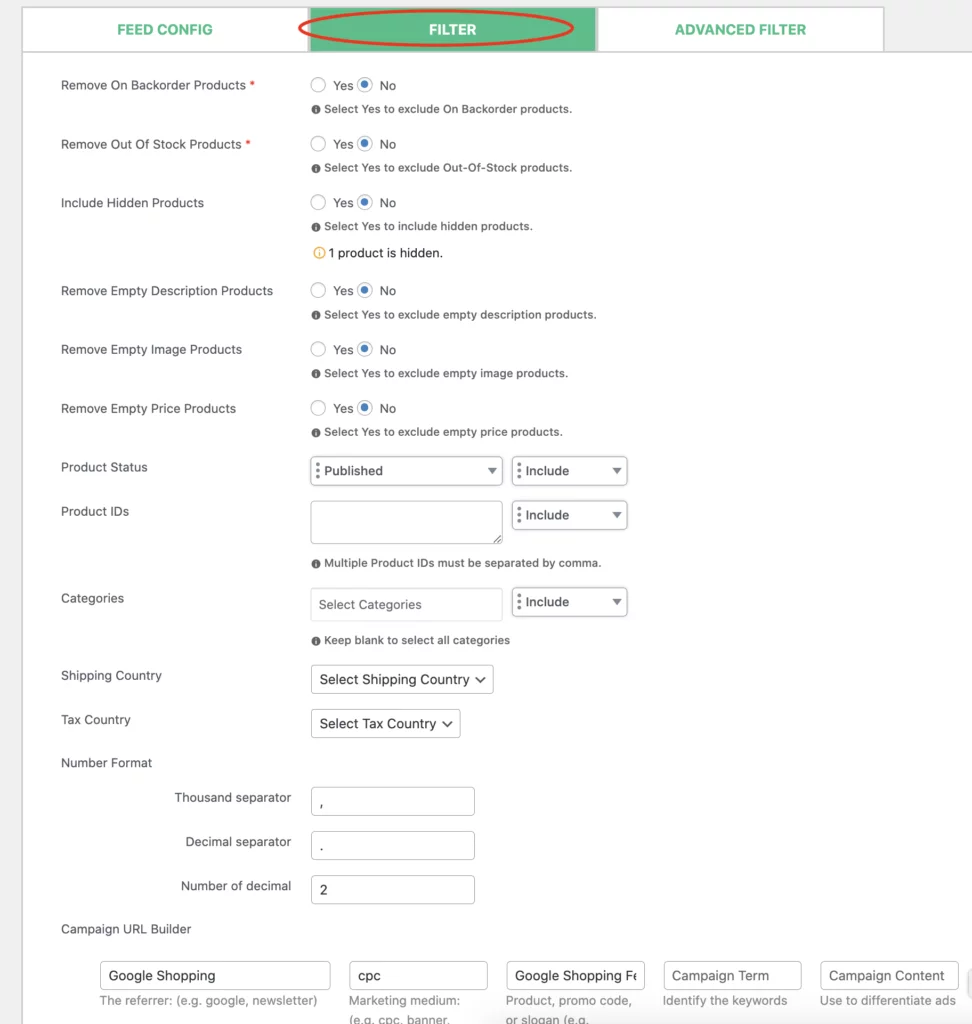
This CTX Feed Pro function will allow you to customize your product feed further by letting you have access to the following features:
- Remove the backorder products from the feed
- Remove out-of-stock products from the feed
- Include/exclude the hidden products
- Remove empty description products from the feed
- Remove empty image products from the feed
- Include/exclude any product from the feed
- Remove empty price products from the feed
- Include/exclude products based on product status
- Include/exclude products by product IDs
- Include or exclude certain product categories
- Select the shipping country
- Create the campaign URL and more.
- replace the string
ADVANCED FILTER
This is another CTX Feed Pro feature to let you introduce multiple conditions for the google product feed creation based on the google product feed specifications. One of the reasons we recommend you use the CTX Feed pro is to enjoy this feature which unlocks the door of unlimited possibilities.
Here’s how to use the advanced filters
Other Pro Features
Apart from the filters and advanced filters tab, there are a lot of other pro features available for you if you the CTX feed plugin for product feed creation.

Some of the pro features include dynamic attributes, category mapping, attribute mapping, multichannel selling options, multicurrency features, and more.
So, there is no reason you should not use the CTX feed pro for product feed creations for any marketing channel you can imagine.
Now that you’re done with the filters and advanced filters tab, and also other pro feature usages, it’s time to finally finish your product feed creation.
To finish it up, just click on the “Update and Generate Feed” button. And you’re done. Congratulations. Your product feed for google is ready based on the Google product feed specifications.
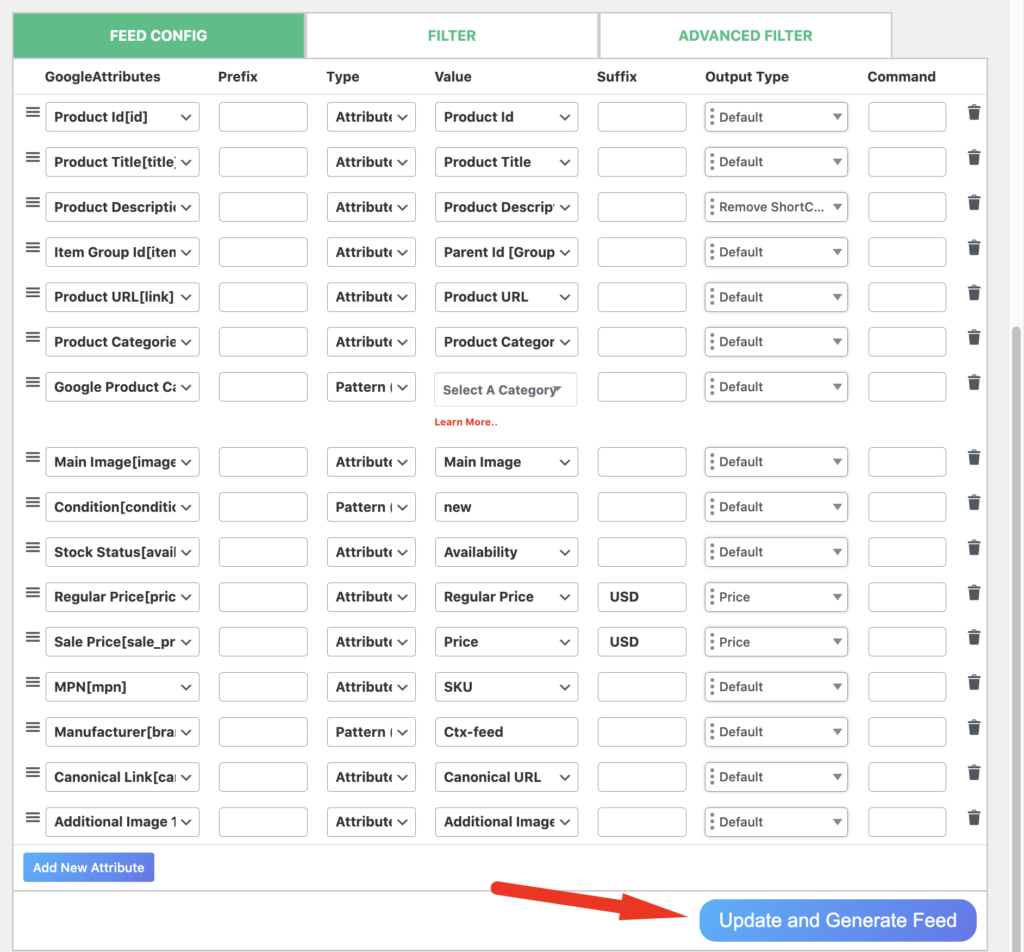
Once you’ve clicked on the update and generate feed button, your product feed will start to get created. Once the product feed creation is done, you’ll receive a success message along with the feed URL.
Step 4: Manage the Feed
After the feed creation, you’ll be redirected to the feed management page.
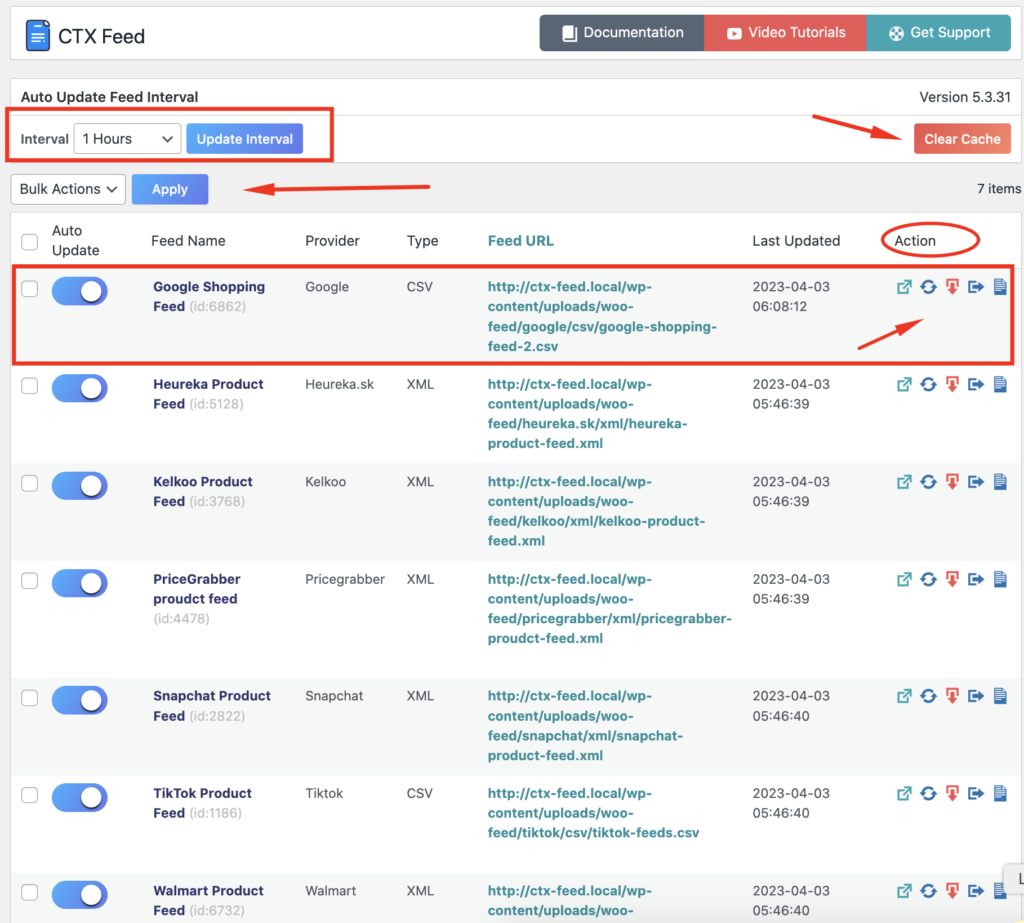
This is the place from where you can manage all your created product feeds including the google product feed that you’ve just created.
You can use this page to download the feed, regenerate it, set intervals for the feed update, and more.
On top of that, you can see the feed URLs, feed types, feed updated time, download the feed, download the feed log, view the feed, etc.
Here’s our documentation on how to manage your feed
That’s all. You’re done with the product feed creation for Google.
Step 5: Upload the Feed on Google Merchant Center
Once you’re done with the product feed creation and management, it’s time to upload your final product feed on Google merchant center and start generating traffic from google shopping ads, free listing, and more.
Read this documentation on how to upload your Google product feed to Google Merchant Center
How to Create WooCommerce Product Feed for Google Shopping (Video Tutorial)
Want a detailed video on how you can create a WooCommerce product feed for Google Shopping?
Here’s something for you to watch:
Final Thoughts
By now you know enough about the required and optional attributes of Google product feed specifications along with how to make a google product feed using a product feed manager plugin. It’s time to get into work and make a product feed for Google now. Good luck.

You May Also Read
- Google Merchant Center Data Feed Template Guide
- How to Create and Customize a TikTok Product Feed
- Google Product Category Taxonomy: The Ultimate Guide
- How to Generate Google Product Review Feed on Google Shopping
- How to Create Google Dynamic Remarketing Feed on WooCommerce
- The Ultimate Guide to Google Shopping Title Optimization
- Google Shopping Annotations: Tips and Tricks to Improve Your Product Listings
- How to Generate Google Local Inventory Feed on WooCommerce
- Google Shopping Automation and Optimization for WooCommerce Store
